Archives
-
New Look?
Trying out a new look. Changed the theme on the blog and created a custom header. The header is an image captured from Wordle which is a pretty neat tool. Give it a bunch of text or point it at a feed and you get a jumble of words. I pointed it at my own feed as it seemed appropriate and it spit out this. Anyways, hope you like it. I think I needed a change from the Marvin3 theme I've had for the past few years.
-
NHibernate: Identity columns that are not the primary key
Sometimes you need a column in your database to automatically increment (like an identity column) in order to provide back to a user say a confirmation number (when an item is added to that table). In NHibernate there's no way to specify this kind of behavior with normal mappings because the column in the Id tag has to be the primary key. Here's a technique we used to do this.
Let's say we have a ticketing system (like TicketMaster) and it's going to give back the user a confirmation number after adding their request. The TicketRequest table ID is keyed off of a Guid but we can't provide that back to the user so we need an additional property called ConfirmationNumber (plus we don't want to expose ID fields to the users).
Specify your table mappings like so:
<class name="TicketRequest" lazy="false">
<id name="Id" type="guid.comb">
<generator class="assigned"/>
</id>
<property name="ConfirmationNumber" generated="insert" insert="false" update="false">
</class>Then in the same mapping file change the ConfirmationNumber column on creation to an identity column using the <database-object> tag:
<database-object>
<create>
ALTER TABLE TicketRequest DROP COLUMN ConfirmationNumber
ALTER TABLE TicketRequest ADD ConfirmationNumber INT IDENTITY
</create>
</database-object>There you have it. When you insert your record, you'll be able to use a Guid ID field but provide back an auto-incrementing field to your users.
Hope that helps.
-
Building an Error Icon in WPF
When you launch a XBAP application you can sometimes stumble over the XBAP error page which might look something like this:

Here's a WPF user control that you can drop into any application that simulates the error icon you see. It's a simple Canvas control with two Grids and uses Paths and Elipses to define the graphical look.
First create a new WPF User Control in your project or a library. Name it whatever you like, I called mine ErrorIcon. It'll be a type derived from UserControl so go into the XAML and change this to Canvas and also update the ErrorIcon.xaml.cs class to derive from Canvas instead of UserControl.
<Canvas x:Class="WpfApplication1.UserControl1"
xmlns="http://schemas.microsoft.com/winfx/2006/xaml/presentation"
xmlns:x="http://schemas.microsoft.com/winfx/2006/xaml"
Height="300" Width="300">
<Grid>
</Grid>
</Canvas>
namespace WpfApplication1
{
/// <summary>
/// Interaction logic for UserControl1.xaml
/// </summary>
public partial class UserControl1 : Canvas
{
public UserControl1()
{
InitializeComponent();
}
}
}
Now drop in the following XAML code into your newly created Canvas:
<Canvas x:Class="WpfApplication1.ErrorIcon" xmlns="http://schemas.microsoft.com/winfx/2006/xaml/presentation" xmlns:x="http://schemas.microsoft.com/winfx/2006/xaml" x:Uid="ErrorCanvas" Margin="0,3,0,0" Width="44">
<Grid Name="RedWarning" x:Uid="RedWarning" Width="44" Height="44" Visibility="Visible">
<Ellipse x:Uid="Ellipse_1">
<Ellipse.Fill>
<LinearGradientBrush x:Uid="LinearGradientBrush_14" StartPoint="0,0" EndPoint="0,1">
<LinearGradientBrush.GradientStops>
<GradientStopCollection x:Uid="GradientStopCollection_4">
<GradientStop x:Uid="GradientStop_32" Color="OrangeRed" Offset="0" />
<GradientStop x:Uid="GradientStop_33" Color="DarkRed" Offset="1" />
</GradientStopCollection>
</LinearGradientBrush.GradientStops>
</LinearGradientBrush>
</Ellipse.Fill>
<Ellipse.Stroke>
<LinearGradientBrush x:Uid="LinearGradientBrush_15" StartPoint="0,0" EndPoint="0,1">
<LinearGradientBrush.GradientStops>
<GradientStopCollection x:Uid="GradientStopCollection_5">
<GradientStop x:Uid="GradientStop_34" Color="transparent" Offset="0" />
<GradientStop x:Uid="GradientStop_35" Color="#44ffffff" Offset="1" />
</GradientStopCollection>
</LinearGradientBrush.GradientStops>
</LinearGradientBrush>
</Ellipse.Stroke>
</Ellipse>
<Ellipse x:Uid="Ellipse_2" Opacity="0.5" Stroke="Transparent" Margin="1">
<Ellipse.Fill>
<LinearGradientBrush x:Uid="LinearGradientBrush_16" StartPoint="0,0" EndPoint="0,1">
<LinearGradientBrush.GradientStops>
<GradientStopCollection x:Uid="GradientStopCollection_6">
<GradientStop x:Uid="GradientStop_36" Color="white" Offset="0" />
<GradientStop x:Uid="GradientStop_37" Color="transparent" Offset="1" />
</GradientStopCollection>
</LinearGradientBrush.GradientStops>
</LinearGradientBrush>
</Ellipse.Fill>
</Ellipse>
<Path x:Uid="Path_1" Stretch="Fill" Width="19.878" Height="19.878" StrokeThickness="5" Stroke="#FFFFFFFF" StrokeStartLineCap="Round" StrokeEndLineCap="Round" Data="M 200,0 L 0,200 M 0,0 L 200,200" />
</Grid>
<Grid x:Uid="RedReflection" Width="44" Height="44" Visibility="Visible" Canvas.Top="80" Canvas.Left="0">
<Grid.OpacityMask>
<LinearGradientBrush x:Uid="LinearGradientBrush_20" StartPoint="0,1" EndPoint="0,0">
<GradientStop x:Uid="GradientStop_44" Offset="0" Color="#3000" />
<GradientStop x:Uid="GradientStop_45" Offset="0.9" Color="Transparent" />
</LinearGradientBrush>
</Grid.OpacityMask>
<Grid.RenderTransform>
<ScaleTransform x:Uid="ScaleTransform_2" ScaleX="1" ScaleY="-0.85" />
</Grid.RenderTransform>
<Ellipse x:Uid="Ellipse_3">
<Ellipse.Fill>
<LinearGradientBrush x:Uid="LinearGradientBrush_17" StartPoint="0,0" EndPoint="0,1">
<LinearGradientBrush.GradientStops>
<GradientStopCollection x:Uid="GradientStopCollection_7">
<GradientStop x:Uid="GradientStop_38" Color="OrangeRed" Offset="0" />
<GradientStop x:Uid="GradientStop_39" Color="DarkRed" Offset="1" />
</GradientStopCollection>
</LinearGradientBrush.GradientStops>
</LinearGradientBrush>
</Ellipse.Fill>
<Ellipse.Stroke>
<LinearGradientBrush x:Uid="LinearGradientBrush_18" StartPoint="0,0" EndPoint="0,1">
<LinearGradientBrush.GradientStops>
<GradientStopCollection x:Uid="GradientStopCollection_8">
<GradientStop x:Uid="GradientStop_40" Color="transparent" Offset="0" />
<GradientStop x:Uid="GradientStop_41" Color="#44ffffff" Offset="1" />
</GradientStopCollection>
</LinearGradientBrush.GradientStops>
</LinearGradientBrush>
</Ellipse.Stroke>
</Ellipse>
<Ellipse x:Uid="Ellipse_4" Opacity="0.5" Stroke="Transparent" Margin="1">
<Ellipse.Fill>
<LinearGradientBrush x:Uid="LinearGradientBrush_19" StartPoint="0,0" EndPoint="0,1">
<LinearGradientBrush.GradientStops>
<GradientStopCollection x:Uid="GradientStopCollection_9">
<GradientStop x:Uid="GradientStop_42" Color="white" Offset="0" />
<GradientStop x:Uid="GradientStop_43" Color="transparent" Offset="1" />
</GradientStopCollection>
</LinearGradientBrush.GradientStops>
</LinearGradientBrush>
</Ellipse.Fill>
</Ellipse>
<Path x:Uid="Path_2" Stretch="Fill" Width="19.878" Height="19.878" StrokeThickness="5" Stroke="#FFFFFFFF" StrokeStartLineCap="Round" StrokeEndLineCap="Round" Data="M 200,0 L 0,200 M 0,0 L 200,200" />
</Grid>
</Canvas>
Bam! You've got an error icon that looks like this:

To use it, just take any surface and add in a reference to the custom Canvas. Here it is in a pseudo-MessageBox like window:

Enjoy!
-
Handling Unhandled Exceptions in XBAP Applications
In your own applications you'll generally want a "catch-all" handler that will take care of unhandled exceptions. In WinForms apps this is done by creating an unhandled exception delegate and (optionally) creating an AppDomain unhandled exception handler. Peter Bromberg has a good article on all of this here and I wrote about the various options for WinForms apps here.
With XBAP (XAML Browser Applications) the rules are slightly different so here's one way to do it.
Take your existing XBAP app (or create a new one) and in the App.xaml.cs file you'll want to create a new event handler for unhandled exceptions. You can do this in the Startup method like so:
protected override void OnStartup(StartupEventArgs e)
{
DispatcherUnhandledException += App_DispatcherUnhandledException;
base.OnStartup(e);
}
In our exception handler, we'll do two things. First we'll set the exception to be handled and then we'll set the content of the MainWindow (a property of the Application class) to be a new exception handler page.
private void App_DispatcherUnhandledException(object sender, DispatcherUnhandledExceptionEventArgs e)
{
e.Handled = true;
MainWindow.Content = new ExceptionHandlerPage();
}
That's really the basics and works. However you don't have the exception information passing onto the new page. We can do something simple for now. Here's the XAML for a simple error handling page:
<Page x:Class="XbapExceptionHandlerSpike.ExceptionHandlerPage"
xmlns="http://schemas.microsoft.com/winfx/2006/xaml/presentation"
xmlns:x="http://schemas.microsoft.com/winfx/2006/xaml"
Width="300" Height="300"
Title="ExceptionHandlerPage">
<Grid>
<Grid.RowDefinitions>
<RowDefinition Height="23" />
<RowDefinition />
</Grid.RowDefinitions>
<TextBlock Margin="10,0,0,0" VerticalAlignment="Center" Grid.Row="0" Text="An exception has occured. Here are the details:" />
<TextBlock Margin="10,0,0,0" Grid.Row="1" x:Name="ErrorInformation" Foreground="Red" FontFamily="Consolas" TextWrapping="Wrap" />
</Grid>
</Page>
I gave a name to the TextBlock in the second row in the grid. This is the control that will display our error message. I've also styled it and set the font to be a mono-spaced font.
We can update our creation of the ExceptionHandlerPage class to include the exception details like so:
private void App_DispatcherUnhandledException(object sender, DispatcherUnhandledExceptionEventArgs e)
{
e.Handled = true;
var page = new ExceptionHandlerPage
{
ErrorInformation = {Text = e.Exception.Message}
};
MainWindow.Content = page;
}
Now our page displays the error with the details provided:

Again, this is really simple and bare-bones. You can get creative with it with things like fancy fonts, dancing bears, floating borders, etc. and passing along the entire Exception (so you might walk through the inner exceptions and details) and even log the exception to your bug tracking system. Jeff Atwood has a great article on creating friendly custom Exception Handlers (one for WinForms here, one for ASP.NET here). A WPF version might be useful.
As with WPF apps, there are a lot of ways to skin this cat. This is just my take on it. Feel free to offer your own twist.
-
Patterns, Practices, and Prism
James Kovacs and I had the pleasure of presenting to a well fed crowd of about 150 crazed developers and IT folk at Shaw here in Calgary last night. We did a drive by discussion of Prism. I say drive by because we really just scratched the surface of what Composite Applications are all about (you can only do so much in 40 minutes on the subject) but we crammed in what we could. I hope it was a good intro to everyone and encourage you to head out and get Prism'd and see what the Patterns and Practices group has put together, it's a really great framework for building WPF based composite apps.

Thanks again to everyone who came out (even if it was for the food) and I had a blast presenting the content with James to you guys. Here's a copy of the slide deck if you're interested and here are a few key links from it:
- Composite Application Guidance for WPF and Silverlight
- WPF Contrib (extensions and more samples for Prism)
- Project White (automated UI testing framework for WinForms, WPF, etc.)
Thanks!
-
9 Options, 4 Icons, 1 MessageBox
You know there are things in life that you never notice or worry about. This is one of them.
The MessageBox API in Windows Forms allows you to specify message box icons to display along side your all-important message you're communicating to the user (System Error, Hard Drive Full, Your Cat is Pregnant, that sort of thing). Icons can help add a little punch to an otherwise drab afternoon staring at rows and rows of spreadsheets and overdue time cards.
The 9 options you can select from to kick your otherwise drab battleship gray business application up are: Asterix, Error, Exclamation, Hand, Information, Question, Stop, Warning, and None. None of course presents no icon. The others provide you with an icon that matches the description. Or does it?
Here's the Asterix option:
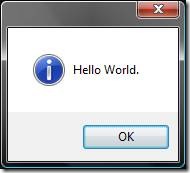
And here's the Information option:
![clip_image002[5]](https://aspblogs.blob.core.windows.net/media/bsimser/WindowsLiveWriter/9Options4Icons1MessageBox_14B8B/clip_image002%255B5%255D_thumb.jpg)
Hmmm... something isn't right here. Am I seeing double? No, both options use the same icon.
Onto the Exclamation icon:
![clip_image002[7]](https://aspblogs.blob.core.windows.net/media/bsimser/WindowsLiveWriter/9Options4Icons1MessageBox_14B8B/clip_image002%255B7%255D_thumb.jpg)
And the Warning one:
![clip_image002[9]](https://aspblogs.blob.core.windows.net/media/bsimser/WindowsLiveWriter/9Options4Icons1MessageBox_14B8B/clip_image002%255B9%255D_thumb.jpg)
Hey! You're copying and pasting the same image!
No friends, I really did write a program to do all this (contact me for licensing and source code rights) and they really are different.
Finally here's the Error, Hand, and Stop icons (all conveniently wrapped up in one picture):
![clip_image002[11]](https://aspblogs.blob.core.windows.net/media/bsimser/WindowsLiveWriter/9Options4Icons1MessageBox_14B8B/clip_image002%255B11%255D_thumb.jpg)
Yup. All three use the red 'X' icon. You would think, oh I don't know, the Hand would display a Hand icon and Stop might, oh what the heck I'll take a stab at this, display a Stop sign. Now I'm all for saving on resources. After all, icons cost money to make; take up valuable bytes in the CLR; and lord knows how many hours of debate over the right shade of yellow for the Warning icon was spent. However if you're going to provide a programmer 9 different options (which all seem reasonable and unique) then why would you only provide 4 icons (I neglected to show the Question icon which is indeed a question mark). Did the MessageBox team have their budget cut or something?
In any case, this seemingly random blog entry has been brought to you by the letters M, M, and M and the number M.
![clip_image002[5]](https://aspblogs.blob.core.windows.net/media/bsimser/WindowsLiveWriter/9Options4Icons1MessageBox_14B8B/clip_image002%255B5%255D.jpg)
![clip_image002[7]](https://aspblogs.blob.core.windows.net/media/bsimser/WindowsLiveWriter/9Options4Icons1MessageBox_14B8B/clip_image002%255B7%255D.jpg)
![clip_image002[9]](https://aspblogs.blob.core.windows.net/media/bsimser/WindowsLiveWriter/9Options4Icons1MessageBox_14B8B/clip_image002%255B9%255D.jpg)
![clip_image002[11]](https://aspblogs.blob.core.windows.net/media/bsimser/WindowsLiveWriter/9Options4Icons1MessageBox_14B8B/clip_image002%255B11%255D.jpg)