Archives
-
Some JSON Resources For You
As a developer I really dig JSON over XML for information exchange. It's clean, simple, and just works. I don't have to deal with complicated schema validation, reams of unreadable encoded text, and hierarchies that make no sense. I prefer to consume in apps and more and more services offer it up natively these days. Here are a few key tools I use that you might fun value-add in your dealings with JSON.
Hmm... is it JSON or Json? Anyway, here's a short list.
IMHO this is the key library for working with JSON. Yes, you can do some native de-serialization with .NET but the Json.NET library makes reading and writing JSON easy. You can de-serialize a JSON response with one line of code and suck it into a set of C# classes (or use the JObject class itself to pluck values out directly). If you're really hung up on the angle brackets, Json.NET can translate your JSON to and from XML (but that would be silly). Highly recommended and it even comes as a Nuget package so nothing to download and unzip!
Getting JSON and trying to look at it can be painful. Sure, it's a human readable format but sometimes it comes as a big gobbly-gook glob of text if the API returns your data with the whitespace compressed (to reduce the size of the package). This online tool lets you paste in a JSON string and reformat it into something more readable. Bonus feature is you can just plug in a URL that returns the data in JSON format as well. Handy.
Of course if you consume JSON with the Json.NET library one very slick feature is a single line of code to de-serialize it into a C# class. Here's an example:
var records = JsonConvert.DeserializeObject<RecordModel>(someDownloadedString);
The variable "records" will now be a complete object graph of your JSON (including child objects de-serialized into arrays, lists, or whatever your collection type is). For this to work you need some classes of course. They're simple to write and are just POCO but do have to match up with the structure of the JSON so it can be tricky creating them and a tiresome task.
Enter the JSON C# Class Generator project. This is a GUI tool that you plunk your JSON into, set some properties and generate a series of C# classes you can link into your project and perform the online-line-de-serialization above. Pretty nice and supports a lot of features plus it's open source to boot.
Going one step better (or worse depending on your point of view) is the online version of a similar tool. With the json2csharp site, you can either enter the JSON data directly or enter the URL and it'll fetch it for you. The class generation is simple (as it should be) with no options but it's nice as you don't have to download/install anything. I did find a few JSON APIs that didn't work with this one but did work with the formatter so in that case I had to enter the URL in the formatter to get the JSON, then plunk the data into this tool to get my classes. In any case, it's way better to use tools like these rather than writing the classes yourself (again, my opinion, your mileage may vary).
If you're using JSON and looking for a quick hit to see your data, look no further than JSONView, a Firefox add-on that will format the JSON data output for you. Once installed, just visit the URL to your JSON data and the output will render in the browser. That's as simple as it can get. No mess, no fuss.
There are a lot of tutorials out there on using some of these tools, including one shameless plug of my own. Here's a blog entry I wrote on consuming MediaWiki's content in JSON format. MediaWiki is the software powering Wikipedia (along with a ton of other wiki sites). It walks through using the Json.NET library and navigating around Wikipedia using the data in JSON created classes.
Got more resources? Post them in the comments if you have some other JSON related resources and I'll update the post with them. Until then, enjoy!
-
Prairie Dev Con West - Sessions Announced and Registration Open!
I’m thrilled to announce that the Prairie Dev Con West folks have posted sessions and speakers on their site, and opened registration for Prairie Developer Conference West!
Three Days of Fantastic Sessions!
Prairie Dev Con West happens March 13 – 15, and will be three days of software development, IT Pro, and Agile sessions delivered by world class speakers and experts in the technical industry! We’ve currently posted 45 of the 72 sessions we’ll be providing, so check out what’s on the site and check back over the next few weeks as we fill out the session list!
Carl Franklin and Richard Campbell’s .NET Rocks Show LIVE at Prairie Dev Con!
We’re excited to have Carl Franklin and Richard Campbell attend the conference! They’ll be presenting sessions, but also doing an episode of their .NET Rocks internet show live from the conference!
Pre Conference Workshops!
We have two pre-conference workshops happening on Monday, March 12th! Dylan Smith will be doing a full day on “Creating Powerful Build and Deploy Processes with TFS Build” and Bil Simser will be doing “Windows Phone 7 Developer Workshop”! Both of these guys are respected experts in their field and we’re very proud to be able to offer these workshops.
Attending either workshop is $399.99, but you can get 50% off if you bundle a workshop with a conference registration!
Early Bird Pricing!
Registration is now open! For the month of December you can register at our early bird price of $499.99, which is $300 off the regular price! Also, groups of 3 or more get an additional $50 off each registration!
You can register online or request an invoice.
Hotel and Venue!
The conference will be held at the TELUS Convention Centre, and the official conference hotel is the Calgary Marriott right next door! We have a limited number of hotel rooms at a conference rate of $209.00 a night, so book your hotel accommodations early! Call 1-800-896-6878 and mention Prairie Developer Conference when booking.
Keep In Touch!
Please let me know if you have any questions or comments! There’s many ways to connect with the conference and receive announcements/updates:- Twitter: https://twitter.com/prairiedevcon (We’re also using #PrDCWest as the conference hashtag)
- Blog: http://prairiedevcon.blogspot.com/
- Email: darcy@prairiedevcon.com
Join us!
Prairie Dev Con West will be *the* technology event to attend in Alberta in 2012! In addition to the three days of fantastic sessions by amazing speakers, there are a number of community events being planned the week of the conference! You’ll definitely want to be in Calgary this March to be part of it! -
Do We Indeed Have a Future? George Takei on Star Wars.
George Takei (rhymes with Okay), probably best known for playing Hikaru Sulu on the original Star Trek, has always had deep concerns for the present and the future. Whether on Earth or among the stars, he has the welfare of humanity very much at heart.
I was digging through my old copies of Famous Monsters of Filmland, a great publication on monster and films that I grew up with, and came across this. This was his reaction to STAR WARS from issue 139 of Famous Monsters of Filmland and was written June 6, 1977. It is reprinted here without permission but I hope since the message is still valid to this day and has never been reprinted anywhere, nobody will mind me sharing it.
STAR WARS is the most pre-posterously diverting galactic escape and at the same time the most hideously credible portent of the future yet.
While I thrilled to the exploits that reminded me of the heroics of Errol Flynn as Robin Hood, Burt Lancaster as the Crimson Pirate and Buster Crabbe as Flash Gordon, I was at the same time aghast at the phantasmagoric violence technology can place at our disposal. STAR WARS raised in my mind the question - do we indeed have a future?
It seems to me what George Lucas has done is to masterfully guide us on a journey through space and time and bring us back face to face with today's reality. STAR WARS is more than science fiction, I think it is science fictitious reality.
Just yesterday, June 7, 1977, I read that the United States will embark on the production of a neutron bomb - a bomb that will kill people on a gigantic scale but will not destroy buildings. A few days before that, I read that the Pentagon is fearful that the Soviets may have developed a warhead that could neutralize ours that have a capacity for that irrational concept overkill to the nth power. Already, it seems we have the technology to realize the awesome special effects simulations that we saw in the film.
The political scene of STAR WARS is that of government by force and power, of revolutions based on some unfathomable grievance, survival through a combination of cunning and luck and success by the harnessing of technology - a picture not very much at variance from the political headlines that we read today.
And most of all, look at the people; both the heroes in the film and the reaction of the audience. First, the heroes; Luke Skywalker is a pretty but easily led youth. Without any real philosophy to guide him, he easily falls under the influence of a mystical old man believed previously to be an eccentric hermit. Recognize a 1960's hippie or a 1970's moonie? Han Solo has a philosophy coupled with courage and skill. His philosophy is money. His proficiency comes for a price - the highest. Solo is a thoroughly avaricious mercenary. And the Princess, a decisive, strong, self-confident and chilly woman. The audience cheered when she wielded a gun. In all three, I missed qualities that could be called humane - love, kindness, yes, I missed sensuality. I also missed a sense of ideals and faith. In this regard the machines seemed more human. They demonstrated real affection for each other and an occasional poutiness. They exhibited a sense of fidelity and constancy. The machines were humanized and the humans conversely seemed mechanical.
As a member of the audience, I was swept up by the sheer romantic escapsim of it all. The deering-dos, the rope swing escape across the pit, the ray gun battles and especially the swash buckle with the ray swords. Great fun!
But I just hope that we weren't too intoxicated by the escapism to be able to focus on the recognizable. I hope the beauty of the effects didn't narcotize our sensitivity to violence. I hope the people see through the fantastically well done futuristic mirrors to the disquieting reflection of our own society. I hope they enjoy STAR WARS without being "purely entertained".
-
Too Many Kittens To Juggle At Once
Ahh, the Internet. That crazy, mixed up place where one tweet turns into a conversation between dozens of people and spawns a blogpost. This is the direct result of such an event this morning.
It started innocently enough, with this:

Then followed up by a blog post by Joel here. In the post, Joel introduces us to the term Business Solutions Architect with mad skillz like InfoPath, Access Services, Excel Services, building Workflows, and SSRS report creation, all while meeting the business needs of users in a SharePoint environment. I somewhat disagreed with Joel that this really wasn’t a new role (at least IMHO) and that a good Architect or BA should really be doing this job. As Joel pointed out when you’re building a SharePoint team this kind of role is often overlooked. Engineers might be able to build workflows but is the right workflow for the right problem?
Michael Pisarek wrote about a SharePoint Business Architect a few months ago and it’s a pretty solid assessment. Again, I argue you really shouldn’t be looking for roles that don’t exist and I don’t suggest anyone create roles to hire people to fill them. That’s basically creating a solution looking for problems. Michael’s article does have some great points if you’re lost in the quagmire of SharePoint duties though (and I especially like John Ross’ quote “The coolest shit is worthless if it doesn’t meet business needs”).
SharePoinTony summed it up nicely with “SharePoint Solutions knowledge is both lacking and underrated in most environments. Roles help”.
Having someone on the team who can dance between a business user and a coder can be difficult. Remember the idea of telling something to someone and them passing it on to the next person. By the time the story comes round the circle it’s a shadow of it’s former self with little resemblance to the original tale. This is very much business requirements as they’re told by the user to a business analyst, written down on paper, read by an architect, tuned into a solution plan, and implemented by a developer.
Transformations between what was said, what was heard, what was written down, and what was developed can be distant cousins. Not everyone has the skill of communication and even less have negotiation skills to suit the SharePoint platform. Negotiation is important because not everything can be (or should be) done in SharePoint. Sometimes it’s just not appropriate to build it on the SharePoint platform but someone needs to know enough about the platform and what limitations it might have, then communicate that (and/or negotiate) with a customer or user so it’s not about “You can’t have this” to “Let’s try it this way”. Visualize the possible instead of denying the impossible.
So what is the right SharePoint team?
My cromag brain came with a fairly simpleton answer (and I’m sure people will just say this is a cop-out). The perfect SharePoint team is just enough people to do the job that know the technology and business problem they’re solving. Bridge the gap between business need and technology platform and you have an architect. Communicate the needs of the business effectively so the entire team understands it and you have a business analyst.
Can you get this with full time workers? Maybe but don’t expect miracles out of the gate. Also don’t take a consultant’s word as gospel. Some consultants just don’t have the diversity of the SharePoint platform to be worth their value so be careful. You really need someone who knows enough about SharePoint to be able to validate a consultants knowledge level. This is basically try for any consultant, not just a SharePoint one.
Specialization is good and needed. A good, well-balanced SharePoint team is one of people that can solve problems with work with the technology, not against it. Having a top developer is great, but don’t rely on them to solve world hunger if they can’t communicate very well with users. An expert business analyst might be great at gathering requirements so the entire team can understand them, but if it means building 100% custom solutions because they don’t fit inside the SharePoint boundaries isn’t of much value.
Just repeat. There is no silver bullet. There is no silver bullet. There is no silver bullet.
A few people pointed out Nick Inglis’ article Excluding The Information Professional In SharePoint. It’s a good read too and hits home that maybe some developers and IT pros need some extra help in the information space. If you’re in an organization that needs labels on people, come up with something everyone understands and go with it. If that’s Business Solutions Architect, SharePoint Advisor, or Guy Who Knows A Lot About Portals, make it work for you.

We all wish that one person could master all that is SharePoint but we also know that doesn’t scale very well and you quickly get into the hit-by-a-bus syndrome (with the organization coming to a full crawl when the guy or girl goes on vacation, gets sick, or pops out a baby). There are too many gaps in SharePoint knowledge to have any one person know it all and too many kittens to juggle all at once. We like to consider ourselves experts in our field, but trying to tackle too many roles at once and we end up being mediocre jack of all trades, master of none. Don't fall into this pit. It's a deep, dark hole you don't want to try to claw your way out of. Trust me. Been there. Done that. Got the t-shirt.
In the end I don’t disagree with Joel. SharePoint is a beast and not something that should be taken on by newbies. If you just read “Teach Yourself SharePoint in 24 Hours” and want to go build your corporate intranet or the next killer business solution with all your new found knowledge plan to pony up consultant dollars a few months later when everything goes to Hell in a handbasket and falls over.
I’m not saying don’t build solutions in SharePoint. I’m just saying that building effective ones takes skill like any craft and not something you can just cobble together with a little bit of cursory knowledge.
Thanks to *everyone* who participated in this tweet rush. It was fun and educational.
-
Adopting the Metro Style for Line of Business Apps
Here are some thoughts around adoption the new Metro style look and feel for line of business applications (LOB) in your organization.
I am not a UX expert (is anyone?) but I think I know what looks and feels right and I strive to try to include that in every solution I build. Metro introduces us to some new concepts and as Jensen Harris pointed out, it isn’t just recompiling your app on WinRT. You have to re-imagine it and think about how it’s organized, how users will interact with it, and do some trimming of the fat so to speak as you move into the Metro world.
Good design practices still apply here. Appropriate use of whitespace, good layout, clear typography, and consistent UI patterns make a big difference so remember these and use them. A UI checklist might be in order for any app, not just Metro ones. I’ll state this from my experience. Very few business users know what they need and most can’t visualize past what they already have. Know this and learn to adapt from this perspective and I think you’ll go farther with the success factor with your users. Far too many times users are stuck with what they have, perhaps a spreadsheet-like application (where the one and only screen is 8000 rows of data and 300 columns). Anything you present to them, no matter how effective, is just shadowed by that grid in their mind.
I’m a strong advocate of the task oriented UI and think it works. Try to keep this in mind when designing the system and don’t let your user try to do 80 things at once on the same screen. You’ll just run around like a chicken with your head cut off trying to cater to everyone and in the end deliver a mediocre product that works for all cases rather than separate UX instances that are stellar for each situation.
Metro is different. It forces you to think about your application in a different manner. No longer are you trying to get tree view feeding items into list view feeding details into file view. There are still groups and collection of groups and all that but remember your UI now is a functional, breathing, living thing. Minimalism is best here so you want to get out as much information in as effective space as possible. As Microsoft pointed out, a live tile isn’t something you should be posting every detail to. It’s an extension of the application so treat it as a first class citizen, not a UI element that needs to be pretty.
Lists should contain just the right amount of information. Again, go back to your users and push them. Try not to take the route of “What do you need” but rather provide them with a solution that accomplishes the goal they’re aiming for (of course that means you need to establish a goal first). If they’re coming from a giant screen of data saying “We need *this*” then push them to answer what they use it for. What goal are they trying to accomplish? Are they trying to summarize information or are they looking for something (e.g. show me all the users with more than 10GB of storage). If they have a goal, key in on it and that might become the basis of a UI workflow.
Again keep the focus on the goal. You don’t want this thing to get out of hand or you’ll end up with a Frankenstein monster of a UI like this:
Take them by the hand and show them. Lead by example and show them what is possible. Giving them design documents might not be enough and don’t describe things like “Imagine this window over here with a list of things…”. You’ll probably be met with the deer in the headlight look. You might be thinking that Metro isn’t right for this app and perhaps you’re right. Don’t assume that you *have* to build a new UI in Metro just because it’s there. Photoshop isn’t going to be a Metro app (ever, at least I hope) but your LOB app might. You need to be sure you’re doing the right thing and don’t try to fit a square peg into a non-existent hole. LOB apps *can* be great looking and useful. I highly recommend you check out Billy Hollis’ screencast he did on LOB apps with WPF. While it’s not Metro, it does show that LOB apps can be great looking and functional. A lot of great tips from Billys talk.
Build something. Even if you sit with them in a whiteboard session and draw pictures on the screen it’ll help. Build up the UI using something like Basalmiq is great and easy for them to see quickly. Visio is just too mechanical to fiddle around with and your users will quickly loose interest. Rapid feedback wins over here but then take that back to the development environment and build it. The next day show them it in action on the real website or desktop you’re building it for.
There’s a danger here that I’ve seen of the “It’s done” syndrome. Users will see a mock-up in a website and think that all the work is done. It isn’t so temper your system with that and read your users. Find out if they really believe it’s just some if/then/else statements you have to do to make it work. I would opt to not call this “prototype” or “mockup”. I prefer to call it the working software. It’s what they’ll use in the production release and it’ll just evolve as they provide feedback, new elements are added, and parts of the system become functionally complete.
Look for some re-imaging of “Classic” apps into Metro ones soon as I’m planning on doing a few blog posts about this.
Many thanks to @colinbowern for some great tips on Twitter.
-
Microsoft's Next Move, Split Metro and Classic Mode in Windows 8?
Caveat lector. This is an opinion piece and not something I do often (or probably well) but my thoughts on this were a little more than 140 characters could handle. You have been warned.
Recently Netflix CEO Reed Hastings stood up and, doing his best impression of a half-pregnant Jeff Bezos, announced the physical division of it's DVD lending system and streaming services. This resulted in Internet carnage that continues to this day. The general feeling there is that the separation is going to cause pain and suffering with long time users who now look at it as having to search two separate and distinct places to find the same stuff, get two different bills, two different user experiences, etc. Visionary perhaps, but not fully baked.
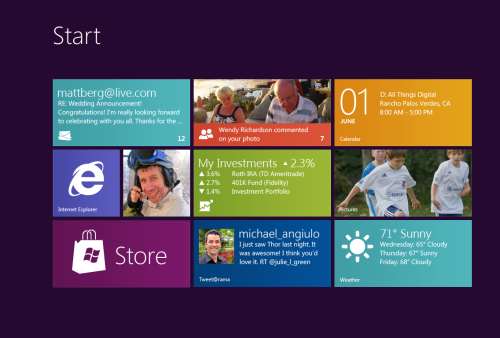
Many who went to the recent Build conference (and others like myself who didn't) got their taste of Microsoft's Jekyll and Hyde next operating system, Windows 8. The "alive with activity" (sans spiders and snakes) view of the living tile Metro user interface is almost revolutionary in style, approach, and implementation.
The Metro UX is a new experience (some say a new way of life) in Windows 8 and is all about building an immersive user experience that’s unlike anything we’ve seen for a long time (a pre-cursor was the Metro makeover they gave Windows Phone 7 last year). Users get information from living tiles rather than static icons on a free-flowing desktop devoid of a clumsy arrangement and optimized for fingers, not mice.
Now that the dust has settled, the question that seems to be bubbling up to the surface for me (and some others), is Microsoft making a mistake? Combining the "optimized for touch" interface with the antiquated keyboard and mouse apps looks like it might be. Maybe Microsoft should be following in Apples footsteps and creating an optimized for touch operating system and a classic one.
Don't get me wrong. I'm not actually saying they should ditch what they have but it could potentially be tweaked. The classic interface could be completely removed from the Metro one and vice versa. This I see is a move that might be welcomed by developers and users alike.
The Development Story
Right now the developer story is just shaping up but already it’s causing confusion. Some developers are still asking the question about the Windows Runtime (WinRT). Why can’t we build Metro apps on Windows 7? Why is the WinRT a different API than the classic CLR. The bits are different. The runtime is different. The security is different. Heck, in Windows 8 you can write “desktop” apps using HTML5 and JavaScript for goodness sake. That in itself just says we’re not in Kansas anymore Toto.
It makes sense, if you think about it. Metro WinRT apps have a distinctive style to them and have restrictions you don’t have in the classic development world. Metro apps can’t even access the underlying file system (sans some Isolated storage which is not meant for large amounts of data). The UX is completely different from the classic desktop we’re familiar with and requires you to “re-imagine” your apps. There is no cross-platform compilation here. This isn’t “build a UI for Metro and build a UI for Classic mode”.
While you have to build two different applications anyways, what’s the difference if they’re on the same OS or not? It doesn’t mean you have to rewrite your entire system from scratch for each OS like you have to do today with Apple. A good developer is going to structure his system so the UI is separate and through the use of patterns like MVVM, changes to the back-end stuff, the important stuff, is minimized.
It does however require you to re-think your application, perhaps removing large chunks of the underlying system and changing the way it not only presents itself but what it presents. I’m not just talking about a UI makeover (which needs to happen) but the fact that your ViewModels today are not the same ones you need for Metro.
For example a Movie Catalog app might provide a ViewModel of titles in a single collection with a category attribute. The current UI might present this in a typical tree view, allowing the user to filter on single or multiple categories which then also lazy fetches the list of titles and presents it (through a child ViewModel) in a list view on the same screen. This two or three pane view of your data might be fine in a traditionally designed app but in Metro things might behave differently. Perhaps the categories are already broken down for you in a grouped collection and selecting one takes you to a view where no collection information is needed so only the movie titles and metadata are displayed. The information you show on the screen might be different for each style as well so ViewModels here cannot really be reused. Even the lazy fetching of the data on the back-end might be different in a Metro style app from a classic one.
In any case, the development story might be a little muddy right now and we’re still playing the Sesame Street “One Of These Things” games. Heading it off at the pass might be a good plan and let developers focus on the target platform that suits their purpose.
The User Story
Users are a whole new ball of wax with Metro and Windows 8. The causal user who’s going to use a touch device wants big targets and easy to use minimalistic apps. They’ll bounce around between weather, RSS feeds, Twitter and Facebook so the “flipping through apps like pages in a book” approach works well here. Nobody in the user community I hear is complaining about how you change between apps in Windows 8. Apps are designed for this. By their very nature, Metro apps are all about quick and concise information and not 800 buttons, 300 windows, 150 graphs, 50 tools, and a partridge in a pear tree in a single app here. The user experience for Metro is flipping through items while waiting for a bus or sitting in a meeting or lying on the couch. It’s casual, even for business users.
People are all impressed to Hell about the Metro look and feel. Look how easy it is to find things. Look how fun it is to share things. Look at how fast I can get to my data. This is not for business users who are going to stare at a 70 by 3000 spreadsheet for hours at a time. It’s for users on the go and a step up from having the same information on a 8 inch phone platform.
Business users need the classic look. As Jensen Harris pointed out in his excellent 8 Traits of Metro Apps presentation, apps like Photoshop just don’t fit into Metro. They don’t belong.
Identity
I see an identity crisis here in the making (or perhaps that ship has already sailed). Microsoft keeps touting the Metro look and says “And your classic apps are right here”. Then the user is subjected to a jarring shift from the beautiful typographic world of Metro to the classic desktop we have now, full of chrome and frames and toolbars oh my. It’s like watching the magnificent tranquility of Claude Monet’s “Water Lillies” and then be suddenly thrown into the world of Jackson Pollocks “Composition with Pouring I”.

The experience right now is jarring. Click on any “classic” app and Metro goes bye-bye and you’re back at traditional desktop. Then you look down, see the iconic Start button, click it, and BAM! You’re back in Metro land, wondering how to get back to the comfort zone. Users don’t know how to use shortcut keys. I struggle and watch people who have been “using” computers for years still not use Ctrl+C/Ctrl+V to copy and paste and if I asked 100 people at work right now if they knew they could lock their computers with a single keystroke (Windows + L) they would shake their heads in disbelief.
I know what you’re thinking right now. Two platforms. Two deployments. Two SKUs. Two nightmares. I don’t think so. It’s a choice. Do you really see people complaining they can’t run their iPad apps on their desktops? Yes, it’s more work but I think it’s the right work. While Microsoft continues to say that Metro works just as well with a mouse and keyboard than it does with touch, people continue to look at the “optimized for touch” interface and scratch their heads wondering what this experience is going to be like with a keyboard. It works but it’s not the best. How do you pinch zoom with a mouse? How do you dual scroll with a keyboard? Just because you can do something, doesn’t mean you should.
Your Move Microsoft
I’m just a guy. Some people think I might have some internal influence with Microsoft but I don’t. I bitch, I complain, I praise just like everyone. People at Microsoft possibly (probably) already have the plans in place for Windows 8. That decision was probably baked over a year ago during early design or roadmap sessions.
Is it a good move for Microsoft? I think so. As a developer I would be happy building systems targeting two operating systems. As a developer I might go through the entire Windows 8 lifecycle without building a Metro app and that’s okay. Some developers might bitch and groan that they need to build two different solutions for the same platform so this would fix that problem. Now you’re building one app for one platform (and optionally another app for another platform should you choose to go that route).
-
Adding Ratings and Comments to SharePoint Publishing Pages
One of the cool features that was introduced in SharePoint 2010 was ratings. Ratings allows you, with a simple configuration option, to provide the ability for users to rate individual list items. This includes pages and documents because, after all, a publishing page is just a document in a library which in turn is just a list item.
On almost any news site you might find the ability to rate content. Voting things up by providing a “I like this” type tag to a page or by giving a page rating. This is missing in the out of the box SharePoint for publishing pages and takes a little work to get it going so let’s turn SharePoint up to 11 and get it done.
Tools you’ll need:
- A SharePoint publishing site
- A “Pages” library where new articles are created (any site created with the Publishing site template creates this automatically)
- SharePoint Designer
- A few minutes of your life
We’ll start with the stock Publishing Site. I’ve added a few articles and just modified the navigation on the side to display pages.

If you navigate to the Pages library (Site Actions > View All Site Content > Pages) and go into the settings for the pages you’ll see the list of default columns for the page library:

Go into List Settings and click on Rating settings under the General Settings section

You’ll be given the option to turn ratings on. Do this for the Pages library and click OK.

Note: You must have the SharePoint Timer Services running and the User Profile Service configured and started for ratings to work. Why? Ratings for items are updated via timer jobs so when you rate an item it takes up to 15 minutes before the rating are updated and propagated throughout the farm. Part of that propegation is updating your SharePoint “social” profile (things you’ve done like rating items, creating tags, and leaving comments). These functions require the User Profile Service to be configured and working (which is way beyond the scope of this article).
After turning on ratings for the library you can look at the updated columns which are going to capture the rating for each item.

The columns are also completely functional so if you just look at the All Documents view of the Pages library you can rate individual items immediately:

This is great but we want to make it a little more intuitive. We’ll modify the page to allow for ratings on the article page when the user views it. For this we’re going to modify the article layout page. We modify the layout page because we need to store the ratings for each page so having it on the Master page won’t work. This approach is fine but remember two things. First, you’ll need to add this snippet to any layout pages you use. Also remember that when you create a new site (and a new Pages library) that it will continue to use the existing layout pages but the library needs additional work to enable ratings on it.
Open the site in SharePoint Designer and select Page Layouts from the Navigation Tree:

We’re going to modifying the first page layout that we’ve used in the articles so far. If you edit the page the click on the Page tab you can view what Page Layout the page is using (it’s also displayed by default in the All Documents List View). Click on Page Layouts and the highlighted one is the layout the page is using. Below it shows we’re using the Body only layout.

Back in SharePoint Designer we need to find this layout. In the Page Layouts view find the page with the title that matches the layout in the browser.

When you click on it to launch it in SharePoint Designer you’ll be warned that there are no editable regions through this dialog box:

Click OK to open the page in “Advanced Mode” which basically just means “Let me edit the entire page”.
Scroll down near the bottom. You’ll find the ContentTemplate that’s for SharePoint 2010 (UIVersion=”4”). This is the layout that is used to display the article (be careful not to change the UIVersion=”3” section above, it’s a carry over when the system is running in “Make it look like SharePoint 2007 mode”).
We’re going to insert this snippet:
This is the control that you saw in the List View which will render the average rating for the item (compiled from all the votes and updated through the Timer service mentioned earlier).
We’ll add it below our article and wrap it in a div tag using the “article-content” class (which will style it the same as our story)

Refresh the page on your site and you’ll probably see this error:

The SharePointControls tag we inserted isn’t known by default in the layout pages so we have to add a declaration to the top of the page. Add this snippet at the top of page:
This just tells the page that when you see the SharePointControls prefix, use this control from this assembly. Insert it at the top of the page like this:

Now go back to the page in your browser and hit F5 to refresh it. You’ll see the rating control added below your article.

Sweet! Go ahead and create a new page (or a few of them) using the Body only layout. You’ll see the rating on each page. Remember that clicking on a rating will take up to 15 minutes before it’s updated so be patient!
Oh, but ratings are not enough. Let’s face it, if we want to foster “social” type of atmosphere with SharePoint in the corporate environment we need social tools. Not only can we add ratings to articles we can also add comments.
Comments are something new to SharePoint (and not stored in lists, don’t get me started on how to do something like aggregate comments). Comments come from the server and are similar to tags (like the “I Like It” tag that you can hit on any page). They’re part of the whole social upgrade SharePoint 2010 got and a very cool thing.
It’s only natural to allow users to comment on articles so let’s do that.
Still in SharePoint Designer insert this snippet below the DIV tag you created for the ratings:
It’s that simple.
Now view the page in your browser again.

That entire chunk in the red box is what was added with the SocialCommentControl.
Enter a comment and click Post. The comment is saved on the server (in one of the new Social databases) and associated with the article. Go to another page and you’ll see that there are no comments so comments are unique for each article.
There’s one gotcha with the comments. Here’s a new comment added to the article:

Note the craptastic layout. It’s as if there’s an imaginary box drawn around the comment that’s forcing it to be a certain size. And if you guessed that, you’d be right! Here’s the behind-the-scenes markup for a comment:

Yup. Comments are rendered inside a DIV tag that’s forced to a width of 390px. If you’re okay with this then you can leave it alone, otherwise insert this into the top of your page layout:

Now refresh the browser to see this:

That’s better. Now the comment takes up the entire width of the screen. We insert the custom CSS onto the page because the default CSS for comments is in a system file (and used on the My Site pages) so we don’t want to screw up that with a global change. If you have a custom CSS file for your site you can add it there too.
Like I said you’ll need to do this on every page layout in the system if you want to enable ratings and comments on article pages. It shouldn’t take more than a few minutes though (probably less time to implement than it took to read this article). Don’t forget to enable Ratings on each Pages Library in your system too. Comments don’t need anything special done to the library as they’re stored centrally (but you do need the My Site functionality setup along with the Social databases it creates).
Hope that helps and have fun! It’s a great feature to enable and a great way to get your users to participate in your corporate content!
Enjoy.
Opening Files in the Browser with SharePoint
A change in SharePoint 2010 is how it handles browser file permissions which results in how files are opened when they’re selected. A common problem is clicking on a PDF file and seeing the browser Save dialog instead of launching the Adobe reader.
There is a setting called Browser File Handling in each Web Application (under General Settings). By default it is set to strict which causes additional HTTP headers to be injected which blocks the opening of PDF and other files. Switching the option to permissive will allow things to function like they did in SharePoint 2007.
This is web application wide so you’ll need to do it for each web app in your farm. Here’s the dialog and the setting.

Hope that helps!
Demystifying the Windows 8 Grid Application
If you’re looking to “re-imagine” your apps on the Windows 8 platform in Metro style you can start with the Grid Application template that’s provided in the Visual Studio 2011 preview.
From Visual Studio choose New Project and select Grid Application under Windows Metro Style in the template tree:

When you start you’ll get a fully blown Windows 8 Metro application, ready to begin filling in with your own content.
How did all that stuff get there and where does it go?
First open up the Sample Data folder in the solution. In there you’ll find a file called SampleDataSource.cs. This contains some sample data to work with and is bound to the Xaml pages in the solution at runtime. You’ll of course replace this with runtime data but the sample helps you visualize your app along with understanding where stuff goes on the screen.
Or does it? The default app is all in Lorem Ipsum speak and while this is great for visualizing a fully populated application, I thought it was a little confusing to know how it fit together. To make it clearer where everything goes I’ve modified the first collection and item in the SampleDataSource.cs calls with more descriptive labels. Here’s a better picture of the GroupedCollectionPage.xaml, the “Home” page in the app:

Note the collection title appears above the group but only the description and category for the item appears for each item. So if you’re relying on users finding things by the item title (maybe it’s the title of a recipe or a newsfeed) then you might want to modify the layout for this to bind the title somewhere. You can get creative for example and overlay the title on top of the image.
And here’s the DetailPage.xaml, what you see when the users clicks on a single item in the collection:

The Collection Title is the prominent title here but it does show the Item Subtitle. Again this might not be the desired location for titles. For example the Item Title is a small item below the image and category. Personally I would swap out the Item Title and Item Subtitle here or even use the Item Title in place of the Collection Title and leave the Item Subtitle alone (removing the Item Title below the image).
There may be some Metro guidelines coming out to help understand the reasoning behind this positioning and maybe my brain isn’t thinking “Metro” just yet, but it doesn’t make a lot of sense to me the way the default locations are.
And here’s the CollectionSummaryPage.xaml, you would navigate to this if you clicked on the Back Arrow in the screen above (next to Collection Title).

Interesting to note with this is that the Collection Content isn’t used here, only the Collection Description. I would probably modify this to include the content or drop that property entirely and just use the description.
You don’t necessarily need to follow all of the structures the default Grid Application layout offers but do keep true to the Metro style and keep things consistent. I urge you strongly to watch Jensen Harris’ keynote on the 8 traits of a Metro app and realize that by using the default setup they give you, you’ll achieve a consistent look to your app that will fit harmoniously within the Windows 8 operating system.
Make more sense now?
Enjoy.
Realistic Blood For Your Films (or Halloween)
With Halloween approaching I thought I would share a recipe for blood (and start a new tag in my blog). I used to do a lot of special effects and animation for amateur and semi-pro films back in the 80s and 90s so thought I would see how that knowledge transfers to the 21st Century. Obviously we’re not shooting in Super-8 anymore and dealing with back winding film, optical printers, and A+B rolling but some things are timeless.
One makeup effect often taken for granted is blood. It’s easy enough to power some store bought “stage” blood but some of these stage bloods are not as realistic as the real thing and tend to look too bright-red. You want to make sure that the blood you see on the screen looks like blood. In addition to stage blood being somewhat expensive, it’s even cost prohibitive these days to get large quantities of it. 8oz of it is about $13 so you’re looking at over $200 for a gallon.
Dick Smith is the undisputed master of makeup and was responsible for making Linda Blair a demon in The Exorcist, John Hurt a caveman in Altered States, and getting pretty bloody with Robert DeNiro in Taxi Driver. Fortunately, Smith was also very open about how he did things and shared a lot of his professional experience over the years.

Here are Dick Smith’s tried-and-proven formulas for creating movie blood guaranteed to set your audiences squirming…
Karo Syrup Zinc Oxide Red Food Color Yellow Food Color Kodak Photo-Flo *see note below Water 1 Pint 1/2 Tsps. 1 ounce 2 1/2 Tsps. 1 ounce 1 ounce 1 Quart 1 Tsps. 2 ounces 5 Tsps. 2 ounces 2 ounces 2 Quarts 2 Tsps. 4 ounces 1 ounce + 4 Tsps. 4 ounces 4 ounces 3 Quarts 3 Tsps. 6 ounces 2 1/2 ounces 6 ounces 6 ounces 1 Gallon 4 Tsps. 8 ounces 3 ounces + 2 Tsps. 8 ounces 8 ounces * If the blood will not be used in the mouth, the Photo-Flo can be added. Photo-Flo is a wetting agent which makes the blood flow over surfaces without beading and helps it to soak into fabrics naturally, like real blood. If you use the Photo-Flo, shake your mixture more gentle than otherwise to avoid excess foaming (caused by the Photo-Flo). Remember, do not use blood with Photo-Flo in the mouth!
Mixing Procedure
Put the zinc oxide in a bowl, add an equal amount of water and stir into a paste. Add the measured amounts of red and yellow food colours and stir. Add a little of the Karo syrup and stir until it is well-mixed.
Pour this mixture into a container which is larger than the final amount of blood; that is, if you are making three quarts of blood, your container should be a gallon jug. This is necessary because once the formula is mixed, it must be shaken prior to each use in order to re-mix the contents, which tend to separate while sitting.
Add the remaining amount of Karo to your container and shake well. Finally, add the amount of water specified, mix thoroughly and you will have blood with normal consistency (thickness).
Ingredients and Tips
Food Colors: Most red food colors are similar, but the yellow ones vary. Some stain white paper lemon-yellow while others are more orange. Do some tests on your targets to see the effect and reduce the amount of yellow you add if it stains too much.
Karo Syrup: This is just a brand name for corn syrup. It’s preferable to get the clear stuff but if that’s not available reduce the amount of yellow food colouring by half for regular corn syrup.
Zinc Oxide: The type referred to in the formula is the pure powder form and can be obtained from a drug store or chemical supply house. In the small amounts used it’s harmless and adds opacity to the blood. It’s the same zinc oxide that’s added to breakfast cereals.
Darker Blood: The formula above matches true blood but might look too bright when used on white materials. Use about 35 drops of green food colouring per quart of Karo blood to darken it.
Thinner Blood: If you want a thinner blood (to pump through tubes) use the same formula (with the Photo-Flo) but dilute the Karo Syrup with an equal amount of water. For instance if the formula calls for one pint of Karo, add one pint of water to it before mixing in the rest of the ingredients.
Keep your blood mixture refrigerated when not in use. If you don’t it will form mould and have to be thrown out. A covered, plastic container is good enough. If refrigerated it’ll keep for long periods of time (months, not years). The regular formula washes off skin and clothes without any trouble but I wouldn’t be dressing in my Sunday best. Get your actors or victims to wear old clothes.
Enjoy!
jQuery, SharePoint Picture Libraries, and automatic thumbnails
Picture Libraries are an interesting beast in SharePoint. When you upload a picture to a picture library you get not one but three images! Whenever you upload an image to a Picture Library, SharePoint automatically creates two additional images for you. A small thumbnail it uses in views and a preview image it uses when you’re viewing the picture properties. Leveraging this “feature” we can build a pretty cool client side gallery using the auto-generated thumbnails and some JavaScript to produce this:

No C# or custom web parts needed. Just a few simple things to get this effect:
- jQuery installed on your site (there are many ways to do this like Jan Tielens solution here)
- A document library to store the JavaScript we’re going to write
- The jQuery Thumbnail Hover Popup for Greasemonkey plugin
- A SharePoint Picture Library
Creating the Picture Library
Create a picture library. I named mine “Pictures” but your can be whatever you want it to be. You must create a Picture Library as we’re going to be using the automatic thumbnails and only the Picture Library template will do this for us. In the demo I just grabbed half a dozen images from the Windows 7 wallpapers on my hard drive (C:\Windows\Web\Wallpaper) and uploaded them.
The Script
Here’s the complete source code to the JavaScript we’ll use. Copy this and upload it to a document library. I use the Site Assets library that’s available on any SharePoint site where the Wiki Home Page feature is activated (like the Team Site template) or you can just use or create any document library for it.
Let’s break down some of the parts to this.
First we have a div tag with an id of “pictureMicroGallery”. This is where we’ll load our pictures into. The text “Loading…” is just a placeholder. You can put an animated image here or whatever you want while the images are fetched.
Next we start our own script.
The first line is this:
Here we’re using a built-in function in SharePoint to tell it to call our own method, “loadSharePointPictures” after the sp.js file is loaded. This is similar to the typical jQuery document load technique you might see:
However instead of waiting for the document to load, we’re waiting for a script to load. If you try to execute client side functions before sp.js is loaded, you’ll run into problems. So we let the system launch our function when it’s ready. Next is the loadSharePointPictures function. This is our call to the client side object model to load content dynamically.
All the lines are commented so pretty self explanatory. In a nutshell we’re loading a list called “Pictures” (line 7), creating a query to fetch all the items (line 9), selecting two columns (line 13), and then executing the call asynchronously (line 15-17).
When this call is successful, we call this function:
Here we get the enumerator of items from our “pictures” variable (this was set in the previous function). Then we iterate through each item, fetching it and the data from each item in the list in lines 6-10.
The FileLeafRef column contains the name of the image file we uploaded (test.jpg, etc.). The FileDirRef column contains the folder where the list lives.
Line 11 is where the magic happens. Remember when you upload a file to a picture library I said there are three images. Your original + two additional images that are automatically generated for you.
Here’s the picture library in SharePoint Manager:

See how we have img13.jpg (which is the original image file uploaded) but then in a “_w” folder there’s “img13_jpg.jpg” and the same in a folder called “_t”.
The _t folder contains the small thumbnail image (set to 160 pixels wide). It’s the image used when you view the “All Pictures” view of your picture library. The other _w folder is the large thumbnail (set to 640 pixels wide). This is the image used when you view the picture properties.
The great thing about these images (apart from being created for you) is that they’re set to a known size (width wise) and the do some magic in setting the height, getting it as close to the original aspect ratio as possible. That means you can use these images yourself to produce a gallery (like we’re doing here) and get pretty consistent results even if your images are totally off.
In any case, in this example I deliberately uploaded very large images (1920 x 1200) to show you that you can use these thumbnails as your gallery rather than trying to resize the originals.
Back to the code. In lines 7-11 we take the filename and directory and build our path to the small thumbnail version of the image (in our _t folder). So img13.jpg becomes:
The thumbnail itself is a .jpg file (regardless of what the original source file is) so the original extension is embedded in the filename if you need it. Just decompose the thumbnail file, drop the extension, and replace the “_” with a “.” to find your original file. Lines 8 and 9 turn our original filename into our thumbnail version.
Lines 15-19 we take the array of pictures we previously built (which is a url to the thumbnail image) and build up a HTML string of IMG tags with the SRC pointing at where the thumbnail is.
Finally in line 21 we use jQuery to replace the contents of our DIV tag with our new HTML containing the IMG tags.
Note: You can separate these out and just have an include file with the .js content and manually add to the <div> tag to your page. Your choice. I just find that SharePoint often mangles the HTML I write and litters it with it’s own styles and tags so I just include the whole thing from a library. That way none of my markup is messed with. Take that Microsoft!
Adding It To The Page
With our script ready, add a Content Editor web part to the page and point the content at our JavaScript include file we uploaded to the Site Assets library (or wherever you have the script living).
Save the page and it should look something like this (I just replaced the Documents web part on the Team Site home page with my Content Editor):

Thumbnail Hover Popup Plugin
I mentioned this up front but why? As it happens, I stumbled over this jQuery plugin awhile ago and filed it away for something to look at some day. Turns out it’s a cool plugin which mirrors how the automatic thumbnails in SharePoint are generated. The author created it for Greasemonkey so he could preview larger images on sites without having to click through to a page. It works where the thumbnails and larger images have similar filenames (except for a change or two).
This works great for SharePoint because the _t or _w directories hold different size images and the filenames are built from the filename of the original image. Once you know one, you can get the image for the other.
We’ll do this on our gallery (which uses the thumbnails) so when we hover over the image, we present the preview image.
First upload the plugin (a single file, jquery.thumbhover.js) to your Site Assets library (or wherever your other script is).
Next add the following line to your own script to include the thumbhover one:
We’ll add a call to the plugin for all our images. Remember the IMG tag we added a class named “pictureGallery” to it (line 16 above). Now we can use a jQuery selector to attach the plugin to every IMG file. We need to do this after we rewrite the HTML for the IMG tags so find this line:
And add this after it:
This attaches the thumbPopup to every IMG tag with the class “pictureGallery”. The imgSmallFlag is the folder for the small images and the imgLargeFlag is for the medium thumbnails (the _w folder).
When it comes time to render the popup, the plugin will grab the SRC of the image then change the imgSmallFlag to the imgLargeFlag (so changing the IMG from the 160 pixel wide thumbnail to the 640 pixel one).
Now when you hover your mouse over the image thumbnails on your page, the plugin will fetch the large thumbnail and use it in the popup. The final effect will look something like this:

Enhance it!
That’s it. Now you have a simple script you can drop onto a page and get a cool looking gallery display out of it, leveraging the automatic thumbnails SharePoint generates for you. Of course, that’s only the beginning.
Some ideas on enhancements you can do to the script:
- Add in the ability to fade the popups in when you hover over the thumbnail. This will create a nicer effect for the user
- Display additional text on the popup in an overlay (use the description field from SharePoint for the text!)
- Change how you display the thumbnail, perhaps link each thumbnail to the original image or SharePoint list item (you’ll need to add more fields to your JavaScript if you want to read them in the success function)
- Add paging to the list of images so you display them in batches of 20 or 30
- Do some better formatting on the gallery and jazz it up a bit
Have fun and don’t be afraid to experiment!
Last Note: We don’t really *need* jQuery for this to work (except for the hover effect). Most of the code is just plain old JavaScript. The line to replace the contents of the DIV tag can be done with regular JavaScript so if you don’t want the hover effect (which is a jQuery plugin so requires it) and don’t want to use jQuery… then don’t. You’ll still have a simple and free client side photo gallery from the automatic thumbnails SharePoint gives you.
Enjoy.
Live SharePoint Data Out Of The Box
I posed a question this morning about how many people knew about the live data feature in SharePoint views.
The what?
Yeah, you can configure a view to do live updates. It's a new feature in SharePoint 2010 but one that removes the need for additonal JavaScript code to do it for you. Here's how to do it.
- Pick a view you want to see live data for (or create a new view) and navigate to that page.
- Click on Site Actions in the menu and choose Edit Page
- Select the List View Web Part on the page and open up the Edit Web Part menu to bring up the properties for the web part
There's a new section you'll see in the Web Part Properties pane:
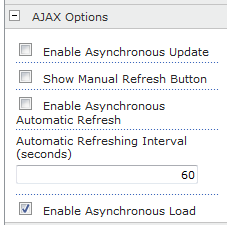
Click on Enable Asynchronous Refresh and set the interval to refresh the data (default is 60 seconds). Click OK and sit back and watch your list view update automagically!
Simple and sweet. Jan Tielens has a larger writeup on this little known feature here. It's sad that people don't know this feature is there and free, as in beer. Now, go forth and refresh your listviews without postbacks!
MediaWiki, WP7 and JSON Together Again For The First Time
In another project that I’m working on (like I don’t have enough of them) I stumbled across the MediaWiki API. MediaWiki is the workhorse wiki software that powers such sites as Wikipedia. What you may (or may not) know is that the MediaWiki API is pretty slick, offering access to any content on a MediaWiki powered site.
In this post we’ll walk through building a Windows Phone 7 app to browse the content on Wikipedia using JSON and the MediaWiki API.
First create a new Windows Phone 7 app. Any app template will do but I find the Windows Phone Databound Application template to be useful as it creates a few useful things out of the box for you like a ViewModel class and adds it to the app. It’s nothing special that you can’t do yourself, but does save a little time.
Next you’ll want to be able to read the data coming from Wikipedia. We’ll be using the MediaWiki API (no download required) which can serve data up in XML format but we’ll opt for using JSON. Rather than using the native JSON methods in .NET let’s use the Json.NET library, a wicked cool library by James Newton-King that makes serializing and deserializing JSON into .NET objects a breeze.
Unfortunately at the time of this writing, the Nuget package for Json.NET doesn’t install properly on Windows Phone 7 projects so you have to download the file, unzip it, and add the references manually. Hopefully someone updates the Nuget package so this 5 minute task can be avoided in the future.
The default app has a listbox with items to display that links to a detail page. For this sample, we’ll fill the list with categories and drill into the category to display the pages associated with it. The first task is to retrieve the categories from Wikipedia. The full documentation for the API is online here. To get the categories it’s a straight forward API call that looks like this:
http://en.wikipedia.org/w/api.php?action=query&list=allcategories&format=json
The first part is where the API page is located on Wikipedia (it may not be in this location on other WikiMedia sites so check with the site owner). Then we specify an action, in this case a query. We ask for a list of items specifying “allcategories” and we want it in JSON format.
Here’s the output:
{<pre style='margin: 0em; padding: 0px; width: 100%; text-align: left; color: black; line-height: 12pt; overflow: visible; font-family: "Courier New", courier, monospace; font-size: 8pt; direction: ltr; background-color: rgb(244, 244, 244);'> query: {</pre><pre style='margin: 0em; padding: 0px; width: 100%; text-align: left; color: black; line-height: 12pt; overflow: visible; font-family: "Courier New", courier, monospace; font-size: 8pt; direction: ltr; background-color: white;'> allcategories: [</pre><pre style='margin: 0em; padding: 0px; width: 100%; text-align: left; color: black; line-height: 12pt; overflow: visible; font-family: "Courier New", courier, monospace; font-size: 8pt; direction: ltr; background-color: rgb(244, 244, 244);'> {</pre><pre style='margin: 0em; padding: 0px; width: 100%; text-align: left; color: black; line-height: 12pt; overflow: visible; font-family: "Courier New", courier, monospace; font-size: 8pt; direction: ltr; background-color: white;'> *: "!"</pre><pre style='margin: 0em; padding: 0px; width: 100%; text-align: left; color: black; line-height: 12pt; overflow: visible; font-family: "Courier New", courier, monospace; font-size: 8pt; direction: ltr; background-color: rgb(244, 244, 244);'> }</pre><pre style='margin: 0em; padding: 0px; width: 100%; text-align: left; color: black; line-height: 12pt; overflow: visible; font-family: "Courier New", courier, monospace; font-size: 8pt; direction: ltr; background-color: white;'> {</pre><pre style='margin: 0em; padding: 0px; width: 100%; text-align: left; color: black; line-height: 12pt; overflow: visible; font-family: "Courier New", courier, monospace; font-size: 8pt; direction: ltr; background-color: rgb(244, 244, 244);'> *: "!!! EPs"</pre><pre style='margin: 0em; padding: 0px; width: 100%; text-align: left; color: black; line-height: 12pt; overflow: visible; font-family: "Courier New", courier, monospace; font-size: 8pt; direction: ltr; background-color: white;'> }</pre><pre style='margin: 0em; padding: 0px; width: 100%; text-align: left; color: black; line-height: 12pt; overflow: visible; font-family: "Courier New", courier, monospace; font-size: 8pt; direction: ltr; background-color: rgb(244, 244, 244);'> {</pre><pre style='margin: 0em; padding: 0px; width: 100%; text-align: left; color: black; line-height: 12pt; overflow: visible; font-family: "Courier New", courier, monospace; font-size: 8pt; direction: ltr; background-color: white;'> *: "!!! albumns"</pre><pre style='margin: 0em; padding: 0px; width: 100%; text-align: left; color: black; line-height: 12pt; overflow: visible; font-family: "Courier New", courier, monospace; font-size: 8pt; direction: ltr; background-color: rgb(244, 244, 244);'> }</pre><pre style='margin: 0em; padding: 0px; width: 100%; text-align: left; color: black; line-height: 12pt; overflow: visible; font-family: "Courier New", courier, monospace; font-size: 8pt; direction: ltr; background-color: white;'> {</pre><pre style='margin: 0em; padding: 0px; width: 100%; text-align: left; color: black; line-height: 12pt; overflow: visible; font-family: "Courier New", courier, monospace; font-size: 8pt; direction: ltr; background-color: rgb(244, 244, 244);'> *: "!!! albums"</pre><pre style='margin: 0em; padding: 0px; width: 100%; text-align: left; color: black; line-height: 12pt; overflow: visible; font-family: "Courier New", courier, monospace; font-size: 8pt; direction: ltr; background-color: white;'> }</pre><pre style='margin: 0em; padding: 0px; width: 100%; text-align: left; color: black; line-height: 12pt; overflow: visible; font-family: "Courier New", courier, monospace; font-size: 8pt; direction: ltr; background-color: rgb(244, 244, 244);'> {</pre><pre style='margin: 0em; padding: 0px; width: 100%; text-align: left; color: black; line-height: 12pt; overflow: visible; font-family: "Courier New", courier, monospace; font-size: 8pt; direction: ltr; background-color: white;'> *: "!!! songs"</pre><pre style='margin: 0em; padding: 0px; width: 100%; text-align: left; color: black; line-height: 12pt; overflow: visible; font-family: "Courier New", courier, monospace; font-size: 8pt; direction: ltr; background-color: rgb(244, 244, 244);'> }</pre><pre style='margin: 0em; padding: 0px; width: 100%; text-align: left; color: black; line-height: 12pt; overflow: visible; font-family: "Courier New", courier, monospace; font-size: 8pt; direction: ltr; background-color: white;'> {</pre><pre style='margin: 0em; padding: 0px; width: 100%; text-align: left; color: black; line-height: 12pt; overflow: visible; font-family: "Courier New", courier, monospace; font-size: 8pt; direction: ltr; background-color: rgb(244, 244, 244);'> *: "!!AFRICA!!"</pre><pre style='margin: 0em; padding: 0px; width: 100%; text-align: left; color: black; line-height: 12pt; overflow: visible; font-family: "Courier New", courier, monospace; font-size: 8pt; direction: ltr; background-color: white;'> }</pre><pre style='margin: 0em; padding: 0px; width: 100%; text-align: left; color: black; line-height: 12pt; overflow: visible; font-family: "Courier New", courier, monospace; font-size: 8pt; direction: ltr; background-color: rgb(244, 244, 244);'> {</pre><pre style='margin: 0em; padding: 0px; width: 100%; text-align: left; color: black; line-height: 12pt; overflow: visible; font-family: "Courier New", courier, monospace; font-size: 8pt; direction: ltr; background-color: white;'> *: "!910s science fiction novels"</pre><pre style='margin: 0em; padding: 0px; width: 100%; text-align: left; color: black; line-height: 12pt; overflow: visible; font-family: "Courier New", courier, monospace; font-size: 8pt; direction: ltr; background-color: rgb(244, 244, 244);'> }</pre><pre style='margin: 0em; padding: 0px; width: 100%; text-align: left; color: black; line-height: 12pt; overflow: visible; font-family: "Courier New", courier, monospace; font-size: 8pt; direction: ltr; background-color: white;'> {</pre><pre style='margin: 0em; padding: 0px; width: 100%; text-align: left; color: black; line-height: 12pt; overflow: visible; font-family: "Courier New", courier, monospace; font-size: 8pt; direction: ltr; background-color: rgb(244, 244, 244);'> *: "!928 births"</pre><pre style='margin: 0em; padding: 0px; width: 100%; text-align: left; color: black; line-height: 12pt; overflow: visible; font-family: "Courier New", courier, monospace; font-size: 8pt; direction: ltr; background-color: white;'> }</pre><pre style='margin: 0em; padding: 0px; width: 100%; text-align: left; color: black; line-height: 12pt; overflow: visible; font-family: "Courier New", courier, monospace; font-size: 8pt; direction: ltr; background-color: rgb(244, 244, 244);'> {</pre><pre style='margin: 0em; padding: 0px; width: 100%; text-align: left; color: black; line-height: 12pt; overflow: visible; font-family: "Courier New", courier, monospace; font-size: 8pt; direction: ltr; background-color: white;'> *: "!936 births"</pre><pre style='margin: 0em; padding: 0px; width: 100%; text-align: left; color: black; line-height: 12pt; overflow: visible; font-family: "Courier New", courier, monospace; font-size: 8pt; direction: ltr; background-color: rgb(244, 244, 244);'> }</pre><pre style='margin: 0em; padding: 0px; width: 100%; text-align: left; color: black; line-height: 12pt; overflow: visible; font-family: "Courier New", courier, monospace; font-size: 8pt; direction: ltr; background-color: white;'> {</pre><pre style='margin: 0em; padding: 0px; width: 100%; text-align: left; color: black; line-height: 12pt; overflow: visible; font-family: "Courier New", courier, monospace; font-size: 8pt; direction: ltr; background-color: rgb(244, 244, 244);'> *: "!946 poems"</pre><pre style='margin: 0em; padding: 0px; width: 100%; text-align: left; color: black; line-height: 12pt; overflow: visible; font-family: "Courier New", courier, monospace; font-size: 8pt; direction: ltr; background-color: white;'> }</pre><pre style='margin: 0em; padding: 0px; width: 100%; text-align: left; color: black; line-height: 12pt; overflow: visible; font-family: "Courier New", courier, monospace; font-size: 8pt; direction: ltr; background-color: rgb(244, 244, 244);'> ]</pre><pre style='margin: 0em; padding: 0px; width: 100%; text-align: left; color: black; line-height: 12pt; overflow: visible; font-family: "Courier New", courier, monospace; font-size: 8pt; direction: ltr; background-color: white;'> }</pre><pre style='margin: 0em; padding: 0px; width: 100%; text-align: left; color: black; line-height: 12pt; overflow: visible; font-family: "Courier New", courier, monospace; font-size: 8pt; direction: ltr; background-color: rgb(244, 244, 244);'> query-continue: {</pre><pre style='margin: 0em; padding: 0px; width: 100%; text-align: left; color: black; line-height: 12pt; overflow: visible; font-family: "Courier New", courier, monospace; font-size: 8pt; direction: ltr; background-color: white;'> allcategories: {</pre><pre style='margin: 0em; padding: 0px; width: 100%; text-align: left; color: black; line-height: 12pt; overflow: visible; font-family: "Courier New", courier, monospace; font-size: 8pt; direction: ltr; background-color: rgb(244, 244, 244);'> acfrom: "!949 births"</pre><pre style='margin: 0em; padding: 0px; width: 100%; text-align: left; color: black; line-height: 12pt; overflow: visible; font-family: "Courier New", courier, monospace; font-size: 8pt; direction: ltr; background-color: white;'> }</pre><pre style='margin: 0em; padding: 0px; width: 100%; text-align: left; color: black; line-height: 12pt; overflow: visible; font-family: "Courier New", courier, monospace; font-size: 8pt; direction: ltr; background-color: rgb(244, 244, 244);'> }</pre><pre style='margin: 0em; padding: 0px; width: 100%; text-align: left; color: black; line-height: 12pt; overflow: visible; font-family: "Courier New", courier, monospace; font-size: 8pt; direction: ltr; background-color: white;'>}</pre>MediaWiki queries come back in two groups. First is the query results and then a section titled “query-continue” that contains the next value that you can use to start from on a subsequent query. You may need to do several queries if you want to get everything. MediaWiki supports up to 500 items per call but very often (especially with the size of Wikipedia) that number can be in the thousands. It’s up to you how to do the queries (all at once or as you go) but think of it as picking up where you left off. The default size is 10 which is fine for now.
However the results are not very pretty and somewhat bizarre list of categories. First we’ll add some more data to the category with information about it. This is done by adding more parameters to the API call:
http://en.wikipedia.org/w/api.php?action=query&list=allcategories&format=json&acprop=size&acprefix=A
All we’ve done is add “&acprop=size&acprefix=A” to the call. This brings in number pages, files, sub categories into the mix (the size property is the sum of all those). We’ll also get categories that start with the letter “A” to avoid the categories named “!”. Here’s the results:
{<pre style='margin: 0em; padding: 0px; width: 100%; text-align: left; color: black; line-height: 12pt; overflow: visible; font-family: "Courier New", courier, monospace; font-size: 8pt; direction: ltr; background-color: rgb(244, 244, 244);'> query: {</pre><pre style='margin: 0em; padding: 0px; width: 100%; text-align: left; color: black; line-height: 12pt; overflow: visible; font-family: "Courier New", courier, monospace; font-size: 8pt; direction: ltr; background-color: white;'> allcategories: [</pre><pre style='margin: 0em; padding: 0px; width: 100%; text-align: left; color: black; line-height: 12pt; overflow: visible; font-family: "Courier New", courier, monospace; font-size: 8pt; direction: ltr; background-color: rgb(244, 244, 244);'> {</pre><pre style='margin: 0em; padding: 0px; width: 100%; text-align: left; color: black; line-height: 12pt; overflow: visible; font-family: "Courier New", courier, monospace; font-size: 8pt; direction: ltr; background-color: white;'> *: "A"</pre><pre style='margin: 0em; padding: 0px; width: 100%; text-align: left; color: black; line-height: 12pt; overflow: visible; font-family: "Courier New", courier, monospace; font-size: 8pt; direction: ltr; background-color: rgb(244, 244, 244);'> size: 0</pre><pre style='margin: 0em; padding: 0px; width: 100%; text-align: left; color: black; line-height: 12pt; overflow: visible; font-family: "Courier New", courier, monospace; font-size: 8pt; direction: ltr; background-color: white;'> pages: 0</pre><pre style='margin: 0em; padding: 0px; width: 100%; text-align: left; color: black; line-height: 12pt; overflow: visible; font-family: "Courier New", courier, monospace; font-size: 8pt; direction: ltr; background-color: rgb(244, 244, 244);'> files: 0</pre><pre style='margin: 0em; padding: 0px; width: 100%; text-align: left; color: black; line-height: 12pt; overflow: visible; font-family: "Courier New", courier, monospace; font-size: 8pt; direction: ltr; background-color: white;'> subcats: 0</pre><pre style='margin: 0em; padding: 0px; width: 100%; text-align: left; color: black; line-height: 12pt; overflow: visible; font-family: "Courier New", courier, monospace; font-size: 8pt; direction: ltr; background-color: rgb(244, 244, 244);'> }</pre><pre style='margin: 0em; padding: 0px; width: 100%; text-align: left; color: black; line-height: 12pt; overflow: visible; font-family: "Courier New", courier, monospace; font-size: 8pt; direction: ltr; background-color: white;'> {</pre><pre style='margin: 0em; padding: 0px; width: 100%; text-align: left; color: black; line-height: 12pt; overflow: visible; font-family: "Courier New", courier, monospace; font-size: 8pt; direction: ltr; background-color: rgb(244, 244, 244);'> *: "A&E Network shows"</pre><pre style='margin: 0em; padding: 0px; width: 100%; text-align: left; color: black; line-height: 12pt; overflow: visible; font-family: "Courier New", courier, monospace; font-size: 8pt; direction: ltr; background-color: white;'> size: 0</pre><pre style='margin: 0em; padding: 0px; width: 100%; text-align: left; color: black; line-height: 12pt; overflow: visible; font-family: "Courier New", courier, monospace; font-size: 8pt; direction: ltr; background-color: rgb(244, 244, 244);'> pages: 0</pre><pre style='margin: 0em; padding: 0px; width: 100%; text-align: left; color: black; line-height: 12pt; overflow: visible; font-family: "Courier New", courier, monospace; font-size: 8pt; direction: ltr; background-color: white;'> files: 0</pre><pre style='margin: 0em; padding: 0px; width: 100%; text-align: left; color: black; line-height: 12pt; overflow: visible; font-family: "Courier New", courier, monospace; font-size: 8pt; direction: ltr; background-color: rgb(244, 244, 244);'> subcats: 0</pre><pre style='margin: 0em; padding: 0px; width: 100%; text-align: left; color: black; line-height: 12pt; overflow: visible; font-family: "Courier New", courier, monospace; font-size: 8pt; direction: ltr; background-color: white;'> }</pre><pre style='margin: 0em; padding: 0px; width: 100%; text-align: left; color: black; line-height: 12pt; overflow: visible; font-family: "Courier New", courier, monospace; font-size: 8pt; direction: ltr; background-color: rgb(244, 244, 244);'> {</pre><pre style='margin: 0em; padding: 0px; width: 100%; text-align: left; color: black; line-height: 12pt; overflow: visible; font-family: "Courier New", courier, monospace; font-size: 8pt; direction: ltr; background-color: white;'> *: "A&E Shows"</pre><pre style='margin: 0em; padding: 0px; width: 100%; text-align: left; color: black; line-height: 12pt; overflow: visible; font-family: "Courier New", courier, monospace; font-size: 8pt; direction: ltr; background-color: rgb(244, 244, 244);'> size: 0</pre><pre style='margin: 0em; padding: 0px; width: 100%; text-align: left; color: black; line-height: 12pt; overflow: visible; font-family: "Courier New", courier, monospace; font-size: 8pt; direction: ltr; background-color: white;'> pages: 0</pre><pre style='margin: 0em; padding: 0px; width: 100%; text-align: left; color: black; line-height: 12pt; overflow: visible; font-family: "Courier New", courier, monospace; font-size: 8pt; direction: ltr; background-color: rgb(244, 244, 244);'> files: 0</pre><pre style='margin: 0em; padding: 0px; width: 100%; text-align: left; color: black; line-height: 12pt; overflow: visible; font-family: "Courier New", courier, monospace; font-size: 8pt; direction: ltr; background-color: white;'> subcats: 0</pre><pre style='margin: 0em; padding: 0px; width: 100%; text-align: left; color: black; line-height: 12pt; overflow: visible; font-family: "Courier New", courier, monospace; font-size: 8pt; direction: ltr; background-color: rgb(244, 244, 244);'> }</pre><pre style='margin: 0em; padding: 0px; width: 100%; text-align: left; color: black; line-height: 12pt; overflow: visible; font-family: "Courier New", courier, monospace; font-size: 8pt; direction: ltr; background-color: white;'> {</pre><pre style='margin: 0em; padding: 0px; width: 100%; text-align: left; color: black; line-height: 12pt; overflow: visible; font-family: "Courier New", courier, monospace; font-size: 8pt; direction: ltr; background-color: rgb(244, 244, 244);'> *: "A&E Television Network shows"</pre><pre style='margin: 0em; padding: 0px; width: 100%; text-align: left; color: black; line-height: 12pt; overflow: visible; font-family: "Courier New", courier, monospace; font-size: 8pt; direction: ltr; background-color: white;'> size: 0</pre><pre style='margin: 0em; padding: 0px; width: 100%; text-align: left; color: black; line-height: 12pt; overflow: visible; font-family: "Courier New", courier, monospace; font-size: 8pt; direction: ltr; background-color: rgb(244, 244, 244);'> pages: 0</pre><pre style='margin: 0em; padding: 0px; width: 100%; text-align: left; color: black; line-height: 12pt; overflow: visible; font-family: "Courier New", courier, monospace; font-size: 8pt; direction: ltr; background-color: white;'> files: 0</pre><pre style='margin: 0em; padding: 0px; width: 100%; text-align: left; color: black; line-height: 12pt; overflow: visible; font-family: "Courier New", courier, monospace; font-size: 8pt; direction: ltr; background-color: rgb(244, 244, 244);'> subcats: 0</pre><pre style='margin: 0em; padding: 0px; width: 100%; text-align: left; color: black; line-height: 12pt; overflow: visible; font-family: "Courier New", courier, monospace; font-size: 8pt; direction: ltr; background-color: white;'> }</pre><pre style='margin: 0em; padding: 0px; width: 100%; text-align: left; color: black; line-height: 12pt; overflow: visible; font-family: "Courier New", courier, monospace; font-size: 8pt; direction: ltr; background-color: rgb(244, 244, 244);'> {</pre><pre style='margin: 0em; padding: 0px; width: 100%; text-align: left; color: black; line-height: 12pt; overflow: visible; font-family: "Courier New", courier, monospace; font-size: 8pt; direction: ltr; background-color: white;'> *: "A&E Television Networks"</pre><pre style='margin: 0em; padding: 0px; width: 100%; text-align: left; color: black; line-height: 12pt; overflow: visible; font-family: "Courier New", courier, monospace; font-size: 8pt; direction: ltr; background-color: rgb(244, 244, 244);'> size: 17</pre><pre style='margin: 0em; padding: 0px; width: 100%; text-align: left; color: black; line-height: 12pt; overflow: visible; font-family: "Courier New", courier, monospace; font-size: 8pt; direction: ltr; background-color: white;'> pages: 14</pre><pre style='margin: 0em; padding: 0px; width: 100%; text-align: left; color: black; line-height: 12pt; overflow: visible; font-family: "Courier New", courier, monospace; font-size: 8pt; direction: ltr; background-color: rgb(244, 244, 244);'> files: 0</pre><pre style='margin: 0em; padding: 0px; width: 100%; text-align: left; color: black; line-height: 12pt; overflow: visible; font-family: "Courier New", courier, monospace; font-size: 8pt; direction: ltr; background-color: white;'> subcats: 3</pre><pre style='margin: 0em; padding: 0px; width: 100%; text-align: left; color: black; line-height: 12pt; overflow: visible; font-family: "Courier New", courier, monospace; font-size: 8pt; direction: ltr; background-color: rgb(244, 244, 244);'> }</pre><pre style='margin: 0em; padding: 0px; width: 100%; text-align: left; color: black; line-height: 12pt; overflow: visible; font-family: "Courier New", courier, monospace; font-size: 8pt; direction: ltr; background-color: white;'> {</pre><pre style='margin: 0em; padding: 0px; width: 100%; text-align: left; color: black; line-height: 12pt; overflow: visible; font-family: "Courier New", courier, monospace; font-size: 8pt; direction: ltr; background-color: rgb(244, 244, 244);'> *: "A&E Television network shows"</pre><pre style='margin: 0em; padding: 0px; width: 100%; text-align: left; color: black; line-height: 12pt; overflow: visible; font-family: "Courier New", courier, monospace; font-size: 8pt; direction: ltr; background-color: white;'> size: 0</pre><pre style='margin: 0em; padding: 0px; width: 100%; text-align: left; color: black; line-height: 12pt; overflow: visible; font-family: "Courier New", courier, monospace; font-size: 8pt; direction: ltr; background-color: rgb(244, 244, 244);'> pages: 0</pre><pre style='margin: 0em; padding: 0px; width: 100%; text-align: left; color: black; line-height: 12pt; overflow: visible; font-family: "Courier New", courier, monospace; font-size: 8pt; direction: ltr; background-color: white;'> files: 0</pre><pre style='margin: 0em; padding: 0px; width: 100%; text-align: left; color: black; line-height: 12pt; overflow: visible; font-family: "Courier New", courier, monospace; font-size: 8pt; direction: ltr; background-color: rgb(244, 244, 244);'> subcats: 0</pre><pre style='margin: 0em; padding: 0px; width: 100%; text-align: left; color: black; line-height: 12pt; overflow: visible; font-family: "Courier New", courier, monospace; font-size: 8pt; direction: ltr; background-color: white;'> }</pre><pre style='margin: 0em; padding: 0px; width: 100%; text-align: left; color: black; line-height: 12pt; overflow: visible; font-family: "Courier New", courier, monospace; font-size: 8pt; direction: ltr; background-color: rgb(244, 244, 244);'> {</pre><pre style='margin: 0em; padding: 0px; width: 100%; text-align: left; color: black; line-height: 12pt; overflow: visible; font-family: "Courier New", courier, monospace; font-size: 8pt; direction: ltr; background-color: white;'> *: "A&E network shows"</pre><pre style='margin: 0em; padding: 0px; width: 100%; text-align: left; color: black; line-height: 12pt; overflow: visible; font-family: "Courier New", courier, monospace; font-size: 8pt; direction: ltr; background-color: rgb(244, 244, 244);'> size: 0</pre><pre style='margin: 0em; padding: 0px; width: 100%; text-align: left; color: black; line-height: 12pt; overflow: visible; font-family: "Courier New", courier, monospace; font-size: 8pt; direction: ltr; background-color: white;'> pages: 0</pre><pre style='margin: 0em; padding: 0px; width: 100%; text-align: left; color: black; line-height: 12pt; overflow: visible; font-family: "Courier New", courier, monospace; font-size: 8pt; direction: ltr; background-color: rgb(244, 244, 244);'> files: 0</pre><pre style='margin: 0em; padding: 0px; width: 100%; text-align: left; color: black; line-height: 12pt; overflow: visible; font-family: "Courier New", courier, monospace; font-size: 8pt; direction: ltr; background-color: white;'> subcats: 0</pre><pre style='margin: 0em; padding: 0px; width: 100%; text-align: left; color: black; line-height: 12pt; overflow: visible; font-family: "Courier New", courier, monospace; font-size: 8pt; direction: ltr; background-color: rgb(244, 244, 244);'> }</pre><pre style='margin: 0em; padding: 0px; width: 100%; text-align: left; color: black; line-height: 12pt; overflow: visible; font-family: "Courier New", courier, monospace; font-size: 8pt; direction: ltr; background-color: white;'> {</pre><pre style='margin: 0em; padding: 0px; width: 100%; text-align: left; color: black; line-height: 12pt; overflow: visible; font-family: "Courier New", courier, monospace; font-size: 8pt; direction: ltr; background-color: rgb(244, 244, 244);'> *: "A&E shows"</pre><pre style='margin: 0em; padding: 0px; width: 100%; text-align: left; color: black; line-height: 12pt; overflow: visible; font-family: "Courier New", courier, monospace; font-size: 8pt; direction: ltr; background-color: white;'> size: 66</pre><pre style='margin: 0em; padding: 0px; width: 100%; text-align: left; color: black; line-height: 12pt; overflow: visible; font-family: "Courier New", courier, monospace; font-size: 8pt; direction: ltr; background-color: rgb(244, 244, 244);'> pages: 66</pre><pre style='margin: 0em; padding: 0px; width: 100%; text-align: left; color: black; line-height: 12pt; overflow: visible; font-family: "Courier New", courier, monospace; font-size: 8pt; direction: ltr; background-color: white;'> files: 0</pre><pre style='margin: 0em; padding: 0px; width: 100%; text-align: left; color: black; line-height: 12pt; overflow: visible; font-family: "Courier New", courier, monospace; font-size: 8pt; direction: ltr; background-color: rgb(244, 244, 244);'> subcats: 0</pre><pre style='margin: 0em; padding: 0px; width: 100%; text-align: left; color: black; line-height: 12pt; overflow: visible; font-family: "Courier New", courier, monospace; font-size: 8pt; direction: ltr; background-color: white;'> }</pre><pre style='margin: 0em; padding: 0px; width: 100%; text-align: left; color: black; line-height: 12pt; overflow: visible; font-family: "Courier New", courier, monospace; font-size: 8pt; direction: ltr; background-color: rgb(244, 244, 244);'> {</pre><pre style='margin: 0em; padding: 0px; width: 100%; text-align: left; color: black; line-height: 12pt; overflow: visible; font-family: "Courier New", courier, monospace; font-size: 8pt; direction: ltr; background-color: white;'> *: "A&E television network shows"</pre><pre style='margin: 0em; padding: 0px; width: 100%; text-align: left; color: black; line-height: 12pt; overflow: visible; font-family: "Courier New", courier, monospace; font-size: 8pt; direction: ltr; background-color: rgb(244, 244, 244);'> size: 0</pre><pre style='margin: 0em; padding: 0px; width: 100%; text-align: left; color: black; line-height: 12pt; overflow: visible; font-family: "Courier New", courier, monospace; font-size: 8pt; direction: ltr; background-color: white;'> pages: 0</pre><pre style='margin: 0em; padding: 0px; width: 100%; text-align: left; color: black; line-height: 12pt; overflow: visible; font-family: "Courier New", courier, monospace; font-size: 8pt; direction: ltr; background-color: rgb(244, 244, 244);'> files: 0</pre><pre style='margin: 0em; padding: 0px; width: 100%; text-align: left; color: black; line-height: 12pt; overflow: visible; font-family: "Courier New", courier, monospace; font-size: 8pt; direction: ltr; background-color: white;'> subcats: 0</pre><pre style='margin: 0em; padding: 0px; width: 100%; text-align: left; color: black; line-height: 12pt; overflow: visible; font-family: "Courier New", courier, monospace; font-size: 8pt; direction: ltr; background-color: rgb(244, 244, 244);'> }</pre><pre style='margin: 0em; padding: 0px; width: 100%; text-align: left; color: black; line-height: 12pt; overflow: visible; font-family: "Courier New", courier, monospace; font-size: 8pt; direction: ltr; background-color: white;'> {</pre><pre style='margin: 0em; padding: 0px; width: 100%; text-align: left; color: black; line-height: 12pt; overflow: visible; font-family: "Courier New", courier, monospace; font-size: 8pt; direction: ltr; background-color: rgb(244, 244, 244);'> *: "A&M Records"</pre><pre style='margin: 0em; padding: 0px; width: 100%; text-align: left; color: black; line-height: 12pt; overflow: visible; font-family: "Courier New", courier, monospace; font-size: 8pt; direction: ltr; background-color: white;'> size: 0</pre><pre style='margin: 0em; padding: 0px; width: 100%; text-align: left; color: black; line-height: 12pt; overflow: visible; font-family: "Courier New", courier, monospace; font-size: 8pt; direction: ltr; background-color: rgb(244, 244, 244);'> pages: 0</pre><pre style='margin: 0em; padding: 0px; width: 100%; text-align: left; color: black; line-height: 12pt; overflow: visible; font-family: "Courier New", courier, monospace; font-size: 8pt; direction: ltr; background-color: white;'> files: 0</pre><pre style='margin: 0em; padding: 0px; width: 100%; text-align: left; color: black; line-height: 12pt; overflow: visible; font-family: "Courier New", courier, monospace; font-size: 8pt; direction: ltr; background-color: rgb(244, 244, 244);'> subcats: 0</pre><pre style='margin: 0em; padding: 0px; width: 100%; text-align: left; color: black; line-height: 12pt; overflow: visible; font-family: "Courier New", courier, monospace; font-size: 8pt; direction: ltr; background-color: white;'> }</pre><pre style='margin: 0em; padding: 0px; width: 100%; text-align: left; color: black; line-height: 12pt; overflow: visible; font-family: "Courier New", courier, monospace; font-size: 8pt; direction: ltr; background-color: rgb(244, 244, 244);'> ]</pre><pre style='margin: 0em; padding: 0px; width: 100%; text-align: left; color: black; line-height: 12pt; overflow: visible; font-family: "Courier New", courier, monospace; font-size: 8pt; direction: ltr; background-color: white;'> }</pre><pre style='margin: 0em; padding: 0px; width: 100%; text-align: left; color: black; line-height: 12pt; overflow: visible; font-family: "Courier New", courier, monospace; font-size: 8pt; direction: ltr; background-color: rgb(244, 244, 244);'> query-continue: {</pre><pre style='margin: 0em; padding: 0px; width: 100%; text-align: left; color: black; line-height: 12pt; overflow: visible; font-family: "Courier New", courier, monospace; font-size: 8pt; direction: ltr; background-color: white;'> allcategories: {</pre><pre style='margin: 0em; padding: 0px; width: 100%; text-align: left; color: black; line-height: 12pt; overflow: visible; font-family: "Courier New", courier, monospace; font-size: 8pt; direction: ltr; background-color: rgb(244, 244, 244);'> acfrom: "A&M Records EPs"</pre><pre style='margin: 0em; padding: 0px; width: 100%; text-align: left; color: black; line-height: 12pt; overflow: visible; font-family: "Courier New", courier, monospace; font-size: 8pt; direction: ltr; background-color: white;'> }</pre><pre style='margin: 0em; padding: 0px; width: 100%; text-align: left; color: black; line-height: 12pt; overflow: visible; font-family: "Courier New", courier, monospace; font-size: 8pt; direction: ltr; background-color: rgb(244, 244, 244);'> }</pre><pre style='margin: 0em; padding: 0px; width: 100%; text-align: left; color: black; line-height: 12pt; overflow: visible; font-family: "Courier New", courier, monospace; font-size: 8pt; direction: ltr; background-color: white;'>}</pre>That looks better. Unfortunately there’s no way to include additional filters like “don’t include items with size = 0” so you’re going to have to make multiple calls and the filtering in your app (LINQ is great for this) but this is good enough to get started.
Json.NET can deserialize these results into an object graph but you need to create the classes for it. One way to do this is to use the JSON C# Class Generator which is a pretty handy tool if you’re starting with JSON as your format and don’t have anything. It doesn’t know anything about the Json.NET library so it uses native C# calls for the structure and helpers and but will give you something to start from.
We’ll just build our classes manually as there are only a few we need. Here’s the first cut (based on the JSON data above):
public class MediaWiki
<pre style='margin: 0em; padding: 0px; width: 100%; text-align: left; color: black; line-height: 12pt; overflow: visible; font-family: "Courier New", courier, monospace; font-size: 8pt; direction: ltr; background-color: rgb(244, 244, 244);'>{</pre><pre style='margin: 0em; padding: 0px; width: 100%; text-align: left; color: black; line-height: 12pt; overflow: visible; font-family: "Courier New", courier, monospace; font-size: 8pt; direction: ltr; background-color: white;'> <span style="color: rgb(0, 0, 255);">public</span> Query Query { get; set; }</pre><pre style='margin: 0em; padding: 0px; width: 100%; text-align: left; color: black; line-height: 12pt; overflow: visible; font-family: "Courier New", courier, monospace; font-size: 8pt; direction: ltr; background-color: rgb(244, 244, 244);'> <span style="color: rgb(0, 0, 255);">public</span> QueryContinue QueryContinue { get; set; }</pre><pre style='margin: 0em; padding: 0px; width: 100%; text-align: left; color: black; line-height: 12pt; overflow: visible; font-family: "Courier New", courier, monospace; font-size: 8pt; direction: ltr; background-color: white;'>}</pre><pre style='margin: 0em; padding: 0px; width: 100%; text-align: left; color: black; line-height: 12pt; overflow: visible; font-family: "Courier New", courier, monospace; font-size: 8pt; direction: ltr; background-color: rgb(244, 244, 244);'> </pre><pre style='margin: 0em; padding: 0px; width: 100%; text-align: left; color: black; line-height: 12pt; overflow: visible; font-family: "Courier New", courier, monospace; font-size: 8pt; direction: ltr; background-color: white;'><span style="color: rgb(0, 0, 255);">public</span> <span style="color: rgb(0, 0, 255);">class</span> Query</pre><pre style='margin: 0em; padding: 0px; width: 100%; text-align: left; color: black; line-height: 12pt; overflow: visible; font-family: "Courier New", courier, monospace; font-size: 8pt; direction: ltr; background-color: rgb(244, 244, 244);'>{</pre><pre style='margin: 0em; padding: 0px; width: 100%; text-align: left; color: black; line-height: 12pt; overflow: visible; font-family: "Courier New", courier, monospace; font-size: 8pt; direction: ltr; background-color: white;'> <span style="color: rgb(0, 0, 255);">public</span> Allcategory[] Allcategories { get; set; }</pre><pre style='margin: 0em; padding: 0px; width: 100%; text-align: left; color: black; line-height: 12pt; overflow: visible; font-family: "Courier New", courier, monospace; font-size: 8pt; direction: ltr; background-color: rgb(244, 244, 244);'>}</pre><pre style='margin: 0em; padding: 0px; width: 100%; text-align: left; color: black; line-height: 12pt; overflow: visible; font-family: "Courier New", courier, monospace; font-size: 8pt; direction: ltr; background-color: white;'> </pre><pre style='margin: 0em; padding: 0px; width: 100%; text-align: left; color: black; line-height: 12pt; overflow: visible; font-family: "Courier New", courier, monospace; font-size: 8pt; direction: ltr; background-color: rgb(244, 244, 244);'><span style="color: rgb(0, 0, 255);">public</span> <span style="color: rgb(0, 0, 255);">class</span> Allcategory</pre><pre style='margin: 0em; padding: 0px; width: 100%; text-align: left; color: black; line-height: 12pt; overflow: visible; font-family: "Courier New", courier, monospace; font-size: 8pt; direction: ltr; background-color: white;'>{</pre><pre style='margin: 0em; padding: 0px; width: 100%; text-align: left; color: black; line-height: 12pt; overflow: visible; font-family: "Courier New", courier, monospace; font-size: 8pt; direction: ltr; background-color: rgb(244, 244, 244);'> <span style="color: rgb(0, 0, 255);">public</span> <span style="color: rgb(0, 0, 255);">int</span> Size { get; set; }</pre><pre style='margin: 0em; padding: 0px; width: 100%; text-align: left; color: black; line-height: 12pt; overflow: visible; font-family: "Courier New", courier, monospace; font-size: 8pt; direction: ltr; background-color: white;'> <span style="color: rgb(0, 0, 255);">public</span> <span style="color: rgb(0, 0, 255);">int</span> Pages { get; set; }</pre><pre style='margin: 0em; padding: 0px; width: 100%; text-align: left; color: black; line-height: 12pt; overflow: visible; font-family: "Courier New", courier, monospace; font-size: 8pt; direction: ltr; background-color: rgb(244, 244, 244);'> <span style="color: rgb(0, 0, 255);">public</span> <span style="color: rgb(0, 0, 255);">int</span> Files { get; set; }</pre><pre style='margin: 0em; padding: 0px; width: 100%; text-align: left; color: black; line-height: 12pt; overflow: visible; font-family: "Courier New", courier, monospace; font-size: 8pt; direction: ltr; background-color: white;'> <span style="color: rgb(0, 0, 255);">public</span> <span style="color: rgb(0, 0, 255);">int</span> Subcats { get; set; }</pre><pre style='margin: 0em; padding: 0px; width: 100%; text-align: left; color: black; line-height: 12pt; overflow: visible; font-family: "Courier New", courier, monospace; font-size: 8pt; direction: ltr; background-color: rgb(244, 244, 244);'>}</pre><pre style='margin: 0em; padding: 0px; width: 100%; text-align: left; color: black; line-height: 12pt; overflow: visible; font-family: "Courier New", courier, monospace; font-size: 8pt; direction: ltr; background-color: white;'> </pre><pre style='margin: 0em; padding: 0px; width: 100%; text-align: left; color: black; line-height: 12pt; overflow: visible; font-family: "Courier New", courier, monospace; font-size: 8pt; direction: ltr; background-color: rgb(244, 244, 244);'><span style="color: rgb(0, 0, 255);">public</span> <span style="color: rgb(0, 0, 255);">class</span> QueryContinue</pre><pre style='margin: 0em; padding: 0px; width: 100%; text-align: left; color: black; line-height: 12pt; overflow: visible; font-family: "Courier New", courier, monospace; font-size: 8pt; direction: ltr; background-color: white;'>{</pre><pre style='margin: 0em; padding: 0px; width: 100%; text-align: left; color: black; line-height: 12pt; overflow: visible; font-family: "Courier New", courier, monospace; font-size: 8pt; direction: ltr; background-color: rgb(244, 244, 244);'> <span style="color: rgb(0, 0, 255);">public</span> Allcategories Allcategories { get; set; }</pre><pre style='margin: 0em; padding: 0px; width: 100%; text-align: left; color: black; line-height: 12pt; overflow: visible; font-family: "Courier New", courier, monospace; font-size: 8pt; direction: ltr; background-color: white;'>}</pre><pre style='margin: 0em; padding: 0px; width: 100%; text-align: left; color: black; line-height: 12pt; overflow: visible; font-family: "Courier New", courier, monospace; font-size: 8pt; direction: ltr; background-color: rgb(244, 244, 244);'> </pre><pre style='margin: 0em; padding: 0px; width: 100%; text-align: left; color: black; line-height: 12pt; overflow: visible; font-family: "Courier New", courier, monospace; font-size: 8pt; direction: ltr; background-color: white;'><span style="color: rgb(0, 0, 255);">public</span> <span style="color: rgb(0, 0, 255);">class</span> Allcategories</pre><pre style='margin: 0em; padding: 0px; width: 100%; text-align: left; color: black; line-height: 12pt; overflow: visible; font-family: "Courier New", courier, monospace; font-size: 8pt; direction: ltr; background-color: rgb(244, 244, 244);'>{</pre><pre style='margin: 0em; padding: 0px; width: 100%; text-align: left; color: black; line-height: 12pt; overflow: visible; font-family: "Courier New", courier, monospace; font-size: 8pt; direction: ltr; background-color: white;'> <span style="color: rgb(0, 0, 255);">public</span> <span style="color: rgb(0, 0, 255);">string</span> Acfrom { get; set; } </pre><pre style='margin: 0em; padding: 0px; width: 100%; text-align: left; color: black; line-height: 12pt; overflow: visible; font-family: "Courier New", courier, monospace; font-size: 8pt; direction: ltr; background-color: rgb(244, 244, 244);'>}</pre>The class and property names here are not the most intuitive but we’ll fix that. First let’s make the call to the API to get our JSON then deserialize it into this object graph. Replace the LoadData method in the MainViewModel with this code:
public void LoadData()
<pre style='margin: 0em; padding: 0px; width: 100%; text-align: left; color: black; line-height: 12pt; overflow: visible; font-family: "Courier New", courier, monospace; font-size: 8pt; direction: ltr; background-color: rgb(244, 244, 244);'>{</pre><pre style='margin: 0em; padding: 0px; width: 100%; text-align: left; color: black; line-height: 12pt; overflow: visible; font-family: "Courier New", courier, monospace; font-size: 8pt; direction: ltr; background-color: white;'> var address = <span style="color: rgb(0, 96, 128);">@"http://en.wikipedia.org/w/api.php?action=query&list=allcategories&format=json&acprop=size&acprefix=A&aclimit=500"</span>;</pre><pre style='margin: 0em; padding: 0px; width: 100%; text-align: left; color: black; line-height: 12pt; overflow: visible; font-family: "Courier New", courier, monospace; font-size: 8pt; direction: ltr; background-color: rgb(244, 244, 244);'> var webclient = <span style="color: rgb(0, 0, 255);">new</span> WebClient();</pre><pre style='margin: 0em; padding: 0px; width: 100%; text-align: left; color: black; line-height: 12pt; overflow: visible; font-family: "Courier New", courier, monospace; font-size: 8pt; direction: ltr; background-color: white;'> webclient.DownloadStringCompleted += OnDownloadStringCompleted;</pre><pre style='margin: 0em; padding: 0px; width: 100%; text-align: left; color: black; line-height: 12pt; overflow: visible; font-family: "Courier New", courier, monospace; font-size: 8pt; direction: ltr; background-color: rgb(244, 244, 244);'> webclient.DownloadStringAsync(<span style="color: rgb(0, 0, 255);">new</span> Uri(address));</pre><pre style='margin: 0em; padding: 0px; width: 100%; text-align: left; color: black; line-height: 12pt; overflow: visible; font-family: "Courier New", courier, monospace; font-size: 8pt; direction: ltr; background-color: white;'>}</pre>This kicks off the download and sets up the callback to invoke when the download is complete (I also added “&aclimit=500” to the end of the query to get more than the default 10 results). When the string is downloaded we call this:
foreach (var category in json.Query.Allcategories.Where(category => category.Size > 0))
<pre style='margin: 0em; padding: 0px; width: 100%; text-align: left; color: black; line-height: 12pt; overflow: visible; font-family: "Courier New", courier, monospace; font-size: 8pt; direction: ltr; background-color: rgb(244, 244, 244);'>{</pre><pre style='margin: 0em; padding: 0px; width: 100%; text-align: left; color: black; line-height: 12pt; overflow: visible; font-family: "Courier New", courier, monospace; font-size: 8pt; direction: ltr; background-color: white;'> Items.Add(</pre><pre style='margin: 0em; padding: 0px; width: 100%; text-align: left; color: black; line-height: 12pt; overflow: visible; font-family: "Courier New", courier, monospace; font-size: 8pt; direction: ltr; background-color: rgb(244, 244, 244);'> <span style="color: rgb(0, 0, 255);">new</span> ItemViewModel</pre><pre style='margin: 0em; padding: 0px; width: 100%; text-align: left; color: black; line-height: 12pt; overflow: visible; font-family: "Courier New", courier, monospace; font-size: 8pt; direction: ltr; background-color: white;'> {</pre><pre style='margin: 0em; padding: 0px; width: 100%; text-align: left; color: black; line-height: 12pt; overflow: visible; font-family: "Courier New", courier, monospace; font-size: 8pt; direction: ltr; background-color: rgb(244, 244, 244);'> LineOne = <span style="color: rgb(0, 96, 128);">"Pages: "</span> + category.Pages,</pre><pre style='margin: 0em; padding: 0px; width: 100%; text-align: left; color: black; line-height: 12pt; overflow: visible; font-family: "Courier New", courier, monospace; font-size: 8pt; direction: ltr; background-color: white;'> LineTwo = <span style="color: rgb(0, 96, 128);">"Subcats: "</span> + category.Size,</pre><pre style='margin: 0em; padding: 0px; width: 100%; text-align: left; color: black; line-height: 12pt; overflow: visible; font-family: "Courier New", courier, monospace; font-size: 8pt; direction: ltr; background-color: rgb(244, 244, 244);'> });</pre><pre style='margin: 0em; padding: 0px; width: 100%; text-align: left; color: black; line-height: 12pt; overflow: visible; font-family: "Courier New", courier, monospace; font-size: 8pt; direction: ltr; background-color: white;'>}</pre>This takes the result of the download and calls the JsonConvert method DeserializeObject. This is a generic method that we pass our MediaWiki class from above to. Then just loop over the Allcategories array to pluck out each category and create our ItemViewModel items manually. We use LINQ in the loop to filter out any categories with a size of 0.
Here's the result on our phone:

This isn’t too exciting because frankly we don’t know what the name of each category is. Remember the JSON?
{<pre style='margin: 0em; padding: 0px; width: 100%; text-align: left; color: black; line-height: 12pt; overflow: visible; font-family: "Courier New", courier, monospace; font-size: 8pt; direction: ltr; background-color: rgb(244, 244, 244);'> *: "A&E Television Network shows"</pre><pre style='margin: 0em; padding: 0px; width: 100%; text-align: left; color: black; line-height: 12pt; overflow: visible; font-family: "Courier New", courier, monospace; font-size: 8pt; direction: ltr; background-color: white;'> size: 0</pre><pre style='margin: 0em; padding: 0px; width: 100%; text-align: left; color: black; line-height: 12pt; overflow: visible; font-family: "Courier New", courier, monospace; font-size: 8pt; direction: ltr; background-color: rgb(244, 244, 244);'> pages: 0</pre><pre style='margin: 0em; padding: 0px; width: 100%; text-align: left; color: black; line-height: 12pt; overflow: visible; font-family: "Courier New", courier, monospace; font-size: 8pt; direction: ltr; background-color: white;'> files: 0</pre><pre style='margin: 0em; padding: 0px; width: 100%; text-align: left; color: black; line-height: 12pt; overflow: visible; font-family: "Courier New", courier, monospace; font-size: 8pt; direction: ltr; background-color: rgb(244, 244, 244);'> subcats: 0</pre><pre style='margin: 0em; padding: 0px; width: 100%; text-align: left; color: black; line-height: 12pt; overflow: visible; font-family: "Courier New", courier, monospace; font-size: 8pt; direction: ltr; background-color: white;'>}</pre>Hmmm.. how are we going to get that name into a property in our class? The Json.NET library matches up names of attributes in the markup with the name of a property in your class. We can’t create a property called “*” as that’s not valid in C#.
The answer is to use the JsonPropertyAttribute on our class and introduce a new property called Title. Here’s our updated Allcategory class with the markup:
public class Allcategory
<pre style='margin: 0em; padding: 0px; width: 100%; text-align: left; color: black; line-height: 12pt; overflow: visible; font-family: "Courier New", courier, monospace; font-size: 8pt; direction: ltr; background-color: rgb(244, 244, 244);'>{</pre><pre style='margin: 0em; padding: 0px; width: 100%; text-align: left; color: black; line-height: 12pt; overflow: visible; font-family: "Courier New", courier, monospace; font-size: 8pt; direction: ltr; background-color: white;'> [JsonProperty(<span style="color: rgb(0, 96, 128);">"*"</span>)]</pre><pre style='margin: 0em; padding: 0px; width: 100%; text-align: left; color: black; line-height: 12pt; overflow: visible; font-family: "Courier New", courier, monospace; font-size: 8pt; direction: ltr; background-color: rgb(244, 244, 244);'> <span style="color: rgb(0, 0, 255);">public</span> <span style="color: rgb(0, 0, 255);">string</span> Title { get; set; }</pre><pre style='margin: 0em; padding: 0px; width: 100%; text-align: left; color: black; line-height: 12pt; overflow: visible; font-family: "Courier New", courier, monospace; font-size: 8pt; direction: ltr; background-color: white;'> <span style="color: rgb(0, 0, 255);">public</span> <span style="color: rgb(0, 0, 255);">int</span> Size { get; set; }</pre><pre style='margin: 0em; padding: 0px; width: 100%; text-align: left; color: black; line-height: 12pt; overflow: visible; font-family: "Courier New", courier, monospace; font-size: 8pt; direction: ltr; background-color: rgb(244, 244, 244);'> <span style="color: rgb(0, 0, 255);">public</span> <span style="color: rgb(0, 0, 255);">int</span> Pages { get; set; }</pre><pre style='margin: 0em; padding: 0px; width: 100%; text-align: left; color: black; line-height: 12pt; overflow: visible; font-family: "Courier New", courier, monospace; font-size: 8pt; direction: ltr; background-color: white;'> <span style="color: rgb(0, 0, 255);">public</span> <span style="color: rgb(0, 0, 255);">int</span> Files { get; set; }</pre><pre style='margin: 0em; padding: 0px; width: 100%; text-align: left; color: black; line-height: 12pt; overflow: visible; font-family: "Courier New", courier, monospace; font-size: 8pt; direction: ltr; background-color: rgb(244, 244, 244);'> <span style="color: rgb(0, 0, 255);">public</span> <span style="color: rgb(0, 0, 255);">int</span> Subcats { get; set; }</pre><pre style='margin: 0em; padding: 0px; width: 100%; text-align: left; color: black; line-height: 12pt; overflow: visible; font-family: "Courier New", courier, monospace; font-size: 8pt; direction: ltr; background-color: white;'>}</pre>This tells Json.NET that when it comes across a value with the markup “*” to deserialize it into the Title property.
Now we can update our LoadData method to use the title instead:
private void OnDownloadStringCompleted(object sender, DownloadStringCompletedEventArgs e)
<pre style='margin: 0em; padding: 0px; width: 100%; text-align: left; color: black; line-height: 12pt; overflow: visible; font-family: "Courier New", courier, monospace; font-size: 8pt; direction: ltr; background-color: rgb(244, 244, 244);'>{</pre><pre style='margin: 0em; padding: 0px; width: 100%; text-align: left; color: black; line-height: 12pt; overflow: visible; font-family: "Courier New", courier, monospace; font-size: 8pt; direction: ltr; background-color: white;'> var json = JsonConvert.DeserializeObject<MediaWiki>(e.Result);</pre><pre style='margin: 0em; padding: 0px; width: 100%; text-align: left; color: black; line-height: 12pt; overflow: visible; font-family: "Courier New", courier, monospace; font-size: 8pt; direction: ltr; background-color: rgb(244, 244, 244);'> <span style="color: rgb(0, 0, 255);">foreach</span> (var category <span style="color: rgb(0, 0, 255);">in</span> json.Query.Allcategories.Where(category => category.Size > 0))</pre><pre style='margin: 0em; padding: 0px; width: 100%; text-align: left; color: black; line-height: 12pt; overflow: visible; font-family: "Courier New", courier, monospace; font-size: 8pt; direction: ltr; background-color: white;'> {</pre><pre style='margin: 0em; padding: 0px; width: 100%; text-align: left; color: black; line-height: 12pt; overflow: visible; font-family: "Courier New", courier, monospace; font-size: 8pt; direction: ltr; background-color: rgb(244, 244, 244);'> Items.Add(</pre><pre style='margin: 0em; padding: 0px; width: 100%; text-align: left; color: black; line-height: 12pt; overflow: visible; font-family: "Courier New", courier, monospace; font-size: 8pt; direction: ltr; background-color: white;'> <span style="color: rgb(0, 0, 255);">new</span> ItemViewModel</pre><pre style='margin: 0em; padding: 0px; width: 100%; text-align: left; color: black; line-height: 12pt; overflow: visible; font-family: "Courier New", courier, monospace; font-size: 8pt; direction: ltr; background-color: rgb(244, 244, 244);'> {</pre><pre style='margin: 0em; padding: 0px; width: 100%; text-align: left; color: black; line-height: 12pt; overflow: visible; font-family: "Courier New", courier, monospace; font-size: 8pt; direction: ltr; background-color: white;'> LineOne = category.Title,</pre><pre style='margin: 0em; padding: 0px; width: 100%; text-align: left; color: black; line-height: 12pt; overflow: visible; font-family: "Courier New", courier, monospace; font-size: 8pt; direction: ltr; background-color: rgb(244, 244, 244);'> LineTwo = <span style="color: rgb(0, 0, 255);">string</span>.Format(<span style="color: rgb(0, 96, 128);">"Pages: {0} Subcats: {1}"</span>, </pre><pre style='margin: 0em; padding: 0px; width: 100%; text-align: left; color: black; line-height: 12pt; overflow: visible; font-family: "Courier New", courier, monospace; font-size: 8pt; direction: ltr; background-color: white;'> category.Pages, category.Subcats),</pre><pre style='margin: 0em; padding: 0px; width: 100%; text-align: left; color: black; line-height: 12pt; overflow: visible; font-family: "Courier New", courier, monospace; font-size: 8pt; direction: ltr; background-color: rgb(244, 244, 244);'> });</pre><pre style='margin: 0em; padding: 0px; width: 100%; text-align: left; color: black; line-height: 12pt; overflow: visible; font-family: "Courier New", courier, monospace; font-size: 8pt; direction: ltr; background-color: white;'> }</pre><pre style='margin: 0em; padding: 0px; width: 100%; text-align: left; color: black; line-height: 12pt; overflow: visible; font-family: "Courier New", courier, monospace; font-size: 8pt; direction: ltr; background-color: rgb(244, 244, 244);'> IsDataLoaded = <span style="color: rgb(0, 0, 255);">true</span>;</pre><pre style='margin: 0em; padding: 0px; width: 100%; text-align: left; color: black; line-height: 12pt; overflow: visible; font-family: "Courier New", courier, monospace; font-size: 8pt; direction: ltr; background-color: white;'>}</pre>Which now looks like this on the phone:

That’s a little better.
With the [JsonProperty] attribute we can also specify the name of the property in the JSON markup so that we’re not tied to that name when specifying the name in our C# class. This allows us to make our C# class a little more readable. Here’s an couple of examples:
public class Query
<pre style='margin: 0em; padding: 0px; width: 100%; text-align: left; color: black; line-height: 12pt; overflow: visible; font-family: "Courier New", courier, monospace; font-size: 8pt; direction: ltr; background-color: rgb(244, 244, 244);'>{</pre><pre style='margin: 0em; padding: 0px; width: 100%; text-align: left; color: black; line-height: 12pt; overflow: visible; font-family: "Courier New", courier, monospace; font-size: 8pt; direction: ltr; background-color: white;'> [JsonProperty(<span style="color: rgb(0, 96, 128);">"allcategories"</span>)]</pre><pre style='margin: 0em; padding: 0px; width: 100%; text-align: left; color: black; line-height: 12pt; overflow: visible; font-family: "Courier New", courier, monospace; font-size: 8pt; direction: ltr; background-color: rgb(244, 244, 244);'> <span style="color: rgb(0, 0, 255);">public</span> Allcategory[] Categories { get; set; }</pre><pre style='margin: 0em; padding: 0px; width: 100%; text-align: left; color: black; line-height: 12pt; overflow: visible; font-family: "Courier New", courier, monospace; font-size: 8pt; direction: ltr; background-color: white;'>}</pre><pre style='margin: 0em; padding: 0px; width: 100%; text-align: left; color: black; line-height: 12pt; overflow: visible; font-family: "Courier New", courier, monospace; font-size: 8pt; direction: ltr; background-color: rgb(244, 244, 244);'> </pre><pre style='margin: 0em; padding: 0px; width: 100%; text-align: left; color: black; line-height: 12pt; overflow: visible; font-family: "Courier New", courier, monospace; font-size: 8pt; direction: ltr; background-color: white;'><span style="color: rgb(0, 0, 255);">public</span> <span style="color: rgb(0, 0, 255);">class</span> Allcategory</pre><pre style='margin: 0em; padding: 0px; width: 100%; text-align: left; color: black; line-height: 12pt; overflow: visible; font-family: "Courier New", courier, monospace; font-size: 8pt; direction: ltr; background-color: rgb(244, 244, 244);'>{</pre><pre style='margin: 0em; padding: 0px; width: 100%; text-align: left; color: black; line-height: 12pt; overflow: visible; font-family: "Courier New", courier, monospace; font-size: 8pt; direction: ltr; background-color: white;'> [JsonProperty(<span style="color: rgb(0, 96, 128);">"*"</span>)]</pre><pre style='margin: 0em; padding: 0px; width: 100%; text-align: left; color: black; line-height: 12pt; overflow: visible; font-family: "Courier New", courier, monospace; font-size: 8pt; direction: ltr; background-color: rgb(244, 244, 244);'> <span style="color: rgb(0, 0, 255);">public</span> <span style="color: rgb(0, 0, 255);">string</span> Title { get; set; }</pre><pre style='margin: 0em; padding: 0px; width: 100%; text-align: left; color: black; line-height: 12pt; overflow: visible; font-family: "Courier New", courier, monospace; font-size: 8pt; direction: ltr; background-color: white;'> <span style="color: rgb(0, 0, 255);">public</span> <span style="color: rgb(0, 0, 255);">int</span> Size { get; set; }</pre><pre style='margin: 0em; padding: 0px; width: 100%; text-align: left; color: black; line-height: 12pt; overflow: visible; font-family: "Courier New", courier, monospace; font-size: 8pt; direction: ltr; background-color: rgb(244, 244, 244);'> <span style="color: rgb(0, 0, 255);">public</span> <span style="color: rgb(0, 0, 255);">int</span> Pages { get; set; }</pre><pre style='margin: 0em; padding: 0px; width: 100%; text-align: left; color: black; line-height: 12pt; overflow: visible; font-family: "Courier New", courier, monospace; font-size: 8pt; direction: ltr; background-color: white;'> <span style="color: rgb(0, 0, 255);">public</span> <span style="color: rgb(0, 0, 255);">int</span> Files { get; set; }</pre><pre style='margin: 0em; padding: 0px; width: 100%; text-align: left; color: black; line-height: 12pt; overflow: visible; font-family: "Courier New", courier, monospace; font-size: 8pt; direction: ltr; background-color: rgb(244, 244, 244);'> [JsonProperty(<span style="color: rgb(0, 96, 128);">"subcats"</span>)]</pre><pre style='margin: 0em; padding: 0px; width: 100%; text-align: left; color: black; line-height: 12pt; overflow: visible; font-family: "Courier New", courier, monospace; font-size: 8pt; direction: ltr; background-color: white;'> <span style="color: rgb(0, 0, 255);">public</span> <span style="color: rgb(0, 0, 255);">int</span> Categories { get; set; }</pre><pre style='margin: 0em; padding: 0px; width: 100%; text-align: left; color: black; line-height: 12pt; overflow: visible; font-family: "Courier New", courier, monospace; font-size: 8pt; direction: ltr; background-color: rgb(244, 244, 244);'>}</pre>The JsonProperty will match whatever markup MediaWiki (or whomever is providing your JSON feed) and we can use a more friendlier name in our code (P.S. the class names can be whatever you want, it’s the properties that are important).
The default app already has the function to display the DetailsPage when you tap on an item in the list. It passes the index of the array of ItemViewModel items to the page which retrieves it from the Items property of the ViewModel stored in the App class and sets up the title of the DetailsPage to the LineOne property of the ViewModel.
This property is really the title of the category and the value we can use to get more information from the MediaWiki API. We’ll use the “categorymembers” action to get all pages in a given category. Here’s the url we’re going to use:
http://en.wikipedia.org/w/api.php?action=query&list=categorymembers&format=json&cmtitle=Category:Zombies&cmprop=type|ids|title
We’re going after all pages in the “Zombies” category and want to include the type of page, the id, and the title.
Here’s the JSON from this call:
{<pre style='margin: 0em; padding: 0px; width: 100%; text-align: left; color: black; line-height: 12pt; overflow: visible; font-family: "Courier New", courier, monospace; font-size: 8pt; direction: ltr; background-color: rgb(244, 244, 244);'> query: {</pre><pre style='margin: 0em; padding: 0px; width: 100%; text-align: left; color: black; line-height: 12pt; overflow: visible; font-family: "Courier New", courier, monospace; font-size: 8pt; direction: ltr; background-color: white;'> categorymembers: [</pre><pre style='margin: 0em; padding: 0px; width: 100%; text-align: left; color: black; line-height: 12pt; overflow: visible; font-family: "Courier New", courier, monospace; font-size: 8pt; direction: ltr; background-color: rgb(244, 244, 244);'> {</pre><pre style='margin: 0em; padding: 0px; width: 100%; text-align: left; color: black; line-height: 12pt; overflow: visible; font-family: "Courier New", courier, monospace; font-size: 8pt; direction: ltr; background-color: white;'> pageid: 8375</pre><pre style='margin: 0em; padding: 0px; width: 100%; text-align: left; color: black; line-height: 12pt; overflow: visible; font-family: "Courier New", courier, monospace; font-size: 8pt; direction: ltr; background-color: rgb(244, 244, 244);'> ns: 0</pre><pre style='margin: 0em; padding: 0px; width: 100%; text-align: left; color: black; line-height: 12pt; overflow: visible; font-family: "Courier New", courier, monospace; font-size: 8pt; direction: ltr; background-color: white;'> title: <span style="color: rgb(0, 96, 128);">"Draugr"</span></pre><pre style='margin: 0em; padding: 0px; width: 100%; text-align: left; color: black; line-height: 12pt; overflow: visible; font-family: "Courier New", courier, monospace; font-size: 8pt; direction: ltr; background-color: rgb(244, 244, 244);'> type: <span style="color: rgb(0, 96, 128);">"page"</span></pre><pre style='margin: 0em; padding: 0px; width: 100%; text-align: left; color: black; line-height: 12pt; overflow: visible; font-family: "Courier New", courier, monospace; font-size: 8pt; direction: ltr; background-color: white;'> }</pre><pre style='margin: 0em; padding: 0px; width: 100%; text-align: left; color: black; line-height: 12pt; overflow: visible; font-family: "Courier New", courier, monospace; font-size: 8pt; direction: ltr; background-color: rgb(244, 244, 244);'> {</pre><pre style='margin: 0em; padding: 0px; width: 100%; text-align: left; color: black; line-height: 12pt; overflow: visible; font-family: "Courier New", courier, monospace; font-size: 8pt; direction: ltr; background-color: white;'> pageid: 27279250</pre><pre style='margin: 0em; padding: 0px; width: 100%; text-align: left; color: black; line-height: 12pt; overflow: visible; font-family: "Courier New", courier, monospace; font-size: 8pt; direction: ltr; background-color: rgb(244, 244, 244);'> ns: 0</pre><pre style='margin: 0em; padding: 0px; width: 100%; text-align: left; color: black; line-height: 12pt; overflow: visible; font-family: "Courier New", courier, monospace; font-size: 8pt; direction: ltr; background-color: white;'> title: <span style="color: rgb(0, 96, 128);">"Felicia Felix-Mentor"</span></pre><pre style='margin: 0em; padding: 0px; width: 100%; text-align: left; color: black; line-height: 12pt; overflow: visible; font-family: "Courier New", courier, monospace; font-size: 8pt; direction: ltr; background-color: rgb(244, 244, 244);'> type: <span style="color: rgb(0, 96, 128);">"page"</span></pre><pre style='margin: 0em; padding: 0px; width: 100%; text-align: left; color: black; line-height: 12pt; overflow: visible; font-family: "Courier New", courier, monospace; font-size: 8pt; direction: ltr; background-color: white;'> }</pre><pre style='margin: 0em; padding: 0px; width: 100%; text-align: left; color: black; line-height: 12pt; overflow: visible; font-family: "Courier New", courier, monospace; font-size: 8pt; direction: ltr; background-color: rgb(244, 244, 244);'> {</pre><pre style='margin: 0em; padding: 0px; width: 100%; text-align: left; color: black; line-height: 12pt; overflow: visible; font-family: "Courier New", courier, monospace; font-size: 8pt; direction: ltr; background-color: white;'> pageid: 143895</pre><pre style='margin: 0em; padding: 0px; width: 100%; text-align: left; color: black; line-height: 12pt; overflow: visible; font-family: "Courier New", courier, monospace; font-size: 8pt; direction: ltr; background-color: rgb(244, 244, 244);'> ns: 0</pre><pre style='margin: 0em; padding: 0px; width: 100%; text-align: left; color: black; line-height: 12pt; overflow: visible; font-family: "Courier New", courier, monospace; font-size: 8pt; direction: ltr; background-color: white;'> title: <span style="color: rgb(0, 96, 128);">"Jiang Shi"</span></pre><pre style='margin: 0em; padding: 0px; width: 100%; text-align: left; color: black; line-height: 12pt; overflow: visible; font-family: "Courier New", courier, monospace; font-size: 8pt; direction: ltr; background-color: rgb(244, 244, 244);'> type: <span style="color: rgb(0, 96, 128);">"page"</span></pre><pre style='margin: 0em; padding: 0px; width: 100%; text-align: left; color: black; line-height: 12pt; overflow: visible; font-family: "Courier New", courier, monospace; font-size: 8pt; direction: ltr; background-color: white;'> }</pre><pre style='margin: 0em; padding: 0px; width: 100%; text-align: left; color: black; line-height: 12pt; overflow: visible; font-family: "Courier New", courier, monospace; font-size: 8pt; direction: ltr; background-color: rgb(244, 244, 244);'> {</pre><pre style='margin: 0em; padding: 0px; width: 100%; text-align: left; color: black; line-height: 12pt; overflow: visible; font-family: "Courier New", courier, monospace; font-size: 8pt; direction: ltr; background-color: white;'> pageid: 1776116</pre><pre style='margin: 0em; padding: 0px; width: 100%; text-align: left; color: black; line-height: 12pt; overflow: visible; font-family: "Courier New", courier, monospace; font-size: 8pt; direction: ltr; background-color: rgb(244, 244, 244);'> ns: 0</pre><pre style='margin: 0em; padding: 0px; width: 100%; text-align: left; color: black; line-height: 12pt; overflow: visible; font-family: "Courier New", courier, monospace; font-size: 8pt; direction: ltr; background-color: white;'> title: <span style="color: rgb(0, 96, 128);">"Clairvius Narcisse"</span></pre><pre style='margin: 0em; padding: 0px; width: 100%; text-align: left; color: black; line-height: 12pt; overflow: visible; font-family: "Courier New", courier, monospace; font-size: 8pt; direction: ltr; background-color: rgb(244, 244, 244);'> type: <span style="color: rgb(0, 96, 128);">"page"</span></pre><pre style='margin: 0em; padding: 0px; width: 100%; text-align: left; color: black; line-height: 12pt; overflow: visible; font-family: "Courier New", courier, monospace; font-size: 8pt; direction: ltr; background-color: white;'> }</pre><pre style='margin: 0em; padding: 0px; width: 100%; text-align: left; color: black; line-height: 12pt; overflow: visible; font-family: "Courier New", courier, monospace; font-size: 8pt; direction: ltr; background-color: rgb(244, 244, 244);'> {</pre><pre style='margin: 0em; padding: 0px; width: 100%; text-align: left; color: black; line-height: 12pt; overflow: visible; font-family: "Courier New", courier, monospace; font-size: 8pt; direction: ltr; background-color: white;'> pageid: 781891</pre><pre style='margin: 0em; padding: 0px; width: 100%; text-align: left; color: black; line-height: 12pt; overflow: visible; font-family: "Courier New", courier, monospace; font-size: 8pt; direction: ltr; background-color: rgb(244, 244, 244);'> ns: 0</pre><pre style='margin: 0em; padding: 0px; width: 100%; text-align: left; color: black; line-height: 12pt; overflow: visible; font-family: "Courier New", courier, monospace; font-size: 8pt; direction: ltr; background-color: white;'> title: <span style="color: rgb(0, 96, 128);">"Philosophical zombie"</span></pre><pre style='margin: 0em; padding: 0px; width: 100%; text-align: left; color: black; line-height: 12pt; overflow: visible; font-family: "Courier New", courier, monospace; font-size: 8pt; direction: ltr; background-color: rgb(244, 244, 244);'> type: <span style="color: rgb(0, 96, 128);">"page"</span></pre><pre style='margin: 0em; padding: 0px; width: 100%; text-align: left; color: black; line-height: 12pt; overflow: visible; font-family: "Courier New", courier, monospace; font-size: 8pt; direction: ltr; background-color: white;'> }</pre><pre style='margin: 0em; padding: 0px; width: 100%; text-align: left; color: black; line-height: 12pt; overflow: visible; font-family: "Courier New", courier, monospace; font-size: 8pt; direction: ltr; background-color: rgb(244, 244, 244);'> {</pre><pre style='margin: 0em; padding: 0px; width: 100%; text-align: left; color: black; line-height: 12pt; overflow: visible; font-family: "Courier New", courier, monospace; font-size: 8pt; direction: ltr; background-color: white;'> pageid: 7568400</pre><pre style='margin: 0em; padding: 0px; width: 100%; text-align: left; color: black; line-height: 12pt; overflow: visible; font-family: "Courier New", courier, monospace; font-size: 8pt; direction: ltr; background-color: rgb(244, 244, 244);'> ns: 0</pre><pre style='margin: 0em; padding: 0px; width: 100%; text-align: left; color: black; line-height: 12pt; overflow: visible; font-family: "Courier New", courier, monospace; font-size: 8pt; direction: ltr; background-color: white;'> title: <span style="color: rgb(0, 96, 128);">"Zombie Squad"</span></pre><pre style='margin: 0em; padding: 0px; width: 100%; text-align: left; color: black; line-height: 12pt; overflow: visible; font-family: "Courier New", courier, monospace; font-size: 8pt; direction: ltr; background-color: rgb(244, 244, 244);'> type: <span style="color: rgb(0, 96, 128);">"page"</span></pre><pre style='margin: 0em; padding: 0px; width: 100%; text-align: left; color: black; line-height: 12pt; overflow: visible; font-family: "Courier New", courier, monospace; font-size: 8pt; direction: ltr; background-color: white;'> }</pre><pre style='margin: 0em; padding: 0px; width: 100%; text-align: left; color: black; line-height: 12pt; overflow: visible; font-family: "Courier New", courier, monospace; font-size: 8pt; direction: ltr; background-color: rgb(244, 244, 244);'> {</pre><pre style='margin: 0em; padding: 0px; width: 100%; text-align: left; color: black; line-height: 12pt; overflow: visible; font-family: "Courier New", courier, monospace; font-size: 8pt; direction: ltr; background-color: white;'> pageid: 5048737</pre><pre style='margin: 0em; padding: 0px; width: 100%; text-align: left; color: black; line-height: 12pt; overflow: visible; font-family: "Courier New", courier, monospace; font-size: 8pt; direction: ltr; background-color: rgb(244, 244, 244);'> ns: 0</pre><pre style='margin: 0em; padding: 0px; width: 100%; text-align: left; color: black; line-height: 12pt; overflow: visible; font-family: "Courier New", courier, monospace; font-size: 8pt; direction: ltr; background-color: white;'> title: <span style="color: rgb(0, 96, 128);">"Zombie walk"</span></pre><pre style='margin: 0em; padding: 0px; width: 100%; text-align: left; color: black; line-height: 12pt; overflow: visible; font-family: "Courier New", courier, monospace; font-size: 8pt; direction: ltr; background-color: rgb(244, 244, 244);'> type: <span style="color: rgb(0, 96, 128);">"page"</span></pre><pre style='margin: 0em; padding: 0px; width: 100%; text-align: left; color: black; line-height: 12pt; overflow: visible; font-family: "Courier New", courier, monospace; font-size: 8pt; direction: ltr; background-color: white;'> }</pre><pre style='margin: 0em; padding: 0px; width: 100%; text-align: left; color: black; line-height: 12pt; overflow: visible; font-family: "Courier New", courier, monospace; font-size: 8pt; direction: ltr; background-color: rgb(244, 244, 244);'> {</pre><pre style='margin: 0em; padding: 0px; width: 100%; text-align: left; color: black; line-height: 12pt; overflow: visible; font-family: "Courier New", courier, monospace; font-size: 8pt; direction: ltr; background-color: white;'> pageid: 22328159</pre><pre style='margin: 0em; padding: 0px; width: 100%; text-align: left; color: black; line-height: 12pt; overflow: visible; font-family: "Courier New", courier, monospace; font-size: 8pt; direction: ltr; background-color: rgb(244, 244, 244);'> ns: 0</pre><pre style='margin: 0em; padding: 0px; width: 100%; text-align: left; color: black; line-height: 12pt; overflow: visible; font-family: "Courier New", courier, monospace; font-size: 8pt; direction: ltr; background-color: white;'> title: <span style="color: rgb(0, 96, 128);">"Zombeatles"</span></pre><pre style='margin: 0em; padding: 0px; width: 100%; text-align: left; color: black; line-height: 12pt; overflow: visible; font-family: "Courier New", courier, monospace; font-size: 8pt; direction: ltr; background-color: rgb(244, 244, 244);'> type: <span style="color: rgb(0, 96, 128);">"page"</span></pre><pre style='margin: 0em; padding: 0px; width: 100%; text-align: left; color: black; line-height: 12pt; overflow: visible; font-family: "Courier New", courier, monospace; font-size: 8pt; direction: ltr; background-color: white;'> }</pre><pre style='margin: 0em; padding: 0px; width: 100%; text-align: left; color: black; line-height: 12pt; overflow: visible; font-family: "Courier New", courier, monospace; font-size: 8pt; direction: ltr; background-color: rgb(244, 244, 244);'> {</pre><pre style='margin: 0em; padding: 0px; width: 100%; text-align: left; color: black; line-height: 12pt; overflow: visible; font-family: "Courier New", courier, monospace; font-size: 8pt; direction: ltr; background-color: white;'> pageid: 34509</pre><pre style='margin: 0em; padding: 0px; width: 100%; text-align: left; color: black; line-height: 12pt; overflow: visible; font-family: "Courier New", courier, monospace; font-size: 8pt; direction: ltr; background-color: rgb(244, 244, 244);'> ns: 0</pre><pre style='margin: 0em; padding: 0px; width: 100%; text-align: left; color: black; line-height: 12pt; overflow: visible; font-family: "Courier New", courier, monospace; font-size: 8pt; direction: ltr; background-color: white;'> title: <span style="color: rgb(0, 96, 128);">"Zombie"</span></pre><pre style='margin: 0em; padding: 0px; width: 100%; text-align: left; color: black; line-height: 12pt; overflow: visible; font-family: "Courier New", courier, monospace; font-size: 8pt; direction: ltr; background-color: rgb(244, 244, 244);'> type: <span style="color: rgb(0, 96, 128);">"page"</span></pre><pre style='margin: 0em; padding: 0px; width: 100%; text-align: left; color: black; line-height: 12pt; overflow: visible; font-family: "Courier New", courier, monospace; font-size: 8pt; direction: ltr; background-color: white;'> }</pre><pre style='margin: 0em; padding: 0px; width: 100%; text-align: left; color: black; line-height: 12pt; overflow: visible; font-family: "Courier New", courier, monospace; font-size: 8pt; direction: ltr; background-color: rgb(244, 244, 244);'> {</pre><pre style='margin: 0em; padding: 0px; width: 100%; text-align: left; color: black; line-height: 12pt; overflow: visible; font-family: "Courier New", courier, monospace; font-size: 8pt; direction: ltr; background-color: white;'> pageid: 6569013</pre><pre style='margin: 0em; padding: 0px; width: 100%; text-align: left; color: black; line-height: 12pt; overflow: visible; font-family: "Courier New", courier, monospace; font-size: 8pt; direction: ltr; background-color: rgb(244, 244, 244);'> ns: 14</pre><pre style='margin: 0em; padding: 0px; width: 100%; text-align: left; color: black; line-height: 12pt; overflow: visible; font-family: "Courier New", courier, monospace; font-size: 8pt; direction: ltr; background-color: white;'> title: <span style="color: rgb(0, 96, 128);">"Category:Hoodoo"</span></pre><pre style='margin: 0em; padding: 0px; width: 100%; text-align: left; color: black; line-height: 12pt; overflow: visible; font-family: "Courier New", courier, monospace; font-size: 8pt; direction: ltr; background-color: rgb(244, 244, 244);'> type: <span style="color: rgb(0, 96, 128);">"subcat"</span></pre><pre style='margin: 0em; padding: 0px; width: 100%; text-align: left; color: black; line-height: 12pt; overflow: visible; font-family: "Courier New", courier, monospace; font-size: 8pt; direction: ltr; background-color: white;'> }</pre><pre style='margin: 0em; padding: 0px; width: 100%; text-align: left; color: black; line-height: 12pt; overflow: visible; font-family: "Courier New", courier, monospace; font-size: 8pt; direction: ltr; background-color: rgb(244, 244, 244);'> ]</pre><pre style='margin: 0em; padding: 0px; width: 100%; text-align: left; color: black; line-height: 12pt; overflow: visible; font-family: "Courier New", courier, monospace; font-size: 8pt; direction: ltr; background-color: white;'> }</pre><pre style='margin: 0em; padding: 0px; width: 100%; text-align: left; color: black; line-height: 12pt; overflow: visible; font-family: "Courier New", courier, monospace; font-size: 8pt; direction: ltr; background-color: rgb(244, 244, 244);'> query-<span style="color: rgb(0, 0, 255);">continue</span>: {</pre><pre style='margin: 0em; padding: 0px; width: 100%; text-align: left; color: black; line-height: 12pt; overflow: visible; font-family: "Courier New", courier, monospace; font-size: 8pt; direction: ltr; background-color: white;'> categorymembers: {</pre><pre style='margin: 0em; padding: 0px; width: 100%; text-align: left; color: black; line-height: 12pt; overflow: visible; font-family: "Courier New", courier, monospace; font-size: 8pt; direction: ltr; background-color: rgb(244, 244, 244);'> cmcontinue: <span style="color: rgb(0, 96, 128);">"subcat|31450932|ZOMBIES AND REVENANTS IN POPULAR CULTURE"</span></pre><pre style='margin: 0em; padding: 0px; width: 100%; text-align: left; color: black; line-height: 12pt; overflow: visible; font-family: "Courier New", courier, monospace; font-size: 8pt; direction: ltr; background-color: white;'> }</pre><pre style='margin: 0em; padding: 0px; width: 100%; text-align: left; color: black; line-height: 12pt; overflow: visible; font-family: "Courier New", courier, monospace; font-size: 8pt; direction: ltr; background-color: rgb(244, 244, 244);'> }</pre><pre style='margin: 0em; padding: 0px; width: 100%; text-align: left; color: black; line-height: 12pt; overflow: visible; font-family: "Courier New", courier, monospace; font-size: 8pt; direction: ltr; background-color: white;'>}</pre>Note that we have a new attribute called “categorymembers” instead of “allcatgories” (but the top level attribute is still “query”). We’ll definitely need a class to handle the categorymembers array returned by the call but should it go into the existing Query class?
Technically you could do it. Json will deserialize it for you and if it can match up the attribute with the C# property name (or find the property decorated with the JsonProperty attribute) it will and the other items will just be null.
It’s up to you if you want to build a special query class for each type of query. I suggest you do (you can even create a generic MediaWikiQuery<T> class that takes in things like a CategoryMember class or AllCategory class) to keep things clean. Otherwise you’re violating a few SOLID principles and laying the foundation for a God class.
For demo purposes I’ll just add the CategoryMember class to our Query class but like I said, it’s a demo only. Here’s the new CategoryMember class and the modified Query class:
public class CategoryMember
<pre style='margin: 0em; padding: 0px; width: 100%; text-align: left; color: black; line-height: 12pt; overflow: visible; font-family: "Courier New", courier, monospace; font-size: 8pt; direction: ltr; background-color: rgb(244, 244, 244);'>{</pre><pre style='margin: 0em; padding: 0px; width: 100%; text-align: left; color: black; line-height: 12pt; overflow: visible; font-family: "Courier New", courier, monospace; font-size: 8pt; direction: ltr; background-color: white;'> <span style="color: rgb(0, 0, 255);">public</span> <span style="color: rgb(0, 0, 255);">int</span> PageId { get; set; }</pre><pre style='margin: 0em; padding: 0px; width: 100%; text-align: left; color: black; line-height: 12pt; overflow: visible; font-family: "Courier New", courier, monospace; font-size: 8pt; direction: ltr; background-color: rgb(244, 244, 244);'> <span style="color: rgb(0, 0, 255);">public</span> <span style="color: rgb(0, 0, 255);">string</span> Title { get; set; }</pre><pre style='margin: 0em; padding: 0px; width: 100%; text-align: left; color: black; line-height: 12pt; overflow: visible; font-family: "Courier New", courier, monospace; font-size: 8pt; direction: ltr; background-color: white;'> <span style="color: rgb(0, 0, 255);">public</span> <span style="color: rgb(0, 0, 255);">string</span> Type { get; set; }</pre><pre style='margin: 0em; padding: 0px; width: 100%; text-align: left; color: black; line-height: 12pt; overflow: visible; font-family: "Courier New", courier, monospace; font-size: 8pt; direction: ltr; background-color: rgb(244, 244, 244);'>}</pre><pre style='margin: 0em; padding: 0px; width: 100%; text-align: left; color: black; line-height: 12pt; overflow: visible; font-family: "Courier New", courier, monospace; font-size: 8pt; direction: ltr; background-color: white;'> </pre><pre style='margin: 0em; padding: 0px; width: 100%; text-align: left; color: black; line-height: 12pt; overflow: visible; font-family: "Courier New", courier, monospace; font-size: 8pt; direction: ltr; background-color: rgb(244, 244, 244);'><span style="color: rgb(0, 0, 255);">public</span> <span style="color: rgb(0, 0, 255);">class</span> Query</pre><pre style='margin: 0em; padding: 0px; width: 100%; text-align: left; color: black; line-height: 12pt; overflow: visible; font-family: "Courier New", courier, monospace; font-size: 8pt; direction: ltr; background-color: white;'>{</pre><pre style='margin: 0em; padding: 0px; width: 100%; text-align: left; color: black; line-height: 12pt; overflow: visible; font-family: "Courier New", courier, monospace; font-size: 8pt; direction: ltr; background-color: rgb(244, 244, 244);'> [JsonProperty(<span style="color: rgb(0, 96, 128);">"allcategories"</span>)]</pre><pre style='margin: 0em; padding: 0px; width: 100%; text-align: left; color: black; line-height: 12pt; overflow: visible; font-family: "Courier New", courier, monospace; font-size: 8pt; direction: ltr; background-color: white;'> <span style="color: rgb(0, 0, 255);">public</span> Allcategory[] Categories { get; set; }</pre><pre style='margin: 0em; padding: 0px; width: 100%; text-align: left; color: black; line-height: 12pt; overflow: visible; font-family: "Courier New", courier, monospace; font-size: 8pt; direction: ltr; background-color: rgb(244, 244, 244);'> </pre><pre style='margin: 0em; padding: 0px; width: 100%; text-align: left; color: black; line-height: 12pt; overflow: visible; font-family: "Courier New", courier, monospace; font-size: 8pt; direction: ltr; background-color: white;'> [JsonProperty(<span style="color: rgb(0, 96, 128);">"categorymembers"</span>)]</pre><pre style='margin: 0em; padding: 0px; width: 100%; text-align: left; color: black; line-height: 12pt; overflow: visible; font-family: "Courier New", courier, monospace; font-size: 8pt; direction: ltr; background-color: rgb(244, 244, 244);'> <span style="color: rgb(0, 0, 255);">public</span> CategoryMember[] Pages { get; set; }</pre><pre style='margin: 0em; padding: 0px; width: 100%; text-align: left; color: black; line-height: 12pt; overflow: visible; font-family: "Courier New", courier, monospace; font-size: 8pt; direction: ltr; background-color: white;'>}</pre>Now when the DetailsPage loads we’ll figure out the index of the item based on the parameter passed in and call a new method on our MainViewModel to load the pages.
protected override void OnNavigatedTo(NavigationEventArgs e)
<pre style='margin: 0em; padding: 0px; width: 100%; text-align: left; color: black; line-height: 12pt; overflow: visible; font-family: "Courier New", courier, monospace; font-size: 8pt; direction: ltr; background-color: rgb(244, 244, 244);'>{</pre><pre style='margin: 0em; padding: 0px; width: 100%; text-align: left; color: black; line-height: 12pt; overflow: visible; font-family: "Courier New", courier, monospace; font-size: 8pt; direction: ltr; background-color: white;'> <span style="color: rgb(0, 0, 255);">string</span> selectedIndex = <span style="color: rgb(0, 96, 128);">""</span>;</pre><pre style='margin: 0em; padding: 0px; width: 100%; text-align: left; color: black; line-height: 12pt; overflow: visible; font-family: "Courier New", courier, monospace; font-size: 8pt; direction: ltr; background-color: rgb(244, 244, 244);'> <span style="color: rgb(0, 0, 255);">if</span> (NavigationContext.QueryString.TryGetValue(<span style="color: rgb(0, 96, 128);">"selectedItem"</span>, <span style="color: rgb(0, 0, 255);">out</span> selectedIndex))</pre><pre style='margin: 0em; padding: 0px; width: 100%; text-align: left; color: black; line-height: 12pt; overflow: visible; font-family: "Courier New", courier, monospace; font-size: 8pt; direction: ltr; background-color: white;'> {</pre><pre style='margin: 0em; padding: 0px; width: 100%; text-align: left; color: black; line-height: 12pt; overflow: visible; font-family: "Courier New", courier, monospace; font-size: 8pt; direction: ltr; background-color: rgb(244, 244, 244);'> <span style="color: rgb(0, 0, 255);">int</span> index = <span style="color: rgb(0, 0, 255);">int</span>.Parse(selectedIndex);</pre><pre style='margin: 0em; padding: 0px; width: 100%; text-align: left; color: black; line-height: 12pt; overflow: visible; font-family: "Courier New", courier, monospace; font-size: 8pt; direction: ltr; background-color: white;'> App.ViewModel.LoadPages(index);</pre><pre style='margin: 0em; padding: 0px; width: 100%; text-align: left; color: black; line-height: 12pt; overflow: visible; font-family: "Courier New", courier, monospace; font-size: 8pt; direction: ltr; background-color: rgb(244, 244, 244);'> DataContext = App.ViewModel.SelectedCategory;</pre><pre style='margin: 0em; padding: 0px; width: 100%; text-align: left; color: black; line-height: 12pt; overflow: visible; font-family: "Courier New", courier, monospace; font-size: 8pt; direction: ltr; background-color: white;'> }</pre><pre style='margin: 0em; padding: 0px; width: 100%; text-align: left; color: black; line-height: 12pt; overflow: visible; font-family: "Courier New", courier, monospace; font-size: 8pt; direction: ltr; background-color: rgb(244, 244, 244);'>}</pre>Note that the LoadPages method is another call to the service so we’ll probably want to create a handler in our view to handle displaying a “Loading” indicator and respond to something like a property changed event on our ViewModel to remove it. Here we’ll just the binding in the ViewModel and the page will update (eventually) with the list of pages. It’s not the UX you want to build but this post is already getting long and I’m sure you’re pretty tired reading it.
We also set the DataContext of our DetailsPage to a new property we added in the ViewModel call SelectedCategory. This way MainViewModel hangs onto whatever category the user selected so we can reference it (and it’s properties) later.
To load the pages first we’ll call out to Wikipedia to fetch them based on our category. We could pass in the title we want but here we’ll pass the index to the title and fetch it in the method:
public void LoadPages(int index)
<pre style='margin: 0em; padding: 0px; width: 100%; text-align: left; color: black; line-height: 12pt; overflow: visible; font-family: "Courier New", courier, monospace; font-size: 8pt; direction: ltr; background-color: rgb(244, 244, 244);'>{</pre><pre style='margin: 0em; padding: 0px; width: 100%; text-align: left; color: black; line-height: 12pt; overflow: visible; font-family: "Courier New", courier, monospace; font-size: 8pt; direction: ltr; background-color: white;'> SelectedCategory = Items[index];</pre><pre style='margin: 0em; padding: 0px; width: 100%; text-align: left; color: black; line-height: 12pt; overflow: visible; font-family: "Courier New", courier, monospace; font-size: 8pt; direction: ltr; background-color: rgb(244, 244, 244);'> var address =</pre><pre style='margin: 0em; padding: 0px; width: 100%; text-align: left; color: black; line-height: 12pt; overflow: visible; font-family: "Courier New", courier, monospace; font-size: 8pt; direction: ltr; background-color: white;'> <span style="color: rgb(0, 0, 255);">string</span>.Format(</pre><pre style='margin: 0em; padding: 0px; width: 100%; text-align: left; color: black; line-height: 12pt; overflow: visible; font-family: "Courier New", courier, monospace; font-size: 8pt; direction: ltr; background-color: rgb(244, 244, 244);'> <span style="color: rgb(0, 96, 128);">"http://en.wikipedia.org/w/api.php?action=query&list=categorymembers&format=json&cmtitle=Category:{0}&cmprop=type|ids|title"</span>,</pre><pre style='margin: 0em; padding: 0px; width: 100%; text-align: left; color: black; line-height: 12pt; overflow: visible; font-family: "Courier New", courier, monospace; font-size: 8pt; direction: ltr; background-color: white;'> SelectedCategory.LineOne);</pre><pre style='margin: 0em; padding: 0px; width: 100%; text-align: left; color: black; line-height: 12pt; overflow: visible; font-family: "Courier New", courier, monospace; font-size: 8pt; direction: ltr; background-color: rgb(244, 244, 244);'> var webclient = <span style="color: rgb(0, 0, 255);">new</span> WebClient();</pre><pre style='margin: 0em; padding: 0px; width: 100%; text-align: left; color: black; line-height: 12pt; overflow: visible; font-family: "Courier New", courier, monospace; font-size: 8pt; direction: ltr; background-color: white;'> webclient.DownloadStringCompleted += OnDownloadPagesCompleted;</pre><pre style='margin: 0em; padding: 0px; width: 100%; text-align: left; color: black; line-height: 12pt; overflow: visible; font-family: "Courier New", courier, monospace; font-size: 8pt; direction: ltr; background-color: rgb(244, 244, 244);'> webclient.DownloadStringAsync(<span style="color: rgb(0, 0, 255);">new</span> Uri(address));</pre><pre style='margin: 0em; padding: 0px; width: 100%; text-align: left; color: black; line-height: 12pt; overflow: visible; font-family: "Courier New", courier, monospace; font-size: 8pt; direction: ltr; background-color: white;'>}</pre>This sets up SelectedCategory based on the index we passed in and crafts the url to the MediaWiki API to fetch all pages for whatever the category is (based on the title).
Now we need to process the JSON when the download of the page list completes. For this we’re going to need a new ViewModel. Here’s a quick and dirty one that just uses the title and pageid property:
public class PageViewModel : INotifyPropertyChanged
<pre style='margin: 0em; padding: 0px; width: 100%; text-align: left; color: black; line-height: 12pt; overflow: visible; font-family: "Courier New", courier, monospace; font-size: 8pt; direction: ltr; background-color: rgb(244, 244, 244);'>{</pre><pre style='margin: 0em; padding: 0px; width: 100%; text-align: left; color: black; line-height: 12pt; overflow: visible; font-family: "Courier New", courier, monospace; font-size: 8pt; direction: ltr; background-color: white;'> <span style="color: rgb(0, 0, 255);">private</span> <span style="color: rgb(0, 0, 255);">int</span> _pageid;</pre><pre style='margin: 0em; padding: 0px; width: 100%; text-align: left; color: black; line-height: 12pt; overflow: visible; font-family: "Courier New", courier, monospace; font-size: 8pt; direction: ltr; background-color: rgb(244, 244, 244);'> <span style="color: rgb(0, 0, 255);">private</span> <span style="color: rgb(0, 0, 255);">string</span> _title;</pre><pre style='margin: 0em; padding: 0px; width: 100%; text-align: left; color: black; line-height: 12pt; overflow: visible; font-family: "Courier New", courier, monospace; font-size: 8pt; direction: ltr; background-color: white;'> </pre><pre style='margin: 0em; padding: 0px; width: 100%; text-align: left; color: black; line-height: 12pt; overflow: visible; font-family: "Courier New", courier, monospace; font-size: 8pt; direction: ltr; background-color: rgb(244, 244, 244);'> <span style="color: rgb(0, 0, 255);">public</span> <span style="color: rgb(0, 0, 255);">int</span> PageId</pre><pre style='margin: 0em; padding: 0px; width: 100%; text-align: left; color: black; line-height: 12pt; overflow: visible; font-family: "Courier New", courier, monospace; font-size: 8pt; direction: ltr; background-color: white;'> {</pre><pre style='margin: 0em; padding: 0px; width: 100%; text-align: left; color: black; line-height: 12pt; overflow: visible; font-family: "Courier New", courier, monospace; font-size: 8pt; direction: ltr; background-color: rgb(244, 244, 244);'> get { <span style="color: rgb(0, 0, 255);">return</span> _pageid; }</pre><pre style='margin: 0em; padding: 0px; width: 100%; text-align: left; color: black; line-height: 12pt; overflow: visible; font-family: "Courier New", courier, monospace; font-size: 8pt; direction: ltr; background-color: white;'> set</pre><pre style='margin: 0em; padding: 0px; width: 100%; text-align: left; color: black; line-height: 12pt; overflow: visible; font-family: "Courier New", courier, monospace; font-size: 8pt; direction: ltr; background-color: rgb(244, 244, 244);'> {</pre><pre style='margin: 0em; padding: 0px; width: 100%; text-align: left; color: black; line-height: 12pt; overflow: visible; font-family: "Courier New", courier, monospace; font-size: 8pt; direction: ltr; background-color: white;'> <span style="color: rgb(0, 0, 255);">if</span> (<span style="color: rgb(0, 0, 255);">value</span> == _pageid) <span style="color: rgb(0, 0, 255);">return</span>;</pre><pre style='margin: 0em; padding: 0px; width: 100%; text-align: left; color: black; line-height: 12pt; overflow: visible; font-family: "Courier New", courier, monospace; font-size: 8pt; direction: ltr; background-color: rgb(244, 244, 244);'> _pageid = <span style="color: rgb(0, 0, 255);">value</span>;</pre><pre style='margin: 0em; padding: 0px; width: 100%; text-align: left; color: black; line-height: 12pt; overflow: visible; font-family: "Courier New", courier, monospace; font-size: 8pt; direction: ltr; background-color: white;'> NotifyPropertyChanged(<span style="color: rgb(0, 96, 128);">"PageId"</span>);</pre><pre style='margin: 0em; padding: 0px; width: 100%; text-align: left; color: black; line-height: 12pt; overflow: visible; font-family: "Courier New", courier, monospace; font-size: 8pt; direction: ltr; background-color: rgb(244, 244, 244);'> }</pre><pre style='margin: 0em; padding: 0px; width: 100%; text-align: left; color: black; line-height: 12pt; overflow: visible; font-family: "Courier New", courier, monospace; font-size: 8pt; direction: ltr; background-color: white;'> }</pre><pre style='margin: 0em; padding: 0px; width: 100%; text-align: left; color: black; line-height: 12pt; overflow: visible; font-family: "Courier New", courier, monospace; font-size: 8pt; direction: ltr; background-color: rgb(244, 244, 244);'> </pre><pre style='margin: 0em; padding: 0px; width: 100%; text-align: left; color: black; line-height: 12pt; overflow: visible; font-family: "Courier New", courier, monospace; font-size: 8pt; direction: ltr; background-color: white;'> <span style="color: rgb(0, 0, 255);">public</span> <span style="color: rgb(0, 0, 255);">string</span> Title</pre><pre style='margin: 0em; padding: 0px; width: 100%; text-align: left; color: black; line-height: 12pt; overflow: visible; font-family: "Courier New", courier, monospace; font-size: 8pt; direction: ltr; background-color: rgb(244, 244, 244);'> {</pre><pre style='margin: 0em; padding: 0px; width: 100%; text-align: left; color: black; line-height: 12pt; overflow: visible; font-family: "Courier New", courier, monospace; font-size: 8pt; direction: ltr; background-color: white;'> get { <span style="color: rgb(0, 0, 255);">return</span> _title; }</pre><pre style='margin: 0em; padding: 0px; width: 100%; text-align: left; color: black; line-height: 12pt; overflow: visible; font-family: "Courier New", courier, monospace; font-size: 8pt; direction: ltr; background-color: rgb(244, 244, 244);'> set</pre><pre style='margin: 0em; padding: 0px; width: 100%; text-align: left; color: black; line-height: 12pt; overflow: visible; font-family: "Courier New", courier, monospace; font-size: 8pt; direction: ltr; background-color: white;'> {</pre><pre style='margin: 0em; padding: 0px; width: 100%; text-align: left; color: black; line-height: 12pt; overflow: visible; font-family: "Courier New", courier, monospace; font-size: 8pt; direction: ltr; background-color: rgb(244, 244, 244);'> <span style="color: rgb(0, 0, 255);">if</span> (<span style="color: rgb(0, 0, 255);">value</span> == _title) <span style="color: rgb(0, 0, 255);">return</span>;</pre><pre style='margin: 0em; padding: 0px; width: 100%; text-align: left; color: black; line-height: 12pt; overflow: visible; font-family: "Courier New", courier, monospace; font-size: 8pt; direction: ltr; background-color: white;'> _title = <span style="color: rgb(0, 0, 255);">value</span>;</pre><pre style='margin: 0em; padding: 0px; width: 100%; text-align: left; color: black; line-height: 12pt; overflow: visible; font-family: "Courier New", courier, monospace; font-size: 8pt; direction: ltr; background-color: rgb(244, 244, 244);'> NotifyPropertyChanged(<span style="color: rgb(0, 96, 128);">"Title"</span>);</pre><pre style='margin: 0em; padding: 0px; width: 100%; text-align: left; color: black; line-height: 12pt; overflow: visible; font-family: "Courier New", courier, monospace; font-size: 8pt; direction: ltr; background-color: white;'> }</pre><pre style='margin: 0em; padding: 0px; width: 100%; text-align: left; color: black; line-height: 12pt; overflow: visible; font-family: "Courier New", courier, monospace; font-size: 8pt; direction: ltr; background-color: rgb(244, 244, 244);'> }</pre><pre style='margin: 0em; padding: 0px; width: 100%; text-align: left; color: black; line-height: 12pt; overflow: visible; font-family: "Courier New", courier, monospace; font-size: 8pt; direction: ltr; background-color: white;'> </pre><pre style='margin: 0em; padding: 0px; width: 100%; text-align: left; color: black; line-height: 12pt; overflow: visible; font-family: "Courier New", courier, monospace; font-size: 8pt; direction: ltr; background-color: rgb(244, 244, 244);'> <span style="color: rgb(0, 0, 255);">public</span> <span style="color: rgb(0, 0, 255);">event</span> PropertyChangedEventHandler PropertyChanged;</pre><pre style='margin: 0em; padding: 0px; width: 100%; text-align: left; color: black; line-height: 12pt; overflow: visible; font-family: "Courier New", courier, monospace; font-size: 8pt; direction: ltr; background-color: white;'> <span style="color: rgb(0, 0, 255);">private</span> <span style="color: rgb(0, 0, 255);">void</span> NotifyPropertyChanged(String propertyName)</pre><pre style='margin: 0em; padding: 0px; width: 100%; text-align: left; color: black; line-height: 12pt; overflow: visible; font-family: "Courier New", courier, monospace; font-size: 8pt; direction: ltr; background-color: rgb(244, 244, 244);'> {</pre><pre style='margin: 0em; padding: 0px; width: 100%; text-align: left; color: black; line-height: 12pt; overflow: visible; font-family: "Courier New", courier, monospace; font-size: 8pt; direction: ltr; background-color: white;'> var handler = PropertyChanged;</pre><pre style='margin: 0em; padding: 0px; width: 100%; text-align: left; color: black; line-height: 12pt; overflow: visible; font-family: "Courier New", courier, monospace; font-size: 8pt; direction: ltr; background-color: rgb(244, 244, 244);'> <span style="color: rgb(0, 0, 255);">if</span> (<span style="color: rgb(0, 0, 255);">null</span> != handler)</pre><pre style='margin: 0em; padding: 0px; width: 100%; text-align: left; color: black; line-height: 12pt; overflow: visible; font-family: "Courier New", courier, monospace; font-size: 8pt; direction: ltr; background-color: white;'> {</pre><pre style='margin: 0em; padding: 0px; width: 100%; text-align: left; color: black; line-height: 12pt; overflow: visible; font-family: "Courier New", courier, monospace; font-size: 8pt; direction: ltr; background-color: rgb(244, 244, 244);'> handler(<span style="color: rgb(0, 0, 255);">this</span>, <span style="color: rgb(0, 0, 255);">new</span> PropertyChangedEventArgs(propertyName));</pre><pre style='margin: 0em; padding: 0px; width: 100%; text-align: left; color: black; line-height: 12pt; overflow: visible; font-family: "Courier New", courier, monospace; font-size: 8pt; direction: ltr; background-color: white;'> }</pre><pre style='margin: 0em; padding: 0px; width: 100%; text-align: left; color: black; line-height: 12pt; overflow: visible; font-family: "Courier New", courier, monospace; font-size: 8pt; direction: ltr; background-color: rgb(244, 244, 244);'> }</pre><pre style='margin: 0em; padding: 0px; width: 100%; text-align: left; color: black; line-height: 12pt; overflow: visible; font-family: "Courier New", courier, monospace; font-size: 8pt; direction: ltr; background-color: white;'>}</pre>We’ll display the Title to the user but the pageid needs to be stored because later we’ll want to retrieve all the details about a single page.
In the ItemViewModel (our category) we have an ObservableCollection of PageViewModel objects called Pages. This mimics the Items property in the MainViewModel. Here’s the declaration:
public ObservableCollection<PageViewModel> Pages { get; private set; }
And here’s the constructor creating them:
public ItemViewModel()<pre style='margin: 0em; padding: 0px; width: 100%; text-align: left; color: black; line-height: 12pt; overflow: visible; font-family: "Courier New", courier, monospace; font-size: 8pt; direction: ltr; background-color: rgb(244, 244, 244);'>{</pre><pre style='margin: 0em; padding: 0px; width: 100%; text-align: left; color: black; line-height: 12pt; overflow: visible; font-family: "Courier New", courier, monospace; font-size: 8pt; direction: ltr; background-color: white;'> Pages = <span style="color: rgb(0, 0, 255);">new</span> ObservableCollection<PageViewModel>();</pre><pre style='margin: 0em; padding: 0px; width: 100%; text-align: left; color: black; line-height: 12pt; overflow: visible; font-family: "Courier New", courier, monospace; font-size: 8pt; direction: ltr; background-color: rgb(244, 244, 244);'>}</pre>Back in the MainViewModel we deserialize the JSON and add the PageViewModel objects to our selected category:
private void OnDownloadPagesCompleted(object sender, DownloadStringCompletedEventArgs e)
<pre style='margin: 0em; padding: 0px; width: 100%; text-align: left; color: black; line-height: 12pt; overflow: visible; font-family: "Courier New", courier, monospace; font-size: 8pt; direction: ltr; background-color: rgb(244, 244, 244);'>{</pre><pre style='margin: 0em; padding: 0px; width: 100%; text-align: left; color: black; line-height: 12pt; overflow: visible; font-family: "Courier New", courier, monospace; font-size: 8pt; direction: ltr; background-color: white;'> var json = JsonConvert.DeserializeObject<MediaWiki>(e.Result);</pre><pre style='margin: 0em; padding: 0px; width: 100%; text-align: left; color: black; line-height: 12pt; overflow: visible; font-family: "Courier New", courier, monospace; font-size: 8pt; direction: ltr; background-color: rgb(244, 244, 244);'> <span style="color: rgb(0, 0, 255);">foreach</span> (var page <span style="color: rgb(0, 0, 255);">in</span> json.Query.Pages.Where(page => page.Type.Equals(<span style="color: rgb(0, 96, 128);">"page"</span>)))</pre><pre style='margin: 0em; padding: 0px; width: 100%; text-align: left; color: black; line-height: 12pt; overflow: visible; font-family: "Courier New", courier, monospace; font-size: 8pt; direction: ltr; background-color: white;'> {</pre><pre style='margin: 0em; padding: 0px; width: 100%; text-align: left; color: black; line-height: 12pt; overflow: visible; font-family: "Courier New", courier, monospace; font-size: 8pt; direction: ltr; background-color: rgb(244, 244, 244);'> SelectedCategory.Pages.Add(</pre><pre style='margin: 0em; padding: 0px; width: 100%; text-align: left; color: black; line-height: 12pt; overflow: visible; font-family: "Courier New", courier, monospace; font-size: 8pt; direction: ltr; background-color: white;'> <span style="color: rgb(0, 0, 255);">new</span> PageViewModel</pre><pre style='margin: 0em; padding: 0px; width: 100%; text-align: left; color: black; line-height: 12pt; overflow: visible; font-family: "Courier New", courier, monospace; font-size: 8pt; direction: ltr; background-color: rgb(244, 244, 244);'> {</pre><pre style='margin: 0em; padding: 0px; width: 100%; text-align: left; color: black; line-height: 12pt; overflow: visible; font-family: "Courier New", courier, monospace; font-size: 8pt; direction: ltr; background-color: white;'> PageId = page.PageId, </pre><pre style='margin: 0em; padding: 0px; width: 100%; text-align: left; color: black; line-height: 12pt; overflow: visible; font-family: "Courier New", courier, monospace; font-size: 8pt; direction: ltr; background-color: rgb(244, 244, 244);'> Title = page.Title</pre><pre style='margin: 0em; padding: 0px; width: 100%; text-align: left; color: black; line-height: 12pt; overflow: visible; font-family: "Courier New", courier, monospace; font-size: 8pt; direction: ltr; background-color: white;'> });</pre><pre style='margin: 0em; padding: 0px; width: 100%; text-align: left; color: black; line-height: 12pt; overflow: visible; font-family: "Courier New", courier, monospace; font-size: 8pt; direction: ltr; background-color: rgb(244, 244, 244);'> }</pre><pre style='margin: 0em; padding: 0px; width: 100%; text-align: left; color: black; line-height: 12pt; overflow: visible; font-family: "Courier New", courier, monospace; font-size: 8pt; direction: ltr; background-color: white;'>}</pre>Just like when we loaded the categories here we only select items where the page.Type is a “page”. In our Zombie example, one of the items is a “subcat”. In a real app, we would have something to handle constructing that and creating some kind of link to another category (since everything is a category, we could reuse a lot of this code for that).
The last part is changing the DetailsPage.xaml to display a list of pages. Here’s the LayoutRoot grid updated:
<Grid x:Name="LayoutRoot" Background="Transparent" d:DataContext="{Binding SelectedCategory}">
<pre style='margin: 0em; padding: 0px; width: 100%; text-align: left; color: black; line-height: 12pt; overflow: visible; font-family: "Courier New", courier, monospace; font-size: 8pt; direction: ltr; background-color: rgb(244, 244, 244);'> <span style="color: rgb(0, 0, 255);"><</span><span style="color: rgb(128, 0, 0);">Grid.RowDefinitions</span><span style="color: rgb(0, 0, 255);">></span></pre><pre style='margin: 0em; padding: 0px; width: 100%; text-align: left; color: black; line-height: 12pt; overflow: visible; font-family: "Courier New", courier, monospace; font-size: 8pt; direction: ltr; background-color: white;'> <span style="color: rgb(0, 0, 255);"><</span><span style="color: rgb(128, 0, 0);">RowDefinition</span> <span style="color: rgb(255, 0, 0);">Height</span><span style="color: rgb(0, 0, 255);">="Auto"</span><span style="color: rgb(0, 0, 255);">/></span></pre><pre style='margin: 0em; padding: 0px; width: 100%; text-align: left; color: black; line-height: 12pt; overflow: visible; font-family: "Courier New", courier, monospace; font-size: 8pt; direction: ltr; background-color: rgb(244, 244, 244);'> <span style="color: rgb(0, 0, 255);"><</span><span style="color: rgb(128, 0, 0);">RowDefinition</span> <span style="color: rgb(255, 0, 0);">Height</span><span style="color: rgb(0, 0, 255);">="*"</span><span style="color: rgb(0, 0, 255);">/></span></pre><pre style='margin: 0em; padding: 0px; width: 100%; text-align: left; color: black; line-height: 12pt; overflow: visible; font-family: "Courier New", courier, monospace; font-size: 8pt; direction: ltr; background-color: white;'> <span style="color: rgb(0, 0, 255);"></</span><span style="color: rgb(128, 0, 0);">Grid.RowDefinitions</span><span style="color: rgb(0, 0, 255);">></span></pre><pre style='margin: 0em; padding: 0px; width: 100%; text-align: left; color: black; line-height: 12pt; overflow: visible; font-family: "Courier New", courier, monospace; font-size: 8pt; direction: ltr; background-color: rgb(244, 244, 244);'> </pre><pre style='margin: 0em; padding: 0px; width: 100%; text-align: left; color: black; line-height: 12pt; overflow: visible; font-family: "Courier New", courier, monospace; font-size: 8pt; direction: ltr; background-color: white;'> <span style="color: rgb(0, 128, 0);"><!--TitlePanel contains the name of the application and page title--></span></pre><pre style='margin: 0em; padding: 0px; width: 100%; text-align: left; color: black; line-height: 12pt; overflow: visible; font-family: "Courier New", courier, monospace; font-size: 8pt; direction: ltr; background-color: rgb(244, 244, 244);'> <span style="color: rgb(0, 0, 255);"><</span><span style="color: rgb(128, 0, 0);">StackPanel</span> <span style="color: rgb(255, 0, 0);">x:Name</span><span style="color: rgb(0, 0, 255);">="TitlePanel"</span> <span style="color: rgb(255, 0, 0);">Grid</span>.<span style="color: rgb(255, 0, 0);">Row</span><span style="color: rgb(0, 0, 255);">="0"</span> <span style="color: rgb(255, 0, 0);">Margin</span><span style="color: rgb(0, 0, 255);">="12,17,0,28"</span><span style="color: rgb(0, 0, 255);">></span></pre><pre style='margin: 0em; padding: 0px; width: 100%; text-align: left; color: black; line-height: 12pt; overflow: visible; font-family: "Courier New", courier, monospace; font-size: 8pt; direction: ltr; background-color: white;'> <span style="color: rgb(0, 0, 255);"><</span><span style="color: rgb(128, 0, 0);">TextBlock</span> <span style="color: rgb(255, 0, 0);">x:Name</span><span style="color: rgb(0, 0, 255);">="PageTitle"</span> <span style="color: rgb(255, 0, 0);">Text</span><span style="color: rgb(0, 0, 255);">="MY APPLICATION"</span> <span style="color: rgb(255, 0, 0);">Style</span><span style="color: rgb(0, 0, 255);">="{StaticResource PhoneTextNormalStyle}"</span><span style="color: rgb(0, 0, 255);">/></span></pre><pre style='margin: 0em; padding: 0px; width: 100%; text-align: left; color: black; line-height: 12pt; overflow: visible; font-family: "Courier New", courier, monospace; font-size: 8pt; direction: ltr; background-color: rgb(244, 244, 244);'> <span style="color: rgb(0, 0, 255);"><</span><span style="color: rgb(128, 0, 0);">TextBlock</span> <span style="color: rgb(255, 0, 0);">x:Name</span><span style="color: rgb(0, 0, 255);">="ListTitle"</span> <span style="color: rgb(255, 0, 0);">Text</span><span style="color: rgb(0, 0, 255);">="{Binding LineOne}"</span> <span style="color: rgb(255, 0, 0);">Margin</span><span style="color: rgb(0, 0, 255);">="9,-7,0,0"</span> <span style="color: rgb(255, 0, 0);">Style</span><span style="color: rgb(0, 0, 255);">="{StaticResource PhoneTextTitle1Style}"</span><span style="color: rgb(0, 0, 255);">/></span></pre><pre style='margin: 0em; padding: 0px; width: 100%; text-align: left; color: black; line-height: 12pt; overflow: visible; font-family: "Courier New", courier, monospace; font-size: 8pt; direction: ltr; background-color: white;'> <span style="color: rgb(0, 0, 255);"></</span><span style="color: rgb(128, 0, 0);">StackPanel</span><span style="color: rgb(0, 0, 255);">></span></pre><pre style='margin: 0em; padding: 0px; width: 100%; text-align: left; color: black; line-height: 12pt; overflow: visible; font-family: "Courier New", courier, monospace; font-size: 8pt; direction: ltr; background-color: rgb(244, 244, 244);'> </pre><pre style='margin: 0em; padding: 0px; width: 100%; text-align: left; color: black; line-height: 12pt; overflow: visible; font-family: "Courier New", courier, monospace; font-size: 8pt; direction: ltr; background-color: white;'> <span style="color: rgb(0, 128, 0);"><!--ContentPanel contains details text. Place additional content here--></span></pre><pre style='margin: 0em; padding: 0px; width: 100%; text-align: left; color: black; line-height: 12pt; overflow: visible; font-family: "Courier New", courier, monospace; font-size: 8pt; direction: ltr; background-color: rgb(244, 244, 244);'> <span style="color: rgb(0, 0, 255);"><</span><span style="color: rgb(128, 0, 0);">Grid</span> <span style="color: rgb(255, 0, 0);">x:Name</span><span style="color: rgb(0, 0, 255);">="ContentPanel"</span> <span style="color: rgb(255, 0, 0);">Grid</span>.<span style="color: rgb(255, 0, 0);">Row</span><span style="color: rgb(0, 0, 255);">="1"</span> <span style="color: rgb(255, 0, 0);">Margin</span><span style="color: rgb(0, 0, 255);">="12,0,12,0"</span><span style="color: rgb(0, 0, 255);">></span></pre><pre style='margin: 0em; padding: 0px; width: 100%; text-align: left; color: black; line-height: 12pt; overflow: visible; font-family: "Courier New", courier, monospace; font-size: 8pt; direction: ltr; background-color: white;'> <span style="color: rgb(0, 0, 255);"><</span><span style="color: rgb(128, 0, 0);">TextBlock</span> <span style="color: rgb(255, 0, 0);">x:Name</span><span style="color: rgb(0, 0, 255);">="ContentText"</span> <span style="color: rgb(255, 0, 0);">Text</span><span style="color: rgb(0, 0, 255);">="{Binding LineThree}"</span> <span style="color: rgb(255, 0, 0);">TextWrapping</span><span style="color: rgb(0, 0, 255);">="Wrap"</span> <span style="color: rgb(255, 0, 0);">Style</span><span style="color: rgb(0, 0, 255);">="{StaticResource PhoneTextNormalStyle}"</span><span style="color: rgb(0, 0, 255);">/></span></pre><pre style='margin: 0em; padding: 0px; width: 100%; text-align: left; color: black; line-height: 12pt; overflow: visible; font-family: "Courier New", courier, monospace; font-size: 8pt; direction: ltr; background-color: rgb(244, 244, 244);'> <span style="color: rgb(0, 0, 255);"><</span><span style="color: rgb(128, 0, 0);">ListBox</span> <span style="color: rgb(255, 0, 0);">x:Name</span><span style="color: rgb(0, 0, 255);">="MainListBox"</span> <span style="color: rgb(255, 0, 0);">Margin</span><span style="color: rgb(0, 0, 255);">="0,0,-12,0"</span> <span style="color: rgb(255, 0, 0);">ItemsSource</span><span style="color: rgb(0, 0, 255);">="{Binding Pages}"</span> <span style="color: rgb(255, 0, 0);">SelectionChanged</span><span style="color: rgb(0, 0, 255);">="MainListBox_SelectionChanged"</span><span style="color: rgb(0, 0, 255);">></span></pre><pre style='margin: 0em; padding: 0px; width: 100%; text-align: left; color: black; line-height: 12pt; overflow: visible; font-family: "Courier New", courier, monospace; font-size: 8pt; direction: ltr; background-color: white;'> <span style="color: rgb(0, 0, 255);"><</span><span style="color: rgb(128, 0, 0);">ListBox.ItemTemplate</span><span style="color: rgb(0, 0, 255);">></span></pre><pre style='margin: 0em; padding: 0px; width: 100%; text-align: left; color: black; line-height: 12pt; overflow: visible; font-family: "Courier New", courier, monospace; font-size: 8pt; direction: ltr; background-color: rgb(244, 244, 244);'> <span style="color: rgb(0, 0, 255);"><</span><span style="color: rgb(128, 0, 0);">DataTemplate</span><span style="color: rgb(0, 0, 255);">></span></pre><pre style='margin: 0em; padding: 0px; width: 100%; text-align: left; color: black; line-height: 12pt; overflow: visible; font-family: "Courier New", courier, monospace; font-size: 8pt; direction: ltr; background-color: white;'> <span style="color: rgb(0, 0, 255);"><</span><span style="color: rgb(128, 0, 0);">StackPanel</span> <span style="color: rgb(255, 0, 0);">Margin</span><span style="color: rgb(0, 0, 255);">="0,0,0,17"</span> <span style="color: rgb(255, 0, 0);">Width</span><span style="color: rgb(0, 0, 255);">="432"</span><span style="color: rgb(0, 0, 255);">></span></pre><pre style='margin: 0em; padding: 0px; width: 100%; text-align: left; color: black; line-height: 12pt; overflow: visible; font-family: "Courier New", courier, monospace; font-size: 8pt; direction: ltr; background-color: rgb(244, 244, 244);'> <span style="color: rgb(0, 0, 255);"><</span><span style="color: rgb(128, 0, 0);">TextBlock</span> <span style="color: rgb(255, 0, 0);">Text</span><span style="color: rgb(0, 0, 255);">="{Binding Title}"</span> <span style="color: rgb(255, 0, 0);">TextWrapping</span><span style="color: rgb(0, 0, 255);">="Wrap"</span> <span style="color: rgb(255, 0, 0);">Style</span><span style="color: rgb(0, 0, 255);">="{StaticResource PhoneTextExtraLargeStyle}"</span><span style="color: rgb(0, 0, 255);">/></span></pre><pre style='margin: 0em; padding: 0px; width: 100%; text-align: left; color: black; line-height: 12pt; overflow: visible; font-family: "Courier New", courier, monospace; font-size: 8pt; direction: ltr; background-color: white;'> <span style="color: rgb(0, 0, 255);"></</span><span style="color: rgb(128, 0, 0);">StackPanel</span><span style="color: rgb(0, 0, 255);">></span></pre><pre style='margin: 0em; padding: 0px; width: 100%; text-align: left; color: black; line-height: 12pt; overflow: visible; font-family: "Courier New", courier, monospace; font-size: 8pt; direction: ltr; background-color: rgb(244, 244, 244);'> <span style="color: rgb(0, 0, 255);"></</span><span style="color: rgb(128, 0, 0);">DataTemplate</span><span style="color: rgb(0, 0, 255);">></span></pre><pre style='margin: 0em; padding: 0px; width: 100%; text-align: left; color: black; line-height: 12pt; overflow: visible; font-family: "Courier New", courier, monospace; font-size: 8pt; direction: ltr; background-color: white;'> <span style="color: rgb(0, 0, 255);"></</span><span style="color: rgb(128, 0, 0);">ListBox.ItemTemplate</span><span style="color: rgb(0, 0, 255);">></span></pre><pre style='margin: 0em; padding: 0px; width: 100%; text-align: left; color: black; line-height: 12pt; overflow: visible; font-family: "Courier New", courier, monospace; font-size: 8pt; direction: ltr; background-color: rgb(244, 244, 244);'> <span style="color: rgb(0, 0, 255);"></</span><span style="color: rgb(128, 0, 0);">ListBox</span><span style="color: rgb(0, 0, 255);">></span></pre><pre style='margin: 0em; padding: 0px; width: 100%; text-align: left; color: black; line-height: 12pt; overflow: visible; font-family: "Courier New", courier, monospace; font-size: 8pt; direction: ltr; background-color: white;'> <span style="color: rgb(0, 0, 255);"></</span><span style="color: rgb(128, 0, 0);">Grid</span><span style="color: rgb(0, 0, 255);">></span></pre><pre style='margin: 0em; padding: 0px; width: 100%; text-align: left; color: black; line-height: 12pt; overflow: visible; font-family: "Courier New", courier, monospace; font-size: 8pt; direction: ltr; background-color: rgb(244, 244, 244);'><span style="color: rgb(0, 0, 255);"></</span><span style="color: rgb(128, 0, 0);">Grid</span><span style="color: rgb(0, 0, 255);">></span></pre>The result is a details page that shows our category as the title and a listbox full of pages.

At this point you can add an additional handler to the listbox to drill down into the page itself. From there you can pluck out a list of images, links to other pages, and even the wiki content and sections.
Check the MediaWiki API for more info on getting down into all of this stuff. It’s very cool being able to poke into MediaWiki and beats the hell out of screen scraping!
A Call to Action!
This just gives you an intro to accessing a resource like Wikipedia using the public API and deserializing results via JSON into a set of classes you can use to bind to a Windows Phone 7 app. I’m going to leave the rest up to you. A few ideas to think about if you were to build on this example:
- Calling directly from the ViewModel isn’t a production practice, it was a demo only. You’ll probably want to create a MediaWikiService and inject it into your ViewModel
- The call can take a few seconds so you’lll need to handle this in your service and update the UI accordingly
- Drill down into a single page, pluck out the images and create a visual MediaWilki browser experience or something.
- You can even post content *to* a MediaWiki wiki (after you login with a username/pass that has rights to) so not only can it be a browser experience but it can be an editing experience too.
- This is just one example to use the MediaWiki API by fetching categories and page content but there are a lot of other type of queries you can make like getting a list of recent changes, comment history, or even random pages.
Use your imagination and above all, have fun. If you get stuck feel free to leave questions in the comments section and I’ll do my best to answer them.
Custom SharePoint Ribbons and Current List Item in JavaScript
I recently had to build a custom ribbon item displayed when a user viewed a list item. The ribbon button would whisk the user away to a view on another list, passing the current list item ID to the view to use as a query string filter. The secondary list has a field that references the first list (sort of a parent/child relationship).
The challenge (besides creating a Ribbon item which is a Hell unto itself) was to get the current list item ID and pass it to the view via a query string so the view could be filtered. The SP.ClientConext class in the ECMAScript Class Library for SharePoint lets you get all kinds of things like retrieving lists and even list items from SharePoint through JavaScript. I didn’t find any way to get the current list item (it’s easy to get all list items for the current list but there didn’t seem to be a property like SP.ListItem.get_current()). Maybe I overlooked it.
After posting a few pleas for help on Twitter (including one dude who told me to go trolling Stack Overflow because “several MVPs frequent” there, to which I replied “Yes I know. I’m one of them.”) I caved in and posted the question on Stack Overflow (well, the recently promoted SharePoint site on StackExchange).
It got a few answers but nothing that really worked for my situation. Remember, I want to a) create a custom ribbon item that links to another view on another list and b) pass along the id of the current list item to that view for filtering (via a query string). Finally I stumbled over the answer buried deep on MSDN.
So here’s the effect we’re going after. A ribbon button on the display form of a list item that links to an associated view:

The Custom Group contains a series of Buttons, each of which links to a view in another list. Each view was created with a custom filter to only show items where a field in that list matched the value passed in.
Normally you would open the list view in SharePoint designer, select the DataView and add a parameter to filter on a query string value. I’ll follow up with another blog post on how to do this programmatically without opening SharePoint Designer.
When the user clicks on one of the custom buttons, we open another dialog and display that view.
Like I said there were some good answers on the question from the SharePoint community. Brage Tukkensæter posted an answer that involved a custom action that iterated through each item selected and passed it along to a dialog. The problem with this was that you needed to have the user select at least one item in the list in tabular form (I’ve turned this function off in the view) and launching from the Display Form, the SP.ListOperation.Selection property he proposes to use is blank.
Wouter van Vugt, another SharePoint MVP (Stack Overflow is just full of them), had another option. Grab the ID value from the query string of the list form and use it. That sounds like a fairly simple idea but it requires a few lines of JavaScript to grab the query string value. There are many examples on the web that you find to do this but they all require some kind of parsing, maybe some regular expressions, and it all feels awkward.
I thought about using SPServices since we had that available but it meant that I would be relying on the JavaScript to call out to SPServices to do this and all of my buttons would have to be written to pass in something unique to a JavaScript method to do this. Again, more work than I think was necessary. I have the item up on the screen so I *know* SharePoint knows what the ID is. Why is it so freakin’ hard to get it.
Well, it isn’t but it required some lucky digging and MSDN documentation from the previous version of SharePoint to surface it.
Buried on this page in MSDN is a HOWTO on adding actions to the user interface. On that page there’s a list of URL Tokens.
- ~site - Web site (SPWeb) relative link.
- ~sitecollection - site collection (SPSite) relative link.
- In addition, you can use the following tokens within a URL:
- {ItemId} - Integer ID that represents the item within a list.
- {ItemUrl} - URL of the item being acted upon. Only work for documents in libraries. [Not functional in Beta 2]
- {ListId} - GUID that represents the list.
- {SiteUrl} - URL of the Web site (SPWeb).
- {RecurrenceId} - Recurrence index. This token is not supported for use in the context menus of list items.
These are normally associated with a UrlAction element but there’s nothing to prevent you from using them in your CustomAction (in my case the CommandAction attribute of a CommandUIHandler since I was building a custom ribbon button).
So I crafted my CommandAction like this:
<CommandUIHandler CommandAction="javascript:viewDialog({ItemId});"/>I simply call my custom JavaScript method and pass it the {ItemId} token. Inside my JavaScript (which I added to my solution as another CustomAction in a mapped folder to Layouts) I have this snippet:
function viewDialog(id) {<pre style='margin: 0em; padding: 0px; width: 100%; text-align: left; color: black; line-height: 12pt; overflow: visible; font-family: "Courier New", courier, monospace; font-size: 8pt; direction: ltr; background-color: rgb(244, 244, 244);'> <span style="color: rgb(0, 0, 255);">var</span> options = { </pre><pre style='margin: 0em; padding: 0px; width: 100%; text-align: left; color: black; line-height: 12pt; overflow: visible; font-family: "Courier New", courier, monospace; font-size: 8pt; direction: ltr; background-color: white;'> url: <span style="color: rgb(0, 96, 128);">"/sitename/Lists/ListName/ViewName.aspx?ID="</span> + id, </pre><pre style='margin: 0em; padding: 0px; width: 100%; text-align: left; color: black; line-height: 12pt; overflow: visible; font-family: "Courier New", courier, monospace; font-size: 8pt; direction: ltr; background-color: rgb(244, 244, 244);'> width: 800, </pre><pre style='margin: 0em; padding: 0px; width: 100%; text-align: left; color: black; line-height: 12pt; overflow: visible; font-family: "Courier New", courier, monospace; font-size: 8pt; direction: ltr; background-color: white;'> height: 600, </pre><pre style='margin: 0em; padding: 0px; width: 100%; text-align: left; color: black; line-height: 12pt; overflow: visible; font-family: "Courier New", courier, monospace; font-size: 8pt; direction: ltr; background-color: rgb(244, 244, 244);'> }; </pre><pre style='margin: 0em; padding: 0px; width: 100%; text-align: left; color: black; line-height: 12pt; overflow: visible; font-family: "Courier New", courier, monospace; font-size: 8pt; direction: ltr; background-color: white;'> </pre><pre style='margin: 0em; padding: 0px; width: 100%; text-align: left; color: black; line-height: 12pt; overflow: visible; font-family: "Courier New", courier, monospace; font-size: 8pt; direction: ltr; background-color: rgb(244, 244, 244);'> SP.UI.ModalDialog.showModalDialog(options);</pre><pre style='margin: 0em; padding: 0px; width: 100%; text-align: left; color: black; line-height: 12pt; overflow: visible; font-family: "Courier New", courier, monospace; font-size: 8pt; direction: ltr; background-color: white;'>}</pre>This takes in an id as a parameter (the {ItemId} token) and builds up the options to pass to the showModalDialog method on the SP.UI object.
The result is a custom button that links to another view passing it the id for the current item.
What’s sad is that it was a bugger trying to find that piece of knowledge. A few people have written short blogs on it but it’s not very discoverable. The 2010 version of the MSDN documentation doesn’t include the URL Token section and frankly its misplaced IMHO. It seems you can use these tokens on any custom action whether it’s a UrlAction or CommandAction. I’m sure there are other uses for it and it’ll be handy in the future.
Hopefully I didn’t kill any kitten or unicorns (or worse, zombies) in answering my own question on Stack Overflow.
If the universe explodes later you’ll know why and you can freely blame me. In the meantime, enjoy this snippet of knowledge.
SharePoint Server 2010 Windows Phone 7 Mobile Edition
It’s wonderful to end the week with two of my favorite passions, SharePoint and Windows Phone 7. The last few months I’ve been working on a special project that you can install on your Windows Phone 7 starting today.
SharePoint Server 2010 running on Windows Phone 7.
That’s right. Now you no longer need an IT shop to use SharePoint. You can just deploy it on your own phone and decide how to run it.


Why would anyone deploy a server to your phone? Several reasons but mostly it’s because you can totally control your entire SharePoint environment even if you’re out of the office or offline.
Scott Haack, Senior Principle Program Manager in Bellevue, Oregon said this about why this project came about:
“It’s about choices. SharePoint Server 2010 on the mobile platform allows users to have choices about who runs their IT systems and decides how the system is configured without having to go through complicated business processes.”
It’s all about competition too. Here’s what Phil Haanselman, Principle Platform Program Manager in Portland, Washington says about the platform:
“With SharePoint Server 2010 on the Windows Phone 7 this pushes the platform to the edge and beyond. There is nothing like this on the iOS or WebOS and nobody is thinking in this space. It’s going to be game changing.”
Bringing the Pieces Together
I knew it was going to be a big job but I was up for it. There were so many pieces to get co-ordinated and I knew I would have a few challenges along the way. Here’s what it took to bring it all together.
IIS Express to the Rescue
Back in June when Scott Guthrie announced IIS Express I got thinking about SharePoint and the Mobile user. Wouldn’t it be great if they could run SharePoint on their phones! I knew Windows Phone 7 was coming up as I was currently in the beta and building Silverlight apps already. I knew SharePoint would run on Window 7 so why not combine the best of both worlds.
IIS Express is a lightweight component that weighs in at under 10mb. It also does not require administrative access to run applications and has a full feature set including SSL, URL Rewrite, and other IIS 7.x modules. All packaged together that can be run from a single location and does not require any registration/configuration steps.
It seemed like IIS Express was perfect to run on WP7.
NoDo Delays
Getting IIS Express onto the phone was going to be a bit of a challenge however with some work and co-ordination with high ranking figures at Microsoft I was able to get it to compile down into a single DLL file.
To get it onto the phone I worked with top people on the Windows Phone team and packaged IIS Express into the next update, the infamous NoDo release. So as of right now, anyone with NoDo installed actually has web server available to them. There were several other updates we packaged into NoDo that were put there for SharePoint Server to run (mostly around Kerberos ticket support and background processing).
So as a result this was the primary reason why NoDo was delayed. I do apologize to the community for the NoDo delays, but now you know the reason. It was so mobile users could run SharePoint.
Getting past the NoDo release the Windows Phone 7 was now ready and enabled for serving up .aspx pages and SharePoint.
Redesigning Central Administration
The biggest challenge was having to rebuild the Central Administration site to work with the Metro look and feel. It was a lot of work but we’ve built all the screens as new using the Windows Phone 7 controls. This was done so you have good touch targets to hit. In early betas, we were just using the out of the box Central Admin web pages but it was hard to click on things and I was always zooming in and out. So I built the Metro screens to make it easier for you to work with Central Admin.
Everything is all there and hopefully organized in a good way so you won’t be totally thrown back when using the WP7 version of SharePoint. Here’s Central Admin running on WP7.


The Metro Way
With the Metro overhaul of Central Admin we wired everything back up. Using MVVM was key in being able to have the UI respond to what you did so it was easy to show real-time information about the server.
Here’s how you can create a new Web Application with Central Admin on the Windows Phone 7
First select Web Applications from Application Management pivot. You’ll see this menu

Now click on Manage web applications. We couldn’t implement the Ribbon in Windows Phone 7 so from the list select Create New Web Application. You’ll be presented with a data entry screen to enter all the information for your new web app:

All of the options are there just like the current release of SharePoint. Unfortunately due to some last minute problems and trying to get this done by the end of the week we were not able to include Claims Based Authentication so only Classic Mode is available. Anyone would be a Fool to try to deliver something in April without testing it so this was why this decision was made.
Complete Feature Set, Almost
Not exactly. As I said we don’t support Claims Based Authentication and there are few other features in SharePoint 2010 we don’t support. Here’s a list of the current restrictions. These have been left out either due to time constraints or technical limitations on the phone platform. A few of these features will be available in the Mango release of Windows Phone 7 due out sometime in 2012.
- Kerberos. Kerberos support is not fully implemented so it’s suggested to keep web sites running under NTLM (most of the system works under Kerberos but without a true integrated authentication on the Windows Phone 7 not everything works, yet)
- Content Deployment. This isn’t implemented at all in this release due to time constraints. It’s planned for a future release. Hopefully this doesn’t hinder people too much.
- InfoPath Forms Services. This was tricky but with some clever coding, we’re able to convert, on the fly InfoPath forms into Windows Phone 7 controls. However in some last minute testing we found that InfoPath forms with complex rules breaks the model. Simple forms work, complex forms will be delivered in Service Pack 1 due out later in the year.
- Define blocked file types. Unfortunately as we don’t have complete control over access to the Windows Phone 7 sub-systems (like the registry) so we’re unable to control blocked file types. No word on when this feature might be available.
Leveraging the Phone
This release doesn’t just allow you to run SharePoint Server on your phone but we’ve also leveraged specific features of the WP7 platform as well. For example you can now hook up SharePoint Picture Libraries to the Windows Phone 7 Media Library and any picture taken on the your phone can instantly be available to anyone browsing the site.
The other big integration point is Geolocation. Windows Phone 7 devices all have a built-in GPS. SharePoint Server 2010 leverages this by geotagging any content. A new feature in Document Libraries allows users to geotag documents with location information which can then be used to filter documents and lists based on locality and even plot document creation locations on a Bing Map using the built-in Bing Map Controls.
It’s really up to the SharePoint web part developer to figure out how best to leverage these new capabilities. Like it was said before, this is game changing.
Availability
Most importantly when can you get this?
Right now!
Download the .xap file here directly and you can instantly sideload it onto your Windows Phone 7 (developer unlock required). If you’re not a developer then you’ll have to wait for the app to make it through Marketplace Certification which should be any day now.
You do require the NoDo update to be able to run SharePoint Server 2010 on your phone so please make sure you have that installed first. The software will detect if IIS Express is installed or not and unfortunately fail if you don’t have the update yet.
The software will be released on CodePlex in the next while under the Apache License so anyone can contribute to it. Please contact me offline if you’re interested.
After MIX11 we’ll be making the server available as a NuGet package that can be deployed anywhere without the need to access the Windows Phone Marketplace. Stay tuned for news on this.
Many Thanks
Many thanks to all the wonderful people that made this project possible. Without their co-operation we wouldn’t be where we are today:
- Geoffrey Chaucer
- Eduard de Dene
- John Aubrey
- Sizdah Bedar
- Joseph Boskin
Using the Builder Pattern To Create SharePoint Lists
In building out a custom solution I get tired of writing procedural code to create a list, add the columns, setup the views, and add some initial data. Many moons ago I decided to follow a creational design pattern called the Builder pattern. This pattern separates the construction of a complex object from it’s representation so that the same process can create different representations. Basically, let’s build a bunch of custom lists using OO instead of repetitive procedural-like code. Here’s how.
First let’s take a look at the Builder pattern. Here it in UML form for visual dudes:

Pretty straight forward. The principle here is that all concrete objects will adhere to a contract (the Builder) and implement the specific way they need to build things while the Director handles the correct sequence of object creation.
This suites Lists pretty nicely in SharePoint. A list needs to be created via the SPWeb it lives in, it needs fields added to it, views setup, and items added to the finished list.
Okay, time for some code.
First here’s our abstract ListBuilder. All implementations of creating a new list will inherit from this. It provides abstract methods that make up all the parts of a list (fields, views, items, and the list itself).
public abstract class ListBuilder
<pre style='margin: 0em; padding: 0px; width: 100%; text-align: left; color: black; line-height: 12pt; overflow: visible; font-family: "Courier New", courier, monospace; font-size: 8pt; direction: ltr; background-color: rgb(244, 244, 244);'>{</pre><pre style='margin: 0em; padding: 0px; width: 100%; text-align: left; color: black; line-height: 12pt; overflow: visible; font-family: "Courier New", courier, monospace; font-size: 8pt; direction: ltr; background-color: white;'> <span style="color: rgb(0, 0, 255);">protected</span> SPList TheList {get; set;}</pre><pre style='margin: 0em; padding: 0px; width: 100%; text-align: left; color: black; line-height: 12pt; overflow: visible; font-family: "Courier New", courier, monospace; font-size: 8pt; direction: ltr; background-color: rgb(244, 244, 244);'> <span style="color: rgb(0, 0, 255);">public</span> <span style="color: rgb(0, 0, 255);">abstract</span> <span style="color: rgb(0, 0, 255);">void</span> CreateList(SPWeb web);</pre><pre style='margin: 0em; padding: 0px; width: 100%; text-align: left; color: black; line-height: 12pt; overflow: visible; font-family: "Courier New", courier, monospace; font-size: 8pt; direction: ltr; background-color: white;'> <span style="color: rgb(0, 0, 255);">public</span> <span style="color: rgb(0, 0, 255);">abstract</span> <span style="color: rgb(0, 0, 255);">void</span> CreateFields();</pre><pre style='margin: 0em; padding: 0px; width: 100%; text-align: left; color: black; line-height: 12pt; overflow: visible; font-family: "Courier New", courier, monospace; font-size: 8pt; direction: ltr; background-color: rgb(244, 244, 244);'> <span style="color: rgb(0, 0, 255);">public</span> <span style="color: rgb(0, 0, 255);">abstract</span> <span style="color: rgb(0, 0, 255);">void</span> CreateViews();</pre><pre style='margin: 0em; padding: 0px; width: 100%; text-align: left; color: black; line-height: 12pt; overflow: visible; font-family: "Courier New", courier, monospace; font-size: 8pt; direction: ltr; background-color: white;'> <span style="color: rgb(0, 0, 255);">public</span> <span style="color: rgb(0, 0, 255);">abstract</span> <span style="color: rgb(0, 0, 255);">void</span> AddInitialData();</pre><pre style='margin: 0em; padding: 0px; width: 100%; text-align: left; color: black; line-height: 12pt; overflow: visible; font-family: "Courier New", courier, monospace; font-size: 8pt; direction: ltr; background-color: rgb(244, 244, 244);'> <span style="color: rgb(0, 0, 255);">public</span> <span style="color: rgb(0, 0, 255);">abstract</span> <span style="color: rgb(0, 0, 255);">void</span> DeleteList(SPWeb web);</pre><pre style='margin: 0em; padding: 0px; width: 100%; text-align: left; color: black; line-height: 12pt; overflow: visible; font-family: "Courier New", courier, monospace; font-size: 8pt; direction: ltr; background-color: white;'>}</pre>Pretty basic stuff. We have methods to create and delete the list (which requires the SPWeb object it belongs to) and there’s methods for creating fields and views and adding some initial data (for example if you have a lookup list you’re creating and you want to seed it with some initial values).
There’s also a protected property called TheList which holds an instance of the list created. This is for adding fields and views later in the construction process. P.S. Personally I hate the property name “TheList” but “List” gets all confused with System.Generic.List types and SPList is already a SharePoint type so to avoid conflicts I picked this. I’m also lazy and didn’t want to call it SharePointList or something. Feel free to make it whatever you want.
Now that we have our abstract ListBuilder let’s create the ListDirector. This class will handle building the list by orchestrating the assembly of the pieces. It also provides outside access to create and delete the lists (which we’ll call from our feature activating/deactivating).
public class ListDirector
<pre style='margin: 0em; padding: 0px; width: 100%; text-align: left; color: black; line-height: 12pt; overflow: visible; font-family: "Courier New", courier, monospace; font-size: 8pt; direction: ltr; background-color: rgb(244, 244, 244);'>{</pre><pre style='margin: 0em; padding: 0px; width: 100%; text-align: left; color: black; line-height: 12pt; overflow: visible; font-family: "Courier New", courier, monospace; font-size: 8pt; direction: ltr; background-color: white;'> <span style="color: rgb(0, 0, 255);">private</span> <span style="color: rgb(0, 0, 255);">readonly</span> SPWeb _web;</pre><pre style='margin: 0em; padding: 0px; width: 100%; text-align: left; color: black; line-height: 12pt; overflow: visible; font-family: "Courier New", courier, monospace; font-size: 8pt; direction: ltr; background-color: rgb(244, 244, 244);'> </pre><pre style='margin: 0em; padding: 0px; width: 100%; text-align: left; color: black; line-height: 12pt; overflow: visible; font-family: "Courier New", courier, monospace; font-size: 8pt; direction: ltr; background-color: white;'> <span style="color: rgb(0, 0, 255);">public</span> ListDirector(SPWeb web)</pre><pre style='margin: 0em; padding: 0px; width: 100%; text-align: left; color: black; line-height: 12pt; overflow: visible; font-family: "Courier New", courier, monospace; font-size: 8pt; direction: ltr; background-color: rgb(244, 244, 244);'> {</pre><pre style='margin: 0em; padding: 0px; width: 100%; text-align: left; color: black; line-height: 12pt; overflow: visible; font-family: "Courier New", courier, monospace; font-size: 8pt; direction: ltr; background-color: white;'> _web = web;</pre><pre style='margin: 0em; padding: 0px; width: 100%; text-align: left; color: black; line-height: 12pt; overflow: visible; font-family: "Courier New", courier, monospace; font-size: 8pt; direction: ltr; background-color: rgb(244, 244, 244);'> }</pre><pre style='margin: 0em; padding: 0px; width: 100%; text-align: left; color: black; line-height: 12pt; overflow: visible; font-family: "Courier New", courier, monospace; font-size: 8pt; direction: ltr; background-color: white;'> </pre><pre style='margin: 0em; padding: 0px; width: 100%; text-align: left; color: black; line-height: 12pt; overflow: visible; font-family: "Courier New", courier, monospace; font-size: 8pt; direction: ltr; background-color: rgb(244, 244, 244);'> <span style="color: rgb(0, 0, 255);">public</span> <span style="color: rgb(0, 0, 255);">void</span> CreateUsing(ListBuilder builder)</pre><pre style='margin: 0em; padding: 0px; width: 100%; text-align: left; color: black; line-height: 12pt; overflow: visible; font-family: "Courier New", courier, monospace; font-size: 8pt; direction: ltr; background-color: white;'> {</pre><pre style='margin: 0em; padding: 0px; width: 100%; text-align: left; color: black; line-height: 12pt; overflow: visible; font-family: "Courier New", courier, monospace; font-size: 8pt; direction: ltr; background-color: rgb(244, 244, 244);'> builder.CreateList(_web);</pre><pre style='margin: 0em; padding: 0px; width: 100%; text-align: left; color: black; line-height: 12pt; overflow: visible; font-family: "Courier New", courier, monospace; font-size: 8pt; direction: ltr; background-color: white;'> builder.CreateFields();</pre><pre style='margin: 0em; padding: 0px; width: 100%; text-align: left; color: black; line-height: 12pt; overflow: visible; font-family: "Courier New", courier, monospace; font-size: 8pt; direction: ltr; background-color: rgb(244, 244, 244);'> builder.CreateViews();</pre><pre style='margin: 0em; padding: 0px; width: 100%; text-align: left; color: black; line-height: 12pt; overflow: visible; font-family: "Courier New", courier, monospace; font-size: 8pt; direction: ltr; background-color: white;'> builder.AddInitialData();</pre><pre style='margin: 0em; padding: 0px; width: 100%; text-align: left; color: black; line-height: 12pt; overflow: visible; font-family: "Courier New", courier, monospace; font-size: 8pt; direction: ltr; background-color: rgb(244, 244, 244);'> }</pre><pre style='margin: 0em; padding: 0px; width: 100%; text-align: left; color: black; line-height: 12pt; overflow: visible; font-family: "Courier New", courier, monospace; font-size: 8pt; direction: ltr; background-color: white;'> </pre><pre style='margin: 0em; padding: 0px; width: 100%; text-align: left; color: black; line-height: 12pt; overflow: visible; font-family: "Courier New", courier, monospace; font-size: 8pt; direction: ltr; background-color: rgb(244, 244, 244);'> <span style="color: rgb(0, 0, 255);">public</span> <span style="color: rgb(0, 0, 255);">void</span> DeleteUsing(ListBuilder builder)</pre><pre style='margin: 0em; padding: 0px; width: 100%; text-align: left; color: black; line-height: 12pt; overflow: visible; font-family: "Courier New", courier, monospace; font-size: 8pt; direction: ltr; background-color: white;'> {</pre><pre style='margin: 0em; padding: 0px; width: 100%; text-align: left; color: black; line-height: 12pt; overflow: visible; font-family: "Courier New", courier, monospace; font-size: 8pt; direction: ltr; background-color: rgb(244, 244, 244);'> builder.Delete(_web);</pre><pre style='margin: 0em; padding: 0px; width: 100%; text-align: left; color: black; line-height: 12pt; overflow: visible; font-family: "Courier New", courier, monospace; font-size: 8pt; direction: ltr; background-color: white;'> }</pre><pre style='margin: 0em; padding: 0px; width: 100%; text-align: left; color: black; line-height: 12pt; overflow: visible; font-family: "Courier New", courier, monospace; font-size: 8pt; direction: ltr; background-color: rgb(244, 244, 244);'>}</pre>The ListDirector is created using the SPWeb object (so it can tell the list builder where to create/delete lists from) and knows the order to put the pieces of the list together. This way ListBuilder (and any classes inheriting from it) don’t need to know how to orchestrate the pieces and can just work independently. You can also create special ListDirectors that do things like update lists (avoid the creation) or append data.
Armed with our abstract class and our director we head down the path of actually creating a specific list. For this sample we’ll do something really simple. A lookup list for countries and contains a name we’ll use for picking items and some internal codes for each item.
First we’ll start with the bare bones builder:
public class CountryListBuilder : ListBuilder
<pre style='margin: 0em; padding: 0px; width: 100%; text-align: left; color: black; line-height: 12pt; overflow: visible; font-family: "Courier New", courier, monospace; font-size: 8pt; direction: ltr; background-color: rgb(244, 244, 244);'>{</pre><pre style='margin: 0em; padding: 0px; width: 100%; text-align: left; color: black; line-height: 12pt; overflow: visible; font-family: "Courier New", courier, monospace; font-size: 8pt; direction: ltr; background-color: white;'> <span style="color: rgb(0, 0, 255);">public</span> <span style="color: rgb(0, 0, 255);">override</span> <span style="color: rgb(0, 0, 255);">void</span> CreateList(SPWeb web)</pre><pre style='margin: 0em; padding: 0px; width: 100%; text-align: left; color: black; line-height: 12pt; overflow: visible; font-family: "Courier New", courier, monospace; font-size: 8pt; direction: ltr; background-color: rgb(244, 244, 244);'> {</pre><pre style='margin: 0em; padding: 0px; width: 100%; text-align: left; color: black; line-height: 12pt; overflow: visible; font-family: "Courier New", courier, monospace; font-size: 8pt; direction: ltr; background-color: white;'> }</pre><pre style='margin: 0em; padding: 0px; width: 100%; text-align: left; color: black; line-height: 12pt; overflow: visible; font-family: "Courier New", courier, monospace; font-size: 8pt; direction: ltr; background-color: rgb(244, 244, 244);'> </pre><pre style='margin: 0em; padding: 0px; width: 100%; text-align: left; color: black; line-height: 12pt; overflow: visible; font-family: "Courier New", courier, monospace; font-size: 8pt; direction: ltr; background-color: white;'> <span style="color: rgb(0, 0, 255);">public</span> <span style="color: rgb(0, 0, 255);">override</span> <span style="color: rgb(0, 0, 255);">void</span> CreateFields()</pre><pre style='margin: 0em; padding: 0px; width: 100%; text-align: left; color: black; line-height: 12pt; overflow: visible; font-family: "Courier New", courier, monospace; font-size: 8pt; direction: ltr; background-color: rgb(244, 244, 244);'> {</pre><pre style='margin: 0em; padding: 0px; width: 100%; text-align: left; color: black; line-height: 12pt; overflow: visible; font-family: "Courier New", courier, monospace; font-size: 8pt; direction: ltr; background-color: white;'> }</pre><pre style='margin: 0em; padding: 0px; width: 100%; text-align: left; color: black; line-height: 12pt; overflow: visible; font-family: "Courier New", courier, monospace; font-size: 8pt; direction: ltr; background-color: rgb(244, 244, 244);'> </pre><pre style='margin: 0em; padding: 0px; width: 100%; text-align: left; color: black; line-height: 12pt; overflow: visible; font-family: "Courier New", courier, monospace; font-size: 8pt; direction: ltr; background-color: white;'> <span style="color: rgb(0, 0, 255);">public</span> <span style="color: rgb(0, 0, 255);">override</span> <span style="color: rgb(0, 0, 255);">void</span> CreateViews()</pre><pre style='margin: 0em; padding: 0px; width: 100%; text-align: left; color: black; line-height: 12pt; overflow: visible; font-family: "Courier New", courier, monospace; font-size: 8pt; direction: ltr; background-color: rgb(244, 244, 244);'> {</pre><pre style='margin: 0em; padding: 0px; width: 100%; text-align: left; color: black; line-height: 12pt; overflow: visible; font-family: "Courier New", courier, monospace; font-size: 8pt; direction: ltr; background-color: white;'> }</pre><pre style='margin: 0em; padding: 0px; width: 100%; text-align: left; color: black; line-height: 12pt; overflow: visible; font-family: "Courier New", courier, monospace; font-size: 8pt; direction: ltr; background-color: rgb(244, 244, 244);'> </pre><pre style='margin: 0em; padding: 0px; width: 100%; text-align: left; color: black; line-height: 12pt; overflow: visible; font-family: "Courier New", courier, monospace; font-size: 8pt; direction: ltr; background-color: white;'> <span style="color: rgb(0, 0, 255);">public</span> <span style="color: rgb(0, 0, 255);">override</span> <span style="color: rgb(0, 0, 255);">void</span> AddInitialData()</pre><pre style='margin: 0em; padding: 0px; width: 100%; text-align: left; color: black; line-height: 12pt; overflow: visible; font-family: "Courier New", courier, monospace; font-size: 8pt; direction: ltr; background-color: rgb(244, 244, 244);'> {</pre><pre style='margin: 0em; padding: 0px; width: 100%; text-align: left; color: black; line-height: 12pt; overflow: visible; font-family: "Courier New", courier, monospace; font-size: 8pt; direction: ltr; background-color: white;'> }</pre><pre style='margin: 0em; padding: 0px; width: 100%; text-align: left; color: black; line-height: 12pt; overflow: visible; font-family: "Courier New", courier, monospace; font-size: 8pt; direction: ltr; background-color: rgb(244, 244, 244);'> </pre><pre style='margin: 0em; padding: 0px; width: 100%; text-align: left; color: black; line-height: 12pt; overflow: visible; font-family: "Courier New", courier, monospace; font-size: 8pt; direction: ltr; background-color: white;'> <span style="color: rgb(0, 0, 255);">public</span> <span style="color: rgb(0, 0, 255);">override</span> <span style="color: rgb(0, 0, 255);">void</span> DeleteList(SPWeb web)</pre><pre style='margin: 0em; padding: 0px; width: 100%; text-align: left; color: black; line-height: 12pt; overflow: visible; font-family: "Courier New", courier, monospace; font-size: 8pt; direction: ltr; background-color: rgb(244, 244, 244);'> {</pre><pre style='margin: 0em; padding: 0px; width: 100%; text-align: left; color: black; line-height: 12pt; overflow: visible; font-family: "Courier New", courier, monospace; font-size: 8pt; direction: ltr; background-color: white;'> }</pre><pre style='margin: 0em; padding: 0px; width: 100%; text-align: left; color: black; line-height: 12pt; overflow: visible; font-family: "Courier New", courier, monospace; font-size: 8pt; direction: ltr; background-color: rgb(244, 244, 244);'>}</pre><pre style='margin: 0em; padding: 0px; width: 100%; text-align: left; color: black; line-height: 12pt; overflow: visible; font-family: "Courier New", courier, monospace; font-size: 8pt; direction: ltr; background-color: white;'> </pre>Now let’s look at each method in detail. There’s not a lot here to see because our list builder should be lightweight. Of course this completely depends on your needs so you might have something with 30 fields but the ListBuilder class should simplify things and remove redundancies for you.
First we’ll create the list. To do this we need the SPWeb object which we’ll pass in.
public override void CreateList(SPWeb web)
<pre style='margin: 0em; padding: 0px; width: 100%; text-align: left; color: black; line-height: 12pt; overflow: visible; font-family: "Courier New", courier, monospace; font-size: 8pt; direction: ltr; background-color: rgb(244, 244, 244);'>{</pre><pre style='margin: 0em; padding: 0px; width: 100%; text-align: left; color: black; line-height: 12pt; overflow: visible; font-family: "Courier New", courier, monospace; font-size: 8pt; direction: ltr; background-color: white;'> var id = web.Lists.Add(<span style="color: rgb(0, 96, 128);">"Countries"</span>, <span style="color: rgb(0, 96, 128);">"Country lookup list"</span>, SPListTemplateType.GenericList);</pre><pre style='margin: 0em; padding: 0px; width: 100%; text-align: left; color: black; line-height: 12pt; overflow: visible; font-family: "Courier New", courier, monospace; font-size: 8pt; direction: ltr; background-color: rgb(244, 244, 244);'> TheList = web.Lists[id];</pre><pre style='margin: 0em; padding: 0px; width: 100%; text-align: left; color: black; line-height: 12pt; overflow: visible; font-family: "Courier New", courier, monospace; font-size: 8pt; direction: ltr; background-color: white;'> TheList.OnQuickLaunch = <span style="color: rgb(0, 0, 255);">true</span>;</pre><pre style='margin: 0em; padding: 0px; width: 100%; text-align: left; color: black; line-height: 12pt; overflow: visible; font-family: "Courier New", courier, monospace; font-size: 8pt; direction: ltr; background-color: rgb(244, 244, 244);'> TheList.Update();</pre><pre style='margin: 0em; padding: 0px; width: 100%; text-align: left; color: black; line-height: 12pt; overflow: visible; font-family: "Courier New", courier, monospace; font-size: 8pt; direction: ltr; background-color: white;'>}</pre>Here we create a generic list, retrieve it, and update the metadata (in this case if it’s on the Quick Launch or not, but you could do things like setting the Title or other values. The call to Update() is only needed to update the metadata. If all you’re doing is adding the list then the first line is all you need.
Next we’ll add our additional fields:
public override void CreateFields()
<pre style='margin: 0em; padding: 0px; width: 100%; text-align: left; color: black; line-height: 12pt; overflow: visible; font-family: "Courier New", courier, monospace; font-size: 8pt; direction: ltr; background-color: rgb(244, 244, 244);'>{</pre><pre style='margin: 0em; padding: 0px; width: 100%; text-align: left; color: black; line-height: 12pt; overflow: visible; font-family: "Courier New", courier, monospace; font-size: 8pt; direction: ltr; background-color: white;'> TheList.Fields.Add(<span style="color: rgb(0, 96, 128);">"Code"</span>, SPFieldType.Text, <span style="color: rgb(0, 0, 255);">true</span>);</pre><pre style='margin: 0em; padding: 0px; width: 100%; text-align: left; color: black; line-height: 12pt; overflow: visible; font-family: "Courier New", courier, monospace; font-size: 8pt; direction: ltr; background-color: rgb(244, 244, 244);'> TheList.Fields.Add(<span style="color: rgb(0, 96, 128);">"Currency"</span>, SPFieldType.Text, <span style="color: rgb(0, 0, 255);">true</span>);</pre><pre style='margin: 0em; padding: 0px; width: 100%; text-align: left; color: black; line-height: 12pt; overflow: visible; font-family: "Courier New", courier, monospace; font-size: 8pt; direction: ltr; background-color: white;'>}</pre>Since we’re creating this list from a generic (custom) list we already have a title field. Here we add two new fields.
Next up is the views.
public override void CreateViews()
<pre style='margin: 0em; padding: 0px; width: 100%; text-align: left; color: black; line-height: 12pt; overflow: visible; font-family: "Courier New", courier, monospace; font-size: 8pt; direction: ltr; background-color: rgb(244, 244, 244);'>{</pre><pre style='margin: 0em; padding: 0px; width: 100%; text-align: left; color: black; line-height: 12pt; overflow: visible; font-family: "Courier New", courier, monospace; font-size: 8pt; direction: ltr; background-color: white;'> var defaultView = TheList.Views[0];</pre><pre style='margin: 0em; padding: 0px; width: 100%; text-align: left; color: black; line-height: 12pt; overflow: visible; font-family: "Courier New", courier, monospace; font-size: 8pt; direction: ltr; background-color: rgb(244, 244, 244);'> view.ViewFields.Add(<span style="color: rgb(0, 96, 128);">"Code"</span>);</pre><pre style='margin: 0em; padding: 0px; width: 100%; text-align: left; color: black; line-height: 12pt; overflow: visible; font-family: "Courier New", courier, monospace; font-size: 8pt; direction: ltr; background-color: white;'> view.ViewFields.Add(<span style="color: rgb(0, 96, 128);">"Currency"</span>);</pre><pre style='margin: 0em; padding: 0px; width: 100%; text-align: left; color: black; line-height: 12pt; overflow: visible; font-family: "Courier New", courier, monospace; font-size: 8pt; direction: ltr; background-color: rgb(244, 244, 244);'> view.Update();</pre><pre style='margin: 0em; padding: 0px; width: 100%; text-align: left; color: black; line-height: 12pt; overflow: visible; font-family: "Courier New", courier, monospace; font-size: 8pt; direction: ltr; background-color: white;'>}</pre>When a list is created a default view is created that contains the Title field. Here we grab that view then add our two custom fields to it. You could also do all kinds of things with the view like setting the sort order, adding filters or creating entirely new views.
Finally we want to seed our list with some initial data so every time our feature is activated we have some data for it.
public override void AddInitialData()
<pre style='margin: 0em; padding: 0px; width: 100%; text-align: left; color: black; line-height: 12pt; overflow: visible; font-family: "Courier New", courier, monospace; font-size: 8pt; direction: ltr; background-color: rgb(244, 244, 244);'>{</pre><pre style='margin: 0em; padding: 0px; width: 100%; text-align: left; color: black; line-height: 12pt; overflow: visible; font-family: "Courier New", courier, monospace; font-size: 8pt; direction: ltr; background-color: white;'> addItem(<span style="color: rgb(0, 96, 128);">"Canada"</span>, <span style="color: rgb(0, 96, 128);">"CAN"</span>, <span style="color: rgb(0, 96, 128);">"CDN"</span>);</pre><pre style='margin: 0em; padding: 0px; width: 100%; text-align: left; color: black; line-height: 12pt; overflow: visible; font-family: "Courier New", courier, monospace; font-size: 8pt; direction: ltr; background-color: rgb(244, 244, 244);'> addItem(<span style="color: rgb(0, 96, 128);">"United States"</span>, <span style="color: rgb(0, 96, 128);">"US"</span>, <span style="color: rgb(0, 96, 128);">"USD"</span>);</pre><pre style='margin: 0em; padding: 0px; width: 100%; text-align: left; color: black; line-height: 12pt; overflow: visible; font-family: "Courier New", courier, monospace; font-size: 8pt; direction: ltr; background-color: white;'>}</pre><pre style='margin: 0em; padding: 0px; width: 100%; text-align: left; color: black; line-height: 12pt; overflow: visible; font-family: "Courier New", courier, monospace; font-size: 8pt; direction: ltr; background-color: rgb(244, 244, 244);'> </pre><pre style='margin: 0em; padding: 0px; width: 100%; text-align: left; color: black; line-height: 12pt; overflow: visible; font-family: "Courier New", courier, monospace; font-size: 8pt; direction: ltr; background-color: white;'><span style="color: rgb(0, 0, 255);">private</span> <span style="color: rgb(0, 0, 255);">void</span> addItem(<span style="color: rgb(0, 0, 255);">string</span> title, <span style="color: rgb(0, 0, 255);">string</span> code, <span style="color: rgb(0, 0, 255);">string</span> currency)</pre><pre style='margin: 0em; padding: 0px; width: 100%; text-align: left; color: black; line-height: 12pt; overflow: visible; font-family: "Courier New", courier, monospace; font-size: 8pt; direction: ltr; background-color: rgb(244, 244, 244);'>{</pre><pre style='margin: 0em; padding: 0px; width: 100%; text-align: left; color: black; line-height: 12pt; overflow: visible; font-family: "Courier New", courier, monospace; font-size: 8pt; direction: ltr; background-color: white;'> var item = TheList.Items.Add();</pre><pre style='margin: 0em; padding: 0px; width: 100%; text-align: left; color: black; line-height: 12pt; overflow: visible; font-family: "Courier New", courier, monospace; font-size: 8pt; direction: ltr; background-color: rgb(244, 244, 244);'> item[<span style="color: rgb(0, 96, 128);">"Title"</span>] = title;</pre><pre style='margin: 0em; padding: 0px; width: 100%; text-align: left; color: black; line-height: 12pt; overflow: visible; font-family: "Courier New", courier, monospace; font-size: 8pt; direction: ltr; background-color: white;'> item[<span style="color: rgb(0, 96, 128);">"Code"</span>] = code;</pre><pre style='margin: 0em; padding: 0px; width: 100%; text-align: left; color: black; line-height: 12pt; overflow: visible; font-family: "Courier New", courier, monospace; font-size: 8pt; direction: ltr; background-color: rgb(244, 244, 244);'> item[<span style="color: rgb(0, 96, 128);">"Currency"</span>] = currency;</pre><pre style='margin: 0em; padding: 0px; width: 100%; text-align: left; color: black; line-height: 12pt; overflow: visible; font-family: "Courier New", courier, monospace; font-size: 8pt; direction: ltr; background-color: white;'> item.Update();</pre><pre style='margin: 0em; padding: 0px; width: 100%; text-align: left; color: black; line-height: 12pt; overflow: visible; font-family: "Courier New", courier, monospace; font-size: 8pt; direction: ltr; background-color: rgb(244, 244, 244);'>}</pre>Here we have a helper to add an item to the list. Adding an item requires a few steps (creating the SPItem via Add, setting the data, calling update) so it’s wrapped in a method in the class.
You might be balking at the use of hard coded values and field names and whatnot here. That’s fine. You could go ahead and assign those to constants inside the class. The point is that the field names are all contained within this one class so if you ever wanted to change them you only have to change the values here. Create constants for the field name might be a good idea too. You could also do something like read from a text or xml file in your AddInitialData method if you had a lot of data to seed (or even pull it from a resource file in the assembly).
Now we have all the parts to build up the list. Let’s call it in a feature. As we move up the ladder and away from our list builder things get dead simple. Here’s the code we have to activate the feature:
public override void FeatureActivated(SPFeatureReceiverProperties properties)
<pre style='margin: 0em; padding: 0px; width: 100%; text-align: left; color: black; line-height: 12pt; overflow: visible; font-family: "Courier New", courier, monospace; font-size: 8pt; direction: ltr; background-color: rgb(244, 244, 244);'>{</pre><pre style='margin: 0em; padding: 0px; width: 100%; text-align: left; color: black; line-height: 12pt; overflow: visible; font-family: "Courier New", courier, monospace; font-size: 8pt; direction: ltr; background-color: white;'> <span style="color: rgb(0, 0, 255);">using</span>(var web = properties.Feature.Parent <span style="color: rgb(0, 0, 255);">as</span> SPWeb)</pre><pre style='margin: 0em; padding: 0px; width: 100%; text-align: left; color: black; line-height: 12pt; overflow: visible; font-family: "Courier New", courier, monospace; font-size: 8pt; direction: ltr; background-color: rgb(244, 244, 244);'> {</pre><pre style='margin: 0em; padding: 0px; width: 100%; text-align: left; color: black; line-height: 12pt; overflow: visible; font-family: "Courier New", courier, monospace; font-size: 8pt; direction: ltr; background-color: white;'> var director = <span style="color: rgb(0, 0, 255);">new</span> ListDirector(web);</pre><pre style='margin: 0em; padding: 0px; width: 100%; text-align: left; color: black; line-height: 12pt; overflow: visible; font-family: "Courier New", courier, monospace; font-size: 8pt; direction: ltr; background-color: rgb(244, 244, 244);'> director.CreateUsing(<span style="color: rgb(0, 0, 255);">new</span> CountryListBuilder());</pre><pre style='margin: 0em; padding: 0px; width: 100%; text-align: left; color: black; line-height: 12pt; overflow: visible; font-family: "Courier New", courier, monospace; font-size: 8pt; direction: ltr; background-color: white;'> }</pre><pre style='margin: 0em; padding: 0px; width: 100%; text-align: left; color: black; line-height: 12pt; overflow: visible; font-family: "Courier New", courier, monospace; font-size: 8pt; direction: ltr; background-color: rgb(244, 244, 244);'>}</pre>Like I said. Dead simple. We pass the SPWeb object to the director (who will internally pass it along to the ListBuilder as needed) and we call the CreateUsing method passing it a new CountryListBuilder.
If we want to add new lists all we have to do is this:
- Create a new ListBuilder class inheriting from ListBuilder
- Fill in the abstract methods
- Add a new CreateUsing call in our FeatureActivated method
- Deploy
Cool huh?
Okay, so we have it build but what about getting rid of it? Just as easy.
First we need to finish our CountryListBuilder. There’s one more method we need to implement:
public override void DeleteList(SPWeb web)
<pre style='margin: 0em; padding: 0px; width: 100%; text-align: left; color: black; line-height: 12pt; overflow: visible; font-family: "Courier New", courier, monospace; font-size: 8pt; direction: ltr; background-color: rgb(244, 244, 244);'>{</pre><pre style='margin: 0em; padding: 0px; width: 100%; text-align: left; color: black; line-height: 12pt; overflow: visible; font-family: "Courier New", courier, monospace; font-size: 8pt; direction: ltr; background-color: white;'> var id = web.Lists[<span style="color: rgb(0, 96, 128);">"Countries"</span>].ID;</pre><pre style='margin: 0em; padding: 0px; width: 100%; text-align: left; color: black; line-height: 12pt; overflow: visible; font-family: "Courier New", courier, monospace; font-size: 8pt; direction: ltr; background-color: rgb(244, 244, 244);'> web.Lists.Delete(id);</pre><pre style='margin: 0em; padding: 0px; width: 100%; text-align: left; color: black; line-height: 12pt; overflow: visible; font-family: "Courier New", courier, monospace; font-size: 8pt; direction: ltr; background-color: white;'>}</pre>Now to finish off we just implement the FeatureDeactivating method:
public ovveride void FeatureDeactivating(SPFeatureReceiverProperties properties)
<pre style='margin: 0em; padding: 0px; width: 100%; text-align: left; color: black; line-height: 12pt; overflow: visible; font-family: "Courier New", courier, monospace; font-size: 8pt; direction: ltr; background-color: rgb(244, 244, 244);'>{</pre><pre style='margin: 0em; padding: 0px; width: 100%; text-align: left; color: black; line-height: 12pt; overflow: visible; font-family: "Courier New", courier, monospace; font-size: 8pt; direction: ltr; background-color: white;'> <span style="color: rgb(0, 0, 255);">using</span>(var web = properties.Feature.Parent <span style="color: rgb(0, 0, 255);">as</span> SPWeb)</pre><pre style='margin: 0em; padding: 0px; width: 100%; text-align: left; color: black; line-height: 12pt; overflow: visible; font-family: "Courier New", courier, monospace; font-size: 8pt; direction: ltr; background-color: rgb(244, 244, 244);'> {</pre><pre style='margin: 0em; padding: 0px; width: 100%; text-align: left; color: black; line-height: 12pt; overflow: visible; font-family: "Courier New", courier, monospace; font-size: 8pt; direction: ltr; background-color: white;'> var director = <span style="color: rgb(0, 0, 255);">new</span> ListDirector(web);</pre><pre style='margin: 0em; padding: 0px; width: 100%; text-align: left; color: black; line-height: 12pt; overflow: visible; font-family: "Courier New", courier, monospace; font-size: 8pt; direction: ltr; background-color: rgb(244, 244, 244);'> director.DeleteUsing(<span style="color: rgb(0, 0, 255);">new</span> CountryListBuilder());</pre><pre style='margin: 0em; padding: 0px; width: 100%; text-align: left; color: black; line-height: 12pt; overflow: visible; font-family: "Courier New", courier, monospace; font-size: 8pt; direction: ltr; background-color: white;'> }</pre><pre style='margin: 0em; padding: 0px; width: 100%; text-align: left; color: black; line-height: 12pt; overflow: visible; font-family: "Courier New", courier, monospace; font-size: 8pt; direction: ltr; background-color: rgb(244, 244, 244);'>}</pre>Just reverse of activating we call the DeleteUsing method on the director passing it a CountryListBuilder object. We really don’t have to keep the variable around and there’s little cost to creating a new object to pass it. There’s nothing unique that we have to keep around from creation. The CountryListBuilder class is just there to provide us the interace to it’s methods.
You might be thinking why do all this? Why don’t I just create the ListBuilder class and call the methods directly. Like I said, the Director abstracts away all the co-ordination you need to build the list while the list knows how to build its parts, it doesn’t necessarily know how to construct itself. This is done for reason. Maybe you want to build the list up differently depending on the environment. Or maybe you have a Director to handle creating items from scratch and another director for updating existing data (say in the Feature Upgrading event with a production site). The same pattern and classes apply, there are just different implementations to create. Also with the abstraction the ListDirector and ListBuilder provides, the code you have to maintain (and debug) in the Feature events is next to nothing and any errors can happen and be handled down where they need to be, not have to bubble up to the feature (remember you have no UI in the feature events).
So that’s it. Now I just have to create a new class for each List I want to build, inherit from ListBuilder and just add one line of code to my Feature activating/deactiving. Pretty clean and pretty quick to get up and running.
This is just *one* way of doing this. You could use other patterns that might be more appropriate (the Abstract Factory or perhaps Prototype comes to mind) but this is the one I went with and it works pretty good for me so far. Fields are more complex beasts so my CreateFields() method is sort of doing double duty by adding fields and also updating existing ones (or new ones) by setting the field lengths. This could be split out to say two methods (CreateFields and UpdateFields) or even a FieldBuilder class could be created and handled by the ListBuilder (who would act as the Director) but maybe that’s over complicating things.
I’m sure there are a lot of things that could be better in this code. Interface vs. abstract class; passing in the SPWeb as a constructor to the ListBuilder; etc. And yes, there’s no exception handling, logging, or backout in case things fail here. What if someone renamed the list? What if the list doesn’t exist when the feature is deactivated? Hey guys, it’s a blog post, not production code. Feel free however to comment and suggest improvements and alternate ideas.
Hope this helps! Happy coding.
Metro Inspiration–Designing Better Looking Apps for Windows Phone 7
Recently I had the pleasure of checking out @jeffwilcox’s newest app for the Windows Phone 7 platform called 4th & Mayor. It allows you to interact with the location-based platform called foursquare.
His app allows you to check in, take pictures, find friends, etc. Everything other mobile apps for foursquare do. In the design of the app, Jeff has really done a nice job on embracing and extending the Metro look and feel that’s prevalent on the Windows Phone 7 platform.


Inspiration
For me, I’m not even a foursquare junkie. I (still) don’t see the value in telling the world where I am at any given moment but I gave it a shot with Jeff’s app. Using his app I created an account, checked into a few places, and even became mayor of a few local hops (like the corner variety store, go me). I still think foursquare is silly, but 4th & Major made it fun for me.
Some key design features I saw in 4th & Mayor:
- Large touchable icons. Not tiny little things but big, bold 200 pixel wide images that expanded out to full size when tapped.
- Use of Accent Colour. Jeff uses it sparingly and doesn’t overdo it by setting subtitles and key information on the screens in whatever accent colour you use.
- Light and Dark. Jeff makes sure that the app still looks good in both dark and light themes and uses bold Metro like icons for types of locations (instead of say photos)
- Whitespace and Alignment. Nothing is too crowded in the design, even when there’s a lot of information to present and all the text aligns nicely so it’s not all over the place.
Enter Metro
What’s Metro? Metro is the name of the new design language created for the Windows Phone 7 interface. It’s heavily influenced by Swiss print and packaging and focusing on simplicity. You can read up more about Metro here and review the Windows Phone 7 design guide that talks about specific controls and implementation here.

Since the release Jeff has also posted what he’s calling his Metro Design Guide. It’s a checklist (of sorts) that goes through the various aspects of the Metro design fundamentals and some things he’s sharing with everyone. It’s a great read and gets you into “thinking Metro” so I encourage everyone to check it out.
So where were we? Oh yeah. After playing around with 4th & Major and checking out a few other apps (like the Rock & Snow App out of the U.K. Marketplace) I thought it would be appropriate to give my simplistic Hamurabi game a facelift, Metro style. Little tweaks here and there just to clean things up a little. Here’s how I transformed the app to the next version.
The app is pretty basic. A pivot table with various sections for playing the app, getting help, etc. and one gameplay screen where all the action takes place. Here’s version 1.0


Bland and boring. The pivot control is the out of the box one. The gameplay screen is just a portrait page with some controls on it. I did do some styling in the first version around the slider control to make it a little better. I really didn’t care for the out of the box slider as my first test user claimed they didn’t know how to use it. So I just styled it with a round button with a little gradient background to make it more prominent. Yes, it looks a little like an iPhone control but there’s no real Metro equivalent and the default implementation sucks.
Metrofication
First up I went through the entire app and cleaned up the various offsets. In Jeff’s guide, the magic number is 12 pixels. I think I have engrained into my head now. 12, 12, 12, 12. And multiples of 12 are fine too, but by default regular text is indented 12 pixels from the edge of the screen. It’s a nice number so don’t mess with it.
As you can see from the screenshots above, I’m not completely consistent in my alignment and spacing. Text overhangs various places and isn’t consistent. Also the text on the home page doesn’t seem to stand out. It’s hard to tell the difference between the titles and the descriptions (they’re larger in size but I think we can do better).
The Prime Directive
If there were a Prime Directive when building an app for WP7 this might be it. Simplicity through consistency. Stick with known styles and numbers. The default spacing is 12 pixels and while you might need some more, try to keep with that number in mind. Keep your spacing consistent throughout your entire app as well as colours and fonts. I don’t mean use the same font everywhere but I do mean to not arbitrarily space controls on the design surface.
This idea here is that when a user is looking at one app, then flipping to another it shouldn’t be a jarring user experience. Your own app pages should be consistent in their font use and spacing as well. If everyone follows some simple consistent rules (both in and out of your app) then the user benefits. The experience is consistent and while you’re totally allowed to be creative, don’t overdo it.
That is, don’t do this:

Here’s a Windows app that someone wrote which just goes to show that being unique isn’t the best experience in the world for the end user. Cluttered, multiple colours, multiple fonts. In a word, confusion just from an aesthetic sense (let alone the poor sucker who has to use this app).
Metro is like a design pattern. In software development we have all kinds of patterns. Patterns for separation of responsibility, patterns for accessing external data. If you can program it, there’s probably a pattern for it. The thing is with patterns think of them like sewing patterns. They provide a shape to cut out and some instructions on how to use them. You can follow them by the book and get a good result. It’s the people that take patterns and apply their own creativity to them that makes them stand out. This is the same with Metro. There’s no rule written in stone that says you have to use a specific font in a specific size for a panorama title. What the Windows Phone toolkit provides out of the box is a default implementation.
Pivot to Panorama
For example let’s take a look at the Panorama control. As I was cleaning up the Hamurabi app I thought it might fare better as a panorama control instead of a pivot. It’s a choice as to what control to use as the two are very similar but I follow a simple rule. If the data presented is different slices of a bigger list (for example filtered views of a large list) then a pivot might be more appropriate. If the screens are somewhat disjointed and don’t really go well together then a panorama might work. Again, no hard and fast rule here but I thought I would try a panorama control.
Here’s the default panorama control you get if you use the Microsoft template:

Simple and it works. Nothing special you need to do except replace the background image with you own.
Or is there?
For Hamurabi I didn’t want the harshness of the title that comes with the out of the box panorama control so I created a new style for the title and added it to the page:
Then instead of using the default Header property I overrode that with a custom TitleTemplate:
The result is a slightly less glaring title. It’s still a Panorama control but I like it better than the default one. The text doesn’t stand out as much and I find it more inviting. Also with the reduced font size from the default, I have a little more room for my application.

Next up were the Panorama Items. Again, here’s the default:

And again we do a little styling. Instead of a single text title I wanted to put in a subtitle and change up the font weights and sizes a bit. Here’s the new XAML styles that we’ll use in our custom item header:
And here’s the updated XAML for the Panorama Item:
And here’s the updated Panorama control from the app:

These are simple changes we’re making here. Nothing Earth shattering but they’re making a difference. I’m not saying everyone should go out and make their apps look like this but be creative. Look at your subject and think about what experience you want your user to have. Is it better to identify things with icons than words? If you’re building something common that everyone knows by sight, maybe you should use graphics for titles (or to supplement them). Again, don’t go overboard here. Look back at good examples like 4th & Mayor. It’s not littered with graphics in every corner. Use it sparingly as an accent, not as the cornerstone of your app.
After doing the initial changes I found a suitable background image for the Panorama control. As Jeff points out in his article, don’t use a Panorama control if you only have two pages (it doesn’t flow very well) and keep the number down (he recommends no more than three). I went a little overboard with mine as I had help, tips, and strategy pages. If I combine them all I could bring that number and maybe I will.
The other slight change I did was to style the default button. Again I didn’t go overboard here as I didn’t want buttons to look like WinForms apps or something. I just felt the default white border button was boring so I just used a simple gradient background and a colour that was more appropriate for the application. Hopefully it blends in a little more. Here’s some screenshots from the transformation.


A little different from the original but not by much. Here’s a summary of the UI changes I did:
- Changed from Pivot control to Panorama (new background image)
- Styled Panorama Title (smaller font; lighter opacity)
- Styled Panorama Item Header to be two lines instead of one (plus slight font and size changes)
- Styled default buttons
- More use of Accent colours sprinkled on various pages to highlight important parts
- Larger icons for game mode selection (130 pixels instead of 100)
- More consistent alignment and spacing throughout the app
All in all it took me about two hours to do all the changes (including hunting down some stock images and putzing around with the button gradient). No real investment and I think it’s an improvement over the original version. It’s still not perfect and I can see a few little tweaks here and there with margins that I need to correct. There’s also version 1.2!
So if you’re going to take anything away from this its to be creative. Don’t always just accept the norm as norm. Apply your artistic talents to your apps and with a few slight modifications you can go from bland and boring to interesting and fun. And remember to not to go crazy. Get an outside opinion. Pass your app onto others, post screenshots, etc. Above all, go out and create.
SharePoint Content and Site Editing Tips
A few content management and site editing tips for power users on this bacon flavoured unicorn morning. The theme here is keep it clean!
- Write "friendly" email addresses
- Remember it's human beings reading your content. So seeing something like "If you have questions please send an email to Corporate.Comm@mycompany.com" breaks up the readiblity. Instead just do the simple steps of writing the content in plain English and going back, highlighting the name and insert a link (note: you might have to prefix the link with mailto:first.last@yourcompany.com). It makes for a friendlier looking page and hides the ugliness that are sometimes in email addresses.
- Use friendly column and list names
- This is a big pet peeve of mine. When you first create a column or list with spaces the internal name is changed. The display name might be "My Amazing List of Animals with Large Testicles" but the internal (and link) name becomes "My_x00x20_Amazing_x00x20_List_x00x20_of_x00x20_Animals_x00x20_with_x00x20_Large_x00x20_Testicles". What's worse is if you create a publishing page named "This Website is Fueled By a Dolphin's Spleen". Not only is it incorrect grammar, but the apostrophe wreaks havoc on both the internal name for the list (with lots of crazy hex codes) as well as the hyperlink (where everything is uuencoded). Instead create the list with a distinct and compact name then go back and change it to whatever you want. The end result is a better formed name that you can both script and access in code easier.
- Keep your Views Clean
- When you add a column to a list or create a new list the default is to add it to the default view. Do everyone a favour and don't check this box! The default view of a list should be something similar to the Title field and nothing else. Keep it clean. If you want to set a defalt view that's different, go back and create one with all the fields and filtering and sorting columns you want and set it as default. It's a good idea to keep the original AllItems.aspx (note the lack of space in the filename!) easy and unfiltered. It's also a good idea to keep your column count down in views. Don't let every column be added by default and don't add every column just because you can. Create separate views for distinct responsibilities and try to keep the number of columns down to a single screen to prevent horizontal scrolling.
- Simple Navigation
- The Quick Launch is a great tool for navigating around your site but don't use the default of adding all lists to it. Uncheck that box and keep navigation simple. Create custom groupings that make sense so if you don't have a site with "Documents and Lists" but "Reports and Notices" makes more sense then do it. Also hide internal lists from the Quick Launch. For example, if most users don't need to see all the lookup tables you might have on a site don't show them. You can use audience filtering on the Quick Launch if you want to hide admin items from non-admin users so consider that as an option.
Enjoy!
WP7 Mobile Friendly WordPress Site
If you're running a WordPress site you owe it to yourself to check out WPTouch. WPTouch is a fabulous plug-in for WordPress that instantly transforms your site into a navigatable mobile friendly one.
Browse to a WordPress site and it's pretty clean. Here's my site using the default Twenty Ten theme in my Windows Phone 7 IE browser:

That's pretty good. In fact, comparing it to the site in the browser it's identical. However navigating tiny links on the site or menus can be tedius with fat fingers. Sure, mobile devices offer pinch zoom and features like that but do you really want to be constantly zooming in, panning around, and zooming back out to read content?
Andrew Woodward over at 21apps turned me onto a WordPress plugin called WPTouch this weekend so I thought I would give it a go. I have a few sites I run on WordPress and I wanted to see what it could do. Wow. What a transformation. Once you install and activate the WPTouch plugin (all from the comfort of your WordPress dashboard) your site will magically be transformed into this:

My WordPress site looks like an iPhone app! No software to install on the client, this is all magically done behind the scenes by detecting the browser and serving up an alternate theme via the plug-in.
To get it working for WP7 I had to add a quick modification to the settings. Once you're installed WPTouch and activated it (just add it through the built-in search in the WordPress dashboard, it's the first one to come up) then go to Settings > WPTouch. Scroll down to Advanced Options. There you'll see a list of currently enabled user-agents so the list is pretty full; Android, BlackBerry, iPhone, etc.
What's missing is the user agent to detect the Windows Phone 7.
Just add "iemobile" which is the lowest common denominator to the Custom user-agents box and save the settings. Visit your site with your WP7 phone and voila, everything will be right as rain.
Don't worry about navigation as it's covered by a clever menu that's created by the plugin so you'll have access to tags, categories and any part of the site:

The rest of the site looks awesome and your browser users will still continue to see the site with whatever theme you have applied. It's not perfect on WP7 as the theme is designed for iPhones but IMHO it's a far better experience than trying to tap on tiny links in a browser. Everything is big and bold, the way it should be on a mobile device.
Finally, if you do decide to add the plugin (it's free, although there is a Pro version too) then show your WPTouch pride to your desktop browser users with a decal. The guys ask you link back to the site if you do. You grab whatever size and format image you want from here.

Hope that helps and here's to a better mobile experience from your WordPress site!
P.S. The "boys" and I were discussing something like this for SharePoint. Yeah, it would be totally awesome if we had something like this which would serve up say a Metro view for WP7 phones. Not sure if it'll become a reality but food for thought.
Secret Agent Man
Just a quick one this morning as we all get started in the week. Something that comes into play (sometimes in a big way) is the user agent string your browser gives off. So for example using the User-Agent field in the request header, you can determine what browser the user is running and act accordingly.
Internet Explorer 9 modified the UA string slightly so just in case you're looking for it here are the user agent strings for IE9 (in various modes):
- Internet Explorer 9 Mode: Mozilla/5.0 (compatible; MSIE 9.0; Windows NT 6.1; WOW64; Trident/5.0)
- Internet Explorer 8 Mode: Mozilla/4.0 (compatible; MSIE 8.0; Windows NT 6.1; WOW64; Trident/4.0; SLCC2; .NET CLR 2.0.50727; .NET CLR 3.5.30729; .NET CLR 3.0.30729; MS-RTC LM 8; InfoPath.3; .NET4.0C; .NET4.0E; Zune 4.7)
- Internet Explorer 7 Mode: Mozilla/4.0 (compatible; MSIE 7.0; Windows NT 6.1; WOW64; SLCC2; .NET CLR 2.0.50727; .NET CLR 3.5.30729; .NET CLR 3.0.30729; MS-RTC LM 8; InfoPath.3; .NET4.0C; .NET4.0E; Zune 4.7)
- Internet Explorer 9 (Compatibility Mode): Mozilla/4.0 (compatible; MSIE 7.0; Windows NT 6.1; WOW64; Trident/5.0; SLCC2; .NET CLR 2.0.50727; .NET CLR 3.5.30729; .NET CLR 3.0.30729; MS-RTC LM 8; InfoPath.3; .NET4.0C; .NET4.0E; Zune 4.7)
A couple of things to note here:
- This was from a 64-bit Windows 7 client so that might account for the WOW64 in the agent string (I don't have a 32-bit client to test from)
- Various applications and platforms add to the UA string just like they do in previous IE releases. So for example you can see I have various .NET versions installed as well as Zune. You can take advantage of this by querying the UA string for compatibilities and present options accordingly to the end user.
- As applications will continue to add and modify this string you'll want to query the string for parts not the entire string. For example if you want to detect if you're coming from IE running on a Windows Phone 7 just look for "iemobile" in the user agent string
Happy hacking!
SharePoint Content Type Cheat Sheet
Principle
Any application or solution built in SharePoint must use a custom content type over adding columns to lists. The only exception to this is one-off solutions that have no life-cycle, proof-of-concepts, etc.
Creating Content Types
- Web UI. Not portable, POC only
- C# or Declarative (XML). Must deploy these as Features
Rule
Do not chagne the base XML for a Content Type after deploying. The only exception to this rule is that you can re-deploy a modified Content Type definition only after completely removing it from the environment (either programatically or by hand).
Updating Content Types
- Update and push down to child types
- Web UI. Manual for each environment. Document steps required for repeatability.
- Feature Upgrade. Preferred solution.
- C#. If you created the content type through code you might want to go this route.
- Create new modified Content Types and hide the old one. Not recommended but useful for legacy.
References
- Create Custom Content Types in SharePoint 2010 (C#)
- Content Type Definitions (XML)
- Creating Content Types (XML and C#)
- Updating Approaches
- Updating Child Content Types
Agree or disagree?
Pet Peeves with the Windows Phone 7 Marketplace
Have you ever noticed how something things just gnaw at your very being. This is the case with the WP7 marketplace, the Zune software, and the things that drive me batshit crazy with a side of fries. To go. I wanted to share.

XBox Live is Not the Centre of the Universe
Okay, it’s fine that the Zune software has an XBox live tag for games so can see them clearly but do we really need to have it shoved down our throats. On every click?
Click on Games in the marketplace:

The first thing that it defaults to on the filters on the right is XBox Live:

Okay. Fine. However if you change it (say to Paid) then click onto a title when you come back from that title is the filter still set to Paid? No. It’s back to XBox Live again.
Really? Give us a break. If you change to any filter on any other genre then click on the selected title, it doesn’t revert back to anything. It stays on the selection you picked. Let’s be fair here. The Games genre should behave just like every other one. If I pick Paid then when I come back to the list please remember that.
Double Dipping
On the subject of XBox Live titles, Microsoft (and developers who have an agreement with Microsoft to produce Live titles, which generally rules out indie game developers) is double dipping with regards to exposure of their titles.
Here’s the Puzzle and Trivia Game section on the Marketplace for XBox Live titles:

And here’s the same category filtered on Paid titles:

See the problem? Two indie titles while the rest are XBox Live ones. So while XBL has it’s filter, they also get to showcase their wares in the Paid and Free filters as well.
If you’re going to have an XBox Live filter then use it and stop pushing down indie titles until they’re off the screen (on some genres this is already the case). Free and Paid titles should be just that and not include XBox Live ones. If you’re really stoked that people can’t find the Free XBox Live titles vs. the paid ones, then create a Free XBox Live filter and a Paid XBox Live filter. I don’t think we would mind much.
Whose Trial is it Anyways?
You might notice apps in the marketplace with titles like “My Fart App Professional Lite” or “Silicon Lamb Spleen Builder Free”. When you submit and app to the marketplace it can either be free or paid. If it’s a paid app you also have the option to submit it with Trial capabilities. It’s up to you to decide what you offer in the trial version but trial versions can be purchased from within the app so after someone trys out your app (for free) and wants to unlock the Super Secret Obama Spy Ring Level, they can just go to the marketplace from your app (if you built that functionality in) and upgrade to the paid version.
However it creates a rift of sorts when it comes to visibility. Some developers go the route of the paid app with a trial version, others decide to submit *two* apps instead of one. One app is the “Free” or “Lite” verions and the other is the paid version. Why go to the hassle of submitting two apps when you can just create a trial version in the same app? Again, visibility.
There’s no way to tell Paid apps with Trial versions and ones without (it’s an option, you don’t have to provide trial versions, although I think it’s a good idea). However there is a way to see the Free apps from the Paid ones so some submit the two apps and have the Free version have links to buy the paid one (again through the Marketplace tasks in the API).
What we as developers need for visibility is a new filter. Trial. That’s it. It would simply filter on Paid apps that have trial capabilities and surface up those apps just like the free ones. If Microsoft added this filter to the marketplace, it would eliminate the need for people to submit their “Free” and “Lite” versions and make it easier for the developer not to have to maintain two systems. I mean, is it really that hard? Can’t be any more difficult than the XBox Live Filter that’s already there.
Location is Everything
The last thing on my bucket list is about location. When I launch Zune I’m running in my native location setting, Canada. What’s great is that I navigate to the Travel Tools section where I have one of my apps and behold the splendour that I see:

There are my apps in the number 1 and number 4 slot for top selling in that category. I show it to my wife to make up for the sleepless nights writing this stuff and we dance around and celebrate.
Then I change my location on my operation system to United States and re-launch Zune. WTF?

My flight app has slipped to the 10th spot (I’m only showing 4 across here out of the 7 in Zune) and my border check app that was #1 is now in the 32nd spot! End of celebration.
Not only is relevance being looked at here, I value the comments people make on may apps as do most developers. I want to respond to them and show them that I’m listening. The next version of my border app will provide multiple camera angles. However when I’m running in my native Canada location, I only see two reviews. Changing over to United States I see fourteen! While there are tools out there to provide with you a unified view, I shouldn’t have to rely on them. My own Zune desktop software should allow me to see everything.
I realize that some developers will submit an app and only target it for some locations and that’s their choice. However I shouldn’t have to jump through hoops to see what apps are ahead of mine, or see people comments and ratings.
Another proposal. Either unify the marketplace (i.e. when I’m looking at it show me everything combined) or let me choose a filter. I think the first option might be difficult as you’re trying to average out top selling apps across all markets and have to deal with some apps that have been omitted from some markets. Although I think you could come up with a set of use cases that would handle that, maybe that’s too much work. At the very least, let us developers view the markets in a drop down or something from within the Zune desktop. Having to shut down Zune, change our location, and re-launch Zune to see other perspectives is just too onerous.
A Call to Action
These are just one mans opinion. Do you agree? Disagree? Feel hungry for a bacon sandwich? Let everyone know via the comments below. Perhaps someone from Microsoft will be reading and take some of these ideas under advisement. Maybe not, but at least let’s get the word out that we really want to see some change. Egypt can do it, why not WP7 developers!
Applying Quotas Across all My Sites
Just a quick snippet this morning. If you need to apply a new quota template to all users My Sites here's a quick script to do it. Changing an existing quota is fine but if you're migrating users from another system or you just want to up everyone's storage a bit here's what you do.
- Create a new quota template. This is found in Central Admin under Application Management | Site Collections | Specify quota templates. There's already a default "Individual Quota" created you might want to create your own or have a special one for your users
- Open up the PowerShell Management Console and enter "Get-SPWebApplication". This will list all your web applications on the farm.
- To apply it to all My Sites (each site is a site collection of its own) run this script below.
1: $webapps = Get-SPWebApplication;2:3: $webapp = $webapps[4];4:5: foreach ($site in $webapp.Sites) {
6: Set-SPSite -Identity $site.url -QuotaTemplate "Your Quota Template"
7: }The first line gets all the web applications on the server. In our case, the forth one is the mysite web app (yours will probably be a different number). Just run Get-SPWebApplication from the console to figure out which one to use. You could get fancy and pipe the name to find it but I'm too lazy for that.
Then we loop through all the sites on the list using the $site.url property and pass it to the Set-SPSite cmdlet and specify the name of the our custom QuotaTemplate.
Easy. Now all users are updated with the new quota template.
Imperative vs. LINQ Performance on WP7
Jesse Liberty had a nice post presenting the concepts around imperative, LINQ and fluent programming to populate a listbox. Check out the post as it’s a great example of some foundational things every .NET programmer should know.
I was more interested in what the IL code that would be generated from imperative vs. LINQ was like and what the performance numbers are and how they differ.
The code at the instruction level is interesting but not surprising. The imperative example with it’s creating lists and loops weighs in at about 60 instructions.
1: .method private hidebysig instance void ImperativeMethod() cil managed
2: {3: .maxstack 34: .locals init (5: [0] class [mscorlib]System.Collections.Generic.IEnumerable`1<int32> someData,
6: [1] class [mscorlib]System.Collections.Generic.List`1<int32> inLoop,
7: [2] int32 n,8: [3] class [mscorlib]System.Collections.Generic.IEnumerator`1<int32> CS$5$0000,
9: [4] bool CS$4$0001)
10: L_0000: nop11: L_0001: ldc.i4.112: L_0002: ldc.i4.s 5013: L_0004: call class [mscorlib]System.Collections.Generic.IEnumerable`1<int32> [System.Core]System.Linq.Enumerable::Range(int32, int32)
14: L_0009: stloc.015: L_000a: newobj instance void [mscorlib]System.Collections.Generic.List`1<int32>::.ctor()
16: L_000f: stloc.117: L_0010: nop18: L_0011: ldloc.019: L_0012: callvirt instance class [mscorlib]System.Collections.Generic.IEnumerator`1<!0> [mscorlib]System.Collections.Generic.IEnumerable`1<int32>::GetEnumerator()
20: L_0017: stloc.321: L_0018: br.s L_003a22: L_001a: ldloc.323: L_001b: callvirt instance !0 [mscorlib]System.Collections.Generic.IEnumerator`1<int32>::get_Current()24: L_0020: stloc.225: L_0021: nop26: L_0022: ldloc.227: L_0023: ldc.i4.528: L_0024: cgt29: L_0026: ldc.i4.030: L_0027: ceq31: L_0029: stloc.s CS$4$000132: L_002b: ldloc.s CS$4$000133: L_002d: brtrue.s L_003934: L_002f: ldloc.135: L_0030: ldloc.236: L_0031: ldloc.237: L_0032: mul38: L_0033: callvirt instance void [mscorlib]System.Collections.Generic.List`1<int32>::Add(!0)
39: L_0038: nop40: L_0039: nop41: L_003a: ldloc.342: L_003b: callvirt instance bool [mscorlib]System.Collections.IEnumerator::MoveNext()
43: L_0040: stloc.s CS$4$000144: L_0042: ldloc.s CS$4$000145: L_0044: brtrue.s L_001a46: L_0046: leave.s L_005a47: L_0048: ldloc.348: L_0049: ldnull49: L_004a: ceq50: L_004c: stloc.s CS$4$000151: L_004e: ldloc.s CS$4$000152: L_0050: brtrue.s L_005953: L_0052: ldloc.354: L_0053: callvirt instance void [mscorlib]System.IDisposable::Dispose()
55: L_0058: nop56: L_0059: endfinally57: L_005a: nop58: L_005b: ldarg.059: L_005c: ldfld class [System.Windows]System.Windows.Controls.ListBox PerfTest.MainPage::LB1
60: L_0061: ldloc.161: L_0062: callvirt instance void [System.Windows]System.Windows.Controls.ItemsControl::set_ItemsSource(class [mscorlib]System.Collections.IEnumerable)
62: L_0067: nop63: L_0068: ret64: .try L_0018 to L_0048 finally handler L_0048 to L_005a
65: }66:67:Compare that to the IL generated for the LINQ version which has about half of the instructions and just gets the job done, no fluff.
1: .method private hidebysig instance void LINQMethod() cil managed
2: {3: .maxstack 44: .locals init (5: [0] class [mscorlib]System.Collections.Generic.IEnumerable`1<int32> someData,
6: [1] class [mscorlib]System.Collections.Generic.IEnumerable`1<int32> queryResult)
7: L_0000: nop8: L_0001: ldc.i4.19: L_0002: ldc.i4.s 5010: L_0004: call class [mscorlib]System.Collections.Generic.IEnumerable`1<int32> [System.Core]System.Linq.Enumerable::Range(int32, int32)
11: L_0009: stloc.012: L_000a: ldloc.013: L_000b: ldsfld class [System.Core]System.Func`2<int32, bool> PerfTest.MainPage::CS$<>9__CachedAnonymousMethodDelegate6
14: L_0010: brtrue.s L_002515: L_0012: ldnull16: L_0013: ldftn bool PerfTest.MainPage::<LINQProgramming>b__4(int32)
17: L_0019: newobj instance void [System.Core]System.Func`2<int32, bool>::.ctor(object, native int)
18: L_001e: stsfld class [System.Core]System.Func`2<int32, bool> PerfTest.MainPage::CS$<>9__CachedAnonymousMethodDelegate6
19: L_0023: br.s L_002520: L_0025: ldsfld class [System.Core]System.Func`2<int32, bool> PerfTest.MainPage::CS$<>9__CachedAnonymousMethodDelegate6
21: L_002a: call class [mscorlib]System.Collections.Generic.IEnumerable`1<!!0> [System.Core]System.Linq.Enumerable::Where<int32>(class [mscorlib]System.Collections.Generic.IEnumerable`1<!!0>, class [System.Core]System.Func`2<!!0, bool>)
22: L_002f: ldsfld class [System.Core]System.Func`2<int32, int32> PerfTest.MainPage::CS$<>9__CachedAnonymousMethodDelegate7
23: L_0034: brtrue.s L_004924: L_0036: ldnull25: L_0037: ldftn int32 PerfTest.MainPage::<LINQProgramming>b__5(int32)26: L_003d: newobj instance void [System.Core]System.Func`2<int32, int32>::.ctor(object, native int)
27: L_0042: stsfld class [System.Core]System.Func`2<int32, int32> PerfTest.MainPage::CS$<>9__CachedAnonymousMethodDelegate7
28: L_0047: br.s L_004929: L_0049: ldsfld class [System.Core]System.Func`2<int32, int32> PerfTest.MainPage::CS$<>9__CachedAnonymousMethodDelegate7
30: L_004e: call class [mscorlib]System.Collections.Generic.IEnumerable`1<!!1> [System.Core]System.Linq.Enumerable::Select<int32, int32>(class [mscorlib]System.Collections.Generic.IEnumerable`1<!!0>, class [System.Core]System.Func`2<!!0, !!1>)
31: L_0053: stloc.132: L_0054: ldarg.033: L_0055: ldfld class [System.Windows]System.Windows.Controls.ListBox PerfTest.MainPage::LB2
34: L_005a: ldloc.135: L_005b: callvirt instance void [System.Windows]System.Windows.Controls.ItemsControl::set_ItemsSource(class [mscorlib]System.Collections.IEnumerable)
36: L_0060: nop37: L_0061: ret38: }Again, not surprising here but a good indicator that you should consider using LINQ where possible. In fact if you have ReSharper installed you’ll see a squiggly (technical term) in the imperative code that says “Hey Dude, I can convert this to LINQ if you want to be c00L!” (or something like that, it’s the 2010 geek version of Clippy).
What about the fluent version? As Jon correctly pointed out in the comments, when you compare the IL for the LINQ code and the IL for the fluent code it’s the same. LINQ and the fluent interface are just syntactical sugar so you decide what you’re most comfortable with. At the end of the day they’re both the same.
Now onto the numbers. Again I expected the imperative version to be better performing than the LINQ version (before I saw the IL that was generated). Call it womanly instinct. A gut feel. Whatever. Some of the numbers are interesting though.
For Jesse’s example of 50 items, the numbers were interesting. The imperative sample clocked in at 7ms while the LINQ version completed in 4. As the number of items went up, the elapsed time didn’t necessarily climb exponentially. At 500 items they were pretty much the same and the results were similar up to about 50,000 items. After that I tried 500,000 items where the gap widened but not by much (2.2 seconds for imperative, 2.3 for LINQ). It wasn’t until I tried 5,000,000 items where things were noticeable. Imperative filled the list in 20 seconds while LINQ took 8 seconds longer (although personally I wouldn’t suggest you put 5 million items in a list unless you want your users showing up at your door with torches and pitchforks).
Here’s the table with the full results.
Method/Items </STRONG><TD vAlign="top" width="71"><STRONG>50</STRONG></TD><STRONG> </STRONG><TD vAlign="top" width="71"><STRONG>500</STRONG></TD><STRONG> </STRONG><TD vAlign="top" width="71"><STRONG>5,000</STRONG></TD><STRONG> </STRONG><TD vAlign="top" width="71"><STRONG>50,000</STRONG></TD><STRONG> </STRONG><TD vAlign="top" width="71"><STRONG>500,000</STRONG></TD><STRONG> </STRONG><TD vAlign="top" width="71"><STRONG>5,000,000</STRONG></TD> </TR> <TR> <TD vAlign="top" width="71">Imperative</TD> <TD vAlign="top" width="71">7ms</TD> <TD vAlign="top" width="71">7ms</TD> <TD vAlign="top" width="71">38ms</TD> <TD vAlign="top" width="71">223ms</TD> <TD vAlign="top" width="71">2230ms</TD> <TD vAlign="top" width="71">20974ms</TD> </TR> <TR> <TD vAlign="top" width="71">LINQ/Fluent</TD> <TD vAlign="top" width="71">4ms</TD> <TD vAlign="top" width="71">6ms</TD> <TD vAlign="top" width="71">41ms</TD> <TD vAlign="top" width="71">240ms</TD> <TD vAlign="top" width="71">2310ms</TD> <TD vAlign="top" width="71">28731ms</TD> </TR>Like I said, at the end of the day it’s not a huge difference and you really don’t want your users waiting around for 30 seconds on a mobile device filling lists. In fact if Windows Phone 7 detects you’re taking more than 10 seconds to do any one thing, it considers the app hung and shuts it down. The results here are for Windows Phone 7 but frankly they're the same for desktop and web apps so feel free to apply it generally.
From a programming perspective, choose what you like. Some LINQ statements can get pretty hairy so I usually fall back with my simple mind and write it imperatively. If you really want to impress your friends, write it old school then let ReSharper do the hard work for!
Happy programming!
Generic Pop and Push for List<T>
Here's a little snippet I use to extend a generic List class to have similar capabilites to the Stack class.
The Stack<T> class is great but it lives in its own world under System.Object. Wouldn't it be nice to have a List<T> that could do the same? Here's the code:
1: public static class ExtensionMethods
2: {3: public static T Pop<T>(this List<T> theList)
4: {5: var local = theList[theList.Count - 1];6: theList.RemoveAt(theList.Count - 1);7: return local;
8: }9:10: public static void Push<T>(this List<T> theList, T item)
11: {12: theList.Add(item);13: }14: }It's a simple extension but I've found it useful, hopefully you will too! Enjoy.
WP7 “Phantom Data” Source Possibly Revealed?
Recently there’s been rumours floating around regarding “phantom” Windows Phone 7 data being magically sent and received on the latest WP7 phones. The news has mostly been floating around twitter so I didn’t pay it much attention. The BBC Technology News picked it up so I thought I would look more into it myself seeing that we have WP7 phones and maybe there was some truth to all this (and more importantly what was the cause).
Full disclosure. I don’t have a lot of data points around this. This is from looking at a few phone logs, changing the configuration and looking back again after the change. I haven’t done a clean baseline test nor have I done testing with hundreds of phones. I leave the experience up to the reader to decide.
So I went spelunking into the phone logs to see what was up. Most providers will show you data usage, at least on a daily basis. I lucked out with the provider and plan in that they provide hourly breakdowns. Here’s a snapshot from my usage throughout one night.
Timestamp Data Usage 12:38:30 AM 2098 Kilobytes 1:30:30 AM 2 Kilobytes 2:38:30 AM 7118 Kilobytes 3:38:30 AM 6622 Kilobytes 4:38:30 AM 76 Kilobytes 5:38:30 AM 29 Kilobytes 6:38:30 AM 19 Kilobytes 7:38:30 AM 20 Kilobytes So a few observations from this data:
- Data seems to be collected on a regular basis. Looking at some other people phone logs, the times vary but it’s always hourly.
- There’s not a tremendous amount of data here (about 16 megabytes) but it seems like a lot for 7 hours
- The phone was connected to my home Wifi during this period
- Nothing was running and the phone was in a locked state
Like I said, not a lot of data but it adds up. 16MB for 7 hours = about 50MB in a 24 hour period. That’s just plain old data being collected (somewhere, somehow) and not actual usage (Marketplace, Email, Browsing, etc.). Besides, when connected to a WiFi network you shouldn’t be charged data usage from your phone company (in theory, YMMV).
After reviewing the logs I made a theory that the only thing that could possibly be sending data is the Feedback feature. With no other apps running under lock, what else could it be?
In Windows 7 under your Settings the last option is Feedback. This sends feedback to Microsoft to “help improve Windows Phone”. On this page you have three options:
- Send feedback and use my cellular data connection
- Send feedback and (presumably) use my WiFi connection
- Don’t send feedback
Knowing what I know about Microsoft, they do use the feedback data. For example some of the placement and inclusion of features in Office 2007 was based on that Feedback data that Office sends (assuming you had opted in).
However in the Privacy Statement (it’s long but a good read at least once in your life), the Phone manual, and every other source I could look at there is no information about how much data it’s planning to send, just that it’s sending some data and that “some data charges with your carrier may apply”.
Looking back at the logs, I have to wonder. 6MB at 3:30 and *then* 7MB the next hour. That’s a lot of information. And it adds up. 50MB in a 24 hour period X 30 days puts most people over a normal 1GB plan. And frankly why am I paying for a data plan only to have 80% of it chewed up by Microsoft, with no real benefit to me. If they included porn in the 50mb daily transfer I’d be okay with this, but I don’t see any new movies on my phone.
So I turned it off. Set Feedback to disabled and wait.
I waited. And waited. And generally didn’t use the phone if I could.
The next day I went back to look at the data usage logs from the time period after turning the feedback mechanism off. Here are the results.
Timestamp Data Usage 1:19:48 PM 0 Kilobytes 2:19:48 PM 0 Kilobytes 3:19:48 PM 0 Kilobytes 4:19:48 PM 678 Kilobytes (took a phone call) 5:19:48 PM 82 Kilobytes 6:19:48 PM 88 Kilobytes 7:20:30 PM 86 Kilobytes (guess they changed their reporting time) 8:20:30 PM 86 Kilobytes 9:20:30 PM 66 Kilobytes 10:20:30 PM 67 Kilobytes 11:20:30 PM 49 Kilobytes 12:20:30 AM 32 Kilobytes 1:20:30 AM 38 Kilobytes 2:20:31 AM 18 Kilobytes 3:20:31 AM 27 Kilobytes 4:20:31 AM 86 Kilobytes 5:20:31 AM 53 Kilobytes 6:20:31 AM 22 Kilobytes 7:22:15 AM 30 Kilobytes (another reporting time change) 8:22:15 AM 29 Kilobytes 9:22:15 AM 74 Kilobytes 10:22:15 AM 154 Kilobytes (phone call) 11:22:15 AM 12 Kilobytes 12:13:27 PM 49 Kilobytes 1:13:27 PM 197 Kilobytes (phone call) Quite a *drastic* change from what Feedback was turned on. I mean for a 24 hour period (sans 3 phone calls) I consumed about 1MB. Still quite a bit of transfer going on but at least it amounts to 30MB per month, not 30MB per day!
Like I said this observation is neither scientific or conclusive. You decide what to do but frankly until Microsoft makes this data transfer exempt from your data plan (like that will happen) I would just turn Feedback off. YMMV.
Do’s and Don’ts Building SharePoint Applications
SharePoint is a great platform for building quick LOB applications. Simple things from employee time trackers to server and software inventory to full blown Help Desks can be crafted up using SharePoint from just customizing Lists. No programming necessary. However there are a few tricks I’ve painfully learned over the years that you can use for your own solutions.
DO
What’s In A Name?
When you create a new list, column, or view you’ll commonly name it something like “Expense Reports”. However this has the ugly effect of creating a url to the list as “Expense%20Reports”. Or worse, an internal field name of “Expense_x0x0020_Reports” which is not only cryptic but hard to remember when you’re trying to find the column by internal name.
While “Expense Reports 2011” is user friendly, “ExpenseReports2011” is not (unless you’re a programmer). So that’s not the solution. Well, not entirely.
Instead when you create your column or list or view use the scrunched up name (I can’t think of the technical term for it right now) of “ExpenseReports2011”, “WomenAtTheOfficeThatAreMen” or “KoalaMeatIsGoodWhenBroiled”. After you’ve created it, go back and change the name to the more friendly “Silly Expense Reports That Nobody Reads”. The original internal name will be the url and code friendly one without spaces while the one used on data entry forms and view headers will be the human version.
Smart Columns
When building a view include columns that make sense. By default when you add a column the “Add to default view” is checked. Resist the urge to be lazy and leave it checked. Uncheck that puppy and decide consciously what columns should be included in the view.
Pick columns that make sense to what the user is trying to do. This means you have to talk to the user. Yes, I know. That can be trying at times and even painful. Go ahead, talk to them. You might learn something.
Find out what’s important to them and why. If they’re doing something repetitively as part of their job, try to make their life easier by including what’s most important to them. Do they really need to see the Created *and* Modified date of a document or do they just need the title and author? You’ll only find out after talking to them (or getting them drunk in a bar and leaving them in the back alley handcuffed to a garbage bin, don’t ask).
Gotta Keep it Separated
Hey, views are there for a reason. Use them. While “All Items” is a fine way to present a list of well, all items, it’s hardly sufficient to present a list of servers built before the Y2K bug hit. You’ll be scrolling the list for hours finally arriving at Page 387 of 12,591 and cursing that SharePoint guy for convincing you that putting your hardware into a list would be of any use to anyone.
Next to collecting the data, presenting it is just as important. Views are often overlooked and many times ignored or misused. They’re the way you can slice and dice the data up so that you’re not trying to consume 3,000 years of human evolution on a single web page.
Remember views can be filtered so feel free to create a view for each status or one for each operating system or one for each species of Information Worker you might be putting in that list or document library. Not only will it reduce the number of items someone sees at one time, it’ll also make the information that much more relevant.
Also remember that each view is a separate page. Use it in navigation by creating a menu on the Quick Launch to each view. The discoverability of the Views menu isn’t overly obvious and if you violate the rule of columns (see Horizontally Scrolling below) the view menu doesn’t even show up until you shuffle the scroll bar to the left. Navigation links, big giant buttons, a screaming flashing “CLICK ME NOW” will help your users find their way.
Sort It!
Views are great so we’re building nice, rich views for the user. Awesomesauce. However sort is not very discoverable by the user. For example when you’re looking at a view how do you know if it’s ascending or descending and what is it sorted on. Maybe it’s sorted using two fields so what’s that all about?
Help your users by letting them know the information they’re looking at is sorted. Maybe you name the view something appropriate like “Bogus Expense Claims Sorted By Deadbeats”. If you use the naming strategy just make sure you keep the name consistent with the description. In the previous example their better be a Deadbeat column so I can see the sort in action. Having a “Loser” column, while equally correct, is a little obtuse to the average Information Worker. Remember, they usually don’t use synonyms and even if they knew how to, it’s not immediately obvious to them that’s what you’re trying to convey.
Another option is to simply drop a Content Editor Web Part above the list and explain exactly the view they’re looking at. Each view is it’s own page so one CEWP won’t be used across the board. Be descriptive in what the user is seeing but try to keep it brief. Dumping the first chapter of I, Claudius might be informative to the data but can gobble up screen real estate and miss the point of having the list.
DO NOT
Useless Attachments
The attachments column is, in a word, useless. For the most part. Sure it indicates there’s an attachment on the list item but in the grand scheme of things that’s not overly informative. Maybe it is and by all means, if it makes sense to you include it. Colour it. Make it shine and stand like the Return of Clippy on every SharePoint list.
Without it being functional it can be boring. EndUserSharePoint.com has an article to make the son of Clippy that much more useful so feel free to head over and check out this blog post by Paul Grenier on the task (Warning code ahead! Danger Will Robinson!)
In any case, I would suggest you remove it from your views. Again if it’s important then include it but consider the jQuery solution above to make it functional. It’s added by default to views and one of things that people forget to clean up.
Horizontal Scrolling
Screen real estate is premium so building a list that contains 8,000 columns and stretches horizontally across 15 screens probably isn’t the most user friendly experience. Most users can’t figure out how to scroll vertically let alone horizontally so don’t make it even that more confusing for them. Take the Steve Krug approach in your view designs and try not to make the user think.
Again views are your friend. Consider splitting up the data into views where one view contains 10 columns and other view contains the other 10. Okay, maybe your information doesn’t work that way but humans can only process 7 pieces of data at a time, 10 at most (then their heads explode and you don’t want to clean that mess up, especially on a Friday night before the big dance).
It drives me batshit crazy when I see a view with 80 columns of data. I often ask the user “So what do you do with all this information”. The response is usually “With this data [the first 10 columns] I decide if I’m going to fire everyone, and with this data [the next 10 columns] I decide if I’m going to set the building on fire and collect the insurance”. It’s at that point I show them how to create two new views “People Who Are About To Get The Axe” and “Beach Time For The Executives”. Again, talk to your users and try to reason with them on cutting down the number of columns they see at once.
Vertical Scrolling
Another big faux pas I find is the use of multi-line comment fields in views. It’s not so bad when you have a statement like this in your view:
“I really like, oh my god, thought I was going to scream when I saw this turtle then I decided what I was going to have for dinner and frankly I hate having to work late so when I was talking to the customer I thought, oh my god, what if the customer has turtles and then it appeared to me that I really was hungry so I'm going to have lunch now.”
It’s fine if that’s the only column along with two or three others, but once you slap those 20 columns of data into the list, the comment field wraps and forms a new multi-page novel that takes up your entire screen.
Do everyone a favour and just avoid adding the column to views. Train the user to just click through to the item if they need to see the contents.
Duplicate Information
Duplication is never good. Views and great as you can group data together. For example create a view of project status reports grouped by author. Then you can see what project manager is being a dip and not submitting their report. However if you group by author do you really need the Created By field as well in the view? Or if the view is grouped by Project then Author do you need both.
Horizontal real estate is always at a premium so try not to clutter up the view with duplicate data like this. Oh yeah, if you’re scratching your head saying “But Bil, if I don’t include the Project name in the view and I have a lot of items then how do I know which one I’m looking at”. That’s a hint that your grouping is too vague or you have too much data in the view based on that criteria. Filter it down a notch, create some views, and try to keep the group down to a single screen where you can see the group header at the top of the page. Again it’s just managing the information you have.
Redundant, See Redundant
This partially relates to duplicate information and smart columns but basically remember to not include the obvious in a view. Remember, don’t make me think. If you’ve gone to the trouble (and it was a lot of trouble wasn’t it?) to create separate views of your data by creating a “September Zombie Brain Sales”, “October Zombie Brain Sales”, etc. then please for the love of all that is holy do not include the Month and Product columns in your view. Similarly if you create a “My” view of anything (“My Favourite Brands of Spandex”, “My Co-Workers I Find The Urge To Disinfect”) then again, do not include the owner or author field (or whatever field you use to identify “My”). That’s just silly.
Hope that helps! Happy customizing!
500 Metro Style WP7 Icons
I was inspired by The Noun Project, a project that offers up “Metro-style” icons in SVG format. The project is licensed under a public domain license and while it’s a great project, all of the content is in SVG format. Jon Galloway has a great post (from 2007) talking about the differences between SVG and XAML so I highly recommend that for some background. I thought it would be helpful to the WPF/Windows Phone 7/Silverlight community to provide the content in alternative formats for use in your applications.
The Goods
I’ve put together a package of the 500 icons (502 actually) in PNG, XAML and the original SVG format along with a couple of sample projects so you can see them in action.
There’s a WPF desktop app:

And a Windows Phone 7 app:

Building It
To get all the content first I wrote up a quick program to suck the original SVG files. Luckily they’re all in a common path just named 1.SVG, 2.SVG, and so on. Easy sleazy to grab the contents. Once I had 500 SVG files I used the latest copy of XamlTune, an open source CodePlex project that has a command line conversion tool to convert the directory of SVG files into XAML (the tool also created a PNG file of each SVG so that’s just icing on the cake).
Conversions
The conversion from SVG to XAML isn’t 100%. While you can just drop the content into a WPF app, it doesn’t work that way for WP7. There are just some small adjustments I made to each format so you’ll have to do the same. Follow the information below or refer to the sample applications.
As a sample, here’s an icon we want to use:

Here’s the original SVG file:
<svg version="1.0" id="Layer_1" xmlns="http://www.w3.org/2000/svg" xmlns:xlink="http://www.w3.org/1999/xlink" x="0px" y="0px" width="100px" height="94.616px" viewBox="0 0 100 94.616" enable-background="new 0 0 100 94.616" xml:space="preserve"> <path d="M25.076,15.639c4.324,0.009,7.824-3.488,7.82-7.82C32.9,3.512,29.4,0.012,25.076,0c-4.313,0.012-7.814,3.512-7.821,7.819 C17.262,12.15,20.763,15.648,25.076,15.639L25.076,15.639z"/> <path d="M4.593,43.388h6.861l4.137-15.135h1.716L13.22,43.388h24.318l-4.389-15.135h1.817l2.32,7.415 c1.08,3.131,3.852,3.851,6.003,1.162l8.375-10.142c2.651-3.42-2.104-7.021-4.844-4.035l-4.993,5.952 c0.007,0.095-0.96-3.278-0.96-3.278c-1.135-3.978-4.918-7.903-10.595-7.922H19.576c-5.071,0.019-9.043,4.434-9.888,7.214 L4.593,43.388L4.593,43.388z"/> <polygon points="56.206,22.753 56.206,7.163 49.192,7.163 49.192,22.753 56.206,22.753 "/> <path d="M79.87,15.738c4.332-0.014,7.831-3.516,7.82-7.82c0.011-4.332-3.488-7.833-7.82-7.82c-4.306-0.013-7.806,3.488-7.821,7.82 C72.064,12.222,75.564,15.725,79.87,15.738L79.87,15.738z"/> <path d="M89.759,89.556v-43.19h5.751V22.804c0.007-3.079-2.757-5.448-6.71-5.449H70.436c-3.65,0.001-4.539,1.186-5.551,2.168 L49.597,37.889c-3.098,3.848,2.428,8.333,5.55,4.743L69.88,25.226v64.43c-0.019,6.475,9.06,6.686,9.081,0.201v-36.58h1.765v36.379 C80.748,96.109,89.772,96.13,89.759,89.556L89.759,89.556z"/> <polygon points="100,54.035 100,45.155 0,45.155 0,54.035 100,54.035 "/> </svg>
Here’s the XAML that XamlTune created. It can be used in any WPF app without any changes:
<Canvas Name="Layer_1" Width="100" Height="94.616" ClipToBounds="True" xmlns="http://schemas.microsoft.com/winfx/2006/xaml/presentation"> <Path Fill="#FF000000"> <Path.Data> <PathGeometry FillRule="Nonzero" Figures="M25.076,15.639C29.4,15.648 32.9,12.151 32.896,7.819 32.9,3.512 29.4,0.012 25.076,0 20.763,0.012 17.262,3.512 17.255,7.819 17.262,12.15 20.763,15.648 25.076,15.639L25.076,15.639z" /> </Path.Data> </Path> <Path Fill="#FF000000"> <Path.Data> <PathGeometry FillRule="Nonzero" Figures="M4.593,43.388L11.454,43.388 15.591,28.253 17.307,28.253 13.22,43.388 37.538,43.388 33.149,28.253 34.966,28.253 37.286,35.668C38.366,38.799,41.138,39.519,43.289,36.83L51.664,26.688C54.315,23.268,49.56,19.667,46.82,22.653L41.827,28.605C41.834,28.7 40.867,25.327 40.867,25.327 39.732,21.349 35.949,17.424 30.272,17.405L19.576,17.405C14.505,17.424,10.533,21.839,9.688,24.619L4.593,43.388 4.593,43.388z" /> </Path.Data> </Path> <Path Fill="#FF000000"> <Path.Data> <PathGeometry FillRule="Nonzero" Figures="M56.206,22.753L56.206,7.163 49.192,7.163 49.192,22.753 56.206,22.753z" /> </Path.Data> </Path> <Path Fill="#FF000000"> <Path.Data> <PathGeometry FillRule="Nonzero" Figures="M79.87,15.738C84.202,15.724 87.701,12.222 87.69,7.918 87.701,3.586 84.202,0.0849999999999991 79.87,0.097999999999999 75.564,0.084999999999999 72.064,3.586 72.049,7.918 72.064,12.222 75.564,15.725 79.87,15.738L79.87,15.738z" /> </Path.Data> </Path> <Path Fill="#FF000000"> <Path.Data> <PathGeometry FillRule="Nonzero" Figures="M89.759,89.556L89.759,46.366 95.51,46.366 95.51,22.804C95.517,19.725,92.753,17.356,88.8,17.355L70.436,17.355C66.786,17.356,65.897,18.541,64.885,19.523L49.597,37.889C46.499,41.737,52.025,46.222,55.147,42.632L69.88,25.226 69.88,89.656C69.861,96.131,78.94,96.342,78.961,89.857L78.961,53.277 80.726,53.277 80.726,89.656C80.748,96.109,89.772,96.13,89.759,89.556L89.759,89.556z" /> </Path.Data> </Path> <Path Fill="#FF000000"> <Path.Data> <PathGeometry FillRule="Nonzero" Figures="M100,54.035L100,45.155 0,45.155 0,54.035 100,54.035z" /> </Path.Data> </Path> </Canvas>
The XAML works AS-IS in a WPF application but there are some changes I did to get it to work in a WP7 app. Here’s the modified XAML in a WP7 application:
<Canvas Grid.Row="0" Grid.Column="0" Name="Icon_1" Width="100" Height="94.616"> <Path Fill="#FF000000" Data="M25.076,15.639C29.4,15.648 32.9,12.151 32.896,7.819 32.9,3.512 29.4,0.012 25.076,0 20.763,0.012 17.262,3.512 17.255,7.819 17.262,12.15 20.763,15.648 25.076,15.639L25.076,15.639z"> </Path> <Path Fill="#FF000000" Data="M4.593,43.388L11.454,43.388 15.591,28.253 17.307,28.253 13.22,43.388 37.538,43.388 33.149,28.253 34.966,28.253 37.286,35.668C38.366,38.799,41.138,39.519,43.289,36.83L51.664,26.688C54.315,23.268,49.56,19.667,46.82,22.653L41.827,28.605C41.834,28.7 40.867,25.327 40.867,25.327 39.732,21.349 35.949,17.424 30.272,17.405L19.576,17.405C14.505,17.424,10.533,21.839,9.688,24.619L4.593,43.388 4.593,43.388z"> </Path> <Path Fill="#FF000000" Data="M56.206,22.753L56.206,7.163 49.192,7.163 49.192,22.753 56.206,22.753z"> </Path> <Path Fill="#FF000000" Data="M79.87,15.738C84.202,15.724 87.701,12.222 87.69,7.918 87.701,3.586 84.202,0.0849999999999991 79.87,0.097999999999999 75.564,0.084999999999999 72.064,3.586 72.049,7.918 72.064,12.222 75.564,15.725 79.87,15.738L79.87,15.738z"> </Path> <Path Fill="#FF000000" Data="M89.759,89.556L89.759,46.366 95.51,46.366 95.51,22.804C95.517,19.725,92.753,17.356,88.8,17.355L70.436,17.355C66.786,17.356,65.897,18.541,64.885,19.523L49.597,37.889C46.499,41.737,52.025,46.222,55.147,42.632L69.88,25.226 69.88,89.656C69.861,96.131,78.94,96.342,78.961,89.857L78.961,53.277 80.726,53.277 80.726,89.656C80.748,96.109,89.772,96.13,89.759,89.556L89.759,89.556z"> </Path> <Path Fill="#FF000000" Data="M100,54.035L100,45.155 0,45.155 0,54.035 100,54.035z"> </Path> </Canvas>All I did was take the data portion and put it directly into a Data attribute on the Path. Note that while it does show up in the app (on the emulator or device) it wouldn’t show up in Visual Studio for me. Maybe some XAML guru out there can tell me why. You can just as easily use the PNG files in WP7 but if you want the crispness of vector graphics, go for the XAML version.
Of course with XamlTune being open source you could always modify the output of that program to cater it to your app. If you do make a change that’s worthy please consider submitting a patch to the project so everyone can benefit.
Hope this helps and happy programming!
Resources and Links
- Sample Project and Icons
- XamlTune an open source project to convert SVG to XAML
- The Noun Project source of the original files
- Jon Galloways post on SVG and XAML
- StackOverflow question on converting SVG to XAML


