Archives
-
VMWare performance with USB drives
As a SharePoint developer a wise choice is to run your Virtual Machines on a separate drive (separate from your OS drive). That way you gain some performance as two different operating systems are not contending for precious read/write times on the disk and, after all, the disk is the biggest bottleneck.
If you're using VMWare with an external USB drive and are plagued by the dreaded 5+ minute black screen as your guest OS shuts down, then here's a potential fix.
-
Locate the config.ini file for VMWare. On Windows 7 you should find it under C:\ProgramData\VMWare\VMWare Workstation
-
Edit the file and add the following lines to it:
-
prefvmx.minVmMemPct = "100"
-
mainMem.useNamedFile = "FALSE"
-
mainMem.partialLazySave = "FALSE"
-
mainMem.partialLazyRestore = "FALSE"
-
Save the file and restart your VM
-
Shut down and the home screen should come up in a matter of seconds instead of minutes
So what are these settings for? minVmMemPct = "100" tells VMWare to fit the memory in the VM into your system RAM (using 100 as 100%). Try to avoid anything other than 100% or else you'll have a lot of file swapping going on here. The useNamedFile property is intended to be set to FALSE for USB-disks or other slow disks. partialLazySave and partialLazyRestore are just that, taking and restoring snapshots in the background or not.
Hope that helps.
-
-
Metro SharePoint Directory–Reading from Lists
As yet another follow-up to the various posts I made on building a Metro-style directory of sorts in SharePoint here and here, one thing that’s been asked a few times already is reading from a list.
In the original post we called the getSubWebsForCurrentUser method to fetch a list of sites. What if you wanted something more generic? Here’s a solution that will let you read from a list instead.
First we’re going to need a list. This part is easy. Create a new custom list through the Site Actions (Site Actions > More Options > List > Custom List, intuitive I know).

The custom list gives you a blank list with one column, Title. That will be our text to display. Next add a new column to the list of type Hyperlink. It can be called Url, Link, or Ganondorf if you’re feeling particularily Zelda-ish. This will be the link that will transport your users to magical places.

Now that we have our list we can use a modified version of the original script to iterate through the list items and build up our menu. I won’t get into the details of how everything works here (go back and read the first article in this series) but here’s the part that will create the menus. Replace your loadSites method with this one:
Line 8 is where things get different from the original implementation. Instead of getting the sites for the user, we get our custom list. Then we create a new CAML query. The SP.CamlQuery object has a method to get all items so we’ll use that (we could construct a custom query here but we want everything for now).
Line 11 we get all the list items based on the query and specify the fields we want to load.
Line 13 is the same as line 18 in the original code and submits our job to the server for execution.
Our onSuccess method is a little different now that we have to enumerate over list items instead of sites. Here’s the modified version:
A few things to note here on what happening.
Line 3 we fetch the list item enumerator.
Line 14 we step over each item in the list.
Line 16-19 we grab the individual item and fields we want.
Line 21-23 we setup the left hand menu navigation with the title and link to the site (from the custom list data)
Line 25-32 we populate the Metro tiles with the same information.
Finally we add it to our markup on the page using jQuery to replace our Loading tags.
That’s it. Now you have your custom menu driven from a SharePoint list. Go ahead and add items to the list and magic will happen.
Look for a more lengthy article on this entire series shortly where I pull it all together as well as adding a few more cool things like tracking and sorting the list based on popularity of clicks. I’m also going to present this whole thing at next weeks Calgary SharePoint User Group meeting if you’re in town so you can join us then.
Enjoy.
Goodbye Ribbon–Going Full Screen Metro Style with SharePoint
Having some fun with a previous post I did about generating a Metro-style menu from a Custom List in SharePoint for the purpose of building something like an Application Directory. It’s a great navigation system and by adding something like Live Tiles (that pulls information from each site) via JavaScript it can be an informative dashboard rather than a pretty menu. You can read the previous write-up I did on this here.
Here’s what my Application Directory looks like:

Nice, but all that SharePoint chrome isn’t needed for the purpose of navigating the directory.
The answer is simple. Just a few CSS styles you override to hide everything.
Here’s the CSS markup you need:
And here’s the result:

Nice and clean.
If your admins need to get to the underlying system pages just navigate to “/_layouts/viewlsts.aspx” and they can navigate around normally from there. You could also create a link on the main page for that, even wrap it in a security token so only admins can see it!
I have a blog post in the works on turning those pretty Metro icons into Live Tiles with data from the subsites, but that’s for another day.
Until then, enjoy!
Tree Surgeon–Alive and Kicking or Dead and Buried?
Tree Surgeon is a Visual Studio project generation tool originally written by Mike Roberts based on a series of blogs he wrote about building up a maintainable and testable development tree for .NET projects (recreated here on the CodePlex site as Mike’s original blog content is gone).
It’s about building up a development tree that’s consistent from project to project; contains source code and all tools and dependencies; checked into source control; atomically integratable (not a word) into a build system complete with unit tests and artefacts (a word but the Canadian version of it).
This is something every developer does on day 0 of the project. So why not automate it and make it a wizard that you don’t have to think about a lot? That’s why Tree Surgeon exists.
I took over the maintenance of the tool and blogged about it back in 2007 when I took over the project and the last release was in June of 2008. The project has been popular. Since it’s launch there’s been over 10,000 downloads and 150,000 page views with 50,000 visitors to the site.
Times have changed. Since that last release in 2008 so much has changed for .NET developers. The question is, today is the project still viable? Do we still need a tool to generate a project tree given that we have things like scaffolding systems, NuGet, and T4 templates. Or should we just give the project its rightful and respectful send off as its had a good life and has outlived its usefulness.
What’s changed since 2008? Plenty.
First off there's the T4 templating system that's now baked into Visual Studio. Scott Hanselman has a great post on it here which has links to some tutorials (and his post is from 2008 but still valid today). From first glance at T4 (and to be honest I haven't done anything except tinker with it) it looks like Tree Surgeon. The templates look pretty much like what we use, except we're using code to search and replace tokens. With T4 it's built in.
Now having said that you still need to do some magic with T4 templates to make them work as they can't tell if you wanted this type of project or that type. If TS was written today, it would probably use T4 as the templating engine instead of the one it uses now. That would eliminate a lot of the heavy lifting and probably make the system a little more robust, dynamic, etc.
So there's that.

Then there's the elephant in the room, NuGet.
I personally worked on NuGet with Microsoft and have a lot of passion for it. With NuGet you can just type something like "Install-Package ScaffoldApp" and have a complete application built out for you. Scaffolding is something that was introduced with ASPMVC but it's a fairly generic concept and basically what Tree Surgeon does. With NuGet, scaffolding is easy and you just have some scripts and whatnot combined with files (potentially T4 templates) and the system will build out for you.
Early on in NuGet I considered that TreeSurgeon could just become a NuGet package. However at the time it was still difficult to get something going (NuGet requires a project to start with so that was a bit of a show stopper). However some other scaffolding systems seem to work well (the MVC ones come to mind) so there might be an opportunity there. The other option is a Visual Studio plug-in as there are a few that will create new projects for you (the HTML5 one comes to mind) complete with all the fixings.
In any case, if a new project was created in Tree Surgeon, I'm almost certain it should use NuGet to fetch the third party references.
Herein lies a bit of a dilemma with TS. For example when I start a new project I just go through the File > New Project and pick some appropriate starter (say a Windows Phone 7 application). Depending on the app platform (WP7, Web, WinForms, WPF) there are a set of packages that I'll just go and install (like Ninject or MVVM Light or something, along with some platform specific ones). It takes me 5 minutes but then I've got a scaffolded project that's ready to go (ala Tree Surgeon).
However two things come to mind. First off, these are installed with NuGet and some people still haven't jumped onto that band wagon. So I think there should be a decision here. Tree Surgeon requires NuGet. That way, the dependencies and whatnot for getting these packages works. That's one of the issues with the current codebase (and why talk of a plugin system was going on). The third party components come and go. We need a system to manage them without having to get a new version of Tree Surgeon every time a new build tool comes out. That plugin system was NuGet (except Nuget does it much better).
Okay, getting past that hurdle then the issue of how to serve up the tool so that a) its easy to get/use/access and b) it supports all the configurations that are out there. There are a *lot* more platforms than when Tree Surgeon started. TS was meant to be a solution starter so it would create your app along with unit test project and a client. The only problem is things like ASPNET MVC came along and already has the unit test framework generator built into the project creator. That sitll leaves WinForms and WebForms projects in the dust though and future of some of these (how many people start WebForms projects these days and where is WinForms going to be in a year when we have Win8 that doesn't support creating them in VS2012).

Pile on top of that the multitude of platforms available now. WPF, SharePoint, Silverlight, MVC, WebForms, WinForms, WP7. How many and how to support/include any or all of these in Tree Surgeon.
Maybe I'm making a mountain out of a molehill but the landscape has changed and I think Tree Surgeon needs to change with it. The question is in what direction?
There continues to be questions asked about creating new projects on StackOverflow for example, all of which either refer to or are similar to Tree Surgeon:
- Project Structure for C# Development Effort
- What’s a good directory structure for large C#/C++ solutions?
- Best Practices organizing a Visual Studio Solution
- Is there a tool that will generate Visual Studio 2008 projects?
- Programatically generate Visual Studio Solution
So like I said, there’s still interest and need for such a tool but is that Tree Surgeon or something else?
I look forward to anyones contributions to the discussion either in the comments below or on the CodePlex site here.
Thanks!
What If Mad Men Landed the Microsoft Advertising Contract?
Back in the day, Marvel had a wonderful comic book series. It was called What If and featured titles like What If Spider-Man Joined the Fantastic Four, What If Captain America Became President, and What If Conan the Barbarian Walked The Earth Today?

Here’s some Sunday afternoon Photoshop fun and my What If version of Mad Men doing the advertising for Microsoft products.


Enjoy!
Code to Interfaces. Right. What’s an Interface?
The premise of coding to interfaces has been around for awhile now. The concept is simple. Given a definition of something you create things based on that definition. That might be a horrible description of an interface but I didn’t want to go all Computer Science on you.
Interface? What’s an Interface?
Here’s a simple interface:
1: interface ICustomerService
<pre style="border-bottom-style: none; text-align: left; padding-bottom: 0px; line-height: 12pt; background-color: #f4f4f4; margin: 0em; border-left-style: none; padding-left: 0px; width: 100%; padding-right: 0px; font-family: 'Courier New', courier, monospace; direction: ltr; border-top-style: none; color: black; border-right-style: none; font-size: 8pt; overflow: visible; padding-top: 0px"><span style="color: #606060" id="lnum2"> 2:</span> {</pre><pre style="border-bottom-style: none; text-align: left; padding-bottom: 0px; line-height: 12pt; background-color: white; margin: 0em; border-left-style: none; padding-left: 0px; width: 100%; padding-right: 0px; font-family: 'Courier New', courier, monospace; direction: ltr; border-top-style: none; color: black; border-right-style: none; font-size: 8pt; overflow: visible; padding-top: 0px"><span style="color: #606060" id="lnum3"> 3:</span> IEnumerable<Customer> GetAllCustomers();</pre><pre style="border-bottom-style: none; text-align: left; padding-bottom: 0px; line-height: 12pt; background-color: #f4f4f4; margin: 0em; border-left-style: none; padding-left: 0px; width: 100%; padding-right: 0px; font-family: 'Courier New', courier, monospace; direction: ltr; border-top-style: none; color: black; border-right-style: none; font-size: 8pt; overflow: visible; padding-top: 0px"><span style="color: #606060" id="lnum4"> 4:</span> }</pre>Pretty basic. We have a Customer class somewhere and this interface describes a method called GetAllCustomers that will return you a list of Customer objects.
With an interface you don’t have an implementation. There’s no code here to say where we get the customers from, just that we expect this to return us a list of them.
Now in our code we can write something like this:
1: public void DisplayAllCustomers(ICustomerService service)
<pre style="border-bottom-style: none; text-align: left; padding-bottom: 0px; line-height: 12pt; background-color: #f4f4f4; margin: 0em; border-left-style: none; padding-left: 0px; width: 100%; padding-right: 0px; font-family: 'Courier New', courier, monospace; direction: ltr; border-top-style: none; color: black; border-right-style: none; font-size: 8pt; overflow: visible; padding-top: 0px"><span style="color: #606060" id="lnum2"> 2:</span> {</pre><pre style="border-bottom-style: none; text-align: left; padding-bottom: 0px; line-height: 12pt; background-color: white; margin: 0em; border-left-style: none; padding-left: 0px; width: 100%; padding-right: 0px; font-family: 'Courier New', courier, monospace; direction: ltr; border-top-style: none; color: black; border-right-style: none; font-size: 8pt; overflow: visible; padding-top: 0px"><span style="color: #606060" id="lnum3"> 3:</span> <span style="color: #0000ff">foreach</span> (var customer <span style="color: #0000ff">in</span> service.GetAllCustomers())</pre><pre style="border-bottom-style: none; text-align: left; padding-bottom: 0px; line-height: 12pt; background-color: #f4f4f4; margin: 0em; border-left-style: none; padding-left: 0px; width: 100%; padding-right: 0px; font-family: 'Courier New', courier, monospace; direction: ltr; border-top-style: none; color: black; border-right-style: none; font-size: 8pt; overflow: visible; padding-top: 0px"><span style="color: #606060" id="lnum4"> 4:</span> {</pre><pre style="border-bottom-style: none; text-align: left; padding-bottom: 0px; line-height: 12pt; background-color: white; margin: 0em; border-left-style: none; padding-left: 0px; width: 100%; padding-right: 0px; font-family: 'Courier New', courier, monospace; direction: ltr; border-top-style: none; color: black; border-right-style: none; font-size: 8pt; overflow: visible; padding-top: 0px"><span style="color: #606060" id="lnum5"> 5:</span> <span style="color: #008000">// Output whatever customer info here</span></pre><pre style="border-bottom-style: none; text-align: left; padding-bottom: 0px; line-height: 12pt; background-color: #f4f4f4; margin: 0em; border-left-style: none; padding-left: 0px; width: 100%; padding-right: 0px; font-family: 'Courier New', courier, monospace; direction: ltr; border-top-style: none; color: black; border-right-style: none; font-size: 8pt; overflow: visible; padding-top: 0px"><span style="color: #606060" id="lnum6"> 6:</span> }</pre><pre style="border-bottom-style: none; text-align: left; padding-bottom: 0px; line-height: 12pt; background-color: white; margin: 0em; border-left-style: none; padding-left: 0px; width: 100%; padding-right: 0px; font-family: 'Courier New', courier, monospace; direction: ltr; border-top-style: none; color: black; border-right-style: none; font-size: 8pt; overflow: visible; padding-top: 0px"><span style="color: #606060" id="lnum7"> 7:</span> }</pre>The method here expects an object that implements the ICustomerService interface. That’s how we can build and compile this but we have yet to build an implementation of this method. Of course the code won’t run because your application doesn’t know how to create an object that implements ICustomerService.
Like I said, the implementation is up to you but you’ll probably be driving it from requirements or what the user needs to see or whatever. Here’s a sample implementation:
1: internal class CustomerRepository : ICustomerService
<pre style="border-bottom-style: none; text-align: left; padding-bottom: 0px; line-height: 12pt; background-color: #f4f4f4; margin: 0em; border-left-style: none; padding-left: 0px; width: 100%; padding-right: 0px; font-family: 'Courier New', courier, monospace; direction: ltr; border-top-style: none; color: black; border-right-style: none; font-size: 8pt; overflow: visible; padding-top: 0px"><span style="color: #606060" id="lnum2"> 2:</span> {</pre><pre style="border-bottom-style: none; text-align: left; padding-bottom: 0px; line-height: 12pt; background-color: white; margin: 0em; border-left-style: none; padding-left: 0px; width: 100%; padding-right: 0px; font-family: 'Courier New', courier, monospace; direction: ltr; border-top-style: none; color: black; border-right-style: none; font-size: 8pt; overflow: visible; padding-top: 0px"><span style="color: #606060" id="lnum3"> 3:</span> <span style="color: #0000ff">public</span> IEnumerable<Customer> GetAllCustomers()</pre><pre style="border-bottom-style: none; text-align: left; padding-bottom: 0px; line-height: 12pt; background-color: #f4f4f4; margin: 0em; border-left-style: none; padding-left: 0px; width: 100%; padding-right: 0px; font-family: 'Courier New', courier, monospace; direction: ltr; border-top-style: none; color: black; border-right-style: none; font-size: 8pt; overflow: visible; padding-top: 0px"><span style="color: #606060" id="lnum4"> 4:</span> {</pre><pre style="border-bottom-style: none; text-align: left; padding-bottom: 0px; line-height: 12pt; background-color: white; margin: 0em; border-left-style: none; padding-left: 0px; width: 100%; padding-right: 0px; font-family: 'Courier New', courier, monospace; direction: ltr; border-top-style: none; color: black; border-right-style: none; font-size: 8pt; overflow: visible; padding-top: 0px"><span style="color: #606060" id="lnum5"> 5:</span> <span style="color: #0000ff">return</span> <span style="color: #0000ff">new</span> List<Customer></pre><pre style="border-bottom-style: none; text-align: left; padding-bottom: 0px; line-height: 12pt; background-color: #f4f4f4; margin: 0em; border-left-style: none; padding-left: 0px; width: 100%; padding-right: 0px; font-family: 'Courier New', courier, monospace; direction: ltr; border-top-style: none; color: black; border-right-style: none; font-size: 8pt; overflow: visible; padding-top: 0px"><span style="color: #606060" id="lnum6"> 6:</span> {</pre><pre style="border-bottom-style: none; text-align: left; padding-bottom: 0px; line-height: 12pt; background-color: white; margin: 0em; border-left-style: none; padding-left: 0px; width: 100%; padding-right: 0px; font-family: 'Courier New', courier, monospace; direction: ltr; border-top-style: none; color: black; border-right-style: none; font-size: 8pt; overflow: visible; padding-top: 0px"><span style="color: #606060" id="lnum7"> 7:</span> <span style="color: #0000ff">new</span> Customer {Name = <span style="color: #006080">"Harold"</span>}, </pre><pre style="border-bottom-style: none; text-align: left; padding-bottom: 0px; line-height: 12pt; background-color: #f4f4f4; margin: 0em; border-left-style: none; padding-left: 0px; width: 100%; padding-right: 0px; font-family: 'Courier New', courier, monospace; direction: ltr; border-top-style: none; color: black; border-right-style: none; font-size: 8pt; overflow: visible; padding-top: 0px"><span style="color: #606060" id="lnum8"> 8:</span> <span style="color: #0000ff">new</span> Customer {Name = <span style="color: #006080">"Kumar"</span>}</pre><pre style="border-bottom-style: none; text-align: left; padding-bottom: 0px; line-height: 12pt; background-color: white; margin: 0em; border-left-style: none; padding-left: 0px; width: 100%; padding-right: 0px; font-family: 'Courier New', courier, monospace; direction: ltr; border-top-style: none; color: black; border-right-style: none; font-size: 8pt; overflow: visible; padding-top: 0px"><span style="color: #606060" id="lnum9"> 9:</span> };</pre><pre style="border-bottom-style: none; text-align: left; padding-bottom: 0px; line-height: 12pt; background-color: #f4f4f4; margin: 0em; border-left-style: none; padding-left: 0px; width: 100%; padding-right: 0px; font-family: 'Courier New', courier, monospace; direction: ltr; border-top-style: none; color: black; border-right-style: none; font-size: 8pt; overflow: visible; padding-top: 0px"><span style="color: #606060" id="lnum10"> 10:</span> }</pre><pre style="border-bottom-style: none; text-align: left; padding-bottom: 0px; line-height: 12pt; background-color: white; margin: 0em; border-left-style: none; padding-left: 0px; width: 100%; padding-right: 0px; font-family: 'Courier New', courier, monospace; direction: ltr; border-top-style: none; color: black; border-right-style: none; font-size: 8pt; overflow: visible; padding-top: 0px"><span style="color: #606060" id="lnum11"> 11:</span> }</pre>So if we created an object of this CustomerRepository class and passed it to the DisplayAllCustomers method above, we would output Harold and Kumar’s names (or whatever your display code was).
The $10,000 Question
People will stare at the code and say, why? Why create that ICustomerService and then have to go to the trouble of creating it and passing it along to the DisplayAllCustomers. More code to maintain they say. More work.
Let’s try to dispel some myths here.
Coding to Interfaces is Hard
Really? Do you understand the code above? That’s coding to an interface. Could you do that yourself? Sure you can. Let’s move on.
Coding to Interfaces Constrains Me
It’s true. If you added the method “void AddCustomer(Customer customer)” to your inteface, you wouldn’t be able to compile your code. The CustomerRepostory class (and any other class that implemented the ICustomerService interface) would require it. Stop thinking about this as a constraint, it’s a design choice. It’s like the Architect giving you a window or door on the side of your house. You don’t go cutting open another hole because you want another window. You have to take into account load bearing walls, structural integrity, etc. which is what the Architect does (I know, I used to be one). Just because it looks good or you need it, doesn’t mean it should be done (at least in the way you might want it).
Coding to Interfaces makes you do extra work
Yes, you have to create those interfaces so yeah, that’s extra work. Some might argue that if your implementation is simple then you’re writing double the code. Again, all true. There are benefits that will outweigh this which we’ll look at in a moment.
Where are the Benefits?
Let’s talk some benefits here. First coding to an interface is giving you a layer of abstraction. Remember that ICustomerService above? The implementation is sort of silly but shows that we can write code that does what the system intends. We could also build an implementation that reads from a database. Or Active Directory. Or SAP. Or a Web Service. Each time we write a new implementation, we don’t have to change our DIsplayAllCustomers method.
That’s abstraction. You don’t have to worry in your DisplayAllCustomers method where the data came from or what infrastructure may or may not exist. All you care about is that you expect a list of customers to come back.
Now multiply that by 10 or 100 and you get the benefits of abstraction against a real codebase.
Some people will talk about future proofing and interfaces and while that may be a benefit down the road, and it can happen, consider it icing on the cake. Imagine if you had coded to an IEnumerable interface instead of ArrayList? Now you *might* not have to rewrite a lot of code (or any if you’re really lucky).
I do believe, and have rarely seen, entire implementations changed. For example one classic is the “build a database interface so we can swap between SQL and Oracle”. You build an abstraction over a database to make it simpler to code to but not necessarily swap out technologies.
Just don’t use the future proofing claim as a crutch to not code to interfaces claiming YAGNI or something. There are different reasons for this.
The other big thing is testing. Going back to our CustomerRepository. It’s an in-memory representation to a list of customers. Imagine you had additional methods on your interface like this:
1: internal interface ICustomerService
<pre style="border-bottom-style: none; text-align: left; padding-bottom: 0px; line-height: 12pt; background-color: #f4f4f4; margin: 0em; border-left-style: none; padding-left: 0px; width: 100%; padding-right: 0px; font-family: 'Courier New', courier, monospace; direction: ltr; border-top-style: none; color: black; border-right-style: none; font-size: 8pt; overflow: visible; padding-top: 0px"><span style="color: #606060" id="lnum2"> 2:</span> {</pre><pre style="border-bottom-style: none; text-align: left; padding-bottom: 0px; line-height: 12pt; background-color: white; margin: 0em; border-left-style: none; padding-left: 0px; width: 100%; padding-right: 0px; font-family: 'Courier New', courier, monospace; direction: ltr; border-top-style: none; color: black; border-right-style: none; font-size: 8pt; overflow: visible; padding-top: 0px"><span style="color: #606060" id="lnum3"> 3:</span> IEnumerable<Customer> GetAllCustomers();</pre><pre style="border-bottom-style: none; text-align: left; padding-bottom: 0px; line-height: 12pt; background-color: #f4f4f4; margin: 0em; border-left-style: none; padding-left: 0px; width: 100%; padding-right: 0px; font-family: 'Courier New', courier, monospace; direction: ltr; border-top-style: none; color: black; border-right-style: none; font-size: 8pt; overflow: visible; padding-top: 0px"><span style="color: #606060" id="lnum4"> 4:</span> <span style="color: #0000ff">void</span> AddCustomer(Customer newCustomer);</pre><pre style="border-bottom-style: none; text-align: left; padding-bottom: 0px; line-height: 12pt; background-color: white; margin: 0em; border-left-style: none; padding-left: 0px; width: 100%; padding-right: 0px; font-family: 'Courier New', courier, monospace; direction: ltr; border-top-style: none; color: black; border-right-style: none; font-size: 8pt; overflow: visible; padding-top: 0px"><span style="color: #606060" id="lnum5"> 5:</span> <span style="color: #0000ff">void</span> DeleteCustomer(Customer customerToDelete);</pre><pre style="border-bottom-style: none; text-align: left; padding-bottom: 0px; line-height: 12pt; background-color: #f4f4f4; margin: 0em; border-left-style: none; padding-left: 0px; width: 100%; padding-right: 0px; font-family: 'Courier New', courier, monospace; direction: ltr; border-top-style: none; color: black; border-right-style: none; font-size: 8pt; overflow: visible; padding-top: 0px"><span style="color: #606060" id="lnum6"> 6:</span> }</pre>And now with your in-memory representation you can write tests that ensure items are added and deleted in your repository and the counts all match and the list comes back with the right names. Now you’re starting to test against your interface, which is a good thing.
Testing
Testing frameworks will let you do things like create stubs or fake implementations of the interface, without actually writing code to return actual values. Without interfaces if you tried to test the AddCustomer method in say a SQL based implementation, you would need a database, login information, test data, etc. That’s great for infrastructure tests but for unit tests it’s a lot of overhead you shouldn’t be getting into.
Another benefit is getting ahead of infrastructure. Imagine if your ICustomerService is going to talk to a web service, as web service that won’t be written for another month. You could go ahead and wait for the infrastructure to show up, code concrete classes against it, and then start your testing but now you’re in the crunch to get the system done and you’re just starting your unit testing.
Instead, based on requirements and perhaps UI discussions with users using paper, whiteboard, or digital wireframes, you come up with the interface. “We’re going to need to display the customer fields and oh yeah, we want to search by first and last name”. Great. From that description you can come up with an interface something like this:
1: interface ICustomerService
<pre style="border-bottom-style: none; text-align: left; padding-bottom: 0px; line-height: 12pt; background-color: #f4f4f4; margin: 0em; border-left-style: none; padding-left: 0px; width: 100%; padding-right: 0px; font-family: 'Courier New', courier, monospace; direction: ltr; border-top-style: none; color: black; border-right-style: none; font-size: 8pt; overflow: visible; padding-top: 0px"><span style="color: #606060" id="lnum2"> 2:</span> {</pre><pre style="border-bottom-style: none; text-align: left; padding-bottom: 0px; line-height: 12pt; background-color: white; margin: 0em; border-left-style: none; padding-left: 0px; width: 100%; padding-right: 0px; font-family: 'Courier New', courier, monospace; direction: ltr; border-top-style: none; color: black; border-right-style: none; font-size: 8pt; overflow: visible; padding-top: 0px"><span style="color: #606060" id="lnum3"> 3:</span> IEnumerable<Customer> FindBy(<span style="color: #0000ff">string</span> firstName);</pre><pre style="border-bottom-style: none; text-align: left; padding-bottom: 0px; line-height: 12pt; background-color: #f4f4f4; margin: 0em; border-left-style: none; padding-left: 0px; width: 100%; padding-right: 0px; font-family: 'Courier New', courier, monospace; direction: ltr; border-top-style: none; color: black; border-right-style: none; font-size: 8pt; overflow: visible; padding-top: 0px"><span style="color: #606060" id="lnum4"> 4:</span> IEnumerable<Customer> FindBy(<span style="color: #0000ff">string</span> firstName, <span style="color: #0000ff">string</span> lastName);</pre><pre style="border-bottom-style: none; text-align: left; padding-bottom: 0px; line-height: 12pt; background-color: white; margin: 0em; border-left-style: none; padding-left: 0px; width: 100%; padding-right: 0px; font-family: 'Courier New', courier, monospace; direction: ltr; border-top-style: none; color: black; border-right-style: none; font-size: 8pt; overflow: visible; padding-top: 0px"><span style="color: #606060" id="lnum5"> 5:</span> }</pre>Again we can write up some implementation (maybe going against a preset list of names you import from a spreadsheet) and actually build out a working UI. The user can put their hands on it, search by names, and see the results returned. All without that pesky infrastructure. Then come the say the database gets built, you create your implementation to read it and do searches and BAM, your system is online and working end-to-end.
On the testing front again, how would you test something that’s dependent on DateTime? For example you have a piece of code that ages some items in a system based on some business rules (or expires them).
It’s all well and fine to start tossing around DateTime objects like this:
1: public void ExpireTest(ICustomerService service, DateTime date)
<pre style="border-bottom-style: none; text-align: left; padding-bottom: 0px; line-height: 12pt; background-color: #f4f4f4; margin: 0em; border-left-style: none; padding-left: 0px; width: 100%; padding-right: 0px; font-family: 'Courier New', courier, monospace; direction: ltr; border-top-style: none; color: black; border-right-style: none; font-size: 8pt; overflow: visible; padding-top: 0px"><span style="color: #606060" id="lnum2"> 2:</span> {</pre><pre style="border-bottom-style: none; text-align: left; padding-bottom: 0px; line-height: 12pt; background-color: white; margin: 0em; border-left-style: none; padding-left: 0px; width: 100%; padding-right: 0px; font-family: 'Courier New', courier, monospace; direction: ltr; border-top-style: none; color: black; border-right-style: none; font-size: 8pt; overflow: visible; padding-top: 0px"><span style="color: #606060" id="lnum3"> 3:</span> <span style="color: #0000ff">foreach</span> (var customer <span style="color: #0000ff">in</span> service.GetAllCustomers())</pre><pre style="border-bottom-style: none; text-align: left; padding-bottom: 0px; line-height: 12pt; background-color: #f4f4f4; margin: 0em; border-left-style: none; padding-left: 0px; width: 100%; padding-right: 0px; font-family: 'Courier New', courier, monospace; direction: ltr; border-top-style: none; color: black; border-right-style: none; font-size: 8pt; overflow: visible; padding-top: 0px"><span style="color: #606060" id="lnum4"> 4:</span> {</pre><pre style="border-bottom-style: none; text-align: left; padding-bottom: 0px; line-height: 12pt; background-color: white; margin: 0em; border-left-style: none; padding-left: 0px; width: 100%; padding-right: 0px; font-family: 'Courier New', courier, monospace; direction: ltr; border-top-style: none; color: black; border-right-style: none; font-size: 8pt; overflow: visible; padding-top: 0px"><span style="color: #606060" id="lnum5"> 5:</span> <span style="color: #0000ff">if</span>(customer.ContractDate > date)</pre><pre style="border-bottom-style: none; text-align: left; padding-bottom: 0px; line-height: 12pt; background-color: #f4f4f4; margin: 0em; border-left-style: none; padding-left: 0px; width: 100%; padding-right: 0px; font-family: 'Courier New', courier, monospace; direction: ltr; border-top-style: none; color: black; border-right-style: none; font-size: 8pt; overflow: visible; padding-top: 0px"><span style="color: #606060" id="lnum6"> 6:</span> {</pre><pre style="border-bottom-style: none; text-align: left; padding-bottom: 0px; line-height: 12pt; background-color: white; margin: 0em; border-left-style: none; padding-left: 0px; width: 100%; padding-right: 0px; font-family: 'Courier New', courier, monospace; direction: ltr; border-top-style: none; color: black; border-right-style: none; font-size: 8pt; overflow: visible; padding-top: 0px"><span style="color: #606060" id="lnum7"> 7:</span> ExpireContractFor(customer);</pre><pre style="border-bottom-style: none; text-align: left; padding-bottom: 0px; line-height: 12pt; background-color: #f4f4f4; margin: 0em; border-left-style: none; padding-left: 0px; width: 100%; padding-right: 0px; font-family: 'Courier New', courier, monospace; direction: ltr; border-top-style: none; color: black; border-right-style: none; font-size: 8pt; overflow: visible; padding-top: 0px"><span style="color: #606060" id="lnum8"> 8:</span> }</pre><pre style="border-bottom-style: none; text-align: left; padding-bottom: 0px; line-height: 12pt; background-color: white; margin: 0em; border-left-style: none; padding-left: 0px; width: 100%; padding-right: 0px; font-family: 'Courier New', courier, monospace; direction: ltr; border-top-style: none; color: black; border-right-style: none; font-size: 8pt; overflow: visible; padding-top: 0px"><span style="color: #606060" id="lnum9"> 9:</span> }</pre><pre style="border-bottom-style: none; text-align: left; padding-bottom: 0px; line-height: 12pt; background-color: #f4f4f4; margin: 0em; border-left-style: none; padding-left: 0px; width: 100%; padding-right: 0px; font-family: 'Courier New', courier, monospace; direction: ltr; border-top-style: none; color: black; border-right-style: none; font-size: 8pt; overflow: visible; padding-top: 0px"><span style="color: #606060" id="lnum10"> 10:</span> }</pre>However things get real ugly real fast. First I have to write this test and I’m sort of breaking both encapsulation and responsibility of the customer class. Maybe I should have a method on customer that takes in a DateTime object. Yuck. Now I’m passing that value into my business object which might be okay (it depends) but now consider the idea of something like this business rule:
1: foreach (var customer in service.GetAllCustomers())
<pre style="border-bottom-style: none; text-align: left; padding-bottom: 0px; line-height: 12pt; background-color: #f4f4f4; margin: 0em; border-left-style: none; padding-left: 0px; width: 100%; padding-right: 0px; font-family: 'Courier New', courier, monospace; direction: ltr; border-top-style: none; color: black; border-right-style: none; font-size: 8pt; overflow: visible; padding-top: 0px"><span style="color: #606060" id="lnum2"> 2:</span> {</pre><pre style="border-bottom-style: none; text-align: left; padding-bottom: 0px; line-height: 12pt; background-color: white; margin: 0em; border-left-style: none; padding-left: 0px; width: 100%; padding-right: 0px; font-family: 'Courier New', courier, monospace; direction: ltr; border-top-style: none; color: black; border-right-style: none; font-size: 8pt; overflow: visible; padding-top: 0px"><span style="color: #606060" id="lnum3"> 3:</span> <span style="color: #0000ff">if</span>(customer.ContractDate.Day == date.Day && date.Hour > 12)</pre><pre style="border-bottom-style: none; text-align: left; padding-bottom: 0px; line-height: 12pt; background-color: #f4f4f4; margin: 0em; border-left-style: none; padding-left: 0px; width: 100%; padding-right: 0px; font-family: 'Courier New', courier, monospace; direction: ltr; border-top-style: none; color: black; border-right-style: none; font-size: 8pt; overflow: visible; padding-top: 0px"><span style="color: #606060" id="lnum4"> 4:</span> {</pre><pre style="border-bottom-style: none; text-align: left; padding-bottom: 0px; line-height: 12pt; background-color: white; margin: 0em; border-left-style: none; padding-left: 0px; width: 100%; padding-right: 0px; font-family: 'Courier New', courier, monospace; direction: ltr; border-top-style: none; color: black; border-right-style: none; font-size: 8pt; overflow: visible; padding-top: 0px"><span style="color: #606060" id="lnum5"> 5:</span> ExpireContractFor(customer);</pre><pre style="border-bottom-style: none; text-align: left; padding-bottom: 0px; line-height: 12pt; background-color: #f4f4f4; margin: 0em; border-left-style: none; padding-left: 0px; width: 100%; padding-right: 0px; font-family: 'Courier New', courier, monospace; direction: ltr; border-top-style: none; color: black; border-right-style: none; font-size: 8pt; overflow: visible; padding-top: 0px"><span style="color: #606060" id="lnum6"> 6:</span> }</pre><pre style="border-bottom-style: none; text-align: left; padding-bottom: 0px; line-height: 12pt; background-color: white; margin: 0em; border-left-style: none; padding-left: 0px; width: 100%; padding-right: 0px; font-family: 'Courier New', courier, monospace; direction: ltr; border-top-style: none; color: black; border-right-style: none; font-size: 8pt; overflow: visible; padding-top: 0px"><span style="color: #606060" id="lnum7"> 7:</span> }</pre>Now I’ll only expire the contract if the date passed in is the same day as my contract and it’s after noon. Silly logic yes, but would require another test method, another date object to be passed in, etc. A lot of setup to test something and then along comes this somewhere in my Customer class:
1: class Customer
<pre style="border-bottom-style: none; text-align: left; padding-bottom: 0px; line-height: 12pt; background-color: #f4f4f4; margin: 0em; border-left-style: none; padding-left: 0px; width: 100%; padding-right: 0px; font-family: 'Courier New', courier, monospace; direction: ltr; border-top-style: none; color: black; border-right-style: none; font-size: 8pt; overflow: visible; padding-top: 0px"><span style="color: #606060" id="lnum2"> 2:</span> {</pre><pre style="border-bottom-style: none; text-align: left; padding-bottom: 0px; line-height: 12pt; background-color: white; margin: 0em; border-left-style: none; padding-left: 0px; width: 100%; padding-right: 0px; font-family: 'Courier New', courier, monospace; direction: ltr; border-top-style: none; color: black; border-right-style: none; font-size: 8pt; overflow: visible; padding-top: 0px"><span style="color: #606060" id="lnum3"> 3:</span> <span style="color: #0000ff">public</span> <span style="color: #0000ff">string</span> Name { get; set; }</pre><pre style="border-bottom-style: none; text-align: left; padding-bottom: 0px; line-height: 12pt; background-color: #f4f4f4; margin: 0em; border-left-style: none; padding-left: 0px; width: 100%; padding-right: 0px; font-family: 'Courier New', courier, monospace; direction: ltr; border-top-style: none; color: black; border-right-style: none; font-size: 8pt; overflow: visible; padding-top: 0px"><span style="color: #606060" id="lnum4"> 4:</span>  </pre><pre style="border-bottom-style: none; text-align: left; padding-bottom: 0px; line-height: 12pt; background-color: white; margin: 0em; border-left-style: none; padding-left: 0px; width: 100%; padding-right: 0px; font-family: 'Courier New', courier, monospace; direction: ltr; border-top-style: none; color: black; border-right-style: none; font-size: 8pt; overflow: visible; padding-top: 0px"><span style="color: #606060" id="lnum5"> 5:</span> <span style="color: #0000ff">public</span> DateTime ContractDate { get; set; }</pre><pre style="border-bottom-style: none; text-align: left; padding-bottom: 0px; line-height: 12pt; background-color: #f4f4f4; margin: 0em; border-left-style: none; padding-left: 0px; width: 100%; padding-right: 0px; font-family: 'Courier New', courier, monospace; direction: ltr; border-top-style: none; color: black; border-right-style: none; font-size: 8pt; overflow: visible; padding-top: 0px"><span style="color: #606060" id="lnum6"> 6:</span>  </pre><pre style="border-bottom-style: none; text-align: left; padding-bottom: 0px; line-height: 12pt; background-color: white; margin: 0em; border-left-style: none; padding-left: 0px; width: 100%; padding-right: 0px; font-family: 'Courier New', courier, monospace; direction: ltr; border-top-style: none; color: black; border-right-style: none; font-size: 8pt; overflow: visible; padding-top: 0px"><span style="color: #606060" id="lnum7"> 7:</span> <span style="color: #0000ff">public</span> <span style="color: #0000ff">int</span> AgeOfContract()</pre><pre style="border-bottom-style: none; text-align: left; padding-bottom: 0px; line-height: 12pt; background-color: #f4f4f4; margin: 0em; border-left-style: none; padding-left: 0px; width: 100%; padding-right: 0px; font-family: 'Courier New', courier, monospace; direction: ltr; border-top-style: none; color: black; border-right-style: none; font-size: 8pt; overflow: visible; padding-top: 0px"><span style="color: #606060" id="lnum8"> 8:</span> {</pre><pre style="border-bottom-style: none; text-align: left; padding-bottom: 0px; line-height: 12pt; background-color: white; margin: 0em; border-left-style: none; padding-left: 0px; width: 100%; padding-right: 0px; font-family: 'Courier New', courier, monospace; direction: ltr; border-top-style: none; color: black; border-right-style: none; font-size: 8pt; overflow: visible; padding-top: 0px"><span style="color: #606060" id="lnum9"> 9:</span> <span style="color: #0000ff">return</span> (<span style="color: #0000ff">int</span>) (DateTime.Now - ContractDate).TotalDays;</pre><pre style="border-bottom-style: none; text-align: left; padding-bottom: 0px; line-height: 12pt; background-color: #f4f4f4; margin: 0em; border-left-style: none; padding-left: 0px; width: 100%; padding-right: 0px; font-family: 'Courier New', courier, monospace; direction: ltr; border-top-style: none; color: black; border-right-style: none; font-size: 8pt; overflow: visible; padding-top: 0px"><span style="color: #606060" id="lnum10"> 10:</span> }</pre><pre style="border-bottom-style: none; text-align: left; padding-bottom: 0px; line-height: 12pt; background-color: white; margin: 0em; border-left-style: none; padding-left: 0px; width: 100%; padding-right: 0px; font-family: 'Courier New', courier, monospace; direction: ltr; border-top-style: none; color: black; border-right-style: none; font-size: 8pt; overflow: visible; padding-top: 0px"><span style="color: #606060" id="lnum11"> 11:</span> }</pre>Now I’m screwed, both in testing in code and testing on the site. I’m going to have to create test data with very specific dates, maybe mess around with the values (because I certainly can’t change the clock on the server) and frankly I’m going to cry.
Interfaces can save you here. What if we had an interface called:
1: interface IDateTime
<pre style="border-bottom-style: none; text-align: left; padding-bottom: 0px; line-height: 12pt; background-color: #f4f4f4; margin: 0em; border-left-style: none; padding-left: 0px; width: 100%; padding-right: 0px; font-family: 'Courier New', courier, monospace; direction: ltr; border-top-style: none; color: black; border-right-style: none; font-size: 8pt; overflow: visible; padding-top: 0px"><span style="color: #606060" id="lnum2"> 2:</span> {</pre><pre style="border-bottom-style: none; text-align: left; padding-bottom: 0px; line-height: 12pt; background-color: white; margin: 0em; border-left-style: none; padding-left: 0px; width: 100%; padding-right: 0px; font-family: 'Courier New', courier, monospace; direction: ltr; border-top-style: none; color: black; border-right-style: none; font-size: 8pt; overflow: visible; padding-top: 0px"><span style="color: #606060" id="lnum3"> 3:</span> DateTime Now { get; set; }</pre><pre style="border-bottom-style: none; text-align: left; padding-bottom: 0px; line-height: 12pt; background-color: #f4f4f4; margin: 0em; border-left-style: none; padding-left: 0px; width: 100%; padding-right: 0px; font-family: 'Courier New', courier, monospace; direction: ltr; border-top-style: none; color: black; border-right-style: none; font-size: 8pt; overflow: visible; padding-top: 0px"><span style="color: #606060" id="lnum4"> 4:</span> }</pre>And instead of the concrete implementation in our customer class we use the IDateTime interface. Here’s the Customer class refactored to use an interface:
1: class Customer
<pre style="border-bottom-style: none; text-align: left; padding-bottom: 0px; line-height: 12pt; background-color: #f4f4f4; margin: 0em; border-left-style: none; padding-left: 0px; width: 100%; padding-right: 0px; font-family: 'Courier New', courier, monospace; direction: ltr; border-top-style: none; color: black; border-right-style: none; font-size: 8pt; overflow: visible; padding-top: 0px"><span style="color: #606060" id="lnum2"> 2:</span> {</pre><pre style="border-bottom-style: none; text-align: left; padding-bottom: 0px; line-height: 12pt; background-color: white; margin: 0em; border-left-style: none; padding-left: 0px; width: 100%; padding-right: 0px; font-family: 'Courier New', courier, monospace; direction: ltr; border-top-style: none; color: black; border-right-style: none; font-size: 8pt; overflow: visible; padding-top: 0px"><span style="color: #606060" id="lnum3"> 3:</span> <span style="color: #0000ff">readonly</span> IDateTime _dateTime;</pre><pre style="border-bottom-style: none; text-align: left; padding-bottom: 0px; line-height: 12pt; background-color: #f4f4f4; margin: 0em; border-left-style: none; padding-left: 0px; width: 100%; padding-right: 0px; font-family: 'Courier New', courier, monospace; direction: ltr; border-top-style: none; color: black; border-right-style: none; font-size: 8pt; overflow: visible; padding-top: 0px"><span style="color: #606060" id="lnum4"> 4:</span>  </pre><pre style="border-bottom-style: none; text-align: left; padding-bottom: 0px; line-height: 12pt; background-color: white; margin: 0em; border-left-style: none; padding-left: 0px; width: 100%; padding-right: 0px; font-family: 'Courier New', courier, monospace; direction: ltr; border-top-style: none; color: black; border-right-style: none; font-size: 8pt; overflow: visible; padding-top: 0px"><span style="color: #606060" id="lnum5"> 5:</span> Customer(IDateTime dateTime)</pre><pre style="border-bottom-style: none; text-align: left; padding-bottom: 0px; line-height: 12pt; background-color: #f4f4f4; margin: 0em; border-left-style: none; padding-left: 0px; width: 100%; padding-right: 0px; font-family: 'Courier New', courier, monospace; direction: ltr; border-top-style: none; color: black; border-right-style: none; font-size: 8pt; overflow: visible; padding-top: 0px"><span style="color: #606060" id="lnum6"> 6:</span> {</pre><pre style="border-bottom-style: none; text-align: left; padding-bottom: 0px; line-height: 12pt; background-color: white; margin: 0em; border-left-style: none; padding-left: 0px; width: 100%; padding-right: 0px; font-family: 'Courier New', courier, monospace; direction: ltr; border-top-style: none; color: black; border-right-style: none; font-size: 8pt; overflow: visible; padding-top: 0px"><span style="color: #606060" id="lnum7"> 7:</span> _dateTime = dateTime;</pre><pre style="border-bottom-style: none; text-align: left; padding-bottom: 0px; line-height: 12pt; background-color: #f4f4f4; margin: 0em; border-left-style: none; padding-left: 0px; width: 100%; padding-right: 0px; font-family: 'Courier New', courier, monospace; direction: ltr; border-top-style: none; color: black; border-right-style: none; font-size: 8pt; overflow: visible; padding-top: 0px"><span style="color: #606060" id="lnum8"> 8:</span> }</pre><pre style="border-bottom-style: none; text-align: left; padding-bottom: 0px; line-height: 12pt; background-color: white; margin: 0em; border-left-style: none; padding-left: 0px; width: 100%; padding-right: 0px; font-family: 'Courier New', courier, monospace; direction: ltr; border-top-style: none; color: black; border-right-style: none; font-size: 8pt; overflow: visible; padding-top: 0px"><span style="color: #606060" id="lnum9"> 9:</span>  </pre><pre style="border-bottom-style: none; text-align: left; padding-bottom: 0px; line-height: 12pt; background-color: #f4f4f4; margin: 0em; border-left-style: none; padding-left: 0px; width: 100%; padding-right: 0px; font-family: 'Courier New', courier, monospace; direction: ltr; border-top-style: none; color: black; border-right-style: none; font-size: 8pt; overflow: visible; padding-top: 0px"><span style="color: #606060" id="lnum10"> 10:</span> <span style="color: #0000ff">public</span> <span style="color: #0000ff">string</span> Name { get; set; }</pre><pre style="border-bottom-style: none; text-align: left; padding-bottom: 0px; line-height: 12pt; background-color: white; margin: 0em; border-left-style: none; padding-left: 0px; width: 100%; padding-right: 0px; font-family: 'Courier New', courier, monospace; direction: ltr; border-top-style: none; color: black; border-right-style: none; font-size: 8pt; overflow: visible; padding-top: 0px"><span style="color: #606060" id="lnum11"> 11:</span>  </pre><pre style="border-bottom-style: none; text-align: left; padding-bottom: 0px; line-height: 12pt; background-color: #f4f4f4; margin: 0em; border-left-style: none; padding-left: 0px; width: 100%; padding-right: 0px; font-family: 'Courier New', courier, monospace; direction: ltr; border-top-style: none; color: black; border-right-style: none; font-size: 8pt; overflow: visible; padding-top: 0px"><span style="color: #606060" id="lnum12"> 12:</span> <span style="color: #0000ff">public</span> IDateTime ContractDate { get; set; }</pre><pre style="border-bottom-style: none; text-align: left; padding-bottom: 0px; line-height: 12pt; background-color: white; margin: 0em; border-left-style: none; padding-left: 0px; width: 100%; padding-right: 0px; font-family: 'Courier New', courier, monospace; direction: ltr; border-top-style: none; color: black; border-right-style: none; font-size: 8pt; overflow: visible; padding-top: 0px"><span style="color: #606060" id="lnum13"> 13:</span>  </pre><pre style="border-bottom-style: none; text-align: left; padding-bottom: 0px; line-height: 12pt; background-color: #f4f4f4; margin: 0em; border-left-style: none; padding-left: 0px; width: 100%; padding-right: 0px; font-family: 'Courier New', courier, monospace; direction: ltr; border-top-style: none; color: black; border-right-style: none; font-size: 8pt; overflow: visible; padding-top: 0px"><span style="color: #606060" id="lnum14"> 14:</span> <span style="color: #0000ff">public</span> <span style="color: #0000ff">int</span> AgeOfContract()</pre><pre style="border-bottom-style: none; text-align: left; padding-bottom: 0px; line-height: 12pt; background-color: white; margin: 0em; border-left-style: none; padding-left: 0px; width: 100%; padding-right: 0px; font-family: 'Courier New', courier, monospace; direction: ltr; border-top-style: none; color: black; border-right-style: none; font-size: 8pt; overflow: visible; padding-top: 0px"><span style="color: #606060" id="lnum15"> 15:</span> {</pre><pre style="border-bottom-style: none; text-align: left; padding-bottom: 0px; line-height: 12pt; background-color: #f4f4f4; margin: 0em; border-left-style: none; padding-left: 0px; width: 100%; padding-right: 0px; font-family: 'Courier New', courier, monospace; direction: ltr; border-top-style: none; color: black; border-right-style: none; font-size: 8pt; overflow: visible; padding-top: 0px"><span style="color: #606060" id="lnum16"> 16:</span> <span style="color: #0000ff">return</span> (<span style="color: #0000ff">int</span>) (_dateTime.Now - ContractDate).TotalDays;</pre><pre style="border-bottom-style: none; text-align: left; padding-bottom: 0px; line-height: 12pt; background-color: white; margin: 0em; border-left-style: none; padding-left: 0px; width: 100%; padding-right: 0px; font-family: 'Courier New', courier, monospace; direction: ltr; border-top-style: none; color: black; border-right-style: none; font-size: 8pt; overflow: visible; padding-top: 0px"><span style="color: #606060" id="lnum17"> 17:</span> }</pre><pre style="border-bottom-style: none; text-align: left; padding-bottom: 0px; line-height: 12pt; background-color: #f4f4f4; margin: 0em; border-left-style: none; padding-left: 0px; width: 100%; padding-right: 0px; font-family: 'Courier New', courier, monospace; direction: ltr; border-top-style: none; color: black; border-right-style: none; font-size: 8pt; overflow: visible; padding-top: 0px"><span style="color: #606060" id="lnum18"> 18:</span> }</pre>Yes, there’s more that needs to be here like how an IDateTime can subtract values from each other, return a TImeSpan object, etc. but this is just for concepts.
With the interface added, I’m now abstracted away from the concrete implementation of DateTime hard coded into my Customer class. I’ll pass in something that might implement DateTime to return some real time but for testing I can set it to anything I want.
Testing is easier now and I don’t have to change my domain logic to deal with responsibilities outside of my concerns.
Interfaces vs. Classes is the kind of thing to start holy flame wars. Some argue it adds extra code/work to the developer, others claim it unnecessarily future-proofs your app (aka YAGNI) and others think it makes for easier testing and abstraction away from things that have yet to come.
I like to live in the latter world where I build my systems loosely coupled but tightly integrated. Interfaces provide me that ability. I hope this article sheds some light on the subject for you, whatever you choose.
Enjoy.
Getting Started with ASP.NET MVC 3, Logging, and Depency Injection
I started a new ASP.NET MVC project recently and wanted to give you a little insight on kicking off new projects. There’s some setup time you want to spend setting up your solution and getting the plumbing in order before you dive into writing unit tests and building out your site.
For a full on, blow my mind, ultimate guide you *have* to go watch Rob Conery and his 90 minute walkthrough of setting up his MVC projects. I’ve watched this video a few times and Rob is awesome and knows his stuff. The tips he gives are gold. You can also check out the MVC 3 Starter Kit on CodePlex which is based on his MVC 2 Starter code but I found it was lacking a few features. In any case, go watch his video for the full meal deal either here on YouTube or here on TekPub. This post is just a mere shadow of his work but updates the use of Ninject with MVC 3.
Okay, so we’re going to be doing some simple plumbing to get this going. We’ll put together the Hello World MVC 3 app, add in a logging system, and plumb in dependency injection in just a few minutes.
You’ll need Visual Studio 2010 with MVC 3 and NuGet installed. You can get MVC 3 from the main site here. Next install NuGet from here. The MVC 3 framework is obviously needed (Visual Studio 2010 only comes with MVC 2 out of the box) and NuGet is used to install our additional libraries (trust me, if you haven’t used NuGet before it will blow your mind).
First steps is to build a new MVC 3 app. File > New Project. Then select Visual C# > Web > ASP.NET MVC 3 Application and give it a name.

Click OK and you’ll see the options dialog for a new MVC 3 Application.

Pick Internet application as it will work for most everyone (Windows authentication works fine too but for this post it’s just easier to go with Internet). Let’s choose Razor for the view engine (ASPX is so 2011) and use HTML 5 markup (hey, it’s just a demo). We won’t create a unit test project but in a real project you’ll create one (or create a class library separately so you can use other unit testing frameworks).
We’re creating a project based on the template to give us a controller as we’ll inject our dependency into it later, otherwise we would have to create those. In a real project we might start with an empty template and create our own controllers from scratch (again, demo land, remember?).
Once you do that you’ll be at the Hello World project of the MVC world.

Okay, now we’re going to install two NuGet packages, Ninject and NLog. Ninject is an open source dependency injection framework and makes working with external dependencies (like infrastructure and services) a breeze. NLog is a free logging solution for .NET and allows you to write anything to almost any target including files, event logs, web services, mail, forms. You name it, it can write to it. I was using log4net for all my projects but lately I’ve switched over to NLog. It’s super-simple to use and highly flexible. Did I mention it’s available as a NuGet package?
Right click on the References in your project and choose Manage NuGet Packages…

Make sure you’re looking at the Online packages (sometimes the dialog will open up to installed packages or updatable ones). Type in “nlog” into the search box and you’ll see the filtered search results. Choose NLog Configuration from the options. If you already had a log configuration file you can just choose NLog to install the logger but since we’re starting from scratch we need a config file to start with. Selecting NLog Configuration and you’ll see it has a dependency on NLog so you can just install the one package which installs a starter config file and then drags along the library with it. Easy.

Once you’ve installed NLog you can enter “ninject” in the search box. This will bring up a list of packages for the dependency injection library Ninject by Nate Kohari. You’ll want to install the Ninject.MVC3 package by Remo Gloor and Ian Davis. This package will install Ninject itself and the extensions for MVC 3 (along with the bootstrapper for web projects. Ninject requires you to review and accept the license agreement before it will install so go ahead and do that.
Two packages and all of their dependencies but you’re now only a few minutes (yes, minutes) away from dependency injection heaven and MVC 3.
The first thing we’re going to do is create an interface that will be our logging system. We have a logger (NLog) but that’s an implementation and while we could scatter NLog statements all over the place, we would be tied directly to that library. If we decided to phase out NLog and replace it with another library (such as how I’ve shifted from log4net to NLog) we would have to go through everywhere in our code and replace the NLog calls with the next best thing.
This the one of the principles of dependency injection, abstraction, and SOLID. Creating an abstraction of an implementation to code against without tying ourselves to any one system (so to speak). At the end of the day we’ll still be calling into NLog functions but we’ll be doing it through an implementation class via our interface.
The other key thing about this approach is that we we can mock or stub out the actual implementation of our logger for unit testing. You can really do that (very well) with concrete implementations. Imagine having to start up a database, file system logger, and the Windows Event log service just to unit test some business code.
In addition to being able to test our code, we can also code to interfaces meaning that we don’t need the actual implementation until it comes time to actually perform the work. For example the project I’m currently working on is going to require to call out to web services and databases. These components are not built yet and won’t be for another month or so. I don’t want to halt the development of my app so I create service interfaces and repositories that will abstract these away from my system, allowing me to build a fully working (and tested) system (which just happens to use hard coded values for now). Later when those services appear I just build an implementation to talk to them and voila, my system is still working exactly the way it does today.
Okay, enough talk. Here’s the interface for our logging system. I’m borrowing from Rob’s approach by creating a folder called Infrastructure with a subfolder called Logging. In it I’ll create an ILogger interface that will let me write an information message (most logging systems have various levels of logging like Information, Warning, Errors, etc.)

And here’s my ILogger interface:
1: namespace MvcStarter.Infrastructure.Logging
<pre style="border-bottom-style: none; text-align: left; padding-bottom: 0px; line-height: 12pt; background-color: #f4f4f4; margin: 0em; border-left-style: none; padding-left: 0px; width: 100%; padding-right: 0px; font-family: 'Courier New', courier, monospace; direction: ltr; border-top-style: none; color: black; border-right-style: none; font-size: 8pt; overflow: visible; padding-top: 0px"><span style="color: #606060" id="lnum2"> 2:</span> {</pre><pre style="border-bottom-style: none; text-align: left; padding-bottom: 0px; line-height: 12pt; background-color: white; margin: 0em; border-left-style: none; padding-left: 0px; width: 100%; padding-right: 0px; font-family: 'Courier New', courier, monospace; direction: ltr; border-top-style: none; color: black; border-right-style: none; font-size: 8pt; overflow: visible; padding-top: 0px"><span style="color: #606060" id="lnum3"> 3:</span> <span style="color: #0000ff">public interface</span> ILogger</pre><pre style="border-bottom-style: none; text-align: left; padding-bottom: 0px; line-height: 12pt; background-color: #f4f4f4; margin: 0em; border-left-style: none; padding-left: 0px; width: 100%; padding-right: 0px; font-family: 'Courier New', courier, monospace; direction: ltr; border-top-style: none; color: black; border-right-style: none; font-size: 8pt; overflow: visible; padding-top: 0px"><span style="color: #606060" id="lnum4"> 4:</span> {</pre><pre style="border-bottom-style: none; text-align: left; padding-bottom: 0px; line-height: 12pt; background-color: white; margin: 0em; border-left-style: none; padding-left: 0px; width: 100%; padding-right: 0px; font-family: 'Courier New', courier, monospace; direction: ltr; border-top-style: none; color: black; border-right-style: none; font-size: 8pt; overflow: visible; padding-top: 0px"><span style="color: #606060" id="lnum5"> 5:</span> <span style="color: #0000ff">void</span> Info(<span style="color: #0000ff">string</span> message);</pre><pre style="border-bottom-style: none; text-align: left; padding-bottom: 0px; line-height: 12pt; background-color: #f4f4f4; margin: 0em; border-left-style: none; padding-left: 0px; width: 100%; padding-right: 0px; font-family: 'Courier New', courier, monospace; direction: ltr; border-top-style: none; color: black; border-right-style: none; font-size: 8pt; overflow: visible; padding-top: 0px"><span style="color: #606060" id="lnum6"> 6:</span> }</pre><pre style="border-bottom-style: none; text-align: left; padding-bottom: 0px; line-height: 12pt; background-color: white; margin: 0em; border-left-style: none; padding-left: 0px; width: 100%; padding-right: 0px; font-family: 'Courier New', courier, monospace; direction: ltr; border-top-style: none; color: black; border-right-style: none; font-size: 8pt; overflow: visible; padding-top: 0px"><span style="color: #606060" id="lnum7"> 7:</span> }</pre>Next we need an implementation. We’ll create one for NLog. This is a simple class that implements ILogger and provides the Info method (along with the setup needed for NLog to work). Here’s the NLogLogger class:
1: using NLog;
<pre style="border-bottom-style: none; text-align: left; padding-bottom: 0px; line-height: 12pt; background-color: #f4f4f4; margin: 0em; border-left-style: none; padding-left: 0px; width: 100%; padding-right: 0px; font-family: 'Courier New', courier, monospace; direction: ltr; border-top-style: none; color: black; border-right-style: none; font-size: 8pt; overflow: visible; padding-top: 0px"><span style="color: #606060" id="lnum2"> 2:</span> </pre><pre style="border-bottom-style: none; text-align: left; padding-bottom: 0px; line-height: 12pt; background-color: white; margin: 0em; border-left-style: none; padding-left: 0px; width: 100%; padding-right: 0px; font-family: 'Courier New', courier, monospace; direction: ltr; border-top-style: none; color: black; border-right-style: none; font-size: 8pt; overflow: visible; padding-top: 0px"><span style="color: #606060" id="lnum3"> 3:</span> <span style="color: #0000ff">namespace</span> MvcStarter.Infrastructure.Logging</pre><pre style="border-bottom-style: none; text-align: left; padding-bottom: 0px; line-height: 12pt; background-color: #f4f4f4; margin: 0em; border-left-style: none; padding-left: 0px; width: 100%; padding-right: 0px; font-family: 'Courier New', courier, monospace; direction: ltr; border-top-style: none; color: black; border-right-style: none; font-size: 8pt; overflow: visible; padding-top: 0px"><span style="color: #606060" id="lnum4"> 4:</span> {</pre><pre style="border-bottom-style: none; text-align: left; padding-bottom: 0px; line-height: 12pt; background-color: white; margin: 0em; border-left-style: none; padding-left: 0px; width: 100%; padding-right: 0px; font-family: 'Courier New', courier, monospace; direction: ltr; border-top-style: none; color: black; border-right-style: none; font-size: 8pt; overflow: visible; padding-top: 0px"><span style="color: #606060" id="lnum5"> 5:</span> <span style="color: #0000ff">public</span> <span style="color: #0000ff">class</span> NLogLogger : ILogger</pre><pre style="border-bottom-style: none; text-align: left; padding-bottom: 0px; line-height: 12pt; background-color: #f4f4f4; margin: 0em; border-left-style: none; padding-left: 0px; width: 100%; padding-right: 0px; font-family: 'Courier New', courier, monospace; direction: ltr; border-top-style: none; color: black; border-right-style: none; font-size: 8pt; overflow: visible; padding-top: 0px"><span style="color: #606060" id="lnum6"> 6:</span> {</pre><pre style="border-bottom-style: none; text-align: left; padding-bottom: 0px; line-height: 12pt; background-color: white; margin: 0em; border-left-style: none; padding-left: 0px; width: 100%; padding-right: 0px; font-family: 'Courier New', courier, monospace; direction: ltr; border-top-style: none; color: black; border-right-style: none; font-size: 8pt; overflow: visible; padding-top: 0px"><span style="color: #606060" id="lnum7"> 7:</span> <span style="color: #0000ff">private</span> Logger _logger;</pre><pre style="border-bottom-style: none; text-align: left; padding-bottom: 0px; line-height: 12pt; background-color: #f4f4f4; margin: 0em; border-left-style: none; padding-left: 0px; width: 100%; padding-right: 0px; font-family: 'Courier New', courier, monospace; direction: ltr; border-top-style: none; color: black; border-right-style: none; font-size: 8pt; overflow: visible; padding-top: 0px"><span style="color: #606060" id="lnum8"> 8:</span> </pre><pre style="border-bottom-style: none; text-align: left; padding-bottom: 0px; line-height: 12pt; background-color: white; margin: 0em; border-left-style: none; padding-left: 0px; width: 100%; padding-right: 0px; font-family: 'Courier New', courier, monospace; direction: ltr; border-top-style: none; color: black; border-right-style: none; font-size: 8pt; overflow: visible; padding-top: 0px"><span style="color: #606060" id="lnum9"> 9:</span> <span style="color: #0000ff">public</span> NLogLogger()</pre><pre style="border-bottom-style: none; text-align: left; padding-bottom: 0px; line-height: 12pt; background-color: #f4f4f4; margin: 0em; border-left-style: none; padding-left: 0px; width: 100%; padding-right: 0px; font-family: 'Courier New', courier, monospace; direction: ltr; border-top-style: none; color: black; border-right-style: none; font-size: 8pt; overflow: visible; padding-top: 0px"><span style="color: #606060" id="lnum10"> 10:</span> {</pre><pre style="border-bottom-style: none; text-align: left; padding-bottom: 0px; line-height: 12pt; background-color: white; margin: 0em; border-left-style: none; padding-left: 0px; width: 100%; padding-right: 0px; font-family: 'Courier New', courier, monospace; direction: ltr; border-top-style: none; color: black; border-right-style: none; font-size: 8pt; overflow: visible; padding-top: 0px"><span style="color: #606060" id="lnum11"> 11:</span> _logger = LogManager.GetCurrentClassLogger();</pre><pre style="border-bottom-style: none; text-align: left; padding-bottom: 0px; line-height: 12pt; background-color: #f4f4f4; margin: 0em; border-left-style: none; padding-left: 0px; width: 100%; padding-right: 0px; font-family: 'Courier New', courier, monospace; direction: ltr; border-top-style: none; color: black; border-right-style: none; font-size: 8pt; overflow: visible; padding-top: 0px"><span style="color: #606060" id="lnum12"> 12:</span> }</pre><pre style="border-bottom-style: none; text-align: left; padding-bottom: 0px; line-height: 12pt; background-color: white; margin: 0em; border-left-style: none; padding-left: 0px; width: 100%; padding-right: 0px; font-family: 'Courier New', courier, monospace; direction: ltr; border-top-style: none; color: black; border-right-style: none; font-size: 8pt; overflow: visible; padding-top: 0px"><span style="color: #606060" id="lnum13"> 13:</span> </pre><pre style="border-bottom-style: none; text-align: left; padding-bottom: 0px; line-height: 12pt; background-color: #f4f4f4; margin: 0em; border-left-style: none; padding-left: 0px; width: 100%; padding-right: 0px; font-family: 'Courier New', courier, monospace; direction: ltr; border-top-style: none; color: black; border-right-style: none; font-size: 8pt; overflow: visible; padding-top: 0px"><span style="color: #606060" id="lnum14"> 14:</span> <span style="color: #0000ff">public</span> <span style="color: #0000ff">void</span> Info(<span style="color: #0000ff">string</span> message)</pre><pre style="border-bottom-style: none; text-align: left; padding-bottom: 0px; line-height: 12pt; background-color: white; margin: 0em; border-left-style: none; padding-left: 0px; width: 100%; padding-right: 0px; font-family: 'Courier New', courier, monospace; direction: ltr; border-top-style: none; color: black; border-right-style: none; font-size: 8pt; overflow: visible; padding-top: 0px"><span style="color: #606060" id="lnum15"> 15:</span> {</pre><pre style="border-bottom-style: none; text-align: left; padding-bottom: 0px; line-height: 12pt; background-color: #f4f4f4; margin: 0em; border-left-style: none; padding-left: 0px; width: 100%; padding-right: 0px; font-family: 'Courier New', courier, monospace; direction: ltr; border-top-style: none; color: black; border-right-style: none; font-size: 8pt; overflow: visible; padding-top: 0px"><span style="color: #606060" id="lnum16"> 16:</span> _logger.Info(message);</pre><pre style="border-bottom-style: none; text-align: left; padding-bottom: 0px; line-height: 12pt; background-color: white; margin: 0em; border-left-style: none; padding-left: 0px; width: 100%; padding-right: 0px; font-family: 'Courier New', courier, monospace; direction: ltr; border-top-style: none; color: black; border-right-style: none; font-size: 8pt; overflow: visible; padding-top: 0px"><span style="color: #606060" id="lnum17"> 17:</span> }</pre><pre style="border-bottom-style: none; text-align: left; padding-bottom: 0px; line-height: 12pt; background-color: #f4f4f4; margin: 0em; border-left-style: none; padding-left: 0px; width: 100%; padding-right: 0px; font-family: 'Courier New', courier, monospace; direction: ltr; border-top-style: none; color: black; border-right-style: none; font-size: 8pt; overflow: visible; padding-top: 0px"><span style="color: #606060" id="lnum18"> 18:</span> }</pre><pre style="border-bottom-style: none; text-align: left; padding-bottom: 0px; line-height: 12pt; background-color: white; margin: 0em; border-left-style: none; padding-left: 0px; width: 100%; padding-right: 0px; font-family: 'Courier New', courier, monospace; direction: ltr; border-top-style: none; color: black; border-right-style: none; font-size: 8pt; overflow: visible; padding-top: 0px"><span style="color: #606060" id="lnum19"> 19:</span> }</pre>We create a private variable of type NLog.Logger and create it in our constructor using the LogManager from NLog. Then to write using NLog we just call the Info method on the class, passing it our message.
There are a lot of other methods we can call and add to our interface so later maybe we’ll extend that but this is enough to get you started.
One more thing is that the default config file that was installed with the package is just that, blank. You need to tell it at least what target to use and what rules to apply to each target. The entire config file is documented online but you can just uncomment the sample implementation. Make sure to match up the logger rule (Trace in the config file) with your method you’re calling in the implementation. I just changed the minLevel of the NLog config file from Trace to Info to match our code.
That’s all you need to have logging working but how do we call it? And how does Ninject fit in?
Back when we installed Ninject it created a file for us. Go back to your project and check out the App_Start folder. Expand it and you’ll see a new file there called NinjectWebCommon.cs

This sucker is responsible for kickstarting Ninject for you. If you watched Rob’s video or saw some tutorials on the net they talk about changing the base HttpApplication to a Ninject one. That’s one approach but with MVC 3 and the NuGet package this way is much simpler. There’s nothing for you to do except tell Ninject what dependencies you want to deal with and how to resolve them.
Open up NinjectWebCommon.cs and scroll down to the RegisterServices method. This is where you’ll specify you own interfaces and concrete classes so Ninject can do it’s magic.
With a single line we’re going to tell Ninject this:
1: /// <summary>
<pre style="border-bottom-style: none; text-align: left; padding-bottom: 0px; line-height: 12pt; background-color: #f4f4f4; margin: 0em; border-left-style: none; padding-left: 0px; width: 100%; padding-right: 0px; font-family: 'Courier New', courier, monospace; direction: ltr; border-top-style: none; color: black; border-right-style: none; font-size: 8pt; overflow: visible; padding-top: 0px"><span style="color: #606060" id="lnum2"> 2:</span> <span style="color: #008000">/// Load your modules or register your services here!</span></pre><pre style="border-bottom-style: none; text-align: left; padding-bottom: 0px; line-height: 12pt; background-color: white; margin: 0em; border-left-style: none; padding-left: 0px; width: 100%; padding-right: 0px; font-family: 'Courier New', courier, monospace; direction: ltr; border-top-style: none; color: black; border-right-style: none; font-size: 8pt; overflow: visible; padding-top: 0px"><span style="color: #606060" id="lnum3"> 3:</span> <span style="color: #008000">/// </summary></span></pre><pre style="border-bottom-style: none; text-align: left; padding-bottom: 0px; line-height: 12pt; background-color: #f4f4f4; margin: 0em; border-left-style: none; padding-left: 0px; width: 100%; padding-right: 0px; font-family: 'Courier New', courier, monospace; direction: ltr; border-top-style: none; color: black; border-right-style: none; font-size: 8pt; overflow: visible; padding-top: 0px"><span style="color: #606060" id="lnum4"> 4:</span> <span style="color: #008000">/// <param name="kernel">The kernel.</param></span></pre><pre style="border-bottom-style: none; text-align: left; padding-bottom: 0px; line-height: 12pt; background-color: white; margin: 0em; border-left-style: none; padding-left: 0px; width: 100%; padding-right: 0px; font-family: 'Courier New', courier, monospace; direction: ltr; border-top-style: none; color: black; border-right-style: none; font-size: 8pt; overflow: visible; padding-top: 0px"><span style="color: #606060" id="lnum5"> 5:</span> <span style="color: #0000ff">private</span> <span style="color: #0000ff">static</span> <span style="color: #0000ff">void</span> RegisterServices(IKernel kernel)</pre><pre style="border-bottom-style: none; text-align: left; padding-bottom: 0px; line-height: 12pt; background-color: #f4f4f4; margin: 0em; border-left-style: none; padding-left: 0px; width: 100%; padding-right: 0px; font-family: 'Courier New', courier, monospace; direction: ltr; border-top-style: none; color: black; border-right-style: none; font-size: 8pt; overflow: visible; padding-top: 0px"><span style="color: #606060" id="lnum6"> 6:</span> {</pre><pre style="border-bottom-style: none; text-align: left; padding-bottom: 0px; line-height: 12pt; background-color: white; margin: 0em; border-left-style: none; padding-left: 0px; width: 100%; padding-right: 0px; font-family: 'Courier New', courier, monospace; direction: ltr; border-top-style: none; color: black; border-right-style: none; font-size: 8pt; overflow: visible; padding-top: 0px"><span style="color: #606060" id="lnum7"> 7:</span> kernel.Bind<ILogger>().To<NLogLogger>().InSingletonScope();</pre><pre style="border-bottom-style: none; text-align: left; padding-bottom: 0px; line-height: 12pt; background-color: #f4f4f4; margin: 0em; border-left-style: none; padding-left: 0px; width: 100%; padding-right: 0px; font-family: 'Courier New', courier, monospace; direction: ltr; border-top-style: none; color: black; border-right-style: none; font-size: 8pt; overflow: visible; padding-top: 0px"><span style="color: #606060" id="lnum8"> 8:</span> } </pre>What are we saying here? Simple. We’re telling Ninject to:
- Whenever you see the ILogger interface needed (e.g. passed into a constructor of a class)
- Resolve to the NLogLogger class
- Make it a singleton (i.e. only do it once and reuse it over and over again)
We’re making our logger a singleton because we don’t need to start NLog every time we want to log a message. You can also specify other scopes (like by thread or on demand) but for logging a singleton works.
Oh yeah, that’s it to hook up your dependency injection engine. And logging is ready to go.
Let’s give it a whirl. Crack open the HomeController class and add a constructor that takes in an ILogger interface then using that interface, write out a message when the Index method is called (i.e. our home page is visited). Here’s the modified HomeController class:
1: using System.Web.Mvc;
<pre style="border-bottom-style: none; text-align: left; padding-bottom: 0px; line-height: 12pt; background-color: #f4f4f4; margin: 0em; border-left-style: none; padding-left: 0px; width: 100%; padding-right: 0px; font-family: 'Courier New', courier, monospace; direction: ltr; border-top-style: none; color: black; border-right-style: none; font-size: 8pt; overflow: visible; padding-top: 0px"><span style="color: #606060" id="lnum2"> 2:</span> <span style="color: #0000ff">using</span> MvcStarter.Infrastructure.Logging;</pre><pre style="border-bottom-style: none; text-align: left; padding-bottom: 0px; line-height: 12pt; background-color: white; margin: 0em; border-left-style: none; padding-left: 0px; width: 100%; padding-right: 0px; font-family: 'Courier New', courier, monospace; direction: ltr; border-top-style: none; color: black; border-right-style: none; font-size: 8pt; overflow: visible; padding-top: 0px"><span style="color: #606060" id="lnum3"> 3:</span>  </pre><pre style="border-bottom-style: none; text-align: left; padding-bottom: 0px; line-height: 12pt; background-color: #f4f4f4; margin: 0em; border-left-style: none; padding-left: 0px; width: 100%; padding-right: 0px; font-family: 'Courier New', courier, monospace; direction: ltr; border-top-style: none; color: black; border-right-style: none; font-size: 8pt; overflow: visible; padding-top: 0px"><span style="color: #606060" id="lnum4"> 4:</span> <span style="color: #0000ff">namespace</span> MvcStarter.Controllers</pre><pre style="border-bottom-style: none; text-align: left; padding-bottom: 0px; line-height: 12pt; background-color: white; margin: 0em; border-left-style: none; padding-left: 0px; width: 100%; padding-right: 0px; font-family: 'Courier New', courier, monospace; direction: ltr; border-top-style: none; color: black; border-right-style: none; font-size: 8pt; overflow: visible; padding-top: 0px"><span style="color: #606060" id="lnum5"> 5:</span> {</pre><pre style="border-bottom-style: none; text-align: left; padding-bottom: 0px; line-height: 12pt; background-color: #f4f4f4; margin: 0em; border-left-style: none; padding-left: 0px; width: 100%; padding-right: 0px; font-family: 'Courier New', courier, monospace; direction: ltr; border-top-style: none; color: black; border-right-style: none; font-size: 8pt; overflow: visible; padding-top: 0px"><span style="color: #606060" id="lnum6"> 6:</span> <span style="color: #0000ff">public</span> <span style="color: #0000ff">class</span> HomeController : Controller</pre><pre style="border-bottom-style: none; text-align: left; padding-bottom: 0px; line-height: 12pt; background-color: white; margin: 0em; border-left-style: none; padding-left: 0px; width: 100%; padding-right: 0px; font-family: 'Courier New', courier, monospace; direction: ltr; border-top-style: none; color: black; border-right-style: none; font-size: 8pt; overflow: visible; padding-top: 0px"><span style="color: #606060" id="lnum7"> 7:</span> {</pre><pre style="border-bottom-style: none; text-align: left; padding-bottom: 0px; line-height: 12pt; background-color: #f4f4f4; margin: 0em; border-left-style: none; padding-left: 0px; width: 100%; padding-right: 0px; font-family: 'Courier New', courier, monospace; direction: ltr; border-top-style: none; color: black; border-right-style: none; font-size: 8pt; overflow: visible; padding-top: 0px"><span style="color: #606060" id="lnum8"> 8:</span> <span style="color: #0000ff">private</span> <span style="color: #0000ff">readonly</span> ILogger _logger;</pre><pre style="border-bottom-style: none; text-align: left; padding-bottom: 0px; line-height: 12pt; background-color: white; margin: 0em; border-left-style: none; padding-left: 0px; width: 100%; padding-right: 0px; font-family: 'Courier New', courier, monospace; direction: ltr; border-top-style: none; color: black; border-right-style: none; font-size: 8pt; overflow: visible; padding-top: 0px"><span style="color: #606060" id="lnum9"> 9:</span>  </pre><pre style="border-bottom-style: none; text-align: left; padding-bottom: 0px; line-height: 12pt; background-color: #f4f4f4; margin: 0em; border-left-style: none; padding-left: 0px; width: 100%; padding-right: 0px; font-family: 'Courier New', courier, monospace; direction: ltr; border-top-style: none; color: black; border-right-style: none; font-size: 8pt; overflow: visible; padding-top: 0px"><span style="color: #606060" id="lnum10"> 10:</span> <span style="color: #0000ff">public</span> HomeController(ILogger logger)</pre><pre style="border-bottom-style: none; text-align: left; padding-bottom: 0px; line-height: 12pt; background-color: white; margin: 0em; border-left-style: none; padding-left: 0px; width: 100%; padding-right: 0px; font-family: 'Courier New', courier, monospace; direction: ltr; border-top-style: none; color: black; border-right-style: none; font-size: 8pt; overflow: visible; padding-top: 0px"><span style="color: #606060" id="lnum11"> 11:</span> {</pre><pre style="border-bottom-style: none; text-align: left; padding-bottom: 0px; line-height: 12pt; background-color: #f4f4f4; margin: 0em; border-left-style: none; padding-left: 0px; width: 100%; padding-right: 0px; font-family: 'Courier New', courier, monospace; direction: ltr; border-top-style: none; color: black; border-right-style: none; font-size: 8pt; overflow: visible; padding-top: 0px"><span style="color: #606060" id="lnum12"> 12:</span> _logger = logger;</pre><pre style="border-bottom-style: none; text-align: left; padding-bottom: 0px; line-height: 12pt; background-color: white; margin: 0em; border-left-style: none; padding-left: 0px; width: 100%; padding-right: 0px; font-family: 'Courier New', courier, monospace; direction: ltr; border-top-style: none; color: black; border-right-style: none; font-size: 8pt; overflow: visible; padding-top: 0px"><span style="color: #606060" id="lnum13"> 13:</span> }</pre><pre style="border-bottom-style: none; text-align: left; padding-bottom: 0px; line-height: 12pt; background-color: #f4f4f4; margin: 0em; border-left-style: none; padding-left: 0px; width: 100%; padding-right: 0px; font-family: 'Courier New', courier, monospace; direction: ltr; border-top-style: none; color: black; border-right-style: none; font-size: 8pt; overflow: visible; padding-top: 0px"><span style="color: #606060" id="lnum14"> 14:</span>  </pre><pre style="border-bottom-style: none; text-align: left; padding-bottom: 0px; line-height: 12pt; background-color: white; margin: 0em; border-left-style: none; padding-left: 0px; width: 100%; padding-right: 0px; font-family: 'Courier New', courier, monospace; direction: ltr; border-top-style: none; color: black; border-right-style: none; font-size: 8pt; overflow: visible; padding-top: 0px"><span style="color: #606060" id="lnum15"> 15:</span> <span style="color: #0000ff">public</span> ActionResult Index()</pre><pre style="border-bottom-style: none; text-align: left; padding-bottom: 0px; line-height: 12pt; background-color: #f4f4f4; margin: 0em; border-left-style: none; padding-left: 0px; width: 100%; padding-right: 0px; font-family: 'Courier New', courier, monospace; direction: ltr; border-top-style: none; color: black; border-right-style: none; font-size: 8pt; overflow: visible; padding-top: 0px"><span style="color: #606060" id="lnum16"> 16:</span> {</pre><pre style="border-bottom-style: none; text-align: left; padding-bottom: 0px; line-height: 12pt; background-color: white; margin: 0em; border-left-style: none; padding-left: 0px; width: 100%; padding-right: 0px; font-family: 'Courier New', courier, monospace; direction: ltr; border-top-style: none; color: black; border-right-style: none; font-size: 8pt; overflow: visible; padding-top: 0px"><span style="color: #606060" id="lnum17"> 17:</span> ViewBag.Message = <span style="color: #006080">"Welcome to ASP.NET MVC!"</span>;</pre><pre style="border-bottom-style: none; text-align: left; padding-bottom: 0px; line-height: 12pt; background-color: #f4f4f4; margin: 0em; border-left-style: none; padding-left: 0px; width: 100%; padding-right: 0px; font-family: 'Courier New', courier, monospace; direction: ltr; border-top-style: none; color: black; border-right-style: none; font-size: 8pt; overflow: visible; padding-top: 0px"><span style="color: #606060" id="lnum18"> 18:</span> _logger.Info(<span style="color: #006080">"Home page visited"</span>);</pre><pre style="border-bottom-style: none; text-align: left; padding-bottom: 0px; line-height: 12pt; background-color: white; margin: 0em; border-left-style: none; padding-left: 0px; width: 100%; padding-right: 0px; font-family: 'Courier New', courier, monospace; direction: ltr; border-top-style: none; color: black; border-right-style: none; font-size: 8pt; overflow: visible; padding-top: 0px"><span style="color: #606060" id="lnum19"> 19:</span> <span style="color: #0000ff">return</span> View();</pre><pre style="border-bottom-style: none; text-align: left; padding-bottom: 0px; line-height: 12pt; background-color: #f4f4f4; margin: 0em; border-left-style: none; padding-left: 0px; width: 100%; padding-right: 0px; font-family: 'Courier New', courier, monospace; direction: ltr; border-top-style: none; color: black; border-right-style: none; font-size: 8pt; overflow: visible; padding-top: 0px"><span style="color: #606060" id="lnum20"> 20:</span> }</pre><pre style="border-bottom-style: none; text-align: left; padding-bottom: 0px; line-height: 12pt; background-color: white; margin: 0em; border-left-style: none; padding-left: 0px; width: 100%; padding-right: 0px; font-family: 'Courier New', courier, monospace; direction: ltr; border-top-style: none; color: black; border-right-style: none; font-size: 8pt; overflow: visible; padding-top: 0px"><span style="color: #606060" id="lnum21"> 21:</span>  </pre><pre style="border-bottom-style: none; text-align: left; padding-bottom: 0px; line-height: 12pt; background-color: #f4f4f4; margin: 0em; border-left-style: none; padding-left: 0px; width: 100%; padding-right: 0px; font-family: 'Courier New', courier, monospace; direction: ltr; border-top-style: none; color: black; border-right-style: none; font-size: 8pt; overflow: visible; padding-top: 0px"><span style="color: #606060" id="lnum22"> 22:</span> <span style="color: #0000ff">public</span> ActionResult About()</pre><pre style="border-bottom-style: none; text-align: left; padding-bottom: 0px; line-height: 12pt; background-color: white; margin: 0em; border-left-style: none; padding-left: 0px; width: 100%; padding-right: 0px; font-family: 'Courier New', courier, monospace; direction: ltr; border-top-style: none; color: black; border-right-style: none; font-size: 8pt; overflow: visible; padding-top: 0px"><span style="color: #606060" id="lnum23"> 23:</span> {</pre><pre style="border-bottom-style: none; text-align: left; padding-bottom: 0px; line-height: 12pt; background-color: #f4f4f4; margin: 0em; border-left-style: none; padding-left: 0px; width: 100%; padding-right: 0px; font-family: 'Courier New', courier, monospace; direction: ltr; border-top-style: none; color: black; border-right-style: none; font-size: 8pt; overflow: visible; padding-top: 0px"><span style="color: #606060" id="lnum24"> 24:</span> <span style="color: #0000ff">return</span> View();</pre><pre style="border-bottom-style: none; text-align: left; padding-bottom: 0px; line-height: 12pt; background-color: white; margin: 0em; border-left-style: none; padding-left: 0px; width: 100%; padding-right: 0px; font-family: 'Courier New', courier, monospace; direction: ltr; border-top-style: none; color: black; border-right-style: none; font-size: 8pt; overflow: visible; padding-top: 0px"><span style="color: #606060" id="lnum25"> 25:</span> }</pre><pre style="border-bottom-style: none; text-align: left; padding-bottom: 0px; line-height: 12pt; background-color: #f4f4f4; margin: 0em; border-left-style: none; padding-left: 0px; width: 100%; padding-right: 0px; font-family: 'Courier New', courier, monospace; direction: ltr; border-top-style: none; color: black; border-right-style: none; font-size: 8pt; overflow: visible; padding-top: 0px"><span style="color: #606060" id="lnum26"> 26:</span> }</pre><pre style="border-bottom-style: none; text-align: left; padding-bottom: 0px; line-height: 12pt; background-color: white; margin: 0em; border-left-style: none; padding-left: 0px; width: 100%; padding-right: 0px; font-family: 'Courier New', courier, monospace; direction: ltr; border-top-style: none; color: black; border-right-style: none; font-size: 8pt; overflow: visible; padding-top: 0px"><span style="color: #606060" id="lnum27"> 27:</span> }</pre>We add an ILogger interface to the constructor. This trigger Ninject to figure out what implementation to grab (our NLogLogger one) and create it for us (or reuse it since we told it we wanted a singleton). Then we use that implementation in our Index() method to log a message.
Compile and run the app to visit the home page of your app and you’ll see this in your log:
1: 2012-05-15 19:18:38.8471 INFO Home page visitedThat’s it. You have a logging system you can call anytime (just inject the interface into the class, Ninject will take care of the rest) and your project is setup with dependency injection and you’re ready to go. Now you can just add additional interfaces as you need them.
The awesome thing here is that a) you can now mock or stub out your logging implementation and test it and b) replace that implementation with some other logger any time and your code will still just work.
That’s the power of dependency injection.
As a bonus piece of information, now that you have the dependency injection setup you can use it any time in case you’re in a pinch and don’t need/want to inject the implementation into your class.
Here’s how you can call the logger from your Application_Start method (found in Global.asax.cs) before any controllers are fired up:
1: protected void Application_Start()
<pre style="border-bottom-style: none; text-align: left; padding-bottom: 0px; line-height: 12pt; background-color: #f4f4f4; margin: 0em; border-left-style: none; padding-left: 0px; width: 100%; padding-right: 0px; font-family: 'Courier New', courier, monospace; direction: ltr; border-top-style: none; color: black; border-right-style: none; font-size: 8pt; overflow: visible; padding-top: 0px"><span style="color: #606060" id="lnum2"> 2:</span> {</pre><pre style="border-bottom-style: none; text-align: left; padding-bottom: 0px; line-height: 12pt; background-color: white; margin: 0em; border-left-style: none; padding-left: 0px; width: 100%; padding-right: 0px; font-family: 'Courier New', courier, monospace; direction: ltr; border-top-style: none; color: black; border-right-style: none; font-size: 8pt; overflow: visible; padding-top: 0px"><span style="color: #606060" id="lnum3"> 3:</span> AreaRegistration.RegisterAllAreas();</pre><pre style="border-bottom-style: none; text-align: left; padding-bottom: 0px; line-height: 12pt; background-color: #f4f4f4; margin: 0em; border-left-style: none; padding-left: 0px; width: 100%; padding-right: 0px; font-family: 'Courier New', courier, monospace; direction: ltr; border-top-style: none; color: black; border-right-style: none; font-size: 8pt; overflow: visible; padding-top: 0px"><span style="color: #606060" id="lnum4"> 4:</span>  </pre><pre style="border-bottom-style: none; text-align: left; padding-bottom: 0px; line-height: 12pt; background-color: white; margin: 0em; border-left-style: none; padding-left: 0px; width: 100%; padding-right: 0px; font-family: 'Courier New', courier, monospace; direction: ltr; border-top-style: none; color: black; border-right-style: none; font-size: 8pt; overflow: visible; padding-top: 0px"><span style="color: #606060" id="lnum5"> 5:</span> RegisterGlobalFilters(GlobalFilters.Filters);</pre><pre style="border-bottom-style: none; text-align: left; padding-bottom: 0px; line-height: 12pt; background-color: #f4f4f4; margin: 0em; border-left-style: none; padding-left: 0px; width: 100%; padding-right: 0px; font-family: 'Courier New', courier, monospace; direction: ltr; border-top-style: none; color: black; border-right-style: none; font-size: 8pt; overflow: visible; padding-top: 0px"><span style="color: #606060" id="lnum6"> 6:</span> RegisterRoutes(RouteTable.Routes);</pre><pre style="border-bottom-style: none; text-align: left; padding-bottom: 0px; line-height: 12pt; background-color: white; margin: 0em; border-left-style: none; padding-left: 0px; width: 100%; padding-right: 0px; font-family: 'Courier New', courier, monospace; direction: ltr; border-top-style: none; color: black; border-right-style: none; font-size: 8pt; overflow: visible; padding-top: 0px"><span style="color: #606060" id="lnum7"> 7:</span>  </pre><pre style="border-bottom-style: none; text-align: left; padding-bottom: 0px; line-height: 12pt; background-color: #f4f4f4; margin: 0em; border-left-style: none; padding-left: 0px; width: 100%; padding-right: 0px; font-family: 'Courier New', courier, monospace; direction: ltr; border-top-style: none; color: black; border-right-style: none; font-size: 8pt; overflow: visible; padding-top: 0px"><span style="color: #606060" id="lnum8"> 8:</span> DependencyResolver.Current.GetService<ILogger>().Info(<span style="color: #006080">"Application Started"</span>);</pre><pre style="border-bottom-style: none; text-align: left; padding-bottom: 0px; line-height: 12pt; background-color: white; margin: 0em; border-left-style: none; padding-left: 0px; width: 100%; padding-right: 0px; font-family: 'Courier New', courier, monospace; direction: ltr; border-top-style: none; color: black; border-right-style: none; font-size: 8pt; overflow: visible; padding-top: 0px"><span style="color: #606060" id="lnum9"> 9:</span> }</pre>See that last line? DependencyResolver.Current.GetService will use whatever IoC you have configured and return the implementation of that interface.
Okay, that’s enough to get started. Again, I encourage you to watch Rob’s *entire* video of setting up a new MVC project. Even though the video is for MVC 2, there are still a lot of idea that hold water in MVC 3 and it’s a great learning too (and free too).
Enjoy!
Broken Windows Phone Marketplace
Recently the Windows Phone Developer Team posted an article about how App Insights work and specifically how Free, Top, and New apps work. It’s all accurate, a good read, and (to an extent) will help you improve your app’s ranking in the Marketplace list.
However there continues to exist a few underlying problems with the Marketplace, specifically for independent app and game developers, that has yet to be fixed. This isn’t the first time someone brought this and I blogged about it over a year ago when the Marketplace had about 10,000 apps. There’s even a user voice item to show trial apps that you can vote on.
While I hate being a “this is broken” it seems that if you don’t call people out on things, they just let them linger and hope someone else fixes them. This is somewhat like the broken windows theory that breaking a few windows in a building and not repairing them leads to more disrepair which then spreads to other areas. The idea is to fix a broken window when you see it and keep things fresh and working. To me, most of these broken windows have been in the Marketplace since day one and in some cases, new ones have appeared since the launch of the web-based Marketplace.
Apps vs. Games
This is probably the biggest issue, next to the XBox LIVE one below. When I visit the Marketplace on the web I see this listed for Apps:

And here’s the home page listing for games:

That’s all well and dandy but what if I click on the “Top” filter under Apps. This is what I see:

No, that isn’t a Photoshop with a mislabelled title. It really is the “Top” listing of apps.
Even though apps and games appear separated, they still get lumped together when you view the “Top” listing (because in the grand scheme of things, Angry Birds is way more popular than YouTube or Facebook).
To me this is wrong. Games have their own grouping. In fact they even have an entire page to themselves:

So why are they being lumped into the Top rankings for Apps?
It gets even worse when you click on Apps from the home page to view all of the app and their sub-categories then click on the Top listing for Apps:

Yes, that’s the Top “Apps” in the all category. Is there a single app in that list? No, you have to scroll down (at least in my marketplace, every marketplace ranking is different) to the 12th icon before it’s an actual app (which is then followed by another 8 games before getting to the 2nd top app).
So basically “Top” apps and games is broken. Plain and simple. If you build a kick-ass app that rises to the top don’t hold your breath to hope it will appear in the “all top” listings because you need to climb above all the XBox live games first. With a separation on the site of Apps vs. Games, this is unacceptable.
Suggestion: If you go the distance to separate Apps vs. Games (like you have done) then go the distance and keep them separated. Don’t show me XBox LIVE titles when I’m asking for the Top Apps.
XBox LIVE
This brings us to the second most annoying “feature”. The Games section of the Marketplace offers a new “XBox LIVE” tab. This will filter out indie games and only show you ones that have been created by Microsoft and other studios for XBox LIVE (i.e. they get to participate in the official achievements and points system).

That’s great if you’re looking for an XBox LIVE title. Just click on it and boom, Bob’s yer uncle.
However why do I see this when I click on the Top games:

Yes kids, just like how these titles bubble up to the “top” of the app listing, they also bubble up to the top of the game listing.
Unfair? You betcha. XBL have a tab of their very own and right now there’s only a few dozen titles. So why in the name of all that is holy are you injecting XBox LIVE titles in to the Free, Top, and New tabs?
Okay, I get it. How would you sort out XBL free, top, and new titles from each other? Fair question but since you have a tab of your very own for XBox LIVE why not go the extra distance and have a Free, Top and New tab or filter for just XBL titles.
In other words, an indie game developer has a snowballs chance in Hell of getting into the Top listing for games (or apps for that matter) when trying to face off against the juggernaut of Microsoft Game Studio titles. Of the *Top* 20 games in all categories, only 1 is a non-XBL title.
Suggestion: Please keep XBL titles out of the filtering from the rest of the games. If you give them a sandbox to play in like you did, then let them play there and stop peeing in our sandbox.
Trial
The third issue here is that of Trial visibility. Do you know how to see if an app or game has a trial version? Click on the details for each individual title and you’ll see it on the page under the price:

There it is. On Each. Individual. Page.
So trying to browse to see what’s a trial vs. not isn’t possible. The system knows they’re trials but they won’t tell you until you look at each individual one.
Suggestion: Include a Trial tab or filter or search box or something. Let us see what’s available as a Trial without having to drill into each title.
To me, the Marketplace is broken on a few levels and it’s difficult (if not almost impossible) for people to get visibility above the AAA titles. Here’s hopes that Microsoft might be listening again and perhaps look into it. If you don’t agree things are broken then just consider me the crazy white dude on the corner yelling about doom and gloom and move on. If you do agree, voice your opinion as comments, tweet this, blog about it, whatever. Lets see if we can instigate change.
Thanks!
Farseer tutorial for the absolute beginners
This post is inspired (and somewhat a direct copy) of a couple of posts Emanuele Feronato wrote back in 2009 about Box2D (his tutorial was ActionScript 3 based for Box2D, this is C# XNA for the Farseer Physics Engine).
Here’s what we’re building:

What is Farseer
The Farseer Physics Engine is a collision detection system with realistic physics responses to help you easily create simple hobby games or complex simulation systems. Farseer was built as a .NET version of Box2D (based on the Box2D.XNA port of Box2D). While the constructs and syntax has changed over the years, the principles remain the same.
This tutorial will walk you through exactly what Emanuele create for Flash but we’ll be doing it using C#, XNA and the Windows Phone platform.
The first step is to download the library from its home on CodePlex. If you have NuGet installed, you can install the library itself using the NuGet package that but we’ll also be using some code from the Samples source that can only be obtained by downloading the library.
Once you download and unpacked the zip file into a folder and open the solution, this is what you will get:

The Samples XNA WP7 project (and content) have all the demos for Farseer. There’s a wealth of info here and great examples to look at to learn. The Farseer Physics XNA WP7 project contains the core libraries that do all the work. DebugView XNA contains an XNA-ready class to let you view debug data and information in the game draw loop (which you can copy into your project or build the source and reference the assembly).
The downloaded version has to be compiled as it’s only available in source format so you can do that now if you want (open the solution file and rebuild everything). If you’re using the NuGet package you can just install that. We only need the core library and we’ll be copying in some code from the samples later.
Your first Farseer experiment
Start Visual Studio and create a new project using the Windows Phone template can call it whatever you want.
It’s time to edit Game1.cs
Lines 4: Declare the debug view we’ll use for rendering (more on that later).
Lines 8: Declare _world variable of type class World. World is the main object to interact with the Farseer engine. It stores all the joints and bodies, and is responsible for stepping through the simulation.
Lines 12-17: Create the graphics device we’ll be rendering on. This is an XNA component and we’re just setting it to be the same size as the phone and toggling it to be full screen (no system tray).
Lines 34: We create a SpriteFont here by adding it to the project. It’s called “font” because that’s what the DebugView uses but you can name it whatever you want (and if you’re not using DebugView for your production app you might have several fonts).
Lines 37-44: We create the physics environment that Farseer uses to contain all the objects by specifying it here. We’re using Vector2.UnitY*10 to represent the gravity to be used in the environment. In other words, 10 units going in a downward motion.
Lines 46-56: We create the DebugViewXNA here. This is copied from the […] from the code you downloaded and provides the ability to render all entities onto the screen. In a production release you’ll be doing the rendering yourself of each object but we cheat a bit for the demo and let the DebugView do it for us. The other thing it can provide is to render out a panel of debugging information while the simulation is going on. This is useful in tracking down objects, figuring out how something works, or just keeping track of what’s in the engine.
Lines 49-67: Here we create a rigid body (Farseer only supports rigid bodies) to represent the floor that we’ll drop objects onto. We create it by using one of the Farseer factories and specifying the width and height. The ConvertUnits class is copied from the samples code as-is and lets us toggle between display units (pixels) and simulation units (usually metres). We’re creating a floor that’s 480 pixels wide and 50 pixels high (converting them to SimUnits for the engine to understand). We also position it near the bottom of the screen. Values are in metres and when specifying values they refer to the centre of the body object.
Lines 77-78: The game Update method fires 30 times a second, too fast to be creating objects this quickly. So we use a variable to track the elapsed seconds since the last update, accumulate that value, then create a new box to drop when 1 second has passed.
Lines 89-94: We create a box the same way we created our floor (coming up with a random width and height for the box).
Lines 96-101: We set the box to be Dynamic (rather than Static like the floor object) and position it somewhere along the top of the screen.
And now you created the world. Gravity does the rest and the boxes fall to the ground. Here’s the result:
 Farseer Physics Engine Demo using XNA
Lines 105: We must update the world at every frame. We do this with the Step method which takes in the time interval. [more]
Lines 108-114: Body objects are added to the world but never automatically removed (because Farseer doesn’t know about the display world, it has no idea if an item is on the screen or not). Here we just loop through all the entities and anything that’s dropped off the screen (below the bottom) gets removed from the World. This keeps our entity count down (the simulation never has more than 30 or 40 objects in the world no matter how long you run it for). Too many entities and the app will grind to a halt.
Lines 125-130: Farseer knows nothing about the UI so that’s entirely up to you as to how to draw things. Farseer is just tracking the objects and moving them around using the physics engine and it’s rules. You’ll still use XNA to draw items (using the SpriteBatch.Draw method) so you can load up your usual textures and draw items and pirates and dancing zombies all over the screen. Instead in this demo we’re going to cheat a little. In the sample code for Farseer you can download there’s a project called DebugView XNA. This project contains the DebugViewXNA class which just handles iterating through all the bodies in the world and drawing the shapes. So we call the RenderDebugData method here of that class to draw everything correctly. In the case of this demo, we just want to draw Shapes so take a look at the source code for the DebugViewXNA class as to how it extracts all the vertices for the shapes created (in this case simple boxes) and draws them. You’ll learn a *lot* about how Farseer works just by looking at this class.
That’s it, that’s all. Simple huh?
Hope you enjoy the code and library. Physics is hard and requires some math skills to really grok. The Farseer Physics Engine makes it pretty easy to get up and running and start building games. In future posts we’ll get more in-depth with things you can do with the engine so this is just the beginning.
I've posted the entire source code for this article on Bitbucket so you can grab the whole package here.
Enjoy!
Introducing SharePointR
Recently there’s been a lot of great press on a async signallying libarary called SignalR. SignalR is the brainchild of Microsoft employee David Fowler and helps you build real-time, multi-user interactive web applications.
The last year I’ve been working with a top team in Redmond on rewriting SharePoint into a complete JavaScript version that runs in the client which we’re now calling SharePointR.

SharePointR is a client side version of SharePoint offers all of the base functionality that SharePoint 2010 has but boasts a 300% improvement in speed and productivity for the Information Worker. Along with key features that can only be offered in a client side product, SharePointR comes out of the box with social media integration so there’s no need to build any third party solution.
Technology
SharePointR is built on top of SignalR, a .NET library for building real-time, multi-user interactive web applications. It’s only natural for SharePointR to use the technology and provide a full blown server product like SharePoint to the client. SignalR makes it dead easy and handles all the heavy lifting for you. SharePointR handles all the heavy lifting of running a SharePoint farm for you by putting it on all the client.
Creator David Fowler sounds a little confusing about the product and had this to say. Not really sure what it means though:
Here’s a production product yesterday and predictive rasterized integration legacy fully operating on leftover server data and yup.
Creating a new instance of SharePointR is a breeze:
1. Create a SharePointR hub:
[HubName("sharePointHub")] public class SharePointRHub : Hub { private readonly SharePointR _server; public SharePointRHub(SharePointR server) { _server = server; } }
2. Create a connection between the server and your client:
var sharePointRHubClient = $.connection.sharePointRHub; // Start the connection $.connection.hub.start(function() { sharePointRHubClient.join('domain\user'); };
That’s it! You now have a fully functional SharePointR server running anywhere you want.
How do you interact with it? Simple. It uses all the classes you’re familiar with in SharePoint land, just in SignalR style. Here’s how to get a listing of documents in a document library and display the list name and number of items in a HTML div tag (called output):
var server = $.connection.sharePointR; server.lists["Shared Documents"].foreach(function(){ $("#output").append("" + name + " items = " + items.getCount()); });
Bonus BizTalk Integration
In addition to just a SharePoint server at your fingertips, SharePointR also includes a fully baked BizTalk server (based on BizTalk 2010). It’s drop dead easy to integrate with it using SharePointR:
var biztalk = $.connection.sharePointR.bizTalkR; biztalk.transport.sendPort = 25; var json = biztalk.send("SELECT * FROM Northwind.Customers").toJson(); $("#datagrid").load(json);
With 4 lines of code I just contacted the BizTalk server, issued a command to submit a SQL query on a send port via SMTP and returned a JSON array that I fed into a jQuery datagrid.
How easy is that?
SharePointR is Open Source
Just as the ASP.NET MVC team recently announced open sourcing the ASP.NET stack, the SharePointR team has open sourced the product in the same fashion. I’m very excited about this because not only does it mean SharePointR is licensed under an open source license (Apache 2.0) but the SharePointR team is now accepting contributions! Yes, now the SharePointR team will ship community code inside the core product.
How do you get involved? Simple.
- Find a bug? Send a unit test or fix it.
- Think our coverage isn’t sufficient? Submit a unit test.
- Got a feature idea? Get involved more deeply with the developers and help write it.
Like every large open source project, every check-in (open source or otherwise) will be evaluated against the existing standards used by the developers. Even better, you’ll get to see our developers' checkins to the product out in the open.
Implementation
To install SharePointR just use NuGet in your browser by going to http://localhost/nuget then issuing the command:
Install-Package SharePointR.Server
This will bring down the server package and give you everything you need to run SharePointR. Additional packages can be installed via NuGet. These are:
- SharePointR.Bdc – Business Data Catalog
- SharePointR.Publishing – Content publishing subsystem
- SharePointR.PowerPivot – Powerful reporting via Excel
- SharePointR.Social – All the social media elements of SharePointR

Integrated Services
Some of the new features of SharePointR that we’re announcing is complete integration with Instagram, the fast, beautiful, and fun way to share your photos. With SharePointR you’ll be able to upload photos to a SharePointR picture library and in the background the pictures are automatically posted to the Instagram photo service. This is done behind the scenes so there’s nothing you need to do except setup your Instagram account and password in the system settings:

PInterest meets SharePointR
The Like system from SharePoint 2010 has been abandoned in favour of a deep link integration with PInterest. Now users can tag documents, photos, videos, and files in SharePointR and have them immediately posted to PInterest. The integration doesn’t just go one way, it’s two-way with SharePointR pulling in your pins and boards and allowing you to navigate them in the familiar SharePoint UI.

Native QR Code Support
The SharePointR team thought that QR codes are the greatest invention since the modem and felt they had to be natively included in the product. And they are! Now you can configure a Document Library or SharePointR list to produce a QR code automatically.

We’ll be releasing QR code generation on a per-item level in a future Service Pack.
Availability
SharePointR is available now! Just install it via the NuGet package or you can grab the source code off GitHub.
What are people saying about SharePointR? Take a look!

I hope this sheds some light on what’s happening with the next version of SharePoint and that you see this as a benefit to your organization. While it does mean all your server side code has to be redone, the CoffeeScript tool will help with that so migration to SharePointR should be quick and seamless.
Please don’t hesitate to contact me on Twitter (@bsimser) or via comments below on more questions about SharePointR!
Displaying Large Text Files in Windows Phone Apps
Have you ever needed to provide instructions or help for your Windows Phone app and found yourself creating gobs of XAML and writing it in the Visual Studio designer into a TextBlock control? Not very efficient is it? Here’s a technique you can use that might make things easier.
Ingredients
- 1 Text File (preferable something appropriate to your app)
- 1 Phone Application Page
- 30 Lines of Code
Preparation
Create a new Phone Application Page (or use an existing one). Add a ScrollViewer to it like so:
<!--ContentPanel - place additional content here--><Grid x:Name="ContentPanel" Grid.Row="1" Margin="12,0,12,0">
<ScrollViewer x:Name="ScrollingTexFromHell"/>
</Grid>
You’ll need a text file to display so create one in your project. By default it’s type is set as Content so that’s what we want. Just make sure the file is copied to the project (you can choose to copy always or copy if newer, doesn’t matter). I use Bacon Ipsum to get me some sample text because well, it’s bacon baby.
In the code behind add a method like this:
private static StackPanel TextToXaml(string filename) { var panel = new StackPanel(); var resourceStream = Application.GetResourceStream(new Uri(filename, UriKind.RelativeOrAbsolute)); if (resourceStream != null) { using (var reader = new StreamReader(resourceStream.Stream)) { string line; do { line = reader.ReadLine(); if (string.IsNullOrEmpty(line)) { panel.Children.Add(new Rectangle { Height = 20.0 }); } else { var textBlock = new TextBlock { TextWrapping = TextWrapping.Wrap, Text = line, Style = (Style)Application.Current.Resources["PhoneTextNormalStyle"], FontSize = 22, }; panel.Children.Add(textBlock); } } while (line != null); } } return panel; }
Finally add a Loaded Event to your page to execute this when the page loads and assign the value of the method above to your ScrollViewer.
// Constructor public MainPage() { InitializeComponent(); Loaded += OnPageLoaded; } private void OnPageLoaded(object sender, RoutedEventArgs e) { ScrollingTexFromHell.Content = TextToXaml("mytextfile.txt"); }
The Result

The code is really simple. It just reads in the text file as a stream and reads each line in the text file. A StackPanel is created in our method and whenever the reader hits a blank line it inserts a small rectangle, otherwise it creates a TextBlock control with the content set to the line. You can adjust the height of the space between paragraphs and the font style and size but I picked something that I think looks pretty good when reading long text.
The paragraphs are stacked up in the StackPanel control which is then set as the content to the ScrollViewer we inserted. The user can just scroll through the entire text as they need to.
Enhancements? Of course. You could
- Put this into a Phone Class Library and use it as you see fit (you could even create a NuGet package!)
- Add parameters to the TextToXaml method like font size and spacing
- Do extra things with the reader while processing the text. For example you could recognize a new line and make each new line bold or larger so the first line in each paragraph would be a heading.
Have fun with it. It’s simple and I find it’s better than entering the text into the XAML page directly.
Official and unofficial apps in the iOS, WP7, and Android marketplaces
The last few months have seen people complaining about the lack of "official" apps in the Windows Phone marketplace. In fact a couple of months ago I wrote about this very thing here and if we really needed these official apps or could get by with third-party solutions.
Recently a list of "Top 100 Mobile Apps" crossed my desk and it was curious. 40 iPhone apps, 40 Android apps, 10 WP7 apps, and 10 BlackBerry apps. Really? 10 for WP7? So I wondered if the media was just playing this up and maybe continuing to do what I think most vendors are doing which is treating Windows Phone as the red-headed step-child you keep in the basement while all along there's nothing wrong with them.
I put together the list and went digging to see how many of the top 40 iOS and Android apps were also on the Windows Phone platform (sorry BlackBerry, you should just shut your doors right now). Here's the results. Note, these are all *free* apps. There might be other pay apps that have official representation across all mobile devices, I just chose to hunt these ones down because I'm cheap.
In the top 40, I easily plucked out 20 that had official apps on all three platforms. These were: Amazon Mobile, ESPN Score Centre, Evernote, Facebook, Foursquare, Google Search, IMDB, Kindle, Shazam, Skype (yes, I know, in beta on WP7), SlackerRadio, The Weather Channel, TripIt, Twitter, Yelp, Flixster, Netflix, TuneIn Radio, Dictionary.com, Angry Birds, and Groupon.
Hey, that's pretty good IMHO. 20 or so apps, all free, and all fully functional and supported (and in some cases, even better looking on the Windows Phone platform than the other platforms).
A dozen or so more apps had official apps on some platforms but not all, so yes, there are gaps here. Here's a rundown of the hangers-on:
Adobe Photoshop Express
This looks great on the iOS platform and there's even an official version on droid. Hope Adobe brings this to WP7. There are other photo editing programs though if you go looking (maybe we can get Paint.NET to be ported to the phone?)
BBC News
A few apps offer news feeds but nothing official on the Windows Phone. The feeds are good but without video this app needs some WP7 love.
Dropbox
Again Windows Phone looses out here with no official app. There are a few third party ones that will help you along and offer most of the functionality that you need but no integration that an official app might bring.
Epicurious
Droid seems to be the trailer here as there are apps for it but nothing official (from what I can tell). Both iOS and WP7 have them.
Flipboard
It's sad with Flipboard as it's such a great newsreader. The only offiical app is for iOS but frankly the iPhone version looks horrible so without a tablet the experience here isn't that hot. Maybe with WP8. Currently there's nothing even remotely similar to this on the other platforms.
Google+
Is anyone still using this? No official app for WP7 but some clones. Apparently there's no API so people are just screen scraping. Ugh.
Mint.com
This app has all kinds of buzz and a lot of votes on the application requests site. Official apps for iOS and droid. No WP7 love (yet).
TED
Quite a few TED apps on WP7 but nothing official. I think the third party ones suffice and some are pretty nice looking, taking advantage of the Metro interface and making for a good show.
WebMD
There's a third party app on WP7 here but nothing official. It seems to contain all the same information and functionality the official apps do so not sure if an official one is needed but its here for inclusion.
The other apps in the top 40 were either very specific to the platform (for example all three of them have a "Find my Phone" app). There are others that are missing out on the WP7 platform like ooVoo, Words With Friends, and some of the Google apps (Google Voice for example). Since you can integrate your GMail account right into the Windows Phone (via linked inboxes) I'm not sure if there's a need for an official GMail app here.
Looking at the numbers Windows Phone still gets the worst of the deal here with half a dozen highly popular "offical" apps that exist on the other mobile platforms and in some cases, nothing even remotely similar to the official app to compare. This doesn't include things like Instagram, PInterest, and others (don't get me started on those).
Still, with over 20+ highly popular free apps all represented on all three mobile platforms I don't think it's a bad place to be in. The Windows Phone platform could get a little more love from the vendors missing here, or at least open up your APIs so the third party crowd can step in and take up the slack.
P.S. these are just my observations and I might have got a few items wrong. Feel free to chime in with missing or incorrect information. I am after all human. Well, most of me is.
PrairieDevCon 2012 Sessions
As a follow-up to yesterdays note about my Windows Phone Developer Workshop (there's still room for more peeps!) here's a list of regular sessions I'm presenting at PrairieDevCon 2012.
SharePoint Client Object Model: Accessing SharePoint Externally Using JavaScript

In SharePoint 2010 there are a number of object models that can be used by developers to access the server. The Client Object Model (Client OM) is a unified model which uses the same or similar programming concepts as the Server Object Model (Server OM). The Client OM can be accessed via web services, via a client (JavaScript) API, and via REST. Everything from enumerating sites and lists, displaying list items, adding and creating content, and getting user information can be done all from the Client Object Model. In this session we'll explore the Client Object Model and create examples accessing SharePoint data using JavaScript and jQuery.
Application Design for Windows Phone
In the past year, we’ve worked with hundreds of developers and designers interpreting the "Metro" design system for their own purposes. We’ve seen great interpretations, and others that aren’t so great. In this session, we’ll share with you the foundations of great Metro application design for Windows Phone, and how to use them to build outstanding applications that will stand out and get noticed… for good reasons. We will also be providing some general best practices for building great mobile experiences.
The Marketplace – What Makes a Successful App on Windows Phone?

If you are a developer and have even thought about developing Windows Phone lately, you likely already know that every app and game that is installed on consumer Windows Phone 7.5 devices comes from the Marketplace. This is new to the traditional Windows Phone ecosystem prior to version 7, and while in some cases this does introduce a change for developers and users, there is a lot of reasons why this change is a great one. In this session, we go through both the consumer and developer/publisher experience on the Marketplace and strategies for distributing your app and game both publicly and privately. We will also provide an overview of our Marketplace presence around the world and what new countries have been introduced with the release of the new 7.5 (formerly codenamed “Mango”) update. Finally, we will provide you with strategies on how to increase the popularity of your applications and games and (if you are charging a price for your masterpiece) how to make more money.
Get Juiced with me and 10,000 friends at Prairie Dev Con West
I”m happy to say that Prairie Dev Con West 2012 is almost upon us. In just over a week geeks from the five corners of the planet will get together and talk about D’Arcy Lussier’s hair and hope that the Mad Mexican doesn’t crash their session.
 For me there’s a few sessions I’m presenting including a day long workshop on Windows Phone Development. If you’re looking to learn hands-on development with a Jedi Master then you’ll need to find a different conference. If however you want to try your hand at learning with me and watch me stumble through trying to run Windows on a MacBook Pro, then bring it. Here’s a rundown of what we’ll be covering with the Windows Phone Developer Workshop.
Start your engines and we’ll go from 0-11 in 60 minutes with building more Hello World apps you’ve ever seen. They’ll be a Hello app, a World app, and even a Hello World app. Everything you need to know to get started with Windows Phone development. After a series of Hello World apps you’ll be ready to build anything (well, anything with the words Hello and World in them)
- Everyone talks about the Model-View-ViewModel (or as we experts say MVVM) pattern when it comes to data binding on the Windows Phone. We’ll explore every concievable angle to using the MVVM pattern, tools that make it less painful to implement the pattern, and different ways we can spell MVVM (like MVMV, MVCM, and the ever popular MCMXXVII)
- For me I’m all about the bling and love to criticize apps that make my eyes bleed. Help me make my eyes bleed less by learning the Metro design language. We’ll just randomly pick ones in the marketplace and rip them a new one. If you like watching Gordon Ramsay yell down at people that cook like donkeys then you’ll fit right into this part of day. I guarantee you’ll know the Metro ways after this or I’ll beat your with your own skull.
- Mango introduces about 800,000 new API features and we’ll look at every one of them in detail. There are some cool tools that will help you debug and work with apps in the emulator and we’ll go over the new and old stuff in Mango. This part of the session may extend the day so bring a sleeping bag and some Red Bull to keep you going through the night.
- Expression Blend is the most complex piece of software ever known to man. We’ll try to figure it out. Barring that, we’ll just sit around and sing Kumbaya and make jokes about people from Edmonton.
I’m also presenting a session on using the JavaScript Client Object Model with SharePoint 2010. We’ll build some funky stuff and learn how to iterate lists, sites, and build alternate UIs for SharePoint without writing a single line of C# code. There are also two additional sessions on Windows Phone that I’m planning on doing which is a deep dive into marketing and design. Oh yeah, there are other people doing sessions at the conference too.
The 10,000 friends? Okay, so I think the attendance for Prairie Dev Con West is only a few hundred, but I like to use my imagination and pretend I can see ten times more people than there really are. Same effect when I drink.
In any case, if you haven’t registered already please consider it. D’Arcy puts on a damn good show and the quality being presented here (sans me) is top notch and there’s a huge diversity of sessions to take in.
Also remember the pre-con day-long workshops are there. If all you want to take in is a workshop, that’s cool too and you’ll get a full day earful of Agile, Windows Phone Development, and TFS Build sessions. Still an absolute cheapskate like me? Then there’s a day long Windows Azure Boot Camp you can come out to that absolutely free (as in beer, but space is limited) and even includes breakfast and lunch (sorry, the Microsoft IT Virtualization Boot Camp is sold out).
Come on down and get smart(ish).
Metro Style Site Directory for SharePoint Using EMCAScript
I’ve always been trying to come up with a useful and clever way to allow users to navigate around SharePoint sites. Recently I put together an “Application Directory” which basically displayed a menu system to navigate around apps. Using the JavaScript Class Library for SharePoint to pull values out of SharePoint I quickly put together something that normally would be a lot of C# code and a web part.
The EMCAScript object model is powerful in that you can quickly pull data out of SharePoint sites and lists and make a pleasant user experience with just a little JavaScript, CSS, HTML, and jQuery. It still will make a call back to the server to fetch the data but it’s done asynchronously so the perception to the user is almost seamless.
This post walks you through building a site directory of sorts. It could be used as a landing page on a top level site collection or as a web part sitting on a team site (to show the contents below the site). It’s up to you but the net result is a nice navigation system (done with a little “Metro” styling) all done in a hundred lines of JavaScript.
Here’s what we’re building:
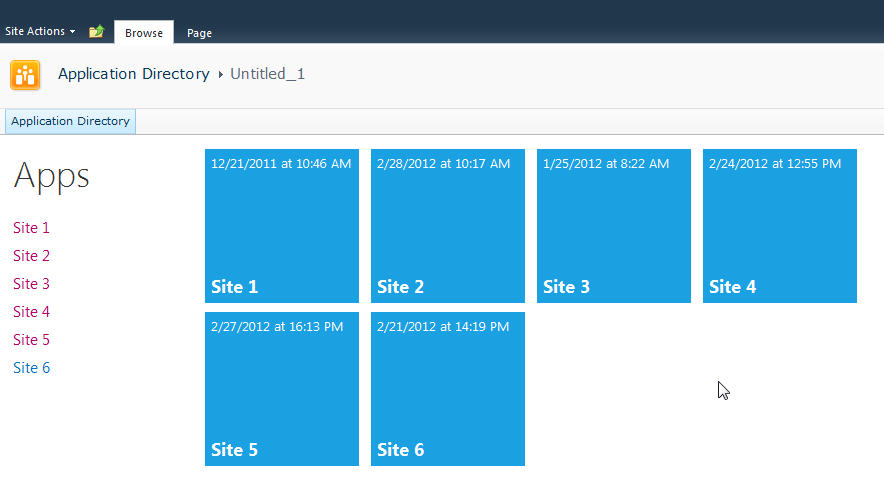
Let’s start with the simplest thing possible. A script that we’ll insert into the page using the Content Editor Web Part via a Content Link. This is my preferred way of doing lightweight adds to SharePoint (like JavaScript or even just raw HTML). The Content Link points to a file in my SiteAssets library in the site and since it’s a link it just gobbles up the content and serves it up. If you try adding HTML to a Content Editor Web Part you’ll find a nice message after saving “Your HTML may have been modified”.
WTF?
Yeah, SharePoint deliciously will go in after you save your nicely formatted content and do some neat things like rename your CSS entities. Oh yeah, it’ll also strip away your JavaScript if it doesn’t like it.
Trust me. Just include the file and you’ll be much better off in the end. Having the file located in the SiteAssets library also lets me just crack it open in SharePoint Designer and while the editor isn’t the greatest, it does give you some Intellisense but the real advantage is saving it in SPD then hitting refresh on your page to see the effect. The file will contain the CSS, JavaScript, and HTML markup. I like putting everything together so I don’t have to worry about files all over my system but you can just as easily use multiple files if you want.
Alright, back to business. Create a new file in your SiteAssets library (you get a SiteAssets library when you create a new site regardless of what template you use or what feature you activate, it’s always there and accessible through SharePoint Designer).
Name the file SiteDirectory.js or something. Doesn’t really matter and you can call it ISavedTheWorldUsingPork.HowAboutThat if you want, but leaving it with a .js extension will give you some semblance of Intellisense inside of SPD.
Drop a Content Editor Web Part on the home page of your site (or wherever you want to put this). This could be a Wiki Page (the Home.aspx page is a wiki page if you activate the Wiki Home Page Feature on a site) or a Web Part Page. There are a few small tweaks you should do depending on what type of page you put this on but just adjust the CSS we’ll be building as you see fit.
Starting simple we're going to just enumerate the child sites and display them in an unordered list. The list is easy to style and works well with jQuery later to be able to animate or attach plugins to.
Here’s the initial code that we’ll put into the SiteDirectory.js file:
Like I said, all this is doing is a) enumerating through the list of subsites then b) spitting them out into an unordered list. Here’s a breakdown of how this works:
Line 1-2: We’ll include some CSS styles here later
Line 4: We include jQuery so we can a) make it easy to replace elements on the page and b) support plugins later. You can choose to use pure JavaScript or omit this if your site already includes jQuery.
Line 8: We declare a variable we’re going to use to hold the list of sites
Line 10: We wait until the core JavaScript files are loaded by SharePoint. This ensures the ClientContext is setup for us when we need it.
Line 12-23: This is the function that calls the Client Object Model to get our web then get the subwebs for the current user. Finally on lines 19-21 we execute the call (which is where we talk to the server) and define the success and failed methods.
Line 25-46: We define the success function to call with our list of subwebs. Here we’re getting an enumerator to the web collection and iterating through them, grabbing the url and title of the site then creating our unordered list using regular HTML markup. Finally on line 45 we find the DIV tag we’re replacing and substitute the HTML we just created.
Line 55-57: This is the HTML markup we’re going to replace in our JavaScript. We initially set the text to “Loading…” so users will see this when the page loads then *magically* it’ll get replaced with our content.
Here’s the result:
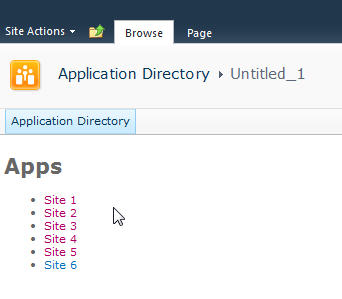
Looks good and lets us know we’re on the right track. If there are any failures you’ll see them here because our failed function will get called and output the error message. This could be anything from a JavaScript error to not calling a known method. Also note that this is already security trimmed since we’re using the getSubwebsForCurrentUser method so we’ll only see sites the user has access to.
Let’s add another list and DIV tag so we have two lists to use:
Not much to explain here, just added a new DIV tag and built up the HTML just like the original. Now we have two unordered lists. We also wrapped up each list in its own DIV tag.
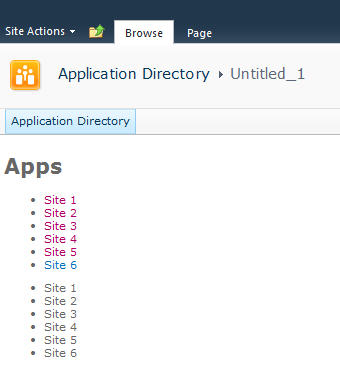
Now we’ll do some simple styling by floating the list of sites down the left hand side and the second list on the right and applying a little styling to the text.
Here’s the updated output:
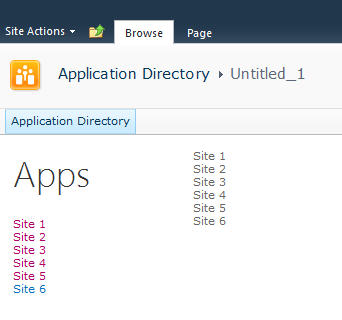
Now it’s starting to look like our target. Let’s style the menu list with a larger font. We’ll also just make one line of code change in our markup in the onSuccess method. Find the line that says menuNavContent += ‘<ul>’ and change it to read menuNavContent += ‘<ul class=”apps”>’. This will style just the unordered list of items on the left.
Here are the new styles to add to the CSS
Now that we have the list done lets focus on the second list which will form our tiles. They’re not as live and vibrant as they could be but they do show some metadata from the site so are at least a little more informative than just navigation boxes.
First we’ll apply some styles to the list to make them into boxes and space them apart. It’s just CSS markup here to add and a couple of small changes in the construction of the HTML for the second list.
We’re just adding some new styles here. There’s a class called theme_blue set to the Metro blue (#1ba1e2) which we set as the background colour for each tile. In addition we set the entire tile to be clickable to the same url as the site. This lets the user click anywhere on the tile (or the list one the left) to launch the site rather than having to click on the title.
Here’s the updated output.
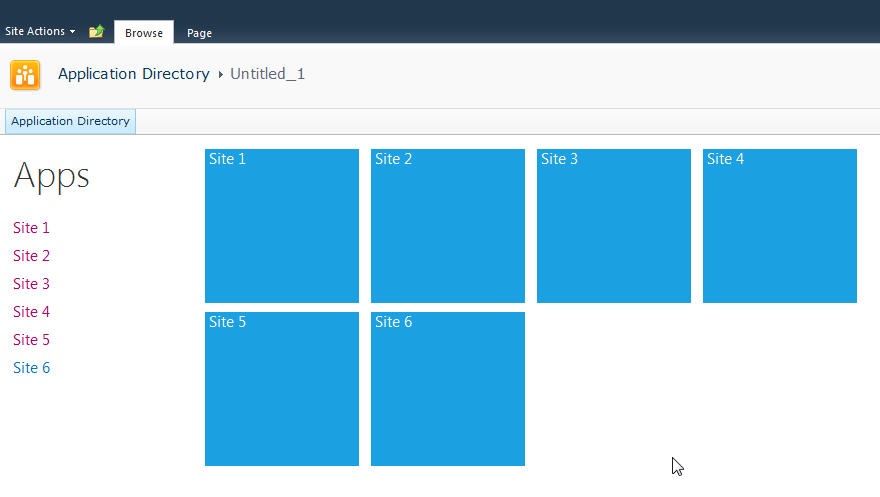
Now that we have our tiles we can add some dynamic metadata to them. This will be pulled from the website itself and give us a navigation system that’s more information than just links.
We wrap the title in a DIV tag with a class of tileTitle which lets us style it to place it at the bottom of the tile and give it a larger font. You do need to be careful of the length of the titles of your sites as this doesn’t work for all scenarios but just adjust it to fit your needs.
We also pull the last modified item date from the web properties. Every site tracks whatever the last item that was modified is and holds onto the date for that item. So now users can see when some content on the site was last changed.
Also we parse out the date from SharePoint into a JavaScript Date object and build a formatted date to display on the tile.
The final image:
That’s it! You now have a single script that you can just drop onto any site to create a Metro style navigation to the subsites. New sites can be added and will automatically show up and users can see when the content on the site was last modified and be able to click on the site to visit it.
Here’s the full source code for the page for you play with.
Remember, this is just a start. There are some fun things you can do with this. For example create custom styles for different colours (for example blue for team sites, red for wikis, etc.) and style them accordingly. Other ideas are to pull other data from the site like description, etc. and put that on a bigger tile. Enumerate the number of subsites in a site and display that. There are other properties you can access off the Web object like if RSS is enabled, etc. so you might want to display different icons on the tile to reflect that. The list of properties on the SP.Web class can be found here.
If you’re following the “Metro” style then remember to keep the UI light and simple. Content over chrome. You don’t want to be dumping all kinds of information here, just enough that your users need to make it useful.
Enjoy!
InstaCam MetroMakeover - Spacing, Margins, and Polish for your Windows Phone App
In the spirit of a recent article that Jeff Wilcox posted on his blog about the MetroRadio app, I thought I would do something similar for the InstaCam app.
InstaCam is a 3rd party app written by Dmitry Manayev to bring Instagram functionality to the Windows Phone platform. I contacted Dmitry about this post to get his permission. Here are a few tweaks that you can keep an eye out for in your own apps.
First up is the Popular Page. This has small square images of the most popular pictures currently posted on Instagram. The page is built on the Panorama control so the title is the default. It’s the pictures that are off a bit here. If they were indented 14 (or maybe 15) pixels then the edge of the pictures would line up with the pano title. Part of Metro is about lining things up and keeping it clean. You should see an invisible line down the left side of your pages that align things up. I saw the same margin issue on the search results page.
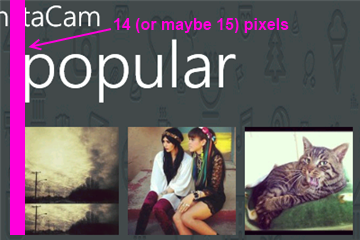
Next up is the search results page. I found the spacing to be a little tight so after measuring it I found that the spacing was in line with the minimum recommended target size from Microsoft, 7mm (check the guidelines here for target sizes). In the recommendations they suggest a target size of 9mm rather than the minimum of 7mm. The idea with Metro is to open up the design and make liberal use of white space. Don’t crowd things together if you can avoid it. There's plenty of space so hitting the target of 9mm (with perhaps a larger font) might open up the page a little more.
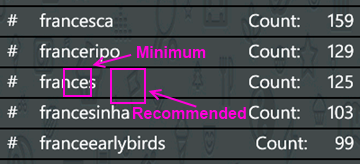
On the feed page there are a few little tweaks I would look at. First is the title for the app. The unwritten rule is that a page title should be in all CAPS. Hey, it’s a style. Check out (most) of the core apps and you’ll see the style applied there. Next is spacing. Jeff Wilcox mentioned there’s no hard and fast rule with vertical spacing (I really wish there was so we could all follow it, hint, hint) but he does say he tends to use 4, 6, 12, or 24 pixels. The default vertical on some of the initially generated XAML you get from Microsoft pegs some vertical space at 17 pixels so the message here can be confusing. For the title spacing I thought a 14px top margin would work here (but 12 would be fine too).

The thing about spacing is be consistent! I don’t think it matters if it’s 12, 17, or 24 but keep it the same on every page. That should be your mantra. Consistency. With vertical spacing (and especially page titles) watch out for the top margin where the system indicators are. If you leave them turned on, you lose 22 pixels. If you turn them off you get that back but remember to turn them on or off across your entire app (or compensate for pages where you have it turned on). For example Panorama pages have the system tray turned off by default so if your app goes from a Pano to a single page (or a pivot) then you might notice a slight “jump” with the title as it moves from a page without the system tray to one with.
Down in the details for a single picture it shows the user who took it, some information about them, and the likes and comments for that photo.
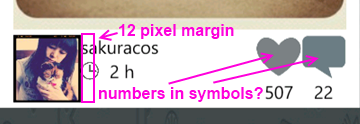
The name and when the picture was taken is a little crowded here and butts up against the profile picture. The suggestion here is to apply a 12 pixel margin to the left of the name (or the right of the picture) to open things up. In addition I would personally put the like and comment counts inside of the symbols (using white to offset the colour). That’s just a personal preference but it might make it a little tighter and gives you more space to be able to use larger symbols. There is a gotcha here of course with numbers inside of symbols. Some images will have 0 comments, other will have 10,000. I have seen a situation where the font scaled based on the width of the number so that might be an option. For sure when testing something like this you should consider ranges like this and try out the extremes. You might not be able to catch every scenario but don't just design for say 4 digits when the possibility of 8 exists for example.
When you view a single image I noticed a few things that a slight adjustment would fix. Again, a lot of these changes here are just minor tweaks to the UI, nothing major. I think this is the case for a lot of applications out there. A couple of hours going over things and moving a few items around goes a long way.
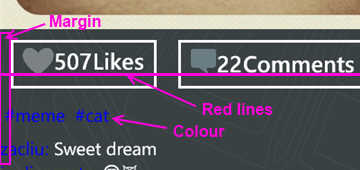
Here again the margin issue rears it’s ugly head. The margin for the Like button is fine (and bleeding the picture itself to the edge of the phone is a nice touch, lets you see more of the image). It’s the tags and detail labels. The colour doesn’t work against a dark background. Whenever you’re looking to highlight something consider using the PhoneAccentBrush colour (but use it sparingly). Dmitry did mention in the latest update that he fixed the colour to the blue phone accent colour. I took these sceenshots from the marketplace so maybe that hasn't been updated. On my phone the text does look better than here but again, watch out for themes when deciding on using accent colours, especially with fixed colour or image backgrounds.
As for the buttons, they’re a little off so as your eye moves horizontally across you see text jump up or down. It’s only a few pixels but a design technique mentioned by Arturo Toledo, a Senior User Experience Designer at Microsoft. On his UX blog he recently talked about the design process for Metro apps. In it he talks about Redlines, marked up screenshots of your app with lines drawn across and up to show alignment and spacing. This is something everyone should incorporate into their release process. Yes, my lines are magenta but that was just for clarity. Red, yellow, magenta, whatever works for you.
For the buttons themselves I would consider doing something with the extra space. Split the buttons (either using a Grid or a StackPanel with the Orientation set to Horizonal) so they’re evenly distributed (Width = 0.5* in the case of a grid). Then regardless of how much the content takes up, they’re consistent and not as jarring to the eyes. Again here I might consider putting the counts inside the symbols (to be consistent with the other views if you did that) but leave the words “Likes” and “Comments” so people know what it refers to. Here the words work because you’ve got the entire width of the phone to display them (vs. the previous image where there’s only room for the symbol).
Finally the user profile page. I would suggest a few small changes here just like the other pages.
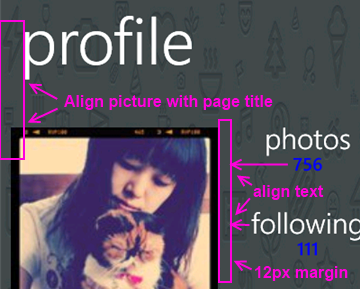
For this page:
- Align the profile picture with the page title
- Align the counts and count labels (photos, following, etc.) on the left. This tends to be the norm rather than centered text which sometimes looks like its floating without an anchor. Again refer to the core apps for some guidance here, for example take a look at a persons profile page (your own or someone else). They’re a good model to follow.
- The colours here are awkward again and hard to read. If you use the PhoneAccentBrush colour then pay attention to how the light and dark themes work against your backgrounds. Sometimes when using background images you need to adjust the Opacity dynamically. When testing, just go through all of the Theme colours in both light and dark mode. It takes an hour or so with a few screens and all of the combos but you’ll cover all the bases.
That’s it. Hopefully that helps you in your own application development and gives you a few little things to look out for. They’re all minor tweaks but things that you can add to a final checklist of things to go over before you submit your app to the marketplace. Thanks for Dmitry for letting me write this post and perhaps he’ll put some of these suggesting in a future release.
Calgary! SharePoint! Workflows! Pigs! Action!
Join me and a cast of thousands as we do an interpretive dance version of Lord of the Flies.

Oh yeah, and Jason Kaczor will also be presenting on custom workflow actions and SharePoint.
From the marketing blurbage:
This presentation is about Custom actions which are .NET components. I will also be presenting some best practice framework code as well for trace logging/etc. I will also talk about Event Receivers – they tie closely to the concept of “something executing based on something else changing” like workflows, but are occasionally the better choice to use.
Registration is preferred for this event. Those that register will be given an extra cookie. Please register at either EventBrite or Microsoft ClickToAttend.
Does the world really need "official" apps?
The "buzz" exploded a few days ago with this site. "Official" application requests for Windows Phone 7, vendors and services that don't have a presence (an official one anyway) on the Microsoft phone platform. I have to ask though, do we really need an "official" app?
Okay, let's take a few steps back before we go forward. What exactly is an "official" app. I would say it's a) an app written by the service owner (Instagram, Pinterest, Twitter, etc.) or maybe b) an app officially endorsed by the service owner. In any case it's considered sanctioned, blessed, whatever. Foursquare, Flickr, Groupon, Twitter, YouTube, etc. all have apps like this. In the case of apps like YouTube and Twitter you'll see the application publisher is Microsoft. These guys might have deferred the creation of the apps to Microsoft or the publishing or both.
People see these apps as *the* app they should get if they want to use that service on their phone. Apps turn into verbs and users are told to use Evernote to use their service on their phone. With the moniker of being an official app I suppose it carries a bit of levity as far as stability and reliability.
Or does it?
In the case of longevity it might be the case. As long as ESPN is on the air, they'll have an ESPN ScoreCenter app. Or will they? Budgets come and go so if I was a manager and looked at "trimming the fat" I might consider lopping off the mobile developers and abandoning that early. After all, how much revenue does a free app on a phone get you? I do think once the genie is out of the bottle that organizations will at least try to keep that division running and we haven't seen too many apps fall by the wayside. So yeah, it's probably a safe bet that "official" apps will stay around as long as the service is there.
On the reliability side it's a different story. What's the number #1 request on the user voice site right now? Facebook. Wait, that has an "official" app doesn't it? It was built by Clarity Consulting but looking at the comments on the uservoice site and on the marketplace you see things like "They need to fix this", "Add some new features", and "Need a lot of work!!". The Twitter app, IMHO, is another fine example of an "official" app generally gone wrong. No live tiles, it's been out for 16 months and it's only on version 1.3 and last time I used it I couldn't even do a "reply all" on a tweet. Frustrating.
Official apps may be no better than 3rd party ones out there so don't be fooled by the "official" title. Indie apps are built by developers with a passion, official apps might in some cases be considered an IT expense.
The first thing you have to look at, does the vendor or service have an app? On any platform. If they don't then the next question (besides should they) might be, is there a way to get one on there? Are there any data sources available. Obviously if they have a web presence then they have data but it may not be publicly consumable. If they do have an app, is it good enough. What are the reviews like? Is it meeting the needs of the many and providing a way to access their services to do everything. Is that the purpose of the app? Sometimes apps are supplements to the on-site services they have available and not a substitute. Aside from services, does the app work correctly, doesn't crash, is quick to respond, is updated frequently to align to new features the service offers, etc.
If they do have an API is it a) publicly consumable and b) is it full featured? One stumbling block I hit with producing an Instagram app for Windows Phone was that they didn't provide a way for users to register new accounts or upload photographs, a cornerstone to the service itself. This can be frustrating so before you embark on perhaps building something check to see if you can do it.
So what's the value-add for you building an application, either as the only application on that platform or a supplement to a broken or limited-functional "official" app? Are you making it better or filling in the gaps the official app is missing? What happens when the official app maybe catches up and delivers that functionality. Now you're playing a game with the official team and you might not win that battle. Something interesting with something like Foursquare is that the reviews are not too horrible (some good, some bad) but looking at the reviews and functionality of something like 4th & Mayor is that the official app came out long after Jeff Wilcox's version. Was it too little and too late? Jeff constantly updates the app not only for stabilization but new features. The reviews, UX, and stability of this "unofficial" app outweighs the popularity of the "official" one, although I think this an exception to the rule. Again, this is a good example of a labor of love vs. an IT project.
I think it's great we have the official apps on the Windows Phone but I think it's even better that we have public APIs, a nice development platform, and a passionate community that wants to do better. If all we do is accept the official apps then we're not pushing the envelope. Sometimes that's just not good enough and we as a community deserve better. Support it by showing your voice on sites like the Marketplace Request site, by blogging about it, and by pushing services to provide the ability for developers to step in and help out.
As for vendors and service owners, please do us a favor by exposing your APIs and letting developers do what they do best, develop. Focus on your service if you want and put it out there for others to pick up the ball and run with it. Keep on top of what's out there, help us by helping you, and you might be surprised in what we might be able to accomplish. It's like I tell game studios, focus on building your game. The development community will stand up and provide the supplemental tools that will build the community for you, you just have to give us the tools to do what we're passionate about.
The Big Dummies Guide for Windows Phone Developer Resources
Windows Phone apps are growing in popularity as does the
50,00060,000 apps in the marketplace today. Microsoft has done a great job at putting together some resources for developers including full documentation. When you first land on App Hub there’s all kind of samples, toolkits, and quick starts to get you going.This post is to fill in some gaps and direct you to some additional resources that I’ve built up over the last couple of years of building phone apps. I won’t regurgitate the Microsoft resources here, you can get all of those at the App Hub itself. Instead these are other resources that will hopefully be useful.
Toolkits and Utilities
What you get out of the box is a lot but there is a lot more to offer out there that others have come up with. Here are a few.
Here’s a collection of utilities put together by the Dutch Windows Phone developer community. A lot of great small classes here that you can leverage in your app with some cool controls and new behaviours. It even has NuGet Support so adding it to your project is a no-brainer.
This is a nice little set of classes and while not as all-encompassing as others, does have a couple of killer things you must have on your phone. Namely an error reporting system (Little Watson) and a system to let users know of new versions and features. Must have!
I’m always writing code to call HttpRequest (or WebClient), download data from a site, deal with callbacks, then deal with updating my ViewModel. Agfx takes the heavy lifting out of a lot of this and tosses in free caching (with policies you specify like auto-refresh) making it a breeze. Highly recommended for any Windows Phone project that needs data.
Silverlight Toolkit for Windows Phone
This is from the Windows team and again, open source, providing you with a dozen or so controls including a frame system that lets your apps look and behave like the core ones, just with one line of code and a few lines of XAML markup on each page.
I’ve always had to write classes and plumbing code when dealing with tombstoning (saving the state of your app). This helper comes as a NuGet package that you can handle all your tombstoning needs with 1 line of code. Simple and easy.
We all hate writing the same boring get/set code for our MVVM properties. Enter this tool. It adds a custom MS Build task to your project and will take care of that for you. Now you just write POCO classes and the rest is handled for you. You're welcome.
Tired of writing about dialogs and screens? Install this (via NuGet of course!) and call it with one line of code. Viola. A complete A bout page with your own user definable pivots, license information, credits, etc. You can even load pages remotely and if there’s no network connection no problem, the library will handle it.
Another great about page, this one is driven from local resources and requires no coding, just configuration. I use this on some of my apps where I want to programatically hide/show sections of the above page (for example showing a "buy" button but only for trial apps). Nice!
Another useful library with a smattering of great controls, helpers, and converters. Drop in, use, profit (okay, the last part might take some work).
Silverlight apps on Windows Phone 7 greatly benefit from databinding and not the databinding you learned to hate in VB6. This is true, two-way databinding that lets you separate your concerns with your app correctly. MVVM Light is one library that helps do this (you can just use IPropertyNotify on your own classes) but provides other things like behaviours that can be bound to properties for eventing. Very useful.
Another MVVM library that works great with Windows Phone 7 (be sure to get the latest code, the NuGet package at the time of this writing didn’t support Mango and needs to be updated).
This is a great add-on that will help you deal with checking if the phone is in trial mode or not which will let you toggle different features or parts of the UI. An added feature is a simple toggle in your App.xaml file will let you put the app into Trial mode to test things out before sending to the marketplace. I packaged this up into a NuGet package so you can add it to any project quickly but check out the documentation on the project site as to how to use it (it's really easy).
Design
Design is a huge part of Windows Phone apps looking to capitalize on the Metro Design Language.
All kinds of icons and images go into just the basic Windows Phone app. Don't worry, it's not complex but it helps having a slick design. Look at getting one from any of the many low-price services out there (check out places like GraphicRiver for some people that would be more than happy to do some work for you). My first few apps I picked up some icons cheap ($5) from sites. Other places are creative commons licensed photos if you need them (make sure you include the proper credits in your About dialog). Microsoft has put together this page for you and while it won't make your app look awesome, it will tell you what graphics you need and where they're used.
This is a simple class that overlays a series of translucent boxes, all evenly spaced, on your app during debug time. It’s invaluable to check the lining up of those controls and titles. By Jeff Wilcox and the Windows Phone team.
31 Weeks of Windows Phone Design
The UX design team got into the habit of posting detailed articles on the Metro design language and it's nuances. It's a fascinating deep dive with a ton of great ideas around how the design of Metro apps works and provides some excellent insight into the design process that you can use in your apps.
Microsoft offers a design guide which is great but Jeff Wilcox turns it up to 11 with this post, covering all kinds of implementation tips developers should use before submitting an app.
Cheryl Simmons on the Windows Phone team has a great cheatsheet to follow here for all Windows Phone developers. Great tips on a variety of subjects.
Resources
Games for sure need music but nothing stopping you from putting original music into an app. Here are some royalty free resources you can use.
Hundreds of great looking Windows Phone icons you can use in your app, app bar, etc. all licensed under Creative Commons.
Development
Jeff Blanketburg took it upon himself to post 31 days of Windows Phone tips that covers all the basics you need to get going. Each post is deep on each topic and a recommended read to get into any of the core controls and features for building WP7 apps.
The last update for Windows Phone called Mango added all kinds of great new features like live tiles, search integration, running under lock screens, etc. Jeff comes back with 31 more days for Mango specific features.
MessageBox and Application Lifecycle
This can be tricky when you’re trying to not only pass certification but manage popups and screens. Here’s a post to help you through that.
Jesse Liberty, another huge name in the Windows Phone arena, has a whole set of tutorials focused on single tasks (currently over 30 of them). Great stuff and very useful!
Adam Nathan did the community a solid by creating 101 Windows Phone apps, then writing two books on it (there’s only enough room in a single book). Each app is detailed in a separate blog post on his site and covers various types of apps you would build with WP7 like stop watches, calendars, to do lists, and more.
Internationalization
Windows Phone is everywhere, not just English speaking nations!
A nice post on how your app can be more recognizable and (perhaps) popular in the Japanese markets. With Nokia phones hitting the marketplace, this tip is invaluable to reach out beyond your own backyard.
Globalization and Localization for your Phone
A great MSDN article (actually a series of them) that walks you through setting up localization for multiple languages. It’s easy and even if you only support one language, do this so all your strings are in a resource file and not hard coded for easy updates.
Achievements
If you’re building a game or even want to incorporate leaderboards and achievements into your phone app look no further.
This is a free and open source solution with a back-end server to keep track of your own user defined leaderboards and achievements. You define it on the site and with a few simple calls in your code, upload scores and award achievements to users and display global leaderboards in your app. Silverlight and XNA samples available to get you started.
Marketing
Building your app is just part of the process, then comes getting it out to the masses and keeping the word out.
Windows Phone 7 App Site Template
This is a complete one-page site template that’s completely data driven. You just make some modifications to the app name, provide some screenshots, deep links, etc. and you’re good to go. There’s even integrated Twitter and Uservoice support.
Adam Nathan puts together his own personal tips for submitting to the marketplace. Feel free to use this as a checklist. I do.
Training
No, this isn’t a link to some overpriced course. It’s a link to over 20 hours of free video training put together by Peter Kuhn. The videos include complete source code and walk through all the aspects of building Windows Phone apps from soup to nuts.
Tools
Tools are any part of a good developers kit and there’s no shortage of them for Windows Phone developers.
Think of it as Firebug for your phone. Why are you still reading this?
Wondering if you’re writing the right thing to your phone or want to take a look at where things are going in your app? This tool lets you peek inside the storage system for you.
This is an awesome tool and installs with ClickOnce so you always have the latest version. It lets you take screenshots effortlessly with or without an emulator skin so you can do cool shots for your blog and take the final images for the marketplace.
Bored with the out of the box emulator every time you launch it from Visual Studio? This tool let’s you change up the skin to something more sexy and fun, all with the click of a button. Be the cool kid at your next Windows Phone presentation and amaze your friends!
Monetization
Microsoft Advertising Services
Microsoft has continued to expand it’s monetization services by offering up ads in new markets (and markets are being added regularily). Various reports have different successes with these services but they’re baked into the Mango SDK and easy to setup and use.
This is by far a complete list so please leave a comment with more links, suggestions, and corrections as you see them. I’ll update the post as quickly as I can.
Now, go get building your first Windows Phone app!
Visual Studio Achievements - Remember Kids They're Just For Fun
I followed a neat project for the last couple of months which today became a reality, Visual Studio Achievements. Achievements are something the gaming world are very familiar with. They're milestones of recognition to meet like "Blowing up 30 Enemies with 1 Grenade" or "Destroy a Super Tank playing the Classic Game". There are a lot of sites around the Internet to track them including one dedicated to just XBox 360 ones here.
They're fun and you get a bit of an internal high when you see this on your screen:

The Visual Studio Achievements follows the same idea and, once installed, are based on your activity as you work. Achievements are measured and discovered in the background when you compile. And hey, it's cool and fun to see this after a compile:

However when you look through the list of achievements one thing jumps out to those that try to follow good coding practices. These are certainly not that. In fact if I caught you writing a class with 10 levels of inheritance I would rip you a new one at the next daily stand up that would make even the likes of Gordon Ramsay shake in his knees.
Ahh but you say these are for fun. Yes, yes they are and far from me to be the party pooper. What sparked me to write this blog response is to emphasize F-U-N and not practice. Seriously you won't believe (or maybe you will) how many developers I talked to around me that thought this was a cool thing to install in their work environment.
Wait. Let's think about this for a minute.
-
Install achievemnts add-on in work environment.
-
Do work
-
Get achievment
Okay, the first step is fine. The second step is what we do. The third step? Hang on. Didn't I just say that having 10 levels of inheritance is a bad thing? So if you get the achievement during your daily work it should be a *bad* thing, not something to celebrate.
It's like breaking the build (which we all do at some point and certainly people get ridiculed for it, it's all fun right). Breaking the build is a bad thing but it's a good spin. It means we recognize something went wrong and whatever mechanism you have to let you know (since everyone on the team should get notified) means you get up, rally around, and fix the problem. Good stuff. Build fixed, work continues.
Where's the rallying here? The only thing that will happen is the dev will see the achievement, pat himself on the back and have a chuckle then what? What *should* happen if you installed this and got an achievment should be:
-
Do work
-
Get achievement
-
Chuckle
-
Silently say "Oh shit"
-
Fix problem
-
Lather, Rinse, Repeat
Hopefully this is the case, but again I've asked a few people and they miss the point of the fun aspect here. This shouldn't be something you strive to achieve, the achievements here (as they stand currently) should be something to avoid. In fact it should set of an internal whoop-whoop alarm and cause you to think "What the Hell was I thinking".
Before you dismiss me, I'm all for fun. I'm the guy that has robot zombies and posters of Close Encounters in my cubicle and challenges developers to games of magnetic Angry Birds after stand-up. I'm all that. However I just want people to be aware that this is fun and there might be a message here. Keep focused on good practices and not bad ones. In the game achievement world, we *try* to achieve these tasks. Heck when I get a game and I'm bored I look through the achievements and set myself up to try to accomplish it (mostly failing since I literally suck at almost every game).
However developers should not be looking at these achievements as something they should be striving for (except just to get the achievement and make it onto the site). What would I really like to see? Some actual achievements that developers can strive for and be proud to achieve. How about "Eliminate 10% of the codebase without removing functionality" or "Mock a service and pass 10 unit tests against it" as achievements.
Herein lies the real problem though. Getting the *fun* achievements is easy. They're tangible and simple to measure. How do you measure "good code"? Can you scan code with a computer and determine separation of concern? Or if your code follows SOLID principles or not? Somethings are detectable but most of the good stuff is not. That's the real trick here (and if you figure it out in a system where you can automatically detect it and award and achievment for, all the better).
Like I said, have fun with this addon. It's neat and I applaud the developers for coming up with it. I don't discourage its use but keep in mind what it is and what the message behind it is. Hopefully one day with might have some positive achievements to strive for as well as the fun ones.
The Big Dummies Guide to Building a SharePoint Internet Site
I'm about to embark on a new project, building a SharePoint based Internet site. This is new for me as all the SharePoint work I've done has been Intranet facing and I know there are some challenges with SharePoint and outward facing sites. So I called on a few MVP friends and people that have some real world experience configuring SharePoint for Internet to see if I could come up with a list of tips, tricks, and things to watch out for.

Search Engine Optimization
-
Out of the box URLs are not SEO friendly, you need a custom solution
-
Jie Li, a program manager on the SharePoint team, has a great collection of tips for optimzing your search engine face
-
For creating short urls (like bit.ly, tinyurl.com, etc.) Waldek Mastykarz has 4 ways to use short urls (which will help with the SEO)
HTML/HTML5
-
Out of the box HTML is somewhat horrible and not very optimized for Internet sites
-
If you want make SharePoint to output native HTML5 pages and get validated, then the answer is no. SharePoint 2010 is designed to output content in XHTML 1.0 natively.
-
I *always* start with Randy Drisgills master pages on new Web Apps. They're clean, optimized, and easy to use. Highly recommended.
-
Randy Drisgill has a post about HTML5 compatibility although it was for IE9 beta and hasn't been updated, but still contains some good info.
-
Kyle Schaeffer has a new "responsive" HTML5 master page for 2010 that seems to have a lot of popularity so might be a good place to start from (or combine it with Randy's master pages)
Multilingual Support
-
A good, detailed post by Serge Tremblay on setting up, configuring, and supporting multiple languages in SharePoint
-
The Planning for Multiple Language support series of articles from Microsoft which is a good starting point
-
An MSDN article on using MUI support with examples on changing and setting languages, good for writing custom JavaScript to let users toggle the language selection
Hardening
-
Use ViewFormPagesLockdown to prevent access to system pages. It's still used in 2010 and turned on by default with publishing sites. Here's a blog post from the support team with some information about it.
-
TechNet has an article about securing your farm for anonymous access. Unfortunately it's for SharePoint 2007 so some (most?) aspects might not apply to SharePoint 2010.
WCAG/508c
The Web Content Accessibility Guidelines 2.0 are the internationally accepted standard for web accessibility so you might want to look at providing this for your Internet facing site.
-
SharePoint 2010 is WCAG 2.0 AA compliant
-
Complete list of Web Accessiblity Compliance tools can be found here
Mobile Support
-
The out of the box mobile experience doesn't support anonymous users, which is the standard for Internet sites. Waldek has one workaround here.
SQL
-
A fairly in-depth blog post about optimizing the SQL side of things while making SharePoint peform better.
General
-
Mavention has a nice site checking tool that's specific for SharePoint 2010. Highly recommended.
-
Elizabeth Olson, a Program Manager for SharePoint, presented at MIX10 on designing an internet facing site in SharePoint. Here's the 45 minute video of that session.
-
As this is an Internet facing site you'll probably want to hook up some kind of tracking system so you can produce nice stats for the suits. Google Analytics is a good start but feel free to use any tool. They all hook in usually through a simple piece of JavaScript you can add into your master page.
Features
Performance
As far as SharePoint and Internet sites you could probably write an entire book on just performance. There are so many things to take into consideration, both on the SharePoint side (configuration wise of the site) and the IIS one. Watch out for content and customization issues though, as they're not directly SharePoint related but people will blame SharePoint for issues. Things like large articles, missized images, unoptimized JavaScript, long running scripts, etc. can all lead to performance issues that have nothing to do with SharePoint.
-
Some tips on how to Reduce page size
-
Fiddler is an invaluable tool to see your pages load times (and tracking down errors)
-
YSlow shows you where bottlenecks are in page loads and helps you optimize them
-
Custom caching to optimize your sites. Good information with pros and cons of the different types of caching.
-
Minifying custom JavaScript files. Nice article by Wictor. Use any tool you need to or the built in one in Visual Studio to do this. JavaScript compressor will do this for you.
-
Here's the article for optimizing the web content management site but it's for SharePoint 2007. Not sure how much is relevant in 2010.
-
Chris O'Brien has a nice checklist for optimizing SharePoint sites like this although much of it is written for SharePoint 2007, but some is universal and works for 2010
-
Joel Oleson did a great presentation on optimizing SharePoint 2010. Here's a PDF of that presentation.
This list is far from complete and should be an evolutionary thing as it's just what I've collected myself. Do you have experience building SharePoint sites on the Internet? What kind of issues did you come across? Feel free to leave comments with your experience, links to your blog, etc. I'll update this list with that information.
Enjoy!


