Contents tagged with SharePoint
-
SPListCollection ContainsList Extension Method
This is such a simple thing but something every SharePoint developer should have in their toolkit (well, actually, this is something Microsoft should put into the product). The SPFieldCollection has a nice method called ContainsField so you can check for the existence of a field (without throwing an exception if you get the spelling wrong). This is my version of the same method for SharePoint Lists.
Enjoy.public static class SPListExtensions
{
public static bool ContainsList(this SPListCollection lists, string displayName)
{
try
{
return lists.Cast<SPList>().Any(list => string.Equals(list.Title, displayName, StringComparison.OrdinalIgnoreCase);
}
catch (Exception)
{
return false;
}
}
}
-
Virtual Machine Tips for running SharePoint
Just a few simple Virtual Machine tips when developing in SharePoint
-
My VMs are 40GB in size and pre-allocated. After installing SharePoint, SQL Server, and Visual Studio and all the tools I need I have about 10GB for data which is more than sufficient for most jobs. The pre-allocation helps performance but you need a lot of disk space so keep that in mind when planning your VM.
-
I run my VMs disconnected with their own Domain Controller (for development I usually just run a single VM with DC, SQL, and SharePoint all in one). I reconnect them via a bridge to the host network adapter when I'm at home off my corporate network. This is to get patches and keep things up to date. Running disconnected is nice because you know when things fail and why. Got a rogue web part that's behaving strangely? Put it in your VM and take a look at it to make sure it's not relying on some external service (which may be throwing proxy errors or something from your corporate network)
-
I rely on source control to store my code and only pull down copies of current projects when I'm ready to work on something and keep things fresh with mulitple check-ins per day. With VMWare the nice thing is that I can mount the VM as a disk image in case I need to pull something off (without having to fire up the VM). Having a source control system like GIT or Mercurial instead of Subversion or VSS will let you do local check-ins then you can sync when you're done at the end of the day.
-
VMs on the local drive (if you're running a SSD) are waaaaaaaaaaay faster than on an external drive. If you have to use an external drive for your VMs (I've since stopped doing this with the increased size of SSDs these days) then go with eSATA for the best performance (although some people will argue USB 3.0 is faster). Pre-allocating the VM on an external drive will help with performance as well.
-
Give your VM lots of memory. Any SharePoint developer must be running at *least* 8GB on their host machine. Give your VM 4-5 GB. No watching movies while you work, defer that to another machine. For SharePoint 2013 you really need to run 16GB on your host machine and give your VMs 8-12 GB of RAM.
-
Copying large files into a VM (like an installer) then deleting it will cause fragmentation that you might not get back during regular usage. Make sure you use your virtualization tools to defragment your VMs on a regular basis.
-
A really great tool to keep your VMs under control size wise is SpaceSniffer. It visually shows you where things are gobbling up space in the OS so you can pinpoint things that you don't need and zap 'em! Get it. It's free!
That's it for now. Just a few simple tips that might help out. Happy developing!
-
-
ASP.NET Training Videos Delivered via SharePoint
Recently Scott Hanselman posted on his blog an ASP.NET Jump Start session they had which featured 9 videos (over 8 hours of content) on developing apps with ASP.NET. This is a great resource and I wanted to share it with the rest of my team. Problem is that a) the team generally doesn’t have access to video content on the web as it’s generally blocked by proxy b) streaming an hour video over the Internet might be okay for one but not for an entire team and c) there must be a better way to share this other than passing out links to Scott’s blog or the Channel 9 site.
We have a team site in SharePoint so I thought this would be a great opportunity to share the information that way. The problem was that even at medium resolution the files are just too big to host inside of SharePoint.
Sidebar. There have been a lot of discussions about “Large file support” in SharePoint 2010 (and beyond) and that’s great but for me the bottom line is that extremely large files (over the default 50MB in size) just isn’t meant for an Intranet. I can hear the arguments now about it but a few things to consider with large files (specifically media files like videos). Uploading a 100MB file to the server means 100MB of memory gets gobbled up by the w3wp.exe process (the process attached to the Application Pool running your site) during the entire time the file is being uploaded. LANs are fast but even a 100MB file only gets uploaded at a certain speed (regardless of how big your pipe is). Also uploading the video commits the user to that web front end (usually pegging the server or process) so your load balancing is shot. In short, many people bump up the maximum size of SharePoint’s default of 50MB without taking any of these things into consideration then wonder why their amazing Intranet site is running slow (and usually they toss more memory on the front-ends thinking it will help). Basically 50MB should be the limit for files on any web application when users are uploading.
In any case, an option is to specify the files via UNC paths which means that a) I can just use the Windows Desktop top copy the files so no size limitations and b) I can address the files via the file:// protocol. This works much for most Intranets and large files and should be considered over stuffing a file into SharePoint (regardless of how you get it in). Remember that a 100MB file in SharePoint generally takes up at least 150MB of space (and if the file is versioned, eek! just watch your content database explode in size!).
So my first step was to download the files and put them onto a file share. Simple enough. 9 files. I grabbed the medium size files but you can get the HD ones or whatever you want (I just didn’t want to wait around for 500MB per file to download with the high quality WMV files). Medium quality is good enough for training as you can clearly see the code in the IDE and not be annoyed by pixel artifacts on the playback.
Now that I had my 9 videos of content on the corporate LAN it was time to set something up to display them. You can get way fancier than I did here with some jQuery, doing some Client Object Model code to write out a video carousel but this is a simple solution that required no code (and I do mean absolutely zero code) and a few minutes of time. In fact it took longer to copy the files than it did to setup the list.
First create a Custom List on the site you want to server your video catalog up from. Then I added three fields (in addition to the default Title field):
- Video. This was set to Hyperlink field that would be the UNC path to the video itself on the file share.
- Thumbnail. This was a Hyperlink field formatted as a picture and would offer up a snapshot of what the user was going to see.
- Description. A multiline field set to Text only that would hold a brief description of the video.
Here’s the Edit form for a video item:
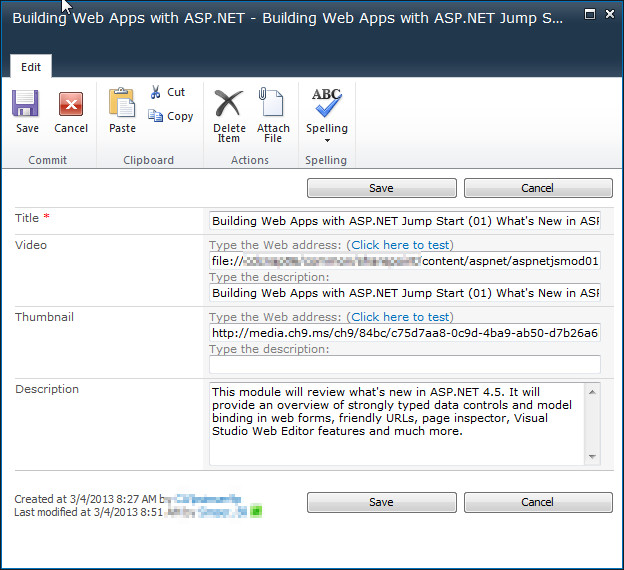
- The title is whatever you want (it’s not used for the catalog)
- The Video is a hyperlink to the file on the file share. This will take the form of “file://” instead of “http://” and point to your UNC path to the file. Put the full title (or whatever the user is going to see to click on) in the description field. With Hyperlink fields if you leave the description field blank it gets automatically filled in with the full link (which isn’t very user friendly).
- The Thumbnail is a hyperlink to an image. You can choose to make your own (if your content is your own). I cheated here and just grabbed the image directly off of Scott’s blog (which is up on some Microsoft content delivery network location). As this field is formatted as a Picture it’ll just display the image so make sure it points to an image file SharePoint recognizes (JPEG is probably preferred here).
- The Description field is just copied straight off the blog. Again, change this to whatever you want so users know what the video is about.
Once you populate the list with the videos you almost ready to go. Here’s the default view of the list:
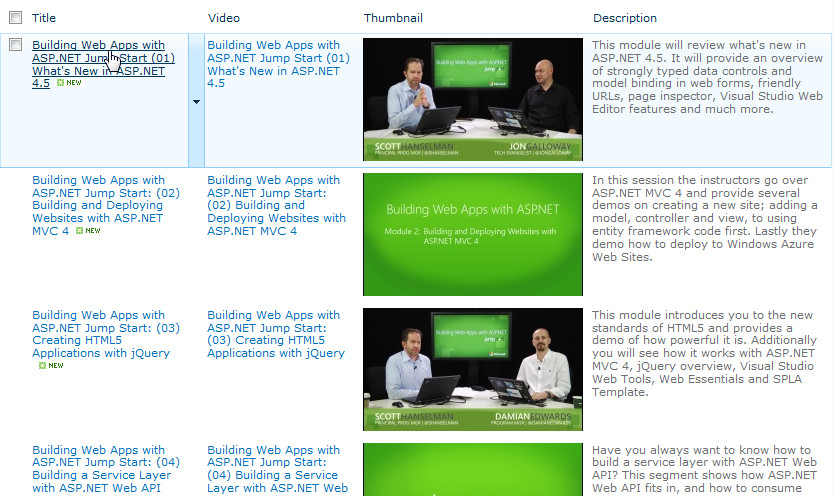
This is okay but not very user friendly for viewing videos. Users might click on the Title field which would open up the List Item instead of launching the video. So instead either create a new view or modify the default one. If you create a new view you might want to set it as a new default so when a user visits the list they see the right view.
In your new view we’ll set a few options:
- Set the first three columns to be Thumbnail, Video, and Description (in this order). This is to create the catalog view of the world so you might want another view for editing content (in case you’re adding something or want to update a value).
- Turn off Tabular View as we don’t need it here
- Under Style choose “Boxed, no labels”
Now here’s the updated view in the browser:
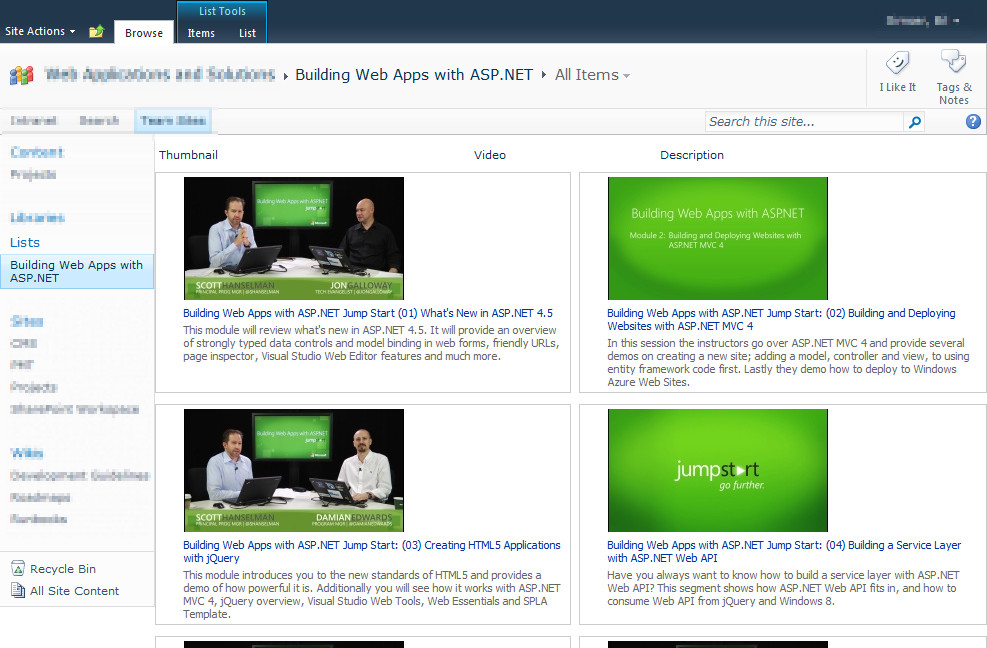
Pretty slick and only took 5 minutes to build the view. Users click on the title and the video launches in Windows Media Player (or whatever player is associated with your video file format you’re pointing to).
Note that this posts talks about a specific set of files for a solution but the video content is up to you. If you have some high quality/large format audio or video files in your organization and want to surface them up in a catalog this solution might work for you. It’s not about the content, it’s about serving up that content.
Enjoy!
-
Defaulting Values in a Multi-Lookup Form in SharePoint
This was a question asked on the MSDN Forums but I thought it was worthy of a blog post as I could get more in depth with the explanation and show some pretty pictures (plus the fact I’ve never done it so thought it would be fun).
The problem was a user wanted to default multiple values in a lookup field in SharePoint. First problem, there are no defaults in a lookup field. Second problem, how do you do default multiple values?
First we’ll start with the setup. Create yourself a list which will hold the lookup values. In this case it’s a list of country names but it can be anything you want. Just a custom list with the Title field is enough.

Now we need a list with a lookup column to select our countries from. Create another custom list and add a column to it that looks something like this. Here’s the name and type:

And here’s the additional column settings where we get our information from (MultiLookupDefaultSpikeSource is the name of the list we created to hold our values)

Here’s what our form looks like when we add a new item:

Thinking about the problem I first though we could manipulate the form in SharePoint Designer but realized that the Form Web Part is going to retrieve all of our values from the list, defaults, etc. and really what we need to do is manipulate the list at runtime in the DOM.
It’s jQuery to the RESCUE!
First we take a look at the original state of the form to find our list boxes. Here’s the snippet we’re interested in, the first listbox:
 <select
 name="ctl00$m$g_478fe6d2_8fdb_48e8_be57_7739de1c3b8f$ctl00$ctl05$ctl01$ctl00$ctl00$ctl04$ctl00$ctl00$SelectCandidate"
 title="Country possible values"
 id="ctl00_m_g_478fe6d2_8fdb_48e8_be57_7739de1c3b8f_ctl00_ctl05_ctl01_ctl00_ctl00_ctl04_ctl00_ctl00_SelectCandidate"
 style="width: 143px; height: 125px; overflow: scroll;"
 ondblclick="GipAddSelectedItems(ctl00_m_g_478fe6d2_8fdb_48e8_be57_7739de1c3b8f_ctl00_ctl05_ctl01_ctl00_ctl00_ctl04_ctl00_ctl00_MultiLookupPicker_m); return false"
 onchange="GipSelectCandidateItems(ctl00_m_g_478fe6d2_8fdb_48e8_be57_7739de1c3b8f_ctl00_ctl05_ctl01_ctl00_ctl00_ctl04_ctl00_ctl00_MultiLookupPicker_m);"
 multiple="multiple">
 <OPTION title=Africa selected value=5>Africa</OPTION>
 <OPTION title=Asia value=1>Asia</OPTION>
 <OPTION title=Europe value=3>Europe</OPTION>
 <OPTION title=India value=4>India</OPTION>
 <OPTION title=Ireland value=6>Ireland</OPTION>
 <OPTION title=Singapore value=2>Singapore</OPTION>
 </select>
We can see that it has an ID that ends in “_SelectCandidate” so we’ll use this for selection.
Another part of the puzzle is a hidden set of fields that store the actual values used in the list. There are three of them and they’re well documented in a blog post here by Marc Anderson on SharePoint Magazine. In it he talks about multiselect columns and breaks down the three hidden fields used (the current set of values, the complete set of values, and the default values).
The second listbox looks like this:
 <select
 name="ctl00$m$g_478fe6d2_8fdb_48e8_be57_7739de1c3b8f$ctl00$ctl05$ctl01$ctl00$ctl00$ctl04$ctl00$ctl00$SelectResult"
 title="Country selected values"
 id="ctl00_m_g_478fe6d2_8fdb_48e8_be57_7739de1c3b8f_ctl00_ctl05_ctl01_ctl00_ctl00_ctl04_ctl00_ctl00_SelectResult"
 style="width: 143px; height: 125px; overflow: scroll;"
 ondblclick="GipRemoveSelectedItems(ctl00_m_g_478fe6d2_8fdb_48e8_be57_7739de1c3b8f_ctl00_ctl05_ctl01_ctl00_ctl00_ctl04_ctl00_ctl00_MultiLookupPicker_m); return false" \
 onchange="GipSelectResultItems(ctl00_m_g_478fe6d2_8fdb_48e8_be57_7739de1c3b8f_ctl00_ctl05_ctl01_ctl00_ctl00_ctl04_ctl00_ctl00_MultiLookupPicker_m);"
 multiple="multiple">
Easy enough. It has an ID that contains “_SelectResult”.
Now a quick jQuery primer when selecting items:
- $("[id='foo']"); // id equals 'foo'
- $("[id!='foo']") // id does not equal 'foo'
- $("[id^='foo']") // id starts with 'foo'
- $("[id$='foo']") // id ends with 'foo'
- $("[id*='foo']") // id contains 'foo'
Simple. We want to find the control that ends with “_SelectCandidate” and remove some items, then find the control that ends with “_SelectResult” and append our selected items.
So a few lines of heavily commented JavaScript:
 $(document).ready(function(){
   // define the items to add to the results (i.e already selected) this the visual part only
   var $resultOptions = "<OPTION title=Africa value=5>Africa</OPTION><OPTION title=India value=4>India</OPTION><OPTION title=Ireland value=6>Ireland</OPTION>";
   // this is the list of initial items (matching the ones above) that are used when the item is saved
   var $resultSpOptions = "5|tAfrica|t4|tIndia|t6|tIreland";
   // find the possible values control
   var possibleValues = $("[id$='_SelectCandidate']");
   // remove 1st option (Africa)
   $("[id$='_SelectCandidate'] option:eq(0)").remove();
   // remove 3rd option (India)
   $("[id$='_SelectCandidate'] option:eq(2)").remove();
   // remove 3rd option (Ireland)
   $("[id$='_SelectCandidate'] option:eq(2)").remove();
   // set selected value to asia (value 1)
   possibleValues.val(1)
   // append the new options to our results (this updates the display only of the second list box)
   $("[id$='_SelectResult']").append($resultOptions);
   // append the new options to our hidden field (this sets the values into the list item when saving)
   $("[id$='MultiLookupPicker']").val($resultSpOptions);
 });
SharePoint 2010 supports editing NewForm.aspx (and the other out-of-the-box forms) in the browser. One option is to modify the list and under advanced settings you can disable “Launch forms in a dialog”. This will launch the form like a regular web page. However that’s 3 or 4 steps and you have to go back and change it when you’re done.
Instead just visit the new form directly:
http://sitename/listname/NewForm.aspx
From this page select Site Actions | Edit Page. Now you can add a Content Editor Web Part to the page. When adding JavaScript I point the Content Link to the .js file (that I upload somewhere like Style Library or the Assets library if you have one) rather than trying to put JavaScript into the Content Editor Web Part. This way a) I can edit the JavaScript outside of the page by loading it up in SharePoint Designer or even upload a new .js file to the library and b) I can debug the JavaScript independently of the NewForm.aspx page (or whatever page I’m adding the .js file to)
The result:

When you save the record, the three default options are saved as well (this was set by the JavaScript).
Hope that helps!
-
Get Juiced with me and 10,000 friends at Prairie Dev Con West
I”m happy to say that Prairie Dev Con West 2012 is almost upon us. In just over a week geeks from the five corners of the planet will get together and talk about D’Arcy Lussier’s hair and hope that the Mad Mexican doesn’t crash their session.
 For me there’s a few sessions I’m presenting including a day long workshop on Windows Phone Development. If you’re looking to learn hands-on development with a Jedi Master then you’ll need to find a different conference. If however you want to try your hand at learning with me and watch me stumble through trying to run Windows on a MacBook Pro, then bring it. Here’s a rundown of what we’ll be covering with the Windows Phone Developer Workshop.
Start your engines and we’ll go from 0-11 in 60 minutes with building more Hello World apps you’ve ever seen. They’ll be a Hello app, a World app, and even a Hello World app. Everything you need to know to get started with Windows Phone development. After a series of Hello World apps you’ll be ready to build anything (well, anything with the words Hello and World in them)
- Everyone talks about the Model-View-ViewModel (or as we experts say MVVM) pattern when it comes to data binding on the Windows Phone. We’ll explore every concievable angle to using the MVVM pattern, tools that make it less painful to implement the pattern, and different ways we can spell MVVM (like MVMV, MVCM, and the ever popular MCMXXVII)
- For me I’m all about the bling and love to criticize apps that make my eyes bleed. Help me make my eyes bleed less by learning the Metro design language. We’ll just randomly pick ones in the marketplace and rip them a new one. If you like watching Gordon Ramsay yell down at people that cook like donkeys then you’ll fit right into this part of day. I guarantee you’ll know the Metro ways after this or I’ll beat your with your own skull.
- Mango introduces about 800,000 new API features and we’ll look at every one of them in detail. There are some cool tools that will help you debug and work with apps in the emulator and we’ll go over the new and old stuff in Mango. This part of the session may extend the day so bring a sleeping bag and some Red Bull to keep you going through the night.
- Expression Blend is the most complex piece of software ever known to man. We’ll try to figure it out. Barring that, we’ll just sit around and sing Kumbaya and make jokes about people from Edmonton.
I’m also presenting a session on using the JavaScript Client Object Model with SharePoint 2010. We’ll build some funky stuff and learn how to iterate lists, sites, and build alternate UIs for SharePoint without writing a single line of C# code. There are also two additional sessions on Windows Phone that I’m planning on doing which is a deep dive into marketing and design. Oh yeah, there are other people doing sessions at the conference too.
The 10,000 friends? Okay, so I think the attendance for Prairie Dev Con West is only a few hundred, but I like to use my imagination and pretend I can see ten times more people than there really are. Same effect when I drink.
In any case, if you haven’t registered already please consider it. D’Arcy puts on a damn good show and the quality being presented here (sans me) is top notch and there’s a huge diversity of sessions to take in.
Also remember the pre-con day-long workshops are there. If all you want to take in is a workshop, that’s cool too and you’ll get a full day earful of Agile, Windows Phone Development, and TFS Build sessions. Still an absolute cheapskate like me? Then there’s a day long Windows Azure Boot Camp you can come out to that absolutely free (as in beer, but space is limited) and even includes breakfast and lunch (sorry, the Microsoft IT Virtualization Boot Camp is sold out).
Come on down and get smart(ish).
-
Calgary! SharePoint! Workflows! Pigs! Action!
Join me and a cast of thousands as we do an interpretive dance version of Lord of the Flies.

Oh yeah, and Jason Kaczor will also be presenting on custom workflow actions and SharePoint.
From the marketing blurbage:
This presentation is about Custom actions which are .NET components. I will also be presenting some best practice framework code as well for trace logging/etc. I will also talk about Event Receivers – they tie closely to the concept of “something executing based on something else changing” like workflows, but are occasionally the better choice to use.
Registration is preferred for this event. Those that register will be given an extra cookie. Please register at either EventBrite or Microsoft ClickToAttend.
-
Prairie Dev Con West - Sessions Announced and Registration Open!
I’m thrilled to announce that the Prairie Dev Con West folks have posted sessions and speakers on their site, and opened registration for Prairie Developer Conference West!
Three Days of Fantastic Sessions!
Prairie Dev Con West happens March 13 – 15, and will be three days of software development, IT Pro, and Agile sessions delivered by world class speakers and experts in the technical industry! We’ve currently posted 45 of the 72 sessions we’ll be providing, so check out what’s on the site and check back over the next few weeks as we fill out the session list!
Carl Franklin and Richard Campbell’s .NET Rocks Show LIVE at Prairie Dev Con!
We’re excited to have Carl Franklin and Richard Campbell attend the conference! They’ll be presenting sessions, but also doing an episode of their .NET Rocks internet show live from the conference!
Pre Conference Workshops!
We have two pre-conference workshops happening on Monday, March 12th! Dylan Smith will be doing a full day on “Creating Powerful Build and Deploy Processes with TFS Build” and Bil Simser will be doing “Windows Phone 7 Developer Workshop”! Both of these guys are respected experts in their field and we’re very proud to be able to offer these workshops.
Attending either workshop is $399.99, but you can get 50% off if you bundle a workshop with a conference registration!
Early Bird Pricing!
Registration is now open! For the month of December you can register at our early bird price of $499.99, which is $300 off the regular price! Also, groups of 3 or more get an additional $50 off each registration!
You can register online or request an invoice.
Hotel and Venue!
The conference will be held at the TELUS Convention Centre, and the official conference hotel is the Calgary Marriott right next door! We have a limited number of hotel rooms at a conference rate of $209.00 a night, so book your hotel accommodations early! Call 1-800-896-6878 and mention Prairie Developer Conference when booking.
Keep In Touch!
Please let me know if you have any questions or comments! There’s many ways to connect with the conference and receive announcements/updates:- Twitter: https://twitter.com/prairiedevcon (We’re also using #PrDCWest as the conference hashtag)
- Blog: http://prairiedevcon.blogspot.com/
- Email: darcy@prairiedevcon.com
Join us!
Prairie Dev Con West will be *the* technology event to attend in Alberta in 2012! In addition to the three days of fantastic sessions by amazing speakers, there are a number of community events being planned the week of the conference! You’ll definitely want to be in Calgary this March to be part of it! -
Too Many Kittens To Juggle At Once
Ahh, the Internet. That crazy, mixed up place where one tweet turns into a conversation between dozens of people and spawns a blogpost. This is the direct result of such an event this morning.
It started innocently enough, with this:

Then followed up by a blog post by Joel here. In the post, Joel introduces us to the term Business Solutions Architect with mad skillz like InfoPath, Access Services, Excel Services, building Workflows, and SSRS report creation, all while meeting the business needs of users in a SharePoint environment. I somewhat disagreed with Joel that this really wasn’t a new role (at least IMHO) and that a good Architect or BA should really be doing this job. As Joel pointed out when you’re building a SharePoint team this kind of role is often overlooked. Engineers might be able to build workflows but is the right workflow for the right problem?
Michael Pisarek wrote about a SharePoint Business Architect a few months ago and it’s a pretty solid assessment. Again, I argue you really shouldn’t be looking for roles that don’t exist and I don’t suggest anyone create roles to hire people to fill them. That’s basically creating a solution looking for problems. Michael’s article does have some great points if you’re lost in the quagmire of SharePoint duties though (and I especially like John Ross’ quote “The coolest shit is worthless if it doesn’t meet business needs”).
SharePoinTony summed it up nicely with “SharePoint Solutions knowledge is both lacking and underrated in most environments. Roles help”.
Having someone on the team who can dance between a business user and a coder can be difficult. Remember the idea of telling something to someone and them passing it on to the next person. By the time the story comes round the circle it’s a shadow of it’s former self with little resemblance to the original tale. This is very much business requirements as they’re told by the user to a business analyst, written down on paper, read by an architect, tuned into a solution plan, and implemented by a developer.
Transformations between what was said, what was heard, what was written down, and what was developed can be distant cousins. Not everyone has the skill of communication and even less have negotiation skills to suit the SharePoint platform. Negotiation is important because not everything can be (or should be) done in SharePoint. Sometimes it’s just not appropriate to build it on the SharePoint platform but someone needs to know enough about the platform and what limitations it might have, then communicate that (and/or negotiate) with a customer or user so it’s not about “You can’t have this” to “Let’s try it this way”. Visualize the possible instead of denying the impossible.
So what is the right SharePoint team?
My cromag brain came with a fairly simpleton answer (and I’m sure people will just say this is a cop-out). The perfect SharePoint team is just enough people to do the job that know the technology and business problem they’re solving. Bridge the gap between business need and technology platform and you have an architect. Communicate the needs of the business effectively so the entire team understands it and you have a business analyst.
Can you get this with full time workers? Maybe but don’t expect miracles out of the gate. Also don’t take a consultant’s word as gospel. Some consultants just don’t have the diversity of the SharePoint platform to be worth their value so be careful. You really need someone who knows enough about SharePoint to be able to validate a consultants knowledge level. This is basically try for any consultant, not just a SharePoint one.
Specialization is good and needed. A good, well-balanced SharePoint team is one of people that can solve problems with work with the technology, not against it. Having a top developer is great, but don’t rely on them to solve world hunger if they can’t communicate very well with users. An expert business analyst might be great at gathering requirements so the entire team can understand them, but if it means building 100% custom solutions because they don’t fit inside the SharePoint boundaries isn’t of much value.
Just repeat. There is no silver bullet. There is no silver bullet. There is no silver bullet.
A few people pointed out Nick Inglis’ article Excluding The Information Professional In SharePoint. It’s a good read too and hits home that maybe some developers and IT pros need some extra help in the information space. If you’re in an organization that needs labels on people, come up with something everyone understands and go with it. If that’s Business Solutions Architect, SharePoint Advisor, or Guy Who Knows A Lot About Portals, make it work for you.

We all wish that one person could master all that is SharePoint but we also know that doesn’t scale very well and you quickly get into the hit-by-a-bus syndrome (with the organization coming to a full crawl when the guy or girl goes on vacation, gets sick, or pops out a baby). There are too many gaps in SharePoint knowledge to have any one person know it all and too many kittens to juggle all at once. We like to consider ourselves experts in our field, but trying to tackle too many roles at once and we end up being mediocre jack of all trades, master of none. Don't fall into this pit. It's a deep, dark hole you don't want to try to claw your way out of. Trust me. Been there. Done that. Got the t-shirt.
In the end I don’t disagree with Joel. SharePoint is a beast and not something that should be taken on by newbies. If you just read “Teach Yourself SharePoint in 24 Hours” and want to go build your corporate intranet or the next killer business solution with all your new found knowledge plan to pony up consultant dollars a few months later when everything goes to Hell in a handbasket and falls over.
I’m not saying don’t build solutions in SharePoint. I’m just saying that building effective ones takes skill like any craft and not something you can just cobble together with a little bit of cursory knowledge.
Thanks to *everyone* who participated in this tweet rush. It was fun and educational.
-
Using the Builder Pattern To Create SharePoint Lists
In building out a custom solution I get tired of writing procedural code to create a list, add the columns, setup the views, and add some initial data. Many moons ago I decided to follow a creational design pattern called the Builder pattern. This pattern separates the construction of a complex object from it’s representation so that the same process can create different representations. Basically, let’s build a bunch of custom lists using OO instead of repetitive procedural-like code. Here’s how.
First let’s take a look at the Builder pattern. Here it in UML form for visual dudes:

Pretty straight forward. The principle here is that all concrete objects will adhere to a contract (the Builder) and implement the specific way they need to build things while the Director handles the correct sequence of object creation.
This suites Lists pretty nicely in SharePoint. A list needs to be created via the SPWeb it lives in, it needs fields added to it, views setup, and items added to the finished list.
Okay, time for some code.
First here’s our abstract ListBuilder. All implementations of creating a new list will inherit from this. It provides abstract methods that make up all the parts of a list (fields, views, items, and the list itself).
public abstract class ListBuilder
<pre style='margin: 0em; padding: 0px; width: 100%; text-align: left; color: black; line-height: 12pt; overflow: visible; font-family: "Courier New", courier, monospace; font-size: 8pt; direction: ltr; background-color: rgb(244, 244, 244);'>{</pre><pre style='margin: 0em; padding: 0px; width: 100%; text-align: left; color: black; line-height: 12pt; overflow: visible; font-family: "Courier New", courier, monospace; font-size: 8pt; direction: ltr; background-color: white;'> <span style="color: rgb(0, 0, 255);">protected</span> SPList TheList {get; set;}</pre><pre style='margin: 0em; padding: 0px; width: 100%; text-align: left; color: black; line-height: 12pt; overflow: visible; font-family: "Courier New", courier, monospace; font-size: 8pt; direction: ltr; background-color: rgb(244, 244, 244);'> <span style="color: rgb(0, 0, 255);">public</span> <span style="color: rgb(0, 0, 255);">abstract</span> <span style="color: rgb(0, 0, 255);">void</span> CreateList(SPWeb web);</pre><pre style='margin: 0em; padding: 0px; width: 100%; text-align: left; color: black; line-height: 12pt; overflow: visible; font-family: "Courier New", courier, monospace; font-size: 8pt; direction: ltr; background-color: white;'> <span style="color: rgb(0, 0, 255);">public</span> <span style="color: rgb(0, 0, 255);">abstract</span> <span style="color: rgb(0, 0, 255);">void</span> CreateFields();</pre><pre style='margin: 0em; padding: 0px; width: 100%; text-align: left; color: black; line-height: 12pt; overflow: visible; font-family: "Courier New", courier, monospace; font-size: 8pt; direction: ltr; background-color: rgb(244, 244, 244);'> <span style="color: rgb(0, 0, 255);">public</span> <span style="color: rgb(0, 0, 255);">abstract</span> <span style="color: rgb(0, 0, 255);">void</span> CreateViews();</pre><pre style='margin: 0em; padding: 0px; width: 100%; text-align: left; color: black; line-height: 12pt; overflow: visible; font-family: "Courier New", courier, monospace; font-size: 8pt; direction: ltr; background-color: white;'> <span style="color: rgb(0, 0, 255);">public</span> <span style="color: rgb(0, 0, 255);">abstract</span> <span style="color: rgb(0, 0, 255);">void</span> AddInitialData();</pre><pre style='margin: 0em; padding: 0px; width: 100%; text-align: left; color: black; line-height: 12pt; overflow: visible; font-family: "Courier New", courier, monospace; font-size: 8pt; direction: ltr; background-color: rgb(244, 244, 244);'> <span style="color: rgb(0, 0, 255);">public</span> <span style="color: rgb(0, 0, 255);">abstract</span> <span style="color: rgb(0, 0, 255);">void</span> DeleteList(SPWeb web);</pre><pre style='margin: 0em; padding: 0px; width: 100%; text-align: left; color: black; line-height: 12pt; overflow: visible; font-family: "Courier New", courier, monospace; font-size: 8pt; direction: ltr; background-color: white;'>}</pre>Pretty basic stuff. We have methods to create and delete the list (which requires the SPWeb object it belongs to) and there’s methods for creating fields and views and adding some initial data (for example if you have a lookup list you’re creating and you want to seed it with some initial values).
There’s also a protected property called TheList which holds an instance of the list created. This is for adding fields and views later in the construction process. P.S. Personally I hate the property name “TheList” but “List” gets all confused with System.Generic.List types and SPList is already a SharePoint type so to avoid conflicts I picked this. I’m also lazy and didn’t want to call it SharePointList or something. Feel free to make it whatever you want.
Now that we have our abstract ListBuilder let’s create the ListDirector. This class will handle building the list by orchestrating the assembly of the pieces. It also provides outside access to create and delete the lists (which we’ll call from our feature activating/deactivating).
public class ListDirector
<pre style='margin: 0em; padding: 0px; width: 100%; text-align: left; color: black; line-height: 12pt; overflow: visible; font-family: "Courier New", courier, monospace; font-size: 8pt; direction: ltr; background-color: rgb(244, 244, 244);'>{</pre><pre style='margin: 0em; padding: 0px; width: 100%; text-align: left; color: black; line-height: 12pt; overflow: visible; font-family: "Courier New", courier, monospace; font-size: 8pt; direction: ltr; background-color: white;'> <span style="color: rgb(0, 0, 255);">private</span> <span style="color: rgb(0, 0, 255);">readonly</span> SPWeb _web;</pre><pre style='margin: 0em; padding: 0px; width: 100%; text-align: left; color: black; line-height: 12pt; overflow: visible; font-family: "Courier New", courier, monospace; font-size: 8pt; direction: ltr; background-color: rgb(244, 244, 244);'> </pre><pre style='margin: 0em; padding: 0px; width: 100%; text-align: left; color: black; line-height: 12pt; overflow: visible; font-family: "Courier New", courier, monospace; font-size: 8pt; direction: ltr; background-color: white;'> <span style="color: rgb(0, 0, 255);">public</span> ListDirector(SPWeb web)</pre><pre style='margin: 0em; padding: 0px; width: 100%; text-align: left; color: black; line-height: 12pt; overflow: visible; font-family: "Courier New", courier, monospace; font-size: 8pt; direction: ltr; background-color: rgb(244, 244, 244);'> {</pre><pre style='margin: 0em; padding: 0px; width: 100%; text-align: left; color: black; line-height: 12pt; overflow: visible; font-family: "Courier New", courier, monospace; font-size: 8pt; direction: ltr; background-color: white;'> _web = web;</pre><pre style='margin: 0em; padding: 0px; width: 100%; text-align: left; color: black; line-height: 12pt; overflow: visible; font-family: "Courier New", courier, monospace; font-size: 8pt; direction: ltr; background-color: rgb(244, 244, 244);'> }</pre><pre style='margin: 0em; padding: 0px; width: 100%; text-align: left; color: black; line-height: 12pt; overflow: visible; font-family: "Courier New", courier, monospace; font-size: 8pt; direction: ltr; background-color: white;'> </pre><pre style='margin: 0em; padding: 0px; width: 100%; text-align: left; color: black; line-height: 12pt; overflow: visible; font-family: "Courier New", courier, monospace; font-size: 8pt; direction: ltr; background-color: rgb(244, 244, 244);'> <span style="color: rgb(0, 0, 255);">public</span> <span style="color: rgb(0, 0, 255);">void</span> CreateUsing(ListBuilder builder)</pre><pre style='margin: 0em; padding: 0px; width: 100%; text-align: left; color: black; line-height: 12pt; overflow: visible; font-family: "Courier New", courier, monospace; font-size: 8pt; direction: ltr; background-color: white;'> {</pre><pre style='margin: 0em; padding: 0px; width: 100%; text-align: left; color: black; line-height: 12pt; overflow: visible; font-family: "Courier New", courier, monospace; font-size: 8pt; direction: ltr; background-color: rgb(244, 244, 244);'> builder.CreateList(_web);</pre><pre style='margin: 0em; padding: 0px; width: 100%; text-align: left; color: black; line-height: 12pt; overflow: visible; font-family: "Courier New", courier, monospace; font-size: 8pt; direction: ltr; background-color: white;'> builder.CreateFields();</pre><pre style='margin: 0em; padding: 0px; width: 100%; text-align: left; color: black; line-height: 12pt; overflow: visible; font-family: "Courier New", courier, monospace; font-size: 8pt; direction: ltr; background-color: rgb(244, 244, 244);'> builder.CreateViews();</pre><pre style='margin: 0em; padding: 0px; width: 100%; text-align: left; color: black; line-height: 12pt; overflow: visible; font-family: "Courier New", courier, monospace; font-size: 8pt; direction: ltr; background-color: white;'> builder.AddInitialData();</pre><pre style='margin: 0em; padding: 0px; width: 100%; text-align: left; color: black; line-height: 12pt; overflow: visible; font-family: "Courier New", courier, monospace; font-size: 8pt; direction: ltr; background-color: rgb(244, 244, 244);'> }</pre><pre style='margin: 0em; padding: 0px; width: 100%; text-align: left; color: black; line-height: 12pt; overflow: visible; font-family: "Courier New", courier, monospace; font-size: 8pt; direction: ltr; background-color: white;'> </pre><pre style='margin: 0em; padding: 0px; width: 100%; text-align: left; color: black; line-height: 12pt; overflow: visible; font-family: "Courier New", courier, monospace; font-size: 8pt; direction: ltr; background-color: rgb(244, 244, 244);'> <span style="color: rgb(0, 0, 255);">public</span> <span style="color: rgb(0, 0, 255);">void</span> DeleteUsing(ListBuilder builder)</pre><pre style='margin: 0em; padding: 0px; width: 100%; text-align: left; color: black; line-height: 12pt; overflow: visible; font-family: "Courier New", courier, monospace; font-size: 8pt; direction: ltr; background-color: white;'> {</pre><pre style='margin: 0em; padding: 0px; width: 100%; text-align: left; color: black; line-height: 12pt; overflow: visible; font-family: "Courier New", courier, monospace; font-size: 8pt; direction: ltr; background-color: rgb(244, 244, 244);'> builder.Delete(_web);</pre><pre style='margin: 0em; padding: 0px; width: 100%; text-align: left; color: black; line-height: 12pt; overflow: visible; font-family: "Courier New", courier, monospace; font-size: 8pt; direction: ltr; background-color: white;'> }</pre><pre style='margin: 0em; padding: 0px; width: 100%; text-align: left; color: black; line-height: 12pt; overflow: visible; font-family: "Courier New", courier, monospace; font-size: 8pt; direction: ltr; background-color: rgb(244, 244, 244);'>}</pre>The ListDirector is created using the SPWeb object (so it can tell the list builder where to create/delete lists from) and knows the order to put the pieces of the list together. This way ListBuilder (and any classes inheriting from it) don’t need to know how to orchestrate the pieces and can just work independently. You can also create special ListDirectors that do things like update lists (avoid the creation) or append data.
Armed with our abstract class and our director we head down the path of actually creating a specific list. For this sample we’ll do something really simple. A lookup list for countries and contains a name we’ll use for picking items and some internal codes for each item.
First we’ll start with the bare bones builder:
public class CountryListBuilder : ListBuilder
<pre style='margin: 0em; padding: 0px; width: 100%; text-align: left; color: black; line-height: 12pt; overflow: visible; font-family: "Courier New", courier, monospace; font-size: 8pt; direction: ltr; background-color: rgb(244, 244, 244);'>{</pre><pre style='margin: 0em; padding: 0px; width: 100%; text-align: left; color: black; line-height: 12pt; overflow: visible; font-family: "Courier New", courier, monospace; font-size: 8pt; direction: ltr; background-color: white;'> <span style="color: rgb(0, 0, 255);">public</span> <span style="color: rgb(0, 0, 255);">override</span> <span style="color: rgb(0, 0, 255);">void</span> CreateList(SPWeb web)</pre><pre style='margin: 0em; padding: 0px; width: 100%; text-align: left; color: black; line-height: 12pt; overflow: visible; font-family: "Courier New", courier, monospace; font-size: 8pt; direction: ltr; background-color: rgb(244, 244, 244);'> {</pre><pre style='margin: 0em; padding: 0px; width: 100%; text-align: left; color: black; line-height: 12pt; overflow: visible; font-family: "Courier New", courier, monospace; font-size: 8pt; direction: ltr; background-color: white;'> }</pre><pre style='margin: 0em; padding: 0px; width: 100%; text-align: left; color: black; line-height: 12pt; overflow: visible; font-family: "Courier New", courier, monospace; font-size: 8pt; direction: ltr; background-color: rgb(244, 244, 244);'> </pre><pre style='margin: 0em; padding: 0px; width: 100%; text-align: left; color: black; line-height: 12pt; overflow: visible; font-family: "Courier New", courier, monospace; font-size: 8pt; direction: ltr; background-color: white;'> <span style="color: rgb(0, 0, 255);">public</span> <span style="color: rgb(0, 0, 255);">override</span> <span style="color: rgb(0, 0, 255);">void</span> CreateFields()</pre><pre style='margin: 0em; padding: 0px; width: 100%; text-align: left; color: black; line-height: 12pt; overflow: visible; font-family: "Courier New", courier, monospace; font-size: 8pt; direction: ltr; background-color: rgb(244, 244, 244);'> {</pre><pre style='margin: 0em; padding: 0px; width: 100%; text-align: left; color: black; line-height: 12pt; overflow: visible; font-family: "Courier New", courier, monospace; font-size: 8pt; direction: ltr; background-color: white;'> }</pre><pre style='margin: 0em; padding: 0px; width: 100%; text-align: left; color: black; line-height: 12pt; overflow: visible; font-family: "Courier New", courier, monospace; font-size: 8pt; direction: ltr; background-color: rgb(244, 244, 244);'> </pre><pre style='margin: 0em; padding: 0px; width: 100%; text-align: left; color: black; line-height: 12pt; overflow: visible; font-family: "Courier New", courier, monospace; font-size: 8pt; direction: ltr; background-color: white;'> <span style="color: rgb(0, 0, 255);">public</span> <span style="color: rgb(0, 0, 255);">override</span> <span style="color: rgb(0, 0, 255);">void</span> CreateViews()</pre><pre style='margin: 0em; padding: 0px; width: 100%; text-align: left; color: black; line-height: 12pt; overflow: visible; font-family: "Courier New", courier, monospace; font-size: 8pt; direction: ltr; background-color: rgb(244, 244, 244);'> {</pre><pre style='margin: 0em; padding: 0px; width: 100%; text-align: left; color: black; line-height: 12pt; overflow: visible; font-family: "Courier New", courier, monospace; font-size: 8pt; direction: ltr; background-color: white;'> }</pre><pre style='margin: 0em; padding: 0px; width: 100%; text-align: left; color: black; line-height: 12pt; overflow: visible; font-family: "Courier New", courier, monospace; font-size: 8pt; direction: ltr; background-color: rgb(244, 244, 244);'> </pre><pre style='margin: 0em; padding: 0px; width: 100%; text-align: left; color: black; line-height: 12pt; overflow: visible; font-family: "Courier New", courier, monospace; font-size: 8pt; direction: ltr; background-color: white;'> <span style="color: rgb(0, 0, 255);">public</span> <span style="color: rgb(0, 0, 255);">override</span> <span style="color: rgb(0, 0, 255);">void</span> AddInitialData()</pre><pre style='margin: 0em; padding: 0px; width: 100%; text-align: left; color: black; line-height: 12pt; overflow: visible; font-family: "Courier New", courier, monospace; font-size: 8pt; direction: ltr; background-color: rgb(244, 244, 244);'> {</pre><pre style='margin: 0em; padding: 0px; width: 100%; text-align: left; color: black; line-height: 12pt; overflow: visible; font-family: "Courier New", courier, monospace; font-size: 8pt; direction: ltr; background-color: white;'> }</pre><pre style='margin: 0em; padding: 0px; width: 100%; text-align: left; color: black; line-height: 12pt; overflow: visible; font-family: "Courier New", courier, monospace; font-size: 8pt; direction: ltr; background-color: rgb(244, 244, 244);'> </pre><pre style='margin: 0em; padding: 0px; width: 100%; text-align: left; color: black; line-height: 12pt; overflow: visible; font-family: "Courier New", courier, monospace; font-size: 8pt; direction: ltr; background-color: white;'> <span style="color: rgb(0, 0, 255);">public</span> <span style="color: rgb(0, 0, 255);">override</span> <span style="color: rgb(0, 0, 255);">void</span> DeleteList(SPWeb web)</pre><pre style='margin: 0em; padding: 0px; width: 100%; text-align: left; color: black; line-height: 12pt; overflow: visible; font-family: "Courier New", courier, monospace; font-size: 8pt; direction: ltr; background-color: rgb(244, 244, 244);'> {</pre><pre style='margin: 0em; padding: 0px; width: 100%; text-align: left; color: black; line-height: 12pt; overflow: visible; font-family: "Courier New", courier, monospace; font-size: 8pt; direction: ltr; background-color: white;'> }</pre><pre style='margin: 0em; padding: 0px; width: 100%; text-align: left; color: black; line-height: 12pt; overflow: visible; font-family: "Courier New", courier, monospace; font-size: 8pt; direction: ltr; background-color: rgb(244, 244, 244);'>}</pre><pre style='margin: 0em; padding: 0px; width: 100%; text-align: left; color: black; line-height: 12pt; overflow: visible; font-family: "Courier New", courier, monospace; font-size: 8pt; direction: ltr; background-color: white;'> </pre>Now let’s look at each method in detail. There’s not a lot here to see because our list builder should be lightweight. Of course this completely depends on your needs so you might have something with 30 fields but the ListBuilder class should simplify things and remove redundancies for you.
First we’ll create the list. To do this we need the SPWeb object which we’ll pass in.
public override void CreateList(SPWeb web)
<pre style='margin: 0em; padding: 0px; width: 100%; text-align: left; color: black; line-height: 12pt; overflow: visible; font-family: "Courier New", courier, monospace; font-size: 8pt; direction: ltr; background-color: rgb(244, 244, 244);'>{</pre><pre style='margin: 0em; padding: 0px; width: 100%; text-align: left; color: black; line-height: 12pt; overflow: visible; font-family: "Courier New", courier, monospace; font-size: 8pt; direction: ltr; background-color: white;'> var id = web.Lists.Add(<span style="color: rgb(0, 96, 128);">"Countries"</span>, <span style="color: rgb(0, 96, 128);">"Country lookup list"</span>, SPListTemplateType.GenericList);</pre><pre style='margin: 0em; padding: 0px; width: 100%; text-align: left; color: black; line-height: 12pt; overflow: visible; font-family: "Courier New", courier, monospace; font-size: 8pt; direction: ltr; background-color: rgb(244, 244, 244);'> TheList = web.Lists[id];</pre><pre style='margin: 0em; padding: 0px; width: 100%; text-align: left; color: black; line-height: 12pt; overflow: visible; font-family: "Courier New", courier, monospace; font-size: 8pt; direction: ltr; background-color: white;'> TheList.OnQuickLaunch = <span style="color: rgb(0, 0, 255);">true</span>;</pre><pre style='margin: 0em; padding: 0px; width: 100%; text-align: left; color: black; line-height: 12pt; overflow: visible; font-family: "Courier New", courier, monospace; font-size: 8pt; direction: ltr; background-color: rgb(244, 244, 244);'> TheList.Update();</pre><pre style='margin: 0em; padding: 0px; width: 100%; text-align: left; color: black; line-height: 12pt; overflow: visible; font-family: "Courier New", courier, monospace; font-size: 8pt; direction: ltr; background-color: white;'>}</pre>Here we create a generic list, retrieve it, and update the metadata (in this case if it’s on the Quick Launch or not, but you could do things like setting the Title or other values. The call to Update() is only needed to update the metadata. If all you’re doing is adding the list then the first line is all you need.
Next we’ll add our additional fields:
public override void CreateFields()
<pre style='margin: 0em; padding: 0px; width: 100%; text-align: left; color: black; line-height: 12pt; overflow: visible; font-family: "Courier New", courier, monospace; font-size: 8pt; direction: ltr; background-color: rgb(244, 244, 244);'>{</pre><pre style='margin: 0em; padding: 0px; width: 100%; text-align: left; color: black; line-height: 12pt; overflow: visible; font-family: "Courier New", courier, monospace; font-size: 8pt; direction: ltr; background-color: white;'> TheList.Fields.Add(<span style="color: rgb(0, 96, 128);">"Code"</span>, SPFieldType.Text, <span style="color: rgb(0, 0, 255);">true</span>);</pre><pre style='margin: 0em; padding: 0px; width: 100%; text-align: left; color: black; line-height: 12pt; overflow: visible; font-family: "Courier New", courier, monospace; font-size: 8pt; direction: ltr; background-color: rgb(244, 244, 244);'> TheList.Fields.Add(<span style="color: rgb(0, 96, 128);">"Currency"</span>, SPFieldType.Text, <span style="color: rgb(0, 0, 255);">true</span>);</pre><pre style='margin: 0em; padding: 0px; width: 100%; text-align: left; color: black; line-height: 12pt; overflow: visible; font-family: "Courier New", courier, monospace; font-size: 8pt; direction: ltr; background-color: white;'>}</pre>Since we’re creating this list from a generic (custom) list we already have a title field. Here we add two new fields.
Next up is the views.
public override void CreateViews()
<pre style='margin: 0em; padding: 0px; width: 100%; text-align: left; color: black; line-height: 12pt; overflow: visible; font-family: "Courier New", courier, monospace; font-size: 8pt; direction: ltr; background-color: rgb(244, 244, 244);'>{</pre><pre style='margin: 0em; padding: 0px; width: 100%; text-align: left; color: black; line-height: 12pt; overflow: visible; font-family: "Courier New", courier, monospace; font-size: 8pt; direction: ltr; background-color: white;'> var defaultView = TheList.Views[0];</pre><pre style='margin: 0em; padding: 0px; width: 100%; text-align: left; color: black; line-height: 12pt; overflow: visible; font-family: "Courier New", courier, monospace; font-size: 8pt; direction: ltr; background-color: rgb(244, 244, 244);'> view.ViewFields.Add(<span style="color: rgb(0, 96, 128);">"Code"</span>);</pre><pre style='margin: 0em; padding: 0px; width: 100%; text-align: left; color: black; line-height: 12pt; overflow: visible; font-family: "Courier New", courier, monospace; font-size: 8pt; direction: ltr; background-color: white;'> view.ViewFields.Add(<span style="color: rgb(0, 96, 128);">"Currency"</span>);</pre><pre style='margin: 0em; padding: 0px; width: 100%; text-align: left; color: black; line-height: 12pt; overflow: visible; font-family: "Courier New", courier, monospace; font-size: 8pt; direction: ltr; background-color: rgb(244, 244, 244);'> view.Update();</pre><pre style='margin: 0em; padding: 0px; width: 100%; text-align: left; color: black; line-height: 12pt; overflow: visible; font-family: "Courier New", courier, monospace; font-size: 8pt; direction: ltr; background-color: white;'>}</pre>When a list is created a default view is created that contains the Title field. Here we grab that view then add our two custom fields to it. You could also do all kinds of things with the view like setting the sort order, adding filters or creating entirely new views.
Finally we want to seed our list with some initial data so every time our feature is activated we have some data for it.
public override void AddInitialData()
<pre style='margin: 0em; padding: 0px; width: 100%; text-align: left; color: black; line-height: 12pt; overflow: visible; font-family: "Courier New", courier, monospace; font-size: 8pt; direction: ltr; background-color: rgb(244, 244, 244);'>{</pre><pre style='margin: 0em; padding: 0px; width: 100%; text-align: left; color: black; line-height: 12pt; overflow: visible; font-family: "Courier New", courier, monospace; font-size: 8pt; direction: ltr; background-color: white;'> addItem(<span style="color: rgb(0, 96, 128);">"Canada"</span>, <span style="color: rgb(0, 96, 128);">"CAN"</span>, <span style="color: rgb(0, 96, 128);">"CDN"</span>);</pre><pre style='margin: 0em; padding: 0px; width: 100%; text-align: left; color: black; line-height: 12pt; overflow: visible; font-family: "Courier New", courier, monospace; font-size: 8pt; direction: ltr; background-color: rgb(244, 244, 244);'> addItem(<span style="color: rgb(0, 96, 128);">"United States"</span>, <span style="color: rgb(0, 96, 128);">"US"</span>, <span style="color: rgb(0, 96, 128);">"USD"</span>);</pre><pre style='margin: 0em; padding: 0px; width: 100%; text-align: left; color: black; line-height: 12pt; overflow: visible; font-family: "Courier New", courier, monospace; font-size: 8pt; direction: ltr; background-color: white;'>}</pre><pre style='margin: 0em; padding: 0px; width: 100%; text-align: left; color: black; line-height: 12pt; overflow: visible; font-family: "Courier New", courier, monospace; font-size: 8pt; direction: ltr; background-color: rgb(244, 244, 244);'> </pre><pre style='margin: 0em; padding: 0px; width: 100%; text-align: left; color: black; line-height: 12pt; overflow: visible; font-family: "Courier New", courier, monospace; font-size: 8pt; direction: ltr; background-color: white;'><span style="color: rgb(0, 0, 255);">private</span> <span style="color: rgb(0, 0, 255);">void</span> addItem(<span style="color: rgb(0, 0, 255);">string</span> title, <span style="color: rgb(0, 0, 255);">string</span> code, <span style="color: rgb(0, 0, 255);">string</span> currency)</pre><pre style='margin: 0em; padding: 0px; width: 100%; text-align: left; color: black; line-height: 12pt; overflow: visible; font-family: "Courier New", courier, monospace; font-size: 8pt; direction: ltr; background-color: rgb(244, 244, 244);'>{</pre><pre style='margin: 0em; padding: 0px; width: 100%; text-align: left; color: black; line-height: 12pt; overflow: visible; font-family: "Courier New", courier, monospace; font-size: 8pt; direction: ltr; background-color: white;'> var item = TheList.Items.Add();</pre><pre style='margin: 0em; padding: 0px; width: 100%; text-align: left; color: black; line-height: 12pt; overflow: visible; font-family: "Courier New", courier, monospace; font-size: 8pt; direction: ltr; background-color: rgb(244, 244, 244);'> item[<span style="color: rgb(0, 96, 128);">"Title"</span>] = title;</pre><pre style='margin: 0em; padding: 0px; width: 100%; text-align: left; color: black; line-height: 12pt; overflow: visible; font-family: "Courier New", courier, monospace; font-size: 8pt; direction: ltr; background-color: white;'> item[<span style="color: rgb(0, 96, 128);">"Code"</span>] = code;</pre><pre style='margin: 0em; padding: 0px; width: 100%; text-align: left; color: black; line-height: 12pt; overflow: visible; font-family: "Courier New", courier, monospace; font-size: 8pt; direction: ltr; background-color: rgb(244, 244, 244);'> item[<span style="color: rgb(0, 96, 128);">"Currency"</span>] = currency;</pre><pre style='margin: 0em; padding: 0px; width: 100%; text-align: left; color: black; line-height: 12pt; overflow: visible; font-family: "Courier New", courier, monospace; font-size: 8pt; direction: ltr; background-color: white;'> item.Update();</pre><pre style='margin: 0em; padding: 0px; width: 100%; text-align: left; color: black; line-height: 12pt; overflow: visible; font-family: "Courier New", courier, monospace; font-size: 8pt; direction: ltr; background-color: rgb(244, 244, 244);'>}</pre>Here we have a helper to add an item to the list. Adding an item requires a few steps (creating the SPItem via Add, setting the data, calling update) so it’s wrapped in a method in the class.
You might be balking at the use of hard coded values and field names and whatnot here. That’s fine. You could go ahead and assign those to constants inside the class. The point is that the field names are all contained within this one class so if you ever wanted to change them you only have to change the values here. Create constants for the field name might be a good idea too. You could also do something like read from a text or xml file in your AddInitialData method if you had a lot of data to seed (or even pull it from a resource file in the assembly).
Now we have all the parts to build up the list. Let’s call it in a feature. As we move up the ladder and away from our list builder things get dead simple. Here’s the code we have to activate the feature:
public override void FeatureActivated(SPFeatureReceiverProperties properties)
<pre style='margin: 0em; padding: 0px; width: 100%; text-align: left; color: black; line-height: 12pt; overflow: visible; font-family: "Courier New", courier, monospace; font-size: 8pt; direction: ltr; background-color: rgb(244, 244, 244);'>{</pre><pre style='margin: 0em; padding: 0px; width: 100%; text-align: left; color: black; line-height: 12pt; overflow: visible; font-family: "Courier New", courier, monospace; font-size: 8pt; direction: ltr; background-color: white;'> <span style="color: rgb(0, 0, 255);">using</span>(var web = properties.Feature.Parent <span style="color: rgb(0, 0, 255);">as</span> SPWeb)</pre><pre style='margin: 0em; padding: 0px; width: 100%; text-align: left; color: black; line-height: 12pt; overflow: visible; font-family: "Courier New", courier, monospace; font-size: 8pt; direction: ltr; background-color: rgb(244, 244, 244);'> {</pre><pre style='margin: 0em; padding: 0px; width: 100%; text-align: left; color: black; line-height: 12pt; overflow: visible; font-family: "Courier New", courier, monospace; font-size: 8pt; direction: ltr; background-color: white;'> var director = <span style="color: rgb(0, 0, 255);">new</span> ListDirector(web);</pre><pre style='margin: 0em; padding: 0px; width: 100%; text-align: left; color: black; line-height: 12pt; overflow: visible; font-family: "Courier New", courier, monospace; font-size: 8pt; direction: ltr; background-color: rgb(244, 244, 244);'> director.CreateUsing(<span style="color: rgb(0, 0, 255);">new</span> CountryListBuilder());</pre><pre style='margin: 0em; padding: 0px; width: 100%; text-align: left; color: black; line-height: 12pt; overflow: visible; font-family: "Courier New", courier, monospace; font-size: 8pt; direction: ltr; background-color: white;'> }</pre><pre style='margin: 0em; padding: 0px; width: 100%; text-align: left; color: black; line-height: 12pt; overflow: visible; font-family: "Courier New", courier, monospace; font-size: 8pt; direction: ltr; background-color: rgb(244, 244, 244);'>}</pre>Like I said. Dead simple. We pass the SPWeb object to the director (who will internally pass it along to the ListBuilder as needed) and we call the CreateUsing method passing it a new CountryListBuilder.
If we want to add new lists all we have to do is this:
- Create a new ListBuilder class inheriting from ListBuilder
- Fill in the abstract methods
- Add a new CreateUsing call in our FeatureActivated method
- Deploy
Cool huh?
Okay, so we have it build but what about getting rid of it? Just as easy.
First we need to finish our CountryListBuilder. There’s one more method we need to implement:
public override void DeleteList(SPWeb web)
<pre style='margin: 0em; padding: 0px; width: 100%; text-align: left; color: black; line-height: 12pt; overflow: visible; font-family: "Courier New", courier, monospace; font-size: 8pt; direction: ltr; background-color: rgb(244, 244, 244);'>{</pre><pre style='margin: 0em; padding: 0px; width: 100%; text-align: left; color: black; line-height: 12pt; overflow: visible; font-family: "Courier New", courier, monospace; font-size: 8pt; direction: ltr; background-color: white;'> var id = web.Lists[<span style="color: rgb(0, 96, 128);">"Countries"</span>].ID;</pre><pre style='margin: 0em; padding: 0px; width: 100%; text-align: left; color: black; line-height: 12pt; overflow: visible; font-family: "Courier New", courier, monospace; font-size: 8pt; direction: ltr; background-color: rgb(244, 244, 244);'> web.Lists.Delete(id);</pre><pre style='margin: 0em; padding: 0px; width: 100%; text-align: left; color: black; line-height: 12pt; overflow: visible; font-family: "Courier New", courier, monospace; font-size: 8pt; direction: ltr; background-color: white;'>}</pre>Now to finish off we just implement the FeatureDeactivating method:
public ovveride void FeatureDeactivating(SPFeatureReceiverProperties properties)
<pre style='margin: 0em; padding: 0px; width: 100%; text-align: left; color: black; line-height: 12pt; overflow: visible; font-family: "Courier New", courier, monospace; font-size: 8pt; direction: ltr; background-color: rgb(244, 244, 244);'>{</pre><pre style='margin: 0em; padding: 0px; width: 100%; text-align: left; color: black; line-height: 12pt; overflow: visible; font-family: "Courier New", courier, monospace; font-size: 8pt; direction: ltr; background-color: white;'> <span style="color: rgb(0, 0, 255);">using</span>(var web = properties.Feature.Parent <span style="color: rgb(0, 0, 255);">as</span> SPWeb)</pre><pre style='margin: 0em; padding: 0px; width: 100%; text-align: left; color: black; line-height: 12pt; overflow: visible; font-family: "Courier New", courier, monospace; font-size: 8pt; direction: ltr; background-color: rgb(244, 244, 244);'> {</pre><pre style='margin: 0em; padding: 0px; width: 100%; text-align: left; color: black; line-height: 12pt; overflow: visible; font-family: "Courier New", courier, monospace; font-size: 8pt; direction: ltr; background-color: white;'> var director = <span style="color: rgb(0, 0, 255);">new</span> ListDirector(web);</pre><pre style='margin: 0em; padding: 0px; width: 100%; text-align: left; color: black; line-height: 12pt; overflow: visible; font-family: "Courier New", courier, monospace; font-size: 8pt; direction: ltr; background-color: rgb(244, 244, 244);'> director.DeleteUsing(<span style="color: rgb(0, 0, 255);">new</span> CountryListBuilder());</pre><pre style='margin: 0em; padding: 0px; width: 100%; text-align: left; color: black; line-height: 12pt; overflow: visible; font-family: "Courier New", courier, monospace; font-size: 8pt; direction: ltr; background-color: white;'> }</pre><pre style='margin: 0em; padding: 0px; width: 100%; text-align: left; color: black; line-height: 12pt; overflow: visible; font-family: "Courier New", courier, monospace; font-size: 8pt; direction: ltr; background-color: rgb(244, 244, 244);'>}</pre>Just reverse of activating we call the DeleteUsing method on the director passing it a CountryListBuilder object. We really don’t have to keep the variable around and there’s little cost to creating a new object to pass it. There’s nothing unique that we have to keep around from creation. The CountryListBuilder class is just there to provide us the interace to it’s methods.
You might be thinking why do all this? Why don’t I just create the ListBuilder class and call the methods directly. Like I said, the Director abstracts away all the co-ordination you need to build the list while the list knows how to build its parts, it doesn’t necessarily know how to construct itself. This is done for reason. Maybe you want to build the list up differently depending on the environment. Or maybe you have a Director to handle creating items from scratch and another director for updating existing data (say in the Feature Upgrading event with a production site). The same pattern and classes apply, there are just different implementations to create. Also with the abstraction the ListDirector and ListBuilder provides, the code you have to maintain (and debug) in the Feature events is next to nothing and any errors can happen and be handled down where they need to be, not have to bubble up to the feature (remember you have no UI in the feature events).
So that’s it. Now I just have to create a new class for each List I want to build, inherit from ListBuilder and just add one line of code to my Feature activating/deactiving. Pretty clean and pretty quick to get up and running.
This is just *one* way of doing this. You could use other patterns that might be more appropriate (the Abstract Factory or perhaps Prototype comes to mind) but this is the one I went with and it works pretty good for me so far. Fields are more complex beasts so my CreateFields() method is sort of doing double duty by adding fields and also updating existing ones (or new ones) by setting the field lengths. This could be split out to say two methods (CreateFields and UpdateFields) or even a FieldBuilder class could be created and handled by the ListBuilder (who would act as the Director) but maybe that’s over complicating things.
I’m sure there are a lot of things that could be better in this code. Interface vs. abstract class; passing in the SPWeb as a constructor to the ListBuilder; etc. And yes, there’s no exception handling, logging, or backout in case things fail here. What if someone renamed the list? What if the list doesn’t exist when the feature is deactivated? Hey guys, it’s a blog post, not production code. Feel free however to comment and suggest improvements and alternate ideas.
Hope this helps! Happy coding.
-
SharePoint Content and Site Editing Tips
A few content management and site editing tips for power users on this bacon flavoured unicorn morning. The theme here is keep it clean!
- Write "friendly" email addresses
- Remember it's human beings reading your content. So seeing something like "If you have questions please send an email to Corporate.Comm@mycompany.com" breaks up the readiblity. Instead just do the simple steps of writing the content in plain English and going back, highlighting the name and insert a link (note: you might have to prefix the link with mailto:first.last@yourcompany.com). It makes for a friendlier looking page and hides the ugliness that are sometimes in email addresses.
- Use friendly column and list names
- This is a big pet peeve of mine. When you first create a column or list with spaces the internal name is changed. The display name might be "My Amazing List of Animals with Large Testicles" but the internal (and link) name becomes "My_x00x20_Amazing_x00x20_List_x00x20_of_x00x20_Animals_x00x20_with_x00x20_Large_x00x20_Testicles". What's worse is if you create a publishing page named "This Website is Fueled By a Dolphin's Spleen". Not only is it incorrect grammar, but the apostrophe wreaks havoc on both the internal name for the list (with lots of crazy hex codes) as well as the hyperlink (where everything is uuencoded). Instead create the list with a distinct and compact name then go back and change it to whatever you want. The end result is a better formed name that you can both script and access in code easier.
- Keep your Views Clean
- When you add a column to a list or create a new list the default is to add it to the default view. Do everyone a favour and don't check this box! The default view of a list should be something similar to the Title field and nothing else. Keep it clean. If you want to set a defalt view that's different, go back and create one with all the fields and filtering and sorting columns you want and set it as default. It's a good idea to keep the original AllItems.aspx (note the lack of space in the filename!) easy and unfiltered. It's also a good idea to keep your column count down in views. Don't let every column be added by default and don't add every column just because you can. Create separate views for distinct responsibilities and try to keep the number of columns down to a single screen to prevent horizontal scrolling.
- Simple Navigation
- The Quick Launch is a great tool for navigating around your site but don't use the default of adding all lists to it. Uncheck that box and keep navigation simple. Create custom groupings that make sense so if you don't have a site with "Documents and Lists" but "Reports and Notices" makes more sense then do it. Also hide internal lists from the Quick Launch. For example, if most users don't need to see all the lookup tables you might have on a site don't show them. You can use audience filtering on the Quick Launch if you want to hide admin items from non-admin users so consider that as an option.
Enjoy!


