Contents tagged with jQuery
-
Defaulting Values in a Multi-Lookup Form in SharePoint
This was a question asked on the MSDN Forums but I thought it was worthy of a blog post as I could get more in depth with the explanation and show some pretty pictures (plus the fact I’ve never done it so thought it would be fun).
The problem was a user wanted to default multiple values in a lookup field in SharePoint. First problem, there are no defaults in a lookup field. Second problem, how do you do default multiple values?
First we’ll start with the setup. Create yourself a list which will hold the lookup values. In this case it’s a list of country names but it can be anything you want. Just a custom list with the Title field is enough.

Now we need a list with a lookup column to select our countries from. Create another custom list and add a column to it that looks something like this. Here’s the name and type:

And here’s the additional column settings where we get our information from (MultiLookupDefaultSpikeSource is the name of the list we created to hold our values)

Here’s what our form looks like when we add a new item:

Thinking about the problem I first though we could manipulate the form in SharePoint Designer but realized that the Form Web Part is going to retrieve all of our values from the list, defaults, etc. and really what we need to do is manipulate the list at runtime in the DOM.
It’s jQuery to the RESCUE!
First we take a look at the original state of the form to find our list boxes. Here’s the snippet we’re interested in, the first listbox:
 <select
 name="ctl00$m$g_478fe6d2_8fdb_48e8_be57_7739de1c3b8f$ctl00$ctl05$ctl01$ctl00$ctl00$ctl04$ctl00$ctl00$SelectCandidate"
 title="Country possible values"
 id="ctl00_m_g_478fe6d2_8fdb_48e8_be57_7739de1c3b8f_ctl00_ctl05_ctl01_ctl00_ctl00_ctl04_ctl00_ctl00_SelectCandidate"
 style="width: 143px; height: 125px; overflow: scroll;"
 ondblclick="GipAddSelectedItems(ctl00_m_g_478fe6d2_8fdb_48e8_be57_7739de1c3b8f_ctl00_ctl05_ctl01_ctl00_ctl00_ctl04_ctl00_ctl00_MultiLookupPicker_m); return false"
 onchange="GipSelectCandidateItems(ctl00_m_g_478fe6d2_8fdb_48e8_be57_7739de1c3b8f_ctl00_ctl05_ctl01_ctl00_ctl00_ctl04_ctl00_ctl00_MultiLookupPicker_m);"
 multiple="multiple">
 <OPTION title=Africa selected value=5>Africa</OPTION>
 <OPTION title=Asia value=1>Asia</OPTION>
 <OPTION title=Europe value=3>Europe</OPTION>
 <OPTION title=India value=4>India</OPTION>
 <OPTION title=Ireland value=6>Ireland</OPTION>
 <OPTION title=Singapore value=2>Singapore</OPTION>
 </select>
We can see that it has an ID that ends in “_SelectCandidate” so we’ll use this for selection.
Another part of the puzzle is a hidden set of fields that store the actual values used in the list. There are three of them and they’re well documented in a blog post here by Marc Anderson on SharePoint Magazine. In it he talks about multiselect columns and breaks down the three hidden fields used (the current set of values, the complete set of values, and the default values).
The second listbox looks like this:
 <select
 name="ctl00$m$g_478fe6d2_8fdb_48e8_be57_7739de1c3b8f$ctl00$ctl05$ctl01$ctl00$ctl00$ctl04$ctl00$ctl00$SelectResult"
 title="Country selected values"
 id="ctl00_m_g_478fe6d2_8fdb_48e8_be57_7739de1c3b8f_ctl00_ctl05_ctl01_ctl00_ctl00_ctl04_ctl00_ctl00_SelectResult"
 style="width: 143px; height: 125px; overflow: scroll;"
 ondblclick="GipRemoveSelectedItems(ctl00_m_g_478fe6d2_8fdb_48e8_be57_7739de1c3b8f_ctl00_ctl05_ctl01_ctl00_ctl00_ctl04_ctl00_ctl00_MultiLookupPicker_m); return false" \
 onchange="GipSelectResultItems(ctl00_m_g_478fe6d2_8fdb_48e8_be57_7739de1c3b8f_ctl00_ctl05_ctl01_ctl00_ctl00_ctl04_ctl00_ctl00_MultiLookupPicker_m);"
 multiple="multiple">
Easy enough. It has an ID that contains “_SelectResult”.
Now a quick jQuery primer when selecting items:
- $("[id='foo']"); // id equals 'foo'
- $("[id!='foo']") // id does not equal 'foo'
- $("[id^='foo']") // id starts with 'foo'
- $("[id$='foo']") // id ends with 'foo'
- $("[id*='foo']") // id contains 'foo'
Simple. We want to find the control that ends with “_SelectCandidate” and remove some items, then find the control that ends with “_SelectResult” and append our selected items.
So a few lines of heavily commented JavaScript:
 $(document).ready(function(){
   // define the items to add to the results (i.e already selected) this the visual part only
   var $resultOptions = "<OPTION title=Africa value=5>Africa</OPTION><OPTION title=India value=4>India</OPTION><OPTION title=Ireland value=6>Ireland</OPTION>";
   // this is the list of initial items (matching the ones above) that are used when the item is saved
   var $resultSpOptions = "5|tAfrica|t4|tIndia|t6|tIreland";
   // find the possible values control
   var possibleValues = $("[id$='_SelectCandidate']");
   // remove 1st option (Africa)
   $("[id$='_SelectCandidate'] option:eq(0)").remove();
   // remove 3rd option (India)
   $("[id$='_SelectCandidate'] option:eq(2)").remove();
   // remove 3rd option (Ireland)
   $("[id$='_SelectCandidate'] option:eq(2)").remove();
   // set selected value to asia (value 1)
   possibleValues.val(1)
   // append the new options to our results (this updates the display only of the second list box)
   $("[id$='_SelectResult']").append($resultOptions);
   // append the new options to our hidden field (this sets the values into the list item when saving)
   $("[id$='MultiLookupPicker']").val($resultSpOptions);
 });
SharePoint 2010 supports editing NewForm.aspx (and the other out-of-the-box forms) in the browser. One option is to modify the list and under advanced settings you can disable “Launch forms in a dialog”. This will launch the form like a regular web page. However that’s 3 or 4 steps and you have to go back and change it when you’re done.
Instead just visit the new form directly:
http://sitename/listname/NewForm.aspx
From this page select Site Actions | Edit Page. Now you can add a Content Editor Web Part to the page. When adding JavaScript I point the Content Link to the .js file (that I upload somewhere like Style Library or the Assets library if you have one) rather than trying to put JavaScript into the Content Editor Web Part. This way a) I can edit the JavaScript outside of the page by loading it up in SharePoint Designer or even upload a new .js file to the library and b) I can debug the JavaScript independently of the NewForm.aspx page (or whatever page I’m adding the .js file to)
The result:

When you save the record, the three default options are saved as well (this was set by the JavaScript).
Hope that helps!
-
Metro SharePoint Directory–Reading from Lists
As yet another follow-up to the various posts I made on building a Metro-style directory of sorts in SharePoint here and here, one thing that’s been asked a few times already is reading from a list.
In the original post we called the getSubWebsForCurrentUser method to fetch a list of sites. What if you wanted something more generic? Here’s a solution that will let you read from a list instead.
First we’re going to need a list. This part is easy. Create a new custom list through the Site Actions (Site Actions > More Options > List > Custom List, intuitive I know).

The custom list gives you a blank list with one column, Title. That will be our text to display. Next add a new column to the list of type Hyperlink. It can be called Url, Link, or Ganondorf if you’re feeling particularily Zelda-ish. This will be the link that will transport your users to magical places.

Now that we have our list we can use a modified version of the original script to iterate through the list items and build up our menu. I won’t get into the details of how everything works here (go back and read the first article in this series) but here’s the part that will create the menus. Replace your loadSites method with this one:
Line 8 is where things get different from the original implementation. Instead of getting the sites for the user, we get our custom list. Then we create a new CAML query. The SP.CamlQuery object has a method to get all items so we’ll use that (we could construct a custom query here but we want everything for now).
Line 11 we get all the list items based on the query and specify the fields we want to load.
Line 13 is the same as line 18 in the original code and submits our job to the server for execution.
Our onSuccess method is a little different now that we have to enumerate over list items instead of sites. Here’s the modified version:
A few things to note here on what happening.
Line 3 we fetch the list item enumerator.
Line 14 we step over each item in the list.
Line 16-19 we grab the individual item and fields we want.
Line 21-23 we setup the left hand menu navigation with the title and link to the site (from the custom list data)
Line 25-32 we populate the Metro tiles with the same information.
Finally we add it to our markup on the page using jQuery to replace our Loading tags.
That’s it. Now you have your custom menu driven from a SharePoint list. Go ahead and add items to the list and magic will happen.
Look for a more lengthy article on this entire series shortly where I pull it all together as well as adding a few more cool things like tracking and sorting the list based on popularity of clicks. I’m also going to present this whole thing at next weeks Calgary SharePoint User Group meeting if you’re in town so you can join us then.
Enjoy.
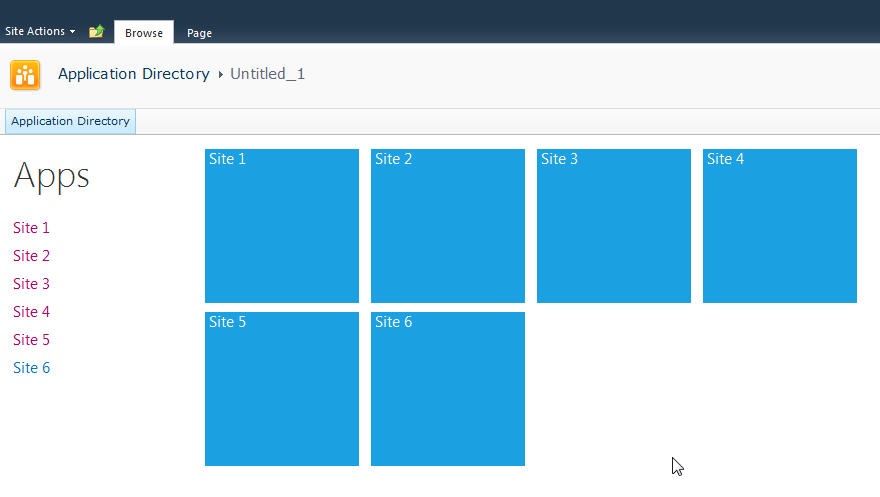
Metro Style Site Directory for SharePoint Using EMCAScript
I’ve always been trying to come up with a useful and clever way to allow users to navigate around SharePoint sites. Recently I put together an “Application Directory” which basically displayed a menu system to navigate around apps. Using the JavaScript Class Library for SharePoint to pull values out of SharePoint I quickly put together something that normally would be a lot of C# code and a web part.
The EMCAScript object model is powerful in that you can quickly pull data out of SharePoint sites and lists and make a pleasant user experience with just a little JavaScript, CSS, HTML, and jQuery. It still will make a call back to the server to fetch the data but it’s done asynchronously so the perception to the user is almost seamless.
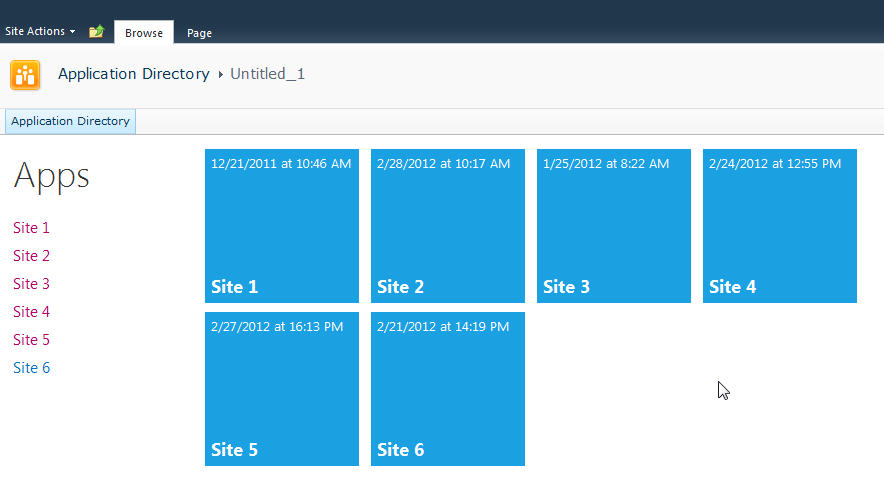
This post walks you through building a site directory of sorts. It could be used as a landing page on a top level site collection or as a web part sitting on a team site (to show the contents below the site). It’s up to you but the net result is a nice navigation system (done with a little “Metro” styling) all done in a hundred lines of JavaScript.
Here’s what we’re building:
Let’s start with the simplest thing possible. A script that we’ll insert into the page using the Content Editor Web Part via a Content Link. This is my preferred way of doing lightweight adds to SharePoint (like JavaScript or even just raw HTML). The Content Link points to a file in my SiteAssets library in the site and since it’s a link it just gobbles up the content and serves it up. If you try adding HTML to a Content Editor Web Part you’ll find a nice message after saving “Your HTML may have been modified”.
WTF?
Yeah, SharePoint deliciously will go in after you save your nicely formatted content and do some neat things like rename your CSS entities. Oh yeah, it’ll also strip away your JavaScript if it doesn’t like it.
Trust me. Just include the file and you’ll be much better off in the end. Having the file located in the SiteAssets library also lets me just crack it open in SharePoint Designer and while the editor isn’t the greatest, it does give you some Intellisense but the real advantage is saving it in SPD then hitting refresh on your page to see the effect. The file will contain the CSS, JavaScript, and HTML markup. I like putting everything together so I don’t have to worry about files all over my system but you can just as easily use multiple files if you want.
Alright, back to business. Create a new file in your SiteAssets library (you get a SiteAssets library when you create a new site regardless of what template you use or what feature you activate, it’s always there and accessible through SharePoint Designer).
Name the file SiteDirectory.js or something. Doesn’t really matter and you can call it ISavedTheWorldUsingPork.HowAboutThat if you want, but leaving it with a .js extension will give you some semblance of Intellisense inside of SPD.
Drop a Content Editor Web Part on the home page of your site (or wherever you want to put this). This could be a Wiki Page (the Home.aspx page is a wiki page if you activate the Wiki Home Page Feature on a site) or a Web Part Page. There are a few small tweaks you should do depending on what type of page you put this on but just adjust the CSS we’ll be building as you see fit.
Starting simple we're going to just enumerate the child sites and display them in an unordered list. The list is easy to style and works well with jQuery later to be able to animate or attach plugins to.
Here’s the initial code that we’ll put into the SiteDirectory.js file:
Like I said, all this is doing is a) enumerating through the list of subsites then b) spitting them out into an unordered list. Here’s a breakdown of how this works:
Line 1-2: We’ll include some CSS styles here later
Line 4: We include jQuery so we can a) make it easy to replace elements on the page and b) support plugins later. You can choose to use pure JavaScript or omit this if your site already includes jQuery.
Line 8: We declare a variable we’re going to use to hold the list of sites
Line 10: We wait until the core JavaScript files are loaded by SharePoint. This ensures the ClientContext is setup for us when we need it.
Line 12-23: This is the function that calls the Client Object Model to get our web then get the subwebs for the current user. Finally on lines 19-21 we execute the call (which is where we talk to the server) and define the success and failed methods.
Line 25-46: We define the success function to call with our list of subwebs. Here we’re getting an enumerator to the web collection and iterating through them, grabbing the url and title of the site then creating our unordered list using regular HTML markup. Finally on line 45 we find the DIV tag we’re replacing and substitute the HTML we just created.
Line 55-57: This is the HTML markup we’re going to replace in our JavaScript. We initially set the text to “Loading…” so users will see this when the page loads then *magically* it’ll get replaced with our content.
Here’s the result:
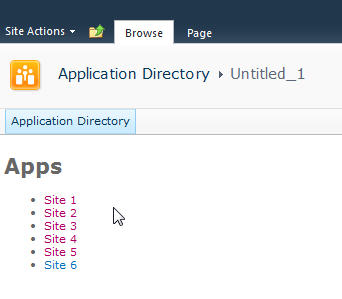
Looks good and lets us know we’re on the right track. If there are any failures you’ll see them here because our failed function will get called and output the error message. This could be anything from a JavaScript error to not calling a known method. Also note that this is already security trimmed since we’re using the getSubwebsForCurrentUser method so we’ll only see sites the user has access to.
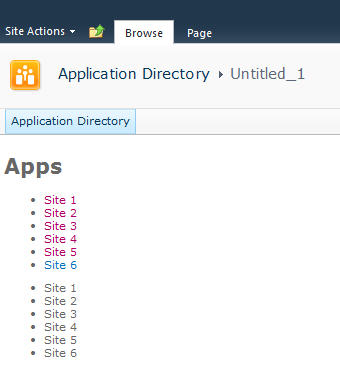
Let’s add another list and DIV tag so we have two lists to use:
Not much to explain here, just added a new DIV tag and built up the HTML just like the original. Now we have two unordered lists. We also wrapped up each list in its own DIV tag.
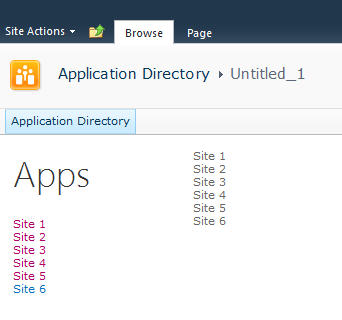
Now we’ll do some simple styling by floating the list of sites down the left hand side and the second list on the right and applying a little styling to the text.
Here’s the updated output:
Now it’s starting to look like our target. Let’s style the menu list with a larger font. We’ll also just make one line of code change in our markup in the onSuccess method. Find the line that says menuNavContent += ‘<ul>’ and change it to read menuNavContent += ‘<ul class=”apps”>’. This will style just the unordered list of items on the left.
Here are the new styles to add to the CSS
Now that we have the list done lets focus on the second list which will form our tiles. They’re not as live and vibrant as they could be but they do show some metadata from the site so are at least a little more informative than just navigation boxes.
First we’ll apply some styles to the list to make them into boxes and space them apart. It’s just CSS markup here to add and a couple of small changes in the construction of the HTML for the second list.
We’re just adding some new styles here. There’s a class called theme_blue set to the Metro blue (#1ba1e2) which we set as the background colour for each tile. In addition we set the entire tile to be clickable to the same url as the site. This lets the user click anywhere on the tile (or the list one the left) to launch the site rather than having to click on the title.
Here’s the updated output.
Now that we have our tiles we can add some dynamic metadata to them. This will be pulled from the website itself and give us a navigation system that’s more information than just links.
We wrap the title in a DIV tag with a class of tileTitle which lets us style it to place it at the bottom of the tile and give it a larger font. You do need to be careful of the length of the titles of your sites as this doesn’t work for all scenarios but just adjust it to fit your needs.
We also pull the last modified item date from the web properties. Every site tracks whatever the last item that was modified is and holds onto the date for that item. So now users can see when some content on the site was last changed.
Also we parse out the date from SharePoint into a JavaScript Date object and build a formatted date to display on the tile.
The final image:
That’s it! You now have a single script that you can just drop onto any site to create a Metro style navigation to the subsites. New sites can be added and will automatically show up and users can see when the content on the site was last modified and be able to click on the site to visit it.
Here’s the full source code for the page for you play with.
Remember, this is just a start. There are some fun things you can do with this. For example create custom styles for different colours (for example blue for team sites, red for wikis, etc.) and style them accordingly. Other ideas are to pull other data from the site like description, etc. and put that on a bigger tile. Enumerate the number of subsites in a site and display that. There are other properties you can access off the Web object like if RSS is enabled, etc. so you might want to display different icons on the tile to reflect that. The list of properties on the SP.Web class can be found here.
If you’re following the “Metro” style then remember to keep the UI light and simple. Content over chrome. You don’t want to be dumping all kinds of information here, just enough that your users need to make it useful.
Enjoy!
jQuery, SharePoint Picture Libraries, and automatic thumbnails
Picture Libraries are an interesting beast in SharePoint. When you upload a picture to a picture library you get not one but three images! Whenever you upload an image to a Picture Library, SharePoint automatically creates two additional images for you. A small thumbnail it uses in views and a preview image it uses when you’re viewing the picture properties. Leveraging this “feature” we can build a pretty cool client side gallery using the auto-generated thumbnails and some JavaScript to produce this:

No C# or custom web parts needed. Just a few simple things to get this effect:
- jQuery installed on your site (there are many ways to do this like Jan Tielens solution here)
- A document library to store the JavaScript we’re going to write
- The jQuery Thumbnail Hover Popup for Greasemonkey plugin
- A SharePoint Picture Library
Creating the Picture Library
Create a picture library. I named mine “Pictures” but your can be whatever you want it to be. You must create a Picture Library as we’re going to be using the automatic thumbnails and only the Picture Library template will do this for us. In the demo I just grabbed half a dozen images from the Windows 7 wallpapers on my hard drive (C:\Windows\Web\Wallpaper) and uploaded them.
The Script
Here’s the complete source code to the JavaScript we’ll use. Copy this and upload it to a document library. I use the Site Assets library that’s available on any SharePoint site where the Wiki Home Page feature is activated (like the Team Site template) or you can just use or create any document library for it.
Let’s break down some of the parts to this.
First we have a div tag with an id of “pictureMicroGallery”. This is where we’ll load our pictures into. The text “Loading…” is just a placeholder. You can put an animated image here or whatever you want while the images are fetched.
Next we start our own script.
The first line is this:
Here we’re using a built-in function in SharePoint to tell it to call our own method, “loadSharePointPictures” after the sp.js file is loaded. This is similar to the typical jQuery document load technique you might see:
However instead of waiting for the document to load, we’re waiting for a script to load. If you try to execute client side functions before sp.js is loaded, you’ll run into problems. So we let the system launch our function when it’s ready. Next is the loadSharePointPictures function. This is our call to the client side object model to load content dynamically.
All the lines are commented so pretty self explanatory. In a nutshell we’re loading a list called “Pictures” (line 7), creating a query to fetch all the items (line 9), selecting two columns (line 13), and then executing the call asynchronously (line 15-17).
When this call is successful, we call this function:
Here we get the enumerator of items from our “pictures” variable (this was set in the previous function). Then we iterate through each item, fetching it and the data from each item in the list in lines 6-10.
The FileLeafRef column contains the name of the image file we uploaded (test.jpg, etc.). The FileDirRef column contains the folder where the list lives.
Line 11 is where the magic happens. Remember when you upload a file to a picture library I said there are three images. Your original + two additional images that are automatically generated for you.
Here’s the picture library in SharePoint Manager:

See how we have img13.jpg (which is the original image file uploaded) but then in a “_w” folder there’s “img13_jpg.jpg” and the same in a folder called “_t”.
The _t folder contains the small thumbnail image (set to 160 pixels wide). It’s the image used when you view the “All Pictures” view of your picture library. The other _w folder is the large thumbnail (set to 640 pixels wide). This is the image used when you view the picture properties.
The great thing about these images (apart from being created for you) is that they’re set to a known size (width wise) and the do some magic in setting the height, getting it as close to the original aspect ratio as possible. That means you can use these images yourself to produce a gallery (like we’re doing here) and get pretty consistent results even if your images are totally off.
In any case, in this example I deliberately uploaded very large images (1920 x 1200) to show you that you can use these thumbnails as your gallery rather than trying to resize the originals.
Back to the code. In lines 7-11 we take the filename and directory and build our path to the small thumbnail version of the image (in our _t folder). So img13.jpg becomes:
The thumbnail itself is a .jpg file (regardless of what the original source file is) so the original extension is embedded in the filename if you need it. Just decompose the thumbnail file, drop the extension, and replace the “_” with a “.” to find your original file. Lines 8 and 9 turn our original filename into our thumbnail version.
Lines 15-19 we take the array of pictures we previously built (which is a url to the thumbnail image) and build up a HTML string of IMG tags with the SRC pointing at where the thumbnail is.
Finally in line 21 we use jQuery to replace the contents of our DIV tag with our new HTML containing the IMG tags.
Note: You can separate these out and just have an include file with the .js content and manually add to the <div> tag to your page. Your choice. I just find that SharePoint often mangles the HTML I write and litters it with it’s own styles and tags so I just include the whole thing from a library. That way none of my markup is messed with. Take that Microsoft!
Adding It To The Page
With our script ready, add a Content Editor web part to the page and point the content at our JavaScript include file we uploaded to the Site Assets library (or wherever you have the script living).
Save the page and it should look something like this (I just replaced the Documents web part on the Team Site home page with my Content Editor):

Thumbnail Hover Popup Plugin
I mentioned this up front but why? As it happens, I stumbled over this jQuery plugin awhile ago and filed it away for something to look at some day. Turns out it’s a cool plugin which mirrors how the automatic thumbnails in SharePoint are generated. The author created it for Greasemonkey so he could preview larger images on sites without having to click through to a page. It works where the thumbnails and larger images have similar filenames (except for a change or two).
This works great for SharePoint because the _t or _w directories hold different size images and the filenames are built from the filename of the original image. Once you know one, you can get the image for the other.
We’ll do this on our gallery (which uses the thumbnails) so when we hover over the image, we present the preview image.
First upload the plugin (a single file, jquery.thumbhover.js) to your Site Assets library (or wherever your other script is).
Next add the following line to your own script to include the thumbhover one:
We’ll add a call to the plugin for all our images. Remember the IMG tag we added a class named “pictureGallery” to it (line 16 above). Now we can use a jQuery selector to attach the plugin to every IMG file. We need to do this after we rewrite the HTML for the IMG tags so find this line:
And add this after it:
This attaches the thumbPopup to every IMG tag with the class “pictureGallery”. The imgSmallFlag is the folder for the small images and the imgLargeFlag is for the medium thumbnails (the _w folder).
When it comes time to render the popup, the plugin will grab the SRC of the image then change the imgSmallFlag to the imgLargeFlag (so changing the IMG from the 160 pixel wide thumbnail to the 640 pixel one).
Now when you hover your mouse over the image thumbnails on your page, the plugin will fetch the large thumbnail and use it in the popup. The final effect will look something like this:

Enhance it!
That’s it. Now you have a simple script you can drop onto a page and get a cool looking gallery display out of it, leveraging the automatic thumbnails SharePoint generates for you. Of course, that’s only the beginning.
Some ideas on enhancements you can do to the script:
- Add in the ability to fade the popups in when you hover over the thumbnail. This will create a nicer effect for the user
- Display additional text on the popup in an overlay (use the description field from SharePoint for the text!)
- Change how you display the thumbnail, perhaps link each thumbnail to the original image or SharePoint list item (you’ll need to add more fields to your JavaScript if you want to read them in the success function)
- Add paging to the list of images so you display them in batches of 20 or 30
- Do some better formatting on the gallery and jazz it up a bit
Have fun and don’t be afraid to experiment!
Last Note: We don’t really *need* jQuery for this to work (except for the hover effect). Most of the code is just plain old JavaScript. The line to replace the contents of the DIV tag can be done with regular JavaScript so if you don’t want the hover effect (which is a jQuery plugin so requires it) and don’t want to use jQuery… then don’t. You’ll still have a simple and free client side photo gallery from the automatic thumbnails SharePoint gives you.
Enjoy.
Dynamic Project Listing for XAMPP
I’m a big fan of two very simple products, XAMPP and WampServer. Both are pre-packaged install kits composed of Apache, MySQL, and PHP (among other tools). They’re the perfect answer to getting a LAMP/WAMP/MAMP stack running quicky for some local PHP development.
Over the years I’ve installed each of these products manually on all platforms they support and installation experiences range from simple to complex. However for quick development, they’re great tools as they give you a simple setup that is no-mess and no fuss. Just run the installer and you’ll have a WAMP or LAMP stack in minutes to develop off of (WampServer only supports Windows but XAMPP supports Linux, Mac, and Windows).
What is It?
One feature I really like with WampServer is the project listing. It’s a simple thing that just lists your folders under your root Apache directory and gives you an easy interface to get to new projects quickly. Just drop a new project in a folder and it shows up on your home page.
Here’s what it looks like in WampServer:

Here’s how you can have the same thing with XAMPP.
XAMPP uses frames and has a few more “behind-the-scenes” files to make it go, however at heart of it, it’s still the same thing. Apache web server. The only difference is it doesn’t have that nice automated way to displays your htdocs folders so taking a nod from WampServer, here’s what we need to do to get a similar effect in XAMPP.
Do It Yourself
First you’ll need to create a new file. Call it naviother.inc and put it in the c:\xampp\htdocs\xampp directory. The contents of this folder should look like this:
1: <br/><a class="n" target="content" onclick="h(this);" href="/projects.php">Projects</a><br>
Now create a new PHP file in the root folder (c:\xampp\htdocs) called projects.php with this code:
1: <!DOCTYPE HTML PUBLIC "-//W3C//DTD HTML 4.01 Transitional//EN"
2: "http://www.w3.org/TR/html4/loose.dtd">
3: <html>4: <head>5: <link href="xampp/xampp.css" rel="stylesheet" type="text/css">
6: <title>7: </title>8: <base target="_blank"/>
9: </head>10: <body>11:12: <?php13: $handle=opendir(".");
14: $projectContents = '';
15: while ($file = readdir($handle))
16: {17: if (is_dir($file) && ($file != "..") && ($file != "."))
18: {19: $projectContents .= '<li><a href="'.$file.'">'.$file.'</a>';
20: $projectContents .= '</li>';
21: }22: }23: closedir($handle);24: if (!isset($projectContents))
25: $projectContents = "No Projects";
26: ?>27:28: <ul id="projectList">
29: <?php echo $projectContents ?>30: </ul>31:32: </body>33: </html>Visit your local installation and you’ll see a new link on the sidebar at the bottom of the Tools section called Projects.

Click on it and you’ll see this (I’ve added a few sample folders):

Now just add new folders under c:\xampp\htdocs and they’ll appear here.
How it Works
So how does this work? It’s really simple.
First you need to know how XAMPP builds the sidebar which contains all those links. Inside the xampp directory under htdocs (the Apache folder) is a file called navi.php. This file contains all the sidebar navigation for the homepage. Down around line 57 you’ll see something like this:
1: <tr valign="top">
2: <td align="right" class="navi">
3: <?php
4: $navi = array('navitools.inc', 'naviservers.inc', 'naviother.inc');
5: foreach ($navi as $inc) {
6: if (is_readable($inc)) {
7: include $inc;
8: }9: }10: ?>
11: <br><br>
12: </td>
13: </tr>
This section just loops through an array of files (navitools.inc, naviservers.inc, and naviother.inc) and includes the contents of each one in line 7.
The file navitools.inc contains links to phpMyAdmin and Webalizer (the first two entries under the Tools sidebar). naviservers.inc contains links to Mercury Mail and FileZilla FTP.
naviother.inc is the oddball here because in the default installation of XAMPP, it doesn’t exist. Yet the code looks for it and if it’s present, includes it. This is the file we create to put our contents in here.
So the contents of naviother.inc just contains a link to our Projects page (projects.php) we create.
1: <br/><a class="n" target="content" onclick="h(this);" href="/projects.php">Projects</a><br>
We’re just cloning the contents you see in the other *.inc files and setting the target to “content” which is the main frame on the page.
Note: If you just installed the “Lite” version (which doesn’t contains the additional servers) you might not have these files or entries but the basic structure should be the same.
Now that we have our Projects link we can move onto the projects.php file it links to. Here’s the code again for that file:
1: <!DOCTYPE HTML PUBLIC "-//W3C//DTD HTML 4.01 Transitional//EN"
2: "http://www.w3.org/TR/html4/loose.dtd">
3: <html>
4: <head>
5: <link href="xampp/xampp.css" rel="stylesheet" type="text/css">
6: <title>
7: </title>
8: <base target="_blank"/>
9: </head>
10: <body>
11:12: <?php
13: $handle=opendir(".");
14: $projectContents = '';
15: while ($file = readdir($handle))
16: {17: if (is_dir($file) && ($file != "..") && ($file != "."))
18: {19: $projectContents .= '<li><a href="'.$file.'">'.$file.'</a>';
20: $projectContents .= '</li>';
21: }22: }23: closedir($handle);24: if (!isset($projectContents))25: $projectContents = "No Projects";26: ?>
27:28: <ul id="projectList">
29: <?php echo $projectContents ?>
30: </ul>
31:32: </body>
33: </html>
This is just a HTML file with some PHP code embedded to get our folder listings.
- Line 5 contains a link to the xampp.css stylesheet so we can maintain the same look and feel as the rest of the site
- Line 8 contains the base target we want our links to open up into. Since we’re listing projects I decided I wanted everything to open up in a new window (or tab). You might want it to just replace the frame contents or swap out the current window so modify this accordingly.
- Line 13 starts our PHP code and gets a handle to the current directory.
- Line 15 reads in each subfolder or file
- Line 17 checks to see if the current item is a directory and also excludes processing the two “dot” directories.
- Line 19 appends the folder name to a variable named projectContents as a HTML list item with a hyperlink to the folder.
- Line 24 checks to see if we have any folders to display and if not, sets the contents indicating this.
- Line 28-30 displays the items in an unordered list
A Little Extra
Here’s a couple of things you can do to spice up a boring directory listing. First we’ll add the “Your Projects” header to page:
1: <h1>Your Projects</h1>
2:3: <ul id="projectList">
4: <?php echo $projectContents ?>
5: </ul>
Which gives us this:

Next, as your project list grows you might find the unordered list a little bland and boring (and long). We’ll toss a little jQuery love into the mix to spice things up and use the ListNav plugin to display our boring unordered list of folders a better light. ListNav is a nice little plugin that can transform your unordered list into something fun (as with most jQuery plugins, with next to no addtional code).
First download a copy of jQuery and the ListNav plugin and drop the files into a /scripts directory under your htdocs folder.
Next let’s make a slight modification to the output of our unordered list by wrapping it in some extra tags that jQuery can pick up:
1: <h1>Your Projects</h1>
2: <div id="projectWrapper">
3: <div id="projectList-nav"></div><br/>
4: <ul id="projectList">
5: <?php echo $projectContents ?>
6: </ul>
7: </div>
Now finallly add jQuery, the ListNav plugin, and this javascript to the top of your projects.php file (or bottom if you prefer):
1: <script type="text/javascript" src="scripts/jquery-1.4.2.js"></script>
2: <script type="text/javascript" src="scripts/jquery.listnav-2.1.js"></script>
3: <script type="text/javascript">
4: $(document).ready(function(){
5: $('#projectList').listnav();
6: });7: </script>The only piece of code we’re writing is a selector to find our unordered list (projectList) and call the listnav() plugin.
Now our boring list has turned into this cool looking navigation control:

I used the CSS from #DemoFour in the ListNav code to get the box effect here, but XAMPP does make it a little tricky. The ListNav creates classes for each letter in the navigation bar (using a single letter style name). However XAMPP also does this in it’s stylesheet so you might notice the letters D, N and others look a little “off”.
Here’s the CSS override you can add to a new stylesheet and just include in your projects.php file to fix it up:
1: /* fix for some classes that xampp defines */2: a.n:link, .n, .d, .h3: {4: color:#BB3902;5: background-color:#F8E8A0;6: font-size:12px;7: }8:9: #projectWrapper10: {11: width:100%;12: }13:14: #projectList li15: {16: list-style: none;17: float:left;18: }19:20: #projectList a21: {22: width:185px;23: display:block;24: text-decoration:none;25: border:1px solid silver;26: padding:10px;27: margin:0 10px 10px 0px;28: }All Done!
Hope that helps and gives you a little mod for your local PHP/MySQL development. I highly recommend checking out XAMPP or WampServer if you’re just looking to get your LAMP/WAMP stack up and running quickly so you can focus on building software rather than installing tools. You pick which one you want to go with but XAMPP has the advantage of being fully portable as you can install it on a USB stick and run it right from the install directory without having to drop anything on your local drive.
Enjoy!
Using jQuery and SPServices to Display List Items
I had an interesting challenge recently that I turned to Marc Anderson’s wonderful SPServices project for. If you haven’t already seen or used SPServices, please do. It’s a jQuery library that does primarily two things. First, it wraps up all of the SharePoint web services in a nice little AJAX wrapper for use in JavaScript. Second, it enhances the form editing of items in SharePoint so you’re not hacking up your List Form pages.
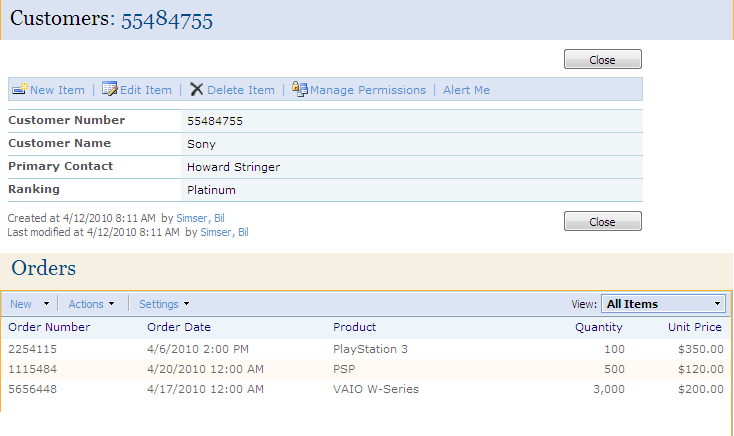
My challenge was simple but interesting. The user wanted to display a SharePoint item page (DispForm.aspx, which already had some customization on it to display related items via this blog post from Codeless Solutions for SharePoint) but launch from an external application using the value of one of the fields in the SharePoint list.
For simplicity let’s say my list is a list of customers and the related list is a list of orders for that customer. It would look something like this (click on the item to see the full image):
Your first thought might be, that’s easy! Display the customer information using a DataView Web Part and filter the item using a query string to match the customer number. However there are a few problems with this idea:
- You’ll need to build a custom page and then attach that related orders view to it. This is a bit of a problem because the solution from Codeless Solutions relies on the Title field on the page to be displayed. On a custom page you would have to recreate all of the elements found on the DispForm.aspx page so the related view would work.
- The DataView Web Part doesn’t look *exactly* like what the out of the box display form page does. Not a huge problem and can be overcome with some CSS style overrides but still, more work.
- A DVWP showing a single record doesn’t have the same toolbar that you would using the DispForm.aspx. Not a show-stopper and you can rebuild the toolbar but it’s going to potentially require code and then there’s the security trimming, etc. that you have to get right.
- DVWPs are not automatically updated if you add a column to the list like DispForm.aspx is. Work, work, work.
For these reasons I thought it would be easier to take the already existing (modified) DispForm.aspx page and just add some jQuery magic to the page to find the item. Why do we need to find it? DispForm.aspx relies on a querystring parameter called “ID” which then displays whatever that item ID number is in the list. Trouble is, when you’re coming in from an external app via a link, you don’t know what that internal ID is (and frankly shouldn’t). I don’t like exposing internal SharePoint IDs to the outside world for the same reason I don’t do it with database IDs. They’re internal and while it’s find to use on the site itself you don’t want external links using it. It’s volatile and can change (delete one item then re-add it back with the same data and watch any ID references break).
The next thought might be to call a SharePoint web service with a CAML query to get the item ID number using some criteria (in this case, the customer number). That’s great if you have that ability but again we had an existing application we were just adding a link to. The last thing I wanted to do was to crack open the code on that sucker and start calling web services (primarily because it’s Java, but really I’m a lazy geek). However if you’re doing this and have access to call a web service that would be an option.
Back to this problem, how do I a) find a SharePoint List Item based on some field value other than ID and b) make it low impact so I can just construct a URL to it?
That’s where jQuery and SPServices came to the rescue. After spending a few hours of emails back and forth with Marc and a couple of phone calls (and updating jQuery to the latest version, duh!) it was a simple answer.
First we need a reference to a) jQuery b) SPServices and c) our script. I just dropped a Content Editor Web Part, the Swiss Army Knives of Web Parts, onto the DispForm.aspx page and added these lines:
<script type="text/javascript" src="http://intranet/JavaScript/jquery-1.4.2.min.js"></script> <script type="text/javascript" src="http://intranet/JavaScript/jquery.SPServices-0.5.3.min.js"></script> <script type="text/javascript" src="http://intranet/JavaScript/RedirectToID.js"> </script>
Update it to point to where you keep your scripts located. I prefer to keep them all in Document Libraries as I can make changes to them without having to remote into the server (and on a multiple web front end, that’s just a PITA), it provides me with version control of sorts, and it’s quick to add new plugins and scripts.
Now we can look at our RedirectToID.js script. This invokes the SPServices Library to call the GetListItems method of the Lists web service and then rewrites the URL to DispForm.aspx to use the correct SharePoint ID (the internal one).
$(document).ready(function(){
</SPAN><SPAN style="COLOR: #0000ff">var</SPAN><SPAN style="COLOR: #000000"> queryStringValues </SPAN><SPAN style="COLOR: #000000">=</SPAN><SPAN style="COLOR: #000000"> $().SPServices.SPGetQueryString(); </SPAN><SPAN style="COLOR: #0000ff">var</SPAN><SPAN style="COLOR: #000000"> id </SPAN><SPAN style="COLOR: #000000">=</SPAN><SPAN style="COLOR: #000000"> queryStringValues[</SPAN><SPAN style="COLOR: #000000">"</SPAN><SPAN style="COLOR: #000000">ID</SPAN><SPAN style="COLOR: #000000">"</SPAN><SPAN style="COLOR: #000000">]; </SPAN><SPAN style="COLOR: #0000ff">if</SPAN><SPAN style="COLOR: #000000">(id </SPAN><SPAN style="COLOR: #000000">==</SPAN><SPAN style="COLOR: #000000"> </SPAN><SPAN style="COLOR: #000000">"</SPAN><SPAN style="COLOR: #000000">0</SPAN><SPAN style="COLOR: #000000">"</SPAN><SPAN style="COLOR: #000000">) { </SPAN><SPAN style="COLOR: #0000ff">var</SPAN><SPAN style="COLOR: #000000"> customer </SPAN><SPAN style="COLOR: #000000">=</SPAN><SPAN style="COLOR: #000000"> queryStringValues[</SPAN><SPAN style="COLOR: #000000">"</SPAN><SPAN style="COLOR: #000000">CustomerNumber</SPAN><SPAN style="COLOR: #000000">"</SPAN><SPAN style="COLOR: #000000">]; </SPAN><SPAN style="COLOR: #0000ff">var</SPAN><SPAN style="COLOR: #000000"> query </SPAN><SPAN style="COLOR: #000000">=</SPAN><SPAN style="COLOR: #000000"> </SPAN><SPAN style="COLOR: #000000">"</SPAN><SPAN style="COLOR: #000000"><Query><Where><Eq><FieldRef Name='CustomerNumber'/><Value Type='Text'></SPAN><SPAN style="COLOR: #000000">"</SPAN><SPAN style="COLOR: #000000"> </SPAN><SPAN style="COLOR: #000000">+</SPAN><SPAN style="COLOR: #000000"> customer </SPAN><SPAN style="COLOR: #000000">+</SPAN><SPAN style="COLOR: #000000"> </SPAN><SPAN style="COLOR: #000000">"</SPAN><SPAN style="COLOR: #000000"></Value></Eq></Where></Query></SPAN><SPAN style="COLOR: #000000">"</SPAN><SPAN style="COLOR: #000000">; </SPAN><SPAN style="COLOR: #0000ff">var</SPAN><SPAN style="COLOR: #000000"> url </SPAN><SPAN style="COLOR: #000000">=</SPAN><SPAN style="COLOR: #000000"> window.location; $().SPServices({ operation: </SPAN><SPAN style="COLOR: #000000">"</SPAN><SPAN style="COLOR: #000000">GetListItems</SPAN><SPAN style="COLOR: #000000">"</SPAN><SPAN style="COLOR: #000000">, listName: </SPAN><SPAN style="COLOR: #000000">"</SPAN><SPAN style="COLOR: #000000">Customers</SPAN><SPAN style="COLOR: #000000">"</SPAN><SPAN style="COLOR: #000000">, async: </SPAN><SPAN style="COLOR: #0000ff">false</SPAN><SPAN style="COLOR: #000000">, CAMLQuery: query, completefunc: </SPAN><SPAN style="COLOR: #0000ff">function</SPAN><SPAN style="COLOR: #000000"> (xData, Status) { $(xData.responseXML).find(</SPAN><SPAN style="COLOR: #000000">"</SPAN><SPAN style="COLOR: #000000">[nodeName=z:row]</SPAN><SPAN style="COLOR: #000000">"</SPAN><SPAN style="COLOR: #000000">).each(</SPAN><SPAN style="COLOR: #0000ff">function</SPAN><SPAN style="COLOR: #000000">(){ id </SPAN><SPAN style="COLOR: #000000">=</SPAN><SPAN style="COLOR: #000000"> $(</SPAN><SPAN style="COLOR: #0000ff">this</SPAN><SPAN style="COLOR: #000000">).attr(</SPAN><SPAN style="COLOR: #000000">"</SPAN><SPAN style="COLOR: #000000">ows_ID</SPAN><SPAN style="COLOR: #000000">"</SPAN><SPAN style="COLOR: #000000">); url </SPAN><SPAN style="COLOR: #000000">=</SPAN><SPAN style="COLOR: #000000"> $().SPServices.SPGetCurrentSite() </SPAN><SPAN style="COLOR: #000000">+</SPAN><SPAN style="COLOR: #000000"> </SPAN><SPAN style="COLOR: #000000">"</SPAN><SPAN style="COLOR: #000000">/Lists/Customers/DispForm.aspx?ID=</SPAN><SPAN style="COLOR: #000000">"</SPAN><SPAN style="COLOR: #000000"> </SPAN><SPAN style="COLOR: #000000">+</SPAN><SPAN style="COLOR: #000000"> id; window.location </SPAN><SPAN style="COLOR: #000000">=</SPAN><SPAN style="COLOR: #000000"> url; }); } }); }});
What’s happening here?
- Line 3: We call SPServices.SPGetQueryString to get an array of query string values (a handy function in the library as I had 15 lines of code to do this which is now gone).
- Line 4: Extract the ID value from the query string
- Line 6: If we pass in “0” it means we’re looking up a field value. This allows DispForm.aspx to work like normal with SharePoint lists but lookup our values when invoked. Why ID at all? DispForm.aspx doesn’t work unless you pass in something and “0” is a *magic* number that will invoke the page but not lookup a value in the database.
- Line 8-15: Extract the CustomerNumber query string value, build a CAML query to find it then call the GetListitems method using SPServices
- Line 16: Process the results in our completefunc to iterate over all the rows (there should only be one) and extract the real ID of the item
- Line 17-20: Build a new URL based on the site (using a call to SPGetCurrentSite) and append our real ID to redirect to the DispForm.aspx page
As you can see, it dynamically creates a CAML query for the call to the web service using the passed in value. You could even make this generic to take in different query strings, one for the field name to search for and the other for the value to find. That way it could be used for any field you want. For example you could bring up the correct item on the DispForm.aspx page based on customer name with something like this:
http://myserver/Lists/Customers/DispForm.aspx?ID=0&FilterId=CustomerName&FilterValue=Sony
Use your imagination. Some people would opt for building a custom page with a DVWP but if you want to leverage all the functionality of DispForm.aspx this might come in handy if you don’t want to rely on internal SharePoint IDs.
Hiding the New Toolbar Button in SharePoint with jQuery
Another quick little fun thing today. Many times you might want (need) to hide the “New” button on a list toolbar. You know the one I mean?

Why would you want to do such a thing? For example on a project I’m building I actually call the NewForm.aspx page with a querystring because I want to pre-populate my form with some vales. As such, I don’t want users to create new items in a list without these references and since they have to come from another list I’m left with the problem of trying to restrict them from creating new items but still offer them the ability to use the features of the list like alerts, exporting to spreadsheets, etc. Yes, the “New” button isn’t available for readers of a list but for contributors it is and for admins you can’t just turn some of this stuff off easily.
If you do some Googling you’ll find some ways to do it. Some want you to modify the list schema, others have C# code to hide it, an others even want you to crack open SharePoint designer and butcher your AllItems.aspx page. Bazooka to kill a mosquito solution IMHO.
Here’s another simple way to do it with your Swiss Army knife, jQuery.
Ingredients
- jQuery (either installed on your server or remotely and referenced in a master page or via a Content Editor Web Part)
- 1 Content Editor Web Part
- 1 lines of jQuery/JavaScript
First you’ll need to have a list to modify. In this case I’ll use a Task list, but any list or library will do. Next go to the view page for the list that you want to do this on.
Click on Edit Page in the Actions menu and you’ll be allowed to add and edit web parts on the view page. This was a feature Microsoft smartly added and is fully supported. Now we can start adding our jQuery love.
Click on Add Web Part, browse for the CEWP and drop it on the page. Make sure you place it below the list form and also mark it as “Hidden” in the Layout options. This keeps the page looking as clean as it was originally.
If you inspect the HTML of any toolbar, it’s basically composed of something like this:
<table class=”ms-menutoolbar”>
<tr>
<td class=”ms-toolbar”>[toolbar item]</td>
<td class=”ms-separator”>[separator image]</td>
<td class=”ms-toolbar”>[toolbar item]</td>
<td class=”ms-separator”>[separator image]</td>
<td class=”ms-toolbar”>[toolbar item]</td>
<td class=”ms-separator”>[separator image]</td>
[etc.]
</tr>
</table>We want to hide the first couple of <TD> elements which contain the “New” button as well as the separator. We can do this easily with this little nugget of jQuery:
<script src="/Javascript/jquery/jquery.js"></script>
<script>
$(document).ready(function(){
$('.ms-menutoolbar td:lt(4)').hide();
});
</script>Add that to your CEWP you added to the NewForm.aspx page and you get this:

fooP! The “New” button disappears.
Sidenotes
The jQuery is super simple here (I try to write as little code as possible). When the document loads, find the toolbar class (‘.ms-menutoolbar’) then find the first 3 <TD> tags and hide them. One thing to note, when I wrote this today at work I was on IE7 and there were only 2 <TD> tags to hide (thus my jQuery selector was “td:lt(3)”). When I wrote this post I did so hitting my site using FireFox and lo and behold there seems to be an additional <TD> tag. In any case, you might have to experiment with the selectors to get the right number depending on your setup.
There are *always* many ways to do things in SharePoint. This is just one of them. I suppose you could also find the “id” of the buttons and remove/hide them but SharePoint IDs are always cryptic and not guaranteed to be the same from list to list, page to page, and site to site. I just find this method easy and low impact. YMMV.
Changing the Home tab in Mutipage Meeting Workspaces with jQuery
Another simple trick today. Very often people ask about how to change the tab name on sites created with the Multipage Workspace Template. A simple enough request but not something you can do out of the box. Or can you?
Okay, let’s take a step back. Let’s say you want a site with tabs. There’s a built-in template under the Meetings group called Mutiplage Meeting Workspace. It creates a site with tabs and allows you to add new tabs (Web Part Pages) and place whatever Web Parts you want on each tab.
Just a note that this is actually a Meeting Workspace template and isn’t quite like a normal site template. You’ll find oddities like the inability to create subsites and weird hidden “1” folders. This is because meeting workspaces are designed to have the ability to repeat and use the hidden folders for supporting this. However for the purpose of creating a site with tabs, it works and easy to get going with. See some links at the end of the article on tips and tricks creating Multipage sites.
Using this template it’s easy (but not intuitive) to change the name of the tab for each page. To change the name of an existing tab:
- Navigate to the tab page
- Click on Site Actions then select Manage Pages

- Click on Order to show the dropdown menu and select Settings

- Change the Page Name and click OK

However if you try this on the Home Page you’ll see this message:

That’s not very comforting (and I can’t recall why you can’t change the name as it’s rather silly) however it’s jQuery to the rescue to correct this quip.
To change the Home Page tab name we’ll need two Content Editor Web Parts (CEWP). One when the Home tab is active and one when it’s not. Using jQuery we simply find the tab and change the text. Seriously it’s this easy:
<script type="text/javascript"> $(document).ready(function(){ $('.ms-tabselected:contains("Home")').text("Zombieland"); }); </script>
And here’s the code when the tab is inactive (it has a different classname):
<script type="text/javascript"> $(document).ready(function(){ $('.ms-tabinactive:contains("Home") a').text("Zombieland"); }); </script>
I know it’s simple and boring. You can also use the ‘begins’ wildcard feature of finding a class in jQuery so rather than the simplistic code above, you can impress your friends and pick up hot chicks with something a little more sophisticated looking like this:
<script type="text/javascript"> $(document).ready(function(){ $('*[className^="ms-tab"]:contains("Home")').text("Zombieland"); }); </script>
However this only works when the Home tab is active. When it’s inactive you need to include the hyperlink so the selector looks like this (note the addition of the ‘a’):
<script type="text/javascript"> $(document).ready(function(){ $('*[className^="ms-tab"]:contains("Home") a').text("Zombieland"); }); </script>
I thought I would be smart and use the className^=”ms-tab” wildcard so it would work on any page but the content changes if the page is active. Even with the class selector when the page is active, there’s no hyperlink to the page (which makes sense) so no ‘a’ selector to find. When the tab isn’t active it’s there. My JavaScript kung-fu prevents me from figuring out something that works for both situations but feel free to post a snippet in the comments and I’ll update the post.
In any case, with a single line of JavaScript and jQuery we transformed this:

into this:

Enjoy!
- Serve Hermans – How to enable Quicklaunch on multipage meeting workspace
- Angus Logan – How to create a multipage site in SharePoint from Craig Box (for 2003 but *should* work on 2007)
- Tariq – No SharePoint Tabstrips but then there is the DataView (again, 2003 but should work in 2007)
Calculated Time Left columns in SharePoint with jQuery
A current project I’m working on in SharePoint is an online auction. I’ll post more info about this and maybe some code and web parts later but for now I wanted to share a simple enhancement we did with a little jQuery to display the time left for each item.
Just like eBay, I wanted to display the time remaining on auction items. I figured this would be a calculated field (based on a date the user chose for when the auction for that item ended) but having to calculate date differences based on the current date doesn’t work in SharePoint (the elusive [Today] problem). I thought jQuery would help and it did. Here’s how.
First you need a couple of fields in your list. Auction items are stored in a list with some details (title, description, bid information, etc.).

Along with the regular fields there are a few other ones at the end that are used for housekeeping on the item (and not displayed to users). In particular there’s an [End Date] field which is a simple Date/Time field for when this item should end and another one called [Time Left].

[Time Left] is a calculate field shown as a Date/Time value. The actual calculated value is irrelevant as we’ll be replacing it with our JavaScript, so we just make it equal to the [End Date] field.

The calculated column serves as a dual purpose because we’re actually going to read this in our List View then replace it with the number of days/hours/minutes/seconds remaining on the auction item. Since it’s a calculated field, the user doesn’t edit it either.
Over at End User SharePoint in the jQuery for Everyone series Paul Grenier, the undisputed King of jQuery in SharePoint, had a great article about dealing with the [Today] problem. His sample finds a column in a list view and displays when an item was last updated. It’s exactly what I needed, except I needed to look forward in time to determine the time remaining rather than backwards. Simple enough to take his example and reverse the dates. Here’s the modified jQuery code:
<script type="text/javascript"> $(document).ready(function(){ var str = "Time Left"; //change this based on col header var a=0; var headers = $("table.ms-listviewtable:first> tbody> tr:first th").get(); $.each(headers, function(i,e){ x = $(e).contents().find("a[title*='"+str+"']").length; a = x > 0 && i > a ? i : a; }); var today = new Date(); today = Date.parse(today)/1000; var dArray = $("table.ms-listviewtable:first> tbody> tr:gt(0)").find(">td:eq("+a+")").get() $.each(dArray, function(i,e){ var d1 = Date.parse($(e).text())/1000; var time = '<span style="color:#ff0000">Ended</span>'; if(d1-today > 0) { // calculate days, hours, minutes and seconds var dd = (d1-today)/86400; var dh = (dd-Math.floor(dd))*24; var dm = (dh-Math.floor(dh))*60; var ds = (dm-Math.floor(dm))*60; // build display string time = ((Math.floor(dd) > 0 ? Math.floor(dd) +"d " : "")+ (Math.floor(dh) > 0 ? Math.floor(dh)+"h " : "")+ (Math.floor(dm) > 0 ? Math.floor(dm)+"m " : "")+ (Math.floor(ds) > 0 ? Math.floor(ds)+"s" : "")); // highlight active auctions var isEndingSoon = (((Math.floor(dd) + Math.floor(dh)) <= 0) && (Math.floor(dm) < 15)) ; if(isEndingSoon) { time = '<span style="color:#ffcc00">' + time + '</span>'; } else { time = '<span style="color:#005a04">' + time + '</span>'; } } // write out text value as html $(e).text('<span style="font-weight:bold">'+time+'</span>'); $(e).html($(e).text()); }); }); </script>
Remember, the [Time Left] column is a calculated value that’s simply displaying the value from the [End Date] column the user enters. Why not just use the [End Date] field? Simple. It makes more sense when editing an item to set the End Date but then display the time remaining. Imagine if you were editing this and saw a field called “Time Left” as a Date/Time value. This way, the user sets the End Date for the auction but never sets the calculated field. We also needed the target date to be displayed in the list view so we could do our calculation so here it is.
Finally I did a little formatting on the time remaining. All items are set in a bold font and coloured green. Items that are ending in less than 15 minutes are coloured orange (yellow doesn’t show up very well against a white background) and items that have ended already are displayed in red.
Once this little jQuery script was written it was a simple matter of going to the list view page, editing it, and adding a Content Editor Web Part with our script in it. You could also use this on a Web Part Page as long as you have the [Time Left] field visible in the view. Here’s the list of items with the Time Left field and coloured highlighting:

Pretty cool and again, thanks to the power of jQuery (and Paul) no assemblies or server deployments needed!
Low impact text changing in SharePoint with jQuery
Mike Smith over at Tech Training Notes had a nice simple post a few weeks back on changing the default text displayed at the bottom of stock web parts in SharePoint. For example discussion boards show this text when it's blank:
"There are no items to show in this view of the "Test" discussion board. To create a new item, click "New" above.
That's great but what if the "New" link isn't avaiable (if you turn off the full toolbar and put a discussion list on a page this would happen). Or what if you don't like calling it a discussion board (for various reasons) and want to say forum. Or want to provide additional information.
His solution is a little bit of JavaScript and then pushing his function into an array _spBodyOnLoadFunctionNames (which is a list of scripts SharePoint will run when the page loads). Here's the original version:
1: <script type="text/javascript">
2:3: function ChangeDiscussionMessage()
4: {5: var a = document.getElementsByTagName("TD")
6: for (var i=0;i<a.length;i++)
7: {8: if (a[i].className=="ms-vb")
9: {10: if (a[i].innerText.indexOf("There are no items to show in this view")>-1)
11: {12: a[i].innerHTML = "There are no active discussions";
13: }14: }15: }16: }17:18: _spBodyOnLoadFunctionNames.push("ChangeDiscussionMessage")
19:20: </script>
Here's a more simplified jQuery version:
1: <script type="text/javascript">
2:3: $(document).ready(function(){
4: $("td .ms-vb:contains('There are no items to show in')").text('There are no active discussions');
5: });6:7: </script>
P.S. I'm still trying to find time to write up the blog post from this last weekend's code camp and will post the SharePoint developer resources soon!


