DotNetStories

I have been looking into ASP.Net MVC 4.0 lately and I thought it would be a nice idea to create a small ASP.Net MVC 4.0 application and write a post about it.
So this is going to be a rather long post that will show you with a hands-on example how to build a simple ASP.Net MVC 4.0 application that will
Have a look in another post of mine regarding ASP.Net MVC 3.0, here .In that post you will find some information on what a Controller,View,Model are and what their relationship is.
Before we begin let's have a look at the tools you need to install in your machine.
I have Visual Studio 2011 beta Ultimate installed in my machine.When I downloaded this, MVC 4.0 was also installed.
In other words,ASP.NET MVC 4 Beta is built-into the upcoming VS11 / .NET 4.5.
You can install all the prerequisites by clicking the following link Web Platform Installer.This will install Visual Studio 2011 Express beta and ASP.Net MVC 4.0 beta.
If you want to work with Visual Studio 2010 and .Net 4.0, the ASP.NET MVC 4 Beta release works with VS 2010 and .NET 4.0.You can download it here
I encourage you to use Visual Studio 2011 beta. In this post I will use (provide screenshots from VS 2011 ultimate beta).
I assume that you have some knowledge of ASP.Net MVC. I will explain everything in detail and this post/tutorial will move into more advanced stuff as we progress.
One last thing before we move on is that the whole application is hosted in IIS Express .
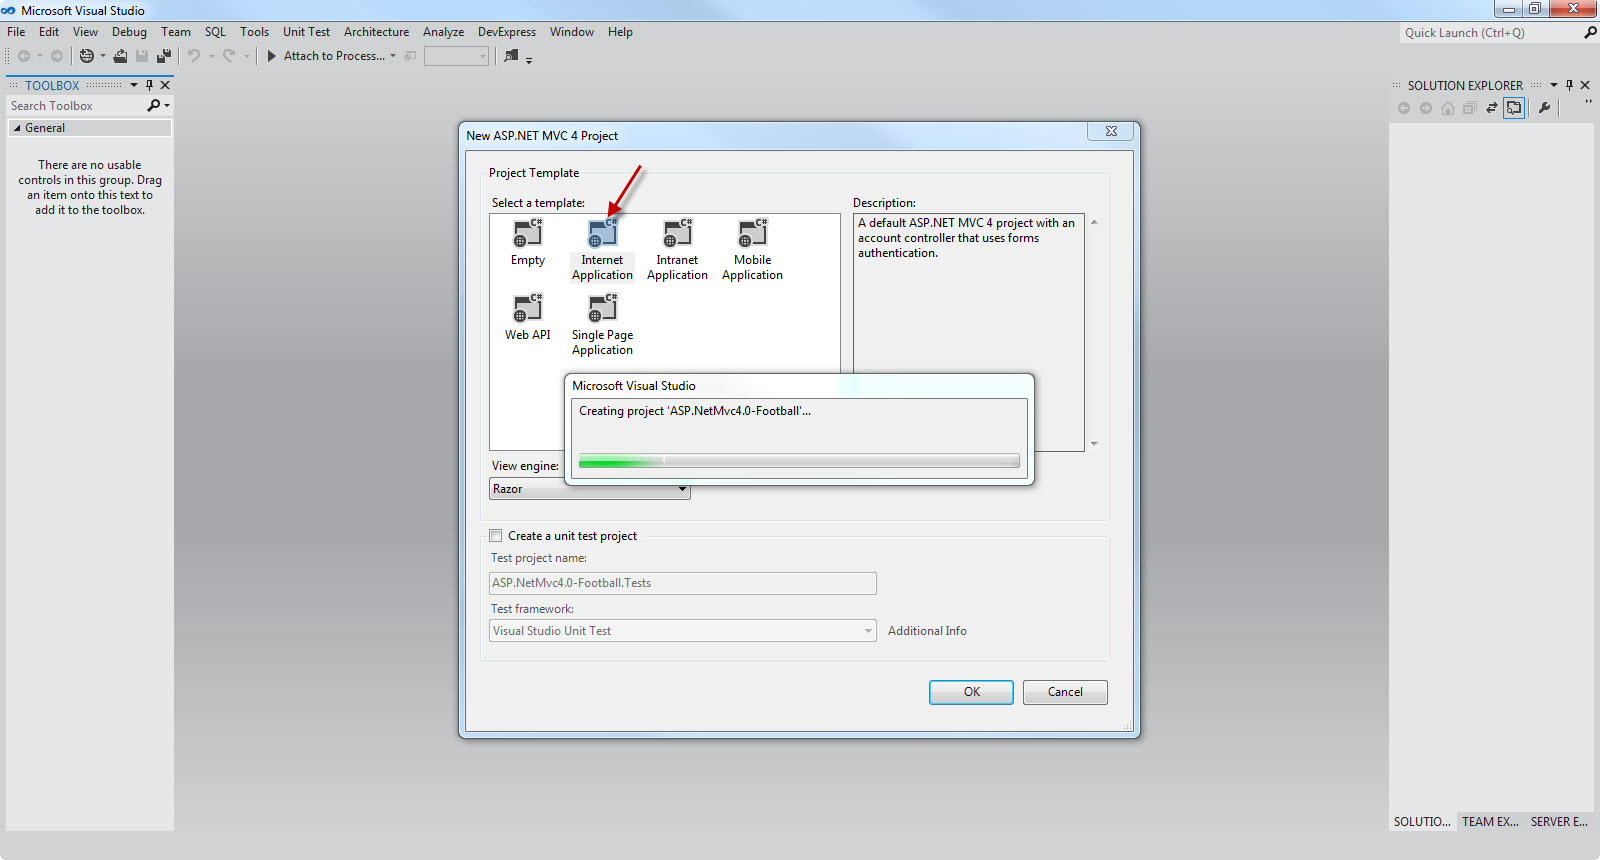
1) I am launching VS 2011 beta.I will Visual C# as the programming language. I will also select ASP.NET MVC 4 Web Application. I have named my project "ASP.NetMvc4.0-Football" and then click OK.
Have a look at the picture below

2) In the New ASP.NET MVC 4 Project dialog box, select Internet Application. Leave Razor as the default view engine.
Then click OK.
Have a look at the picture below
3) Build and run your application.You have a working application out of the box.An application that you can extend. Have a look at the picture below to see what I mean
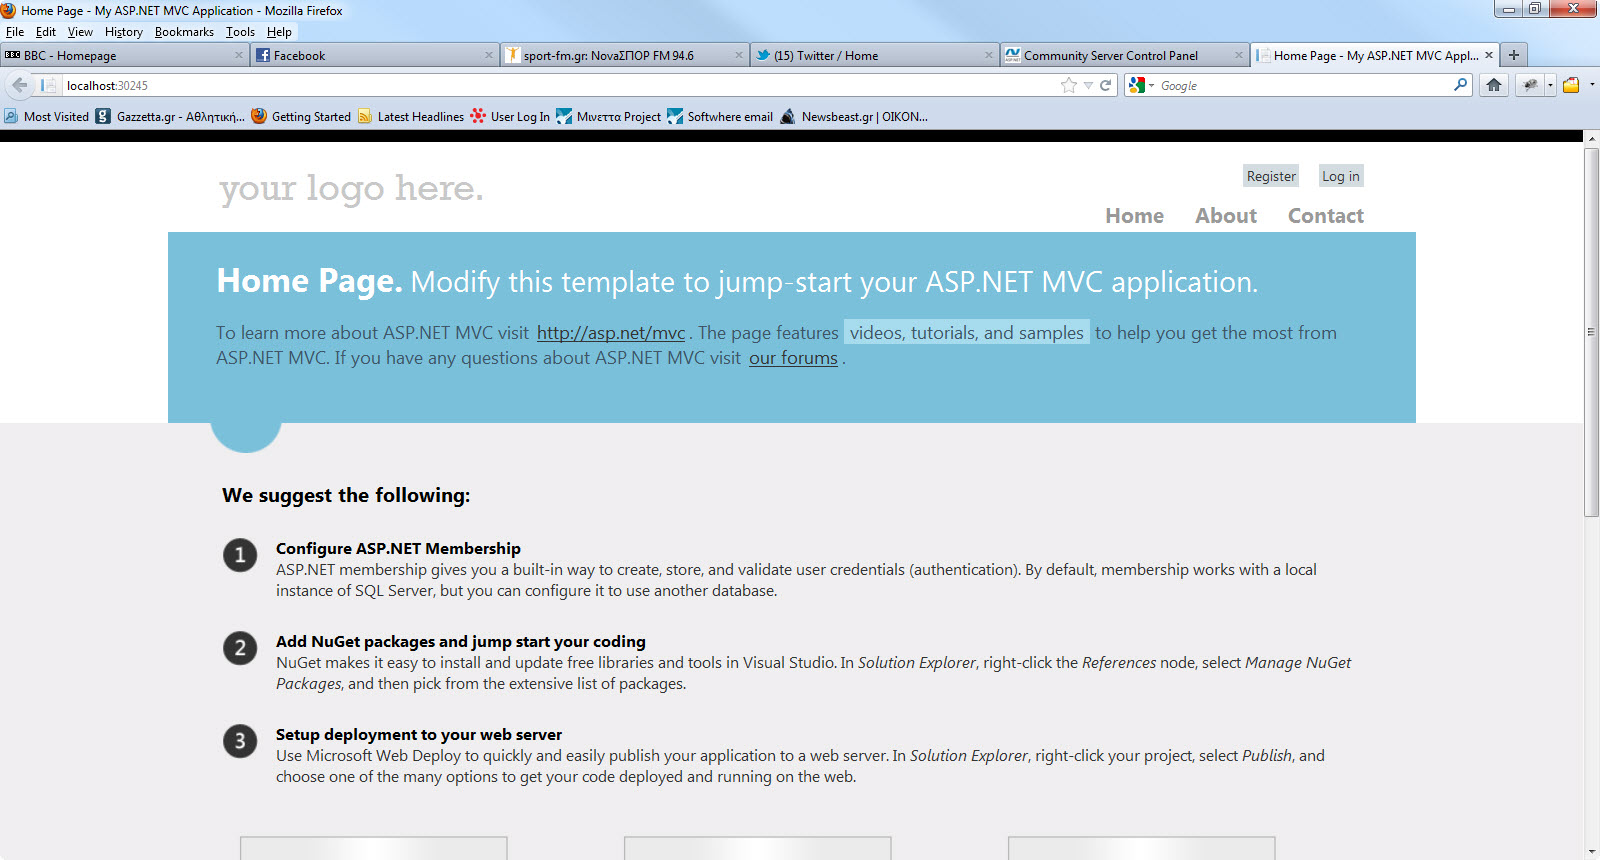
The default template gives us Home, Contact and About pages. There are links to Facebook and Twitter.We also can register and log in.
4) I urge you to look at the Source (HTML) code that is sent back from the server

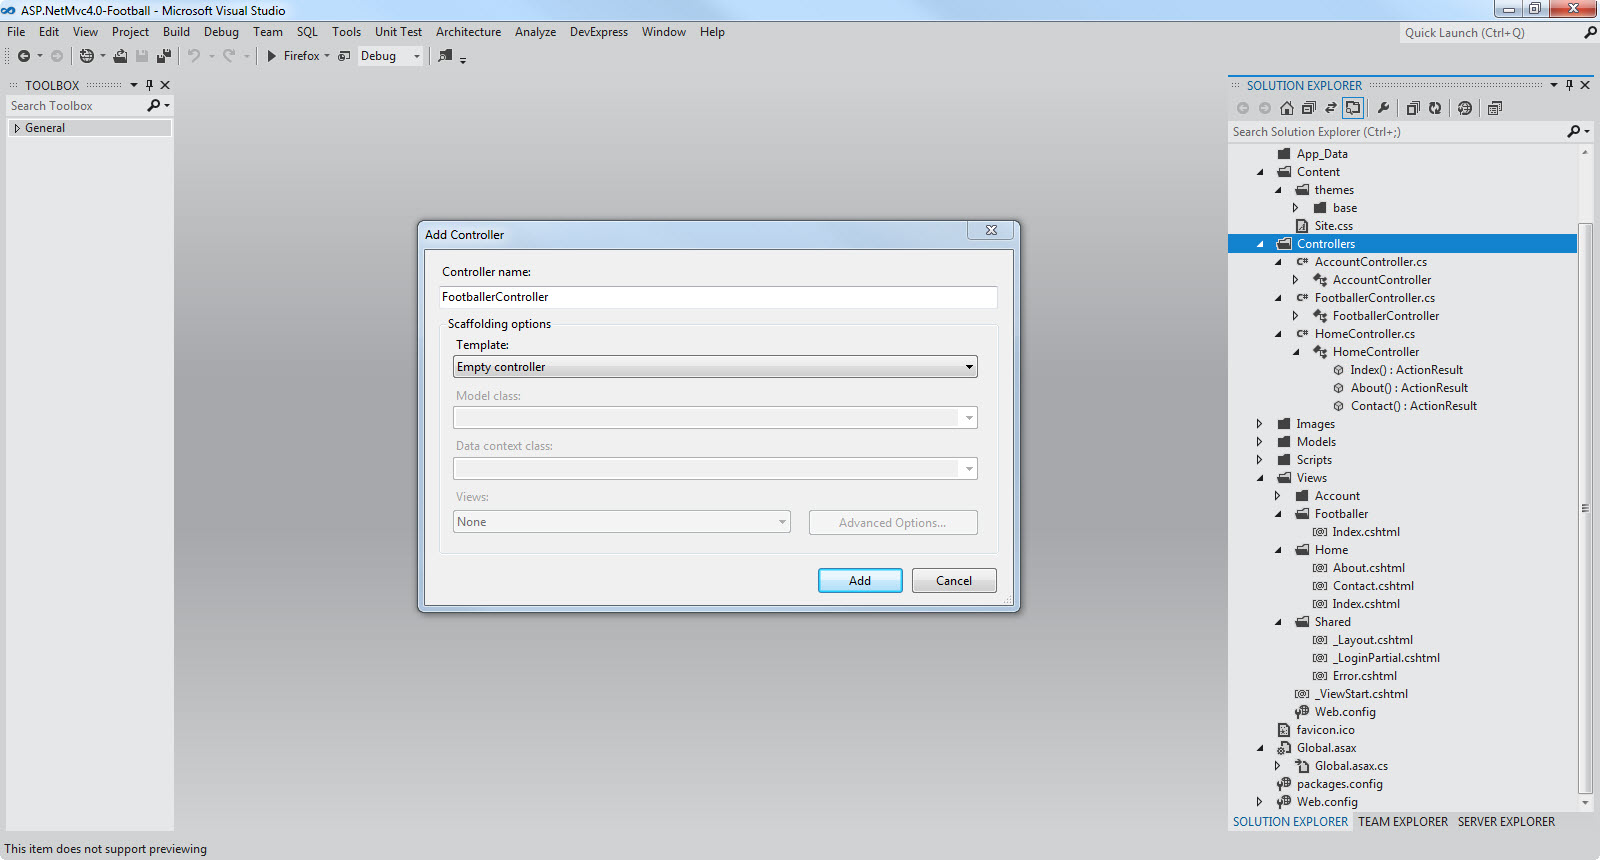
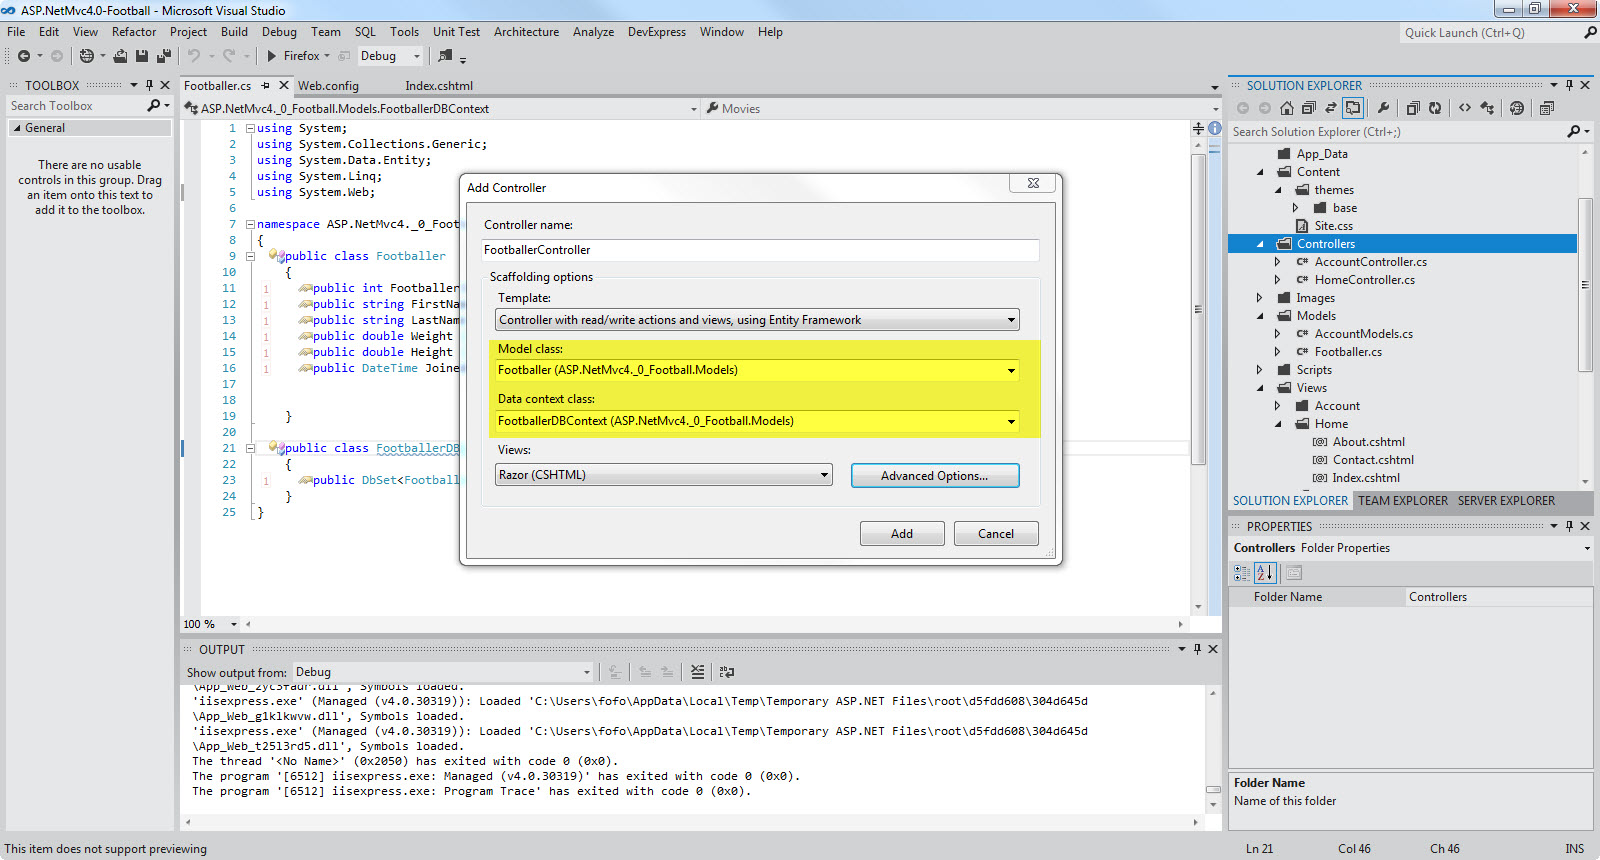
5) Νow I will add a new controller to my project.I will name it FootballerController.cs.This is going to be a class file that will handle incoming requests, as all controller classes do.
In the Solution Explorer right - click on the Controllers folder and then click Add Controller.Name your new controller FootballerController and then click Add.
Have a look in the picture below
Have a look also at the FootballerController.cs file that has been created.There is just a public method in it
public ActionResult Index()
{
return View();
}
These are called Action methods and return an ActionResult.Basically it tells the controller what to do next.In this case it tells the controller to load the Index View.
Now we need to add the view.Think of the view as a template file.The ASP.Net MVC application uses it to dynamically generate HTML responses.
These templates will use the Razor View engine that was introduced to the ASP.Net MVC 3.0.These views have a .cshtml file extension and this is a way to create clean HTML.
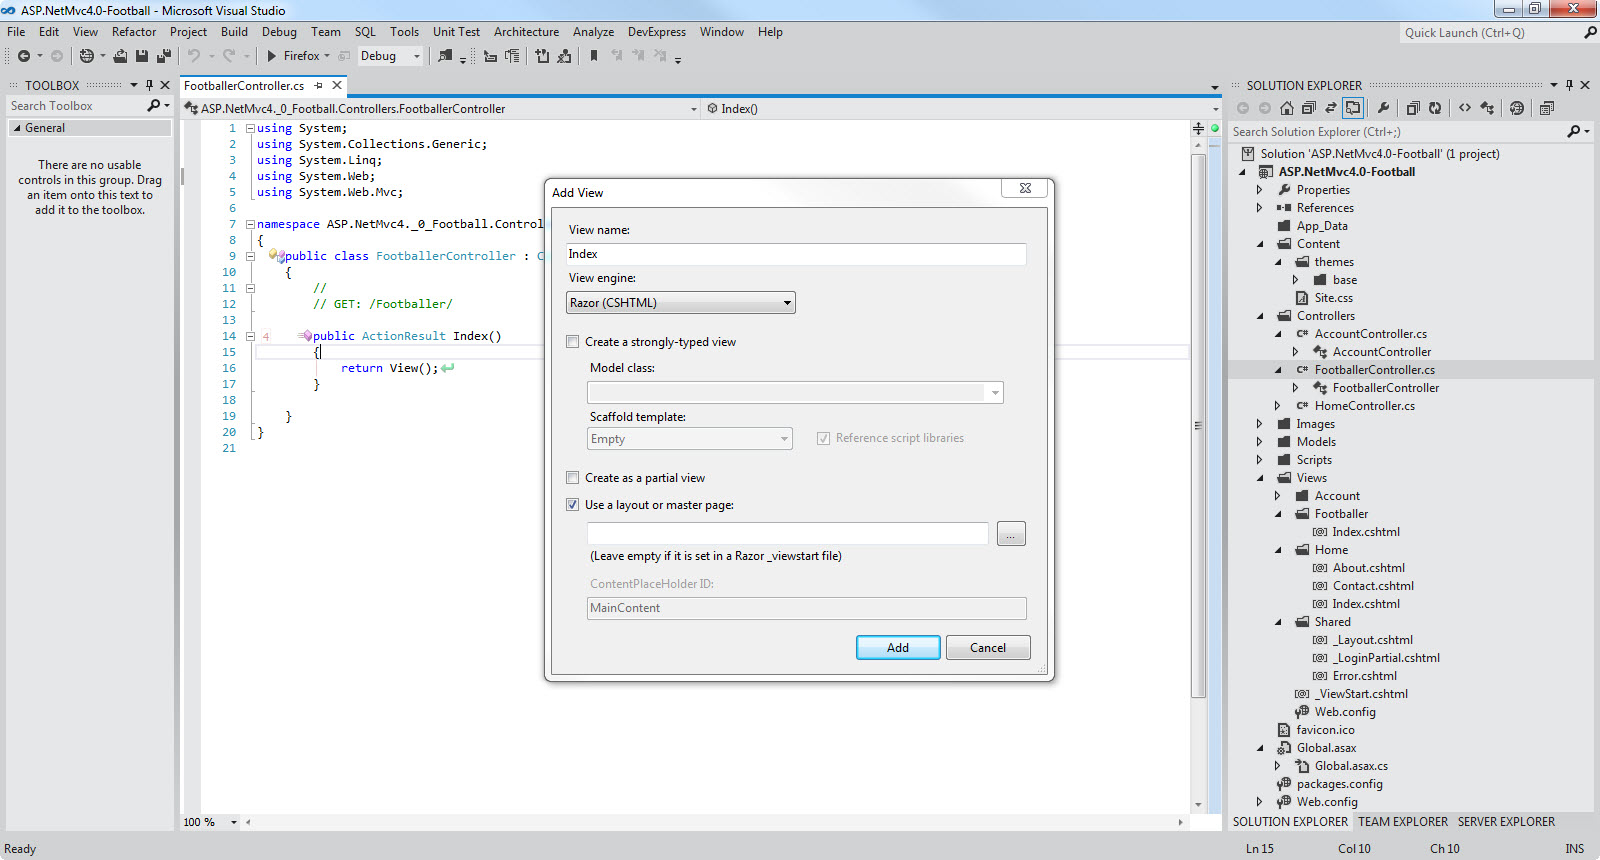
Inside the FootballerController.cs file, right-click inside the Index method and click Add View.The Add View dialog box appears. Leave the defaults and click the Add button
Have a look at the picture below
There is a new folder created Footballer.Inside there, we have the Index.cshtml. Have a look at the picture below

The contents of Index.cshtml are
@{
ViewBag.Title = "Index";
}
<h2>Index</h2>
Now navigate to the url localhost/yourport/Fooballer and you will see the new page and its contents.
One might wonder how this works.The Index method returns a view (Index) that finds it inside the Footballer folder.
6) Now I will add a model to the application.I will use this model to manage the footballer's data.I will use Entity Framework as the data access technology. More specifically I will use the Code First paradigm. You might have come across the term POCO classes.This is exactly what I am going to use.If you want to learn more about Code First have a look in this post .
Then from the model class we will create our database.In the Solution Explorer right-click on the Models folder,select Add and then select Class.
Name the class Footballer.cs and add some properties to the class.My complete class follows
public class Footballer
{
public int FootballerID { get; set; }
public string FirstName { get; set; }
public string LastName { get; set; }
public double Weight { get; set; }
public double Height { get; set; }
public DateTime JoinedClub { get; set; }
}
Let me explain what I am doing here. I will use the Footballer class to represent footballers in a database (which I am going to create). Each instance of a Footballer class will correspond to a row within a database table.Naturally each property of the Footballer class will map to a column in the table (which I am going to create).
We need to add some more code to the Footballer.cs
public class FootballerDBContext : DbContext
{
public DbSet<Footballer> Footballers { get; set; }
}
The FootballerDBContext is a database context class.This class is responsible for talking to the underlying database,storing and updating the data to the database.
We need to add this reference to the file
using System.Data.Entity;
7) Now we need to create the connection string.The only place we can do that is by opening the web.config file and adding the following lines of code (inside the <connectionStrings> section)
<add name="FootballerDBContext"
connectionString="Data Source=(LocalDb)\v11.0;AttachDbFilename=|DataDirectory|\Footballers.mdf;Integrated Security=True"
providerName="System.Data.SqlClient"
/>
As you can see from the connection string I am using LocalDB.
Have a look here in order to see what LocalDB is.
8) Now we need to access our model from a controller.This is going to be a simple class that retrieves the footballers data.Before we move on we need to delete a few things we created (We created these controllers/classes and views for demonstration purposes only) earlier.
In the Controllers folder delete the FootballerController.cs file. In the Views folder delete the Footballer folder and the view (Index.csthml) in it.
Right-click the Controllers folder and create a new FootballerController controller. Have a look at the picture below to set the appropriate settings
Click Add. Visual Studio will create the following
A FootballerController.cs file in the project's Controllers folder.
A Footballer folder in the project's Views folder.
Create.cshtml, Delete.cshtml, Details.cshtml, Edit.cshtml, and Index.cshtml in the new Views\Footballer folder.
Have a look at the picture below

The ASP.NET MVC 4 framework automatically creates the CRUD (create, read, update, and delete) action methods and views.This is know as scaffolding. We have a fully functional web application that lets you create, list, edit, and delete records.
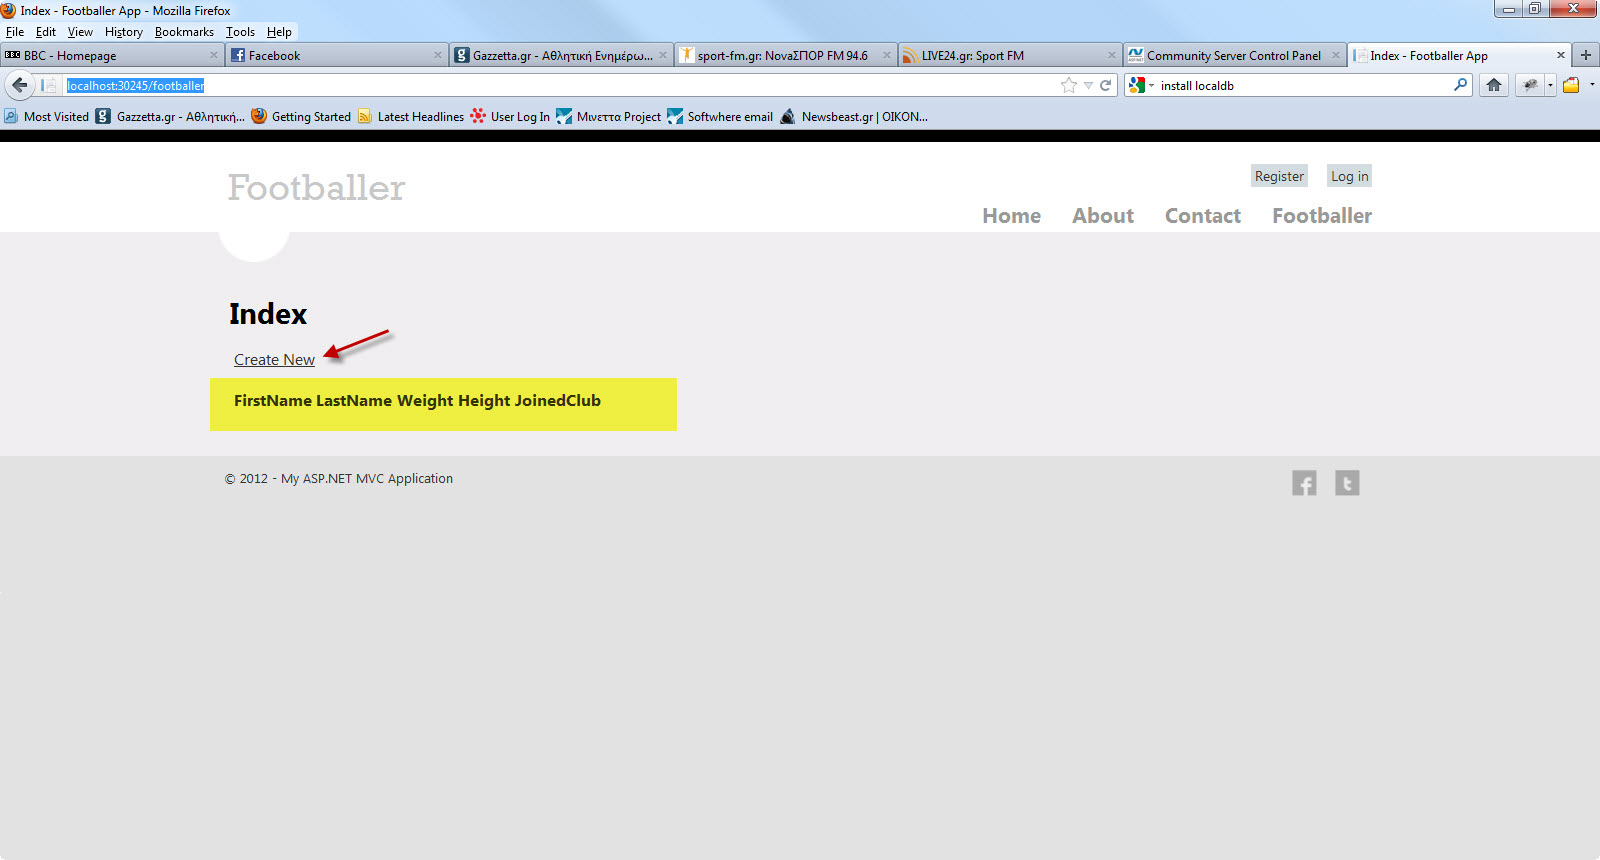
9) Build and run your application.Navigate to the localhost/youport/footballer
Have a look at the picture below
You can create a new footballer object-record.This information will be saved in the LocalDB-Footballers.mdb database.Have a look at the picture below
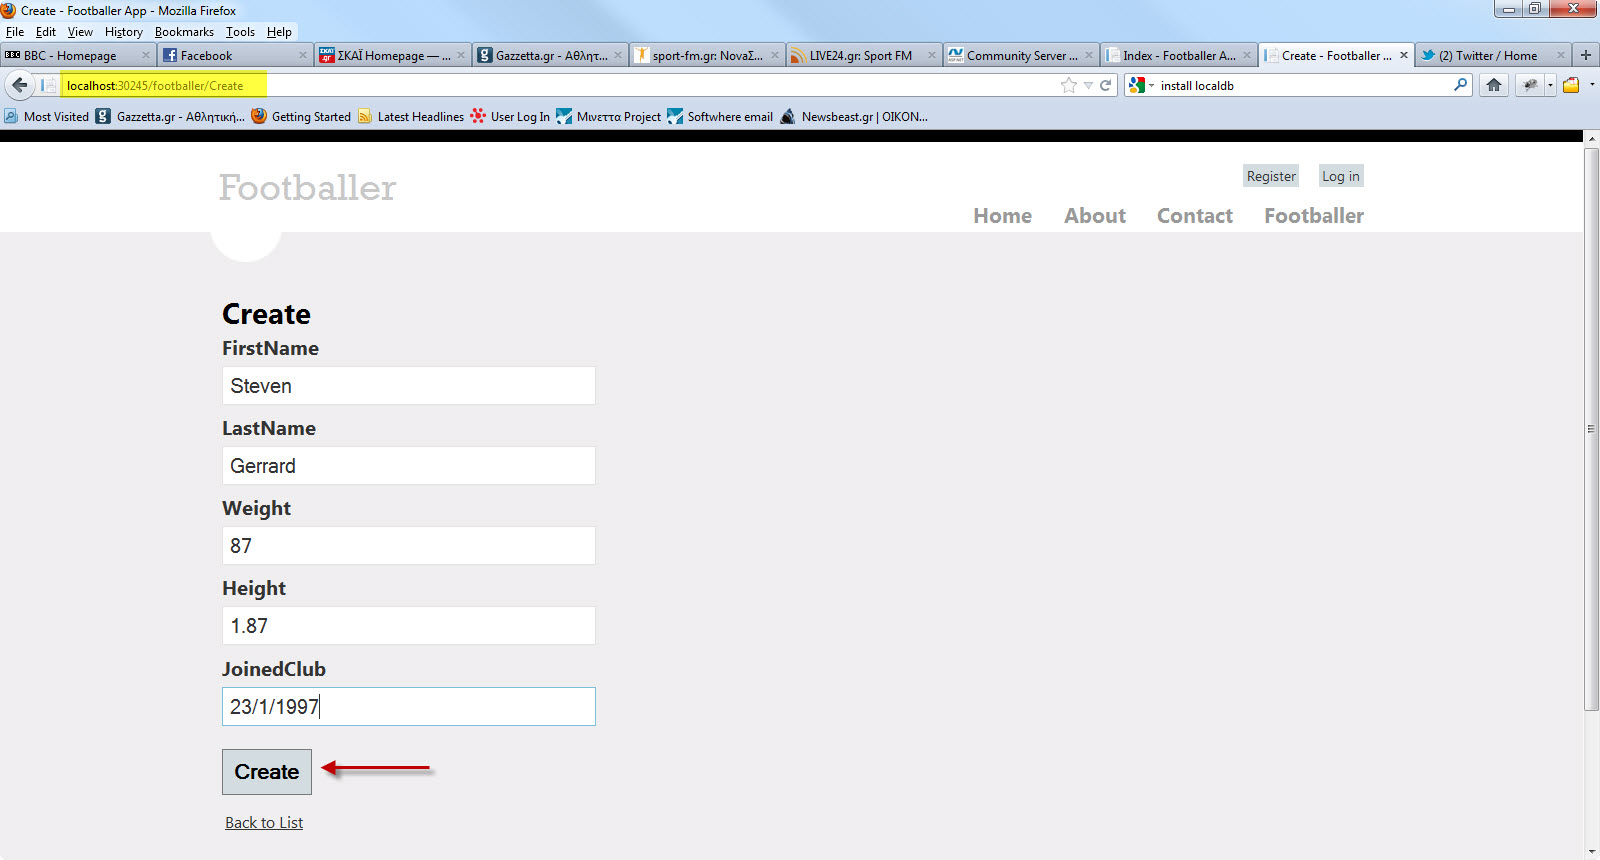
Make sure you add more entries to the database through the view.
We have created a new record and stored it in the database.Click the Edit,Details and Delete links.We have all this functionality out of the box through the magic of scaffolding.
I urge you to have a look (place breakpoints as well) in the FootballerController.cs class file.
We pass a strongly typed object (Footballer) to the various views.
Have a look in the views inside the Views/Footballer folder.
In the Create.cshtml, Delete.cshtml, Details.cshtml, Edit.cshtml, and Index.cshtml Views , at the beginning of these files, you will see this line of code.
@model MvcFootball.Models.Footballer
By adding a @model statement at the top of the view file, we tell the view the type of object that the view should render.
This is how we pass a model through a controller to the appropriate view.I am sure you can clearly see the separation of concerns.
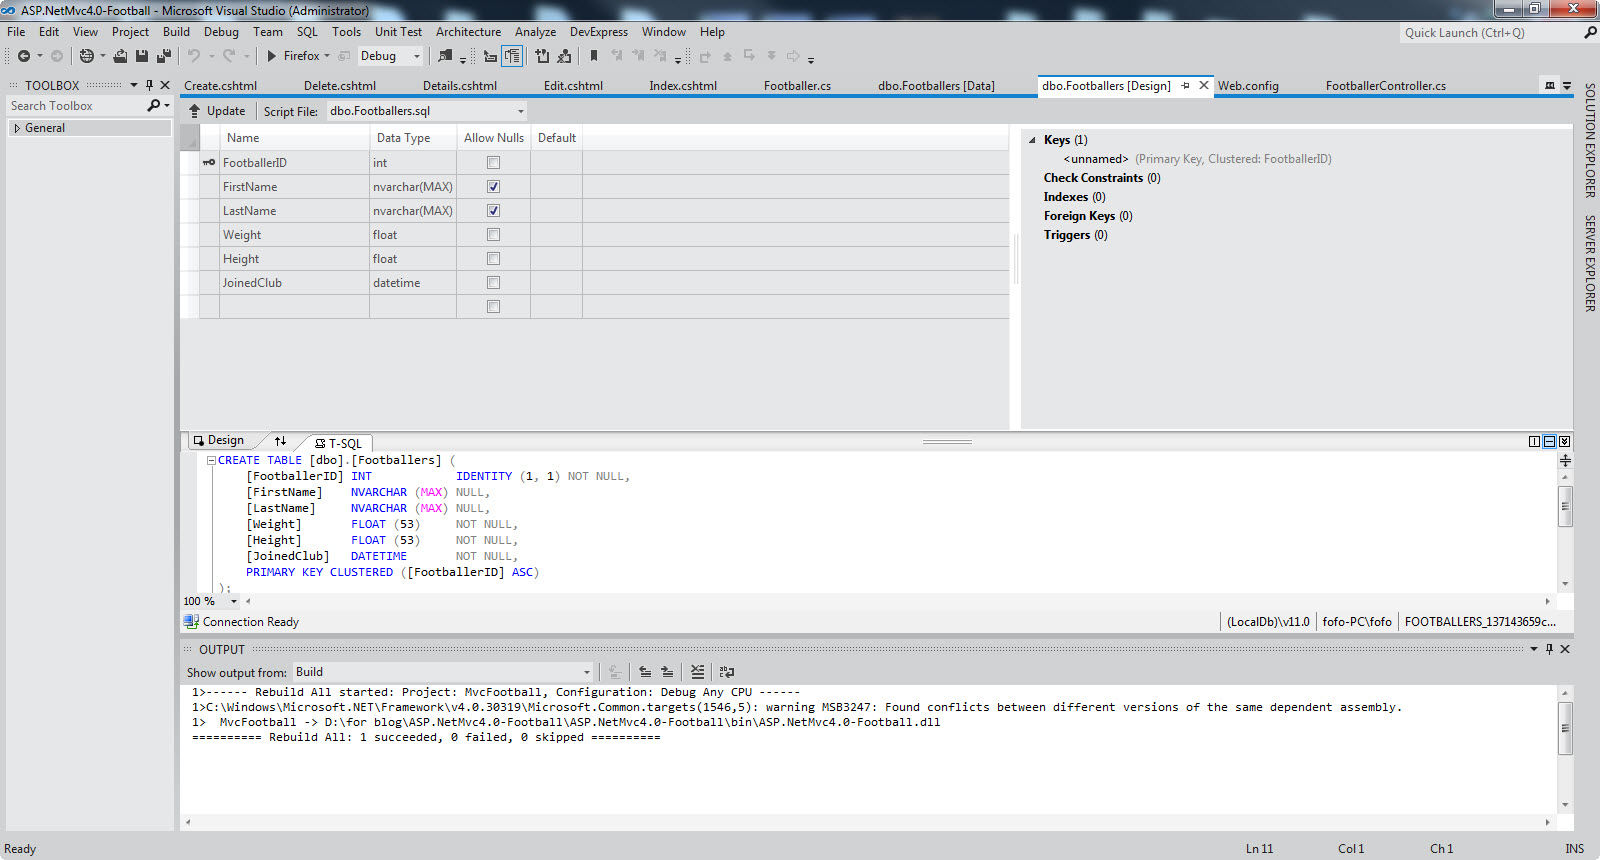
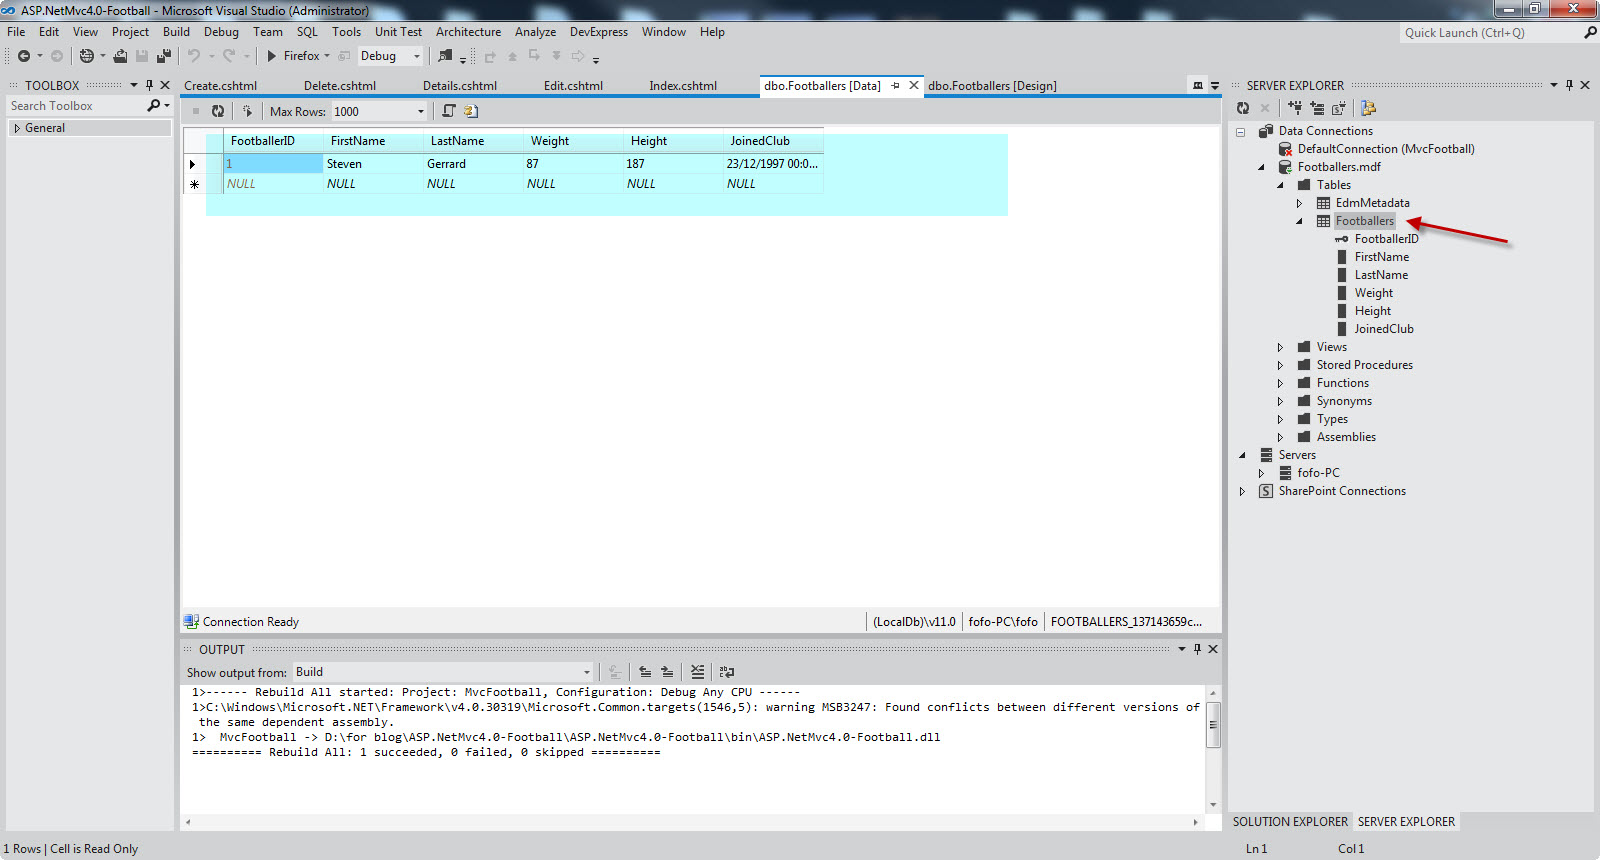
10) In the Solutions Explorer refresh the contents of your application. In the folder App_Data you will see the Footballers.mdf
Right-Click on the Footballers.mdf and select Open.Then you will see the Footballers table. Right-click on it and select Open Table definition
Have a look at the picture below to see what I mean
Select the Footballers table. Right-click on it and select Show Table Data
Have a look at the picture below to see what I mean
I know exactly what you are thinking right now. You did not create any database.
Entity Framework Code First created the database for us. EF detected that the database connection string provided, pointing to a Footballers database didn’t exist, so Code First created the database automatically.
11) Νοw we can add some more functionality to our application.We will add a search functionality.We need to add some code to the FootballerController.cs file.We will add another public method (Search) that gets an input parameter(looks for first name).The code is very easy to follow.I just use standard LINQ syntax.
public ActionResult Search(string searchString)
{
var footballers = from footballer in db.Footballers
select footballer;
if (!String.IsNullOrEmpty(searchString))
{
footballers = footballers.Where(f => f.FirstName.Contains(searchString));
}
return View(footballers);
}
Now we need to implement the corresponding view.Right-click on the public ActionResult Search(string searchString) and select Add View.
Have a look at the picture below to see the settings you must add in the popup window (Add View)

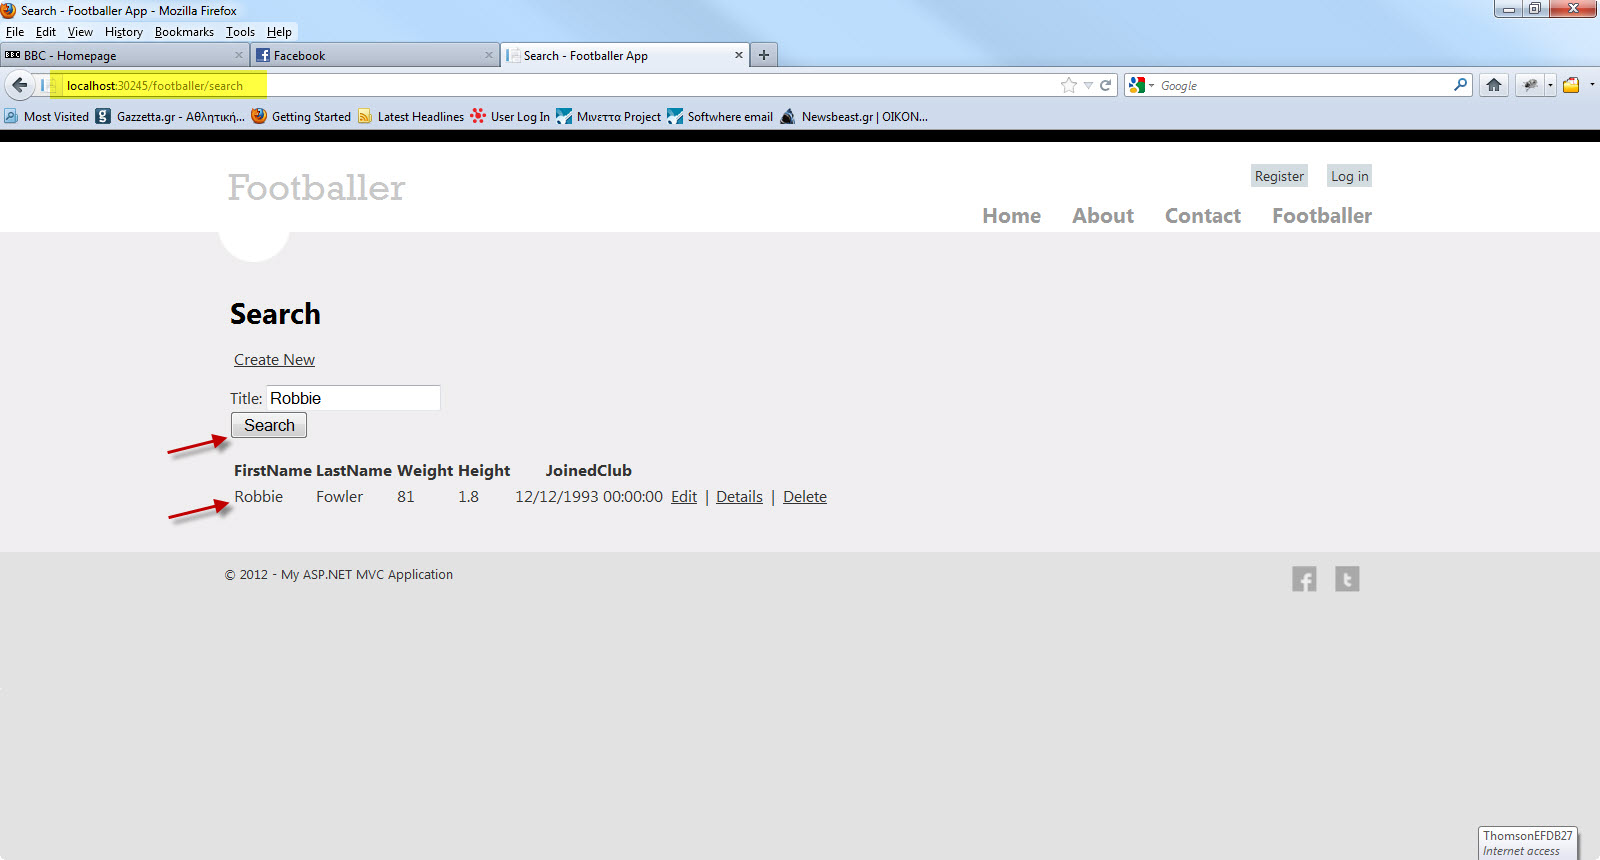
Click Add.Have a look at the Search.cshtml file that was created inside the Views/Footballer folder.Have a look at the generated code.You will see HTML helper objects and methods.Run your application and navigate to /Footballer/Search. Append a query string such as ?searchString=Steven to the URL. The filtered entries are displayed.
Have a look at the picture below

12) Now we need some sort of user interface,so that the user can enter the search string.I am going to make some changes to the Views\Footballer\Search.cshtml view.
Open the file and under the
<p>
@Html.ActionLink("Create New", "Create")
add the following lines
@using (Html.BeginForm()){
<p> Title: @Html.TextBox("SearchString") <br />
<input type="submit" value="Search" /></p>
}
</p>
We have the Html.BeginForm helper method that creates an opening <form> tag. The helper method causes the form to post to itself when the user submits the form by clicking the Search button. Have a look at the picture below
12) Νοw I make changes to the class Footballer.cs and see how this will affect my database and our application.I will add another property to the class.The new class follows
public class Footballer
{
public int FootballerID { get; set; }
public string FirstName { get; set; }
public string LastName { get; set; }
public double Weight { get; set; }
public double Height { get; set; }
public DateTime JoinedClub { get; set; }
public string PositionPlayed {get;set;}
}
13) We have updated the Model class and now we need to update the \Views\Footballer\Index.cshtml and \Views\Footballer\Create.cshtml view templates in order to display the new property in the view.
In the Index.cshtml add (only with the bold)
<th>
@Html.DisplayNameFor(model => model.JoinedClub)
</th>
<th>
@Html.DisplayNameFor(model => model.PositionPlayed)
</th>
and some more changes (only with the bold)
<td>
@Html.DisplayFor(modelItem => item.JoinedClub)
</td>
<td>
@Html.DisplayFor(modelItem => item.PositionPlayed)
</td>
In the Create.cshtml add (only with the bold)
<div class="editor-label">
@Html.LabelFor(model => model.JoinedClub)
</div>
<div class="editor-field">
@Html.EditorFor(model => model.JoinedClub)
@Html.ValidationMessageFor(model => model.JoinedClub)
</div>
<div class="editor-label">
@Html.LabelFor(model => model.PositionPlayed)
</div>
<div class="editor-field">
@Html.EditorFor(model => model.PositionPlayed)
@Html.ValidationMessageFor(model => model.PositionPlayed)
</div>
Build and run your application.You will receive an error.Have at the picture below

We have this error because the updated Footballer model class in the application but now we have a different schema in the existing database. You might wonder how this error message was thrown back to us. You might think "How EF knew that the model has changed but those changes were not reflected back to the database?" .
EF Code First adds a table to the database to help track whether the schema of the database is in sync with the model classes it was generated from.
The table is called EdmMetadata.It provides a hash field that represents our model classes and stores a value which is used to track all the changes.
I will show you how to do that by having the Entity Framework automatically drop and re-create the database based on the new model class.This is something we do not do in a production system.It is obvious that with this method we lose all our data.
Select the Global.asax file.In this file we have a set of special methods that are called when something happens.
In the Application_Start event handler routine (runs when the application starts) we will add this code
protected void Application_Start(object sender, EventArgs e)
{
 Database.SetInitializer(
new DropCreateDatabaseIfModelChanges<FootballerDBContext>());
}
So if a change in the model occurs, we instruct our application to drop and recreate the database.If you go and see your Footballers table again, the PositionPlayed column will be there.
If you run your application again, you will not get any error but you will not see any data either.The database was dropped and recreated and wiped all the data.
In the Solutions Explorer refresh the contents of your application. In the folder App_Data you will see the Footballers.mdf. Right-Click on the Footballers.mdf and select Open.Then select the Footballers table. Right-click on it and select Show Table Data
Have a look in the picture below.
15) We need to add a new class file to the Models folder.Name it EFFootballerCreate.cs . We will use this class to add new data to the database.
The code follows for the EFFootballerCreate.cs
namespace MvcFootball.Controllers
{
public class EFFootballerCreate:DropCreateDatabaseIfModelChanges<FootballerDBContext>
{
protected override void Seed(FootballerDBContext ctx)
{
var footballers = new List<Footballer>
{
new Footballer {
FirstName = "Steven",LastName="Gerrard", Height=1.85,
Weight=85, JoinedClub=DateTime.Parse("12/12/1999"),
PositionPlayed="Attacking Midfielder"},
new Footballer {
FirstName = "Jamie",LastName="Garragher", Height=1.89,
Weight=89, JoinedClub=DateTime.Parse("12/02/2000"),
PositionPlayed="Central Defender"},
new Footballer {
FirstName = "Luis",LastName="Suarez", Height=1.72,
Weight=73, JoinedClub=DateTime.Parse("12/01/2012"),
PositionPlayed="Striker"},
};
footballers.ForEach(foot => ctx.Footballers.Add(foot));
}
}
In this class I inherit from the DropCreateDatabaseIfModelChanges<FootballerDBContext> class and I will override the default behaviour of that class with my class.
I will ovverride the Seed method with some data.Then I create 3 instances of the Footballer entity.
We need to make some more changes in the Global.asax file and change the code inside the
protected void Application_Start(object sender, EventArgs e)
{
 Database.SetInitializer(
new DropCreateDatabaseIfModelChanges<FootballerDBContext>());
}
to this one
protected void Application_Start(object sender, EventArgs e)
{
 Database.SetInitializer(new EFFootballerCreate());
}
Run your application. You will see no data appearing. If you look in the database tables there will be no data. You probably wondering why is that.
If you think what the EFFootballerCreate class does, you will see why there is no data appearing on the page and why there is no data in the database.
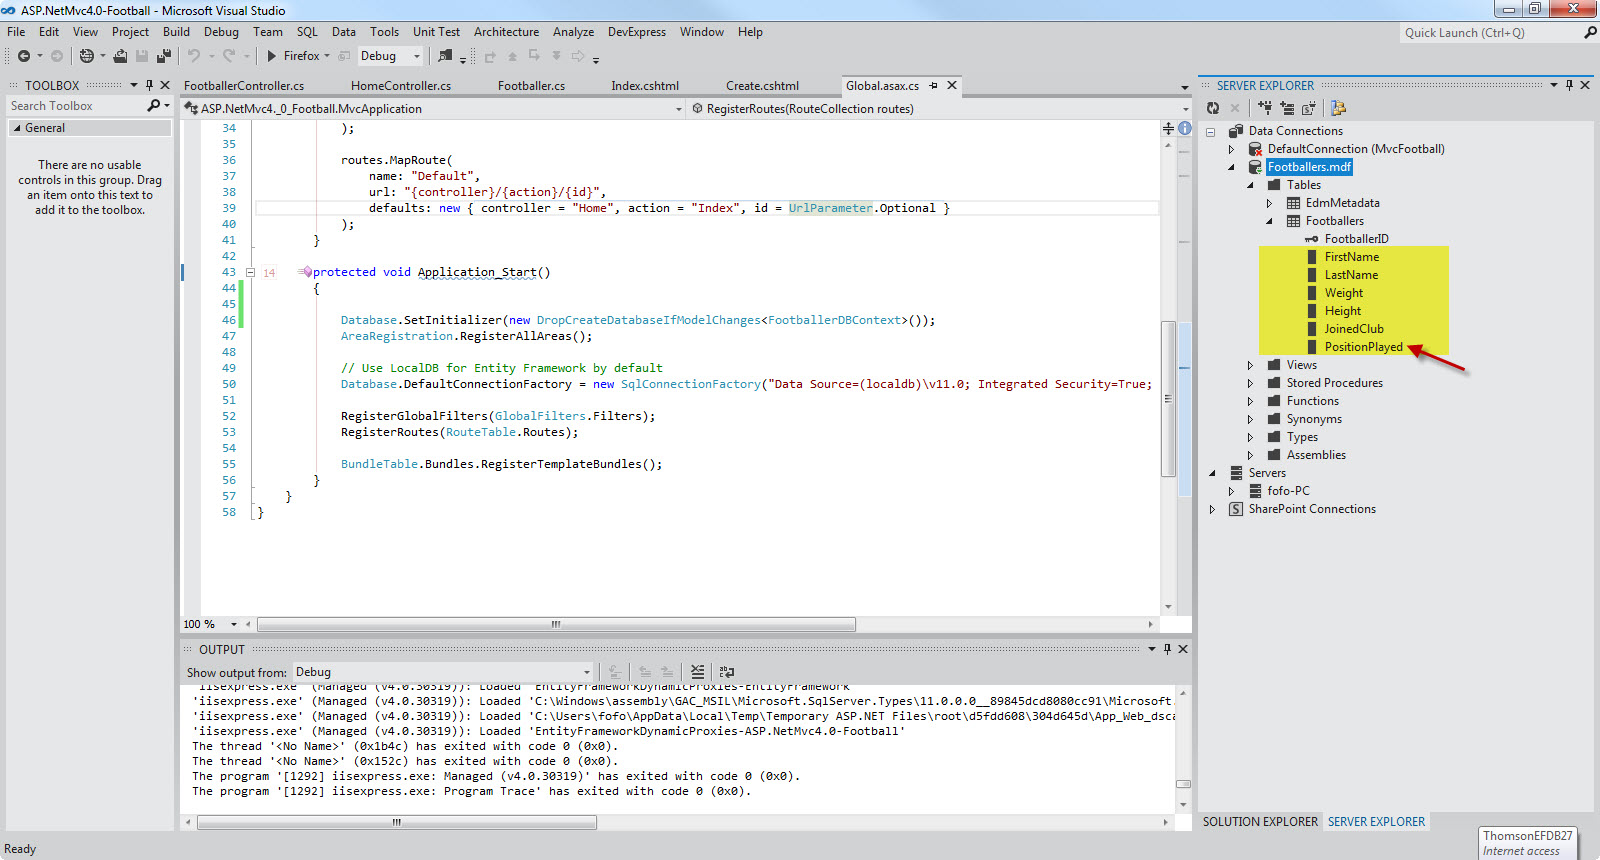
The EFFootballerCreate class will drop and create the database only when the model changes. Well, there is no change in our model. So let's make a change to or model, by going to the Footballer class and add a new property (GoalsScored). The code for the class follows.
public class Footballer
{
public int FootballerID { get; set; }
public string FirstName { get; set; }
public string LastName { get; set; }
public double Weight { get; set; }
public double Height { get; set; }
public DateTime JoinedClub { get; set; }
public string PositionPlayed {get;set;}
public int GoalsScored {get;set;}
}
16) We have updated the Model class and now we need to update the \Views\Footballer\Index.cshtml and \Views\Footballer\Create.cshtml view templates in order to display the new property in the view.
In the Index.cshtml add (only with the bold)
<th>
@Html.DisplayNameFor(model => model.PositionPlayed)
</th>
<th>
@Html.DisplayNameFor(model => model.GoalsScored)
</th>
and some more changes (only with the bold)
<td>
@Html.DisplayFor(modelItem => item.PositionPlayed)
</td>
<td>
@Html.DisplayFor(modelItem => item.GoalsScored)
</td>
In the Create.cshtml add (only with the bold)
<div class="editor-field">
@Html.EditorFor(model => model.PositionPlayed)
@Html.ValidationMessageFor(model => model.PositionPlayed)
</div>
<div class="editor-label">
@Html.LabelFor(model => model.GoalsScored)
</div>
<div class="editor-field">
@Html.EditorFor(model => model.GoalsScored)
@Html.ValidationMessageFor(model => model.GoalsScored)
</div>
We need to change the code for the EFFootballerCreate.cs file to add values for the new field.
The code follows for the EFFootballerCreate.cs
namespace MvcFootball.Controllers
{
public class EFFootballerCreate:DropCreateDatabaseIfModelChanges<FootballerDBContext>
{
protected override void Seed(FootballerDBContext ctx)
{
var footballers = new List<Footballer>
{
new Footballer {
FirstName = "Steven",LastName="Gerrard", Height=1.85,
Weight=85, JoinedClub=DateTime.Parse("12/12/1999"),
PositionPlayed="Attacking Midfielder",GoalsScored=150},
new Footballer {
FirstName = "Jamie",LastName="Garragher", Height=1.89,
Weight=89, JoinedClub=DateTime.Parse("12/02/2000"),
PositionPlayed="Central Defender",GoalsScored=3},
new Footballer {
FirstName = "Luis",LastName="Suarez", Height=1.72,
Weight=73, JoinedClub=DateTime.Parse("12/01/2012"),
PositionPlayed="Striker",GoalsScored=24},
};
footballers.ForEach(foot => ctx.Footballers.Add(foot));
//base.Seed(ctx);
}
}
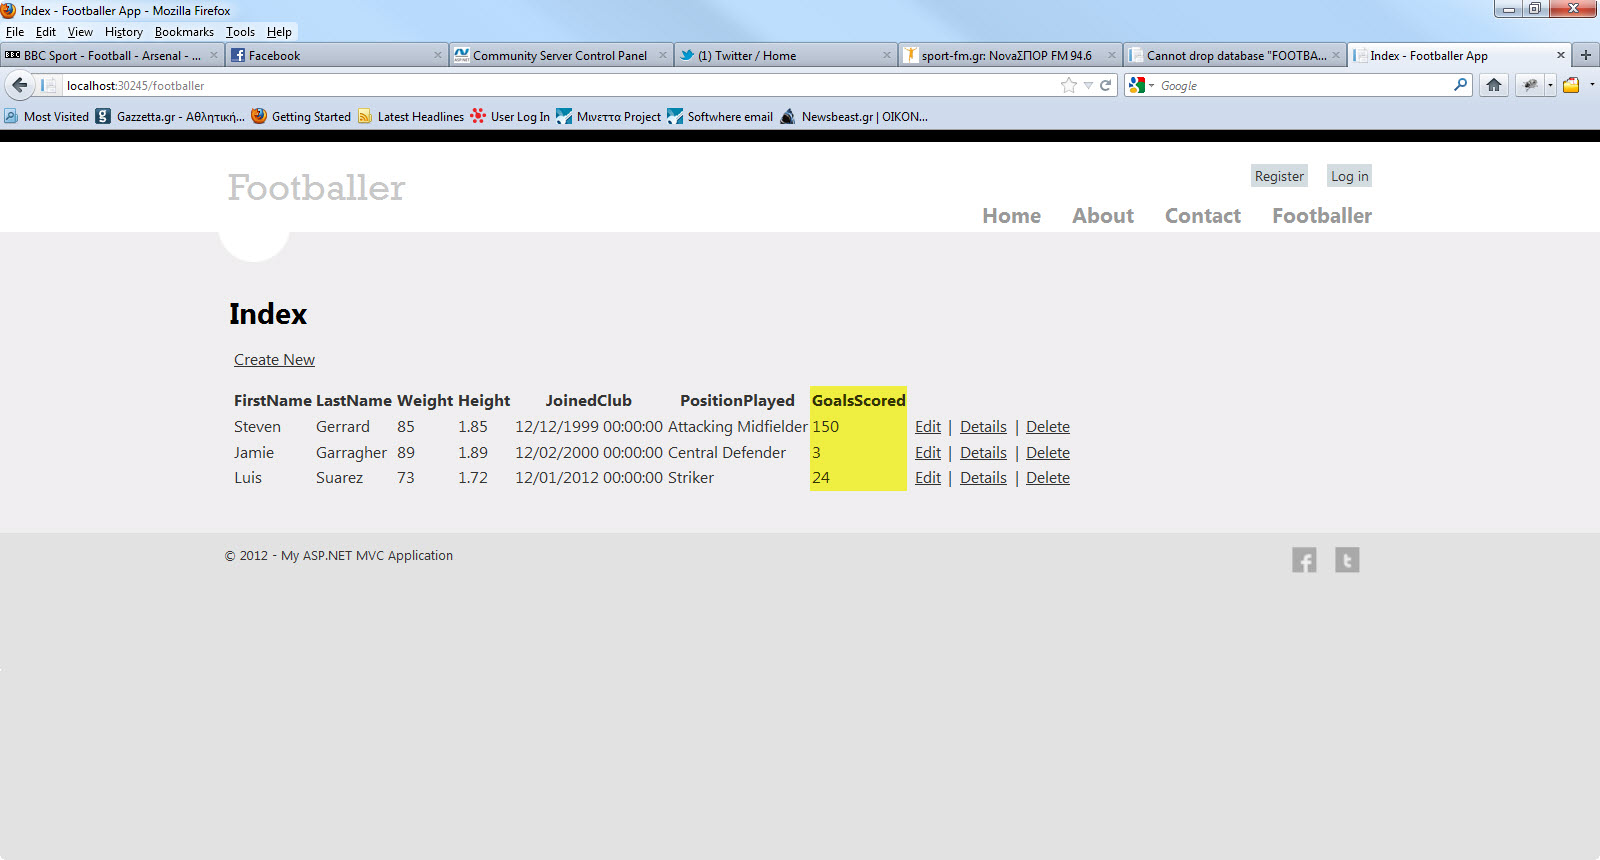
Build and run your application and you will see that the page (http://localhost:xxx/footballer) will fill with data.Have a look at the picture below
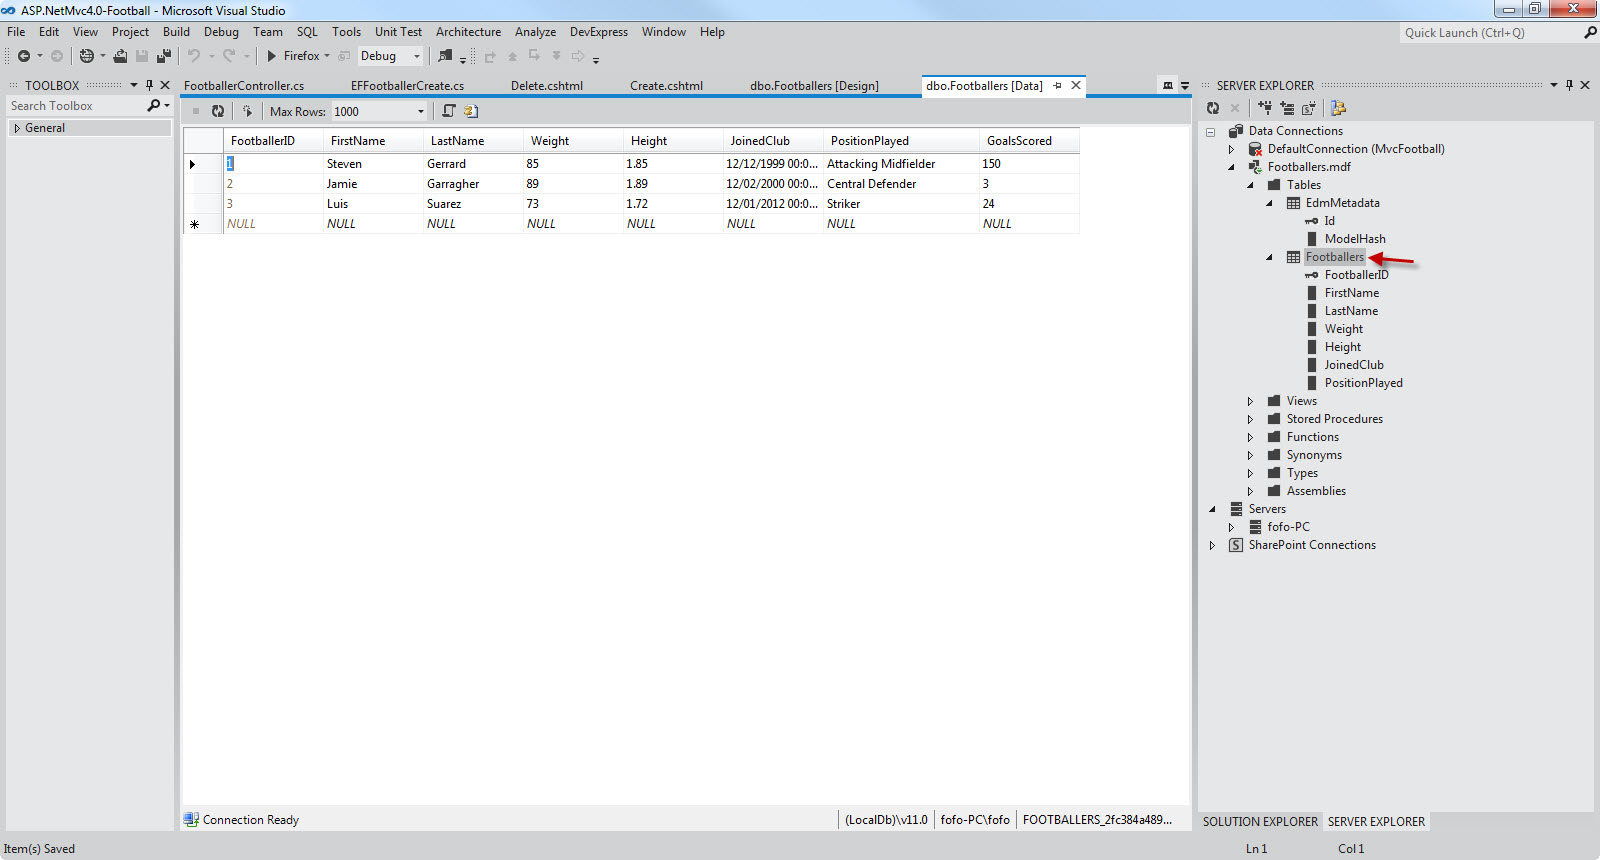
Go to the Server Explorer and open the connection to the database and see the data in the database table.Have a look at the picture below
17) You can create a new record if you want through the web page. Now we will change the code in the Delete.cshtml,Details.cshtml,Edit.cshtml,Search.cshtml views in the Views/Footballer folder
At the bottom of the Details.cshtml add these lines of code
<div class="display-label">
@Html.DisplayNameFor(model => model.PositionPlayed)
</div>
<div class="display-field">
@Html.DisplayFor(model => model.PositionPlayed)
</div>
<div class="display-label">
@Html.DisplayNameFor(model => model.GoalsScored)
</div>
<div class="display-field">
@Html.DisplayFor(model => model.GoalsScored)
</div>
At the bottom of the Edit.cshtml add these lines of code
<div class="editor-label">
@Html.LabelFor(model => model.PositionPlayed)
</div>
<div class="editor-field">
@Html.EditorFor(model => model.PositionPlayed)
@Html.ValidationMessageFor(model => model.PositionPlayed)
</div>
<div class="editor-label">
@Html.LabelFor(model => model.GoalsScored)
</div>
<div class="editor-field">
@Html.EditorFor(model => model.GoalsScored)
@Html.ValidationMessageFor(model => model.GoalsScored)
</div>
At the bottom of the Delete.cshtml add these lines of code
<div class="display-label">
@Html.DisplayNameFor(model => model.PositionPlayed)
</div>
<div class="display-field">
@Html.DisplayFor(model => model.PositionPlayed)
</div>
<div class="display-label">
@Html.DisplayNameFor(model => model.GoalsScored)
</div>
<div class="display-field">
@Html.DisplayFor(model => model.GoalsScored)
</div>
In the Search.cshtml add these lines of code
<th>
@Html.DisplayNameFor(model => model.PositionPlayed)
</th>
<th>
@Html.DisplayNameFor(model => model.GoalsScored)
</th>
and
<td>
@Html.DisplayFor(modelItem => item.PositionPlayed)
</td>
<td>
@Html.DisplayFor(modelItem => item.GoalsScored)
</td>
Build and run your application again.Create a new record.Click on Details,Edit,Delete links.
To recap, ASP.Net MVC is built on ASP.Net.It is a framework that provides clean URLs and clean HTML.It is a very SEO friendly framework. It encourages separation of concerns.
Finally it is a highly testable and extensible framework.
Hope it helps!!!!!
Comments have been disabled for this content.