DotNetStories

In this post I would like to talk about Ajax history in ASP.Net applications and how it works.The problem with ASP.Net Ajax applications is that the browser's back and forward buttons do not store the history of the page.
The browser recognises only URLs. When having Ajax enabled applications and Ajax requests, the page's URL does not change.As a result of that the browser saves nothing in its history cache.
In a nutshell, browser back and forward buttons do not work, are disabled.
As always I will demonstrate the inner workings of Ajax history with a hands on example.I will need an instance of SQL Server running in my machine and a database.
I assume that you have access to a version of SQL Server and NorthWind database.
If you do not, you can download and install the free SQL Server Express edition from here.
If you need the installation scripts for the NorthWind database click here.I have SQL Server 2008 R2 Developer edition installed my machine.
I will create a very simple ASP.Net application and then ajaxify it.In this example you will see how to use a master-detail form without writing any code.This is not the best way to do it but it is good enough for now and for our example.
I will have a dropdownlist control that contains the categories of the products and then as the user selects a category, the products (that will be presented through a GridView control) will get displayed on the screen. I will use SqlDataSource controls.
1) Launch Visual Studio 2010 (express edition will work fine). Create an ASP.Net Web Application from the available templatesand choose a suitable name for it. Choose C# as the development language.
2) Add a new item on your application, a web form. Name it products.aspx. Drop a GridView and a DropDownlist on the products.aspx. Leave the default names.
3) Add a SqlDataSource web server control on the page.Click on the smart tag , of the control and choose Configure Data Source. Create a new connection to the database by specifying the server name and the database name.Then follow the steps of the wizzard. Select the Categories table from the available tables. Choose only CategoryID and CategoryName from the available columns.The Select statement should look something like this
SELECT DISTINCT [CategoryID], [CategoryName] FROM [Categories] ORDER BY [CategoryName]
then finish the wizzard.
We must then associate this SqlDataSource with the DropDownList control
The complete markup (so far) follows
 <asp:DropDownList ID="DropDownList1" runat="server" AutoPostBack="True"
        DataSourceID="SqlDataSource1" DataTextField="CategoryName"
        DataValueField="CategoryID">
    </asp:DropDownList>
    <asp:SqlDataSource ID="SqlDataSource1" runat="server"
        ConnectionString="<%$ ConnectionStrings:NorthwindConnectionString %>"
        SelectCommand="SELECT DISTINCT [CategoryID], [CategoryName] FROM
[Categories] ORDER BY [CategoryName]">
</asp:SqlDataSource>
4) Add another SqlDataSource web server control on the page.Click on the smart tag , of the control and choose Configure Data Source.
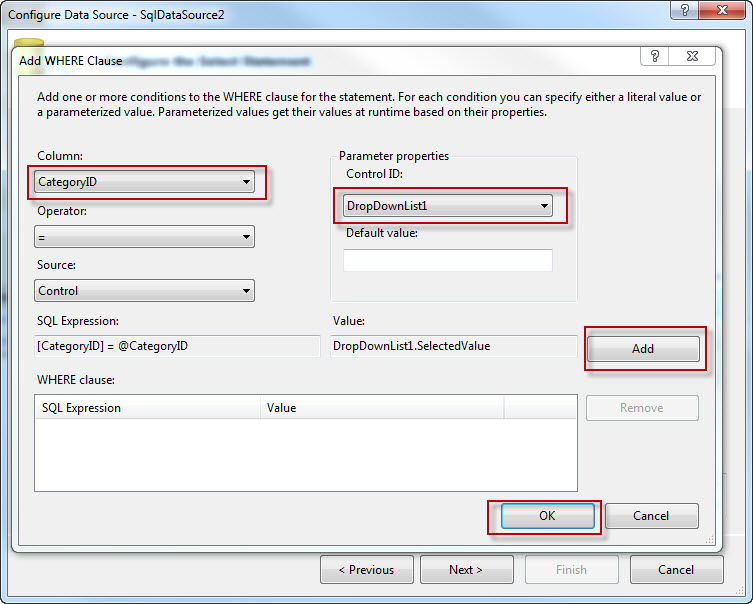
Use the same connection string as before and this time choose the Products table from the available objects and choose only the Product columns (ProductID,ProductName,UnitsInStock).Then click the WHERE button on the wizzard.Select the CategoryID and set the Source to Control. The CategoryID value will be set from whatever value the user picks in the DropDownList control.
Have a look at the picture below, to see the actual settings
Then you can click OK , then click Next and then finish the wizzard. The complete markup so far is (inside the <form> tags)
 <asp:DropDownList ID="DropDownList1" runat="server" AutoPostBack="True"
        DataSourceID="SqlDataSource1" DataTextField="CategoryName"
        DataValueField="CategoryID">
    </asp:DropDownList>
    <asp:SqlDataSource ID="SqlDataSource1" runat="server"
        ConnectionString="<%$ ConnectionStrings:NorthwindConnectionString %>"
        SelectCommand="SELECT DISTINCT [CategoryID], [CategoryName] FROM
[Categories] ORDER BY [CategoryName]"></asp:SqlDataSource>
    <asp:GridView ID="GridView1" runat="server" AllowPaging="True"
        AllowSorting="True" AutoGenerateColumns="False"
        BackColor="LightGoldenrodYellow" BorderColor="Tan" BorderWidth="1px"
     CellPadding="2" DataKeyNames="ProductID" DataSourceID="SqlDataSource2"
        ForeColor="Black" GridLines="None">
        <AlternatingRowStyle BackColor="PaleGoldenrod" />
        <Columns>
            <asp:CommandField ShowSelectButton="True" />
            <asp:BoundField DataField="ProductID" HeaderText="ProductID"
          InsertVisible="False" ReadOnly="True" SortExpression="ProductID" />
            <asp:BoundField DataField="ProductName" HeaderText="ProductName"
            SortExpression="ProductName" />
         <asp:BoundField DataField="UnitsInStock" HeaderText="UnitsInStock"
           SortExpression="UnitsInStock" />
        </Columns>
        <FooterStyle BackColor="Tan" />
        <HeaderStyle BackColor="Tan" Font-Bold="True" />
        <PagerStyle BackColor="PaleGoldenrod" ForeColor="DarkSlateBlue"
            HorizontalAlign="Center" />
        <SelectedRowStyle BackColor="DarkSlateBlue" ForeColor="GhostWhite" />
        <SortedAscendingCellStyle BackColor="#FAFAE7" />
        <SortedAscendingHeaderStyle BackColor="#DAC09E" />
        <SortedDescendingCellStyle BackColor="#E1DB9C" />
        <SortedDescendingHeaderStyle BackColor="#C2A47B" />
    </asp:GridView>
    <asp:SqlDataSource ID="SqlDataSource2" runat="server"
        ConnectionString="<%$ ConnectionStrings:NorthwindConnectionString %>"
        SelectCommand="SELECT [ProductID], [ProductName], [UnitsInStock] FROM
[Products] WHERE ([CategoryID] = @CategoryID) ORDER BY [ProductName]">
        <SelectParameters>
            <asp:ControlParameter ControlID="DropDownList1" Name="CategoryID"
                PropertyName="SelectedValue" Type="Int32" />
        </SelectParameters>
    </asp:SqlDataSource>
5) Add a link to the products page to the Default.aspx page.Run your application and see the products being displayed according to the user's selection in the DropDownList control.
6) Now let's ajaxify our application. The contents of the DropDownList control are not likely to change.Those contents should not be part of the partial update and should not get posted back to the server.
We will add a ScriptManager control on the Products.aspx page. Then we will add an UpdatePanel control on the Products.aspx page.Inside there we will have the second SqlDatasource control and the GridView control.Now if you run your application it will work fine (as before) but still the page does not behave like an ajaxified page. We can see flickering and it is less responsive than it should be. We will a use a Triggers element, an asynchronous postback trigger inside the UpDatePanel element to fix that.Basically we need a way to indicate that the SelectedIndexChanged event of the DropDownList control should trigger an Ajax request to update the page.The markup for the Triggers element follows (snippet)
<asp:UpdatePanel ID="UpdatePanel1" runat="server">
<Triggers>
<asp:AsyncPostBackTrigger ControlID="DropDownList1"
EventName="SelectedIndexChanged" />
</Triggers>
<ContentTemplate>
....
7) The complete markup for the page follows
<body>
    <form id="form1" runat="server">
    <div>

       <a href="Default.aspx">Default.aspx</a></div>
<br/>
       <asp:ScriptManager ID="ScriptManager1" runat="server">
		</asp:ScriptManager>
<asp:DropDownList ID="DropDownList1" runat="server" AutoPostBack="True"
        DataSourceID="SqlDataSource1" DataTextField="CategoryName"
        DataValueField="CategoryID">
    </asp:DropDownList>
    <asp:SqlDataSource ID="SqlDataSource1" runat="server"
        ConnectionString="<%$ ConnectionStrings:NorthwindConnectionString %>"
        SelectCommand="SELECT DISTINCT [CategoryID], [CategoryName] FROM
[Categories] ORDER BY [CategoryName]"></asp:SqlDataSource>
        <br />
        <br />


        <asp:UpdatePanel ID="UpdatePanel1" runat="server">
        <Triggers>
	<asp:AsyncPostBackTrigger ControlID="DropDownList1"
EventName="SelectedIndexChanged" />
        </Triggers>
        <ContentTemplate>
    <asp:GridView ID="GridView1" runat="server" AllowPaging="True"
        AllowSorting="True" AutoGenerateColumns="False"
        BackColor="LightGoldenrodYellow" BorderColor="Tan" BorderWidth="1px"
        CellPadding="2" DataKeyNames="ProductID" DataSourceID="SqlDataSource2"
        ForeColor="Black" GridLines="None">
        <AlternatingRowStyle BackColor="PaleGoldenrod" />
        <Columns>
            <asp:CommandField ShowSelectButton="True" />
            <asp:BoundField DataField="ProductID" HeaderText="ProductID"
           InsertVisible="False" ReadOnly="True" SortExpression="ProductID" />
            <asp:BoundField DataField="ProductName" HeaderText="ProductName"
          SortExpression="ProductName" />
            <asp:BoundField DataField="UnitsInStock" HeaderText="UnitsInStock"
           SortExpression="UnitsInStock" />
        </Columns>
        <FooterStyle BackColor="Tan" />
        <HeaderStyle BackColor="Tan" Font-Bold="True" />
        <PagerStyle BackColor="PaleGoldenrod" ForeColor="DarkSlateBlue"
            HorizontalAlign="Center" />
        <SelectedRowStyle BackColor="DarkSlateBlue" ForeColor="GhostWhite" />
        <SortedAscendingCellStyle BackColor="#FAFAE7" />
        <SortedAscendingHeaderStyle BackColor="#DAC09E" />
        <SortedDescendingCellStyle BackColor="#E1DB9C" />
        <SortedDescendingHeaderStyle BackColor="#C2A47B" />
    </asp:GridView>
    <asp:SqlDataSource ID="SqlDataSource2" runat="server"
        ConnectionString="<%$ ConnectionStrings:NorthwindConnectionString %>"
        SelectCommand="SELECT [ProductID], [ProductName], [UnitsInStock] FROM
[Products] WHERE ([CategoryID] = @CategoryID) ORDER BY [ProductName]">
        <SelectParameters>
            <asp:ControlParameter ControlID="DropDownList1" Name="CategoryID"
                PropertyName="SelectedValue" Type="Int32" />
        </SelectParameters>
    </asp:SqlDataSource>

    </ContentTemplate>
   </asp:UpdatePanel>
    </form>
</body>
8) Run your application again and see the page fully ajaxified. Select various options from the DropDownList control. The URL in the browser does not change.The Back and Forward buttons of the browser are disabled.Now click on the Defaul.aspx link and you will get to the home page.Now go to the Products.aspx page again.If you keep selecting different categories and then click the Back button.You will get back to the default.aspx page and not the last category with the products.So we have a problem. Ajax history feature comes to the rescue.It is not enabled by default.You have to implement page state.In this example we have to record state for each category the user selects.In this example we should create a history point each time the user selects a new product category.A history point is a save state that you can navigate back to.
9) Let's see the changes we should make on the products.aspx page.We should make some changes to the ScriptManager web server control.The new markup should look like this.
<asp:ScriptManager ID="ScriptManager1" runat="server" EnableHistory="true"
        EnableSecureHistoryState="false" onNavigate="ScriptManager1_Navigate">
  </asp:ScriptManager>
We set the EnableHistory attribute to True.We also must specify a methood for the onNavigate event.This is the event that fires when the user navigates between pages.
We also have to place the DropDownList control and it respective SqlDataSource control inside the UpdatePanel control. If we want to have Ajax history enabled those controls have to be moved inside the UpdatePanel control.The final markup for the page follows
<body>
    <form id="form1" runat="server">
    <div>

  <a href="Default.aspx">Default.aspx</a></div>
  <asp:ScriptManager ID="ScriptManager1" runat="server" EnableHistory="true"
  EnableSecureHistoryState="false" onNavigate="ScriptManager1_Navigate">
</asp:ScriptManager>


        <asp:UpdatePanel ID="UpdatePanel1" runat="server">
        <Triggers>
	<asp:AsyncPostBackTrigger ControlID="DropDownList1"
        EventName="SelectedIndexChanged" />
	</Triggers>
        <ContentTemplate>
    <asp:DropDownList ID="DropDownList1" runat="server" AutoPostBack="True"
        DataSourceID="SqlDataSource1" DataTextField="CategoryName"
        DataValueField="CategoryID"
        onselectedindexchanged="DropDownList1_SelectedIndexChanged">
    </asp:DropDownList>
    <asp:SqlDataSource ID="SqlDataSource1" runat="server"
        ConnectionString="<%$ ConnectionStrings:NorthwindConnectionString %>"
        SelectCommand="SELECT DISTINCT [CategoryID], [CategoryName] FROM
[Categories] ORDER BY [CategoryName]"></asp:SqlDataSource>
    <asp:GridView ID="GridView1" runat="server" AllowPaging="True"
        AllowSorting="True" AutoGenerateColumns="False"
        BackColor="LightGoldenrodYellow" BorderColor="Tan" BorderWidth="1px"
        CellPadding="2" DataKeyNames="ProductID" DataSourceID="SqlDataSource2"
        ForeColor="Black" GridLines="None">
        <AlternatingRowStyle BackColor="PaleGoldenrod" />
        <Columns>
            <asp:CommandField ShowSelectButton="True" />
            <asp:BoundField DataField="ProductID" HeaderText="ProductID"
         nsertVisible="False" ReadOnly="True" SortExpression="ProductID" />
            <asp:BoundField DataField="ProductName" HeaderText="ProductName"
                SortExpression="ProductName" />
            <asp:BoundField DataField="UnitsInStock" HeaderText="UnitsInStock"
                SortExpression="UnitsInStock" />
        </Columns>
        <FooterStyle BackColor="Tan" />
        <HeaderStyle BackColor="Tan" Font-Bold="True" />
        <PagerStyle BackColor="PaleGoldenrod" ForeColor="DarkSlateBlue"
            HorizontalAlign="Center" />
        <SelectedRowStyle BackColor="DarkSlateBlue" ForeColor="GhostWhite" />
        <SortedAscendingCellStyle BackColor="#FAFAE7" />
        <SortedAscendingHeaderStyle BackColor="#DAC09E" />
        <SortedDescendingCellStyle BackColor="#E1DB9C" />
        <SortedDescendingHeaderStyle BackColor="#C2A47B" />
    </asp:GridView>
    <asp:SqlDataSource ID="SqlDataSource2" runat="server"
        ConnectionString="<%$ ConnectionStrings:NorthwindConnectionString %>"
        SelectCommand="SELECT [ProductID], [ProductName], [UnitsInStock] FROM
[Products] WHERE ([CategoryID] = @CategoryID) ORDER BY [ProductName]">
        <SelectParameters>
            <asp:ControlParameter ControlID="DropDownList1" Name="CategoryID"
                PropertyName="SelectedValue" Type="Int32" />
        </SelectParameters>
    </asp:SqlDataSource>

    </ContentTemplate>
   </asp:UpdatePanel>
    </form>
</body>
10) We have to add some code in the code behind files. I am going to write some code for the SelectedIndexChanged event of the DropDownList control.We are going to create/save a history point every time the user makes a selection. We also have to check whether we have an asynschronous request and we are not navigating to another page.
The code follows
protected void DropDownList1_SelectedIndexChanged(object sender, EventArgs e)
        {
//check whether we have an asynschronous request and we are //not navigating to another page. if (ScriptManager1.IsInAsyncPostBack && !ScriptManager1.IsNavigating) {
 //create a unique title for the page

                string mytitle = "Northwind Products for the category: "
                    + DropDownList1.SelectedItem.Text;
                this.Title = mytitle;
                Page.Title = mytitle;
     //create a history point

                ScriptManager1.AddHistoryPoint("thecategory",
                    DropDownList1.SelectedIndex.ToString(),
                    mytitle);
            }
        }
11) We also have to write some code for the Navigate event of the ScriptManage control. This event fires when the user navigates to an item in the browser history list.
So when we hit the Back button in the browser, we have to get the category ID of the products and pass it to the SelectedIndex property so the products will be filtered according to the new selection (as a part of the Back button operation)
protected void ScriptManager1_Navigate(object sender, HistoryEventArgs e)
        {
            string indexStr = e.State["thecategory"];
            if (string.IsNullOrEmpty(indexStr))
                DropDownList1.SelectedIndex = 0;
            else
            {
                int index = Convert.ToInt32(indexStr);
                DropDownList1.SelectedIndex = index;
            }

        }
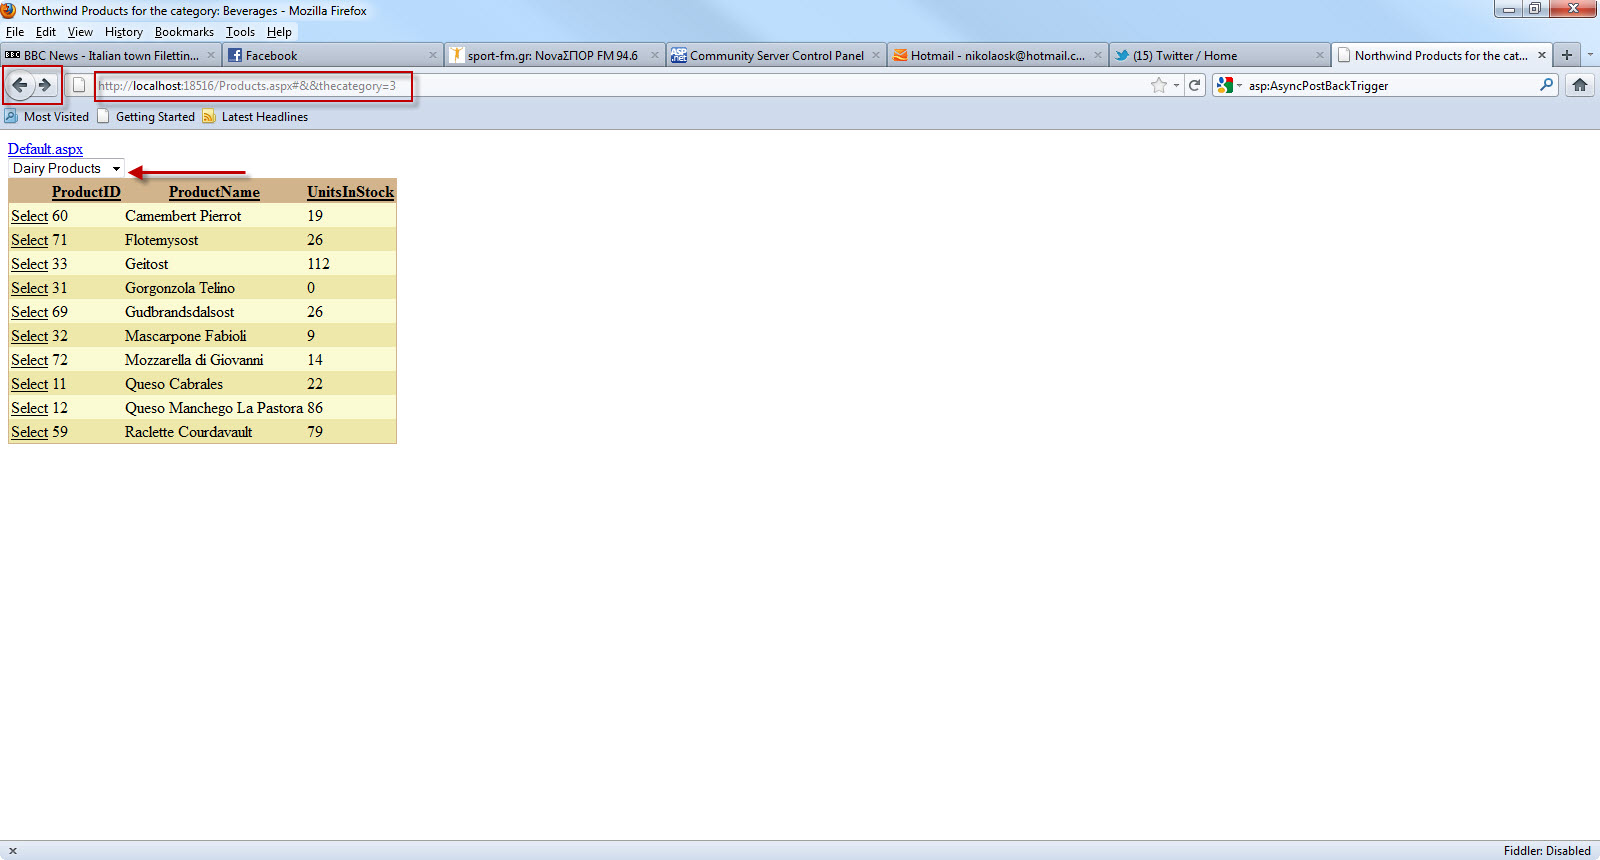
12) Run your application and select different options from the dropdownlist control. Then note that the Back and Forward buttons are enabled. Move Back and Forward using the browser buttons.Note that now we have history enabled and we can move to the previous and next product categories.
Have a look at the picture below.
Email me if you need the source code.
Hope it helps !!!
Comments have been disabled for this content.