Getting Started with Windows Phone 7 Development
Mobile phone development has exploded over the past few years and with the release of Windows Phone 7 there's a new mobile platform available that offers an extremely productive way to build applications and games. With Windows Phone 7 you can build Silverlight or XNA applications and take advantage of languages and tools you already know. In fact, if you're already familiar with Silverlight then you can instantly be productive building Windows Phone 7 applications since the same overall concepts apply.
The Windows Phone 7 platform can be grouped into 4 main categories including runtime functionality (what you see on the phone screen), tools (the phone emulator, XNA Game Studio, Visual Studio and Expression Blend), cloud services such as location services, push notification services and XBOX LIVE integration and portal services such as the Windows Phone Marketplace where consumers access applications. In this post I'll introduce you to the Windows Phone 7 framework and runtime, discuss the tools that are available and walk through several of the key features from a 10,000 foot level. Future posts will drill-down into more details and explain how controls, tasks, notifications and other features can be used within mobile applications. Let's get started by taking a look at what Windows Phone 7 brings to the table for developers.
Windows Phone 7 Tools
Windows Phone 7 provides several benefits over existing mobile development platforms especially when it comes to developer productivity. If you're just getting started building mobile applications for Windows Phone 7 then the first thing you'll want to do is visit the http://developer.windowsphone.com site and download the free tools. If you already have Visual Studio 2010 or Expression Blend 4 installed you can use them in conjunction with the Windows Phone 7 tools. If you don't have any integrated development environment (IDE) installed, the Windows Phone 7 tools provide Visual Studio 2010 Express and Expression Blend for Windows Phone (both of which are free) that can be used to build applications.
The free Windows Phone 7 tools provide everything you need including the phone's Silverlight runtime, an emulator for testing applications locally (see the image that follows), samples and guidance documentation as well as APIs to access different phone sensors and services. Although the tools are free there is a $99 per year charge to publish applications or games to Microsoft's App Hub so that users can search, try and buy your applications. Visit http://create.msdn.com/en-us/home/membership for more details on how the App Hub membership works.
In addition to the Windows Phone 7 tools there are also a robust set of resources available to help you learn how to build different types of applications and games. A set of Silverlight and XNA labs is available through the Windows Phone 7 Developer Training Kit and documentation that provides important details on user interface guidelines and best practices is also available. Along with labs and guidance documents, Microsoft recently released a set of XAML templates that can be used to more efficiently build mobile user interfaces. By using the templates you can save a lot of time typically spent arranging text, controls and other objects in a Windows Phone 7 user interface. A list of these different resources is shown next:
| Windows Phone 7 Tools | |
| Windows Phone 7 Documentation | http://msdn.microsoft.com/en-us/library/ff402535(v=VS.92).aspx |
| Windows Phone 7 Developer Training Kit | http://create.msdn.com/en-US/education/catalog/article/wp7_training_kit |
| UI Design and Interaction Guide for Windows Phone 7 | |
| Windows Phone 7 Design Templates | |
| App Hub Information |
The Windows Phone 7 Framework
The Windows Phone 7 framework consists of core phone system components as well as Silverlight and XNA runtimes. I'll focus on Silverlight application development in this post but the resources mentioned earlier will help get you started with XNA Game Studio if you're interested in going that direction. The following provides an overview of the different runtime frameworks provided with Windows Phone 7 (I’m not a big fan of the white text used but it’s the image provided in the framework documentation available at http://msdn.microsoft.com/en-us/library/ff402531(v=VS.92).aspx).

Looking through the different Windows Phone 7 framework components you can see that there's built-in support for sensors, navigation (PhoneApplicationFrame and PhoneApplicationPage), camera functionality, push notifications for sending messages directly to a phone, media playback, Bing maps integration, plus more. These features combined with support for the Silverlight and XNA frameworks provide robust functionality that can be used to build consumer or enterprise applications.
If you're a Silverlight developer you may look through the framework components and wonder what version of Silverlight is available with the initial release of Windows Phone 7 and exactly what features are supported on phones. When Windows Phone 7 was being created, Silverlight 3 had been finalized and Silverlight 4 development was in process. As a result, Windows Phone 7 supports Silverlight 3 plus additional functionality (some refer to the version as "Silverlight 3+") such as custom phone controls, sensor APIs, launchers and choosers, hardware acceleration and overall performance enhancements. Microsoft's developers also incorporated different optimizations into the Silverlight runtime provided with Windows Phone 7 to accommodate battery constraints and lower-powered processors. Features specific to Silverlight 4 aren't supported but I'm hoping they will be added fairly quickly as new versions of Windows Phone 7 roll out. A list of supported framework features available in Windows Phone 7 can be found at http://msdn.microsoft.com/en-us/library/ff426931(v=VS.95).aspx.
What's really nice about the Windows Phone 7 framework is that if you already know XAML and C# (note that only C# is currently supported) you can build mobile applications very quickly without having to go through a new learning curve. Standard controls such as Button, TextBox and TextBlock are available as well as new mobile-specific controls such as Panorama and Pivot. The learning curve comes into play with learning the new controls, using built-in system controls such as ApplicationBar and integrating with different launchers, choosers or sensor APIs. If you have a good understanding of how object properties, methods and events work then it's simply a matter of spending a little time in the documentation and tutorials.
Key Windows Phone 7 Controls
Windows Phone 7 has a lot of important components that can't be covered in a single post. However, there are a few key concepts I'd like to discuss here regarding controls. You've likely worked with most of the controls available in Windows Phone 7 since they're also available in Silverlight. However, there are a few controls that you need to know about early on such as ApplicationBar, Pivot and Panorama. Let's take a quick look at each of these controls and see how they can be used in mobile applications.
The ApplicationBar control is a system control (as opposed to a built-in Silverlight control) used to provide direct access to commonly used functionality. Think of it like a toolbar that's always accessible in an application.
You can define an ApplicationBar using the XAML shown next:
<phone:PhoneApplicationPage
    xmlns="http://schemas.microsoft.com/winfx/2006/xaml/presentation"
    xmlns:x="http://schemas.microsoft.com/winfx/2006/xaml"
    xmlns:shell="clr-namespace:Microsoft.Phone.Shell;assembly=Microsoft.Phone"
    xmlns:phone="clr-namespace:Microsoft.Phone.Controls;assembly=Microsoft.Phone"
    mc:Ignorable="d" xmlns:d="http://schemas.microsoft.com/expression/blend/2008"
    xmlns:mc="http://schemas.openxmlformats.org/markup-compatibility/2006"
    d:DesignHeight="728" d:DesignWidth="480">

    <phone:PhoneApplicationPage.ApplicationBar>
        <shell:ApplicationBar x:Name="AppBar" IsMenuEnabled="true">
            <shell:ApplicationBar.Buttons>
                <shell:ApplicationBarIconButton
                IconUri="/icons/appbar.check.rest.png" Text="Submit" />
                <shell:ApplicationBarIconButton
                IconUri="/icons/appbar.cancel.rest.png" Text="Cancel" />
            </shell:ApplicationBar.Buttons>
        </shell:ApplicationBar>
    </phone:PhoneApplicationPage.ApplicationBar>

    ...

</phone:PhoneApplicationPage>
The easiest way to work with the ApplicationBar control is to highlight the PhoneApplicationPage object in Expression Blend and then access the ApplicationBar property in the Properties window. From there you can visually add buttons and select from built-in icons as opposed to manually typing the XAML code.
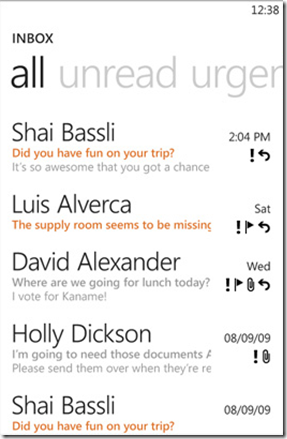
In addition to the ApplicationBar system control, Windows Phone 7 also provides a Pivot control (which is a regular Silverlight control rather than a system control). The Pivot control is similar to the TabControl available in Silverlight applications since it can be used to display multiple data views or pages of data on a single screen. The Pivot control shown next is used to display email messages and contains three pivot items including all, unread and urgent. The control has built-in gesture support capabilities that allow users to swipe the screen to switch between pivot items.
An example of defining a Pivot control with two pivot items in it is shown next. When you create a new Silverlight Windows Phone 7 project in Visual Studio 2010 or Expression Blend you have the option of starting with a Pivot project.
<controls:Pivot Title="Pivot Example">
    <controls:PivotItem Header="First Pivot Item">
        <!-- Pivot item content goes here -->
    </controls:PivotItem>

    <controls:PivotItem Header="Second Pivot Item">
        <!-- Pivot item content goes here -->
    </controls:PivotItem>
</controls:Pivot>
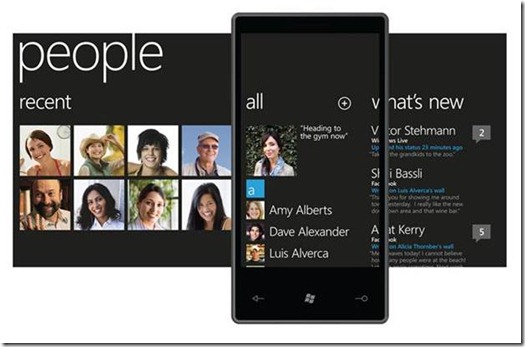
The final control we’ll discuss is the Panorama control. It's similar to the Pivot control in some ways since it allows data views to be accessed by swiping right or left on the screen. However, it's used to simulate showing one large horizontal screen that a user can navigate around as shown next. The screen can be divided into sections by defining multiple panorama items within the control as shown next:
Here’s an example of defining a Panorama control in XAML. As with the Pivot control, you can create a Panorama project in Visual Studio 2010 or Expression Blend which provides the necessary XAML to get started using the control quickly.
<controls:Panorama Title="people">

    <controls:Panorama.Background>
        <ImageBrush ImageSource="PanoramaBackground.png"/>
    </controls:Panorama.Background>

    <controls:PanoramaItem Header="recent">
        <!-- PanoramaItem content to show -->
    </controls:PanoramaItem>

    <controls:PanoramaItem Header="all">
        <!-- PanoramaItem content to show -->
    </controls:PanoramaItem>

    <controls:PanoramaItem Header="what's new">
        <!-- PanoramaItem content to show -->
    </controls:PanoramaItem>

</controls:Panorama>
In addition to built-in controls such as Pivot and Panorama, Microsoft has also released additional controls in the Silverlight for Windows Phone Toolkit available at http://silverlight.codeplex.com.
Launchers and Choosers
The final topic that I'll cover is launchers and choosers available in Windows Phone 7. When developing an application you may have the need to allow the user to launch another application such as an email client or select a picture, a contact phone number or some other piece of data to use in your application. Launchers and choosers support this type of functionality while allowing applications to run in their own sandbox.
Launchers (located in the Microsoft.Phone.Tasks namespace) allow other applications to be launched from your application in situations where you don't expect data to be returned. An example would be the EmailComposeTask launcher which displays a new email message and allows the user to fill in the missing data and then send the message when they're done. Another example would be the PhoneCallTask which allows a phone number and display name to be passed directly to the phone. Other key launchers include SearchTask, SmsComposeTask, WebBrowserTask and MediaPlayerLauncher. The following code shows an example of using the EmailComposeTask to initiate an email message from within an application.
var emailComposeTask = new EmailComposeTask();
emailComposeTask.To = "jdoe@test.com";
emailComposeTask.Body = "How was your vacation?";
emailComposeTask.Subject = "Checking in";
emailComposeTask.Show();
Choosers can be used to initiate a user dialog that returns data to your application asynchronously. Examples of choosers include CameraCaptureTask, EmailAddressChooserTask, PhoneNumberChooserTask and PhotoChooserTask. As mentioned, choosers work asynchronously meaning that you create them and provide a callback method that's invoked once the user finishes using a given chooser object. The following code shows an example of using the EmailAddressChooserTask to select an email address from a user's contacts.
private void Button_Click(object sender, System.Windows.RoutedEventArgs e)
{
    var emailTask = new EmailAddressChooserTask();
    emailTask.Completed += emailAddressChooserTask_Completed;
    emailTask.Show();
}

void emailTask_Completed(object sender, EmailResult e)
{
    if (e.TaskResult == TaskResult.OK)
    {
        MessageBox.Show(e.Email);
    }
}
By using launchers and choosers you can ensure that your application remains secure while allowing users to interact with other applications on their phone.
There are a lot more Windows Phone 7 topics that can be discussed such as themes, push notifications, isolated storage, sensor APIs, the application life cycle and tombstoning, etc. However, the goal of this post was to introduce you to the general features available in Windows Phone 7 and show a few examples of how they can be used to build applications. Future posts will drill-down into the features and provide additional details so stay tuned!


