How to create a Module based Silverlight application (Part 1)
When building RIA (Rich Internet Application) with Silverlight, it’s important to make sure the Silverlight application is loaded as fast as possible. Users don’t like to see a splash screen for several seconds or minutes, they want an application to start directly. One way to make a Silverlight app load fast, is by minimizing the XAP file, this can be done by not adding to much images, videos or other files to the Silverlight application project. If we have a large application, we can also split the application into small “modules”, for example assemblies or .XAP files. We can then load them on demand when they are needed. The base application can be kept small and be the core engine for the other modules. In this first part of my blog post I will add some examples how we can split our Silverlight applications into modules, and load them on demand asynchronous. The next part will be about how to use MEF (Managed Extensibility Framework) to create module bases Silverlight application.
The core components to load assemblies or .XAP on demand is the WebClient class and the AssemblyPart class.The following code will demonstrate how we can use the WebClient and AssemblyPart to load a Silverligth Class Library located in the ClientBin folder of our Silverlight Web host:
var webClient = new WebClient();

webClient.OpenReadCompleted += webClient_OpenReadCompleted;
webClinet.OpenReadAsync(new Uri("Module1.dll", UriKind.Relative));
The Module1 Silverlight Class Library can contains Silverlight User Controls and classes etc.
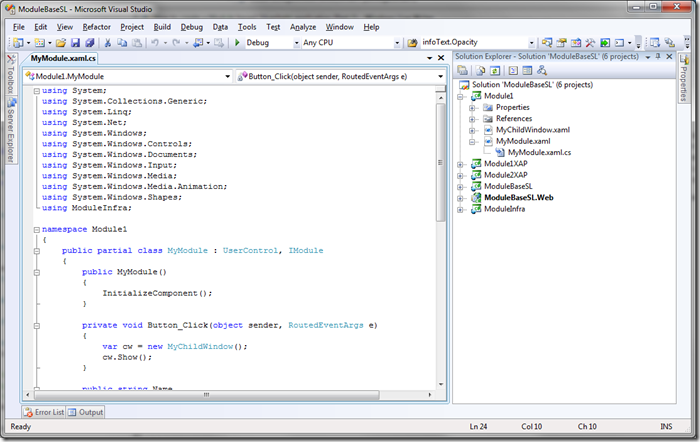
In this example I have added a Child Window (MyChildWindow) and a Silverlight User control (MyModule) to the Silverlight Class Library. When the project is build, the .xaml will be included into the cliss librarie’s assmebly. The next step is to handle the webClient_OpenReadCompleted event, this event will be trigged when the WebClient have loaded the specified assembly. The following code will demonstrate how the MyModule is added to a Grid dynamically:
void webClient_OpenReadCompleted(object sender, OpenReadCompletedEventArgs e)
{
    AssemblyPart assemblyPart = new AssemblyPart();
    Assembly assembly = assemblyPart.Load(e.Result);

    var userControl = assembly.CreateInstance("Module1.MyModule") as UserControl;

    if (userControl != null)
        LayoutRoot.Children.Add(userControl);
}
The AssemblyPart is used to load an Assembly out from a Stream (the OpenReadCompletedEventArgs’s Result property returns the Stream which the WebClient has loaded, in this case a Stream of the Module1.dll). When an Assembly is loaded the Assembly’s CreateInstance method can be used to create an instance of a type (Namespace.ClassName) located in the assembly. The User Control added to the Silverlight Class Library exists in the namespace Module1 and the User Controls name is MyModule. Because the MyModule inherits from the class UserControl we can simply cast the created instance to a UserControl and then add it to the Grid by using the Children.Add method.
Note: If we have added references to other assemblies within the Silverlight Class Library, we also need to load them, or the main Silverlight application need to have a reference to them. If not, we will get an exception about a missing assembly.
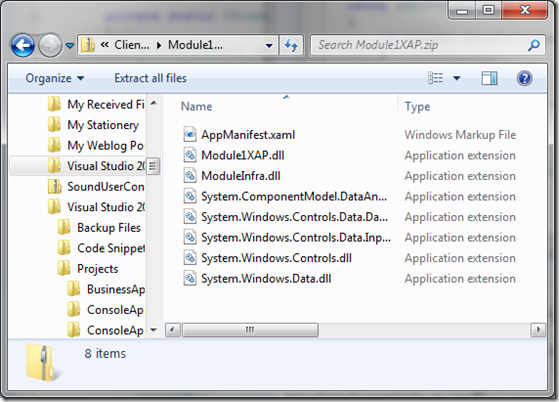
If we want to create a package with all required assemblies for a “module”, we can for example use a .XAP file. The .XAP files contain a AppManifest.xaml file, which contains information of the files inside of an .XAP file. Here is an example of a .XAP files content:
Note: A .XAP file can be explored by changing the .XAP to .ZIP, it’s basically a normal zip file.
The following is the content of the AppManifest.xaml file in the above .xap file:
<Deployment ...>
  <Deployment.Parts>
    <AssemblyPart x:Name="Module1XAP" Source="Module1XAP.dll" />
    <AssemblyPart x:Name="ModuleInfra" Source="ModuleInfra.dll" />
    <AssemblyPart x:Name="System.ComponentModel.DataAnnotations" Source="System.ComponentModel.DataAnnotations.dll" />
    <AssemblyPart x:Name="System.Windows.Controls.Data.DataForm.Toolkit" Source="System.Windows.Controls.Data.DataForm.Toolkit.dll" />
    <AssemblyPart x:Name="System.Windows.Controls.Data.Input" Source="System.Windows.Controls.Data.Input.dll" />
    <AssemblyPart x:Name="System.Windows.Controls" Source="System.Windows.Controls.dll" />
    <AssemblyPart x:Name="System.Windows.Data" Source="System.Windows.Data.dll" />
  </Deployment.Parts>
</Deployment>
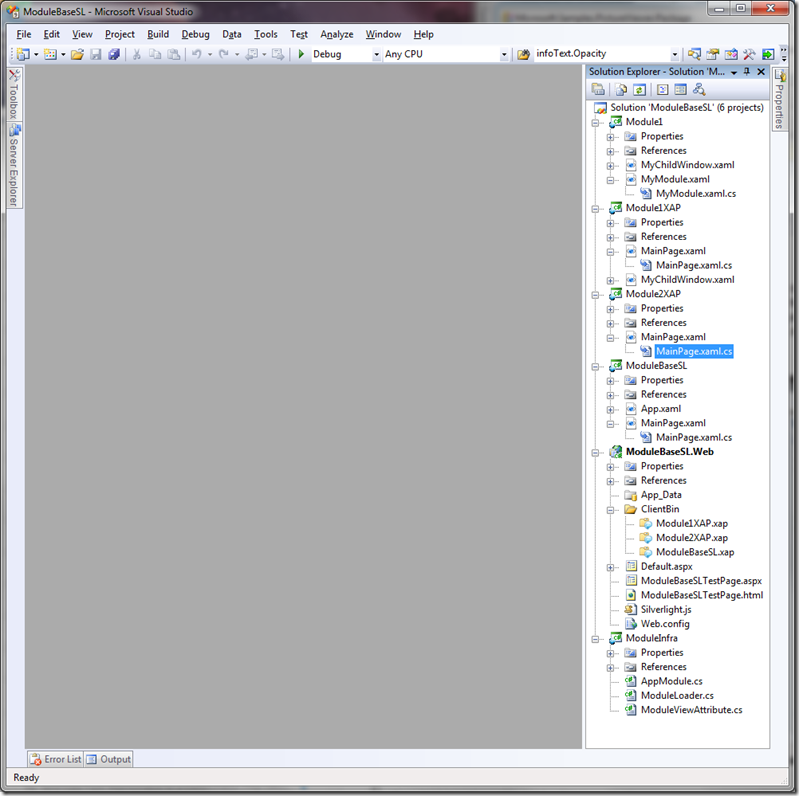
We can with the WebClient load the .XAP file and get the AppManifest.xaml from the loaded stream by using the StreamResourceInfo class and the Application’s GetResourceStream method. After that we can get the AssemblyPart from the AppManifest file and load them all. Every assembly we have as an reference will be included in the .XAP file. Here is an example where three Silverlight Application projects are added to a Solution. The Module1XAP and Module2XAP are the modules, and the ModuelBaseSL is the main Silverlight application. The main Silverlight application will load the Modules on demand. When building the solution, the Silverlight applications will be packaged into .XAP file, in this example, Module1XAP.xap, Module2XAP.xap and ModuleBaseSL.xap and will be added to the ClientBin folder.
There is no API yet out of the box which will help us loading a package (not while this post is written), so we need to write code that will do it. In this example I have created a class which will help us load a module.
public class ModuleLoader
{

   public void LoadModule(Uri uri, Action<AsyncCompletedEventArgs, AppModule> moduleDownloadCompleted)
   {
      WebClient webClient = new WebClient();
      webClient.OpenReadCompleted += webClient_OpenReadCompleted;

      webClient.OpenReadAsync(uri, moduleDownloadCompleted);
   }

   void webClient_OpenReadCompleted(object sender, OpenReadCompletedEventArgs e)
   {
      // ...
   }
}
The LoadModule method will take an Uri to the .XAP file and also a callback method when the module is loaded.
void webClient_OpenReadCompleted(object sender, OpenReadCompletedEventArgs e)
{
    var appModule = GetModule(e.Result);
var completedCallback = e.UserState as Action<AsyncCompletedEventArgs, AppModule>;
    if (completedCallback != null)
       completedCallback(new AsyncCompletedEventArgs(e.Error, e.Cancelled, null), appModule);
}
The following code will create a StreamResourceInfo object. By using the Application’s GetResourceStream method, we can easy get a file out from the Stream. The following code “picks” out the AppManifest.xaml. The code will also load all assemblies located in the .XAP file.
private AppModule GetModule(Stream loadedModuleStream)
{
   AppModule appModule = null;

   StreamResourceInfo moduleStreamInfo = new StreamResourceInfo(loadedModuleStream, null);

   StreamResourceInfo manifestStreamInfo = Application.GetResourceStream(
                                                                moduleStreamInfo,
                                                                new Uri("AppManifest.xaml", UriKind.Relative));

   using (XmlReader reader = XmlReader.Create(manifestStreamInfo.Stream))
   {
       if (reader.ReadToFollowing("AssemblyPart"))
       {
          do
          {
             string source = reader.GetAttribute("Source");

             if (source != null)
             {
                StreamResourceInfo sri = Application.GetResourceStream(
                                                                moduleStreamInfo,
                                                                new Uri(source, UriKind.Relative));

                 var assemblyPart = new AssemblyPart();
                 var assembly = assemblyPart.Load(sri.Stream);

                 if (appModule == null)
                     appModule = GetModuleInformation(assembly);
             }
         }
         while (reader.ReadToNextSibling("AssemblyPart"));
     }
  }
  return appModule;
}
The AppModule is a class that will hold all information about a module, such as the Name of the module and the View (UserControl) that should be the startup View for the module. The method GetModuleInformation will check if there is any UserControl inside of the assembly which has a specific Attribute (ModuleViewAttribute), if there is, it will be the startup View for the module. It would be easy to use a Metadata class or file with the information about the Module. But the code in this post is only used to demonstrate how to load modules and kept relative simple.
public class AppModule
{
     private UserControl _mainView;
     private string _name;

     public string Name
     {
        get { return _name; }
        internal set { _name = value; }
     }


     public UserControl View
     {
        get { return _mainView; }
        internal set { _mainView = value; }
     }
}
public class ModuleViewAttribute : Attribute
{
    public ModuleViewAttribute()
    {
    }

    public ModuleViewAttribute(string name)
    {
        this.Name = name;
    }

    public string Name { get; set; }

 }
The following shows a UserContorl with the ModuleViewAttribute:
[ModuleView(Name = "My XAP Module 2")]
 public partial class MainPage : UserControl
{
     public MainPage()
    {
        InitializeComponent();
    }
}
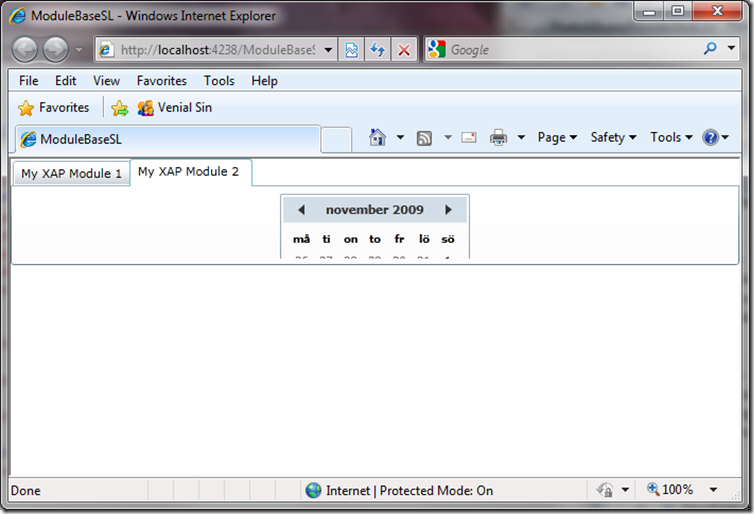
The following code will load two different .XAP files and add TabItems to a Tab control in Silverlight 3:
public partial class MainPage : UserControl
{
     public MainPage()
     {
         InitializeComponent();

         ModuleLoader loader = new ModuleLoader();

         loader.LoadModule(
                           new Uri("Module1XAP.xap", UriKind.Relative),
                           (e, mod) =>
                           {
                              modulesTabContron.Items.Add(
                                              new TabItem() { Content = mod.View, Header = mod.Name });
                           });

         loader.LoadModule(
                           new Uri("Module2XAP.xap", UriKind.Relative),
                           (e, mod) =>
                           {
                             modulesTabContron.Items.Add(
                                             new TabItem() { Content = mod.View, Header = mod.Name });
                           });
     }
}
<UserControl xmlns:controls="clr-namespace:System.Windows.Controls;assembly=System.Windows.Controls"  x:Class="ModuleBaseSL.MainPage"
    xmlns="http://schemas.microsoft.com/winfx/2006/xaml/presentation"
    xmlns:x="http://schemas.microsoft.com/winfx/2006/xaml"
    xmlns:d="http://schemas.microsoft.com/expression/blend/2008" xmlns:mc="http://schemas.openxmlformats.org/markup-compatibility/2006"
    mc:Ignorable="d" d:DesignWidth="640" d:DesignHeight="480">
  <Grid x:Name="LayoutRoot">
        <Grid.RowDefinitions>
            <RowDefinition Height="100"/>
            <RowDefinition Height="*"/>
        </Grid.RowDefinitions>

        <controls:TabControl Grid.Row="0" x:Name="modulesTabContron"></controls:TabControl>

    </Grid>
</UserControl>
Note: The code in this post is only used for a demonstration, some refactoring need to be done etc.
I hope this blog post have given you some ideas about how you can create a module based Silverlight application.
If you want to know when I publish a blog post or other information, you can follow me on twitter: http://www.twitter.com/fredrikn


