Silverlight 4 - MVVM with Commanding and WCF RIA Services
Note: The code example in this post uses Silverlight 4 PDC Beta and WCR RIA Services PDC Beta, so some changes can be made before RTM.
In my previous post I wrote about “WCF RIA Services and a guide to use DTO/”Presentation Model””, and mention that I will later write a blog post about using a ViewModel. In this post I will show you how you can create a ViewModel and use Silverlight 4 Commanding to use the MVVM pattern. In this blog post I will use Unity as my Dependency Injection framework to inject my Repository to the DomainService, to make this possible we need to create our own DomainServiceFactory, check out my “WCF RIA Services Unity DomainServiceFactory” for information about how to use Unity and Dependency Injection, because I will not cover it in this post.
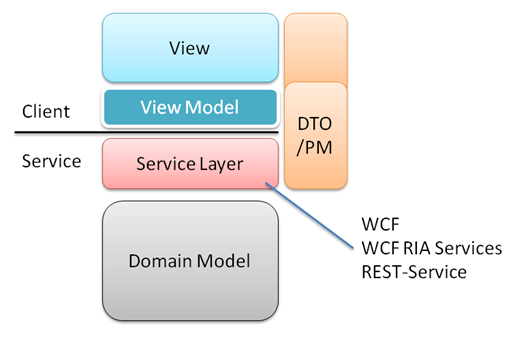
Architecture and design in this post
The following figure will show you the architecture and design I often use when building Rich Internet Applications:
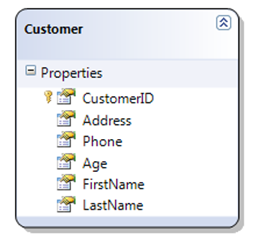
In this post the Service Layer will be a DomainService using WCF RIA Services, the Domain Model will be a very simple, just have a Customer entity and a CustomerRepository. The follow if a class diagram of the Customer entity:

The following code is the CustomerRepository interface:
  public interface ICustomerRepository
  {
     Customer GetCustomerByID(int customerID);

     void Update(Customer customer);
  }
Note: This post will not focus on how the ICustomerRepository is implemented, assume it used Entity Framework, Linq to SQL, nHibernate or ADO.NET etc. It’s not important to know in this blog post.
The following code is the Service Layer, where WCF RIA Services DomainService is used and where the ICustomerRepository should be injected:
 [EnableClientAccess()]
 public class CustomerService : DomainService
 {
      private ICustomerRepository _customerRepository;

      public CustomerService(ICustomerRepository customerRepository)
      {
          _customerRepository = customerRepository;
      }

      public CustomerDto GetCustomerByID(int customerID)
      {
          var customer = _customerRepository.GetCustomerByID(customerID);

          return MapCustomerToCustomerDto(customer);
      }

      public void UpdateCustomer(CustomerDto customer)
      {
          if (customerDto == null)
              throw new ArgumentNullException("customer");

          _customerRepository.Update(MapCustomerDtoToCustomer(customerDto));
      }
  }
As you may notice there is a mapping (translator) between the domain Entity Customer to CustomerDto (Data transfer object). If we have used WCF, we would map our domain entity to the DataContract. Frameworks like the AutoMapper could for example be used here instead of manual mapping. In a small Intranet application where the internal bandwidth is good and we don’t have a lot of business logic, we could simply use our Customer and by pass the mapping. But it all depends on the application we are building, there are so many factors included before we can decide the proper design for our application. So this post is not showing any Silver Bullets, they aren’t any. The following is the code for the CustomerDto, some validation annotation is used on the DTO, when using a ViewModel this validation could instead be added as “real” code to the ViewModel, if we do so, the validation will be executed when we write a test against our ViewModel. But in this example code, I decide that I don’t need to include data rules as part of the test.
 public class CustomerDto
 {
     [Key]
     public int CustomerID { get; set; }

     [Required]
     [StringLength(32, MinimumLength=2)]
     public string FirstName { get; set; }

     [Required]
     [StringLength(32, MinimumLength = 2)]
     public string LastName { get; set; }

     public int Age { get; set; }
}
Note: I will use my own DomainServiceFactory to make sure ICustomerRepository will be injected when the CustomerService is created, you can read more about it here.
Now the serer-side and Service layer is completed we can leave it and continue with the client implementation where a ViewModel is going to be used and also Silverlight 4’s Commanding.
ViewModel
A ViewModel is a representation of the View but as a class. Think of the movie Matrix, they only saw a lot of characters moving on the screens, but by looking at them, they saw the world. Think of the ViewModel class as the characters and by looking at it we should see the View. The reason to use a ViewModel is separation of concerns, we don’t want to have logic added to the view. With this separation we could also write automated test to test our View even if the UI isn’t in place.
Here is a skeleton of the ViewModel where Commanding is used:
    public class CustomerViewModel : ViewModel
    {
        public CustomerViewModel()
        {
        }

        public string FirstName
        {
            get;
            set;
        }

        public string LastName
        {
            get;
            set;
        }

        public bool IsAdult
        {
            get;
        }
        public bool IsLoading
        {
           get;
           internal set;
        }
        public ICommand Save
        {
            get;
        }
    }
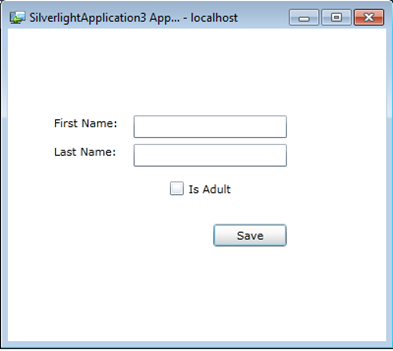
The ViewModel represents a View which should display two Input fields for FirstName and LastName, and also a read-only checkbox if the Customer is an adult or not. The View should also have a Save button. The IsLoading is used to show or hide a BusyIndicator. Here is the UI of the View which will use the ViewModel:
The following is the XAML for the View, where no code-behind is needed, instead a ViewModel is added as a resource and the data binding feature is used to bind the View to the ViewModel:
<UserControl
xmlns:my="clr-namespace:System.Windows.Controls;assembly=System.Windows.Controls.Toolkit"
    x:Class="SilverlightApplication1.MainPage"
    xmlns="http://schemas.microsoft.com/winfx/2006/xaml/presentation"
    xmlns:x="http://schemas.microsoft.com/winfx/2006/xaml"
    xmlns:d="http://schemas.microsoft.com/expression/blend/2008"
    xmlns:mc="http://schemas.openxmlformats.org/markup-compatibility/2006"
    xmlns:vm="clr-namespace:SilverlightApplication1.ViewModels"
    mc:Ignorable="d"
    d:DesignHeight="300" d:DesignWidth="400">

    <UserControl.Resources>
        <vm:CustomerViewModel x:Name="customerViewModel"/>
    </UserControl.Resources>

    <Grid x:Name="LayoutRoot" DataContext="{StaticResource customerViewModel}">

        <my:BusyIndicator IsBusy="{Binding IsLoading}"></my:BusyIndicator>

        <TextBox Text="{Binding FirstName, Mode=TwoWay, NotifyOnValidationError=True}"  ... />
        <TextBox Text="{Binding LastNaem, Mode=TwoWay, NotifyOnValidationError=True}" ... />

        <TextBlock Text="First Name:" .../>
        <TextBlock Text="Last Name:" .../>

        <CheckBox IsChecked="{Binding IsAdult}" Content="Is Adult" .../>

        <Button Command="{Binding Save}" Content="Save" ... />

    </Grid>
</UserControl>
ViewModel implementation
You have probably notice that the CustomerViewModel inherits the ViewModel class, the ViewModel class implements the the INotifyPropertyChanged and INotifyDataErrorInfo. You can find the implementation of the ViewModel on my other post about INotifyDataErrorInfo class. In the CustomerViewModel constructor there is a call to the WCF RIA Services to get a specific Customer, because the operation is asynchronous we can’t know how long it will take before the Customer is loaded, so the IsLoading property is set to true to show the BusyIndicator. Here is the whole implementation of the CustomerViewModel:
  public class CustomerViewModel : ViewModel, ISaveableViewModel
  {
        CustomerContext _customerContext = new CustomerContext();
        CustomerDto _customerDto = new CustomerDto();

        bool _isLoading = false;

        public CustomerViewModel()
        {
            this.IsLoading = true;

            _customerContext.Load<CustomerDto>(
                               _customerContext.GetCustomerByIDQuery(10),
                               loadOperation =>
                               {
                                 _customerDto = loadOperation.Entities.SingleOrDefault();
                                 LoadingCompleted();
                               }, null);
        }


        public string FirstName
        {
            get { return _customerDto.FirstName; }
            set
            {
                if (_customerDto.FirstName != value)
                {
                    _customerDto.FirstName = value;
                    NotifyPropertyChanged("FirstName");
                }
            }
        }


        public string LastName
        {
            get { return _customerDto.LastName; }
            set
            {
                if (_customerDto.LastName != value)
                {
                    _customerDto.LastName = value;
                    NotifyPropertyChanged("LastName");
                }
            }
        }


        public bool IsLoading
        {
            get { return _isLoading; }
            internal set
            {
               _isLoading = value;
               NotifyPropertyChanged("IsLoading");
            }
        }


        public bool IsAdult
        {
            get { return _customerDto.Age >= 18; }
        }


        public ICommand Save
        {
            get { return new SaveCommand(this); }
        }


        internal void SaveCustomer()
        {
            _customerContext.SubmitChanges();
        }


        private void LoadingCompleted()
        {
            NotifyPropertyChanged("FirstName");
            NotifyPropertyChanged("LastName");
            NotifyPropertyChanged("IsAdult");
            this.IsLoading = false;
        }
 }
Note: The above CustomerViewModel is not designed for testability, if we want to write a unit test to test the ViewModel, we could for example pass a DomainClient to the CustomerContext constructor when it’s created, it can be done in several ways, one way is for example to pass the DomainClient as an argument to the CustomerViewModel constructor, but then we have to use code-behind to create the CustomerViewModel or adding our own AttachedProperty. We can also add a DomainClient as a resources in XAML and use property injection to inject the DominContext to the ViewModel.
Something that may seems strange is the empty CustomerDto assigned to the _customerDto field. The other properties in the CustomerViewModel will access the _customerDto and its properties. To avoid adding a lot of if statements to check for null in both the get and set, a default CustomerDto is used. So it’s only a “ugly” hack to avoid a lot of code in each property. The load operation of a Customer will take place in the default constructor of the CustomerViewModel:
public CustomerViewModel()
{
   this.IsLoading = true;

   _customerContext.Load<CustomerDto>(
             _customerContext.GetCustomerByIDQuery(10),
             loadOperation =>
             {
                  _customerDto = loadOperation.Entities.SingleOrDefault();
                  LoadingCompleted();
             }, null);
}
The IsLoading property is set to true to make sure the BusyIndicator will be displayed when the loading takes place. When the loading of the Customer is completed the _customerDto will be set to the loaded customer and the LoadingCompleted method will be called. This method will make sure the BusyIndicator will be hidden and also notify the View about changes, so the bindings to the controls will call the get methods of bounded properties to get the loaded customer’s information and show it. The last part to cover is the use of Commanding in Silverlight 4.
Commanding
You can read about Commanding in my post “Silverlight 4 Commanding enables ViewModels”. In the ViewModel there are one method SaveRule, this is from the interface ISaveableViewModel implemented by the CustomerViewModel. There is also a Save property added to the CustomerViewModel, this property will return a SaveCommand where the ViewModel is passed as an argument.
public ICommand Save
{
    get { return new SaveCommand(this); }
}

internal void SaveRule()
{
     _customerContext.SubmitChanges();
}
The Save property is bounded to the View’s Save button’s command property. Here is the implementation of the SaveCommand returned from the Save property:
public class SaveCommand : ICommand
{
    private ISaveableViewModel _view;

    public SaveCommand(ISaveableViewModel view)
    {
        _view = view;
    }

    public bool CanExecute(object parameter)
    {
       return true;
    }

    public event EventHandler CanExecuteChanged;

    public void Execute(object parameter)
    {
        _view.SaveRule();
     }
}
As you can see the SaveCommand takes a ISaveableViewModel interface (Yes I know the name of the interface may be strange, but I’m not so good at naming ;)). The idea is to make sure the operation the Command should execute is added to the ViewModel itself, by doing so the Command can be reused by several other Views.
Summary
This post was about giving you the ideas of how you can use WCF RIA Services, the Model View View Model pattern and Commanding. The code used in this example is not perfect, no specific error handling was added more than using the WCF RIA Services validation annotation.
If you want to know when I publish a new blog post, then follow me on twitter: http://www.twitter.com/fredrikn

