Shared Message Area in WPF Using Publish/Subscribe
I posted a quick answer a little while ago on StackOverflow, where the question was "What is the best way to display a status message in WPF?"
My answer:
You may want to consider doing a publish/subscribe ("Observer" pattern) -- define a "status changed" event on a base page, and create a custom control that sets up a delegate and event handler to listen for status updates.
Then you could drop the custom control on any page that inherits from the base, and it would automatically listen for and display status messages whenever the event is fired.
I thought this would be fun to prove out, so last night I threw together a sample app that implements this solution. Here is a walkthrough.
Custom Event Args
The first thing that is needed is an "EventArgs" class to be able to pass message text through an event. Here is the class declaration. It's simply a class derived from "EventArgs" that defines a single string property to hold the message text:
using System;

namespace MessageAreaBlogDemo
{
    public class DisplayMessageEventArgs : EventArgs
    {
        // Constructor
        public DisplayMessageEventArgs(string s) { MessageText = s; }

        // Read-only property
        public String MessageText { get; private set; }
    }
}
Creating the Custom Base Class
Next, create a new class for the custom System.Windows.Window-derived base class, which I called "CustomWindowBase", that defines the event. Here is the code:
using System.Windows;

namespace MessageAreaBlogDemo
{
    public class CustomWindowBase : Window
    {
        // Declare the event handler
        public delegate void DisplayMessageEventHandler(object sender, DisplayMessageEventArgs e);

        // Declare the event
        public event DisplayMessageEventHandler DisplayMessage;

        // Create a method that can be called to publish the message to any listeners
        public void PublishMessage(object sender, string text)
        {
            // Check if the event is null, meaning there are no Message Areas subscribed
            // to it.  If you don't check this, the app will throw an exception when it
            // tries to display a message on a form without a Message Area!
            if (DisplayMessage != null)
            {
                DisplayMessage(sender, new DisplayMessageEventArgs(text));
            }
        }
    }
}
Setting a Window to Inherit From the Custom Base Class
Changing the base class of a WPF Window requires changes in both the code and the xaml. In the XAML, start by adding a new namespace for the local assembly, and changing the "Window" class definition to your new type. Note that both files must be changed before you can build.
XAML before:
<Window x:Class="MessageAreaBlogDemo.Window1"
    xmlns="http://schemas.microsoft.com/winfx/2006/xaml/presentation"
    xmlns:x="http://schemas.microsoft.com/winfx/2006/xaml"
    Title="Window1" Height="300" Width="300">
    <Grid>

    </Grid>
</Window>
XAML After:
<local:CustomWindowBase x:Class="MessageAreaBlogDemo.Window1"
    xmlns="http://schemas.microsoft.com/winfx/2006/xaml/presentation"
    xmlns:x="http://schemas.microsoft.com/winfx/2006/xaml"
    xmlns:local="clr-namespace:MessageAreaBlogDemo"
    Title="Window1" Height="300" Width="300">
    <Grid>

    </Grid>
</local:CustomWindowBase>
Code for Window1.xaml.cs:
namespace MessageAreaBlogDemo
{
    /// <summary>
    /// Interaction logic for Window1.xaml
    /// </summary>

    // Modify to inherit from CustomWindowBase
    public partial class Window1 : CustomWindowBase
    {
        public Window1()
        {
            InitializeComponent();
        }
    }
}
Creating the Message Area
Now you can create a new User Control to house the message area. I just defined a simple user control that contains a grid that holds a label. I set the color of the grid so that it jumps out on the page. Also, note the "Loaded" event handler to the control declaration in XAML -- this is used to fire the event that registers the control with the parent Window to receive messages.

<UserControl x:Class="MessageAreaBlogDemo.MessageArea"
    xmlns="http://schemas.microsoft.com/winfx/2006/xaml/presentation"
    xmlns:x="http://schemas.microsoft.com/winfx/2006/xaml"
    Height="30" Width="300">
    <Grid Background="AliceBlue" >
        <Label Name="labelMessage">Message Goes Here</Label>
    </Grid>
</UserControl>
And here is the code behind:
using System.Windows;
using System.Windows.Controls;

namespace MessageAreaBlogDemo
{
    /// <summary>
    /// Interaction logic for MessageArea.xaml
    /// </summary>
    public partial class MessageArea : UserControl
    {
        public MessageArea()
        {
            InitializeComponent();
        }

        // Event that fires after the Window and all controls have been loaded and
        // are about to be rendered
        private void UserControl_Loaded(object sender, System.Windows.RoutedEventArgs e)
        {
            // Get the containing Window using the static "Window.GetWindow" method,
            // then cast it to a CustomWindowBase
            CustomWindowBase parent = (CustomWindowBase)Window.GetWindow(this);

            // Register with the event delegate
            parent.DisplayMessage += new CustomWindowBase.DisplayMessageEventHandler(parent_DisplayMessage);
        }

        // Event handler, called whenever the parent Window raises the custom event
        void parent_DisplayMessage(object sender, DisplayMessageEventArgs e)
        {
            // Display the text in the message area
            this.labelMessage.Content = e.MessageText;
        }
    }
}
Put the Controls on the Form
The last step is to just put the MessageArea on the form, and fire the event to display messages on it. Without going into how to add the control to the toolbox, we can just add the controls in the xaml editor like so:
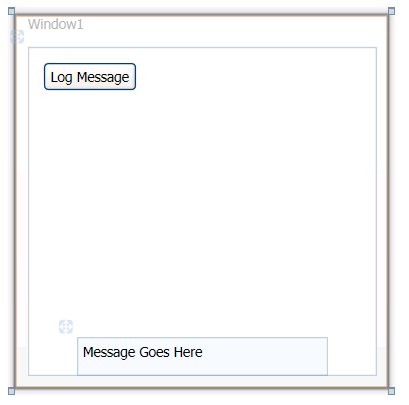
<local:CustomWindowBase x:Class="MessageAreaBlogDemo.Window1"
    xmlns="http://schemas.microsoft.com/winfx/2006/xaml/presentation"
    xmlns:x="http://schemas.microsoft.com/winfx/2006/xaml"
    xmlns:local="clr-namespace:MessageAreaBlogDemo"
    Title="Window1" Height="300" Width="300">
    <Grid>
        <Button Height="23" HorizontalAlignment="Left" Margin="12,12,0,0" Name="button1"
                VerticalAlignment="Top" Width="75" Click="button1_Click">Log Message</Button>
        <local:MessageArea VerticalAlignment="Bottom" Width="200"/>
    </Grid>
</local:CustomWindowBase>
Now, in the code behind for the Window, simply have the "Click" handler fire the event with an appropriate message. I just have it display the date/time so that you can see the seconds refresh to verify that it is working:
private void button1_Click(object sender, System.Windows.RoutedEventArgs e)
{
    this.PublishMessage(sender, "Date/Time:" + System.DateTime.Now.ToString());
}
Conclusions
Any number of message areas could be added to a Window, and they will all register with the delegate and display the message when the event fires; likewise, windows that inherit from the custom base class don't have to have a message area, the event just won't fire.