Sending emails using MvcMailer
MvcMailer is an interesting component that you can use for sending emails in ASP.NET MVC Framework. The very great thing is that it uses Razor view engine views as email templates and is pretty easy to setup and use. In this article you will see how to install it, setup email templates and send emails…
1. INSTALLATION
- First of all, create new ASP.NET MVC project (or use one you are already developing…)
- The next thing is to install the component. The component can be installed using NuGet Package Manager (PowerShell console or NuGet Packages Dialog) or you can get the source code directly from the Github repository here.
Installing using NuGet Package Manager
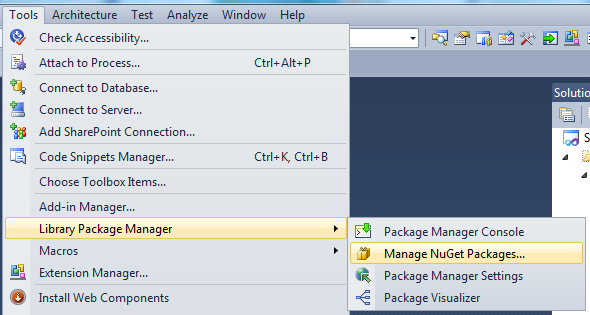
If you want to install it using NuGet Packages Manager Dialog, you can find it on Visual Studio.NET 2010 in Tools –> Library Package Manager –> Manage NuGet Packages…
and then search for MvcMailer
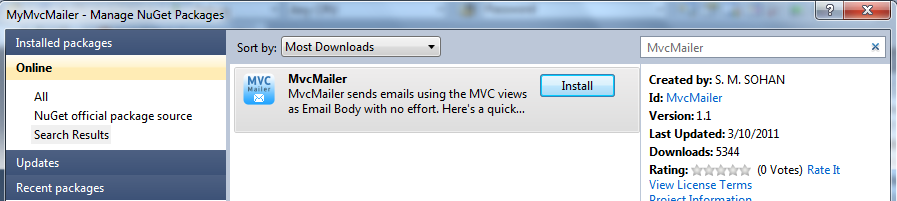
By clicking Install, the NuGet will do all the job for you.
On the other hand (as I always prefer to do), if you use NuGet PowerShell Console, just run the following command:

Once you run the command, following log in the console has been generated in my side:
PM> Install-Package MvcMailer
Attempting to resolve dependency 'T4Scaffolding (≥ 0.9.7)'.
Attempting to resolve dependency 'EntityFramework (≥ 4.1.10311.0)'.
You are downloading EntityFramework from Microsoft, the license agreement to which is available at http://go.microsoft.com/fwlink/?LinkId=224682. Check the package for additional dependencies, which may come with their own license agreement(s). Your use of the package and dependencies constitutes your acceptance of their license agreements. If you do not accept the license agreement(s), then delete the relevant components from your device.
Successfully installed 'EntityFramework 4.1.10715.0'.
Successfully installed 'T4Scaffolding 0.9.9'.
Successfully installed 'MvcMailer 1.1'.
Successfully removed 'EntityFramework 4.1.10331.0' from MyMvcMailer.
Successfully added 'EntityFramework 4.1.10715.0' to MyMvcMailer.
Successfully added 'T4Scaffolding 0.9.9' to MyMvcMailer.
Successfully added 'MvcMailer 1.1' to MyMvcMailer.
NuGet will add MvcMailer.dll to your solution and you are done with installation.
2. SETUP EMAIL SETTINGS & EMAIL TEMPLATES
- Setup Email Settings
General practice in ASP.NET is to setup your email settings in Web.Config. Once you’ve installed MvcMailer, if you open web.config you will see it already have setup default mail settings…
    <system.net>
        <mailSettings>
            <!-- Method#1: Configure smtp server credentials -->
            <smtp from="some-email@gmail.com">
                <network enableSsl="true" host="smtp.gmail.com" port="587" userName="some-email@gmail.com" password="valid-password" />
            </smtp>
            <!-- Method#2: Dump emails to a local directory -->
            <!--
            <smtp from="some-email@gmail.com" deliveryMethod="SpecifiedPickupDirectory">
                <network host="localhost" />
                <specifiedPickupDirectory pickupDirectoryLocation="c:\temp\"/>
            </smtp>
            -->
        </mailSettings>
    </system.net>
Replace your SMTP settings and you are done.
- Setup Default Email Templates
Open NuGet Console and run the following command:
PM> Scaffold Mailer UserMailer Welcome,GoodBye
After running this command, default email templates will be installed in your project. The log should be as follows:
Added MvcMailer output 'Mailers\IUserMailer.cs'
Added MvcMailer output 'Mailers\UserMailer.cs'
Added MyScaffolder output 'Views\UserMailer\_Layout.cshtml'
Added MyScaffolder output 'Views\UserMailer\Welcome.cshtml'
Added MyScaffolder output 'Views\UserMailer\GoodBye.cshtml'
Expand Views –> UserMailer and you will see the following:
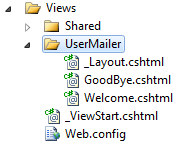
Then expand Mailers folder where you have IUserMailer interface and UserMailer class with implementation for Welcome and GoodBye mail templates.
3. SEND EMAILS
To send email, simply create new Controller (name it whatever you like) and create view for that controller.
Example
Controller: HomeController (add ActionResult Index)
View: Home/Index
To send email, use the following code:
public ActionResult Index()
{
    IUserMailer mailer = new UserMailer();
    mailer.Welcome().Send();
    return View();
}
or even better implementation would be:
private IUserMailer _mailer = new UserMailer();
public IUserMailer Mailer
{
    get { return _mailer; }
    set { _mailer = value; }
}
public ActionResult Index()
{
    Mailer.Welcome().Send();
    return View();
}
You will need to include:
using Mvc.Mailer;
and directive to your ProjectName.Mailers where UserMailer class is implemented.
Open UserMailer.cs and change the Welcome() method code to this:
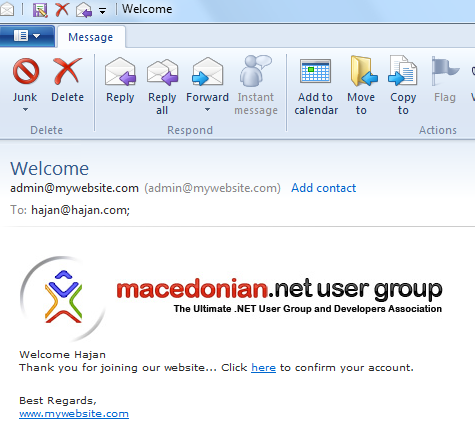
public virtual MailMessage Welcome()
{
    var mailMessage = new MailMessage { Subject = "Welcome" };

    mailMessage.To.Add("hajan@hajan.com");
    ViewBag.Name = "Hajan";
    PopulateBody(mailMessage, viewName: "Welcome");
    return mailMessage;
}
4. PASS DATA TO EMAIL TEMPLATE
You can pass data to email template using ViewBag, ViewData, TempData or strongly typed Model.
5. USE MASTER LAYOUT AND ABSOLUTE URL FOR IMAGES
Since your email templates are Razor views, you can easily use _Layout.cshtml as master layout.
For example, your _Layout.cshtml could be something like this:
<html>
    <head>
        <style type="text/css">
            div { font-family:Verdana, Arial, Sans-Serif; font-size:10px; }
            #mail-message { padding:10px; }
            #mail-footer { padding:10px; }
        </style>
    </head>
    <body>
    <div id="mail-message">
        @RenderBody()
    </div>
    <div id="mail-footer">
        Best Regards,<br />
        <a href="http://www.mywebsite.com">www.mywebsite.com</a>
    </div>
    </body>
</html>
Welcome.cshtml:
Welcome @ViewBag.Name
<br />
Thank you for joining our website...
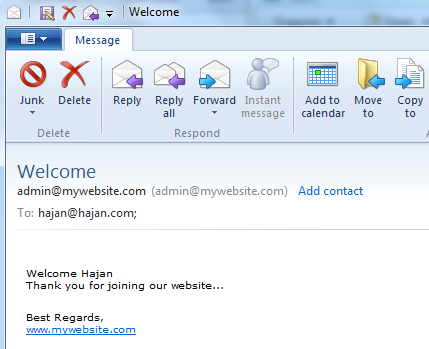
The email sent looks like this:
If you want to add links or images to your email, you have to use Absolute URL to your images… For that purpose, MvcMailer have Abs extension method.
Welcome.cshtml view with image
6. TEST EMAILS WITH WRITING OUT TO TEMP FOLDER
If you don’t want to setup SMTP, you can easily switch to write emails out to C:\temp folder by commenting the SMTP block in web.config and use the Method#2
<smtp from="admin@mywebsite.com" deliveryMethod="SpecifiedPickupDirectory">
    <network host="localhost" />
    <specifiedPickupDirectory pickupDirectoryLocation="c:\temp\"/>
</smtp>
Try to send email and open the C:\Temp folder.
7. BONUS STUFF…
You can see that MvcMailer is very good component that can help you sending emails on an very easy way by using razor (or any other view engine) views as email templates. We have generated Welcome and GoodBye views, but you can also generate other mailers as well, using the following command (example):
Scaffold Mailer NotficationMailer FriendRequest, FriendsMessage, Follow, Liked
PM> Scaffold Mailer NotficationMailer FriendRequest, FriendsMessage, Follow, Liked
Added MvcMailer output 'Mailers\INotficationMailer.cs'
Added MvcMailer output 'Mailers\NotficationMailer.cs'
Added MyScaffolder output 'Views\NotficationMailer\_Layout.cshtml'
Added MyScaffolder output 'Views\NotficationMailer\FriendRequest.cshtml'
Added MyScaffolder output 'Views\NotficationMailer\FriendsMessage.cshtml'
Added MyScaffolder output 'Views\NotficationMailer\Follow.cshtml'
Added MyScaffolder output 'Views\NotficationMailer\Liked.cshtml'
MvcMailer gives you very clean and easy way for having mail sender feature in your ASP.NET MVC web applications. By using Views as templates, you can use the powerful Razor to easily create, update and maintain your email templates.
Hope this was useful and helpful post.
Regards,
Hajan