Maintain Browser History with AJAX

Most of you out there would have noticed that browser history button doesn’t work if you are using AJAX. Instead of rolling forward or backward the AJAX step they actually move the complete page. This can be a nightmare for users that always tend to use them.

AJAX has a very nice feature known as History Points that allow the browser to keep track of AJAX steps and therefore move through them using forward and backward buttons.

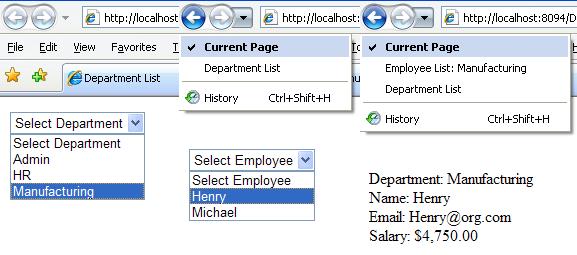
Let’s understand how History Points work through a simple example. We have a page that show company’s departments in a drop down list. On selecting one, the page shows the employees working in that department in a list; on selecting the employee it shows employee details like name, email, salary etc.  Employee information is stored in Employee class.

    public class Employee
    {
        public string Name { get; set; }
        public string Dept { get; set;}
        public string Email { get; set; }
        public int Salary { get; set; }
    }

Our aspx page has three update panels as follows:

    <asp:ScriptManager ID="SManager" runat="server"></asp:ScriptManager>
        <asp:UpdatePanel ID="DeptUpdPanel" runat="server">
            <ContentTemplate>
                <asp:Panel ID="DeptPanel" runat="server" Visible="True">
                    <asp:DropDownList ID="DrpDept" runat="server"
                    AutoPostBack="True"
                    OnSelectedIndexChanged="DeptDrp_SelectedIndexChanged">
                        <asp:ListItem Text="Select Department" Selected="true" />
                        <asp:ListItem Text="Admin" />
                        <asp:ListItem Text="HR" />
                        <asp:ListItem Text="Manufacturing" />
                    </asp:DropDownList>                    
                </asp:Panel>
            </ContentTemplate>
        </asp:UpdatePanel>
        <asp:UpdatePanel ID="EmpUpdPanel" runat="server">
            <ContentTemplate>
                <asp:Panel ID="EmpPanel" runat="server" Visible="False">
                    <asp:DropDownList ID="DrpEmployee" runat="server"
                    AutoPostBack="True"
                    OnSelectedIndexChanged="EmpDrp_SelectedIndexChanged">
                    </asp:DropDownList>                   
                </asp:Panel>
            </ContentTemplate>
        </asp:UpdatePanel>
        <asp:UpdatePanel ID="DetailUpdPanel" runat="server">
            <ContentTemplate>
                <asp:Panel ID="DetailPanel" runat="server" Visible="False">
                    Department: <asp:Label runat="server" ID="LblDept"/></asp:Label><br>
                    Name: <asp:Label runat="server" ID="LblName"/></asp:Label><br>
                    Email: <asp:Label runat="server" ID="LblEmail"/></asp:Label><br>
                    Salary: <asp:Label runat="server" ID="LblSalary"/<br>
                </asp:Panel>
            </ContentTemplate>

        </asp:UpdatePanel>

The code behind is very simple and contains event handlers for drop down selected index change. The DeptDrp_SelectedIndexChanged generate test employee data and stores them in a generic list named Employees. The handler uses a basic LINQ query to retrieve employee data for selected department.

        protected void DeptDrp_SelectedIndexChanged(object sender, EventArgs e)
        {
            if (Session["Employees"] == null)
            {
                Employees = new List<Employee>(new Employee[]{
                    new Employee(){Name = "David",
                        Dept="HR", Email = "David@org.com",
                        Salary = 2000},
                    new Employee(){Name = "George",
                        Dept="Admin", Email = "George@org.com",
                        Salary = 2500},
                    new Employee(){Name = "Bill",
                        Dept="Admin", Email = "Bill@org.com",
                        Salary = 6000},
                    new Employee(){Name = "Henry",
                        Dept="Manufacturing", Email = "Henry@org.com",
                        Salary = 4750},
                    new Employee(){Name = "Michael",
                        Dept="Manufacturing", Email = "Michael@org.com",
                        Salary = 8000},
                });
 
                Session["Employees"] = Employees;
            }
            else
            {
                Employees = (List<Employee>)Session["Employees"];
            }
            DeptPanel.Visible = false;
            EmpPanel.Visible = true;
            var Emp = from E in Employees
                      where E.Dept == DrpDept.SelectedValue
                      select new { E.Name };
            DrpEmployee.DataSource = Emp;
            DrpEmployee.DataValueField = "Name";
            DrpEmployee.DataBind();
            DrpEmployee.Items.Insert(0, "Select Employee");

        }

The EmpDrp_SelectedIndexChanged handler displays the employee details for the selected employee.

        protected void EmpDrp_SelectedIndexChanged(object sender, EventArgs e)
        {
            Employees = (List<Employee>)Session["Employees"];
            EmpPanel.Visible = false;
            DetailPanel.Visible = true;
            var Emp = from E in Employees
                      where E.Name == DrpEmployee.SelectedValue
                      select new { E.Name, E.Email, E.Dept, E.Salary };
 
            foreach (var EDetail in Emp)
            {
                LblDept.Text = EDetail.Dept;
                LblEmail.Text = EDetail.Email;
                LblName.Text = EDetail.Name;
                LblSalary.Text = EDetail.Salary.ToString("C");
            }

        }

When the project is Build, Run and navigated, you will notice that the browser history buttons are disabled because the browser has no clue regarding the AJAX steps.

To overcome this problem we will have to introduce History Points to the scene. To maintain history we first need to enable it in script manager and specify an event handler that will be invoked when browser history buttons are clicked. The script manager tag will look like this:

    <asp:ScriptManager ID="SManager" runat="server"

    EnableHistory=true

    OnNavigate="History_Navigate" />

We would need to insert two history points as there are two AJAX postbacks being performed, one at the end of DeptDrp_SelectedIndexChanged and other at the end of EmpDrp_SelectedIndexChanged. For this create a method Add_History as follows:

        private void Add_History(string Title)
        {
            NameValueCollection State = new NameValueCollection();
            State.Add("DeptIndex", DrpDept.SelectedIndex.ToString());
            State.Add("EmployeeIndex", DrpEmployee.SelectedIndex.ToString());
            SManager.AddHistoryPoint(State, Title);

        }

To create history point we call AddHistoryPoint function of the script manager. This method allow to maintain current state of the page by storing it in a NameValueCollection along with history point's title that is displayed in the browser. This saved state is then used to render the page when browser history buttons are clicked.

To add history point on DeptDrp_SelectedIndexChanged we write the following code at the end of the handler:

        if (SManager.IsInAsyncPostBack && !SManager.IsNavigating)

            Add_History("Employee List: " + DrpDept.SelectedValue);

!SManager.IsNavigating indicates that the postback didn't occurred as a result of the user clicking the back or forward button. In the same way we add a history point in EmpDrp_SelectedIndexChanged:

        if (SManager.IsInAsyncPostBack && !SManager.IsNavigating)

            Add_History("Employee Detail:" + DrpEmployee.SelectedItem.Text);

Note that when the first history point is added the value of DrpEmployee.SelectedIndex is zero therefore the state will have EmployeeIndex value set to 0 which identifies that it's the first of AJAX steps. However the second history point will have values in both EmployeeIndex and DeptIndex. Additionally, when the page is initially loaded and department list is displayed there is no state thus DeptIndex and EmployeeIndex are both null. We will use these assumptions to re-create page when History_Navigate handler is called by clicking Backward / Forward buttons.

        protected void History_Navigate(object sender, HistoryEventArgs e)
        {
            NameValueCollection State = e.State;
            string DeptIndex = State["DeptIndex"];
            string EmployeeIndex = State["EmployeeIndex"];
 
            //Set DeptIndex = "0" when its null
            DeptIndex = string.IsNullOrEmpty(DeptIndex)
                ? "0" : DeptIndex;
            EmployeeIndex = string.IsNullOrEmpty(EmployeeIndex)
                ? "0" : EmployeeIndex;
 
            //Dept List View
            if (DeptIndex == "0")
            {
                DeptPanel.Visible = true;

                EmpPanel.Visible = false;

                DetailPanel.Visible = false;
            }
            //Employee List View
            if (DeptIndex != "0" && EmployeeIndex == "0")
            {
                DeptPanel.Visible = false;
                EmpPanel.Visible = true;
                DetailPanel.Visible = false;
            }
            //Employee Detail View
            if (EmployeeIndex != "0")
            {
                DeptPanel.Visible = false;
                EmpPanel.Visible = false;
                DetailPanel.Visible = true;
            }

        }

The History_Navigate handler gets the current state from HistoryEventArgs and uses the values of DeptIndex and EmployeeIndex to hide / show each panel. Build, Run and navigate through the project, the output will look like:

We have successfully added browser history for AJAX calls and can navigate forward / backward. One important point to be mentioned here is that history points are stored in browser as URLs and the history state is maintaned in those. The maximum size of URL can only be 1024 chars so caution needs to be taken to store minimum information in history state.

kick it on DotNetKicks.com

2 Comments

Comments have been disabled for this content.