Dev Blog - Johan Danforth
I'm Johan Danforth and this is my dev blog - a mix of .NET, ASP.NET, Rest, Azure and some other random coding stuff.
-
Lazy Loading TreeView Sample with ASP.NET MVC and jqTree
I’ve been looking for a lightweight TreeView library to use with ASP.NET MVC, and I think I’ve found my “weapon of choice” – jqTree.
The code is available on https://github.com/mbraak/jqTree and the author mbraak (Marco Braak) is very active in the “issues” section answering questions from users.
The package is not available on Nuget at the moment though, but it’s easy enough to download and set up manually.
Download and unzip the code from Github, copy the files jqtree.css and jqtree-circle.png to your /Content folder, and copy the tree.jquery.js file to your /Scripts folder. Then open up your /App_Start/BundlesConfig.cs file and add the files to your bundles, something like this:
  bundles.Add(new ScriptBundle("~/bundles/bootstrap").Include(
                      "~/Scripts/bootstrap.js",
                      "~/Scripts/tree.jquery.js",
                      "~/Scripts/respond.js"));

  bundles.Add(new StyleBundle("~/Content/css").Include(
                      "~/Content/bootstrap.css",
                      "~/Content/jqtree.css",
                      "~/Content/font-awesome.min.css",
                      "~/Content/site.css"));
Add this viewmodel to hold the treeview node data:
public class Node
{
    public string label { get; set; }
    public string id { get; set; }
    public bool load_on_demand { get; set; }

    public Node(string label, string id, bool loadOnDemand = true)
    {
        this.label = label;
        this.id = id;
        this.load_on_demand = loadOnDemand;
    }
}
Then create a controller method in HomeController.cs which will be called on-demand/lazily by the TreeView control in your HTML-view. My action is called /Home/Nodes and takes and optional “node” parameter which holds the id of the treeview-node being “expanded”. This is some simple test-code using the local computer folder structure on the D-drive just to try it out. If it’s a folder I’m passing “true” to the load_on_demand property of the jqTree javascript model:
public ActionResult Nodes(string node)
{
    Debug.WriteLine("id=" + node);
    var list = new List<Node>();
    if (node == null)
    {
        var items = Directory.GetFileSystemEntries("D:/");
        foreach (var item in items)
        {
            list.Add(new Node(Path.GetFileName(item), item, Directory.Exists(item)));
        }
    }
    else
    {
        var items = Directory.GetFileSystemEntries(node);
        foreach (var item in items)
        {
            list.Add(new Node(Path.GetFileName(item), item, Directory.Exists(item)));
        }
    }
    return Json(list, JsonRequestBehavior.AllowGet);
}
In your Razor HTML-view, the base for the TreeView control is a simple <div> tag, with an data-url attribute pointing at the method it should call to get data:
<div id="tree1" data-url="/home/nodes"></div>
and finally some javascript/jquery to initialize the TreeView and add some handling, this code loads the treeview, sets the icons I would like to have (from font-awesome) and adds a click-handler which just writes out the selected node name to the console.
@section scripts {
    <script language="javascript" type="text/javascript">

        $(function () {
             $('#tree1').tree({
                closedIcon: $('<i class="fa fa-plus"></i>'),
                openedIcon: $('<i class="fa fa-minus"></i>'),
                dragAndDrop: false,
                selectable: false
            });

            // bind 'tree.click' event
            $('#tree1').bind(
                'tree.click',
                function (event) {
                    // The clicked node is 'event.node'
                    var node = event.node;
                    console.log('clicked ' + node.name );
                }
            );
        });

    </script>
}
This is all you need to do, and it’s possible (and quite easy too) to modify the look of the tree in the view, have your own icons and such. Ask questions in the “issues” section of the project and I’m sure you’ll get your answers - https://github.com/mbraak/jqTree/issues
Thanks to mbraak for cool stuff, me likes

-
AppBarButton Icons for Universal Apps
This is a good page showing the available AppBarButton icons for your Windows 8.1 and Windows Phone 8.1 universal apps.
http://msdn.microsoft.com/en-us/library/windows/apps/xaml/jj841127.aspx
-
Converting from Silverlight To Universal Apps – MVVM, ListView and Commands
Converting a Windows Phone Silverlight app to a Universal WinRT app isn’t straight forward, and it’s hard to Google for answers. I converted one of my not too advanced apps to universal Windows/Phone and here are some of the things I had to do. The quick-list for Xaml changes is here.
I’m using MVVMLight because it makes it so much easier to develop apps. When developing the Silverlight app I used Interation.Triggers and EventTrigger/EventToCommand to fire off commands in my ViewModel from clicked ListBox items. When converting to universal/winrt I ran into problems with referencing the Microsoft.Expression.Interactions assemblies for the Windows and Windows Phone projects so I decided to code up a simple ItemClickCommand instead which uses an attach property on the ListView. Based (more or less a replica) on the code by Marco Minerva, the command-class looks like this:
public static class ItemClickCommand
{
    public static readonly DependencyProperty CommandProperty =
        DependencyProperty.RegisterAttached("Command", typeof (ICommand),
            typeof (ItemClickCommand), new PropertyMetadata(null, OnCommandPropertyChanged));

    public static void SetCommand(DependencyObject d, ICommand value)
    {
        d.SetValue(CommandProperty, value);
    }

    public static ICommand GetCommand(DependencyObject d)
    {
        return (ICommand) d.GetValue(CommandProperty);
    }

    private static void OnCommandPropertyChanged(DependencyObject dependencyObject, DependencyPropertyChangedEventArgs dependencyPropertyChangedEventArgs)
    {
        var listView = dependencyObject as ListViewBase;
        if (listView != null)
            listView.ItemClick += (sender, itemClickEventArgs) =>
            {
                var viewBase = sender as ListViewBase;
                var command = GetCommand(viewBase);

                if (command != null && command.CanExecute(itemClickEventArgs.ClickedItem))
                    command.Execute(itemClickEventArgs.ClickedItem);
            };
    }
}
The command in the ViewModel is set up like this:public class SportsViewModel : ViewModelBase
{
public ObservableCollection<Sport> Sports { get; set; }
public RelayCommand<Sport> SportSelected { get; private set; }
public SportsViewModel()
{
SportSelected = new RelayCommand<Sport>(sport =>
{
if (sport == null) return; //should not happen
_navigationService.NavigateTo(typeof(LeaguesView), sport.Id);
});
}
//and so on...
}And this is how I use this command in the XAML view:<ListView IsItemClickEnabled="True" SelectionMode="None"
commands:ItemClickCommand.Command="{Binding SportSelected}"
ItemsSource="{Binding Sports}" >
<ListView.ItemTemplate>
<DataTemplate>
<TextBlock Text="{Binding Name}" />
</DataTemplate>
</ListView.ItemTemplate>
</ListView>Remember to set the IsItemClickEnabled and SelectionMode properties for your ListView or nothing will happen when you click the items in the list

-
Converting from Silverlight To Universal Apps – Themes and Styles
Converting a Windows Phone Silverlight app to a Universal WinRT app isn’t straight forward, and it’s hard to Google for answers. I converted one of my not too advanced apps to universal Windows/Phone and here are some of the things I had to do. The quick-list for Xaml changes is here.
In my Windows Phone Silverlight app I used a whole bunch of built in static resources for the control styles. You’ll have to go through them all and create your own or use new ones that work well on both Windows-devices and the Phone. To get better control of how controls are styled for shared views in Windows and Phone, I create 2 different MyStyles.xaml resources and place one in each project, then reference them in the App.xaml like this:
<Application
    x:Class="Danforth.Matchkalender.App"
    xmlns="http://schemas.microsoft.com/winfx/2006/xaml/presentation"
    xmlns:x="http://schemas.microsoft.com/winfx/2006/xaml"
    xmlns:viewModel="using:danforth.matchkalender.matchkalender.ViewModel">
    <Application.Resources>
        <ResourceDictionary >
            <ResourceDictionary.MergedDictionaries>
                <ResourceDictionary Source="ms-appx:///MyStyles.xaml"></ResourceDictionary>
            </ResourceDictionary.MergedDictionaries>
            <!-- MVVMLight viewmodel locator -->
            <viewModel:ViewModelLocator x:Key="Locator" />
        </ResourceDictionary>
    </Application.Resources>
</Application>
This way I can fine tune font sizes and such in both Windows and Phone view. The MyStyles.xaml for the Windows project may look like this:And in the same file in the Windows Phone project I can actually use a resource that displays the phone accent color:<!-- WINDOWS -->
<ResourceDictionary
xmlns="http://schemas.microsoft.com/winfx/2006/xaml/presentation"
xmlns:x="http://schemas.microsoft.com/winfx/2006/xaml">
<Style x:Key="MyTitleStyle" TargetType="TextBlock">
<Setter Property="FontSize" Value="40"></Setter>
<Setter Property="Foreground" Value="DarkOliveGreen"></Setter>
</Style>
<Style x:Key="MyGameDetailsBigStyle" TargetType="TextBlock">
<Setter Property="FontSize" Value="60"></Setter>
</Style>
<Style x:Key="MyDateBorderStyle" TargetType="Border">
<Setter Property="Height" Value="100" />
<Setter Property="Width" Value="100" />
</Style>
</ResourceDictionary><!-- WINDOWS PHONE -->
<ResourceDictionary
xmlns="http://schemas.microsoft.com/winfx/2006/xaml/presentation"
xmlns:x="http://schemas.microsoft.com/winfx/2006/xaml">
<Style x:Key="MyTitleStyle" TargetType="TextBlock">
<Setter Property="FontSize" Value="30"></Setter>
<Setter Property="Foreground" Value="{ThemeResource PhoneAccentBrush}"></Setter>
</Style>
<Style x:Key="MyGameDetailsBigStyle" TargetType="TextBlock">
<Setter Property="FontSize" Value="30"></Setter>
</Style>
<Style x:Key="MyDateBorderStyle" TargetType="Border">
<Setter Property="Height" Value="60" />
<Setter Property="Width" Value="60" />
</Style>
</ResourceDictionary> -
Converting from Silverlight To Universal Apps – Xaml Stuff
Converting a Windows Phone Silverlight app to a Universal WinRT app isn’t straight forward, and it’s hard to Google for answers. I converted one of my not too advanced apps to universal Windows/Phone and here are some of the things I had to do.
The xaml needs a lot of changes… and here’s the quick-list of things I needed to change in my XAML views to make them work in universal winrt.
The XAML quick-list
1) In the “header”, change the type PhoneApplicationPage to Page (obviously in the code behind too).
2) Remove the SupportedOrientation and Orientation properties from the Page tag.
3) Remove the SystemTray properties from the Page tag.
4) Remove all references to StaticResource-properties that reference Phone* stuff.
5) If you use TransitionService-stuff from the Windows Phone Toolkit – remove them! You get basic transitions set up for free in the new App-class you get from a new universal project.
6) If you use transparent background in your page, grid or controls, change to the new ThemeResource ApplicationPageBackgroundThemeBrush. This will reflect the theme background on your phone and/or computer and works as expected on Windows too.
7) Change your ListBox controls to ListView.
8) Convert your ApplicationBar to use the new BottomAppBar instead.
I’ll post some more details about commands and styles soon.
-
Kindle Halo and Cortana Wallpapers
There are hundreds of wallpapers for your (jailbreaked) Kindle out there, and I created a couple of my own for the Halo books I’m reading now.
Cheers!
-
Move e-books from Adobe Digital Editions to Kindle with Calibre
Just so you know – if you bought books that are not available from Amazon (like Swedish books) and want to read them on your Kindle – there is a plugin for Calibre that will help you do that. Just saying. http://bit.ly/1huf42M
-
Form Validation Formatting in ASP.NET MVC 5 and Bootstrap 3
When creating a new MVC project in ASP.NET MVC 5, Bootstrap is already included. For some reason proper formatting for form errors (the red colored error message and the red border around the controls) are not working. There are loads of articles and blog posts how to change this and that to enable this, but in ASP.NET MVC 5, the only thing you actually have to do is add a few classes to your Site.css file. Why they aren’t in there from the outset I don’t know.
Site.css
/* styles for validation helpers */
.field-validation-error {
    color: #b94a48;
}

.field-validation-valid {
    display: none;
}

input.input-validation-error {
    border: 1px solid #b94a48;
}


select.input-validation-error {
    border: 1px solid #b94a48;
}

input[type="checkbox"].input-validation-error {
    border: 0 none;
}

.validation-summary-errors {
    color: #b94a48;
}

.validation-summary-valid {
    display: none;
}
Sample form.cshtml
@model WebApplication6.Models.TestModel

@{
    ViewBag.Title = "Home Page";
}
<br /><br />

@using (Html.BeginForm("Index", "Home", FormMethod.Post, new { @class = "form-horizontal", role = "form" }))
{
    <div class="form-group">
        @Html.LabelFor(m => m.Name, new { @class = "col-md-2 control-label" })
        <div class="col-md-10">
            @Html.TextBoxFor(m => m.Name, new { @class = "form-control" })
            <br />
            @Html.ValidationMessageFor(m => m.Name)
        </div>
    </div>
    <div class="form-group">
        @Html.LabelFor(m => m.GenderId, new { @class = "col-md-2 control-label" })
        <div class="col-md-10">
            @Html.DropDownListFor(m => m.GenderId, new SelectList(Model.Genders, Model.GenderId), "", new { @class = "form-control" })
            <br />
            @Html.ValidationMessageFor(m => m.GenderId)
        </div>
    </div>


    <div class="form-group">
        <div class="col-md-offset-2 col-md-10">
            <input type="submit" class="btn btn-default" value="OK" />
        </div>
    </div>
}
Sample TestModel.cs
public class TestModel
{
   [Required(ErrorMessage = "Name is required")]
   [MinLength(3, ErrorMessage = "Name must be at least 3 letter")]
   public string Name { get; set; }
   [Display(Name= "Gender")]
   [Required(ErrorMessage = "Gender is required")]
   public string GenderId { get; set; }

   public string[] Genders = new[] {"Male", "Female"};
} -
Subsequent calls to AcquireToken()
Using the Active Directory Authentication Library (ADAL) and getting that annoying flash from the authentication dialog on subsequent calls? Maybe you’re creating a new AuthenticationContext every time? In that case the call to AcquireToke() by the context cannot keep and lookup the cached token and refreshtokens. You should try to keep a cached or static version of the AuthenticationContext alive between calls. Something like this of you’re calling a web api or similar:
private static readonly AuthenticationContext AuthenticationContext = new AuthenticationContext("https://login.windows.net/domain.com");

private static AuthenticationResult GetAuthenticationToken()
{
    var acquireToken = AuthenticationContext.AcquireToken("https://domain.com/WebApp-something.azurewebsites.net", //resource id of the web api
        "acca2f90-5f76-45b5-8ec3------", //the client id
        new Uri("https://domain.com/YourClientRedirectUrl"));    //client redirect url

    return acquireToken;
}

public static async Task<string> GetRequestAsync(string requestUri)
{
    var client = new HttpClient();
    var request = new HttpRequestMessage(HttpMethod.Get, requestUri);
    var authorizationHeader = GetAuthenticationToken().CreateAuthorizationHeader();
    request.Headers.TryAddWithoutValidation("Authorization", authorizationHeader);
    var response = await client.SendAsync(request);
    var responseString = await response.Content.ReadAsStringAsync();
    Debug.WriteLine(responseString);
    return responseString;
} -
Secure ASP.NET Web API with Windows Azure AD
Note that the APIs, tools and methods change quickly in this area, this blog post will get old and die eventually…
Many organizations now look at the Azure environment to host their websites and web APIs, and some decide to move their mail and Active Directory too. Now with the latest updates and previews in Azure, you’re able to secure your web APIs with Azure AD. Vittorio Bertocci wrote an article for MSDN Magazine about Secure ASP.NET Web API with Windows Azure AD and Microsoft OWIN Components and it worked fine up until a couple of weeks ago when things moved around in these parts of Azure

I will try to describe in detail how to secure your web API with Azure Active Directory now, using Visual Studio 2013 and the preview of ADAL (Active Directory Authentication Library) package.
Create a web API project
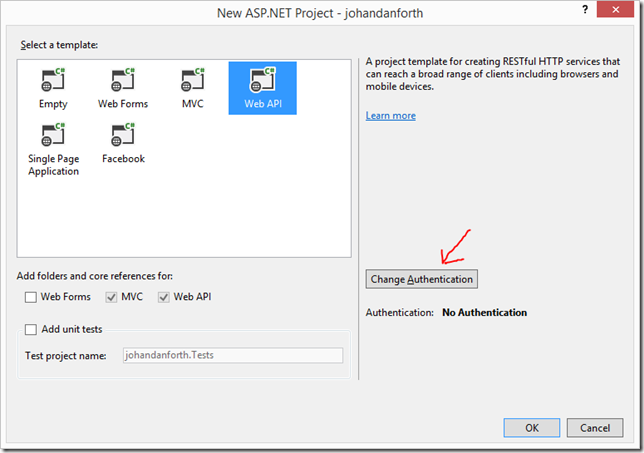
Fire up Visual Studio and create a new ASP.NET Web Application. I’m calling mine “johandanforth”, I’m selecting “Web API” and click the “Change Authentication”
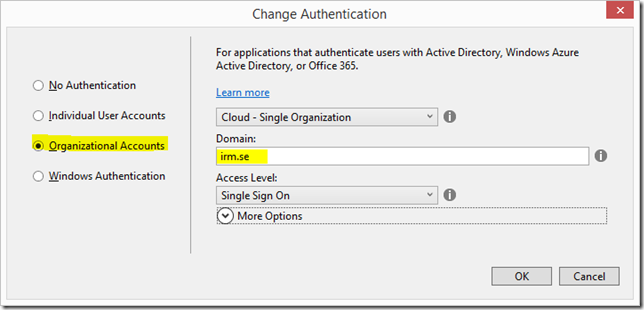
In the next dialog, click “Organizational Account” and enter the domain of your Azure AD tenant, in my case it’s “irm.se”:
After you press “OK” you’ll be asked to login with your Azure AD account, then “OK” again and Visual Studio will create a web application resource in your Azure AD. Now look it up in the Azure Management application. Note that you may have to log out and in again or restart the Azure management web app to see the newly created application.
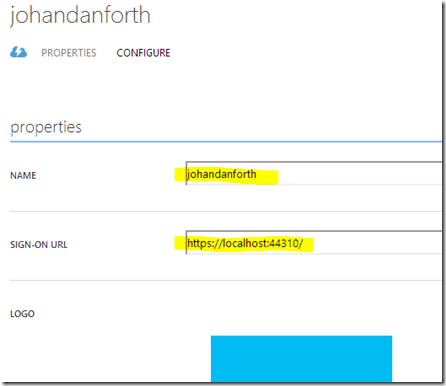
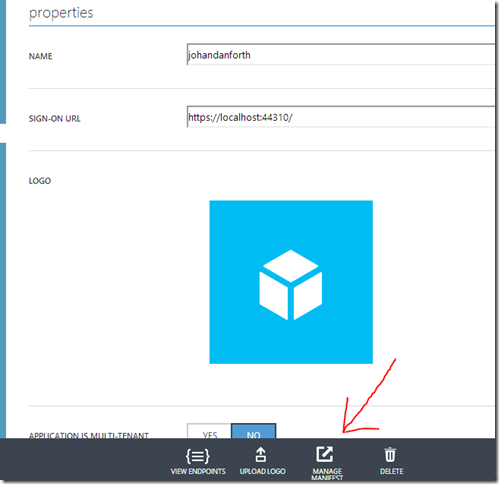
In my case the application has been named “johandanforth” and is for securing your development project on localhost. The SIGN-ON URL (also called the APP URL in the management application) is https://localhost:44310/ which can be seen both on the applications overview and if you click on the application and go to the CONFIGURE “tab”:
The sign-on url should be the same as where the web API is hosted, in this case the same localhost-settings as you got in the development project web-settings.
Open up web.config of your web API project and have a look at these settings:
    <add key="ida:Audience" value="https://irm.se/johandanforth" />
    <add key="ida:ClientID" value="d169beb7-34bc-441b-8b93-87e3181a1132" />
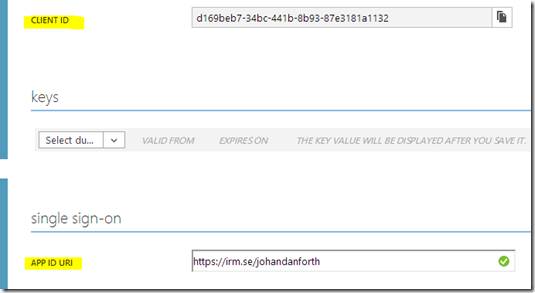
The “ida:Audience” in web.config correspond to the value of APP ID URI of the application resource in the management portal and the “ida:ClientID” correspond to the CLIENT ID in the portal.
Update the web application manifest
Before you any application can access this resource, we must update the “manifest”. Still on the CONFIGURE tab for your web API resource, there should be a MANAGE MANIFEST menu option down at the bottom toolbar. Click it and select “Download Manifest”. It’s a json-text-file, and should save it somewhere where you know is, because we will add a section to it and then upload it again using the same menu option:
Open the json-manifest and replace the "appPermissions": [], section with this:
"appPermissions":[
      {
         "claimValue":"user_impersonation",
         "description":"Allow the application full access to the service on behalf of the signed-in user",
         "directAccessGrantTypes":[

         ],
         "displayName":"Have full access to the service",
         "impersonationAccessGrantTypes":[
            {
               "impersonated":"User",
               "impersonator":"Application"
            }
         ],
         "isDisabled":false,
         "origin":"Application",
         "permissionId":"b69ee3c9-c40d-4f2a-ac80-961cd1534e40",
         "resourceScopeType":"Personal",
         "userConsentDescription":"Allow the application full access to the service on your behalf",
         "userConsentDisplayName":"Have full access to the service"
      }
   ],
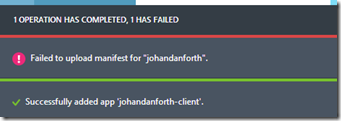
At the moment, there doesn’t seem to much in way of documentation on this manifest file, but it should work without modifications. I’ll try to write something about this manifest file as soon as I get some more docs on it.Next thing you do is upload the modified manifest file. Note that the portal may give you an error message during upload, but things seems to work anyway! It may look like this:Create a client
Now let’s try and access the sample ValuesController Web API in your development environment using a web browser, Fiddler or similar. In my case it’s https://localhost:44309/api/values and you should get a HTTP/1.1 401 Unauthorized error back. To be able to access the protected resource, you must add a client resource in the AD and configure it to access the web API.
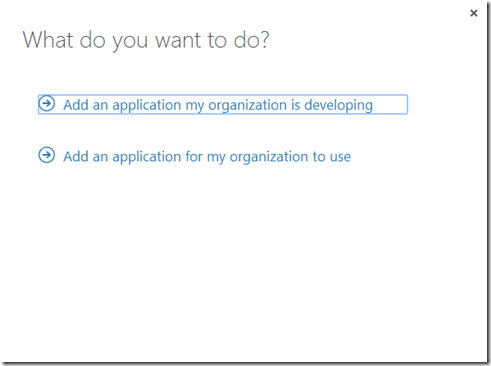
If you are not there already, in the Azure management portal, go to Active Directory, click on your domain name and select the APPLICATIONS tab. Then click the ADD-icon down the center of the bottom toolbar. Then go ahead and select “Add an application my organization is developing”:
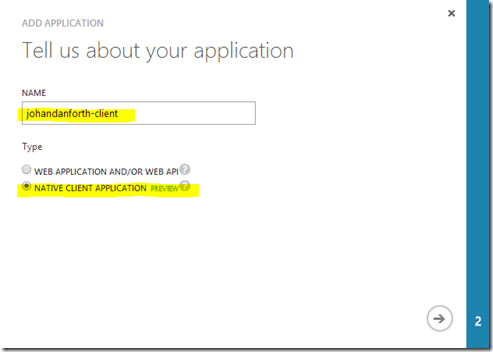
Enter a name for your client (I’m going with “johandanforth-client”, and make sure you select NATIVE CLIENT APPLICATION because we’re going to write a simple Windows WPF client to call our web API:
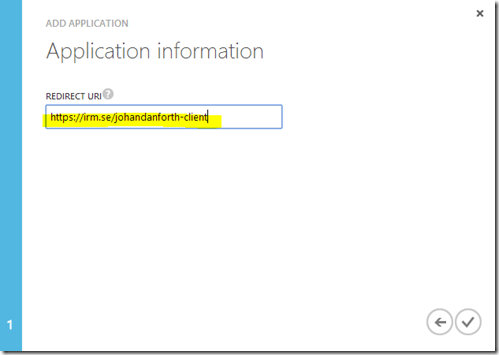
On the second page, type in a redirect url for your client – it can be anything as long as it is a valid url. I’m going with https://irm.se/johandanforth-client.
Your client is now created, but the last step to do is to give permission to our web API. Scroll down to the bottom of the client application CONFIGURE page and look at the “permissions to other applications (preview)” section. In the dropdown marked “select application” you should be able to see and select your web API. You must also select the “Delegated permissions” dropdown and mark the only option available for you. As you can see, the description matches the text in the manifest file:
Remember to SAVE!
Almost there, hang on…
Create a Windows WPF application for testing
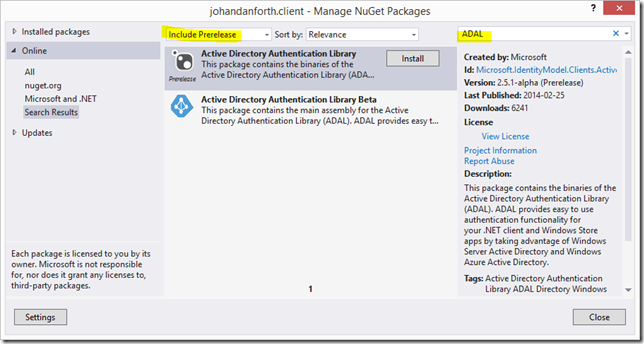
Add a new Windows WPF Application to your solution, I’m calling it “johandanforth.client”, and create a button with a click-event or something to hold the code that will authenticate and get values from your API. Bring up NuGet and search for “ADAL”, make sure you have “Include Prerelease” selected:
Install the prerelease package from February 2014 (it will probably be updated soon), then paste this code into the click-event of that button you created earlier:
using System;
using System.Net.Http;
using System.Windows;
using Microsoft.IdentityModel.Clients.ActiveDirectory;

namespace johandanforth.client
{
    public partial class MainWindow : Window
    {
        public MainWindow()
        {
            InitializeComponent();
        }

        private async void Button_Click(object sender, RoutedEventArgs e)
        {
            //this is to accept dev certificates - do not use in production!
            System.Net.ServicePointManager.ServerCertificateValidationCallback = ((a, b, c, d) => true);

            var ac = new AuthenticationContext("https://login.windows.net/irm.se");   //ad domain = irm.se

            var ar1 = ac.AcquireToken("https://irm.se/johandanforth",   //app id uri of the web api
              "91b4bc31-92c2-4699-86f5-fa84a718da30",                   //the client id
              new Uri("https://irm.se/johandanforth-client"));          //the client redirect uri

            var authHeader = ar1.CreateAuthorizationHeader();

            var client = new HttpClient();
            var request = new HttpRequestMessage(HttpMethod.Get, "https://localhost:44310/api/values");
            request.Headers.TryAddWithoutValidation("Authorization", authHeader);
            var response = await client.SendAsync(request);
            var responseString = await response.Content.ReadAsStringAsync();
            MessageBox.Show(responseString);
        }
    }
}
There are a few lines that must be change to work with your sample code. First change the AuthenticaitonContext to match your Azure AD domain/tenant name:
var ac = new AuthenticationContext("https://login.windows.net/irm.se");Next look at the code part which acquires a token – this is when the login dialog pops up and asks the user to log in using his or hers organizational account. This line corresponds to the web API uri, which is the same as the “ida:Audience” in your web.config file, so update it to match that value:
var ar1 = ac.AcquireToken("https://irm.se/johandanforth",
The next line is the client id of the application client you created in Azure AD, look it up and change the id accordingly:
"91b4bc31-92c2-4699-86f5-fa84a718da30",
The last line is the redirect-uri of the client, look it up on the same page in the Azure management portal:
new Uri("https://irm.se/johandanforth-client"));
You must also modify the line with the call to the web API method to match your web server localhost settings:
var request = new HttpRequestMessage(HttpMethod.Get, "https://localhost:44310/api/values");
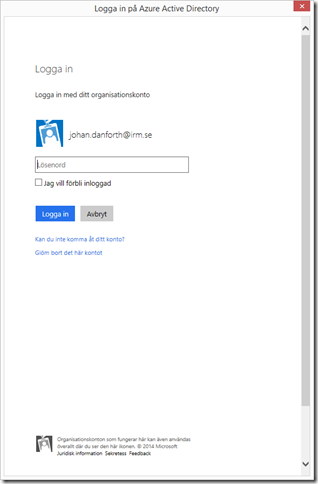
Now, start the web API program in debug mode and wait until you see the Home Page, then right click and start debug of the WPF client. Click the button and you should be prompted to log in with your organizational account (this is the look of it in Swedish):
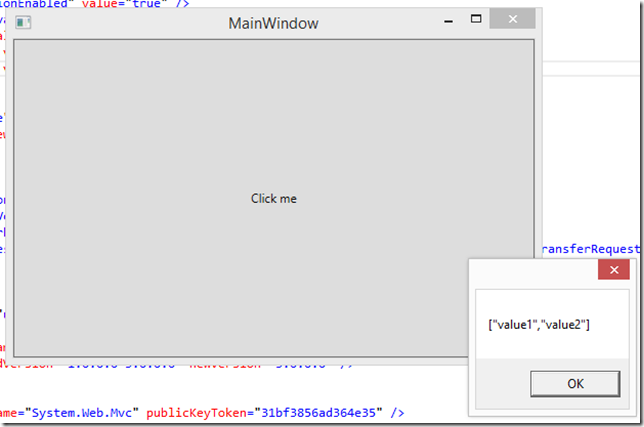
After a successful login, the code continues and you should be greeted with this:
Still with me?
Deploy to Azure
This is all well and good (hopefully), but we want to deploy our web API to Azure and run our clients against it in the cloud. To do that we need to:
1) Create a web site to host our web API in Azure
2) Publish our code to the site
3) Create an Azure AD resource for the web API (VS does this for you)
4) Modify the manifest for the web API (like before)
5) Give the client permission to the new resource (like before)
6) Update web.config and the client code to match the IDs and URIs of the new resources (ida:Audience == APP ID URI == the resource you want to access)
7) Publish the code again (to get the updated web.config uploaded)
8) Run!
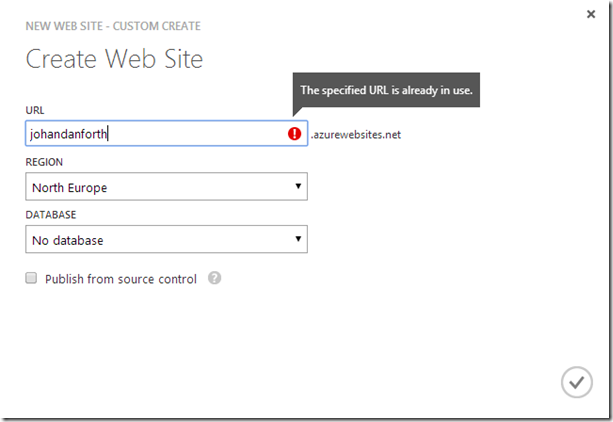
Here’s some quick shots of some of the steps. First create a web site in Azure by selecting “WEB SITES” in the left hand menu of the Azure Portal, press the big plus-sign down in the corner and create a custom web site. I’m calling mine “johandanforth” (ignore the error message
 )
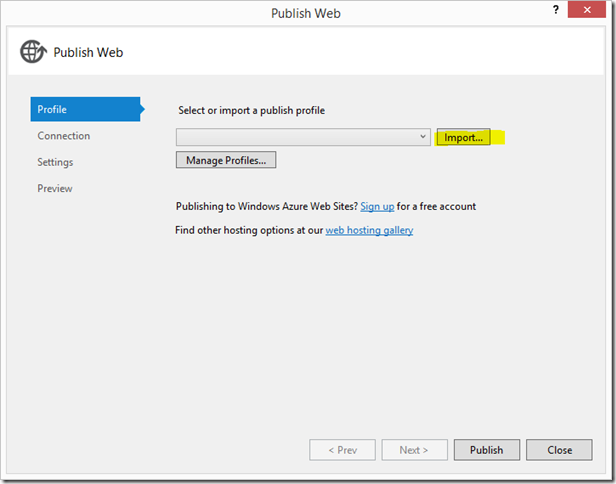
)Now go back to Visual Studio, right click the web API project and select “Publish…”.
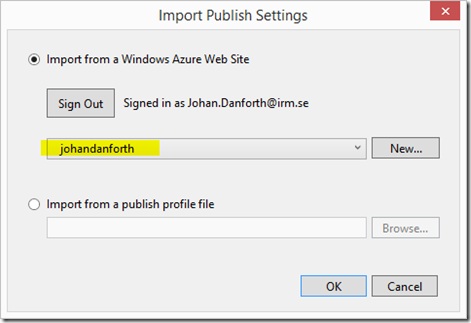
Press the “Import…” button to download and import the publishing profile of the web site you created, and select the newly created Web Site in the dropdown. Click OK.
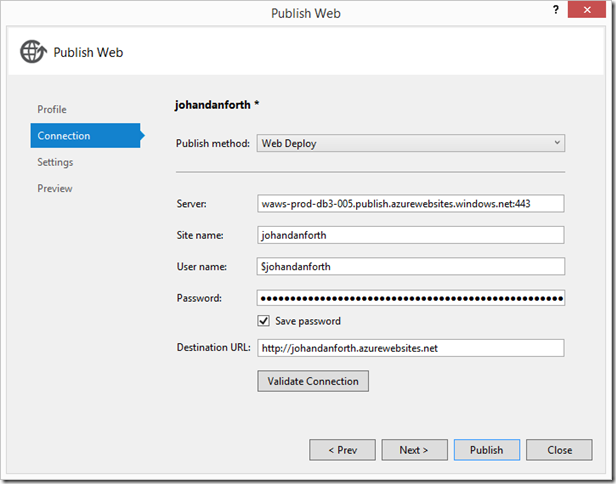
You have to authenticate one or two times to get past these steps, but should finally get to the last step of the Publish process:
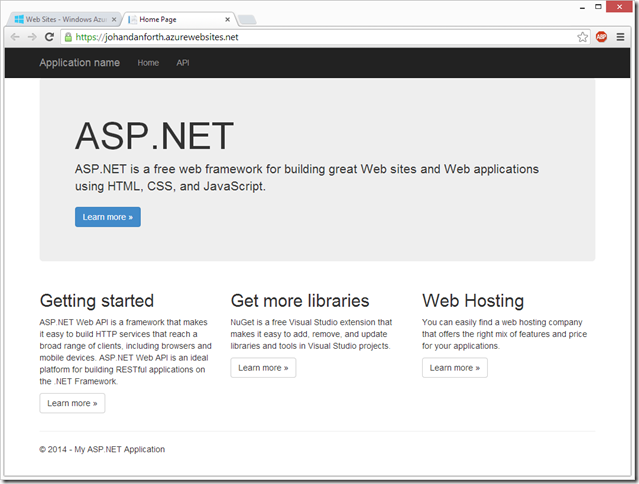
When Visual Studio is done publishing, a browser page will open up with the Home Page showing:
Visual Studio should now have created a new application resource in the Azure Active Directory, so get back to the portal and have a look at the list of AD applications. A resource named “WebApp-xxxxxxxxx.azurewebsites.net” should be listed there. Note – you may have to sign out and sign in to the portal to show the web api resource. This has happened to me a couple of times!
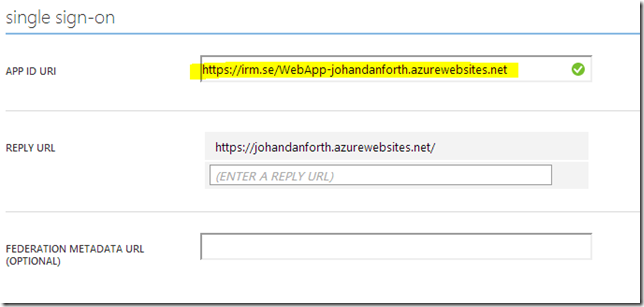
Click on the resource and look at the details in the CONFIGURE tab.
Copy the name of the “APP ID URI” and past it into the “ida:Audience” value in the web.config file of your web API project in Visual Studio:
<add key="ida:Audience" value="https://irm.se/WebApp-johandanforth.azurewebsites.net" />
The same value must also be updated in the WPF client:
var ar1 = ac.AcquireToken(https://irm.se/WebApp-johandanforth.azurewebsites.net,
You must also (of course) update the call to the web API method to point at the web site in the cloud:
var request = new HttpRequestMessage(HttpMethod.Get, "https://johandanforth.azurewebsites.net/api/values");
We’re not done yet though… now you have to do the same steps you did for the localhost resource earlier - download and update the manifest file for the web API resource and give the client resource permission to use the service.
Finally (yes finally) – publish the web API project again to get the updated web.config file to the cloud site!
Once the code is published, you should be able to run the client successfully.
Please give feedback if you have problems with any step/s of this walkthrough. Other questions, bugs and such is better asked on the Windows Azure Active Directory forum. I’m still learning these things and trying to keep up with the changes


