Contents tagged with ASP.NET
-
Build and Debug ASP.NET MVC 5 Framework Web Application 4.x in VS Code
Some of us are stuck with older, brownfield web projects based on Framwork 4.x that has to be supported yet for a while. But we’ve also tasted the sweetness of the still not bloated (dream on suckers, it will be bloated) VS Code and want to use it while it’s still pristine and fast. But is it possible?
Yes, it’s possible
It requires some editing with the launch.json and tasks.json files in the .vscode folder. Hang on and note that I just got this running last night.
Fist, open the folder where your “old” web application is located. In the same directory as your .sln file, create a folder named .vscode. In the .vscode folder, a file called tasks.json, which describes one or more build steps.
tasks.json
{
"version": "2.0.0",
"tasks": [
{
"label": "build",
"type": "shell",
"command": "C:\\Program Files (x86)\\Microsoft Visual Studio\\2019\\Professional\\MSBuild\\Current\\Bin\\msbuild.exe",
"args": [
"${workspaceFolder}/WebApplication1/WebApplication1.csproj",
"/t:build",
"/p:GenerateFullPaths=true",
"/p:Configuration=Debug",
"/consoleloggerparameters:NoSummary"
],
"group": {
"kind": "build",
"isDefault": true
}
"presentation": {
"reveal": "silent"
},
"problemMatcher": "$msCompile"
},
]
}
Of course, you will have to replace “WebApplication1” with your project name, and you may also have to change the path to which ever msbuild.exe you want or need to run (bold, italic above).
To build i VS Code, press CTRL+SHIFT+B and your project should do just that. The task we defined is set to be the default, so VS Code will not ask you for anything, just build. Hopefully.
Run in IIS Express, 64-bit
To run this application in IIS Express, add the following task to tasks.json “tasks” array:
tasks.json (part)
… stuff before…
{
"label": "iisexpress",
"type": "shell",
"command": "C:\\Program Files\\IIS Express\\iisexpress.exe",
"args": [
"/path:${workspaceRoot}\\WebApplication1",
"/port:5006"
],
"presentation": {
"reveal": "silent"
},
"problemMatcher": "$msCompile"
},
…stuff after…Again – replace “WebApplication1” with your project name.
Note that the iisexpress.exe we point at MUST be the 64-bit version, or we won’t be able to debug later on. The 64-bit version is located in c:\program files\ directory, and the 32-bit version in – you guessed it – the c:\program files(x86)\ directory.
To get IIS Express going from VS Code, press CTRL+SHIFT+P, to bring up the command prompt, then type/select “Tasks: Run Task” and select “iisexpress”.
You should see something like this in the VS Code terminal window (you may have to bring it up):
Starting IIS Express ...
Successfully registered URL "http://localhost:5006/" for site "Development Web Site" application "/"
Registration completed
IIS Express is running.
Enter 'Q' to stop IIS ExpressYou can now open a browser and point at http://localhost:5006, your web application should hopefully start.
Debugging
Debugging in VS Code is defined in the launch.json file. VS Code has to “attach” to the iisexpress.exe process. So create a launch.json file in .vscode directory, and add this:
launch.json
{
"version": "0.2.0",
"configurations": [
{
"name": ".NET Attach",
"type": "clr",
"request": "attach",
"processName": "iisexpress.exe",
}
]
}
To “attach” and debug our running application. Press F5 in VS Code. If all is well, the debugger should start running, and you should be able to set breakpoints and whatnot. I’ve not looked at how to debug *.cshtml files yet, but I’m sure it can be done if needed.
Build, Run and Browse
It’s possible to do build, run in iis express and start Chrome/Edge in one step for convenience. This is my full tasks.json file for that. On F5 it will run the default task “build run browse” which depends on the tasks “build”, “iisexpress” and “browser”. You might want to exclude the “browser” subtask, but here it is:
{
// See https://go.microsoft.com/fwlink/?LinkId=733558
// for the documentation about the tasks.json format
//https://bigfont.ca/debug-an-iis-express-web-application-from-vs-code/
//appcmd add site /name:"WebApplication1" /bindings:https/*5006:localhost /physicalPath:C:\code-test\framework\WebApplication1\WebApplication1\obj\Debug\Package\PackageTmp
//"C:\Program Files (x86)\IIS Express\appcmd.exe" add site /name:"WebApplication1" /bindings:https/*5006:localhost /physicalPath:C:\code-test\framework\WebApplication1\WebApplication1\obj\Debug\Package\PackageTmp
"version": "2.0.0",
"tasks": [
{
"label": "build run browse",
"dependsOn": [
"build",
"iisexpress",
"browser"
],
"group": {
"kind": "build",
"isDefault": true
}
},
{
"label": "build",
"type": "shell",
"command": "C:\\Program Files (x86)\\Microsoft Visual Studio\\2019\\Professional\\MSBuild\\Current\\Bin\\msbuild.exe",
"args": [
"${workspaceFolder}/WebApplication1/WebApplication1.csproj",
"/t:build",
"/p:GenerateFullPaths=true",
"/p:Configuration=Debug",
"/consoleloggerparameters:NoSummary"
],
"group": "build",
"presentation": {
"reveal": "silent"
},
"problemMatcher": "$msCompile"
},
{
"label": "iisexpress",
"type": "shell",
"command": "C:\\Program Files\\IIS Express\\iisexpress.exe",
"args": [
"/path:${workspaceRoot}\\WebApplication1",
"/port:5006"
],
"presentation": {
"reveal": "silent"
},
"problemMatcher": "$msCompile"
},
{
"label": "browser",
"type": "shell",
"command": "C:\\Program Files (x86)\\Google\\Chrome\\Application\\chrome.exe",
"args": [
"http://localhost:5006"
],
"problemMatcher": []
}
]
}
Hopefully this might help some of you out there to use VS Code with Framework projects and transition over to .net 5 or 6. VS Code is still fast and really, really useful, though VS 2022 looks awesome and seems to outshine VS Code for me.
-
Secure ASP.NET Web API with Windows Azure AD
Note that the APIs, tools and methods change quickly in this area, this blog post will get old and die eventually…
Many organizations now look at the Azure environment to host their websites and web APIs, and some decide to move their mail and Active Directory too. Now with the latest updates and previews in Azure, you’re able to secure your web APIs with Azure AD. Vittorio Bertocci wrote an article for MSDN Magazine about Secure ASP.NET Web API with Windows Azure AD and Microsoft OWIN Components and it worked fine up until a couple of weeks ago when things moved around in these parts of Azure

I will try to describe in detail how to secure your web API with Azure Active Directory now, using Visual Studio 2013 and the preview of ADAL (Active Directory Authentication Library) package.
Create a web API project
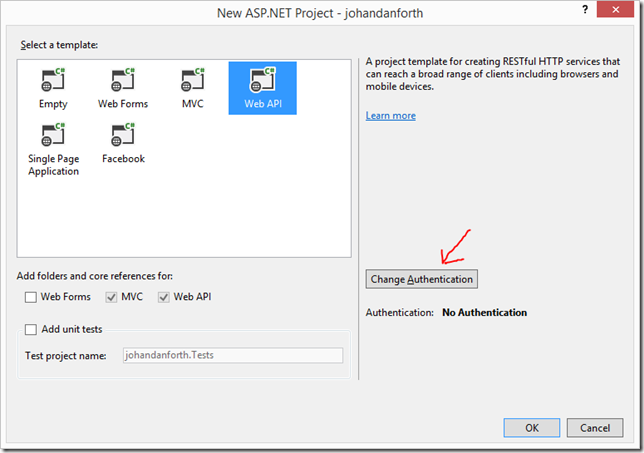
Fire up Visual Studio and create a new ASP.NET Web Application. I’m calling mine “johandanforth”, I’m selecting “Web API” and click the “Change Authentication”
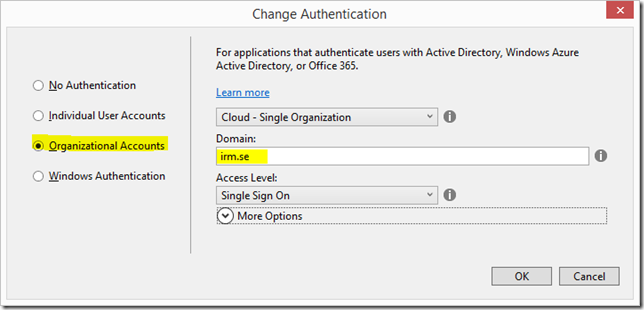
In the next dialog, click “Organizational Account” and enter the domain of your Azure AD tenant, in my case it’s “irm.se”:
After you press “OK” you’ll be asked to login with your Azure AD account, then “OK” again and Visual Studio will create a web application resource in your Azure AD. Now look it up in the Azure Management application. Note that you may have to log out and in again or restart the Azure management web app to see the newly created application.
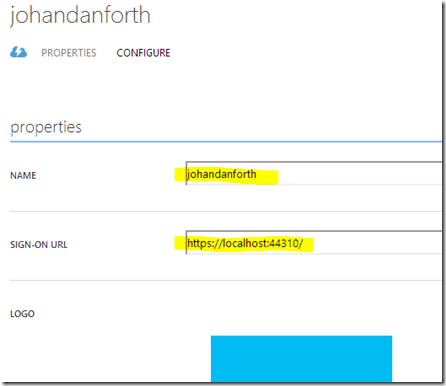
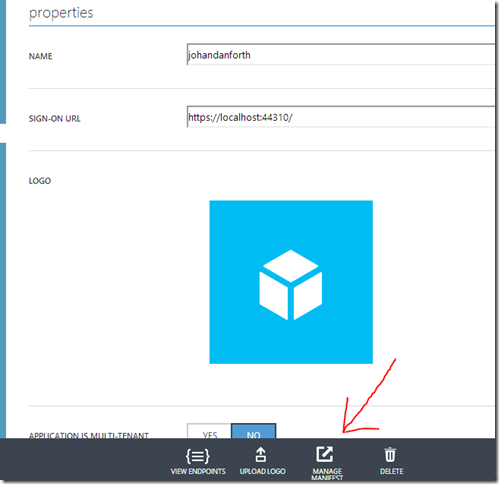
In my case the application has been named “johandanforth” and is for securing your development project on localhost. The SIGN-ON URL (also called the APP URL in the management application) is https://localhost:44310/ which can be seen both on the applications overview and if you click on the application and go to the CONFIGURE “tab”:
The sign-on url should be the same as where the web API is hosted, in this case the same localhost-settings as you got in the development project web-settings.
Open up web.config of your web API project and have a look at these settings:
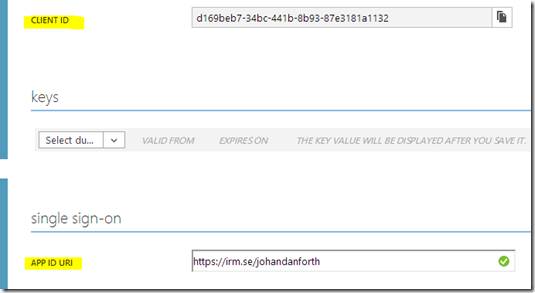
    <add key="ida:Audience" value="https://irm.se/johandanforth" />
    <add key="ida:ClientID" value="d169beb7-34bc-441b-8b93-87e3181a1132" />
The “ida:Audience” in web.config correspond to the value of APP ID URI of the application resource in the management portal and the “ida:ClientID” correspond to the CLIENT ID in the portal.
Update the web application manifest
Before you any application can access this resource, we must update the “manifest”. Still on the CONFIGURE tab for your web API resource, there should be a MANAGE MANIFEST menu option down at the bottom toolbar. Click it and select “Download Manifest”. It’s a json-text-file, and should save it somewhere where you know is, because we will add a section to it and then upload it again using the same menu option:
Open the json-manifest and replace the "appPermissions": [], section with this:
"appPermissions":[
      {
         "claimValue":"user_impersonation",
         "description":"Allow the application full access to the service on behalf of the signed-in user",
         "directAccessGrantTypes":[

         ],
         "displayName":"Have full access to the service",
         "impersonationAccessGrantTypes":[
            {
               "impersonated":"User",
               "impersonator":"Application"
            }
         ],
         "isDisabled":false,
         "origin":"Application",
         "permissionId":"b69ee3c9-c40d-4f2a-ac80-961cd1534e40",
         "resourceScopeType":"Personal",
         "userConsentDescription":"Allow the application full access to the service on your behalf",
         "userConsentDisplayName":"Have full access to the service"
      }
   ],
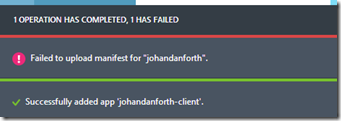
At the moment, there doesn’t seem to much in way of documentation on this manifest file, but it should work without modifications. I’ll try to write something about this manifest file as soon as I get some more docs on it.Next thing you do is upload the modified manifest file. Note that the portal may give you an error message during upload, but things seems to work anyway! It may look like this:Create a client
Now let’s try and access the sample ValuesController Web API in your development environment using a web browser, Fiddler or similar. In my case it’s https://localhost:44309/api/values and you should get a HTTP/1.1 401 Unauthorized error back. To be able to access the protected resource, you must add a client resource in the AD and configure it to access the web API.
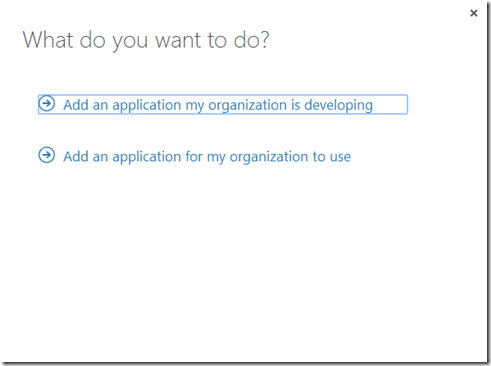
If you are not there already, in the Azure management portal, go to Active Directory, click on your domain name and select the APPLICATIONS tab. Then click the ADD-icon down the center of the bottom toolbar. Then go ahead and select “Add an application my organization is developing”:
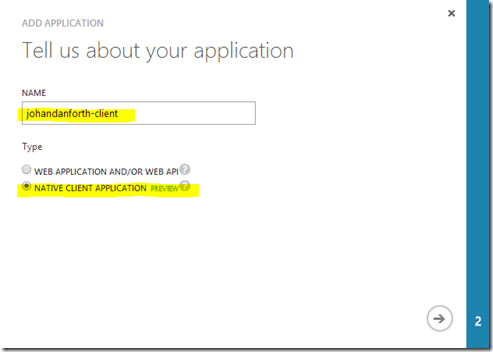
Enter a name for your client (I’m going with “johandanforth-client”, and make sure you select NATIVE CLIENT APPLICATION because we’re going to write a simple Windows WPF client to call our web API:
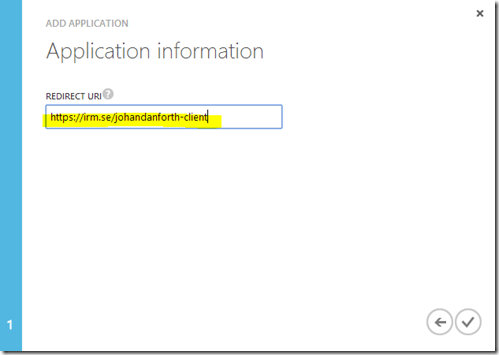
On the second page, type in a redirect url for your client – it can be anything as long as it is a valid url. I’m going with https://irm.se/johandanforth-client.
Your client is now created, but the last step to do is to give permission to our web API. Scroll down to the bottom of the client application CONFIGURE page and look at the “permissions to other applications (preview)” section. In the dropdown marked “select application” you should be able to see and select your web API. You must also select the “Delegated permissions” dropdown and mark the only option available for you. As you can see, the description matches the text in the manifest file:
Remember to SAVE!
Almost there, hang on…
Create a Windows WPF application for testing
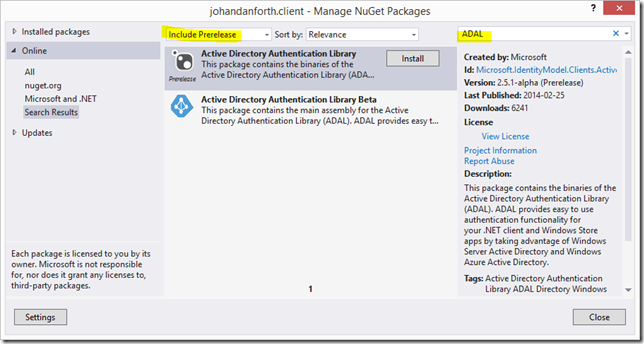
Add a new Windows WPF Application to your solution, I’m calling it “johandanforth.client”, and create a button with a click-event or something to hold the code that will authenticate and get values from your API. Bring up NuGet and search for “ADAL”, make sure you have “Include Prerelease” selected:
Install the prerelease package from February 2014 (it will probably be updated soon), then paste this code into the click-event of that button you created earlier:
using System;
using System.Net.Http;
using System.Windows;
using Microsoft.IdentityModel.Clients.ActiveDirectory;

namespace johandanforth.client
{
    public partial class MainWindow : Window
    {
        public MainWindow()
        {
            InitializeComponent();
        }

        private async void Button_Click(object sender, RoutedEventArgs e)
        {
            //this is to accept dev certificates - do not use in production!
            System.Net.ServicePointManager.ServerCertificateValidationCallback = ((a, b, c, d) => true);

            var ac = new AuthenticationContext("https://login.windows.net/irm.se");   //ad domain = irm.se

            var ar1 = ac.AcquireToken("https://irm.se/johandanforth",   //app id uri of the web api
              "91b4bc31-92c2-4699-86f5-fa84a718da30",                   //the client id
              new Uri("https://irm.se/johandanforth-client"));          //the client redirect uri

            var authHeader = ar1.CreateAuthorizationHeader();

            var client = new HttpClient();
            var request = new HttpRequestMessage(HttpMethod.Get, "https://localhost:44310/api/values");
            request.Headers.TryAddWithoutValidation("Authorization", authHeader);
            var response = await client.SendAsync(request);
            var responseString = await response.Content.ReadAsStringAsync();
            MessageBox.Show(responseString);
        }
    }
}
There are a few lines that must be change to work with your sample code. First change the AuthenticaitonContext to match your Azure AD domain/tenant name:
var ac = new AuthenticationContext("https://login.windows.net/irm.se");Next look at the code part which acquires a token – this is when the login dialog pops up and asks the user to log in using his or hers organizational account. This line corresponds to the web API uri, which is the same as the “ida:Audience” in your web.config file, so update it to match that value:
var ar1 = ac.AcquireToken("https://irm.se/johandanforth",
The next line is the client id of the application client you created in Azure AD, look it up and change the id accordingly:
"91b4bc31-92c2-4699-86f5-fa84a718da30",
The last line is the redirect-uri of the client, look it up on the same page in the Azure management portal:
new Uri("https://irm.se/johandanforth-client"));
You must also modify the line with the call to the web API method to match your web server localhost settings:
var request = new HttpRequestMessage(HttpMethod.Get, "https://localhost:44310/api/values");
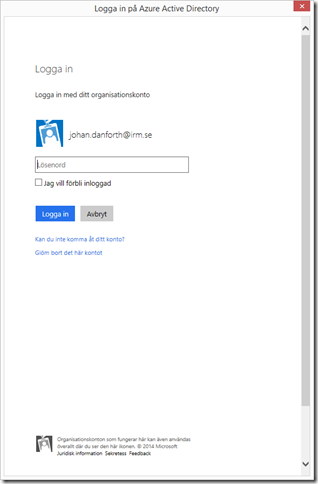
Now, start the web API program in debug mode and wait until you see the Home Page, then right click and start debug of the WPF client. Click the button and you should be prompted to log in with your organizational account (this is the look of it in Swedish):
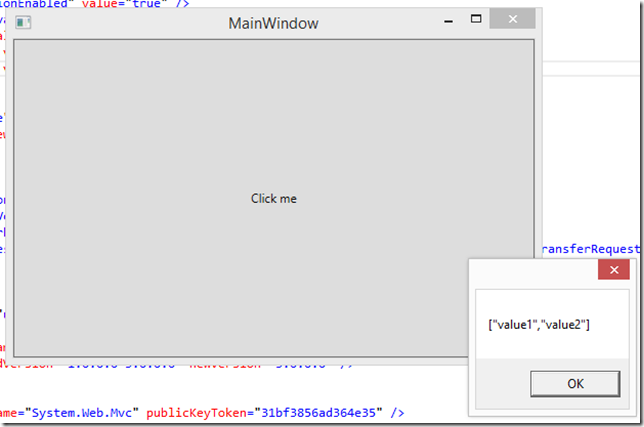
After a successful login, the code continues and you should be greeted with this:
Still with me?
Deploy to Azure
This is all well and good (hopefully), but we want to deploy our web API to Azure and run our clients against it in the cloud. To do that we need to:
1) Create a web site to host our web API in Azure
2) Publish our code to the site
3) Create an Azure AD resource for the web API (VS does this for you)
4) Modify the manifest for the web API (like before)
5) Give the client permission to the new resource (like before)
6) Update web.config and the client code to match the IDs and URIs of the new resources (ida:Audience == APP ID URI == the resource you want to access)
7) Publish the code again (to get the updated web.config uploaded)
8) Run!
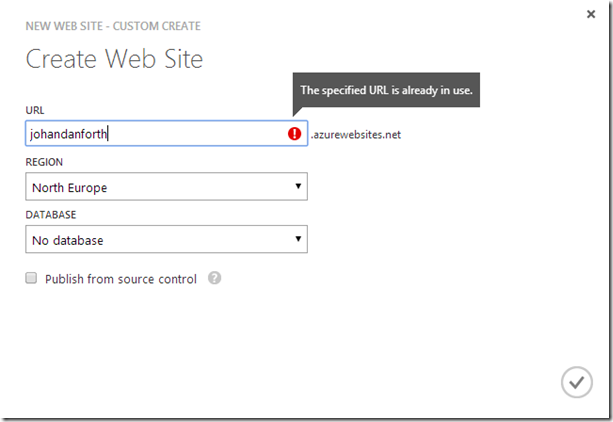
Here’s some quick shots of some of the steps. First create a web site in Azure by selecting “WEB SITES” in the left hand menu of the Azure Portal, press the big plus-sign down in the corner and create a custom web site. I’m calling mine “johandanforth” (ignore the error message
 )
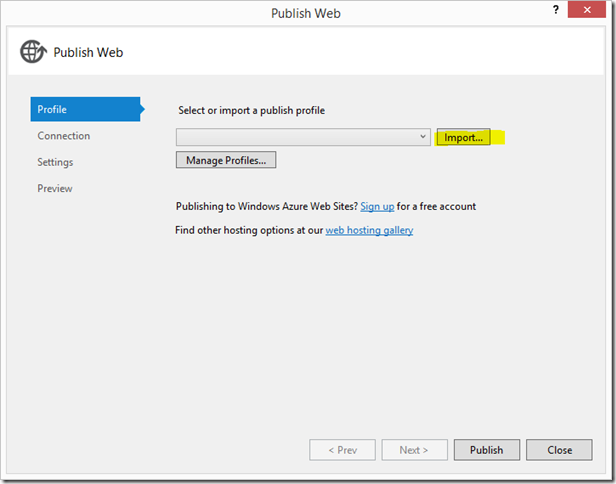
)Now go back to Visual Studio, right click the web API project and select “Publish…”.
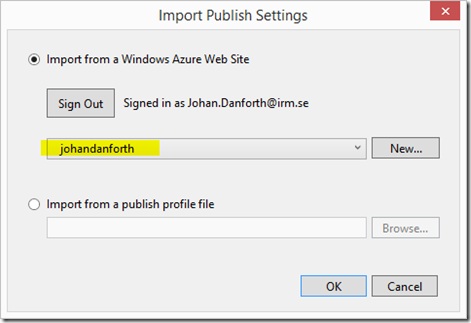
Press the “Import…” button to download and import the publishing profile of the web site you created, and select the newly created Web Site in the dropdown. Click OK.
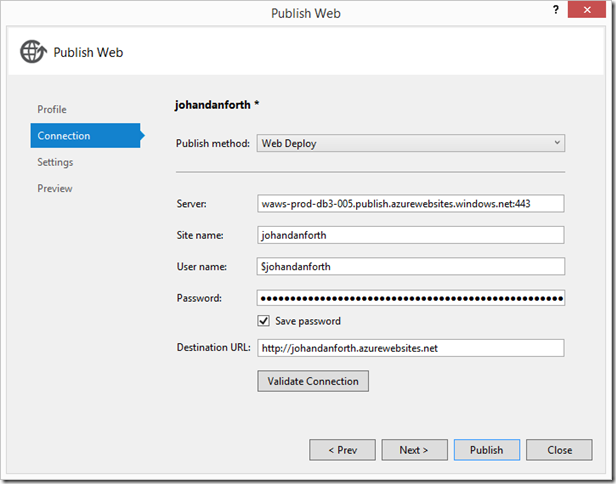
You have to authenticate one or two times to get past these steps, but should finally get to the last step of the Publish process:
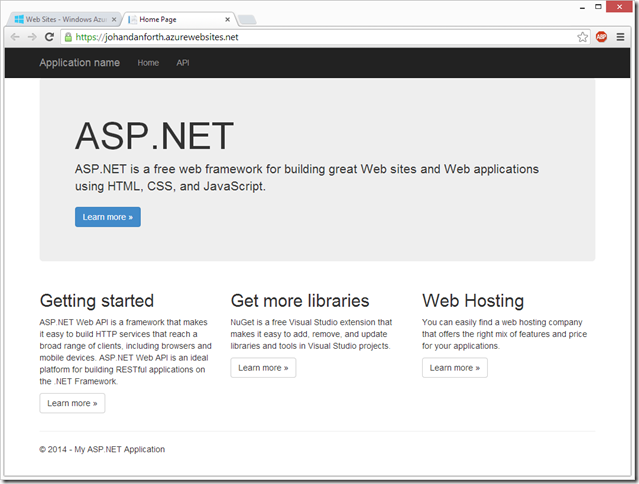
When Visual Studio is done publishing, a browser page will open up with the Home Page showing:
Visual Studio should now have created a new application resource in the Azure Active Directory, so get back to the portal and have a look at the list of AD applications. A resource named “WebApp-xxxxxxxxx.azurewebsites.net” should be listed there. Note – you may have to sign out and sign in to the portal to show the web api resource. This has happened to me a couple of times!
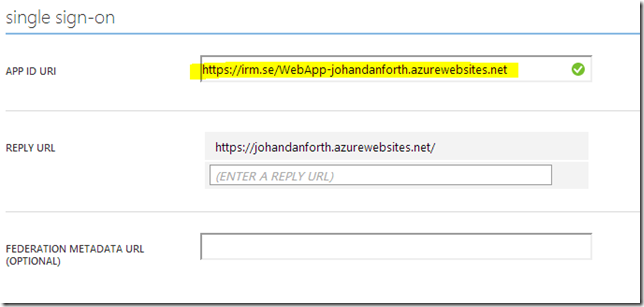
Click on the resource and look at the details in the CONFIGURE tab.
Copy the name of the “APP ID URI” and past it into the “ida:Audience” value in the web.config file of your web API project in Visual Studio:
<add key="ida:Audience" value="https://irm.se/WebApp-johandanforth.azurewebsites.net" />
The same value must also be updated in the WPF client:
var ar1 = ac.AcquireToken(https://irm.se/WebApp-johandanforth.azurewebsites.net,
You must also (of course) update the call to the web API method to point at the web site in the cloud:
var request = new HttpRequestMessage(HttpMethod.Get, "https://johandanforth.azurewebsites.net/api/values");
We’re not done yet though… now you have to do the same steps you did for the localhost resource earlier - download and update the manifest file for the web API resource and give the client resource permission to use the service.
Finally (yes finally) – publish the web API project again to get the updated web.config file to the cloud site!
Once the code is published, you should be able to run the client successfully.
Please give feedback if you have problems with any step/s of this walkthrough. Other questions, bugs and such is better asked on the Windows Azure Active Directory forum. I’m still learning these things and trying to keep up with the changes

-
Insufficient Permissions Problems with MSDeploy and TFS Build 2010
I ran into these problems on a TFS 2010 RC setup where I wanted to deploy a web site as part of the nightly build:
C:\Program Files (x86)\MSBuild\Microsoft\VisualStudio\v10.0\Web\Microsoft.Web.Publishing.targets (3481): Web deployment task failed.(An error occurred when reading the IIS Configuration File 'MACHINE/REDIRECTION'. The identity performing the operation was 'NT AUTHORITY\NETWORK SERVICE'.) An error occurred when reading the IIS Configuration File 'MACHINE/REDIRECTION'. The identity performing the operation was 'NT AUTHORITY\NETWORK SERVICE'. Filename: \\?\C:\Windows\system32\inetsrv\config\redirection.config Error: Cannot read configuration file due to insufficient permissions
As you can see I’m running the build service as NETWORK SERVICE which is quite usual. The first thing I did then was to give NETWORK SERVICE read access to the whole directory where redirection.config is sitting; C:\Windows\system32\inetsrv\config.
That gave me a new error:
C:\Program Files (x86)\MSBuild\Microsoft\VisualStudio\v10.0\Web\Microsoft.Web.Publishing.targets (3481): Web deployment task failed. (Attempted to perform an unauthorized operation.)
The reason for this problem was that NETWORK SERVICE didn’t have write permission to the place where I’ve told MSDeploy to put the web site physically on the disk. Once I’d given the NETWORK SERVICE the right permissions, MSDeploy completed as expected!
NOTE! I’ve not had this problem with TFS 2010 RTM, so it might be just a RC issue!
-
Package and Publish Web Sites with TFS 2010 Build Server
To package and publish web sites with TFS 2010 Build Server, you can use MSDeploy and some of the new MSBuild arguments. For example:
/p:DeployOnBuild=True
/p:DeployTarget=MsDeployPublish
/p:MSDeployPublishMethod=InProc
/p:CreatePackageOnPublish=True
/p:DeployIisAppPath="Default Web Site/WebApplication1"
/p:MsDeployServiceUrl=localhost
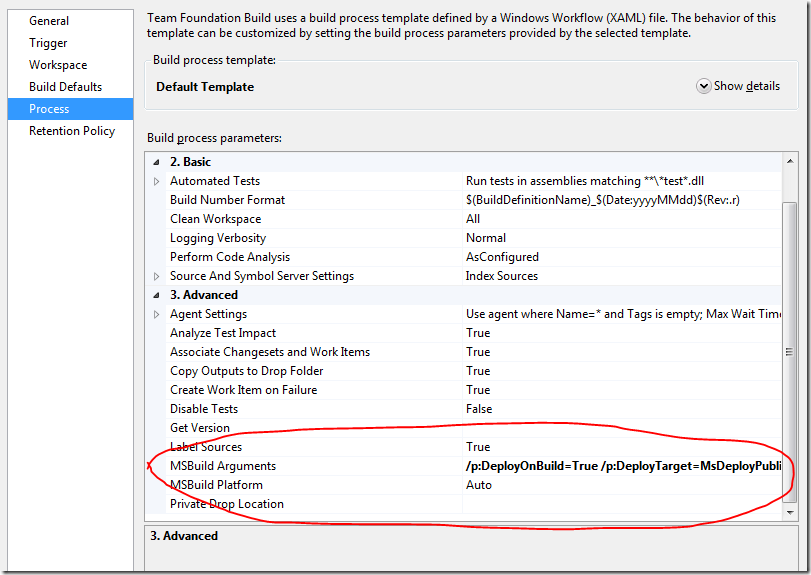
Does all the work for you! Unfortunately these arguments are not very well documented, yet. Please feel free comment with pointers to good docs. You can enter these arguments when editing the Build Definition, under the Process tab and the Advanced section:
If you’re working with these things, I’m sure you’ve not missed the PDC 2009 presentation by Vishal Joshi about MS Deploy.
A few links on the topic:
http://www.hanselman.com/blog/WebDeploymentMadeAwesomeIfYoureUsingXCopyYoureDoingItWrong.aspx
-
ASP.NET 4 Website Fails to Start on Your TFS 2010 Server?
Getting a “Could not find permission set named ‘ASP.Net’” error on your TFS 2010 server? It may have to do with the fact you’re trying to run ASP.NET as a child site of a SharePoint Web Site. The problem is described in the “ASP.NET 4 braking changes” site:
This error occurs because the ASP.NET 4 code access security (CAS) infrastructure looks for a permission set named ASP.Net. However, the partial trust configuration file that is referenced by WSS_Minimal does not contain any permission sets with that name.
Currently there is not a version of SharePoint available that is compatible with ASP.NET. As a result, you should not attempt to run an ASP.NET 4 Web site as a child site underneath SharePoint Web sites.
There is a workaround you could try by setting this in your web.config, if you know what you’re doing:
<trust level="Full" originUrl="" />
