Contents tagged with Azure
-
How to setup Continuous Integration and Deploy Pipeline for ASP.NET MVC Framework application to Azure Web App
In this article I will try to explain in as few steps as possible a way to do CI and deploy from an Azure DevOps repository to an Azure hosted Web App. There are many ways to do this, but this worked for me (2021-01-18).
I’m creating the CI from the Azure portal, but you can also do it more manually, like described by Scott Hanselman in this blog post, which can be useful to read through: https://www.hanselman.com/blog/azure-devops-continuous-builddeploytest-with-aspnet-core-22-preview-in-one-hour
Tools and Frameworks used: Visual Studio 2019 Version 16.8.4, .Net Framework 4.7.2
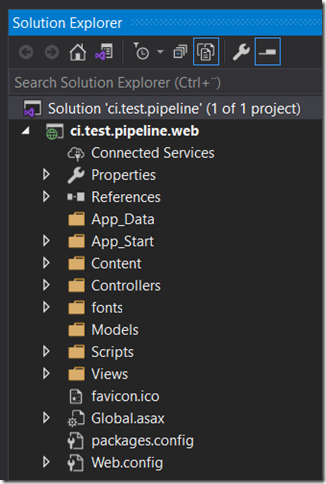
Pre-reqs: I assume you already have an Azure Web App registered that runs ASP.NET 4.8 or similar. Mine is called ‘ci-test-pipeline’. I also assume you already have a repository and a project in Azure DevOps, again, mine is called ‘ci-test-pipeline’. You can also have your repo in github, the steps should be similar. In this repo, I have a vanilla ASP.NET MVC application created and checked in. In my case ‘ci.test.pipeline.web’ in a ‘ci.test.pipeline’ solution:
Initially the pipeline page in DevOps will be empty, unless you’ve already setup a pipeline. To create a CI pipeline you can go about it in a few different ways, but this article describes how to do it from the Web App page in Azure portal.
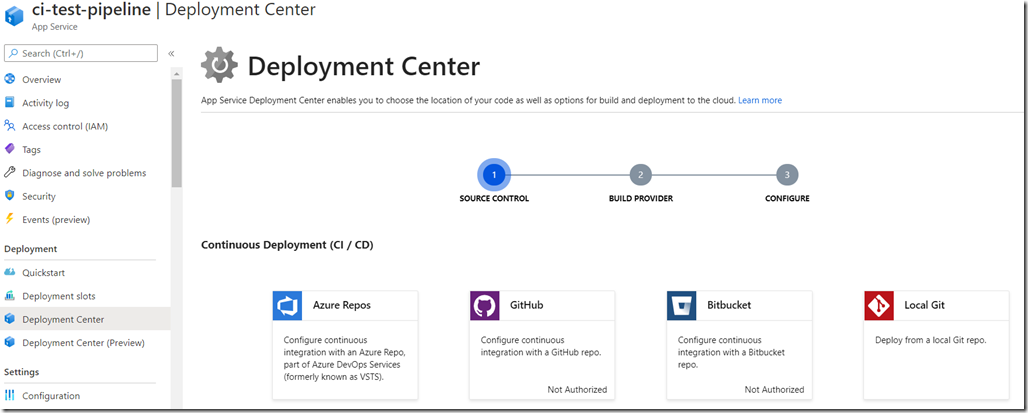
Goto the Deployment Center page in the Web App menu, and select to create a Continous Deployment (CI / CD) deployment for ‘Azure Repos’.
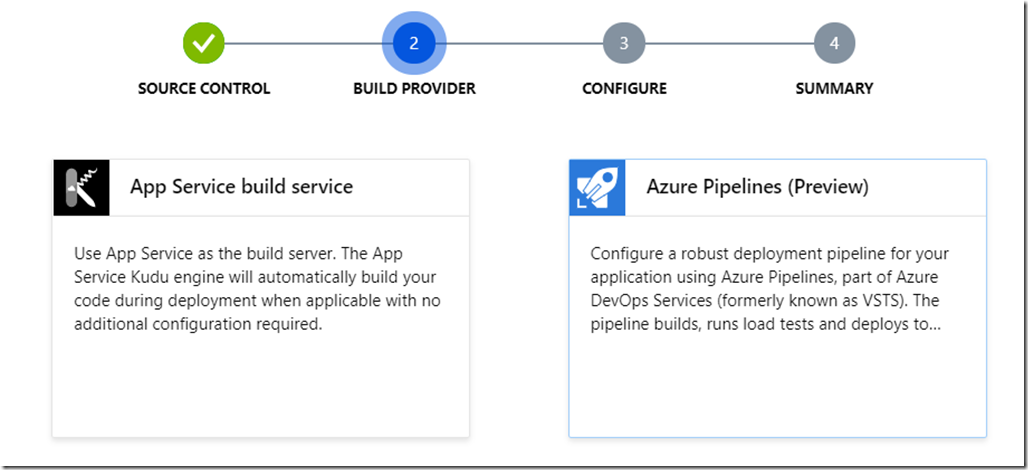
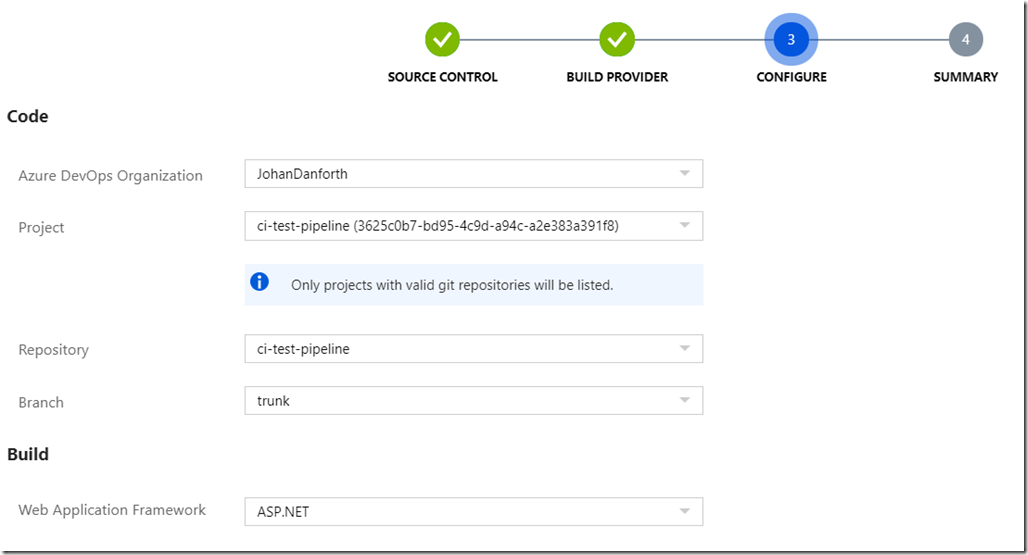
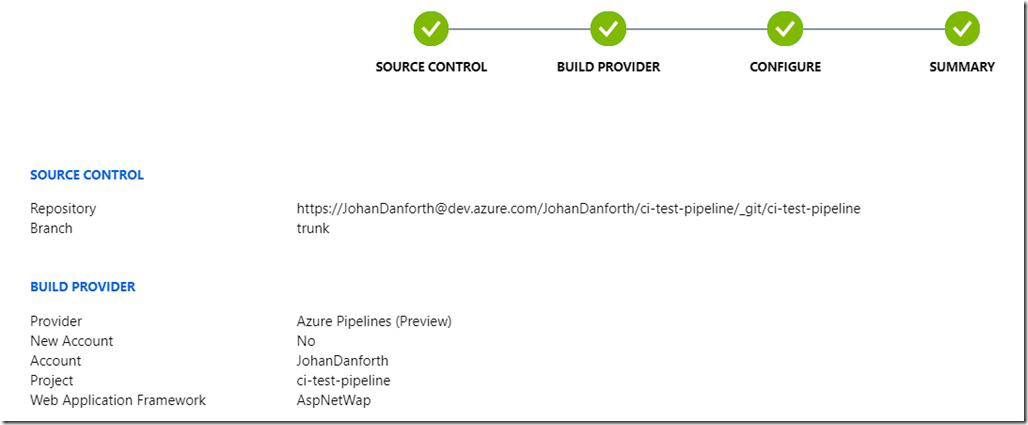
Then just follow the steps, it’s hard to do anything wrong as the wizard helps you with dropdowns along the way. Just make sure you select the correct repo and which ‘Web Application Framework’ you are using. In my case for an ASP.NET MVC .Net Framework solution, select ‘ASP.NET’.
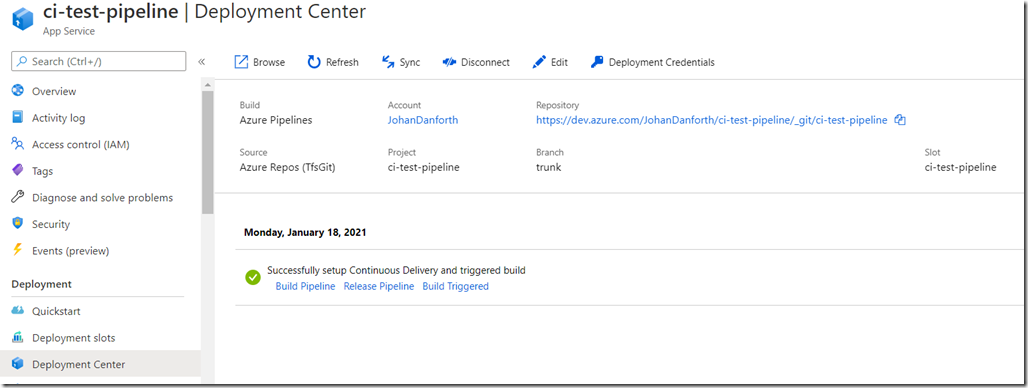
Once the pipeline is created, it should look something like this on the deployment center page, with a message of a successful setup. This is still in the Azure portal, under your Web App:
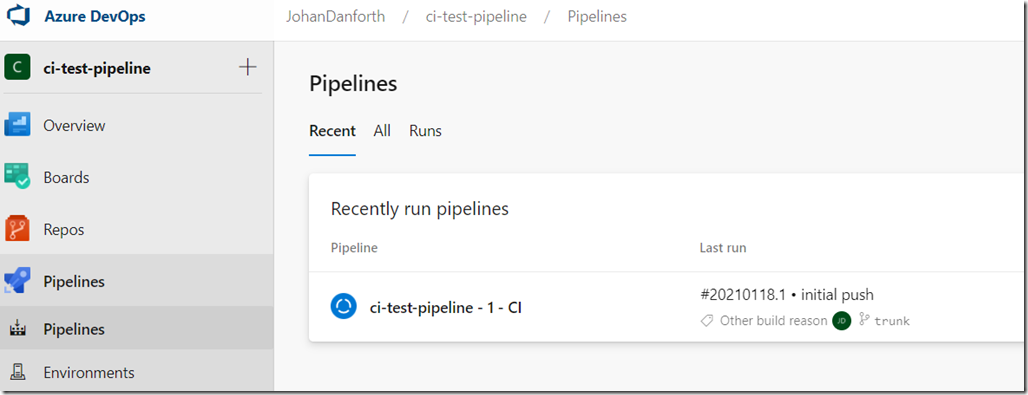
If your project was already checked in, like in my case, this also triggers a first build + deployment in Azure DevOps:
And you should eventually get an email from Azure DevOps with a success or failure message. In my case I get a ‘partial success’ because of an error in the pipeline:
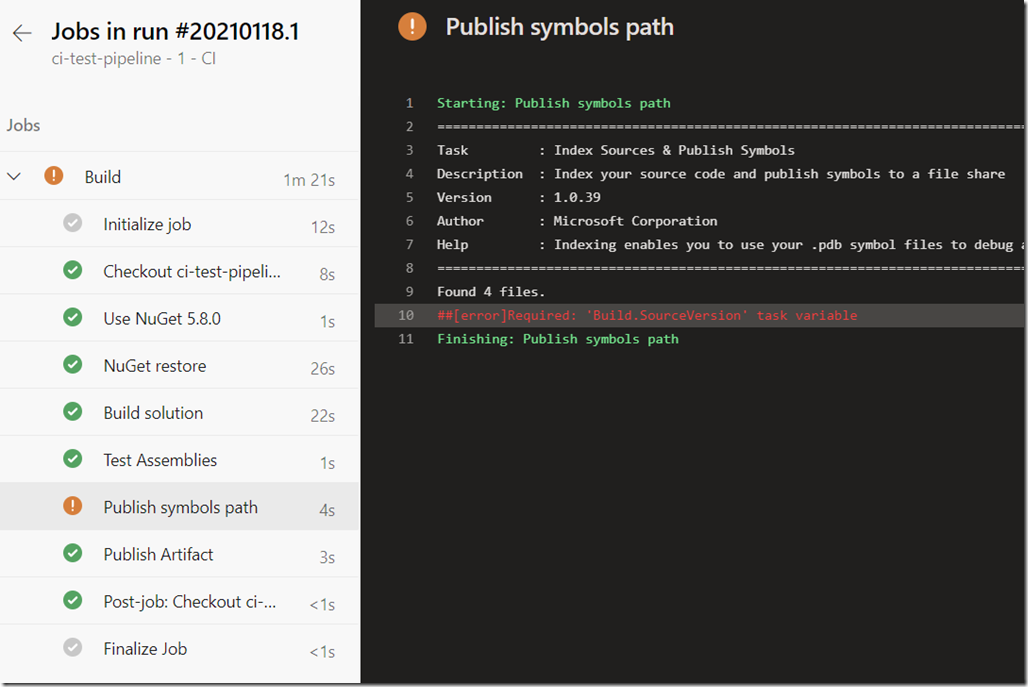
To view the deails of this message, just look through the detailed steps in the last run in Azure DevOps. You can easily get to these details by clicking the ‘View results’ link/button in the email, and drill into the job details:
For some reason the ‘Publish symbols path’ is missing a required task variable – ‘Build.SourceVersion’, but the build succeded and published/uploaded the artifact to a ‘drop container’ and the application is deployed to the Azure Web App. I’m not concerned about this warning right now, just happy it runs through.
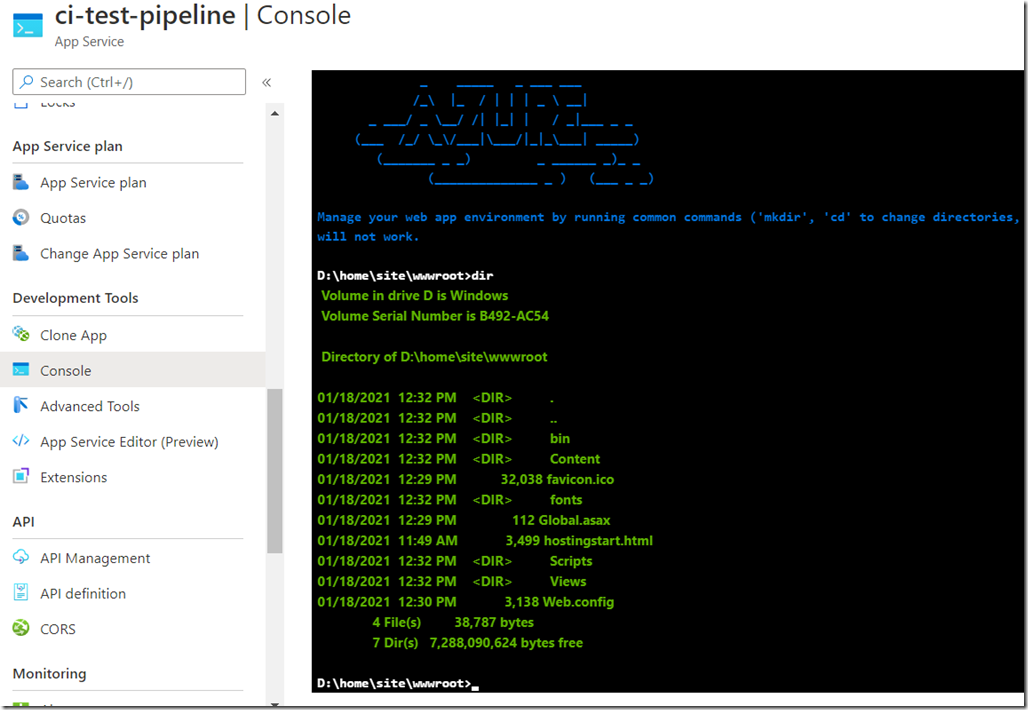
To see the deployed files in the Azure portal, you can go look at the console development tool for the Web App in Azure portal, which is neat:
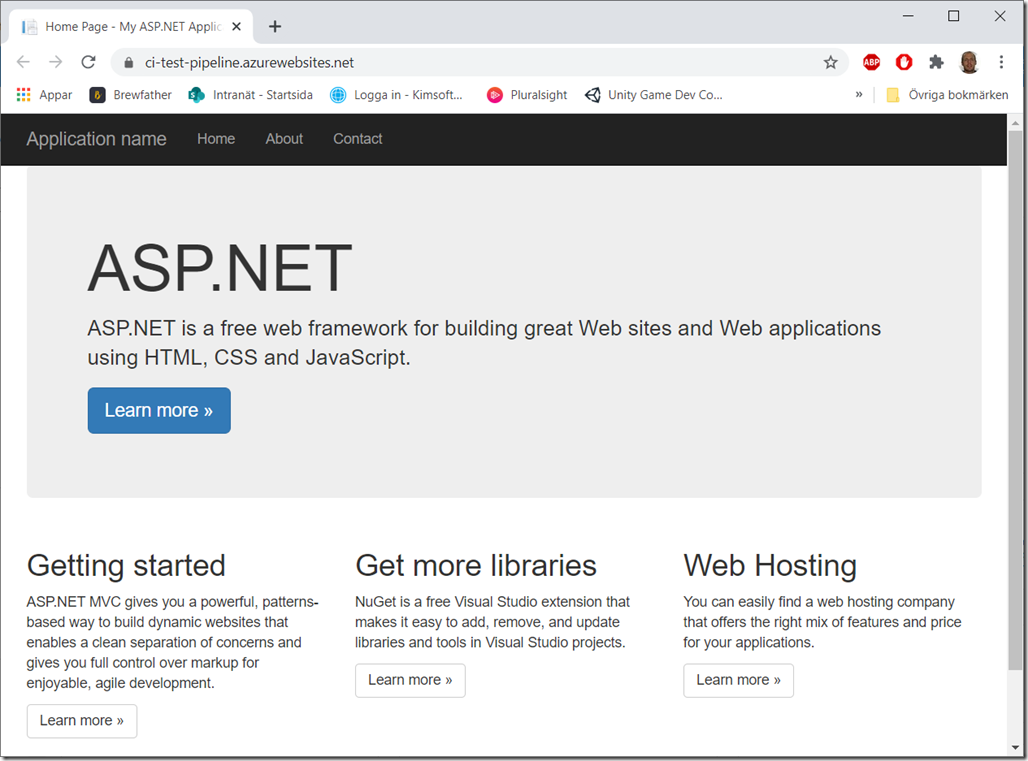
And you should also be able to view your website at <your web app name>.azurewebsites.net, to see that it works as expected:
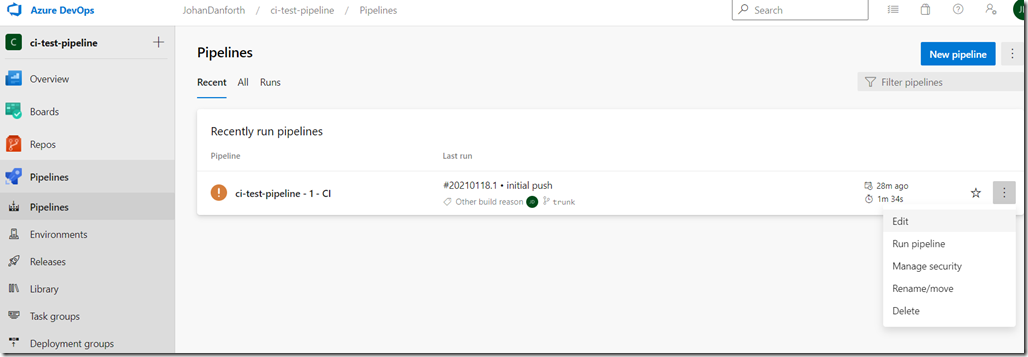
To view and edit the pipelines steps created for you by the Azure portal wizard, visit the pipelines menu in Azure DevOps, and select to ‘Edit’ the pipeline:
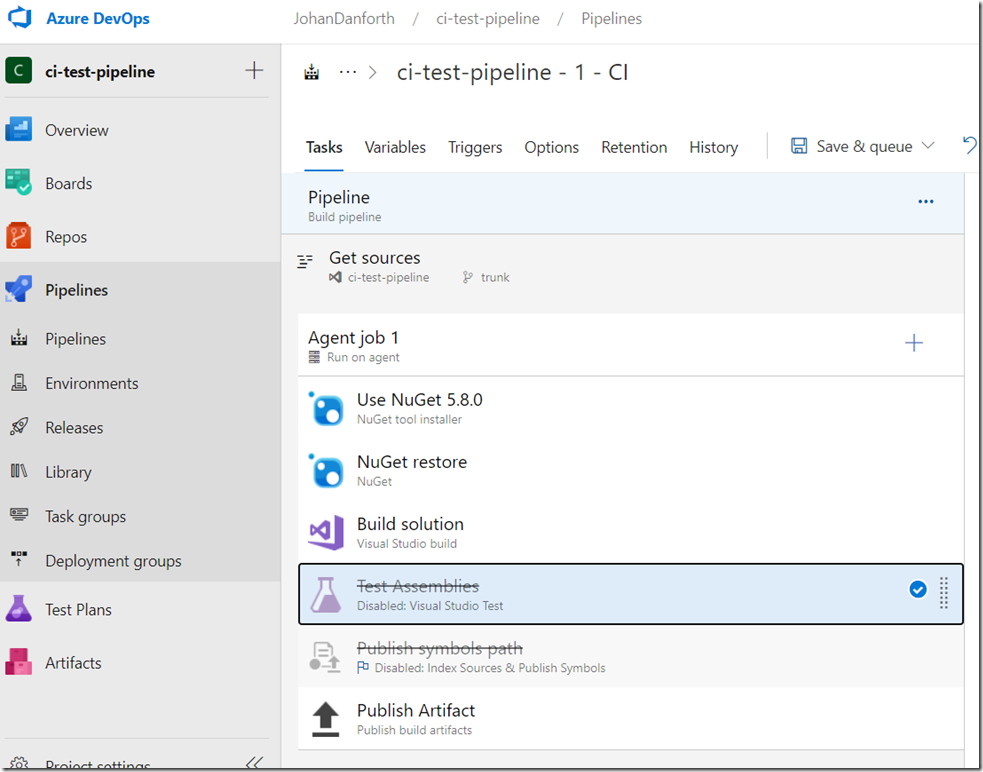
In edit mode, you see all the steps, and you may opt to disable the ‘Test Assemblies’ and ‘Publish symbols path’, until they are needed:
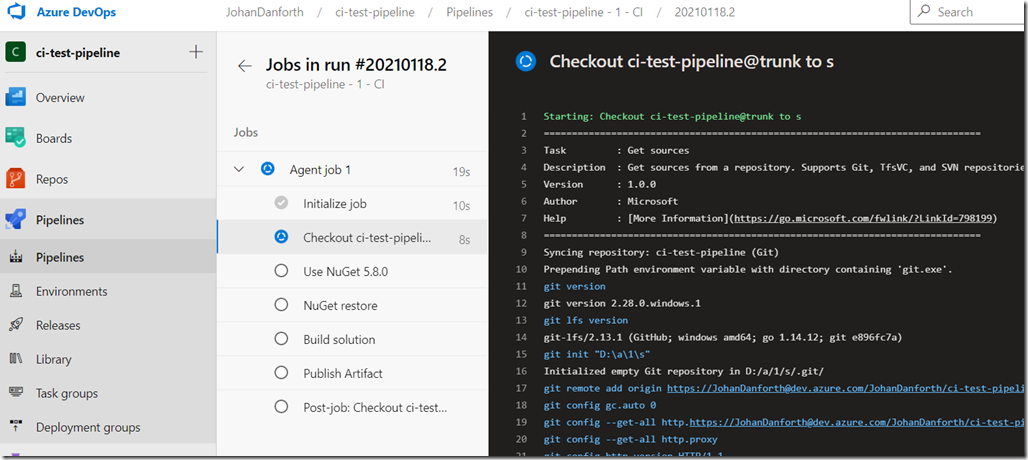
Remember to save the changes, and try them out again. It’s useful to follow the pipeline job by clicking on the ‘Agent’ that runs the job. the screen updates for every step:
There are loads of different pipeline steps you can add and customize, which is very helpful if you want to do pre- or post-build steps with your code – like adding build information to your website - which build is deployed and what source code version is actually running.
That’s enough screenshots for this article. Hope it helps.
In a follow-up to this blog post, I’ll add build information to the website, and finally add authentication.
-
Subsequent calls to AcquireToken()
Using the Active Directory Authentication Library (ADAL) and getting that annoying flash from the authentication dialog on subsequent calls? Maybe you’re creating a new AuthenticationContext every time? In that case the call to AcquireToke() by the context cannot keep and lookup the cached token and refreshtokens. You should try to keep a cached or static version of the AuthenticationContext alive between calls. Something like this of you’re calling a web api or similar:
private static readonly AuthenticationContext AuthenticationContext = new AuthenticationContext("https://login.windows.net/domain.com");

private static AuthenticationResult GetAuthenticationToken()
{
    var acquireToken = AuthenticationContext.AcquireToken("https://domain.com/WebApp-something.azurewebsites.net", //resource id of the web api
        "acca2f90-5f76-45b5-8ec3------", //the client id
        new Uri("https://domain.com/YourClientRedirectUrl"));    //client redirect url

    return acquireToken;
}

public static async Task<string> GetRequestAsync(string requestUri)
{
    var client = new HttpClient();
    var request = new HttpRequestMessage(HttpMethod.Get, requestUri);
    var authorizationHeader = GetAuthenticationToken().CreateAuthorizationHeader();
    request.Headers.TryAddWithoutValidation("Authorization", authorizationHeader);
    var response = await client.SendAsync(request);
    var responseString = await response.Content.ReadAsStringAsync();
    Debug.WriteLine(responseString);
    return responseString;
} -
Secure ASP.NET Web API with Windows Azure AD
Note that the APIs, tools and methods change quickly in this area, this blog post will get old and die eventually…
Many organizations now look at the Azure environment to host their websites and web APIs, and some decide to move their mail and Active Directory too. Now with the latest updates and previews in Azure, you’re able to secure your web APIs with Azure AD. Vittorio Bertocci wrote an article for MSDN Magazine about Secure ASP.NET Web API with Windows Azure AD and Microsoft OWIN Components and it worked fine up until a couple of weeks ago when things moved around in these parts of Azure

I will try to describe in detail how to secure your web API with Azure Active Directory now, using Visual Studio 2013 and the preview of ADAL (Active Directory Authentication Library) package.
Create a web API project
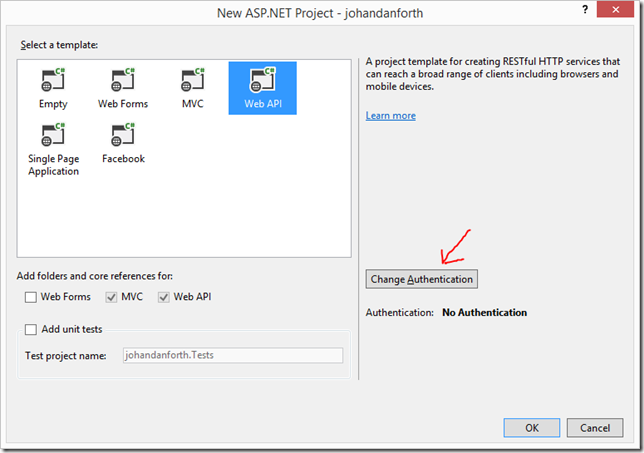
Fire up Visual Studio and create a new ASP.NET Web Application. I’m calling mine “johandanforth”, I’m selecting “Web API” and click the “Change Authentication”
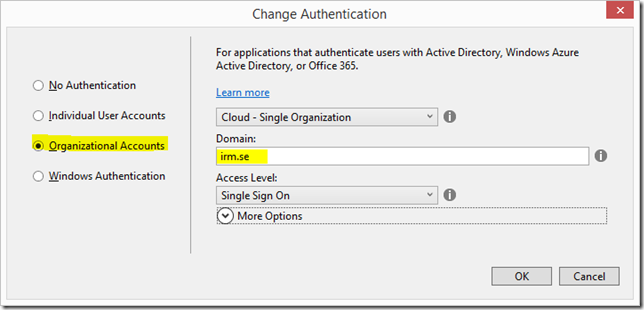
In the next dialog, click “Organizational Account” and enter the domain of your Azure AD tenant, in my case it’s “irm.se”:
After you press “OK” you’ll be asked to login with your Azure AD account, then “OK” again and Visual Studio will create a web application resource in your Azure AD. Now look it up in the Azure Management application. Note that you may have to log out and in again or restart the Azure management web app to see the newly created application.
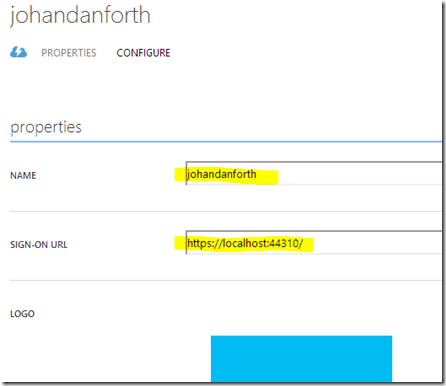
In my case the application has been named “johandanforth” and is for securing your development project on localhost. The SIGN-ON URL (also called the APP URL in the management application) is https://localhost:44310/ which can be seen both on the applications overview and if you click on the application and go to the CONFIGURE “tab”:
The sign-on url should be the same as where the web API is hosted, in this case the same localhost-settings as you got in the development project web-settings.
Open up web.config of your web API project and have a look at these settings:
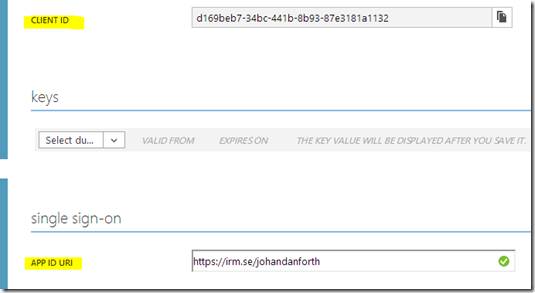
    <add key="ida:Audience" value="https://irm.se/johandanforth" />
    <add key="ida:ClientID" value="d169beb7-34bc-441b-8b93-87e3181a1132" />
The “ida:Audience” in web.config correspond to the value of APP ID URI of the application resource in the management portal and the “ida:ClientID” correspond to the CLIENT ID in the portal.
Update the web application manifest
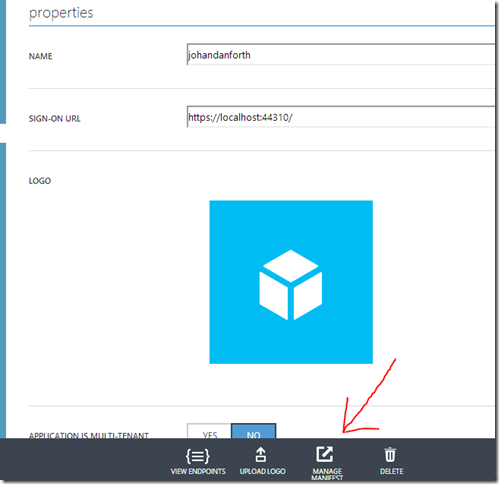
Before you any application can access this resource, we must update the “manifest”. Still on the CONFIGURE tab for your web API resource, there should be a MANAGE MANIFEST menu option down at the bottom toolbar. Click it and select “Download Manifest”. It’s a json-text-file, and should save it somewhere where you know is, because we will add a section to it and then upload it again using the same menu option:
Open the json-manifest and replace the "appPermissions": [], section with this:
"appPermissions":[
      {
         "claimValue":"user_impersonation",
         "description":"Allow the application full access to the service on behalf of the signed-in user",
         "directAccessGrantTypes":[

         ],
         "displayName":"Have full access to the service",
         "impersonationAccessGrantTypes":[
            {
               "impersonated":"User",
               "impersonator":"Application"
            }
         ],
         "isDisabled":false,
         "origin":"Application",
         "permissionId":"b69ee3c9-c40d-4f2a-ac80-961cd1534e40",
         "resourceScopeType":"Personal",
         "userConsentDescription":"Allow the application full access to the service on your behalf",
         "userConsentDisplayName":"Have full access to the service"
      }
   ],
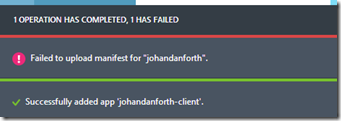
At the moment, there doesn’t seem to much in way of documentation on this manifest file, but it should work without modifications. I’ll try to write something about this manifest file as soon as I get some more docs on it.Next thing you do is upload the modified manifest file. Note that the portal may give you an error message during upload, but things seems to work anyway! It may look like this:Create a client
Now let’s try and access the sample ValuesController Web API in your development environment using a web browser, Fiddler or similar. In my case it’s https://localhost:44309/api/values and you should get a HTTP/1.1 401 Unauthorized error back. To be able to access the protected resource, you must add a client resource in the AD and configure it to access the web API.
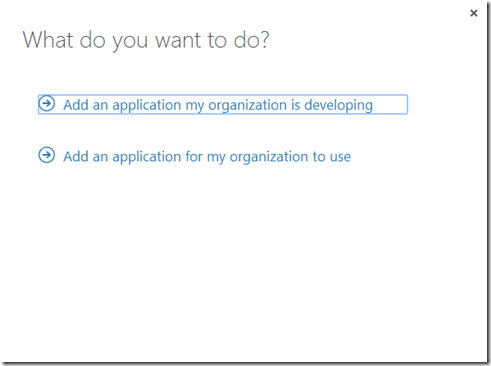
If you are not there already, in the Azure management portal, go to Active Directory, click on your domain name and select the APPLICATIONS tab. Then click the ADD-icon down the center of the bottom toolbar. Then go ahead and select “Add an application my organization is developing”:
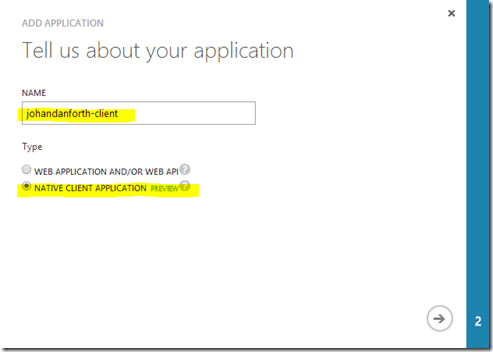
Enter a name for your client (I’m going with “johandanforth-client”, and make sure you select NATIVE CLIENT APPLICATION because we’re going to write a simple Windows WPF client to call our web API:
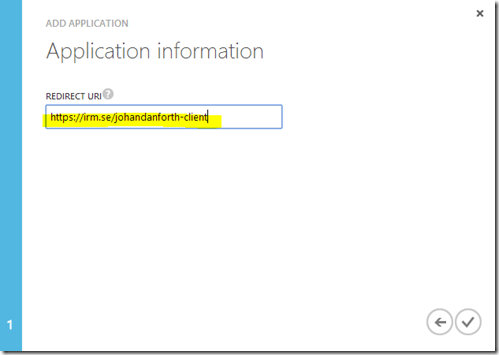
On the second page, type in a redirect url for your client – it can be anything as long as it is a valid url. I’m going with https://irm.se/johandanforth-client.
Your client is now created, but the last step to do is to give permission to our web API. Scroll down to the bottom of the client application CONFIGURE page and look at the “permissions to other applications (preview)” section. In the dropdown marked “select application” you should be able to see and select your web API. You must also select the “Delegated permissions” dropdown and mark the only option available for you. As you can see, the description matches the text in the manifest file:
Remember to SAVE!
Almost there, hang on…
Create a Windows WPF application for testing
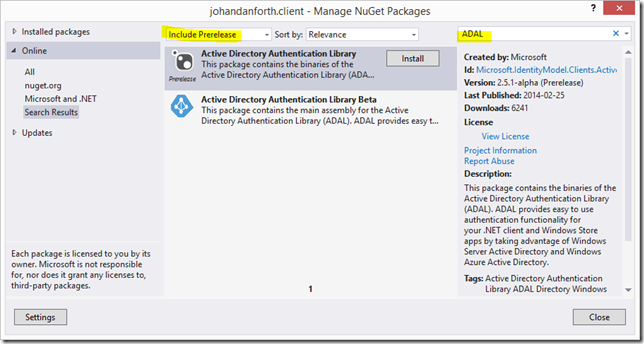
Add a new Windows WPF Application to your solution, I’m calling it “johandanforth.client”, and create a button with a click-event or something to hold the code that will authenticate and get values from your API. Bring up NuGet and search for “ADAL”, make sure you have “Include Prerelease” selected:
Install the prerelease package from February 2014 (it will probably be updated soon), then paste this code into the click-event of that button you created earlier:
using System;
using System.Net.Http;
using System.Windows;
using Microsoft.IdentityModel.Clients.ActiveDirectory;

namespace johandanforth.client
{
    public partial class MainWindow : Window
    {
        public MainWindow()
        {
            InitializeComponent();
        }

        private async void Button_Click(object sender, RoutedEventArgs e)
        {
            //this is to accept dev certificates - do not use in production!
            System.Net.ServicePointManager.ServerCertificateValidationCallback = ((a, b, c, d) => true);

            var ac = new AuthenticationContext("https://login.windows.net/irm.se");   //ad domain = irm.se

            var ar1 = ac.AcquireToken("https://irm.se/johandanforth",   //app id uri of the web api
              "91b4bc31-92c2-4699-86f5-fa84a718da30",                   //the client id
              new Uri("https://irm.se/johandanforth-client"));          //the client redirect uri

            var authHeader = ar1.CreateAuthorizationHeader();

            var client = new HttpClient();
            var request = new HttpRequestMessage(HttpMethod.Get, "https://localhost:44310/api/values");
            request.Headers.TryAddWithoutValidation("Authorization", authHeader);
            var response = await client.SendAsync(request);
            var responseString = await response.Content.ReadAsStringAsync();
            MessageBox.Show(responseString);
        }
    }
}
There are a few lines that must be change to work with your sample code. First change the AuthenticaitonContext to match your Azure AD domain/tenant name:
var ac = new AuthenticationContext("https://login.windows.net/irm.se");Next look at the code part which acquires a token – this is when the login dialog pops up and asks the user to log in using his or hers organizational account. This line corresponds to the web API uri, which is the same as the “ida:Audience” in your web.config file, so update it to match that value:
var ar1 = ac.AcquireToken("https://irm.se/johandanforth",
The next line is the client id of the application client you created in Azure AD, look it up and change the id accordingly:
"91b4bc31-92c2-4699-86f5-fa84a718da30",
The last line is the redirect-uri of the client, look it up on the same page in the Azure management portal:
new Uri("https://irm.se/johandanforth-client"));
You must also modify the line with the call to the web API method to match your web server localhost settings:
var request = new HttpRequestMessage(HttpMethod.Get, "https://localhost:44310/api/values");
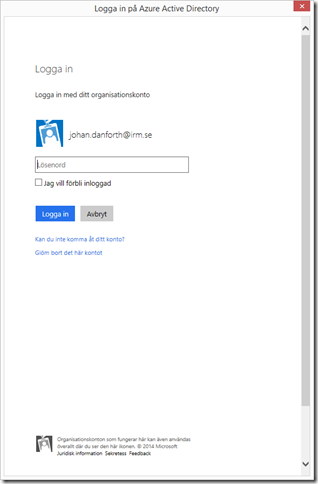
Now, start the web API program in debug mode and wait until you see the Home Page, then right click and start debug of the WPF client. Click the button and you should be prompted to log in with your organizational account (this is the look of it in Swedish):
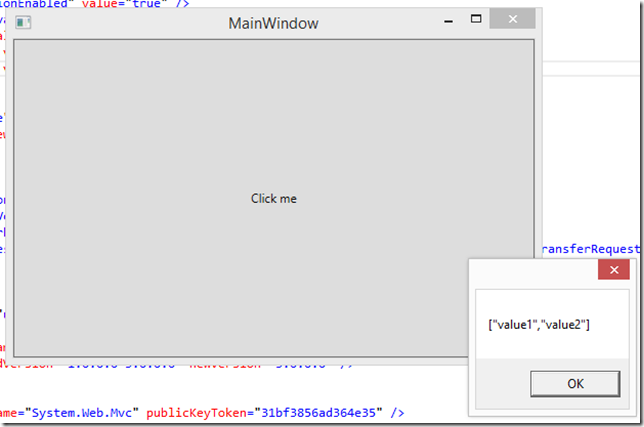
After a successful login, the code continues and you should be greeted with this:
Still with me?
Deploy to Azure
This is all well and good (hopefully), but we want to deploy our web API to Azure and run our clients against it in the cloud. To do that we need to:
1) Create a web site to host our web API in Azure
2) Publish our code to the site
3) Create an Azure AD resource for the web API (VS does this for you)
4) Modify the manifest for the web API (like before)
5) Give the client permission to the new resource (like before)
6) Update web.config and the client code to match the IDs and URIs of the new resources (ida:Audience == APP ID URI == the resource you want to access)
7) Publish the code again (to get the updated web.config uploaded)
8) Run!
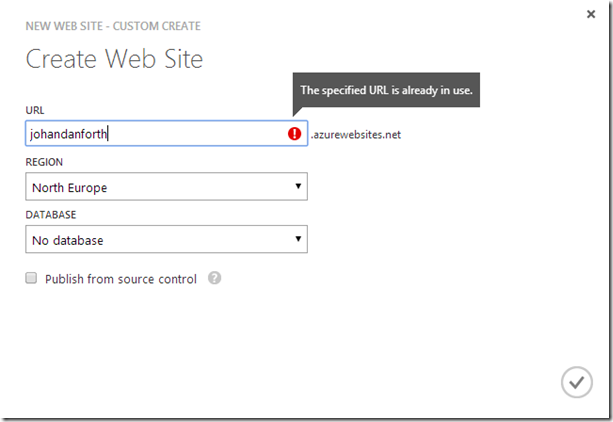
Here’s some quick shots of some of the steps. First create a web site in Azure by selecting “WEB SITES” in the left hand menu of the Azure Portal, press the big plus-sign down in the corner and create a custom web site. I’m calling mine “johandanforth” (ignore the error message
 )
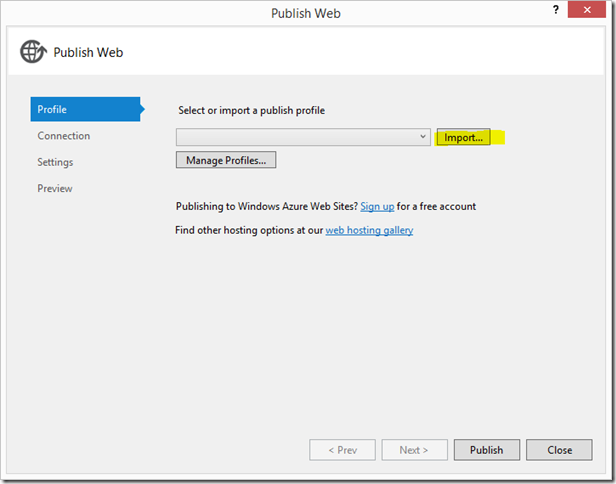
)Now go back to Visual Studio, right click the web API project and select “Publish…”.
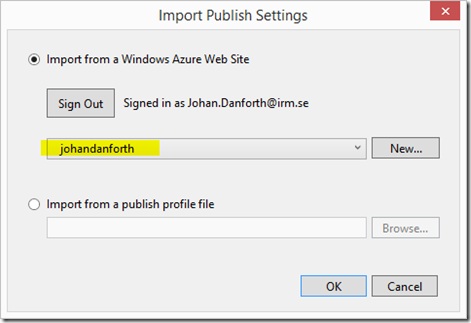
Press the “Import…” button to download and import the publishing profile of the web site you created, and select the newly created Web Site in the dropdown. Click OK.
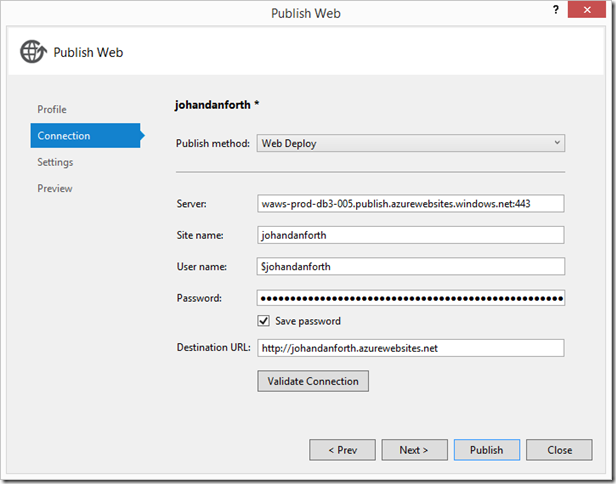
You have to authenticate one or two times to get past these steps, but should finally get to the last step of the Publish process:
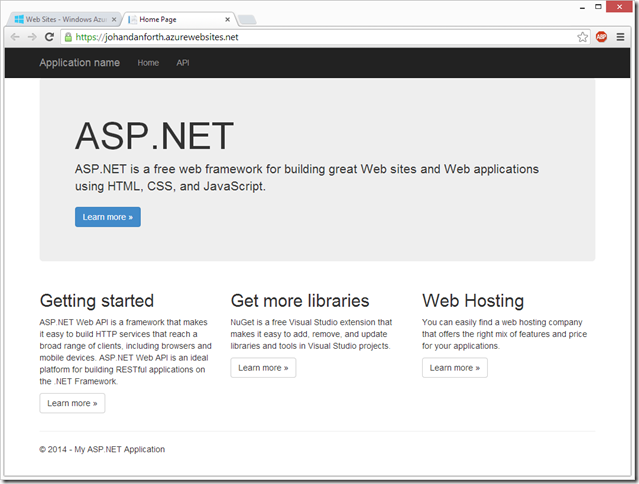
When Visual Studio is done publishing, a browser page will open up with the Home Page showing:
Visual Studio should now have created a new application resource in the Azure Active Directory, so get back to the portal and have a look at the list of AD applications. A resource named “WebApp-xxxxxxxxx.azurewebsites.net” should be listed there. Note – you may have to sign out and sign in to the portal to show the web api resource. This has happened to me a couple of times!
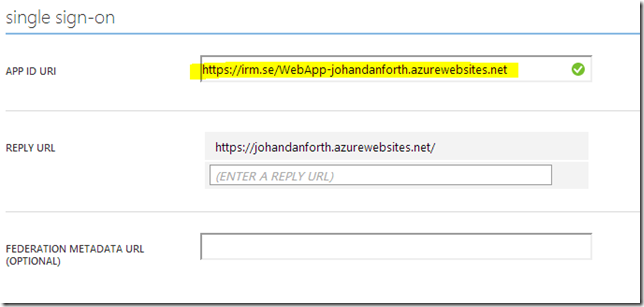
Click on the resource and look at the details in the CONFIGURE tab.
Copy the name of the “APP ID URI” and past it into the “ida:Audience” value in the web.config file of your web API project in Visual Studio:
<add key="ida:Audience" value="https://irm.se/WebApp-johandanforth.azurewebsites.net" />
The same value must also be updated in the WPF client:
var ar1 = ac.AcquireToken(https://irm.se/WebApp-johandanforth.azurewebsites.net,
You must also (of course) update the call to the web API method to point at the web site in the cloud:
var request = new HttpRequestMessage(HttpMethod.Get, "https://johandanforth.azurewebsites.net/api/values");
We’re not done yet though… now you have to do the same steps you did for the localhost resource earlier - download and update the manifest file for the web API resource and give the client resource permission to use the service.
Finally (yes finally) – publish the web API project again to get the updated web.config file to the cloud site!
Once the code is published, you should be able to run the client successfully.
Please give feedback if you have problems with any step/s of this walkthrough. Other questions, bugs and such is better asked on the Windows Azure Active Directory forum. I’m still learning these things and trying to keep up with the changes

-
How to do Custom Event Logging and Trace Writing in Azure
We’re about to begin our first “real” Azure project and I needed to wrap my head around event logging and trace writing in the cloud. Any proper application running in any cloud needs this sooner or later.
I quickly noticed that the information around Azure diagnostics was all over the place, and some things seems to have been changed in newer versions of the Azure SDK. So, something I thought was going to take me just a few minutes to figure out took about a day, but I think I got it sorted in the end and here’s what I did to get simple event logging and trace writing to work for our web role.
First thing I had to understand was how data for all kinds of diagnostics is handled and stored in Azure. You need to define which kinds of diagnostics data you want to capture, and you need to define where Azure should transfer the data captured so that you can download them or look at then with various tools. You also need to define how often these values should be transferred. I’ll get back to that a bit later.
Create a Custom Event Source
First thing I wanted to have was a custom event source to write to for warnings and errors. To do this I created a simple cmd-file which I placed inside the web role project and uploaded with the packed deployment. Now when the web role is deployed, you define startup task which runs in elevated mode (to be able to create the event source) and points to this cmd-file. So, create a file inside your project’s root called CreateEventSource.cmd and put this inside it:
EventCreate /L Application /T Information /ID 900 /SO "MySource" /D "my custom source"
NOTE! Make sure the cmd-file property for “copy to output directory” is set to “copy always” or “copy if newer”.
Then open up your service definition file, ServiceDefinition.csdef, and add a startup task to it:
<?xml version="1.0" encoding="utf-8"?>
<ServiceDefinition name="MyWeb" xmlns="http://schemas.microsoft.com/ServiceHosting/2008/10/ServiceDefinition">
  <WebRole name="MyWebRole" vmsize="ExtraSmall">
    <Startup>
      <Task commandLine="CreateEventSource.cmd" executionContext="elevated" taskType="simple" />
    </Startup>
    <Sites>
… and so on…
</ServiceDefinition>
So now when your application is deployed the cmd-file should be executed with elevated permission and create the event log source you specified. EventCreate is a tool which is available on the Azure server so it’s nothing you need to worry about. Same thing should work well on your local dev machine too.
Storage Location for Diagnostics Data
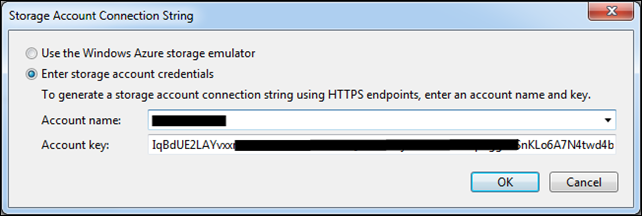
You need a place for the diagnostics data to be transferred to. This is number of Azure Storage tables so you need to create an Azure Storage Account where Azure can create these specific tables and transfer the captured data. So you basically go to the Azure Management Portal and create a new Storage Account and copy the access key. Then paste the storage account name and key into the Service Configuration:
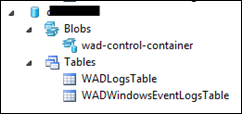
Now when Azure starts to transfer data from event log and trace writes, they will be written to these two tables; WADLogsTable and WADWindowsEventLogsTable:
If you capture performance counters and such, these will be written to other tables.
Diagnostics Configuration
Next thing to do is to configure which diagnostics to capture for your application. This is done in the OnStart() method of your WebRole.cs file. What I wanted to test initially was event logging to my custom source and also some trace writings for information, warning and errors. I also specified how frequently I wanted these diagnostics to be written to the storage tables:
public override bool OnStart()
{
    var diag = DiagnosticMonitor.GetDefaultInitialConfiguration();

    diag.Logs.ScheduledTransferLogLevelFilter = LogLevel.Information;
    diag.Logs.ScheduledTransferPeriod = TimeSpan.FromSeconds(30);

    diag.WindowsEventLog.DataSources.Add("Application!*[System[Provider[@Name='MySource']]]");
    diag.WindowsEventLog.ScheduledTransferPeriod = TimeSpan.FromSeconds(30);

    DiagnosticMonitor.Start("Microsoft.WindowsAzure.Plugins.Diagnostics.ConnectionString", diag);

    return base.OnStart();
}
Note a few things about this code – The transfer schedule is set to 30 seconds and you may want to set this one a bit higher and also look at the buffer quotas. The sample code is also only capturing and transferring event logs from the “Application” logs, and I’ve added an xpath expression to only transfer logs from the “MySource” event source we specified in the cmd-file earlier. You may want to grab all application events as well as all system logs too, in that case:
diag.WindowsEventLog.DataSources.Add("System!*");
diag.WindowsEventLog.DataSources.Add("Application!*");
Writing to Event and Trace Logs
The simplest thing is then to add some code to write to the event log and trace logs in your code, for example:
Trace.TraceError("Invalid login");
EventLog.WriteEntry("MySource","Invalid login",EventLogEntryType.Error);
Looking at the Data
To actually see what’s been written to these tables, you need to either download the data from the storage tables via APIs, use the server explorer or some tool, like the one from Cerebrata – “Azure Diagnostics Manager” – which seems to do the job pretty well. As far as I know, there is no proper tool available from Microsoft. Be that as it may.
Please, feel free to write comments below and add tips and tricks about handling diagnostics in your Azure application. I’d like to know more about the Transfer Period and Buffer Quotas and how they may affect the application and maybe also the billing… I’m sure there are loads to learn about this
 .
. -
Azure Summit Sweden
Azure Summit Sweden, held at Microsoft Sweden, was quite successful I would say. Every session was more or less fully booked and had 100 people or so attending.I held a session with Dag König on the basics of Web Role and Worker Role and promised to put the code for the “Twitted Demo” on Codeplex so that those who were interested could work on the code together and transform it into something that would or could work in a larger scenario.
So I put the code up on Codeplex and called it Another Azure Demo Project - http://anotherazuredemoproj.codeplex.com/.
Feel free to go there, and request to join the project if you like!
The initial version of the code is made as a simple getting started demo, made for one instance of a web role and one instance of a worker role. The code has a worker role which does a search for specific words or tags on Twitter and stores the number of hits for that word in a table storage. A web page displays the number of hits per minute in a graph. This hand/mouse written sketch should explain the overall idea pretty much I think/hope (it's sketchy on purpose :)
The Future Version
The idea is to make the code grow into something that is more "Azureable", something that would support multiple instances of the web and worker role. I've not worked out the final scenario yet, but one place to start would be to support searching for loads of tags, and have the search distributed between multiple instances of the worker role. -
SQL Azure Explorer on Channel 9
 Our SQL Azure Explorer Addin for VS2010, which is on Codeplex was mentioned on the Last Week on Channel 9 show, which is cool. Made the download stats peek even though it’s for VS2010 Beta 1 only and you need to have an SQL Azure CTP account.
 That show is one of the best for people like me who need to keep up with the latest stuff happening on the Windows and .NET front.
I need to get some time and refactor the data access layer. It works, but it’s not consistent and could use more integration tests. Or I’ll let it be and just work on new features, which is way funnier ;)
-
SQL Azure Explorer Addin for VS2010 Beta 1
Me and Dag König just released the alpha version of a (so far) small Codeplex project we’ve been working on for the last week or so – an SQL Azure Explorer Addin for Visual Studio 2010 Beta 1.
The reasons for this project are several, but mostly to learn more about VS2010, how to create addins for it, dig into SQL Azure and at the same time learn some WPF and XAML.
The addin is a VSIX package and easily installed in VS2010 by just downloading and double clicking it.
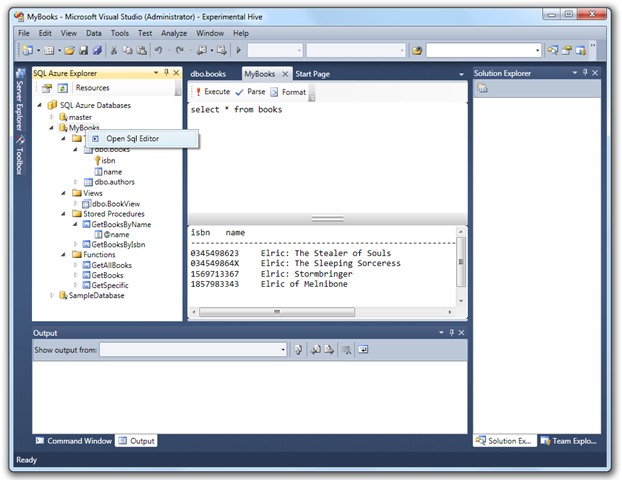
Here’s a sample screenshot of the explorer and the integrated SQL Editor:
If you got VS2010 Beta 1 and some SQL Azure databases you work with, please download and feedback. I’m sure Microsoft will eventually support SQL Azure in the built-in server explorer, but as I said, this is for fun (it’s great fun to code addins) and the code might be useful for other future projects :)
