Contents tagged with ClickOnce
-
Writespace - Fullscreen Writing Environment Add-in for Word
 I just published this open source project on Codeplex, and this information is available on the Writespace Codeplex home page as well.
Writespace is a fullscreen writing environment, developed with WPF (Windows Presentation Foundation) as a ClickOnce installed add-in for Word 2007 . Unfortunately Codeplex cannot host ClickOnce applications, so to install the add-in you will have to download and run the installer locally until I've found a site to host it.
Writespace is inspired by Dark Room (http://they.misled.us/dark-room) for Windows and Write Room (http://www.hogbaysoftware.com/product/writeroom) for OS X. One advantage of Writespace is the built in spellcheck support (English, French, Spanish and German).
The program is quite simple, but I've been missing a plug-in for Word like this one. I've been using the excellent Dark Room editor, but unfortunately it doesn't have support for spell checking or Word integration.IMPORTANT NOTE
Always, always, always keep a copy of your orginal document or text before you try out or use Writespace so you can revert if things go bad. Writespace is work in progress and has not yet been tested enough to be called "stable".System Requirements
NOTE: I need help with specifying the requirements to run this, but personally I'm on Vista, .NET 3.5 SP1 and Word 2007.
Downloads and Installation
The add-in is installed as a ClickOnce application, but it's not possible to host ClickOnce installers on Codeplex, so you will either have to download the binaries as a zip or download the source and run it from Visual Studio 2008.Shortcuts
Writespace supports the following shortcuts from within the writing environment:
CTRL+Mousewheel - Zoom in/out
CTRL+F - Search
F3 - Find next
CTRL+G - Go to line
ESC- Exit to Word
CTRL+S - Save
Writespace also supports the standard Undo/Redo/Select/Cut/Paste functionality you are used to.Word Integration
Writespace is started from the View-tab of the Word 2007 Ribbon, just click the "Writespace" button and the text of the current document is grabbed and put into the Writespace full screen editor. When you escape from Writespace, the text in the Word document is updated with the text from Writespace. Note that Writespace removes all formating of the text, so italics, font size, bold text, is removed and converted into the font, color and size Writespace uses. Word documents containing tables, pictures and other "non-text" content will not be possible to move to the Writespace editor, and you will get an error dialog if you try this. This is to protect you from messing things up.Text Formatting
Writespace does not have any support for formatting the text. You can select the size, color and type of font, which will affect the whole editor, but that's it. This may change in the future though. Note that if you enter the Writespace editor from an existing document in Word, the formatting of that text will be removed and converted to plain Writespace text.Spell Check
Writespace uses the built in spell checking support which comes with WPF. Language is set from the options dialog. Unfortunately WPF only supports English, French, German and Spanish at the moment. If you still want to spell check your text, just escape back to Word and let it handle that for you.Drag/drop Margin
The left and right side margin can be changed without leaving Writespace. Just move the mouse over the left margin until it lights up, and adjust the size of the margin until you are satisfied.
Drag the margin with left mouse button and release. The new margin size will be saved to settings automatically.Find
Press CTRL+F to display the find dialog. Press F3 to find next, next, next... as you are probably used to.Goto Line
Press CTRL+G to display the goto dialog which helps you go to a specific line in the text.Status Bar
The editor has a descrete status bar to show information about file saved and it also displays the current row and column in an animated, fade-out way. Feedback about the status bar and the row/col informaiton is appreciated.Mousewheel Zoom
The font size can also be changed without leaving the writing environment. Just hold CTRL and use the mouse wheel to zoom in our out of the text. The current size will also be saved to the settings.Options
It's possible to set color, font, size and margin from the options dialog. It's also possible to enable/disable spellchecking by specifying the language.
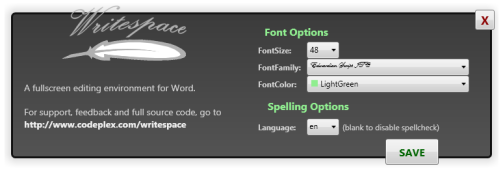
(image is shrinked down to fit in the blog)
Writespace Re-use
The Writespace editor and options dialog have public classes, methods and properties which makes it possible to run it from other .NET compatible languages. This will be better documented in the future. -
Expiring Temp ClickOnce Certificates - Create Your Own With Long Expiration
I'm looking at ClickOnce and ran into several blog posts where people were worried about expiring certificates when using a temporary PFX file created by VisualStudio. Appearently the certs issued by VS expire after a year and you will probably start running into problems with new deployments after that.
There is a KB article on MSDN that describes this problem but doesn't offer any good solutions (IMHO). Instead, if you have the Windows SDK installed you can create a certificte with much longer expiration, then create a PFX file from the cert and use with your ClickOnce application:
makecert.exe -r -pe -a sha1 -n "CN=MyClickOnceApp" -b 01/01/2000
-e 01/01/2036 -eku 1.3.6.1.5.5.7.3.3 -sv MyClickOnceApp.pvk MyClickOnceApp.cer
pvk2pfx.exe -pvk MyClickOnceApp.pvk -spc MyClickOnceApp.cer -pfx MyClickOnceApp.pfx
This has been described in several places out there and my initial tests with makecert/pvk2pfx seems to work well so I'm storing the steps here for later use. I'm going to use it for a Codeplex project I'm opening up soon, so stay tuned...