Contents tagged with WPF
-
Using FontAwesome in WPF
 Want to use FontAwesome (http://fontawesome.io/) in your WPF application? With a few simple steps you can do it.
1) Use Nuget and Install-Package FontAwesome
2) Mark the file /fonts/fontawesome-webfont.ttf and set it’s “Build Action” to “Resource”
3) Test the font in a simple TextBlock like this:
<Window x:Class="FontAwesomeWPFBlogTest.MainWindow"
xmlns="http://schemas.microsoft.com/winfx/2006/xaml/presentation"
xmlns:x="http://schemas.microsoft.com/winfx/2006/xaml"
Title="MainWindow"
Height="350"
Width="525"> <Grid> <Viewbox> <TextBlock Text=""
FontFamily="pack://application:,,,/fonts/#FontAwesome" /> </Viewbox> </Grid> </Window>Run it and you should see this:

The “hardest” thing is to make sure you enter the right icon-hexcode for the Text property. You can look at the different icons available in the icon-gallery page on http://fontawesome.io/icons/ then check the name of the icon you like. After that, go to the /Contents/font-awesome.css file in your project and look it up there, say for example the paint-brush icon:
.fa-paint-brush:before {   content: "\f1fc";
}
The content-value says “\f1fc” which is the hex value of the paint-brush symbol in the font and that is the value you have to enter in the Text-property in your XAML:
Text=”&#f1fc;”
-
Detecting Idle Time with Global Mouse and Keyboard Hooks in WPF
Years and years ago I wrote this blog post about detecting if the user was idle or active at the keyboard (and mouse) using a global hook. Well that code was for .NET 2.0 and Windows Forms and for some reason I wanted to try the same in WPF and noticed that a few things around the keyboard and mouse hooks didn’t work as expected in the WPF environment. So I had to change a few things and here’s the code for it, working in .NET 4.
I took the liberty and refactored a few things while at it and here’s the code now. I’m sure I will need it in the far future as well.
using System;
using System.Diagnostics;
using System.Runtime.InteropServices;

namespace Irm.Tim.Snapper.Util
{
    public class ClientIdleHandler : IDisposable
    {
        public bool IsActive { get; set; }

        int _hHookKbd;
        int _hHookMouse;

        public delegate int HookProc(int nCode, IntPtr wParam, IntPtr lParam);
        public event HookProc MouseHookProcedure;
        public event HookProc KbdHookProcedure;

        //Use this function to install thread-specific hook.
        [DllImport("user32.dll", CharSet = CharSet.Auto,
             CallingConvention = CallingConvention.StdCall)]
        public static extern int SetWindowsHookEx(int idHook, HookProc lpfn,
            IntPtr hInstance, int threadId);

        //Call this function to uninstall the hook.
        [DllImport("user32.dll", CharSet = CharSet.Auto,
             CallingConvention = CallingConvention.StdCall)]
        public static extern bool UnhookWindowsHookEx(int idHook);

        //Use this function to pass the hook information to next hook procedure in chain.
        [DllImport("user32.dll", CharSet = CharSet.Auto,
             CallingConvention = CallingConvention.StdCall)]
        public static extern int CallNextHookEx(int idHook, int nCode,
            IntPtr wParam, IntPtr lParam);

        //Use this hook to get the module handle, needed for WPF environment
        [DllImport("kernel32.dll", CharSet = CharSet.Auto)]
        public static extern IntPtr GetModuleHandle(string lpModuleName);

        public enum HookType : int
        {
            GlobalKeyboard = 13,
            GlobalMouse = 14
        }

        public int MouseHookProc(int nCode, IntPtr wParam, IntPtr lParam)
        {
            //user is active, at least with the mouse
            IsActive = true;
            Debug.Print("Mouse active");

            //just return the next hook
            return CallNextHookEx(_hHookMouse, nCode, wParam, lParam);
        }

        public int KbdHookProc(int nCode, IntPtr wParam, IntPtr lParam)
        {
            //user is active, at least with the keyboard
            IsActive = true;
            Debug.Print("Keyboard active");

            //just return the next hook
            return CallNextHookEx(_hHookKbd, nCode, wParam, lParam);
        }

        public void Start()
        {
            using (var currentProcess = Process.GetCurrentProcess())
            using (var mainModule = currentProcess.MainModule)
            {

                if (_hHookMouse == 0)
                {
                    // Create an instance of HookProc.
                    MouseHookProcedure = new HookProc(MouseHookProc);
                    // Create an instance of HookProc.
                    KbdHookProcedure = new HookProc(KbdHookProc);

                    //register a global hook
                    _hHookMouse = SetWindowsHookEx((int)HookType.GlobalMouse,
                                                  MouseHookProcedure,
                                                  GetModuleHandle(mainModule.ModuleName),
                                                  0);
                    if (_hHookMouse == 0)
                    {
                        Close();
                        throw new ApplicationException("SetWindowsHookEx() failed for the mouse");
                    }
                }

                if (_hHookKbd == 0)
                {
                    //register a global hook
                    _hHookKbd = SetWindowsHookEx((int)HookType.GlobalKeyboard,
                                                KbdHookProcedure,
                                                GetModuleHandle(mainModule.ModuleName),
                                                0);
                    if (_hHookKbd == 0)
                    {
                        Close();
                        throw new ApplicationException("SetWindowsHookEx() failed for the keyboard");
                    }
                }
            }
        }

        public void Close()
        {
            if (_hHookMouse != 0)
            {
                bool ret = UnhookWindowsHookEx(_hHookMouse);
                if (ret == false)
                {
                    throw new ApplicationException("UnhookWindowsHookEx() failed for the mouse");
                }
                _hHookMouse = 0;
            }

            if (_hHookKbd != 0)
            {
                bool ret = UnhookWindowsHookEx(_hHookKbd);
                if (ret == false)
                {
                    throw new ApplicationException("UnhookWindowsHookEx() failed for the keyboard");
                }
                _hHookKbd = 0;
            }
        }

        #region IDisposable Members

        public void Dispose()
        {
            if (_hHookMouse != 0 || _hHookKbd != 0)
                Close();
        }

        #endregion
    }
}
The way you use it is quite simple, for example in a WPF application with a simple Window and a TextBlock:
<Window x:Class="WpfApplication2.MainWindow"
        xmlns="http://schemas.microsoft.com/winfx/2006/xaml/presentation"
        xmlns:x="http://schemas.microsoft.com/winfx/2006/xaml"
        Title="MainWindow" Height="350" Width="525">
    <Grid>
        <TextBlock Name="IdleTextBox"/>
    </Grid>
</Window>
And in the code behind we wire up the ClientIdleHandler and a DispatcherTimer that ticks every second:
public partial class MainWindow : Window
{
    private DispatcherTimer _dispatcherTimer;
    private ClientIdleHandler _clientIdleHandler;

    public MainWindow()
    {
        InitializeComponent();
    }

    private void Window_Loaded(object sender, RoutedEventArgs e)
    {
        //start client idle hook
        _clientIdleHandler = new ClientIdleHandler();
        _clientIdleHandler.Start();

        //start timer
        _dispatcherTimer = new DispatcherTimer();
        _dispatcherTimer.Tick += TimerTick;
        _dispatcherTimer.Interval = new TimeSpan(0, 0, 0, 1);
        _dispatcherTimer.Start();
    }

    private void TimerTick(object sender, EventArgs e)
    {
        if (_clientIdleHandler.IsActive)
        {
            IdleTextBox.Text = "Active";
            //reset IsActive flag
            _clientIdleHandler.IsActive = false;
        }
        else IdleTextBox.Text = "Idle";
    }
}
Remember to reset the ClientIdleHandle IsActive flag after a check.
-
Custom Caret “cheat” in WPF TextBox
I’ve seen people ask for custom Carets in the WPF TextBox, like in insert mode and you want to have a block caret or underscore. Some say it’s going to be possible/easier to do this in .NET 4.0, but until then, there are some simple cheats you can do to add it yourself, but it will need some tweaking. In this test I’ve put a Canvas on top of the TextBox, on which I draw the custom caret and move it when keys are pressed in the TextBox. If you absolutely need this behavior you can probably tweak it to work, but movement, drawing and all that depends on the font face and size.

In my sample code, the custom caret is invisible to start with, and only drawn when in overwrite mode. The drawing is kind of jerky when using the arrow keys and home, end etc, but I think it can be fixed. One way would be to make the built in caret the same color as the TextBox background, like described by Lester in his blog post.
-
SQL Azure Explorer Addin for VS2010 Beta 1
Me and Dag König just released the alpha version of a (so far) small Codeplex project we’ve been working on for the last week or so – an SQL Azure Explorer Addin for Visual Studio 2010 Beta 1.
The reasons for this project are several, but mostly to learn more about VS2010, how to create addins for it, dig into SQL Azure and at the same time learn some WPF and XAML.
The addin is a VSIX package and easily installed in VS2010 by just downloading and double clicking it.
Here’s a sample screenshot of the explorer and the integrated SQL Editor:

If you got VS2010 Beta 1 and some SQL Azure databases you work with, please download and feedback. I’m sure Microsoft will eventually support SQL Azure in the built-in server explorer, but as I said, this is for fun (it’s great fun to code addins) and the code might be useful for other future projects :)
-
WPF Learnings - Drawing on Multiple Monitors
 Some time ago I wrote a fullscreen editing environment add-in for Word to learn some WPF and some Office Ribbon stuff. The editor is called Writespace and is now available om Codeplex as open source.
Scott Hanselman was kind enough to take a few minutes and review the first draft of the editor and told me I should support multiple monitors and that I could look at BabySmash code to see how he did it. Said and done, I downloaded the BabySmash code, dug into the multi-monitor stuff and found out it's not that strange.
Writespace is a fullscreen editor, and when the user press CTRL+M I want to move the whole thing over to the next available monitor. First you may want to do some sanity check that you got more than one monitor available. This is easy enough with something like this:
if (SystemInformation.MonitorCount < 2)
{
...only one monitor available...
}
The different screens are available via the Screen.AllScreens[] array so once I've picked a screen to draw on I send it as a paramter to a CreateEditor() method:
private static void CreateEditor(Screen screen)
{
var editor = new TextEditorWindow
{
WindowStartupLocation = WindowStartupLocation.Manual,
Left = screen.WorkingArea.Left,
Top = screen.WorkingArea.Top,
Width = screen.WorkingArea.Width,
Height = screen.WorkingArea.Height
};
//setting up other stuff, like events and things here...
editor.Show();
editor.WindowState = WindowState.Maximized; //do this after Show() or won't draw on secondary screens
editor.Focus();
}
The setting of WindowState to Maximized after Show() is a trick/workaround for something that seems to be a bug or something I don't grok about WPF in full screen and multiple monitors. The editor window itself has WindowStyle="None" ResizeMode="NoResize" set.
Hope this helps someone.
-
WPF Learnings - Animated Screen Glint Effect
To learn some WPF I wrote this full screen editor called Writespace, which is now open source on Codeplex. I wanted to add some bling to the editor when it was loaded up, so I created a simple animated "screen glint" effect which is totally useless but looks kind of nice (IMHO). Basically it's a semi-transparent gradient, in a rectangle, on a canvas, the size of the screen, which animates over the screen from left to right.
I had a question about the best way to do this over at Stackoverflow, so check it out if you want some sample code which produces the test-output you see above (which is in mid-animation :)
-
Writespace - Fullscreen Writing Environment Add-in for Word
 I just published this open source project on Codeplex, and this information is available on the Writespace Codeplex home page as well.
Writespace is a fullscreen writing environment, developed with WPF (Windows Presentation Foundation) as a ClickOnce installed add-in for Word 2007 . Unfortunately Codeplex cannot host ClickOnce applications, so to install the add-in you will have to download and run the installer locally until I've found a site to host it.
Writespace is inspired by Dark Room (http://they.misled.us/dark-room) for Windows and Write Room (http://www.hogbaysoftware.com/product/writeroom) for OS X. One advantage of Writespace is the built in spellcheck support (English, French, Spanish and German).
The program is quite simple, but I've been missing a plug-in for Word like this one. I've been using the excellent Dark Room editor, but unfortunately it doesn't have support for spell checking or Word integration.IMPORTANT NOTE
Always, always, always keep a copy of your orginal document or text before you try out or use Writespace so you can revert if things go bad. Writespace is work in progress and has not yet been tested enough to be called "stable".System Requirements
NOTE: I need help with specifying the requirements to run this, but personally I'm on Vista, .NET 3.5 SP1 and Word 2007.
Downloads and Installation
The add-in is installed as a ClickOnce application, but it's not possible to host ClickOnce installers on Codeplex, so you will either have to download the binaries as a zip or download the source and run it from Visual Studio 2008.Shortcuts
Writespace supports the following shortcuts from within the writing environment:
CTRL+Mousewheel - Zoom in/out
CTRL+F - Search
F3 - Find next
CTRL+G - Go to line
ESC- Exit to Word
CTRL+S - Save
Writespace also supports the standard Undo/Redo/Select/Cut/Paste functionality you are used to.Word Integration
Writespace is started from the View-tab of the Word 2007 Ribbon, just click the "Writespace" button and the text of the current document is grabbed and put into the Writespace full screen editor. When you escape from Writespace, the text in the Word document is updated with the text from Writespace. Note that Writespace removes all formating of the text, so italics, font size, bold text, is removed and converted into the font, color and size Writespace uses. Word documents containing tables, pictures and other "non-text" content will not be possible to move to the Writespace editor, and you will get an error dialog if you try this. This is to protect you from messing things up.Text Formatting
Writespace does not have any support for formatting the text. You can select the size, color and type of font, which will affect the whole editor, but that's it. This may change in the future though. Note that if you enter the Writespace editor from an existing document in Word, the formatting of that text will be removed and converted to plain Writespace text.Spell Check
Writespace uses the built in spell checking support which comes with WPF. Language is set from the options dialog. Unfortunately WPF only supports English, French, German and Spanish at the moment. If you still want to spell check your text, just escape back to Word and let it handle that for you.Drag/drop Margin
The left and right side margin can be changed without leaving Writespace. Just move the mouse over the left margin until it lights up, and adjust the size of the margin until you are satisfied.
Drag the margin with left mouse button and release. The new margin size will be saved to settings automatically.Find
Press CTRL+F to display the find dialog. Press F3 to find next, next, next... as you are probably used to.Goto Line
Press CTRL+G to display the goto dialog which helps you go to a specific line in the text.Status Bar
The editor has a descrete status bar to show information about file saved and it also displays the current row and column in an animated, fade-out way. Feedback about the status bar and the row/col informaiton is appreciated.Mousewheel Zoom
The font size can also be changed without leaving the writing environment. Just hold CTRL and use the mouse wheel to zoom in our out of the text. The current size will also be saved to the settings.Options
It's possible to set color, font, size and margin from the options dialog. It's also possible to enable/disable spellchecking by specifying the language.
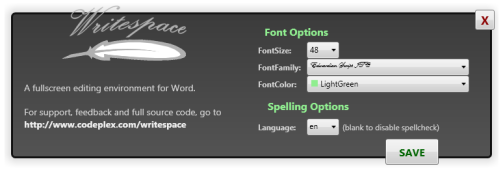
(image is shrinked down to fit in the blog)
Writespace Re-use
The Writespace editor and options dialog have public classes, methods and properties which makes it possible to run it from other .NET compatible languages. This will be better documented in the future. -
WPF is Different - The XAML Way of Doing Things
 Wow, I've finally spent some time looking at Silverlight and WPF samples, and it sure takes a while to wrap your head around "The XAML Way of Doing Things". It's so easy to fall back to the WinForms coding style when you're supposed to do it The XAML Way.
For example, if you have an options dialog with user settings for your app - DON'T do it the old WinForms way, but look at Configuration with Databinding (from Scott Hanselman's adventure with BabySmash). The code behind you need is really minimal if you do it the right way.
There are also a gazillion ways to handle control events declaratively within the XAML itself, without having to create a code behind event and code things up from there. Take a look at WPF Styles and Triggers and learn it! Especially if you want to create nice looking effects, animations and such, but styles and triggers are useful for more than bells and whistles. For many things related to the UI there are 2 ways of doing it - in XAML or in code behind. There's a pretty good starter on Styles and Triggers on the Microsoft Belgium MSDN site. It may not be wrong to do it in code behind, and some things *must* be coded that way, but always search for The XAML Way of doing it before falling into old WinForms behaviour.
Finally, what will take me a long time to understand and learn (if I ever learn it) is the XAML layout manager. I'm trying to position a group of controls in the center of a WPF Window that may be in full screen mode. First I used the Canvas panel and hacked away in a WinForms style specifying location depending on screen size and stuff, but I'm sure it can all be done in XAML... somehow *smile* ScottGu wrote an intro for Silverlight 2 on the layout manager, which is good reading if you are new to this.
I should probably install Expression Blend and learn at least the basics of it. The XAML editor in VS2008 is just not enough for more complex layouts. What scares me somewhat is that a fairly complex WPF/Silverlight window may result in pretty nasty XAML with a bunch of Grids, Stackpanels, Canvases, more Stackpanels within Stackpanels within a certain Grid.Column and so on. Add a bunch more if you're using triggers and animation. I know you can shrink the XAML somewhat by using Styles, but are we getting back into HTML Table Hell again when we've just been saved by CSS?
-
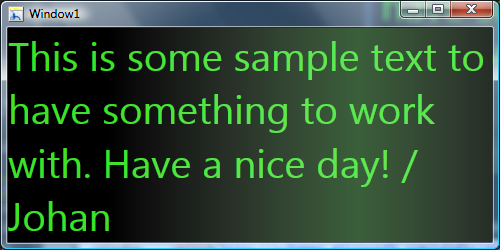
Open a WPF Window from WinForms
If you find yourself in need to open a WPF Window from a WinForms program - this is one way to do it (works for me):
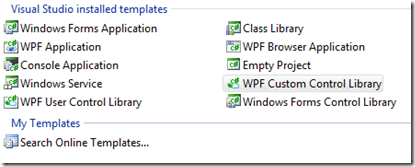
1) Create/Add a new project of type "WPF Custom Control Library"
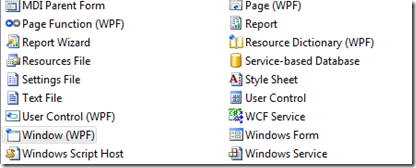
2) Add a new Item of type "Window (WPF)"
3) Do your thing with the WPF Window
4) From your WinForms app, create and open the WPF Window:
using System;
using System.Windows.Forms;
using System.Windows.Forms.Integration;
var wpfwindow = new WPFWindow.Window1();
ElementHost.EnableModelessKeyboardInterop(wpfwindow);
wpfwindow.Show();
There you go!
The EnableModelessKeyboardInterop() call is necessary to handle keyboard input in the WPF window if loaded from a non-WPF host like WinForms. I understand there are other ways to do this and you can read more about WPF/WinForms interop here.