Archives
-
Binding multiple websites to HTTPS on your development machine
On your development machine you can use host headers to bind to different websites within IIS, allowing you to host multiple websites on a single development machine (you can do this too in production but this article is focusing on the development environment).
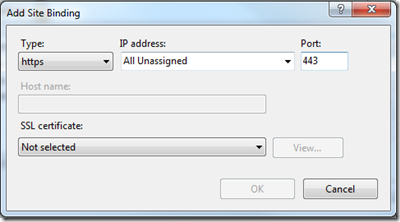
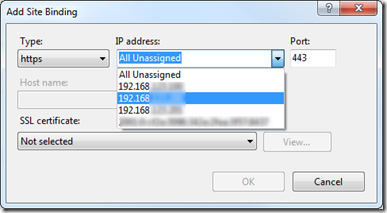
Host headers work only with HTTP since IIS is not able to see the host header information in an HTTPS request until it reaches the website so it would not know which site to bind to. For this reason, IIS does not allow you to specify a host header when setting up an HTTPS binding:
When you select the Binding Type of HTTPS, then the Host name box is disabled.
You then have two other choices to allow multiple websites on your development IIS environment to both run with HTTPS. You can either vary the Port or the IP Address between the two. Changing the Port is not desirable because this would usually mean extra code to make sure a special port number was used in requests (and then would not match a production environment). So this leaves you with IP address.
Most development machines have only a single network card and therefore, by default, a single IP address. So only having one IP address will not help you run more than one site under SSL.
But hidden within the Network Connection properties dialog is a way to specify a second (or third) IP address for your development machine; which is exactly what is needed to allow multiple websites to use SSL on your development machine.
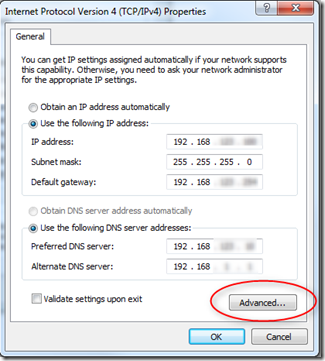
Go to Control Panel > Network and Sharing Center > Change adapter settings (or just get to the properties of your Network Adapter).
Here is where you will see the primary IP address for your machine (either it will be as above if you have a static IP address, or more likely you have a dynamic IP address and then both of the Obtain IP address and DNS server automatically options will be selected. But there is a way to add a second (or third) IP address. Just click that Advanced button in the lower right.
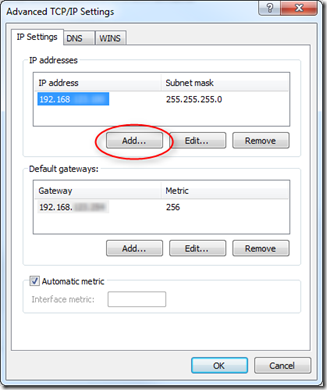
Now click the Add… button where you will be able to add a static IP address (you will need a static IP address to be able to do this).
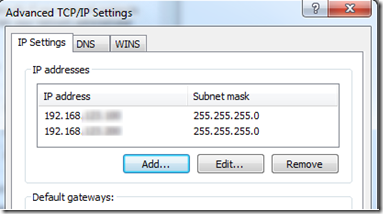
OK your way out and now your machine will have two IP addresses.
Returning back to the IIS Add Site Binding dialog and now in the IP Address drop down you will see your second IP address (or in the case of the screenshot below a third too).
Just choose one of these IP addresses for one site and the other for the other site that you also want to allow HTTPS (SSL) requests on.
Now there is one last thing to take care of and that is to make sure the request to this site is resolving to the correct IP address. In most cases, if you are using host headers to host multiple websites on your development machine, then you have entered entries into your Hosts file using the local loopback IP address 127.0.0.1. But now you will need to make sure you change these to the IP addresses that you specified for that particular website.
You can confirm that the host header is resolving to the correct IP address by pinging that host header.
Technorati Tags: Binding multiple websites to HTTPS on your development machine -
How to increase the timeout for a SharePoint 2010 website
The default timeout for an Http Request in SharePoint Foundation 2010 is 120 seconds*. Any Http Requests above this 120 seconds will be met with a “Request timed out” error as displayed in the SharePoint logs:
Unexpected System.Web.HttpException: Request timed out.
Note: The SharePoint logs can be found at:
C:\Program Files\Common Files\Microsoft Shared\Web Server Extensions\14\LOGSTo increase this timeout you will need to modify the web.config file for the SharePoint Website. If you are using the default SharePoint configuration, then the web.config file will be found at:
C:\inetpub\wwwroot\wss\VirtualDirectories\80\web.config
Open this file in Notepad and then scroll down to the system.web > httpRuntime element (about half way down the file). To increase the timeout, add the executionTimeout attribute to the httpRuntime element with a value of the number of seconds for the timeout. For example, to increase the timeout to 5 minutes, add an executionTimeout of 300 like this:
<httpRuntime maxRequestLength="51200" executionTimeout="300" />
In the default SharePoint Foundation 2010 web.config file it will look like this:
Save the web.config file and now the timeout for HttpRequests will have been increased (Of course you need to ask why a request is taking more than 2 minutes to justify increasing the timeout in the first place… increasing the timeout to make the error go away but yet your customers have a horrible user experience is not a valid solution).
*The ASP.NET MSDN reference indicates that the default setting for the executionTimeout property is 110 seconds: http://msdn.microsoft.com/en-us/library/e1f13641.aspx. But the SharePoint logs show a timeout occurring at exactly 120 seconds with the default executionTimeout setting. I am not sure where the extra 10 seconds are coming from but I used 120 seconds in this article since that is what someone will find when investigating the SharePoint logs.
-
How to troubleshoot a SharePoint 2010 error
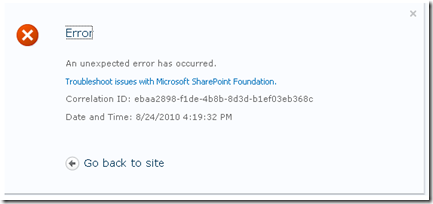
When an error occurs within Microsoft SharePoint Foundation 2010 a Correlation ID will be displayed in the error message:
This Correlation ID is logged within the SharePoint log files and you can use it to find out more details about the error that occurred.
The two pieces of information you will need from the error message above are the Correlation ID and the date and time of the error.
Once you have those two pieces of information, browse to the SharePoint log files on your SharePoint server located at:
C:\Program Files\Common Files\Microsoft Shared\Web Server Extensions\14\LOGS
The log files will be labeled with a date time stamp so find the one that corresponds to the time frame of the error and then open this log file in Notepad (or the text editor of your choice) and search for the Correlation ID.
You will probably find it listed in several places, from the beginning GET request to when the error occurred, and finally to when the logging of correlation data stops. Of course you are probably most interested in the error message but there will be more information in the log associated with the Correlation ID to help you find the root cause of the error.
