Contents tagged with ASP.NET
-
The configuration section 'system.web.extensions' cannot be read because it is missing a section declaration
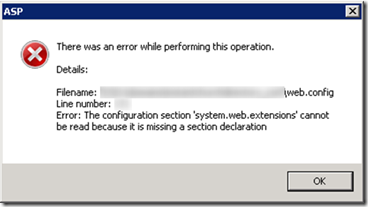
After upgrading an ASP.NET application from .NET Framework 3.5 to .NET Framework 4.0 I ran into the following error message dialog when trying to view any of the modules in IIS on the server.
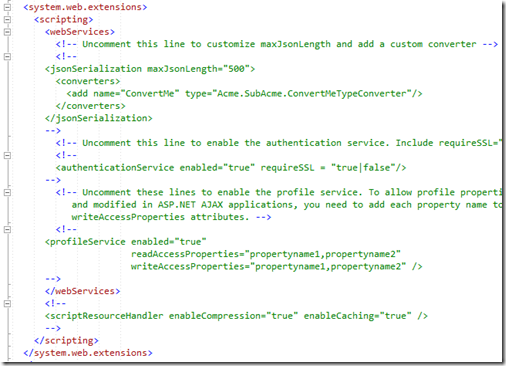
What happened is during the upgrade, the web.config file was automatically converted for .NET Framework 4.0. This left behind an empty system.web.extensions section:
It was an easy fix to resolve, just remove the unused system.web.extensions section.
ERROR DIALOG TEXT:
---------------------------
ASP
---------------------------
There was an error while performing this operation.
Details:
Filename: \\?\web.config
Line number: 171
Error: The configuration section 'system.web.extensions' cannot be read because it is missing a section declaration
---------------------------
OK
--------------------------- -
VB.NET IF() Coalesce and “Expression Expected” Error
I am trying to use the equivalent of the C# “??” operator in some VB.NET code that I am working in.
This StackOverflow article for “Is there a VB.NET equivalent for C#'s ?? operator?” explains the VB.NET IF() statement syntax which is exactly what I am looking for... and I thought I was going to be done pretty quickly and could move on.
But after implementing the IF() statement in my code I started to receive this error:
Compiler Error Message: BC30201: Expression expected.
And no matter how I tried using the “IF()” statement, whenever I tried to visit the aspx page that I was working on I received the same error.
This other StackOverflow article Using VB.NET If vs. IIf in binding/rendering expression indicated that the VB.NET IF() operator was not available until VS2008 or .NET Framework 3.5. So I checked the Web Application project properties but it was targeting the .NET Framework 3.5:
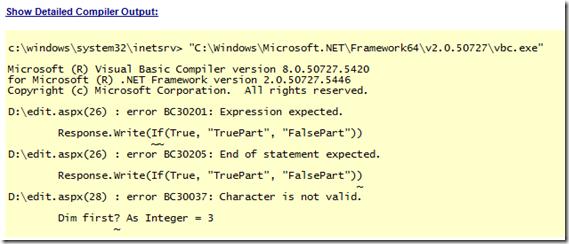
So I was still not understanding what was going on, but then I noticed the version information in the detailed compiler output of the error page:
This happened to be a C# project, but with an ASPX page with inline VB.NET code (yes, it is strange to have that but that is the project I am working on). So even though the project file was targeting the .NET Framework 3.5, the ASPX page was being compiled using the .NET Framework 2.0. But why? Where does this get set? How does ASP.NET know which version of the compiler to use for the inline code?
For this I turned to the web.config. Here is the system.codedom/compilers section that was in the web.config for this project:
<system.codedom>
<compilers>
<compiler language="c#;cs;csharp" extension=".cs" warningLevel="4" type="Microsoft.CSharp.CSharpCodeProvider, System, Version=2.0.0.0, Culture=neutral, PublicKeyToken=b77a5c561934e089">
<providerOption name="CompilerVersion" value="v3.5" />
<providerOption name="WarnAsError" value="false" />
</compiler>
</compilers>
</system.codedom>Keep in mind that this is a C# web application project file but my aspx file has inline VB.NET code. The web.config does not have any information for how to compile for VB.NET so it defaults to .NET 2.0 (instead of 3.5 which is what I need).
So the web.config needed to include the VB.NET compiler option. Here it is with both the C# and VB.NET options (I copied the VB.NET config from a new VB.NET Web Application project file).
<system.codedom>
<compilers>
<compiler language="c#;cs;csharp" extension=".cs" warningLevel="4" type="Microsoft.CSharp.CSharpCodeProvider, System, Version=2.0.0.0, Culture=neutral, PublicKeyToken=b77a5c561934e089">
<providerOption name="CompilerVersion" value="v3.5" />
<providerOption name="WarnAsError" value="false" />
</compiler>
<compiler language="vb;vbs;visualbasic;vbscript" extension=".vb" warningLevel="4" type="Microsoft.VisualBasic.VBCodeProvider, System, Version=2.0.0.0, Culture=neutral, PublicKeyToken=b77a5c561934e089">
<providerOption name="CompilerVersion" value="v3.5"/>
<providerOption name="OptionInfer" value="true"/>
<providerOption name="WarnAsError" value="false"/>
</compiler>
</compilers>
</system.codedom>So the inline VB.NET code on my aspx page was being compiled using the .NET Framework 2.0 when it really needed to be compiled with the .NET Framework 3.5 compiler in order to take advantage of the VB.NET IF() coalesce statement. Without the VB.NET web.config compiler option, the default is to compile using the .NET Framework 2.0 and the VB.NET IF() coalesce statement does not exist (at least in the form that I want it in). FYI, there is an older IF statement in VB.NET 2.0 compiler which is why it is giving me the unusual “Expression Expected” error message – see this article for when VB.NET got the new updated version.
EDIT (2011-06-20): I had made a wrong assumption in the first version of this blog post. After a little more research and investigation I was able to figure out that the issue was in the web.config and not with the IIS App Pool. Thanks to the comment from James which forced me to look into this again.
-
How to disable an ASP.NET linkbutton when clicked
Scenario: User clicks a LinkButton in your ASP.NET page and you want to disable it immediately using javascript so that the user cannot accidentally click it again.
I wrote about disabling a regular submit button here: How to disable an ASP.NET button when clicked. But the method described in the other blog post does not work for disabling a LinkButton. This is because the Post Back Event Reference is called using a snippet of javascript from within the href of the anchor tag:
<a id="MyContrl_MyButton" href="javascript:__doPostBack('MyContrl$MyButton','')">My Button</a>
If you try to add an onclick event to disable the button, even though the button will become disabled, the href will still be allowed to be clicked multiple times (causing duplicate form submissions). To get around this, in addition to disabling the button in the onclick javascript, you can set the href to “#” to prevent it from doing anything on the page. You can add this to the LinkButton from your code behind like this:
MyButton.Attributes.Add("onclick", "this.href='#';this.disabled=true;" + Page.ClientScript.GetPostBackEventReference(MyButton, "").ToString());
This code adds javascript to set the href to “#” and then disable the button in the onclick event of the LinkButton by appending to the Attributes collection of the ASP.NET LinkButton control. Then the Post Back Event Reference for the button is called right after disabling the button. Make sure you add the Post Back Event Reference to the onclick because now that you are changing the anchor href, the button still needs to perform the original postback.
With the code above now the button onclick event will look something like this:
onclick="this.href='#';this.disabled=true;__doPostBack('MyContrl$MyButton','');"
The anchor href is set to “#”, the linkbutton is disabled, AND then the button post back method is called.
Technorati Tags: ASP.NET LinkButton -
Binding multiple websites to HTTPS on your development machine
On your development machine you can use host headers to bind to different websites within IIS, allowing you to host multiple websites on a single development machine (you can do this too in production but this article is focusing on the development environment).
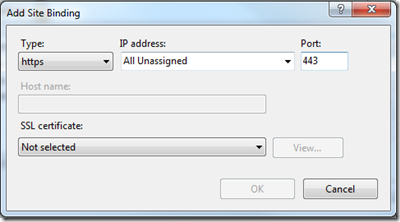
Host headers work only with HTTP since IIS is not able to see the host header information in an HTTPS request until it reaches the website so it would not know which site to bind to. For this reason, IIS does not allow you to specify a host header when setting up an HTTPS binding:
When you select the Binding Type of HTTPS, then the Host name box is disabled.
You then have two other choices to allow multiple websites on your development IIS environment to both run with HTTPS. You can either vary the Port or the IP Address between the two. Changing the Port is not desirable because this would usually mean extra code to make sure a special port number was used in requests (and then would not match a production environment). So this leaves you with IP address.
Most development machines have only a single network card and therefore, by default, a single IP address. So only having one IP address will not help you run more than one site under SSL.
But hidden within the Network Connection properties dialog is a way to specify a second (or third) IP address for your development machine; which is exactly what is needed to allow multiple websites to use SSL on your development machine.
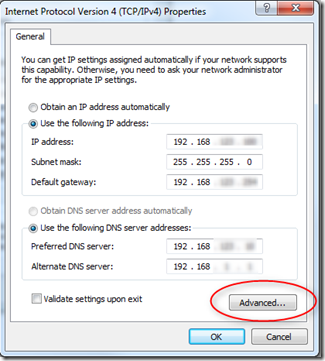
Go to Control Panel > Network and Sharing Center > Change adapter settings (or just get to the properties of your Network Adapter).
Here is where you will see the primary IP address for your machine (either it will be as above if you have a static IP address, or more likely you have a dynamic IP address and then both of the Obtain IP address and DNS server automatically options will be selected. But there is a way to add a second (or third) IP address. Just click that Advanced button in the lower right.
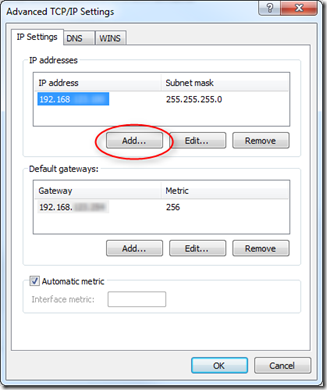
Now click the Add… button where you will be able to add a static IP address (you will need a static IP address to be able to do this).
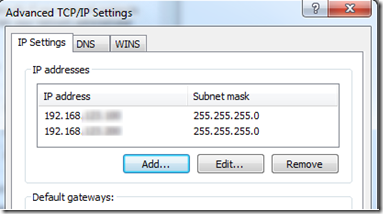
OK your way out and now your machine will have two IP addresses.
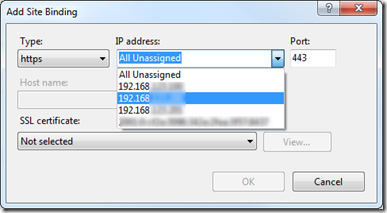
Returning back to the IIS Add Site Binding dialog and now in the IP Address drop down you will see your second IP address (or in the case of the screenshot below a third too).
Just choose one of these IP addresses for one site and the other for the other site that you also want to allow HTTPS (SSL) requests on.
Now there is one last thing to take care of and that is to make sure the request to this site is resolving to the correct IP address. In most cases, if you are using host headers to host multiple websites on your development machine, then you have entered entries into your Hosts file using the local loopback IP address 127.0.0.1. But now you will need to make sure you change these to the IP addresses that you specified for that particular website.
You can confirm that the host header is resolving to the correct IP address by pinging that host header.
Technorati Tags: Binding multiple websites to HTTPS on your development machine -
How to switch between HTTP and HTTPS in ASP.NET MVC2
ASP.NET MVC2 has the new RequireHttpsAttribute that you can use to decorate any action to force any non-secure request to come through HTTPS (SSL). It can be used as simply as this:
[RequireHttps]
public ActionResult LogOn()
{
.....
}Now any request to the LogOn action that is not over HTTPS will automatically be redirected back to itself over HTTPS. This is very useful and easy to implement.
Unfortunately though, once the scheme is changed to HTTPS, all following requests will also be under HTTPS, which is not necessarily what you want. In most cases you do not need all requests to your site to be secure but only certain ones such as the logon page or pages that accept credit card information.
To handle this you can override the Controller.OnAuthorization method. From within this method, you can check to see if the RequireHttps attribute is set on the Controller Action by searching the Attributes collection of the ActionDescriptor object. If the RequireHttpsAttribute is not set AND the request is under SSL, then return a redirect result to the HTTP (non-SSL) url:
public class ControllerBase : Controller
{protected override void OnAuthorization(AuthorizationContext filterContext)
{//the RequireHttpsAttribute set on the Controller Action will handle redirecting to Https.
// We just need to handle any requests that are already under SSL but should not be.
if (Request.IsSecureConnection)
{
Boolean requireHttps = false;
requireHttps = filterContext.ActionDescriptor.GetCustomAttributes(typeof(RequireHttpsAttribute), false).Count() >= 1;
//If this request is under ssl but yet the controller action
// does not require it, then redirect to the http version.
if (!requireHttps && !filterContext.IsChildAction)
{
UriBuilder uriBuilder = new UriBuilder(Request.Url);
//change the scheme
uriBuilder.Scheme = "http";
uriBuilder.Port = 80;
filterContext.Result = this.Redirect(uriBuilder.Uri.AbsoluteUri);
}
}
base.OnAuthorization(filterContext);
}}
Now any HTTPS requests to controller actions that are not decorated with a RequireHttps attribute will be forced back to an HTTP (non-secure) request.
EDITED (2010-08-21): Modified the code as recommended by the comment from Donnie Hale to move the check for Request.SecureConnection to the outermost if block.
EDITED (2011-01-06): Modified the code as recommended by the comment from Sergio Tai to not perform this check if use Html.Action in views
-
Getting Started with Windows Azure: Part 2 - Creating a Windows Azure Hello World Application
Follow along as I learn all about Windows Azure.
Part 0 – Where do I go to get started?
Part 1 - Setting up your development environment
Part 2 - Creating a Windows Azure Hello World Application <<<< YOU ARE HEREBelow are the steps to create a simple Windows Azure Hello World application. These steps assume that you have installed the Windows Azure Tools for Visual Studio. See Part 1 - Setting up your development environment for more information on setting up your development environment.
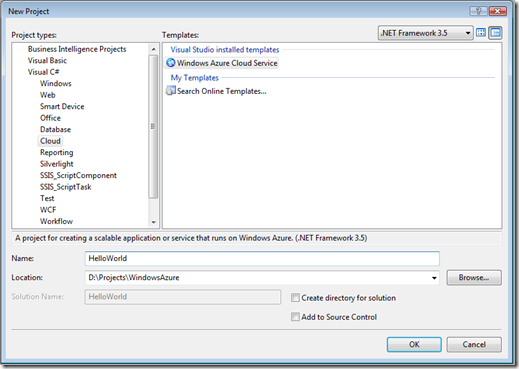
Open Visual Studio 2008 and choose New Project. Then expand the language of your choice and click on the “Cloud” category to find the Windows Azure Cloud Service project type.
Select the Windows Azure Cloud Service project type and then you will be presented with the Role selection dialog. Choose the ASP.NET Web Role and move it to the right-hand frame. You can edit the name of the role by clicking on the edit (pencil) icon for that role.
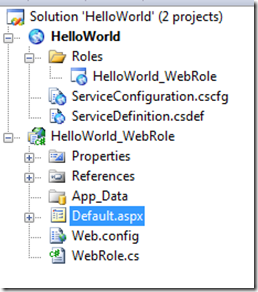
You will then have Visual Studio projects like the following:
Modify the Default.aspx page to include your “Hello World” text or anything else you would like and then hit F5 to test.
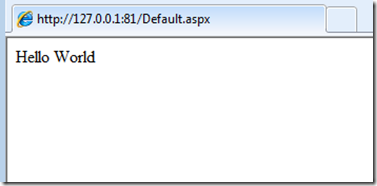
After Windows Azure finishes initializing the Development Storage, you will be presented with your Hello World page running on your local machine:
At this point you are ready to deploy to the cloud but first you need to sign up for the service. I will move on with how to sign up and create the Windows Azure Portal Account and then come back to publishing and deploying your Hello World project later….
Signing up for the Windows Azure Service
Next up is to sign up for the Windows Azure Service through Microsoft Online Services. Signing up for a Windows Azure account can be a little confusing since you don’t sign up for Windows Azure directly but sign up with Microsoft Online Services which manages all of your subscriptions to the Microsoft Online Services (Azure is one of them; there also is the hosted Exchange and SharePoint which you can sign up for too).
You can see the various Windows Azure offers from this page and here is a Windows Azure Comparison chart which shows that there is a free offer called “Introductory Special”. The Introductory Special offer says it lasts only until July so I guess at that point Microsoft Online Services will start charging your credit card for any services that are in use.
WARNING: The introductory offer only includes 25 hours of compute time. You can easily burn through that by just leaving your deployment running (faster if you have both a staging and production deployment running). Make sure you DELETE (not suspend; you must DELETE) your hosted service deployment (see below) when you have finished with this tutorial.
Clicking on the Buy button takes me to the Microsoft Online Services customer portal where you can sign in with your Windows Live account and sign up for the Windows Azure Service. NOTE: Signing up on the Microsoft Online Services site is a multi-step process where you first create your account, then checkout with the Windows Azure Introductory Special in your shopping cart, activate your service, and finally specify the service administrator.
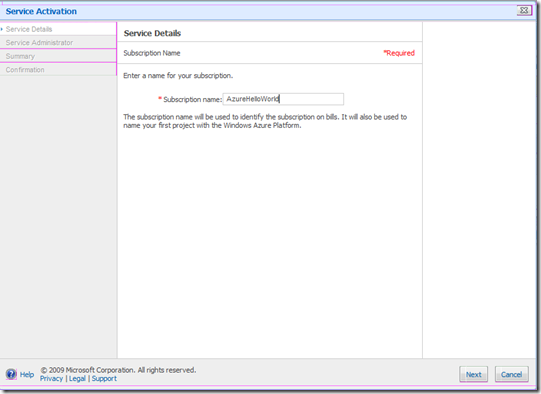
Here is the Service Activation Screen where I have specified the project name as “AzureHelloWorld”. This project name will be the project that is created in the Windows Azure Portal later on (what’s up with those purple borders around everything?!?).
Now you will have a subscription to Windows Azure and after a little bit the Microsoft Online Services Customer Portal will show that the Service is Active:
Now you can go to the Windows Azure Portal (http://windows.azure.com) and sign in with the same Windows Live account that you used to sign up for the subscription at Microsoft Online Services.
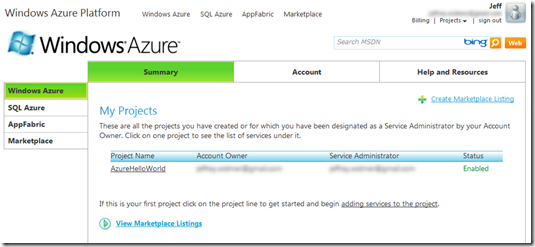
Now you will see the Windows Azure Portal home page with a single project named from when you activated the service (in my case, AzureHelloWorld).
Select this project and choose New Service which is located to the right and just above the project name:

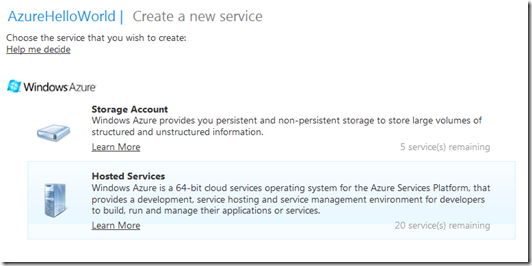
Choose the Hosted Services from the two Windows Azure services that are presented:
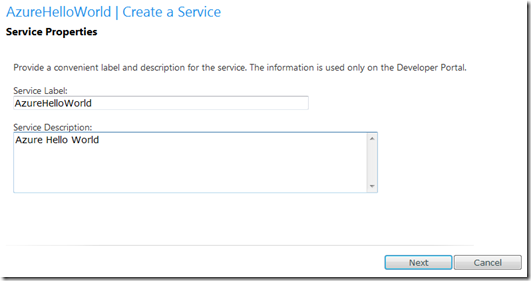
Then name the service:
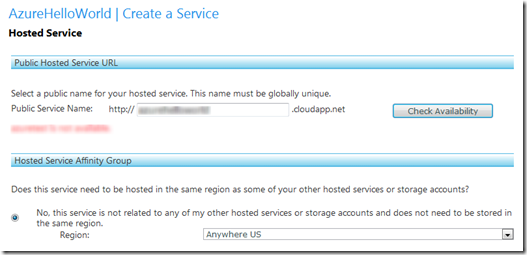
Then choose a url for your service and also the region where it will be running:
Clicking Next will get you to the Deployment page:
Now you are at the point where you can deploy your Hello World project that you created earlier, but first you have to use Visual Studio to Publish it.
Return to your Hello World Visual Studio Windows Azure project and right click on the HelloWorld Azure Project and click “Publish…”:
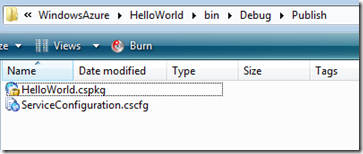
This will create the deployment package and the configuration package (and open Windows Explorer to their location too):
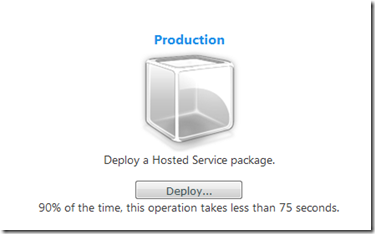
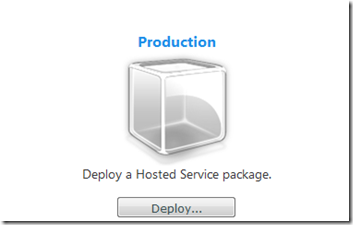
A new browser will be opened and you will be taken to the Windows Azure Portal but you can close that and return to the previous window where the Deploy cube was showing:
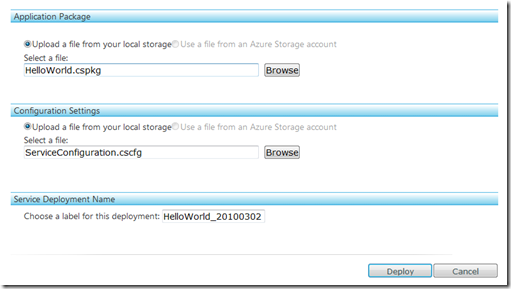
Click that “Deploy…” button and browse to the application package (*.cspkg) and configuration settings (*.cscfg) and then give a name for this deployment:
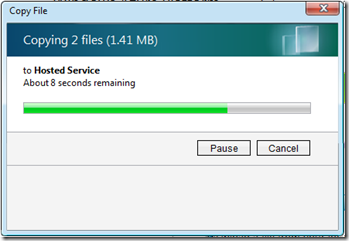
and finally click the Deploy button. Your files will begin copying:
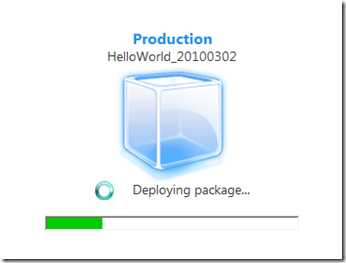
And then you will see your package getting deployed:
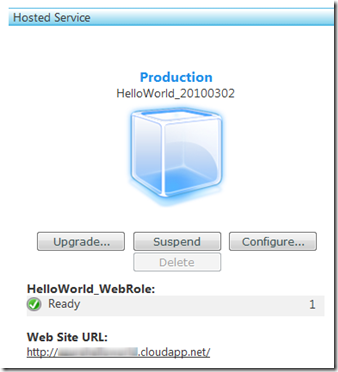
Then once it is deployed, you can click Run and your application will begin initializing:
This took a while for me but eventually it finished (I actually went to lunch so I am not sure how long it took but it was greater than 10 minutes).
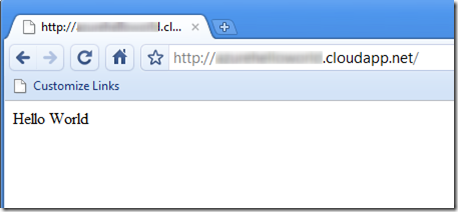
And now when you browse to the cloudapp.net web site url on your console you will get your Windows Azure Hello World:
And there you have it… a successfully created and deployed (and running) Windows Azure Hello World application from beginning to end.
DON'T FORGET: Make sure your DELETE your hosted service deployment when you are finished trying out Windows Azure. The introductory offer only includes 25 hours of compute time. You can easily burn through that by just leaving your deployment running (faster if you have both a staging and production deployment running). And only suspended it does not stop the hours from accumulating. You will need to DELETE the hosted service deployment to stop the compute hours from accumulating.
-
Format the email subject in the Elmah Error Logging Module
Elmah error logging modules and handlers for ASP.NET is a great module for logging asp.net errors to many different and configurable repositories. One of the repositories that Elmah works with is email. You can easily set up Elmah to send emails by changing the elmah configuration section in your web.config.
You can find a sample of all the different elmah web.config settings here. The email configuration settings are the following:
<errorMail
  from="elmah@example.com"
  to="admin@example.com"
  subject="..."
  async="true|false"
  smtpPort="25"
  smtpServer="smtp.example.com"
  userName="johndoe"
  password="secret"
  noYsod="true|false" />
Only the from and to settings are required. If you leave off the subject attribute you will get the default subject line which is something like this:
Error (System.Exception): This is a test exception
Which is made up of the type of exception followed by the exception message:
Error (Exception.Type): Exception.Message
But did you know you can configure the subject line with these pieces of information and also add something more specific for the application you are working on? For example, I always like the Exception Message in my error email prefixed by the application name and the environment. For example:
My Web Application (STAGING): This is a test exception
You can do that by specifying the String.Format parameters in the configuration section subject attribute like this:
<errorMail
  from="elmah@example.com"
  to="admin@example.com"
  subject="My Web Application (STAGING): {0}"
  />
Now the Exception Message will replace the {0} in the email subject and you can more easily filter the emails that appear in your inbox (hopefully though there will not be so many). You can also include the Exception Type by adding {1} to the subject anywhere you want.
Here is the line of code from the Elmah project:
mail.Subject = string.Format(subjectFormat, error.Message, error.Type).Replace('\r', ' ').Replace('\n', ' ');
Technorati Tags: Elmah -
WebConfigurationManager.OpenWebConfiguration() - Failed to resolve the site ID
I am writing a small administrative tool to read configuration settings from web.config files for various websites that are running on the same web server as the tool. Initially I thought the method WebConfigurationManager.OpenWebConfiguration(), and the various overloads, would have been able to help me out. The method signature is exactly what I am trying to do:
The WebConfigurationManager class (System.Web.Configuration.WebConfigurationManager) has a method named OpenWebConfiguration which can open a configuration file located at a specific virtual path and for a specified IIS site.
This sounded perfect and exactly what I was trying to do until I ran into this exception when I first tried it:
Failed to resolve the site ID for 'otherwebsite.local'.
After digging around a bunch and confirming I had the parameters spelled correctly I finally found this post: Thread: Unable to open web configuration on non default websites.
It turns out that because the adminwebsite.local is in an application pool named adminwebsite.local and otherwebsite.local is in a different application pool named otherwebsite.local, they can’t talk to each other. To prove this, I moved otherwebsite.local into the adminwebsite.local application pool and the OpenWebConfiguration method worked perfectly.
So if the two websites could live in the same application pool then the WebConfigurationManager.OpenWebConfiguration() method would have worked great for the tool I am writing.
But unfortunately this is not how the web server is setup and not the recommended best practice (to have all websites in the same application pool). So I switched to a more brute force method of reading and parsing the config file as an XML document (using a Dataset object to do the heavy lifting):
DataSet ds = new DataSet();
ds.ReadXml(path + \\web.config);
DataTable dt = ds.Tables["appSettings"];
DataRow[] appSettings= dt.Rows[0].GetChildRows("appSettings_add");
foreach (DataRow appSetting in appSettings)
{
String str = Convert.ToString(appSetting["key"]);
//Do other work here....
}
ds.Dispose();Technorati Tags: WebConfigurationManager,web.config -
How to 301 Permanent Redirect in ASP.NET
In the next release of the .NET Framework (.NET Framework 4.0) there is a new response method for permanently redirecting a request: Response.RedirectPermanent. You can see the Beta MSDN documentation for Response.RedirectPermanent here. This will automatically issue the 301 moved permanently status code and redirect to the target page. A permanent redirect status code tells a search engine to update their cache and reassign the old url to the new url.
But if you need to do this now (prior to .NET Framework 4.0) you will need to do it the manual way. To do so you will need to manually add the status and location headers to the response.
The pre .NET Framework 4.0 versions are:
Response.Status = "301 Moved Permanently";
Response.AddHeader("Location", "/");Response.Status = "301 Moved Permanently";
Response.AddHeader("Location", "/");
Response.End();There is also a RedirectToRoutePermanent method which will allow you to redirect to a new url using route parameters (and sends the 301 Moved Permanently status code).
UPDATE: See RichardD's comment below for a different method. I have not tried it that way but I will next time because it certainly does look much cleaner.
Technorati Tags: C#,Permanent Redirects -
Line-breaks and carriage returns (\r \n) are invalid in email subject
I received this exception when sending an email using System.Net.Mail.MailMessage:
"The specified string is not in the form required for a subject."
System.ArgumentException: The specified string is not in the form required for a subject.
at System.Net.Mail.Message.set_Subject(String value)
at System.Net.Mail.MailMessage.set_Subject(String value)The subject line of the email I was sending had a carriage return and line break in it so it made sense that this would be an invalid subject line.
And I was able to confirm that a check is made on the subject line to make sure there are not Carriage Returns or Line Feeds when the MailMessage.Subject property is set, but also that these are the only characters checked for.
To remove the line breaks and carriage returns I just did a simple find and replace:
subject= subject.Replace("\n", " ").Replace("\r", " ");
Technorati Tags: System.Net.Mail.MailMessage.Subject
