Working with ADO.NET Data Services in AJAX
Introduction
If you haven't heard, we've shipped ASP.NET AJAX CodePlex Preview 3. It's live and available here. I'm really excited about this release because it includes client-side support for ADO.NET Data Services, replacing the AJAX Client Library for ADO.NET Data Services that we had on CodePlex before.
The new library currently has read-only declarative integration with the DataView, but on its own, includes support for query, insert, update, and remove operations. We also support optimistic concurrency and POST verb tunneling.
In this blog post, I'm going to walk through building a simple ASP.NET Web Site that showcases using ADO.NET Data Services with our new client library, while also using familiar features from ASP.NET AJAX CodePlex Preview 2, such as the DataView and Client-Side Databinding. I'll also include a simple master-detail view with support for DataView placeholders and the concept of a selected item (new features in Preview 3).
I built this demo using Visual Studio 2008 Team Suite SP1. You will need a version of Visual Studio with SP1 in order for the demo to work properly, and you will also need to have the AJAX CodePlex Preview 3 bits, which you can download here. Note that certain dialogs may appear differently if you are using a different version of Visual Studio than I am. I'm also going to assume some level of familiarity with the features we shipped in AJAX Preview 2.
The finished product will be a website that allows you to manipulate an ADO.NET Data Service from JavaScript, including insert, delete, and update operations. It may help you before you start to download the zipped up project (AdoNetDemo.zip) attached to this post to get a feel for what the final product is like.
Website Setup
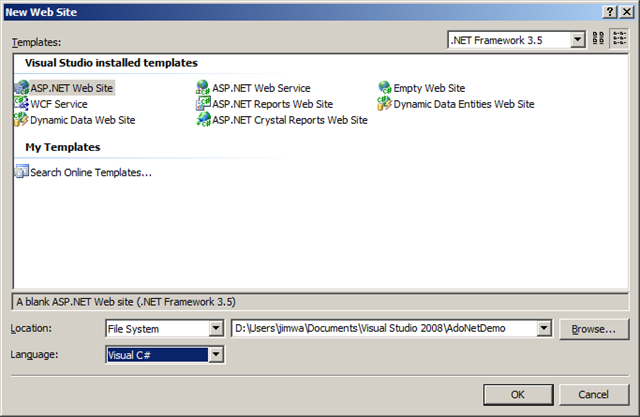
Let's start by creating a blank website. Open Visual Studio and navigate to File->New Website. I'm going to create my site in my Documents folder and call it AdoNetDemo.
You should now have a website set up with an App_Data folder, web.config, and Default.aspx/Default.aspx.cs. Let's go ahead and make the following changes to the head section of Default.aspx:
<head runat="server">
    <title>AdoNetDemo</title>
    <style type="text/css">
        @import url(Default.css);
        .sys-template { display:none }
    </style>
</head>
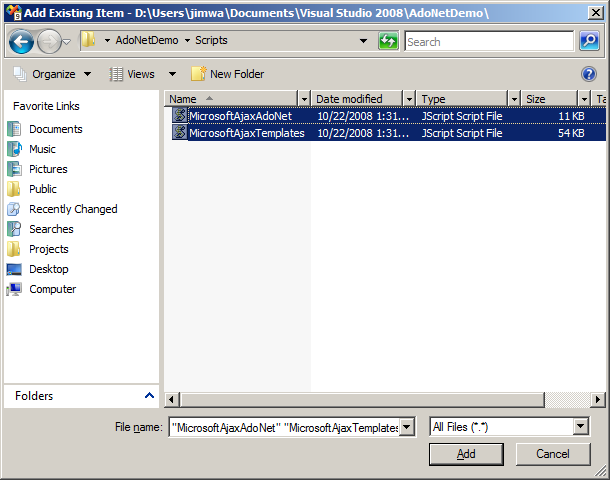
Here we're adding the sys-template class to support the DataView features we'll be using later on. I've also imported a default stylesheet to clean up the appearance of the site, feel free to substitute your own (mine, Default.css, is available in this zip). Now, let's copy over MicrosoftAjaxAdoNet.js and MicrosoftAjaxTemplates.js to a Scripts sub-folder in the website (don't forget to create the Scripts folder through the designer), and add the files to the project as existing items by right clicking on the Scripts folder, as shown below.
Now we can add the references to the client libraries, as well as namespace support for the DataView, as shown by the following code snippets for the body:
<body   xmlns:sys="javascript:Sys"
        xmlns:dv="javascript:Sys.UI.DataView"
        sys:activate="*">
and for the ScriptManager (inside the form tag):
<asp:ScriptManager ID="ScriptManager1" runat="server">
<Scripts>
    <asp:ScriptReference Path="~/Scripts/MicrosoftAjaxAdoNet.js" />
    <asp:ScriptReference Path="~/Scripts/MicrosoftAjaxTemplates.js" />
</Scripts>
</asp:ScriptManager>
ADO.NET Data Service Setup
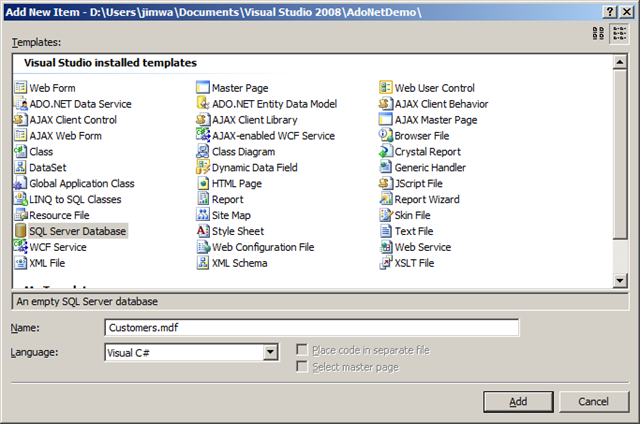
Now let's go ahead and set up our ADO.NET data service. I'm going to use a SQL Database at the backend, so let's go ahead and create a new one. Right click the top level item in the Solution Explorer and select "Add New Item". Find "SQL Server Database", rename it to "Customers.mdf", and click Add. You'll be prompted to put it under "App_Data", select "Yes".
Now let's add some tables to our database. Double-click Customers.mdf in the Solution Explorer, right click Tables and click "Add New Table". Go ahead and set the following table up. To make CustomerID the primary key, right click the row and select "Add Primary Key". Make sure you have matching datatypes here as well, the default of nchar(10) isn't going to work well for the CompanyName and ContactName. To make things simpler on the client-side, we're going to make CustomerID an int datatype, so that we can use it as an identity. Your table should look like this:
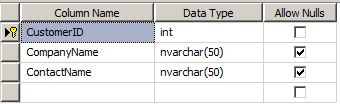
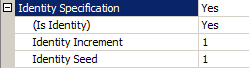
Now let's set CustomerID to be an identity, so that the ID increments automatically when you add to the database. In Column Properties with CustomerID selected, expand "Identity Specification", and set (Is Identity) to 1. The other defaults should be fine. If we didn't specify this, we would have to specify a unique CustomerID client-side every time we did an insert, which would quickly become difficult to manage.
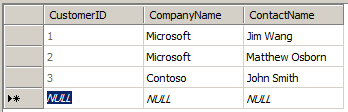
After you're done with this, you can go ahead and save the table. You'll be prompted for a table name, go ahead and name the table "Contact". While we're here, let's add some data to our newly created table. Let's find it in the Server Explorer, right-click, and select "Show Table Data".

Here's the data I've entered initially and saved.
Now let's go ahead and create the actual ADO.NET Data Service and associated Entity Model. Once again, right click the top level item in the Solution Explorer and select "Add New Item". Find "ADO.NET Data Service", rename the service to "Customers.svc", and click "Add".

You're going to have two files added to your solution, Customers.svc in the root, and Customers.cs under the App_Code directory. Open up the Customers.cs class and note that there is a "TODO" comment to add your data source class name between the angled brackets. This is where we are going to plug in our entity model, which we are going to create now.
public class Customers : DataService< /* TODO: put your data source class name here */ >
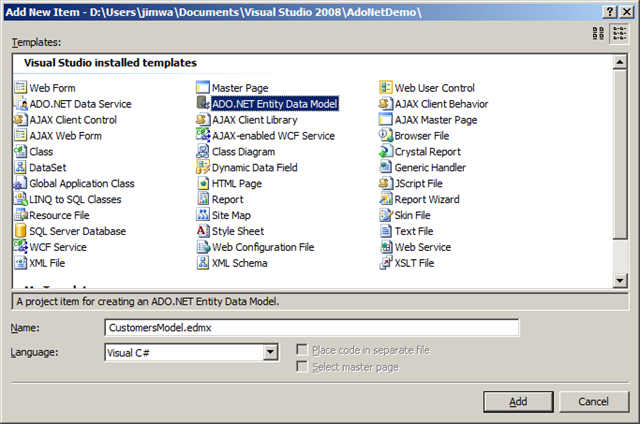
Let's go ahead and add our ADO.NET Entity Model, and call it CustomersModel.edmx:
You'll be prompted to put the edmx under App_Code, select "Yes". A wizard should now pop up for you to generate your model that should look something like this:
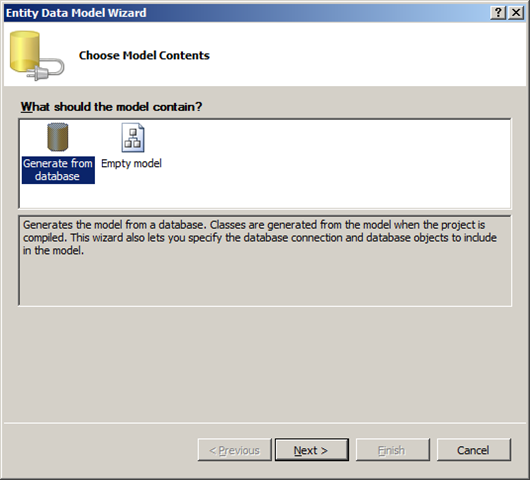
Click "Next" with "Generate from database" selected. That should bring you to this screen, where you should be able to accept the defaults (yours may differ) and click Next. This will add a connection string to your web.config.
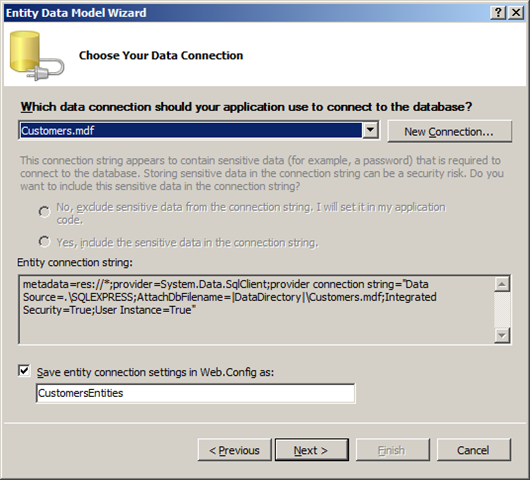
You will now be prompted for which database objects you would like to include in your model. Go ahead and select the "Contact" table that we created earlier, and click Finish.
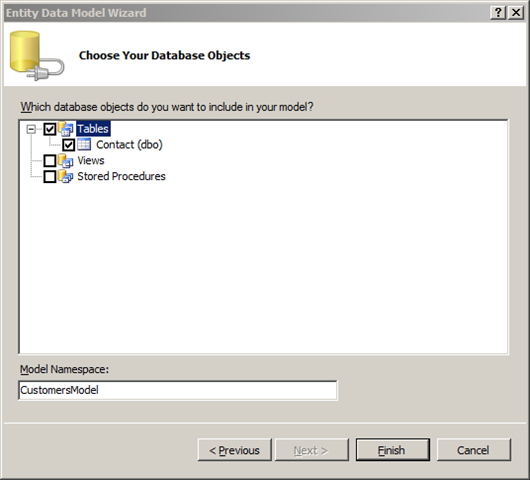
This step may take a while on your machine as the model is generated. When done, you'll be shown a view of the edmx file. If you were paying close attention, notice that we left our model namespace as "CustomersModel", and our entity connection setting name is CustomersEntities. We'll need these shortly when we hook up our ADO.NET Data Service to the Entity Model.
Let's go back to our Customers.cs class, and change the first line to this:
public class Customers : DataService<CustomersModel.CustomersEntities>
so now our ADO.NET Data Service is linked to the Entity Model. We also want to go ahead and set the correct permissions so that we can access our database client-side. Remove the large "TODO" comment from the InitializeService API and replace it with the following:
config.SetEntitySetAccessRule("*", EntitySetRights.All);
config.SetServiceOperationAccessRule("*", ServiceOperationRights.All);
Let's save the Customers.cs file with these changes, and get back to our main Default.aspx page.
Website Development
Now let's write some JavaScript to actually hook up our data service. I'm going to add a JavaScript block to the <head> section of the website, right after the <title> and before the <style>. Let's start by hooking into pageLoad.
<script type="text/javascript">
        function pageLoad() {
            setupDataService();
        }
        var dataService;
        function setupDataService() {
            dataService = new Sys.Data.AdoNetServiceProxy("Customers.svc");
            dataService.set_timeout(60000);
            dataService.set_defaultFailedCallback(onFailure);
            dataService.set_defaultSucceededCallback(onSuccess);
        }
</script>
As you can see, on pageLoad I'm going to set up my data service by creating a new instance of AdoNetServiceProxy, which is included in MicrosoftAjaxAdoNet.js. I'm going to point it to my Customers.svc service, and set some initial parameters, like the timeout (60 seconds here), and the default failed and default succeeded callbacks. Before writing the failed and succeeded handlers though, I'm going to write some markup so that our handlers actually make sense. In the main <div> of the page, I've added the following markup:
<div>
    Error Status: <input type="text" id="errorStatus" />
    <fieldset style="float:left">
    <legend>Master View</legend>
    <div id="myDataView" sys:attach="dv" dv:itemtemplate="masterTemplate"
        dv:itemplaceholder="masterPh" dv:selecteditemclass="selectedItem">
    <div id="masterPh">
        No data returned yet, please stand by...
    </div>
    </div>
    <div id="masterTemplate" class="sys-template">
        <a sys:id="{{$id('cust')}}" sys:command="select">{{ContactName}}</a>
        <br />
    </div>
    </fieldset>
</div>
So here, I've added an input box to use as a error status box (as opposed to showing an alert every time you hit an error), and a fieldset which includes a basic master view. Note that the "myDataView" div attaches a dataview, and declaratively refernces an item template and an item placeholder. The item placeholder is placed inside of the dataview ("masterPh"), whereas the item template ("masterTemplate") is put outside of the dataview and has the sys-template class applied to it. Inside the item template, you will notice that I have a link that is generating a unique id and is binding to the ContactName value which will be retrieved from the ADO.NET Data Source (we will set the data imperatively through JavaScript later on). The interesting thing about this link is that it uses the sys:command syntax to map a select command to each generated link.
This concept of a selected item works with the DataView to set a selectedData and selectedIndex property on the DataView. Also note that there is a selectedItemClass property, which controls the class used for selected items. We'll visit this in detail soon. Since these properties will be set on the master, we can implement a detail view by simply binding to the selectedData property of the Master View, like so (add this fieldset under the first fieldset):
<fieldset>
<legend>Detail View</legend>
<div id="myDetailView" sys:attach="dv"
dv:data="{binding selectedData, source={{$find('myDataView')}}}"
dv:itemtemplate="detailTemplate" dv:itemplaceholder="detailPh">
    <div id="detailPh">
       No selected data
    </div>
</div>
<div id="detailTemplate" class="sys-template">
    Customer ID: <span id="customerIdInputDetail">{{CustomerID}}</span>
    <br />
    Company Name: <input type="text" id="companyNameInputDetail"
    value="{{CompanyName}}" /><br />
    Contact Name:<input type="text" id="contactNameInputDetail"
    value="{{ContactName}}" /><br />
    <input type="button" id="removeButton" onclick="removeCustomer()"
    value="Remove" />
    <input type="button" id="updateButton" onclick="updateCustomer()"
    value="Update" /><br />
</div>
</fieldset>
As you can see, the detail view simply binds to the selectedData property of the master view. The item template for the detail view includes a display of the CustomerID, and input boxes with the Company Name and Contact Name, for both display and update purposes. You can see that I've also added some placeholder buttons for calling remove and update JavaScript functions.
Remember when we created the master view, that we had a selectedItemClass property that pointed to "selectedItem". Let's go ahead and define that class right now. This is the class that will be automatically applied to the selected item. Feel free to use your discretion in defining this class. Mine looks like this:
<style type="text/css">
    @import url(Default.css);
    .sys-template { display:none }
    body {
        width: 350px;
        margin: 0px auto;
    }
    .selectedItem {
        text-decoration: none;
        color: White;
        background-color: Black;
    }
    .selectedItem:hover {
        text-decoration: none;
    }
    .selectedItem:visited {
        color: White;
    }
    .selectedItem:active {
        color: White;
    }
</style>
So now let's go back to JavaScript and define our onSuccess and onFailure handlers for calls to the ADO.NET data service. I have the following handlers defined:
function onSuccess(result, userContext, operation) {
    var dataView = $find("myDataView");
    dataView.set_data(result);
}
function onFailure(result, userContext, operation) {
    $get("errorStatus").value = result.get_message() + "\r\tStatus Code:  "
    + result.get_statusCode() + "\r\tTimed Out:  " + result.get_timedOut();
}
As you can see, the success handler sets the data of the master DataView to the result, and the failure handler takes the error message, status code, and timeout flag and puts it into the "errorStatus" input box we defined in markup. So now we're ready to query the service. I've made the following changes to enable this:
function pageLoad() {
    setupDataService();
    queryService();
}
function queryService() {
    dataService.query("Contact");
}
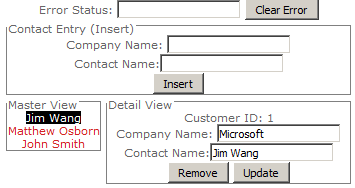
So by default, my call to query uses the onSuccess and onFailure handlers I defined earlier. Congratulations for making it this far; we're ready to look at a preview of the website. Right click on Default.aspx and select "View In Browser" to launch the page in your default browser. If everything has gone well, you should see the placeholders for the master and detail views, and then the data you entered earlier show up. If you used my stylesheets, this should look something like this:
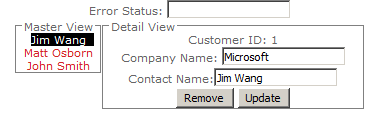
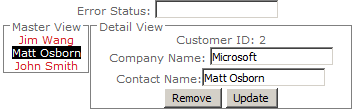
As you can see, by default, the first item is selected in the master view fieldset. Notice that the selectedItemClass we specified earlier is applied to the first item. Now, because the detail view is bound to the selectedData property of the master view, we're able to display different data client side just by clicking on the master links, like so:
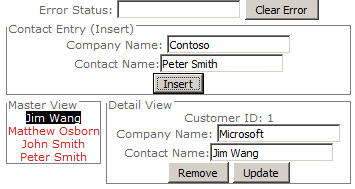
So now we have a read-only implementation calling the ADO.NET Data Service from JavaScript. Let's add the ability to insert. First let's put another fieldset in our page, containing some markup that will make it easy for the user to insert contacts. I've chosen to put it at the top under the error status box, and I've also added a button that calls a JavaScript function that will allow me to clear any error messages that we get on insert when we're playing around with it later on.
Error Status: <input type="text" id="errorStatus" />
<input type="button" id="clearErrorButton" onclick="clearError()"
    value="Clear Error" />
<fieldset>
<legend>Contact Entry (Insert) </legend>
Company Name: <input type="text" id="companyNameInput" /><br />
Contact Name:<input type="text" id="contactNameInput" /><br />
<input type="button" id="insertButton" onclick="insertCustomer()"
    value="Insert" />
</fieldset>
So now our website should look something like this:
Now let's write the back-end JavaScript code for clearError() and insertCustomer(). The first function is easy, all it does is grab the textbox using $get and set the value to "", like so:
function clearError() {
    $get("errorStatus").value = "";
}
The insert operation is a little more interesting. By default, the insert operation will return the item that has been inserted with additional fields and metadata populated (in this case, the CustomerID). However, in our case, we just want the Master View to update with the new list of items. So we'll make our success handler point to the query call, so once the insert is successful, the data is re-queried and the Master View is set (in the onSuccess handler of the queryService function). So the code looks like this:
function insertCustomer() {
    inCompany = $get("companyNameInput").value;
    inContact = $get("contactNameInput").value;
    dataService.insert({ CompanyName: inCompany, ContactName: inContact },
                       "Contact", queryService);
}
As you can see, we're grabbing the values from the input textboxes and putting them in a dictionary as the data item to use in the call to insert. We're also specifying that we want to insert into the Contact table, and that we want to call queryService on success (since we didn't specify a failure handler, the default one will be called). Let's run our website now, and insert another contact:
So now that we have a way to insert new Contacts, let's implement the remove and update operations. The removeCustomer() function grabs the Customer ID from the selected item in the detail view, does a query for that item, and when the query succeeds, removes the item and does another query to update the Master View. It sounds pretty complex, but the code is actually quite simple:
function removeCustomer() {
    custID = $get("customerIdInputDetail").innerHTML;
    dataService.query("Contact?$filter=CustomerID eq " + custID, foundItem);
    function foundItem(result, userContext, operation) {
        if (result.length > 0) {
            dataService.remove(result[0], queryService);
        }
    }
}
Now let's look at updateCustomer(), where we are going to do a very similar thing: query for the item we are interested in, update it with new data customer entry if it's found, and do a final query to update the Master View.
function updateCustomer() {
    custID = $get("customerIdInputDetail").innerHTML;
    dataService.query("Contact?$filter=CustomerID eq " + custID, foundItem);
    function foundItem(result, userContext, operation) {
        if (result.length > 0) {
            result[0].CompanyName = $get("companyNameInputDetail").value;
            result[0].ContactName = $get("contactNameInputDetail").value;
            dataService.update(result[0], queryService);
        }
    }
}
Congratulations! At this point you should be able to play around with your site and insert, remove, and update contacts through the UI.
Bonus: Selected Index Manipulation
As you play around with the UI, you may notice the fact that the current implementation always defaults back to the first item selected. This creates an abrupt user experience that makes the queries to the data service obvious, and is not always desirable. For example, if I update a contact, I may want to keep it selected. Similarly, if I remove a contact, I may want the next contact above it to be selected. All this is possible by programmatically manipulating the selectedIndex property of the Master View. As an example, I will implement the functionality where I keep the current item selected after I update a contact.
To enable this, I can modify updateCustomer(), where I will redirect the success handler of the update call to point to my own function, queryServiceUpdate(), instead of the generic queryService() function. The queryServiceUpdate() function extracts the current index from the Master View and passes it as the userContext to a direct call to query, with its own success handler, onSuccessUpdate(). The onSuccessUpdate handler does the same thing as onSuccess, but it extracts the userContext, and uses that to set the selectedIndex on the Master View. Here's the updated function:
function updateCustomer() {
    custID = $get("customerIdInputDetail").innerHTML;
    dataService.query("Contact?$filter=CustomerID eq " + custID, foundItem);
    function foundItem(result, userContext, operation) {
        if (result.length > 0) {
            result[0].CompanyName = $get("companyNameInputDetail").value;
            result[0].ContactName = $get("contactNameInputDetail").value;
            dataService.update(result[0], queryServiceUpdate);
        }
    }
    function queryServiceUpdate() {
        savedIndex = $find("myDataView").get_selectedIndex();
        dataService.query("Contact", onSuccessUpdate, onFailure, savedIndex);
    }
    function onSuccessUpdate(result, userContext, operation) {
        var dataView = $find("myDataView");
        dataView.set_data(result);
        dataView.set_selectedIndex(userContext);
    }
}
Now load up the website again and notice that the update experience is much cleaner. Similar logic can be added to enable manipulation of the selectedIndex property when contacts are removed, and the ability to pass information through the userContext mechanism allows for many other scenarios in general.
Conclusion and Housekeeping
I hope you've enjoyed working through this demo and that it has given you an idea of what is possible with our new client-side ADO.NET AJAX Library. I've attached my entire project as a zip. Comments and suggestions are welcome :).