Tutorial: create a custom Silverlight Splash Screen
The first time a user visit the page which holds your Silverlight app, the browser needs to download the XAP file first, but sometimes this file can become large, so Silverlight automatically displays its default “loading screen”, also called a “Splash Screen”:

Good news is you can customize the default splash screen!
To do this you need to create a XAML file for the UI and use a bit of JavaScript to show progression status, this tutorial will show you how step by step. Source code is available at the end.
Build the animation in XAML
My goal in this tutorial is to display an animated UI and a progress bar, something like this:

Create a new blank XAML file in the web project, not in the Silverlight project as we want the plug-in to be able to display this file while your Silverlight app is loading, so it must not reside in the xap. Here I create a blank splash.xaml file in ClientBin folder. Also this is not a regular Silverlight xaml page with codebehind, so just create a new xml file and rename it as xaml.
Keep in mind that in this xaml splash screen you can only use Silverlight controls from the core plugin (no DataGrid, Calendar, Toolkit controls here…) because your app and referenced assemblies are not there yet…
Feel free to use Expression Blend to design this page.
For the animation part I use an Ellipse with a RotateTransform and animate its Angle property from 0 to 360 during 2 sec with a DoubleAnimation. The Ellipse will animate continuously until the xap has finished downloading.
For the progress bar I use 2 Rectangle, one for the black border and a green one to fill the former.
ClientBin/splash.xaml
<Rectangle Stroke="#FF000000" Width="384" Height="29" RadiusX="2" RadiusY="2" StrokeThickness="3"/>
<Rectangle Fill="#FF03FF00" StrokeThickness="0" Width="377" Height="23.25" RenderTransformOrigin="0,0.5">
    <Rectangle.RenderTransform>
      <ScaleTransform x:Name="progressBarScale" />
    </Rectangle.RenderTransform>
</Rectangle>
<TextBlock Width="272" Height="62" Foreground="#FFFFFFFF" Text="" TextWrapping="Wrap" x:Name="txtLoading" FontSize="30"/>
The TextBlock will simply display progress percentage.
Notice the ScaleTransform named “progressBarScale” which will allow us to animate the green bar via JavaScript.
Activate your splash screen
To make your Silverlight application use your custom splash screen you set the SplashScreenSource object tag parameter and point to the xaml file.
TestPage.html
<object data="data:application/x-silverlight-2," type="application/x-silverlight-2">
    <param name="source" value="ClientBin/CustomSplashScreen.xap"/>
    <param name="SplashScreenSource" value="ClientBin/splash.xaml" />
    <param name="onSourceDownloadProgressChanged" value="DownloadProgress" />
</object>
The onSourceDownloadProgressChanged param specify a JavaScript function that runs while the xap file is downloading.
For a comprehensive list of Silverlight param, see my previous post.
Display progression with JavaScript
On the same HTML page we add the DownloadProgress JavaScript function we can wire up to a function.
<script type="text/javascript">
function DownloadProgress(sender, eventArgs) {
    sender.findName("txtLoading").Text = "Loading: " + Math.round(eventArgs.progress * 100) + "%";
    sender.findName("progressBarScale").ScaleX = eventArgs.progress;
}
</script>
eventArgs.progress provide the loading progress value as a number from 0 to 1.
findName() function gets reference to the XAML element by x:Name, so we can display progress percentage in the TextBlock, and update the ScaleX property of the ScaleTransform to move the green bar. To make the green bar grow from left to right set the RenderTransformOrigin to 0.
Test your splash screen
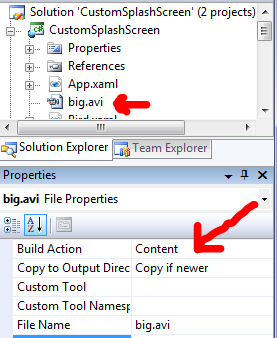
Testing your custom splash screen locally can be hard because it loads too fast. To solve this add a big file in your Silverlight project and mark it as “Content” so it gets embedded in the XAP and slow down the loading time.
Here I add a video (big.avi - 90MB) just to try my splash screen, then I will remove it once I am satisfied with my loading experience.
Download source code