Introduction to ASP.NET Web Pages
Klicka här för att läsa posten på svenska
What is ASP.NET Web Pages?
When .NET Framework 1.0 was released you could create web sites using Web Forms, which looks a lot like how you used to create applications with Visual Basic and similar. The idea was to have an event driven way to create web pages, and that you should not have to take care of how it rendered the HTML. It became an success and many went from classic ASP and other languages to this new framework.
There is some disadvantages with Web Forms though. Since the code were tightly coupled to the views (code behind files coupled to the web forms), it became hard to test the code since you had to have access to the current HttpContext and the controls used by the aspx file. Because of the Microsoft released ASP.NET MVC in 2007. It solved the problems with Web Forms by de-coupling the code and putting it to a controller, and made it possible to have full control over the rendering which many developers had asked for.
As it is now there is two different approaches, which both are used commonly in different kinds of project – sometimes side by side. There is though still a lot of developers who is still using classic ASP, PHP, Ruby or other similar dynamic languages. This is the kind of developers who wants to have dynamic code on the server side, and sometimes also have logic direclty in the view pages since it makes it easy to distribute och modify the pages without the need of compiling. It is also easy to perform common tasks with just a few lines of code.
For those developers Microsoft just released a third alternative called ASP.NET Web Pages. It makes it possible to use the new dynamic functions in .NET 4.0 and the rest of the .NET Framework, but still allows them to work like they have before. Pages created with ASP.NET Web Pages can be created using C# or Visual Basic, and requires .NET 4.0 to be installed on the server. When creating the pages you use a new syntax called “Razor”.
The new tools
When developing using for example PHP, a common tool is LAMP (Linux, Apache, MySQL, PHP), which is a package with tools which contains a web server, database and PHP support. It is very easy to use and is very popular. For .NET developers there is an application called Web Application Installer, with which you can install the same tools separate. The problem with Web Platform Installer is that everything is installed separate and we get different tools for different tasks (Visual Studio Express, IIS, SQL Server Management Studio Express etc). Because of this Microsoft released a new tool called “Web Matrix”.
For those of you who developed web sites built on ASP.NET 1.1 you might remember a tool with the same name, but this is a completely new product.
Web Matrix is a new tool where you can create new projects, either from scratch or from an existing open source application which you can download and install from the user interface. There is also a built in database manager for SQL Server Compact databases. These databases does not require SQL Server to be installed on the server, instead you distribute the dlls needed to run the database directly from the application. With the built-in deployment support you can easily distribute the web site including the database directly to the server. When installing this tool you also get the new web server, IIS Express, which is built on the latest IIS 7.x, but is installed in Program files and can run without administrator access. It supports Windows XP and later, which means you do not need IIS 5.1 anymore.
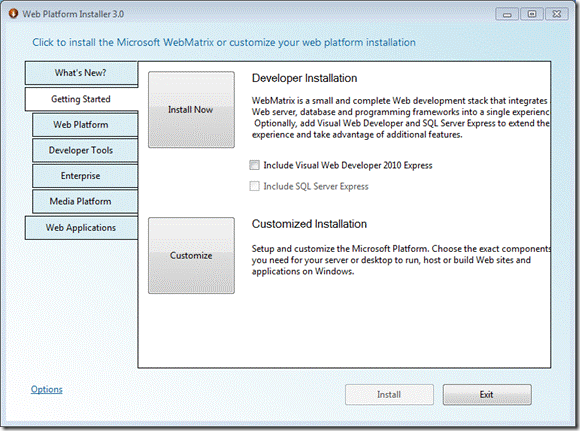
When it is installed you can install the whole package with Web Matrix and the other tools you need.When this is installed you have everything you need to start developing using ASP.NET Web Pages.
Create your first project
When you create a new project using Web Matrix there is two ways to do it. The first is to open the application and choose to create a new project on the start screen, which looks like this:
We can se both existing projects and create a new project form Web Gallery, which contains different open source projects, create a new project using a template, or create a new project by selecting a folder on the harddisk.
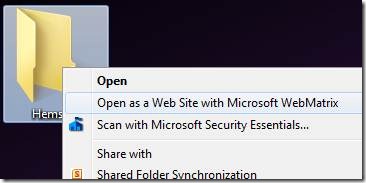
The other way to do it is to create a folder on the harddisk, right-click on it and choose to open it with Web Matrix. I choose to do it this way, so I start by creating a folder on the desktop, right-click on it and choose ”Open as a Web Site with Microsoft WebMatrix”.
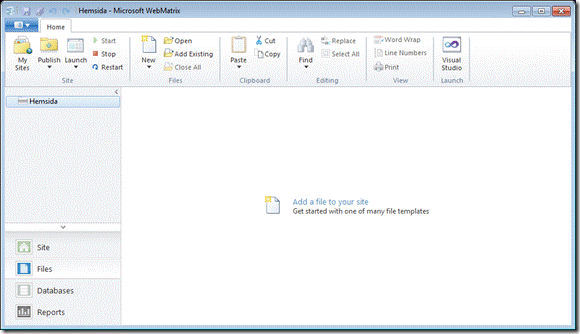
When Web Matrix opens I get this on the screen:
At the top I have a ribbon with options to see my sites, publish the current site to the server using Web Deploy or FTP, start or stop IIS Express and do some basic text editing. I can also open the project in Visual Studio 2010 if that is installed, but unfortunately there is no syntax highlighting or intellisense there yet.
To the left I have a list with all the files in the project (empty for the moment), and shortcuts to Site which contains information about the site, Databases where I can create or edit databases used in the project and Reports where I can see different reports for the site such as SEO analysis.
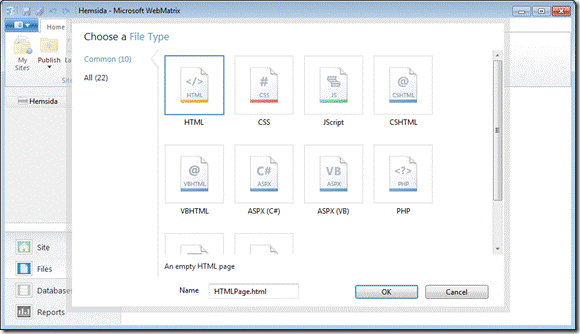
In the middle I have ”Add a file to your site”, where I can create a new file. I choose to do that and get this:
We are now going to create a CSHTML page, which is a ASP.NET page using C# with the new Razor syntax. We set the name for the page to Default.cshtml and get this:
<!DOCTYPE html>
<html>
<head>
<title></title>
</head>
<body>
</body>
</html>
This is a very clean page, and if you look at the doctype you can see that this is a HTML 5 page. To get some content on the page, I add this:
<!DOCTYPE html>
<html>
<head>
<title>Min hemsida</title>
</head>
<style>
* {font-family: Georgia;
}
body {width: 750px;
margin: 0px auto;
background-color: #ccc;
}
h2 { font-style: italic; } a {text-decoration: none;
}
nav ul {list-style: none;
padding-left: 0px;
}
nav ul li {background-color: #fff;
border-radius: 5px;
-moz-border-radius: 5px;
-webkit-border-radius: 5px;
display: inline-block;
margin: 3px;
padding: 3px;
}
section {display: block;
background-color: #fff;
border-radius: 10px;
-moz-border-radius: 10px;
-webkit-border-radius: 10px;
padding: 3px;
margin: 3px;
}
</style>
<body>
<hgroup>
<h1>Min hemsida</h1>
<h2>Skapad med ASP.NET Web Pages!</h2>
</hgroup>
<nav>
<ul>
<li><a href="@Href("~/")">Startsidan</a></li>
<li><a href="@Href("~/Guestbook")">Gästboken</a></li>
</ul>
</nav>
<section>
<p>
Välkommen till min hemsida!
</p>
</section>
</body>
</html>
If you look on the page you can see something that is neither HTML 5 nor CSS 3. The links on the pages is using Razor (@Href(”~/”)). When using inline code with Razor you start with an at (@) and then have the method name or property name that you want to use. We can mix this with our HTML without problems.
If you want to have more code on a single line you can use this:
@{ SomeMethod(”Hello, World!”); HelloWorld(); }Or if you use the same code, but on multiple lines:
@{SomeMethod(”Hello, World!”);
HelloWorld();
}
It is much cleaner than the syntax used today by ASP.NET MVC.
If we open the web site in a web browser that supports HTML 5 and CSS 3 (like Internet Explorer 9) by clicking on Launch, we get this:
We have a very simple page which is using IIS Express to render our ASP.NET Web Pages based web site, which is created in Web Matrix.
Use master pages with ASP.NET Web Pages
If we want to reuse parts of the page with ASP.NET Web Forms or ASP.NET MVC, we use master pages. It is a container for the content on our pages, which contains the menu and other static HTML.
To separate everything on our start page, we start with moving the CSS to a separate file. Close the current document and click on ”Add a file to your site”, where you choose to create a new CSS file. The next step is to identify which parts that is unique for all pages.
What we want to be unique for each page is:
· The title for the document.
· Subtitle.
· Everything in the section element.
To create a new master page (layout page in ASP.NET Web Pages), create a new file with the name “_Layout.cshtml”. The reason to why we have an underscore as a prefix is because we do not want the users to be able to visit that page directly. All pages that starts with an underscore is blocked from that.
In _Layout.cshtml we add this:
<!DOCTYPE html>
<html>
<head>
<title>@ViewData["PageTitle"]</title>
</head>
<link href="style.css" rel="stylesheet" type="text/css" />
<body>
<hgroup>
<h1>Min hemsida</h1>
<h2>@ViewData["PageHeader"]</h2>
</hgroup>
<nav>
<ul>
<li><a href="@Href("~/")">Startsidan</a></li>
<li><a href="@Href("~/Guestbook")">Gästboken</a></li>
</ul>
</nav>
<section>
@RenderBody()
</section>
</body>
</html>
We get @ViewData[”PageTitle”] for the title, @ViewData[”PageHeader”] for the subtitleand RenderBody() for the content on the page.
To use the layout page for Default.cshtml we only have to change it to this:
@{ //Set _Layout.cshtml as layout page LayoutPage = "~/_Layout.cshtml"; //Set properties for the layout pageViewData["PageTitle"] = "My website";
ViewData["PageHeader"] = "Created with ASP.NET Web Pages!";
}
<p>
Welcome to my web site!
</p>
What we do here is to set the layout page and all the properties we want to show on it.
If we visit default.cshtml now, it looks just like before, but we have less code in the page. When creating new pages, we only have to add this couple of lines.If we want to change the layout on the page, we will just have to modify _Layout.cshtml.
Create a database for the guestbook
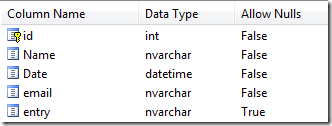
In the menu, there is a link to /Guestbook, which does not exist yet. To create a guestbook we start with the database. What we want to save there is name, e-mail, date and the entry.
First of all you have to click on Databases in the left menu. Then you choose ”Add a database to your site”. What happens now is that a new file is created. It is a SQL Server Compact database that we will be able to connect from directly from the site.
Create the fields like on this picture:
Save the table as ”Entries” and close it.
When we go to Files in the left menu we can se that a new App_Data folder have been created (if it is not there, right-click and choose Refresh).
Open the database by double clicking on it in the file view. Here we can add new data, and modify the existing. Now add some entries like this:
Now we have a database for our project with sample data. Next step is to read from the database and make it possible to add new posts to it.
Using data in ASP.NET Web Pages
In ASP.NET 2.0 we got some new DataSource controls, which you can when working with databases, XML or other data. In .NET 3.5 we got Linq to SQL and in .NET 3.5 SP 1 there was Entity Framework, which makes it easier to generate code that makes it possible to with a few lines of code work with the database.
In ASP.NET Web Pages there is a new way to work with data. It is like a mix of the different types of functions that we had before. The reason to this is that we must be able to focus on what we really want to do, and let the framework do the rest of it. This new functionality uses the dynamic functions in .NET 4.0 to make it possible to get the data without the need of an existing model.
To get all the entries from the database, we create a new file with the name ”Guestbook.cshtml”. We add this code to the file:
@{ //Set _Layout.cshtml as layout page LayoutPage = "~/_Layout.cshtml"; //Set properties for the pageViewData["PageTitle"] = "My guestbook";
ViewData["PageHeader"] = "Write something in my guestbook!";
var db = Database.OpenFile("Hemsida.sdf");}
<h3>Gästboken</h3>
<section>
@foreach (var row in db.Query("SELECT * FROM Entries ORDER BY Date DESC")) {
<article class="guestbook-entry">
@Gravatar.GetHtml(row.Email)
<p>
@row.Entry
</p>
@row.Name @@ <time datetime="">@row.Date</time></article>
}
</section>
If you look at the first lines it looks like it dit on our start page. There is one thing that differs though, we have added a new variable that calls the method Database.OpenFile(). It creates a new connection to our database, which we can use to query it from the code.
A couple of lines below that we have an foreach-loop with get the rows from db.Query(”SQL query”) and iterates through them. With two lines of code we can create a database connection, and then get all the values as a collection. Since everything is dynamic, we can use for example @row.Name to get the Name field from the database.
We are also using one of the built-in helper, @Gravatar.GetHtml(). There are also helpers for Twitter, generate tables from collections and others, which helps us add functionality with a single line of code. The Gravatar helper takes the e-mail address and get the Gravatar image for it if it exists.
To make the guestbook look better we add this to the CSS file:
article.guestbook-entry {display: block;
border-radius: 5px;
-moz-border-radius: 5px;
-webkit-border-radius: 5px;
padding: 5px;
}
article.guestbook-entry:nth-child(2n+1) {background-color: #ccc;
}
It gives us rounded corners and gives every second row a grey background color.
If we visit the guestbook we get this:
With just a few lines of code, we can show name, date, text and also a pciture of the person.
If we want others to add entries to the guestbook we must add a form and code for that. First of all we add the form:
<fieldset>
<legend>Write a new entry!</legend>
<form action="@Href("~/Guestbook")" method="post">
<div>
<label for="name">Name:</label>
<input type="text" name="name" />
</div>
<div>
<label for="email">E-mail:</label>
<input type="email" name="email" />
</div>
<div>
<label for="entry">Entry:</label>
<textarea name="entry"></textarea>
</div>
<div>
<input type="submit" value="Send!" />
</div>
</form>
</fieldset>
It is a ordinary form, which posts back to the same page. To get the values and save the post to the database we add some code after the database connection:
var db = Database.OpenFile("Guestbook.sdf");if (IsPost){ var name = Request["name"]; var entry = Request["entry"]; var email = Request["email"];var date = DateTime.Now;
var insertQuery = "INSERT INTO Entries (Name, Entry, Date, Email) VALUES (@0, @1, @2, @3)";db.Execute(insertQuery, name, entry, date, email);
}
The variable ”db” is the same one that we use for reading from the database. What we do in the new code is to check if the user posted to the page, and then we get all the values and then we save the entry by calling db.Execute(). We use parameters to get the values into the SQL statement.
If we post something, it is saved into the database and then displayed on the page. All this is possible to do with just a few lines of code, and without compiling anything.
Conclusion
With the new tools, the new syntax and the new functions, you can start with ASP.NET in not weeks, not days, not hours, but just a couple of minutes. Even though it looks simple, you can still use all the functions in .NET Framework since this is just a layer on top of ASP.NET.
Download the post as pdf or xps here (both in english and swedish).
