Archives
-
Illustrator Image Edges and Anti-Aliasing
By Nannette Thacker
As a developer, many times I work with web graphic designers who provide me a layered template in Adobe Illustrator. It is my job to take each image and save it for the web, as well as design the style sheets and master pages.
Using Adobe Illustrator, I ran into a problem where when saving an image for the web, I noticed that Illustrator put a 1 pixel edge around the image. Not being a designer and Illustrator afficianado myself, I didn't know what was causing it or how to fix it. I tried nearly everything and finally found the solution. I want to share that for those who might have problems with this in the future.
Here is a view of what the image looks like with the edging I'm talking about. Notice the little white edges at the top and bottom.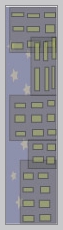
Here is what I want it to look like, without the edging:
Here is the "secret." When on the "Save for the Web" page, select the "Image Size" tab, and deselect the "Anti-alias" checkbox and select "Apply." This will remove the edges from the image and save it the way it was designed.
May your dreams be in ASP.net!
Nannette -
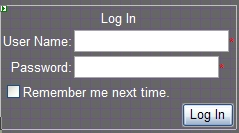
OnLoggingIn Custom Method
And from design view, it looks something like this (depending on your background):
-
AutoEventWireup and Debugging Why Events Are Not Being Hit
What happens if you don't have "Handles Me.Load"? Nothing. Absolutely nothing. You'll run the page, but your Page_Load function will not run. You'll ponder why this code isn't being hit, and you'll even put in debug breakpoints and try to step through it, but it never hits your Page_Load. And until you remember this little tidbit of advice, you'll be pulling out your hair wondering why your code is being ignored.
-
HTML Tables to ASP.net Table Controls
If you're new to ASP.net, but familiar with ASP Classic or HTML, you might wonder about the ASP.net table control.
Dragging an HTML table from your toolbox...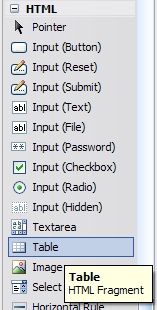
... will generate these table commands: