February 2008 - Posts
By Nannette Thacker
This is an issue that seems to confuse a lot of new developers. How do you use the "connectionStringName" defined within the membership provider area of the web.config file within a custom membership provider? Big mouthful, eh? Okay, let's break it down.
Within the web.config file, you may define your connection strings. For our example, below I am setting up a connection string to a SQL Server database within my project's App_Data folder, but it could be a connection string to a remote database on a database server as well.
<connectionStrings>
<add name="SSSDataMDFConnectionString"
connectionString="Data Source=.\SQLEXPRESS;
AttachDbFilename=|DataDirectory|\SSSDatabase.mdf;
Integrated Security=True;User Instance=True"
providerName="System.Data.SqlClient" />
</connectionStrings>
In the above example, I have named my connection string SSSDataMDFConnectionString. Now I want to setup my custom Membership Provider in the system.web section of my web.config:
<membership defaultProvider="SSSMembershipProvider">
<providers>
<clear/>
<add name="SSSMembershipProvider"
type="SSSMembershipProvider"
requiresQuestionAndAnswer="false"
enablePasswordRetrieval="true"
enablePasswordReset="true"
description="Custom Membership Provider"
requiresUniqueEmail="true"
applicationName="/"
passwordFormat="clear"
userIsOnlineTimeWindow="15"
connectionStringName="SSSDataMDFConnectionString"/>
</providers>
</membership>
In the above example, I have inserted the connection string name within the "connectionStringName" property. Note that if your custom membership provider is defined within a namespace, to be sure to add that to the name of the provider itself. For instance, if your namespace is "SSS" then you would add the namespace to the definition:
<membership defaultProvider="SSS.SSSMembershipProvider">
<providers>
<clear/>
<add name="SSS.SSSMembershipProvider"
type="SSS.SSSMembershipProvider"
Now let's look at a few snippets from our custom membership provider class. In the snippet below, notice I have defined the connection string variable.
Public Class SSSMembershipProvider
Inherits MembershipProvider
Public connStr As String
Typically, you may obtain the value of various configuration file settings with the use of config():
config("enablePasswordReset")
However, we need to use the ConfigurationManager.ConnectionStrings Property to obtain the configuration setting. Within the initialize function of the class I now retrieve the value of the actual connection string that is associated with the name defined in the web.config:
Public Overrides Sub Initialize(ByVal name As String, _
ByVal config As System.Collections.Specialized.NameValueCollection)
connStr = ConfigurationManager.ConnectionStrings(config("connectionStringName")).ConnectionString
The above is a very long line, and just in case it is cut off on the right, I will break it on 2 lines so you don't miss it:
connStr = ConfigurationManager.ConnectionStrings(
config("connectionStringName")).ConnectionString
Now you're all set to use this in your class functions for accessing the connection:
Using conn As New SqlConnection(connStr)
conn.Open()
May your dreams be in ASP.NET!
Nannette Thacker
By Nannette Thacker
In this tutorial, learn how to import data from an Excel Spreadsheet to a Database by creating a tiered application architecture using Visual Studio's Typed DataSets and TableAdapters. The application consists of an ASP.NET page that enables a user to upload an Excel spreadsheet, view the data in the spreadsheet, and import the data from the spreadsheet into the application's database. A Zip file with the complete source code, Excel Spreadsheet, and SQL Server Database is available for download.
The article series hosted on 4guysfromrolla.com begins with Importing an Excel Spreadsheet Using Typed DataSets and TableAdapters: Building the Database.
Download the Application in ZIP Format
May your dreams be in ASP.NET!
Nannette Thacker
By Nannette Thacker
In ASP.NET, you may define multiple themes to be used within your web applications. In this example, let's say you have a theme based around the color purple, and another theme based around the color blue. When using your purple theme, you have a special image, let's say a logo, that is designed with purple colors. But when using the blue theme, you want your logo to change to one that uses blue colors. This tutorial will show you how to setup your code within your master page so that you will pull this logo image from your cascading style sheet, rather than hard coding it within your master page or web form.
Normally, when defining a hyperlinked image, one would simply type an anchor tag and an image tag like so:
<a href="http://weblogs.asp.net/default.asp" mce_href="http://weblogs.asp.net/default.asp"><img src="http://weblogs.asp.net/Images/Logo.jpg" mce_src="http://weblogs.asp.net/Images/Logo.jpg" /></a>
But if your path to your image is hardcoded within your web form, you've now limited your ability to change your image based on your theme.
See the ASP.NET Themes and Skins Overview for details on themes and skins. Although how to implement a theme and master page is beyond the scope of this example, I will briefly explain the concept. Within your ASP.NET project within Solution Explorer, you would right click and select to add a Theme folder. Upon selection, an App_Themes folder is created and within that folder, another Theme folder is created. You may name it anything you want, preferably something that describes your new theme. Within your theme folder, you may add several types of files, the primary one being your cascading style sheet file. Each theme folder you create should have its own .css style sheet.
Also note that when using a theme, the default theme to use is defined within the web.config file. The style sheet is not included in the top of the web form or in the master page. Here is an example of defining the theme to be used within the web.config file in the system.web area.
<pages styleSheetTheme="Purple">
</pages>
For our example, the style sheet will simply define a style for our Logo:
.Logo
{
display: block;
width: 317px;
height: 72px;
background: url(Logo.jpg);
background-repeat: no-repeat;
}
In the above style, notice that we define the display as block. Without this, our image will not display. We also define the width, height, and path to the logo. Be sure to include the path to your image, if the image is not in the same directory as the style sheet. With themes, if your image is within your theme directory or within a subdirectory within your theme directory, the path to the image is relative to the theme directory.
For instance, if you have an "image" subdirectory within your theme directory, the path would be:
background-image: url(Images/Logo.jpg);
It would NOT be ../App_Themes/Purple/Images/Logo.jpg.
In our Logo example, notice we also set the style to not repeat the background by using background-repeat: no-repeat;. Other options are that you may repeat the image vertically or horizontally or both, but we only want to display it once, so we indicate no-repeat.
Now we are ready to call the "Logo" class within our web form page, in our case our master page.
<a href="<%= ResolveClientUrl("~/default.aspx")%>" class="Logo"></a>
In our above example, we are defining a hyperlink that has nothing implemented between the opening and closing anchor tags. But it does have a class defined within the opening anchor tag as class="Logo". This goes to our style sheet and picks up the .Logo style, adding our image in this position on the page.
If you are new to ASP.NET, you may not understand the purpose of our ResolveClientUrl("~/default.aspx") code. Simply put, the ResolveClientUrl Method allows you to define a URL that will be recognized within your browser and "the URL returned by this method is relative to the folder containing the source file in which the control is instantiated." For instance, if you define a regular hyperlink or image URL within a webform, you may have no issues, but if you define one within your master page and this master page is used by web forms throughout your site within several different sub directories, use of ResolveClientUrl allows the path to be resolved from the master page and thus found every time. This is true if used within a control as well.
Also, if you are building your application locally on an intranet, ASP.NET adds your project name to the path as well, such as in my case http://localhost:1120/ShiningstarVB/. If I don't use ResolveClientURL for HTML hyperlinks and images, my path can really be messed up when testing locally. So it is good practice to use ResolveClientURL throughout your application, rather than hard-coding paths. Be aware that using the ASP.NET Hyperlink control will use resolved urls, so you don't need to use it within those.
For understanding the use of the (~) tilde, I would suggest you also read VirtualPathUtility Class, where it explains: "An absolute virtual path starts with the literal slash mark (/). A relative virtual path is relative to the application root directory, if it is just a tilde (~) or starts with the tilde and a double backslash (~\\) or the tilde and a slash mark (~/). Making a virtual path relative makes the path independent of the application." With stylesheets, you may also use Skins to define your images, but this is beyond the scope of this example.
In our example, we could have also had our hyperlink go to our default page with this code:
<a href="<%= ResolveClientUrl("~/")%>" class="Logo"></a>
The above code takes us to our root directory, where our application knows to use the default page within that directory.
May your dreams be in ASP.NET!
Nannette Thacker
By Nannette Thacker
If you're new to ASP.NET, let me offer you a word of caution in regard to using the onclick event within your controls and the Handles key word within your procedure declarations. To demonstrate this, let's create a web form and add these two controls:
<asp:Button ID="Button1" runat="server" Text="Button"/><br />
<asp:Label ID="Label1" runat="server" Text="Label"></asp:Label>
Double-click the button in your Design view, and you will be taken to the codebehind where you may see that a new Button1_Click Sub has been created for you. Notice the Handles Button1.Click key word has automatically been added to the end of the procedure declaration to handle the Button Click event.
Protected Sub Button1_Click(ByVal sender As Object, _
ByVal e As System.EventArgs) Handles Button1.Click
End Sub
If you utilize the code as generated, you are safe. However, what if you are copying and pasting from someone else's snippets? You may see onclick="Button1_Click" added to the button:
<asp:Button ID="Button1" runat="server" Text="Button" onclick="Button1_Click"/><br />
<asp:Label ID="Label1" runat="server" Text="Label"></asp:Label>
Beware of this common mistake. You must choose either the onclick within the button or the Handles keyword within the procedure declaration. Let's look at what happens if you have both in your code. To test this, I altered my Label1 to add the value of Label1 and the string " test 1 : " and display it to the screen.
Protected Sub Button1_Click(ByVal sender As Object, _
ByVal e As System.EventArgs) Handles Button1.Click
Label1.Text = Label1.Text & " test 1 : "
End Sub
When testing in Internet Explorer 7.0, each time I hit the page, IE would close the browser and ask to send an error report. When I ran the code in FireFox, my label displayed this result:
Label test 1 : test 1 :
In other words, the code is hit twice, which may not only double your processing, but return unexpected results. So simply be aware of this possibility and avoid using onclick with Handles.
May your dreams be in ASP.net!
Nannette Thacker
By Nannette Thacker
Step-by-step instructions for creating a database connection to a remote SQL Server Database, using Visual Web Developer.
- Go to the View menu item and select Database Explorer.
- Depending on how you have your Visual Web Developer interface setup, go to the Solution Explorer, and at the bottom you will see a tab for Database Explorer. Click that.
- You will see the "Data Connections" available in the Database Explorer. We currently have none displaying.
- Right click in the Database Explorer area and select "Add Connection..."
- This will bring up the Add Connection dialog box. Select the "Change" button.
- In our example, we are connecting to a SQL Server database, so select the "Microsoft SQL Server" Data source option as well as the ".NET Framework Data Provider for SQL Server" Data provider.
- Select "OK" to return to the "Add Connection" dialog. Put in the IP address or server name for your database. In our case, we use Windows Authentication, but you may optionally input a User Name and Password and select "Use SQL Server Authentication." Use the drop down list to "Connect to a database" and "Select or enter a database name:" Select "Test Connection" to make sure you have it setup properly. Then "OK."
- Now you may use the Database Explorer tab to view your tables and data.
Although you may create and alter a SQL Server .mdf database within your project, Visual Web Developer doesn't support opening a table definition or adding a new table from your SQL Server 2000 database. But it does allow "Show Table Data." It allows you to see the names of your stored procedures, but not to edit or view their content, just the properties. It is very limited, but you may wish to have it just for those purposes.
If you don't yet have the new Visual Studio, but do have Visual Interdev, perhaps for use with your ASP Classic development sites, you may utilize VI to manipulate your SQL Server databases remotely.
May your dreams be in ASP.net!
Nannette Thacker
By Nannette Thacker
There are several ways to retrieve values from a DataReader.
The first method is by using the index and looping through the fields in order as retrieved within the Select statement. Starting with the 0 index, you may use the GetValue() Function.
The following code snippets are in VB. A C# snippet is provided at the bottom.
reader = objCommand.ExecuteReader()
While reader.Read()
If Not reader.GetValue(0) Is DBNull.Value Then _
lastname = reader.GetValue(0)
If Not reader.GetValue(1) Is DBNull.Value Then _
firstname = reader.GetValue(1)
End While
reader.Close()However, this makes the code harder to read, and if a field is added or removed from the query, it could break your code. So let's look at how to retrieve the values by field names.
If your reader is using an OleDbDataReader, we use the reader.Item function.
If Not reader.Item("lastname") Is DBNull.Value Then _
lastname = reader.Item("lastname")
If Not reader.Item("firstname") Is DBNull.Value Then _
firstname = reader.Item("firstname")If your reader is using a SqlDataReader, we use the reader.GetItem function.
If Not reader.GetItem("lastname") Is DBNull.Value Then _
lastname = reader.GetItem("lastname")
If Not reader.GetItem("firstname") Is DBNull.Value Then _
firstname = reader.GetItem("firstname")Here is a C# example:
if (reader["lastname"] != DBNull.Value)
lastname = reader["lastname"].ToString();A reader of my column, Zac, suggests that reader("lastname") instead of reader.Item("lastname") will also work.
He is correct. For the DataReader class implementation, Item is the default property and may be left out. You may access an indexer by using the () operator on the base class object or you may access an indexer by using the Item property.
Another reader of my column, Marneus, pointed out the GetOrdinal option as well. He said "there is a performance hit, each time you use the reader("lastname"), it has to check the meta datas to get the column number."
Readers may refer to this document on the GetOrdinal()
http://msdn2.microsoft.com/en-us/library/system.data.sqlclient.sqldatareader.getordinal.aspx Please note this comment on efficiency:
"Because ordinal-based lookups are more efficient than named lookups, it is inefficient to call GetOrdinal within a loop. Save time by calling GetOrdinal once and assigning the results to an integer variable for use within the loop."
From the article, here is the usage:
' Call GetOrdinal and assign value to variable.
Dim customerID As Integer = reader.GetOrdinal("CustomerID")
' Use variable with GetString inside of loop.
While reader.Read()
Console.WriteLine("CustomerID={0}", reader.GetString(customerID))
End WhileAnother reader, AndrewSeven, pointed out the cost for hitting the reader twice for each field. He suggests:
object val = reader["lastname"];
if (val != DBNull.Value)
{
lastname = val;
}And also comments "If your concern is readability, you should probably encapsulate the null test so you can write:
lastname = GetValueFromReader(reader,"lastname");"
Travis responded with this suggestion: "Just do this, it handles nulls nicely unlike .ToString():"
lastname = Convert.ToString(reader["lastname"]);
So I tested his theory by creating columns that would not allow null values, and imported columns with null values. In VB it is written like so:
lastname = Convert.ToString(reader("lastname"))
firstname = Convert.ToString(reader("firstname"))That is much cleaner! Thanks everyone for your great input!
May your dreams be in ASP.net!
Nannette Thacker
By Nannette Thacker
Ready to learn ASP.NET? Here are my recommendations for videos and articles to learn ASP.NET in a logical order. One thing about learning a new language, it won't happen in five minutes, no matter how badly you wish it did. Sometimes it seems it is taking you forever to learn. I suggest you keep a link-diary of all the pages you have read, tutorials you have walked-through, and videos you have watched. (See my article on Microsoft Office OneNote 2007 for a review on how you can use this product to keep a diary of pages you have studied.) Then when you become discouraged that things aren't moving as rapidly as you would like, review your list of subjects you have learned, and you will realize that you know more than when you started and that you are actually learning!
The two most important suggestions I can give you are: Walk-through the examples and become acquainted with all the features available so that when you need them you'll know they exist. If you keep a link-diary, when you need something and remember you read or watched it somewhere, you can refer to your link diary to find the information.
Use the Microsoft Developer Network (MSDN) and ASP.net web sites, and other internet resources such as tutorials on 4guysfromrolla.com. All of the resources below are FREE. You should be able to learn ASP.NET without having to purchase a single book or subscription. I recommend your public library as well. Most libraries have online services to allow patrons to search, check out, place a hold on books, and utilize Interlibrary Loans.
Learn ASP.NET
Creating Pages in ASP.NET
- Creating Pages
- Walkthrough: Creating a Basic Web Page in Visual Web Developer - In-Line Code
- Walkthrough: Creating a Basic Web Page with Code Separation in Visual Web Developer - Code-Behind Pages
- Walkthrough: Basic HTML Editing in Visual Web Developer - Design View, Source View, Document Outline, Tag Navigator
- Walkthrough: Working with Cascading Style Sheet Styles in Visual Web Developer - inline styles, style blocks, .css file, changing style sheet references programmatically
- Walkthrough: Advanced HTML Editing in Visual Web Developer - Formatting markup, Format Document, Format Selection, Formatting and Validation, Outlining Elements (creating collapsible regions to reduce clutter).
- Walkthrough: Code Editing in Web Pages in Visual Web Developer - Correcting errors, Refactoring and renaming code (C#), renaming symbols, inserting code snippets.
ASP.NET IntelliSense
ASP.NET Code Snippets
ASP.NET Refactoring
- Refactoring (C#) (Below topics and: Encapsulate Field, Extract Interface, Promote Local Variable to Parameter, Remove Parameters, Reorder Parameters
ASP.NET Client Script
May your dreams be in ASP.NET!
Nannette Thacker
by Nannette Thacker
It would be rare for a developer to work on a website without having to do something with the images. And if you're a one-person team, you'll likely have to do the image compression yourself.
To show the importance of image optimization, I took a page with 64 HTML images and ran it through a page load test. I then optimized the images and ran it through the test again. For my testing, I used the free Web Page Analyzer at WebSiteOptimization.com.
| Optimization: |
Before |
After |
| Image Size in Bytes |
5814746 |
3758008 |
| 56K Download In Seconds |
1189.21 |
779.31 |
| ISDN 128K Download In Seconds |
374.19 |
248.65 |
| T1 Download In Seconds |
45.63 |
34.73 |
Below is the technique I used to optimize the images.
Batch Image Optimization Using Adobe Photoshop
With Adobe Photoshop, you can batch compress your images for the web. To do this, we must first open an image, in Photoshop, and record as we save the file with compression. Then we can use the Automate / Batch process to automatically process all of our files with the same amount of compression.
Open Photoshop. Then select to open one of your files that you desire to have compressed:

Then open the Actions Pane by selecting Window > Actions:

Select the "Create New Action" icon to record a new action:

Name your New Action. I've named mine "CompressWeb" as shown below:

After naming your Action, select the "Begin Recording" icon.

Since your image is already opened, simply select the File / Save for Web menu item to bring up the dialog box to save the image. In the below screenshot, you'll see we've saved the file type as "JPG" and the quality at "50." Then select the Save button. I saved my compressed image into a new directory I had previously created called "Resized."

In the Actions pane, select the "Stop playing/recording" icon.

Now we are ready to begin batch compression of our directory. From the File menu, select the Automate > Batch... menu items.

The Batch dialog box will appear. Select your Action as "CompressWeb." Use the Source drop down to select on which files to perform the Action. I selected "Folder." Select the "Choose..." button. Optionally, you may also select to "Include All Subfolders."

The "Browse for Folder" dialog box will open, allowing you to "Choose a batch folder..." for the action. Select "OK."

Our first test file used for setup is found in the target location, so a "Replace Files" dialog box will appear. You can leave it selected (it will simply perform the compression on the original file again), or deselect the box and select "Replace."

Upon selecting "Replace," Photoshop will automatically open all of the files in the directory and perform the compression on each, and save them.

When you are done, you can view the file sizes for the newly compressed directory versus your original directory and see the the compressions were performed successfully.

When done, select the File > Close All to close all the files. Photoshop wil ask you if you wish to "Save changes... before closing?" Select "No" for each one since you have already saved the file with the desired compression.
The above steps work successfully with "Destination" = "None" if you create your destination folder in advance, and save your original sample file to that destination folder during recording. However, the Batch screen provides other options to select "Folder" for your "Destination" and "Choose" the folder. This also allows Photoshop to Batch rename your files during the Action.
May your dreams be in ASP.net!
Nannette Thacker
I noticed as I peruse the web that more and more of the articles websites I visit are covered with ASP.NET web ads. I wanted some for my site, Shining Star Software, so did a search on the asp.net blogs and found mention of the Lake Quincy ads. I thought I'd give them a try so applied.
I was asked my site's rank. Well, I don't track my site's rank with any tools, so I found this slick tool that will tell you your site's rank on Google and Alexa:
Rank Checker - Pretty slick. Check it out if you want to know your site's rank.
Oh, here is the original post I found on asp.net in regard to Lake Quincy.
May your dreams be in ASP.net!
Nannette Thacker
By Nannette Thacker
I discovered Microsoft Office OneNote 2007. I don't need all the fancy note sharing capabilities, but I'll show you what it does that is important to me as a developer.
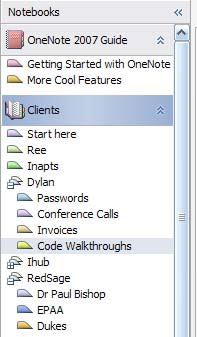
OneNote is an invaluable tool for creating Snippet folders to hold snippets of code under various categories. Then during web application development, if I need to reuse a snippet of code on another site, I have it handy and searchable.
I can also add comments to my snippets, with easily pasteable links to further details on a given function or command.
OneNote also has the ability to set up a notebook for my clients. I can keep all my client passwords, invoices, conference call notes, code walkthrough notes, etc., all in one place and easily available.
If you're like me, when learning something new, you may research on MSDN, then read blogs and articles on related sites, do some searches on Google, make your own notes, etc. But now that you've read all of that information, how do you keep it for reference to go back to later when you get an "Aha!" moment? Say you're programming and you need to do something you know you read about, but you just can't find it anymore. You can't find it in your browser history, you can't find it in your Favorites/Bookmarks, it appears to be gone forever. Sigh. But not if you use OneNotes for organizing this data.
OneNotes has the fantastic ability to create and organize by multiple NoteBooks, Sections, Section Groups, and Pages per group. Notice how I've organized all of my ASP.NET research.
Are some of your notes confidential, such as your client passwords and web server access IP's? From the File menu you may select to Password Protect a Section.
Which will then bring up a sidebar screen allowing you to enter a password.
Now when you try to access this section, you'll see a screen informing you that the section is locked and allowing you to enter the password to unlock it.
But what is the most important to me is the way it allows me to save and search through my research. Say I go to the web and I find a web page I like. I could bookmark it and store it in my favorites, but what good does that do mixed with a jillion other favorites and that certainly doesn't make the content of that page searchable. So now OneNote comes in handy. From within Internet Explorer, when OneNote is installed, there is a new OneNote icon in the top right area of the screen. When you are on a web page that you like, simply click the OneNote icon ...
...and it will immediately send the content of that page to your OneNote in an Unfiled Notebook. OneNote doesn't always save the formatting properly, especially when there are sidebars and advertisements on the page, so many times I will click to view the Printable version, and then save that instead.
Say you don't want to store the entire page, you only want to keep a certain selection. Simply drag your mouse over the desired area to select it, then click your "Send to OneNotes" icon.
Now that section is stored in OneNotes, along with a link identifying that it was "Inserted from..." and the URL.
I can now right click the page tab in my Unfiled Notes and Move the Page To a Section I've already set up.
Every section can have multiple pages that are displayed by name in the right column, such as those below.
Then later, when I want to go back to my notes to look up something specific, I can use the handy search feature, type in my keyword...
...and the search will display my search results.
I can click "View List" to view a list of the search results.
And click one of the search results topics to view the actual content. Notice how my keyword is highlighted throughout. Each hyperlink is also clickable to take me directly to the links in my web browser. The note also contains a "Pasted from..." reference to the original article so that I can go to the complete post.
I hope you've found this brief tour of OneNotes informative and may it help you in organizing your snippets and your research!
May your dreams be in ASP.net!
Nannette Thacker
More Posts
Next page »