Using Unity – Part 1
I have been going through implementing some IoC pattern using Unity and so I decided to share my learnings (I know that’s not an English word, but you get the point).
Ok, so I have an ASP.net project named ProductWeb and a class library called ProductModel. In the model library, I have a class called Product:
1: public class Product
2: {
3: public string Name { get; set; }
4: public string Description { get; set; }
5:
6: public Product()
7: {
8: Name = "iPad";
9: Description = "Not just a reader!";
10: }
11:
12: public string WriteProductDetails()
13: {
14: return string.Format("Name: {0} Description: {1}", Name, Description);
15: }
16: }
In the Page_Load event of the default.aspx, I’ll need something like:
1: Product product = new Product();
2: productDetailsLabel.Text = product.WriteProductDetails();
Now, let’s go ‘Unity’fy this application. I assume you have all the bits for the pattern. If not, get it from here.
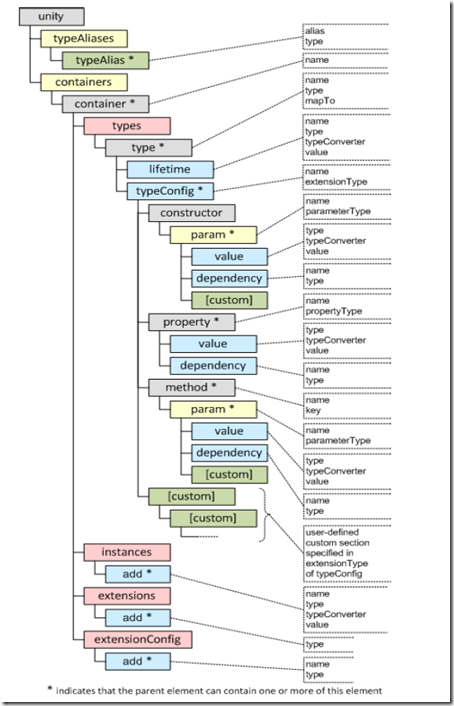
I found this schematic representation of Unity pattern from the above link.
This image might not make much sense to you now, but as we proceed, things will get better.
The first step to implement the Inversion of Control pattern is to create interfaces that your types will implement. An IProduct interface is added to the ProductModel project.
1: public interface IProduct
2: {
3: string WriteProductDetails();
4: }
Let’s make our Product class to implement the IProduct interface. The application will compile and run as before despite the changes made.
Add the following references to your web project:
Microsoft.Practices.Unity
Microsoft.Practices.Unity.Configuration
Microsoft.Practices.Unity.StaticFactory
Microsoft.Practices.ObjectBuilder2
We need to add a few lines to the web.config file. The line below tells what version of Unity pattern we’ll be using.
1: <configSections>
2: <section name="unity" type="Microsoft.Practices.Unity.Configuration.UnityConfigurationSection, Microsoft.Practices.Unity.Configuration, Version=1.2.0.0, Culture=neutral, PublicKeyToken=31bf3856ad364e35"/>
3: </configSections>
Add another block with the same name as the section name declared above – ‘unity’.
1: <unity>
2: <typeAliases>
3: <!--Custom object types-->
4: <typeAlias alias="IProduct" type="ProductModel.IProduct, ProductModel"/>
5: <typeAlias alias="Product" type="ProductModel.Product, ProductModel"/>
6: </typeAliases>
7: <containers>
8: <container name="unityContainer">
9: <types>
10: <type type="IProduct" mapTo="Product"/>
11: </types>
12: </container>
13: </containers>
14: </unity>
From the Unity Configuration schematic shown above, you see that the ‘unity’ block has a ‘typeAliases’ and a ‘containers’ segment.
The typeAlias element gives a ‘short-name’ for a type. This ‘short-name’ can be used to point to this type any where in the configuration file (web.config in our case, but all this information could be coming from an external xml file as well).
The container element holds all the mapping information. This container is referenced through its name attribute in the code and you can have multiple of these container elements in the containers segment.
The ‘type’ element in line 10 basically says: ‘When Unity requests to resolve the alias IProduct, return an instance of whatever the short-name of Product points to’. This is the most basic piece of Unity pattern and all of this is accomplished purely through configuration. So, in future you have a change in your model, all you need to do is
- implement IProduct on the new model class and
- either add a typeAlias for the new type and point the mapTo attribute to the new alias declared
- or modify the mapTo attribute of the type element to point to the new alias (as the case may be).
Now for the calling code. It’s a good idea to store your unity container details in the Application cache, as this is rarely bound to change and also adds for better performance. The Global.asax.cs file comes for our rescue:
1: protected void Application_Start(object sender, EventArgs e)
2: {
3: // create and populate a new Unity container from configuration
4: IUnityContainer unityContainer = new UnityContainer();
5: UnityConfigurationSection section = (UnityConfigurationSection)ConfigurationManager.GetSection("unity");
6: section.Containers["unityContainer"].Configure(unityContainer);
7: Application["UnityContainer"] = unityContainer;
8: }
9:
10: protected void Application_End(object sender, EventArgs e)
11: {
12: Application["UnityContainer"] = null;
13: }
All this says is: create an instance of UnityContainer() and read the ‘unity’ section from the configSections segment of the web.config file. Then get the container named ‘unityContainer’ and store it in the Application cache.
In my code-behind file, I’ll make use of this UnityContainer to create an instance of the Product type.
1: public partial class _Default : Page
2: {
3: private IUnityContainer unityContainer;
4: protected void Page_Load(object sender, EventArgs e)
5: {
6: unityContainer = Application["UnityContainer"] as IUnityContainer;
7: if (unityContainer == null)
8: {
9: productDetailsLabel.Text = "ERROR: Unity Container not populated in Global.asax.<p />";
10: }
11: else
12: {
13: IProduct productInstance = unityContainer.Resolve<IProduct>();
14: productDetailsLabel.Text = productInstance.WriteProductDetails();
15: }
16: }
17: }
Looking the ‘else’ block, I’m asking the unityContainer object to resolve the IProduct type. All this does, is to look at the matching type in the container, read its mapTo attribute value, get the full name from the alias and create an instance of the Product class.
Fabulous!! I’ll go more in detail in the next blog. The code for this blog can be found here.
