Timeline .NET
My latest project over on CodePlex.com is Timeline .NET.
The Project Description…Timeline .NET is the most complete ASP.NET WebControl which wraps the MIT Simile Timeline API.
Control such things as the data feed which can come directly from an RSS feed or add Timeline Events directly with a fully managed API. You can also control the Height and Width of the Timeline itself; the Bubble Height and Width; full control over type different bands in use (HotZone, Original, Standard) and adding any number of Zones to each band, etc...
I wanted to put together a quick article on the usage of the control and some of its options.
UsageFirst off we will download the current release off of the Codeplex website, found at: http://www.codeplex.com/timelinenet/Release/ProjectReleases.aspx Right now I have made available a direct download to the DLL alone, named “TimelineNet.dll”.
Next create a new Web Application using Visual Studio. By the way, I’m using Visual Studio 2008 (and ASP.NET 2.0), so the dialogs might be slightly different if you are using 2005.
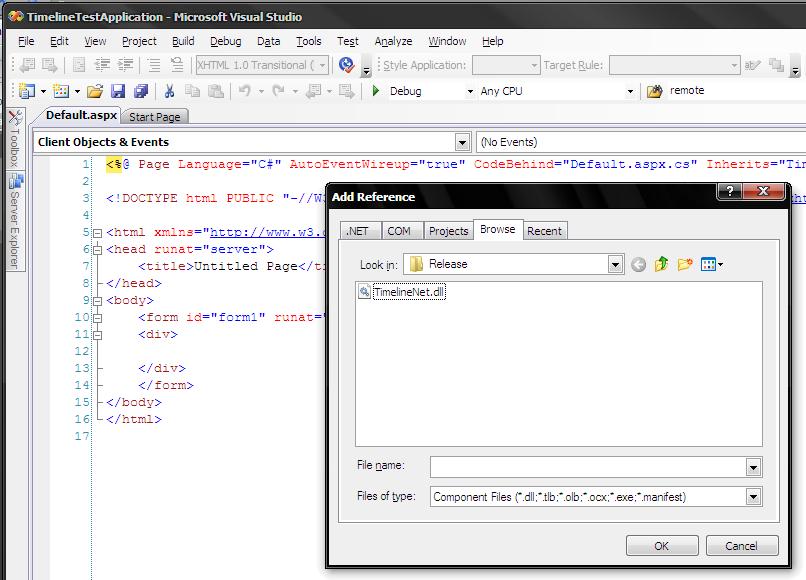
In this Web Application you will need to set a reference to the TimelineNet.dll which you previously downloaded. Right click the project in the solution explorer, and choose “Add Reference”. Browse until you find the DLL and then hit OK.
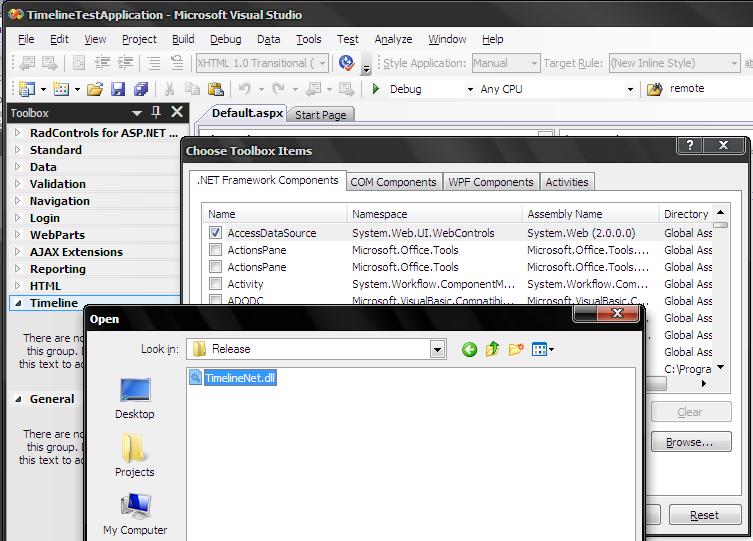
The next step that you might want to do is add it to the Toolbox in VS.NET. To do this right click the Toolbox and first add a new tab called “Timeline”. In that tab right click and choose “Choose Items”. Again browse for the TimelineNet.dll. You should now see the Timeline control in the Toolbox.
Drag the Timeline control onto the page and lets add in a few basic properties:
<cc1:TimelineNotice that we are instructing the control to grab the RSS feed from my weblog. This will instruct the Ajax Handler (which we will get to in 2 seconds) to yank the RSS feed content and use it as the datasource for the events which will be rendered in the Timeline.
Now in order to actually load data into the timeline, the DLL contains a http module which we need to register in the web.config file. In your web.config file, find the <system.web> section and add:
<httpHandlers></httpHandlers>
Once you have completed that, all you need now is to hit F5 and give the control a test. (If you get a dialog about modifying the web.config to enable debugging, just hit ok).
You should see something similar to:
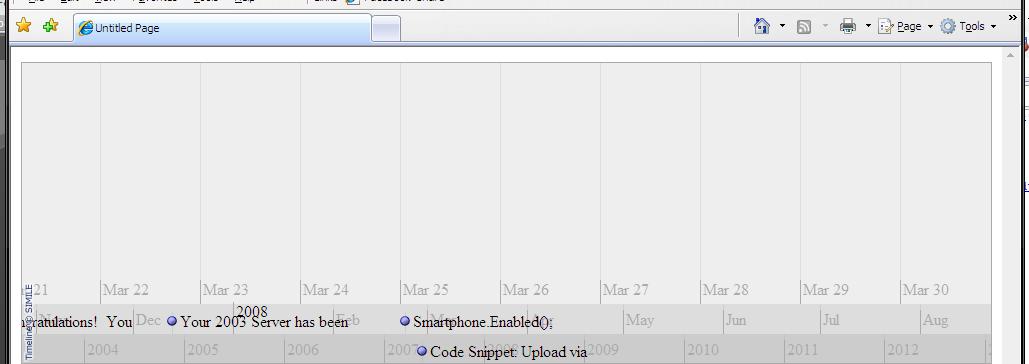
A very basic timeline rendering events from the RSS feed you supplied.
Additional Usage
Once you managed to get the basic timeline rendering you will want to start to tweak the control. Here is the current complete list of properties available:
|
Property |
Description |
| JSName |
The name of the variable in javascript to represent our timeline. This should be set to a unique value per instance |
| LabelWidth |
The width of the label |
| BubbleWidth |
The typical width of the bubble |
| BubbleHeight |
The typical height of the bubble |
| ParentElementID |
The client side element to render the timeline into |
| LocalTimelineJSFolder |
If you set the ScriptSourceLocation variable to local, you can set the root path to the timeline folder. Typically this will be the relative path from the root of the current applicaiton which contains the timeline-api.js file |
| ScriptSourceLocation |
Allows you to choose remote vs local script source/ Remote location defaults to: http://simile.mit.edu/timeline/api/timeline-api.js |
| TimelineData |
The root of our data source to add events to. This is your starting point for adding data. |
| Theme |
The theme which will be used to render the timeline. Default is the ClassicTheme |
| EnableSearchAndFilter |
Allows you to control the Search and Filter controls. Note: If this is enabled it will force the script source location to remote |
| DataSourceType |
The type of data source. |
| Bands |
A list of the bands to render. This is your starting point for adding bands of different types and time ranges. A zone is added to the specific band itself. |
| DataUrl |
If you are using a remote or local data source (other than named) you must provide the URL to the resource to load |
| SearchAndFilterTag |
The client side DOM element which to render the Search and Filter elements |
The two key properties to notice are “TimelineData” and “Bands”.
If you need to manipulate the basic bands in use, here is an example:
protected void Page_Load(object sender, EventArgs e) {Here we are adding a year, month and day band. In the Day band we are adding a HotZone broken down by hour, this will have the effect of:
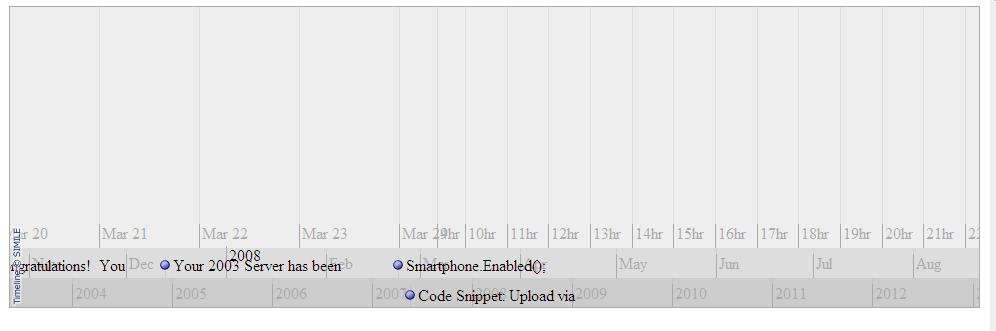
Notice that the top band breaks down to hour increments on the right side, a HotZone.
Update the aspx file to simply be:
<cc1:TimelineAnd then in the code behind we can do something like:
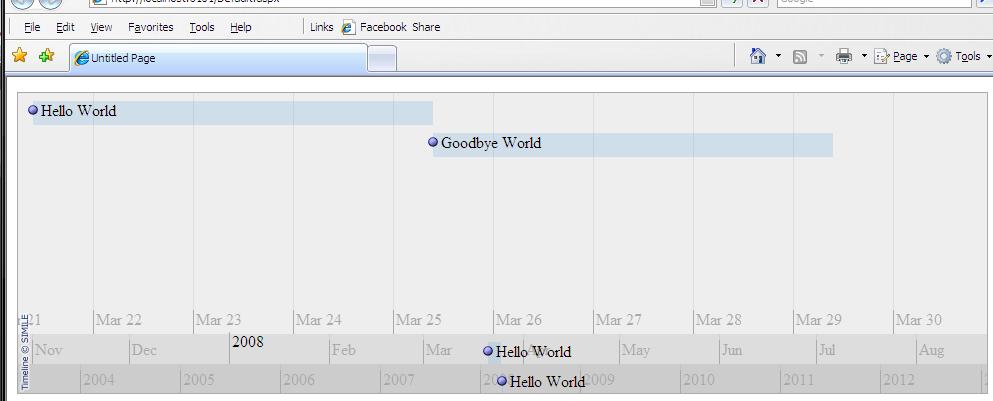
We change the DataSourceType to be a named data source, which means that we are going to rely on the fact that the Event Data will come directly and not automatically derived from an XML document or RSS feed. The next few lines above initialize the TimelineData object and then create two simple events. This will render as:
39 Comments
Comments have been disabled for this content.
Brad said
SWEET work! I just saw the Timeline and had a couple of projects plan to implement it. I do believe you have just saved me a serious amount of time.
Thom Shannon said
That's pretty cool! Nice work. What would also be cool is if rather than fetching the data via xml, it was written out as nice semantic HTML (hCalender), then as the page loads that content can be parsed with javascript and then replaced with the full featured interface. This means that if people don't have javascript they get a normal list, also good for search engines and screenreaders
Puleen Patel said
Excellent! You just need to incorporate some good CSS and make it look spiffy ;)
Will Sullivan said
That is really nice. I like it--a lot. The only problem I have with it is common to complex dhtml-y websites. In order to operate the control, you must click and drag it. However, the webpage treats these actions as if you were selecting text. I know there's a way to stop click-drag events from bubbling and causing text to be highlighted, but I'm not sure if it works in any flavor of IE, let alone FF or O or whatever. Have you looked into preventing that unwanted behavior?
Ilias said
Great job. Is it possible to set the showEventText flag to false on a band?
Wan Yuee said
Hi followed your example for "Custom Timeline – Named Events" but it didn't work for me. Renders the event as "No Data Provided!" despite setting DataSourceTypes.named Tested : RSS Feeds as datasource works just fine. Version : Timeline.NET Preview Release 2 Help Please...
Mihir said
Thanks, Its pity good. but doesn't work in Mozilla Do you have any solution for this?
Rob Chartier said
Will Sullivan, Thom Shannon: Consider posting this feature request to the Timeline project itself. Ilias:showEventText I will look into that. Wan Yuee: Did you add any named events to the TimelineData property as described in the doc's? Mihir: The preview release 2 supports Mozilla.
Rob Chartier said
Ilias:showEventText just commited to source control
Katherine Jackson said
I've had a go at getting a timeline running - its a great control - however i have problems when trying to put one into a content control of a master page ? Can this be done ?
Herman du Plessis said
Hi Rob. Thanks, this looks really cool. Only, I can't get it to work. It doesn't display the events I added. Please can tell me if I did something wrong? ASPX: Code behind: protected void Page_Load(object sender, EventArgs e) { if (!IsPostBack) { Timeline1.DataSourceType = TimelineNet.DataSourceTypes.named; Timeline1.TimelineData = new TimelineData(); Timeline1.TimelineData.Add(new Event(DateTime.Now.AddDays(-5), DateTime.Now.AddDays(-1), false, "Hello World", null, "This is a sample event", null)); Timeline1.TimelineData.Add(new Event(DateTime.Now.AddDays(-1), DateTime.Now.AddDays(3), false, "Goodbye World", null, "This is another sample event", null)); } } Thanks!
Sit said
Hi, I'm a young student looking for a decent timeline to use in visual studio. And when I found this page it looked very promising. However I encountered a problem. I follow each step in this tutorial. Though I get no result the timeline remains "blank" when executed (in vs 2008 .net 2.0). Also when looking at my aspx page in design view the timeline-control displays a message inside : "Timeline could not find the head tag. Be sure you have one on the page: .." Any help would be much appreciated. Kind regards, Sit.
Mike F said
Anyone else getting the error 'Timeline could not find the head tag' ??? I'm using it in VWD2008 and have added the required references. Really hope to get this working!
aziz said
I have a Problem when I run My Project. It consist on an error like this : Timeline could not find the head tag.Be sure you have <head runat="server" Knowing that my web file have of course a head with a Runat="server" !!!!
STG said
I've been looking for a similar control for a couple of days. This seems to work perfectly for me, but as much as I try it, it doesn't work on my machine. I'm using VS2005. I followed the installation instructions posted here and in Codeplex, and used the exact same code, but there is no way to make it work. In the design tab of the page, the control shows the following message: "Timeline could not find the head tag. Be sure you have one on the page: " I do have a head tag though, so I'm not sure what hapens with the control. If I try to run the project, I get the following JS error when loading the page: "Error: Expected ':'" Please help!! Thanks
Olivier said
I have same problem as above..."Timeline could not find the head tag..." Do we need to put a reference to javascript? Thanks for your help, Olivier
skhan said
Any ideas if this can be ported to winforms?
mthakershi said
Hello, Is it possible to add events from the server-side? If I have a timeline inside an update panel (or even without update panel) and I write code to add new events on a button click it doesn't work. In case if it is in an update panel, the whole control becomes white. What am I missing? Do I need to call some refresh method after I add an event? Please help me.
Mike said
Hi Rob. Great tool, however I cannot for the life of me get this to recognize the correct script emitter in FireFox. I still get this when I view my source: function t1.onLoad() { var eventSource = new Timeline.DefaultEventSource(); where as firefox won't parse unless it is t1.onLoad = function() { var eventSource = new Timeline.DefaultEventSource(); Any ideas? Is the link to the newest release broken somehow on codeplex? Halp! :)
Gerard said
Hi Rob, I tried your fix for the SSL problem (http://simile.mit.edu/issues/browse/TIMELINE-52) but i can't get it to work. I have overridden the js files from the latest version of the timeline, but that didn't work either. Any help would be great!
Tim said
Hi STG, The "Error: Expected ':'" disappears if we add the following the system.web section in to our web.config: Don't ask me for a precize explanation, but it works for us. HTH
phil w said
Neat idea. I can't get it to work on FF or IE7 though - FF shows: "missing ( before formal parameters/ function t1.onLoad()" As I can't debug the DLL I guess I will have to use the naked js libraries and do it that way.
dude said
"Katherine Jackson said: I've had a go at getting a timeline running - its a great control - however i have problems when trying to put one into a content control of a master page ?" Did you ever get this to work? When I try to put Simile on a page that uses a masterpage everything works except the title does not appear on the items? Thanks
bmagnuss said
Seem like the solution must use a specific date format? It works with but not with Both the header problem and the colon problem disappears with the former tag.
David Carnley said
"missing ( before formal parameters/ function t1.onLoad()" problem goes away if you get the latest source code and compile the DLL. The DLL available for download is older (3/25/2008) and does not include the fix for this problem. Get any version after 3/26/2008.
mabra said
Hi ! Really eciting work. I saw timeline before and I'll put it on an admin status page. Can I add events [data] on the client side? I'll additionally use a silverlight control [without GUI], acting as a TCP server, which should receive events from the server and update the timeline client control. Is this possible? Thanks so far. br--mabra
Sean said
Has anyone resolved it? I cannot get it to work. From looking at the source code it seems like it somehow related to existing or non axisting "master page" (I do not have), however I'm not sure.
Rob Strong said
Hey Rob, Is there a way to connect this up to a database using ado or should I stick with local XML?
Piers said
Just some general comments 1st - it works with firefox, just download the sourcecode and recomplile it then use that new dll. 2nd - should be easy to connect to any database, just connect, and then add to the timeline in a loop, similar to local XMl. Anyways nice piece of code, works nicely.
Arinto said
Hi all, I try to set the Start field of Event object into 12:00:00 AM Saturday, March 08, 2003 by using DateTime variable with aforementioned value. However, in the Timeline control, it is converted to Sat, 7 Mar 2003 08:00:00 UTC How is it possible? Any work around to overcome this problem? Regards, Arinto
myMailMarket said
About: The "Error: Expected ':'" disappears if we add the following the system.web section in to our web.config. This is because the culture of the webpage, which generates following Javascript: ,Timeline.createHotZoneBandInfo({ zones: [],overview: true ,trackHeight: 0,2 ,trackGap: 0,5 ,width: "10%" ,intervalUnit: Timeline.DateTime.MONTH ,intervalPixels: 100 ,eventSource: eventSource ,timeZone: 1 }) As you can see, the "," is used to separate the parameters in the function, but sadly also as decimal separator. We need the generation of javascript output something like this: ,trackHeight: 0.2 ,trackGap: 0.5 see the difference ? :-)
tamer said
i just install your great control but when i run i get this error --------------------------- Message from webpage --------------------------- Failed to load data xml from TimelineData.ashx?DataID=ebe7033f-710d-4489-8e57-22b18ff36cf8&type=named Not Found --------------------------- OK --------------------------- regards
Joan said
Excellent initiative, but cannot get this stuff to work .. I just get a blank box in my page. Anyone who've seen this behaviour? Are we sure this component still works with the ASP.NET Ajax libraries? R/j
Martin D said
For all those that get the error ""Timeline could not find the head tag. Be sure you have one on the page: .." I would recomend to put this inside your I Hope this fix the problem
Igor said
Hello, Used it successfully pointing to sample RSS feed. Would now like to use own RSS feed from SQL server but don't understand how xml should be formatted. Can you help ?
Igor said
Hello, Used it successfully pointing to sample RSS feed. Would now like to use own RSS feed from SQL server but don't understand how xml should be formatted. Can you help ?
goranpersson said
Is this thing still working? I get an error in the javascript file. It doesn't like the comma in trackgap property. Regards
hcetiner said
timeline.net project seems last updated on 2008. and seems very useful. only a dll published.no source albeit its BSD license. http://weblogs.asp.net/rchartier/archive/2008/03.aspx I am on framerowork dotnet 3.5. when I put the web control on to page.web preview shows an error timeline couldnot find a head tag.Be sure you have one on the page : and when I press F5 .Web Browser raises an error Message: Expected ':' Line: 34 Char: 1 Code: 0 how can I make this old stuff work ? thanks.
darshan4742 said
i m trying to use this control but i m not geting output. just black box is there. i have tried to solve from above comments. but i m not getting answer i have head tag as well in my page