Contents tagged with .NET
-
Convert GUIDs to a Shorter Textual Representation and Back
The shortest textual representation of a GUID available out-of-the-box is with
ToString("N"), which will create a string of 32 characters, e.g.:b91d07b8826e4233ba40142603cff7ef
If you have several GUIDs next to each other, e.g., in columns in an Excel file, they can take up a considerable amount of space. For my use case (Excel export/import of data from/to an application), hiding the columns was not an option, as I needed to be able to take a look at the GUIDs. Not for the actual value, just to notice differences and patterns in the data.
Behind the scenes, a GUID consists of 128 bits. Converting the bits to a (case-insensitive) hex number as done with
ToString("N")leaves some room for improvement. The usual choice for a better conversion from binary to text is base64 encoding, which is described in https://datatracker.ietf.org/doc/html/rfc4648#section-4. This encoding creates text that consists of case-sensitive letters, digits, and only a few special characters (more on that later).The .NET framework offers the functions
Convert.ToBase64String()andConvert.FromBase64String(), so implementing the conversion is straightforward.Details worth noting
- The result of
Convert.ToBase64String(someGuid.ToByteArray())is a string that always ends on two padding characters (“==”). These can be removed and added back later for a conversion into the other direction. - The base64 encoding uses the characters “+” and “/”. Depending on your scenario, this may cause issues, so replacing them with different characters is an option. In my case, I did not feel comfortable having arithmetic operators around in Excel, even though they do not cause trouble unless a cell value starts with “=”. This is why my code uses the characters “_” and “$” instead.
The code
I wrote a helper class with two functions and published it on https://github.com/RWeigelt/ShortGuidHelperDemo
The following code
var originalGuid = Guid.NewGuid();
Console.WriteLine($"From GUID   : {originalGuid:N}");

var shortId=ShortGuidHelper.GetShortId(originalGuid);
Console.WriteLine($"To short ID : {shortId}");

var recreatedGuid=ShortGuidHelper.GetGuid(shortId);
Console.WriteLine($"Back to GUID: {recreatedGuid:N}");
results in output similar to this:
From GUID   : b91d07b8826e4233ba40142603cff7ef
To short ID : uAcduW6CM0K6QBQmA8$37w
Back to GUID: b91d07b8826e4233ba40142603cff7ef
Ten characters saved for one GUID may not be much, but with several GUIDs next to each other, it still adds up.
- The result of
-
How to Create a PNG File from a Web Page in C#
Both Google Chrome and Microsoft Edge provide a feature for creating a PNG file from the currently visible viewport. For this, you start the browser executable in “headless mode”, i.e., without the UI (command line argument
--headless), and provide the path of the output file (—screenshot=<path>).Using this from C# code is straightforward:
void HtmlToPng(string source, string outputFilePath)
{
    var arguments = $"--headless --disable-gpu --default-background-color=00000000 --window-size=1920,1080 --hide-scrollbars --screenshot=\"{outputFilePath}\" \"{source}\"";

    var process = new System.Diagnostics.Process();
    process.StartInfo.FileName = "msedge"; // or "chrome"
    process.StartInfo.Arguments = arguments;
    process.StartInfo.UseShellExecute = true;
    process.Start();
}
Examples:
HtmlToPng("https://www.example.com", @"C:\example\output.png");HtmlToPng(@"C:\example\input.html", @"C:\example\output.png");
(For complete code, download the demo project on GitHub)
Details
- By starting the process with
UseShellExcute = true, we do not have to care about the exact location of the Edge (or Chrome) executable – specifyingmsedgeorchromeis sufficient. --disable-gpuis taken from the Google docs (we don’t need a GPU for what is basically one frame).--default-background-colorspecifies the background color to use if the page itself has no background set. The color is a hex value in the format AARRGGBB (AA = alpha).00000000means transparent;0also works, but could be confused with “black” when reading the code later.--window-sizespecifies the size of the area available for the webpage to render. The created PNG file will only show this area.- The
--hide-scrollbarstakes care of scrollbars that may appear if the page needs more space than available.
- By starting the process with
-
Using a Video Device with getUserMedia in WebView2 in a Kiosk Scenario (Update)
Back in July I wrote about my experiments with using a video capture device on a web page loaded into the WebView2 component. Since then, WebView2 has received a few updates. I am not sure when or how things have changed (or which version exactly I was using back then), but the workaround I described for using
getUserMedia()without HTTPS no longer worked when I revisited this topic recently.While switching to HTTPS is my goal in the long run, I encountered problems with certificates that look like they could be solved by WebView2 feedback item #624, so I shelved the work on this for my application for now. Fortunately, there is a way to “fake” HTTPS in WebView2 that is good enough to meet the requirements for
getUserMedia().The
CoreWebView2.SetVirtualHostNameToFolderMapping()function allows you to map a server name to a local folder. This way navigating to e.g.https://someServer/somePage.htmlwill load the local filesomePage.htmlcontained in that folder. If the server part and the display part of your application run on different computers, you will obviously have transfer the files e.g. to a temporary folder.The Microsoft documentation contains everything you need to know, so I will not go into further detail here. As usual, when working with WebView2, make sure
yourWebView.EnsureCoreWebView2Async()has been executed before callingyourWebView.CoreWebView2.SetVirtualHostNameToFolderMapping().See also
- ”Get started with WebView2 in WPF” – step by step tutorial in the Microsoft documentation.
- Web search for “webcam video getUserMedia” – useful resources for using video devices in JavaScript.
- Using a Video Device with getUserMedia in WebView2 in a Kiosk Scenario – my previous blog post on this topic, containing information on how to handle the request for permission to use the camera.
-
Using a Video Device with getUserMedia in WebView2 in a Kiosk Scenario
I use Microsoft’s WebView2 control for a digital signage desktop application running in fullscreen mode (“kiosk client”). All visible content is HTML coming from a server (on a private network), so the kiosk client itself has to be updated very rarely.
Right now, I am exploring how to display the output of another computer that is (physically) standing nearby, but on a different network, using a video capture device. Showing the video stream in HTML is pretty straightforward using
navigator.mediaDevices.getUserMedia(). I will not go into detail on this, as a web search for “webcam video getUserMedia” gives you helpful information on how to get things up and running very quickly.Instead, the focus of this article is on two problems that I ran into:
How to avoid the request for permission to use the camera
When browsing the web with a normal browser, nobody wants a web page to be able to simply switch on a webcam or a microphone without the user’s consent. That is why it is a good thing that
getUserMedia()opens a prompt asking the use for permission.For an unattended kiosk display, though, such a prompt is a no-go. The request for permission must be handled programmatically. Fortunately, the
WebView2control offers a way to do this.Let’s say you followed the first steps of the “Get started with WebView2 in WPF” tutorial in the Microsoft documentation, so you have
WebView2control called “webView” in your application window. Now, instead of setting theSourceproperty in XAML, you add an event handler for theLoadedevent. After callingEnsureCoreWebView2Async()you can add an event handler for thePermissionRequestedevent, where things work pretty much as expected: If the requested permission is for the camera, your code allows it.public partial class MainWindow : Window { public MainWindow() { InitializeComponent(); Loaded += HandleLoaded; } private async void HandleLoaded(object sender, RoutedEventArgs e) { await webView.EnsureCoreWebView2Async(); // important webView.CoreWebView2.PermissionRequested += HandlePermissionRequested; webView.Source = new Uri("...URI of your page..."); } private void HandlePermissionRequested(object? sender, CoreWebView2PermissionRequestedEventArgs e) { if (e.PermissionKind == CoreWebView2PermissionKind.Camera) { e.State = CoreWebView2PermissionState.Allow; } } }If you want, you can check the
Uriproperty of theCoreWebView2PermissionRequestedEventArgsto lock down the automatic permission to specific URIs.How to circumvent the requirement for HTTPS for
getUserMedia()- for the purposes of this scenarioMy digital signage solution is currently using HTTP. A web page loaded into Edge/WebView2 this way cannot use
navigator.mediaDevices.getUserMedia(). What does work is using a file URI, both for a local file or a file a remote file share.A local file deployed with the setup for the kiosk application could require more frequent update installations, though. And a file share for this sole purpose is not exactly an elegant solution.
So what I did was to use
WebClient.DownloadFileto download the HTML file on startup via HTTP from the server to a local file in a temporary folder. Then I could navigate to that file using a file URI.At some point in the future, I will move my application to HTTPS. But until then, this solution is good enough.
Update 2021-12-29: The approach described above no longer works. Please see my other blog post for updated information on a workaround.
-
Compiling DirectShow.Net for use in .NET 5
In a previous blog post, I wrote about how to access webcam properties from C# using DirectShow.Net. The last release of the library is version 2.1 from February 2010, with project files for Visual Studio 2008.
Fortunately, porting the project to compile for .NET 5 went pretty quick.
The project file
<Project Sdk="Microsoft.NET.Sdk">

  <PropertyGroup>
    <TargetFramework>net5.0-windows</TargetFramework>
    <RootNamespace>DirectShowLib</RootNamespace>
    <SignAssembly>true</SignAssembly>
    <AssemblyOriginatorKeyFile>DShowNET.snk</AssemblyOriginatorKeyFile>
    <DelaySign>false</DelaySign>
    <GenerateAssemblyInfo>false</GenerateAssemblyInfo>
    <PackageId>DirectShowLib.Net</PackageId>
    <Authors>http://sourceforge.net/projects/directshownet/</Authors>
  </PropertyGroup>

</Project>
Things to note:
- The target framework is
net5.0-windowsbecause the code (obviously) uses Windows-specific features. - I added
<GenerateAssemblyInfo>false<GenerateAssemblyInfo>to use theAssemblyInfo.csfile that came with the original project.
AssemblyInfo.cs
The following modifications were necessary:
- Change
AssemblyVersionfrom2.1.0.*to2.1.0.0because the compiler complained about the wildcard. - Remove the lines related to the
.snkfile (now handled in the project file). - Add
SupportedOSPlatform("windows").
using System; using System.Reflection; using System.Runtime.InteropServices; using System.Security.Permissions; [assembly : AssemblyTitle("DirectShow Net Library")] [assembly : AssemblyDescription(".NET Interfaces for calling DirectShow. See http://directshownet.sourceforge.net/")] [assembly : AssemblyConfiguration("")] [assembly : AssemblyCompany("")] [assembly : Guid("6D0386CE-37E6-4f77-B678-07C584105DC6")] [assembly : AssemblyVersion("2.1.0.0")] #if DEBUG [assembly : AssemblyProduct("Debug Version")] #else [assembly : AssemblyProduct("Release Version")] #endif [assembly : AssemblyCopyright("GNU Lesser General Public License v2.1")] [assembly : AssemblyTrademark("")] [assembly : AssemblyCulture("")] [assembly : AssemblyDelaySign(false)]// Path is relative to the resulting executable (\Bin\Debug) #if USING_NET11 [assembly : AssemblyKeyFile("..\\..\\DShowNET.snk")] #endif [assembly : AssemblyKeyName("")][assembly : ComVisible(false)] [assembly : CLSCompliant(true)][assembly : SecurityPermission(SecurityAction.RequestMinimum, UnmanagedCode=true)][assembly: System.Runtime.Versioning.SupportedOSPlatform("windows")]LGPL
The DirectShow.Net library is licensed under the Lesser General Public License (LGPL) Version 2.1.
To be able distribute my software at some point in the future, the LGPL license requires – in addition to proper attribution – to
- ship the library as an individual DLL (instead of ripping out just the parts that I need), and to
- make the source code available publicly.
In order to comply with the LGPL, I published my fork of the library on https://github.com/RWeigelt/DirectShow.Net.
Please note that I did not perform any tests of features that go beyond accessing webcam properties. The library compiles, I can use it in my project, and so far it did not break my code – that’s good enough for me at this moment…
- The target framework is
-
How to Access Webcam Properties from C#
My Logitech C920 webcam requires some tweaking of settings like exposure, gain, focus, etc. to get good image quality. I uninstalled the “feature rich” Logitech software and now change the settings using the bare-bones Windows webcam properties dialog. This works well for me; unfortunately, the settings are not persisted reliably. After a cold-boot, or sometimes after simply starting an application that uses the webcam, I have to make the adjustments again.
That is why I became interested in what would it take to read and write the webcam properties and to open the properties dialog from C#. The result of a web search was a bit intimidating as I came across multimedia APIs that go way beyond what I intended to do. After all, I only wanted to access the properties, not write a full-blown video capture suite.
In the end I settled on DirectShow.Net, a C# wrapper around DirectShow under LPGL license. Even though DirectShow is an old API and the DirectShow.Net project seems to be no longer active, I found one very important reason to use it: A working sample that opened the webcam properties dialog.
This blog post starts with a guided tour through the sample, with the intended side-effect of making the sample easier to discover on the web. Additionally, I will describe how to access the properties from your code.
Step 1: Download DirectShow.Net
- Visit http://directshownet.sourceforge.net/
- Go to “Downloads”
- Download the latest version of the library (
DirectShowLibV2-1.zipat the time of this writing) - Download the samples (
DirectShowSamples-2010-February.zip) - Unpack the ZIP files so that the folder
Samplesis in the same directory asDocs,libandsrc. - The
libfolder contains the fileDirectShowLib-2005.dllwhich the samples reference.
Step 2: Run the “DxPropPages” demog
- Open
Samples\Capture\DxPropPages\DxPropPages-2008.slnin Visual Studio and let the “One-way upgrade” finish. - Run the project.
- In the window that appears,
- select your webcam and
- press the “Show property pages” button.
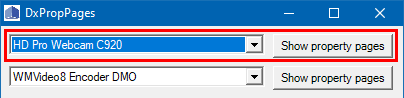
- On my computer, a properties dialog with two tabs appears. Depending on your drivers/webcam software, the dialog may have been replaced. But the generic, low-level dialog looks like this:
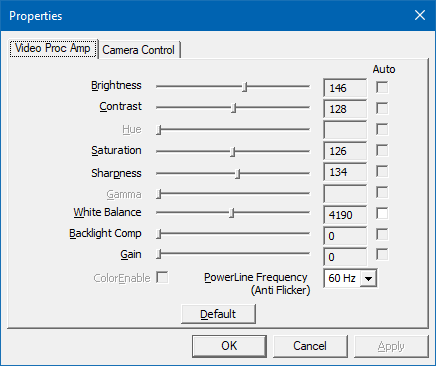
(Remember “Video Proc Amp” and “Camera Control”, we will come across these names later)
Step 3: Look at the code
- Stop the program.
- Open the code view of the file
Form1.cs. - Set a breakpoint at the start of
- the constructor e
Form1(), - the
comboBox1_SelectedIndexChanged()event handler, and - the
DisplayPropertyPage()method. - Run the program in the debugger.
How to get the available webcam(s)
When the first breakpoint is hit, you will see the following lines:
foreach (DsDevice ds in DsDevice.GetDevicesOfCat(FilterCategory.VideoInputDevice))
{
    comboBox1.Items.Add(ds.Name);
}
The code gets all available “video input devices” (which include webcams) and fills the dropdown that you used in step 2 to choose your webcam.
A
DsDeviceinstance has two important properties for identifying a device:Namereturns a human-readable name (i.e., what you saw in the dropdown list)DevicePathreturns a unique identifier.
At this point, the sample does not store the instances, only the names, even though we need the
DsDeviceinstance for the selected webcam later. I am not sure whether there is a reason for this other than keeping the sample code short and to be able to re-use theCreateFilter()method (which we will look at soon).How to open the properties dialog
Now continue to run the program. The
comboBox1_SelectedIndexChangedevent handler gets called automatically during startup. If your webcam is not the first device, let the program continue and select the webcam in the dropdown.After the breakpoint has been hit, look at the code.
- The purpose of the event handler is to set the field
theDevice(of typeIBaseFilter) which we need later. - The call of
Marshal.ReleaseComObject(theDevice)when switching between devices is a reminder that we are dealing with COM and its reference counting (instead of relying on garbage collection). - Note that the variable name
devicepathis misleading; the dropdown contains the display names of the devices. This becomes clear when we look at theCreateFilter()method: The second parameter is calledfriendlynamewhich is more appropriate.
Inside the
CreateFilter()method, some “COM stuff” happens. The important bit for us is that the returnedIBaseFilteris assigned to the fieldtheDevice, which is used in thebutton1_Clickhandler when callingDisplayPropertyPage().The method
DisplayPropertyPage()contains even more COM stuff that we can ignore for now, because the method does exactly what its name says. We will see later that we need some basic understanding what is happening inside, though.How to make the controls in the dialog appear “Windows 10”-like
The steps described my blog post “Windows 10 Theme for a Properties Dialog” for a WPF application are also valid for WinForms. In the case of the sample application the change also affects the controls of the main window.
Step 4: Start to experiment
The code inside
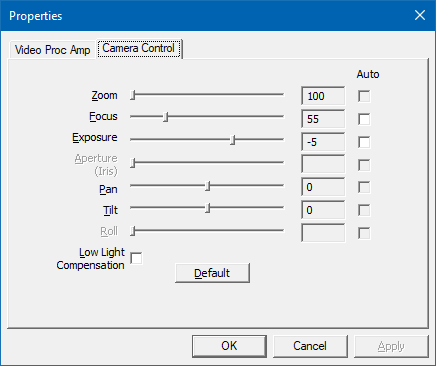
DisplayPropertyPage()uses theISpecifyPropertyPagesinterface. Two other interesting interfaces areIAMVideoProcAmpandIAMCameraControl. The names correspond to the pages of the properties dialog. Using the two interfaces, you can access the properties you see in the dialog.How to read or write the webcam properties from your code
The interfaces
IAMVideoProcAmpandIAMCameraControlboth offerGetRange(),Get()andSet()methods.For
IAMCameraControl, these methods are defined like this:int GetRange( [In] CameraControlProperty Property, [Out] out int pMin, [Out] out int pMax, [Out] out int pSteppingDelta, [Out] out int pDefault, [Out] out CameraControlFlags pCapsFlags ); int Set( [In] CameraControlProperty Property, [In] int lValue, [In] CameraControlFlags Flags ); int Get( [In] CameraControlProperty Property, [Out] out int lValue, [Out] out CameraControlFlags Flags );
When using the methods:
- You specify the property you want to access via an enum value of type
CameraControlProperty. Your device may not support all properties, though – if you look at the screenshots above, you will notice that some sliders are disabled. Therefore it is important to check the return value to be 0 (zero) for a successful call. - The
CameraControlFlagsvalue contains information whether the property is (or should be) set automatically and / or manually.
Let us say you want to access the “exposure” property of your webcam (this may or may not work on your webcam; if not, you can try another property).
For a quick-and-dirty test, resize the “Show property pages” button so can add another button next to it, double click the new button and insert the following code into the “Click” event handler:
var cameraControl = theDevice as IAMCameraControl;
if (cameraControl == null) return;

cameraControl.GetRange(CameraControlProperty.Exposure,
	out int min, out int max, out int steppingDelta,
	out int defaultValue, out var flags);

Debug.WriteLine($"min: {min}, max: {max}, steppingDelta: {steppingDelta}");
Debug.WriteLine($"defaultValue: {defaultValue}, flags: {flags}");
When I run the program, select my Logitech C920 webcam and press the button I added above, the following appears in the debug output window in Visual Studio:
min: -11, max: -2, steppingDelta: 1
defaultValue: -5, flags: Auto, Manual
This means that the exposure can be adjusted from -11 to -2, with -5 being the default. The property supports both automatic and manual mode.
Not all properties have a stepping delta of 1. For the Logitech C920, for instance, the focus property (
CameraControlProperty.Focus) has a range from 0 to 250 with a stepping delta of 5. This is why setting the property value to e.g. 47 has the same effect on the hardware as setting the value to 45.Calling the
Get()andSet()methods is simple. For instance, setting the focus to a fixed value of 45 looks like this:cameraControl.Set(CameraControlProperty.Focus, 45, CameraControlFlags.Manual);
The
CameraControlFlags.Manualtells the webcam to switch off aufo-focus.Where to go from here
Note the COM pitfall in the sample
If you are as inexperienced working with COM interop as I am and look at the original sample code inside
DisplayPropertyPage(), you may notice that the lineISpecifyPropertyPages pProp = dev as ISpecifyPropertyPages;
seems to have a corresponding
Marshal.ReleaseComObject(pProp);
Does this mean that we need a similar call in our experimental code we added above?
No, because if you add the (only supposedly) “missing”
Marshal.ReleaseComObject(cameraControl)to your code and click the button repeatedly, you will run into this exception:System.Runtime.InteropServices.InvalidComObjectException HResult=0x80131527 Message=COM object that has been separated from its underlying RCW cannot be used. Source=DxPropPages …
What is happening here? The answer is that simply “casting” to a COM interface in C# is not something that has to be “cleaned up”. The code may imply that, but you could change the line
Marshal.ReleaseComObject(pProp);
to
Marshal.ReleaseComObject(dev); // oDevice would work, too
and it still would run without leaking references.
How do I know? Because
Marshal.ReleaseComObject()returns the new reference count and changing the line toDebug.WriteLine(Marshal.ReleaseComObject(oDevice));
will output 1 each time we opened and close the properties dialog. The value of 1 is correct, because want to continue to be able to access the device object.
Placing a copy of that line in front of the call of the external function
OleCreatePropertyFrame()obviously does not make sense and will lead to an exception. But if you do it anyway, just for testing, the debug output will show 0 instead of 1. This shows us that passing the object as a parameter in COM interop – at least in this case – caused the reference count to be increased. This is whyMarshal.ReleaseComObject()is called afterOleCreatePropertyFrame(), not because of the cast toISpecifyPropertyPages.Practice defensive coding
As already mentioned, not all webcams support all properties. And if a webcam supports a property, the allowed values may differ from other devices. That is why you should use
GetRange()to determine- whether a property is supported (return value 0),
- the range of the allowed values, and
- whether the property can be set to “auto”.
Last, but not least: When you access a USB webcam – like any other detachable device – be prepared for it not being available. Not only at startup, but also while your program is running, because the device could have been unplugged unexpectedly.
-
Tiny Difference, Big Consequences Reloaded: SignalR in .NET Core 3.1 vs. .NET 5
In a past blog post I wrote about a surprising change I encountered during the migration of a .NET Core 2.2 application to .NET Core 3.0. I have just migrated that same application to .NET 5 and guess what, I stumbled across another “tiny difference with big consequences”.
The situation: I have a WPF desktop client that communicates with an ASP.NET Core server that in turn communicates with a small TypeScript browser application. I use Web API for accessing files and meta data, and SignalR to call remote functions.
After the migration I ran the application and things were working fine – until a certain point, where I received the following exception in a call of SignalR’s
HubConnection.InvokeCoreAsync()(actual function name replaced with “doSomething”):Microsoft.AspNetCore.SignalR.HubException
HResult=0x80131500
Message=Failed to invoke 'doSomething' due to an error on the server.
Source=System.Private.CoreLibOn the server side, my own code was not even called.
It took me a while to notice that one of the parameters of the function had the type of a class with a specific constellation of constructors:
- A public constructor with parameters
- A private default constructor.
It turned out while SignalR in .NET Core 3.1 has no problem (de)serializing an instance of a class with a private default constructor, SignalR in .NET 5 does. So simply removing that constructor fixed the problem. In terms forcing the usage of the other constructor when explicitly creating objects of that type, nothing changed; I did not need a private default constructor for that.
P.S. Do not ask me why I had a private default constructor in the first place. But the project is a couple of years old now, and things like this do happen.
-
Quick #if … #endif in Visual Studio
In my previous blog post “Commenting out Code in C# (Oldie but Goldie Tip)” I recommended using “#if … #endif” to disable code lines.
A quick way to do this in Visual Studio:
- Select the code lines you want to disable.
- Hit Ctrl+K, Ctrl+S to open the following popup:

- Press the Down Arrow key, then Enter.
- Enter an undefined symbol name (e.g. DISABLED). Note: the default is “true”, which is defined and thus does not disable the code).
-
Commenting out Code in C# (Oldie but Goldie Tip)
I usually “comment out” code
- when something does not work as expected and I am looking for a workaround, or
- when I want to quickly try out an idea for an alternative solution
and
- I feel that using source control is too much hassle for what I’m trying to do in this situation.
How?
The term “comment out” obviously comes from using code comments to hide source code from the compiler. C# has two kinds of comments that can be used for this, each with their pros and cons:
- End-of-line comments (“// this is a comment”) can be nested, i.e. you can comment a commented line. But they do not explicitly convey the start and the end of a commented section when looking at adjacent commented lines.
- Block comments (“/* this is a comment, possibly spanning several lines */”) do have an explicit start and end, but cannot be nested; you cannot surround a block comment with a block comment.
For disabling full lines of code, a different approach is to use the “#if … #endif” directive which tells the C# compiler to consider the code inside only if the specified symbol is defined. So to disable code, you simply specify a symbol that does not exist:
#if SOME_UNDEFINED_SYMBOL
	...one or more lines...
#endif
Using the preprocessor for this purpose is nothing new, especially to those with a C/C++ background. On the other hand, considering how often I watch developers use comments in situations where “#if” would have clear advantages, maybe this blog post benefits at least some people out there.
Why #if?
“#if” directives can be nested
The C# compiler does not blindly look for a closing “#endif”; it understands which “#endif” belongs to which “#if”, so e.g. the following is possible:
#if DISABLED
	...some code...
#if DEBUG
	...debug code...
#endif
	...some code...
#endif
You can express why you disabled a specific block of code
For example, you could use “#if TODO” when you are working on new code, but want to quickly run the program again without that code before continuing.
Something like “#if TO_BE_DELETED” (or maybe “#if DEL” for less typing) could mark code that you intend to remove after compiling the project and running the unit tests. If you are consistent with the naming of the symbol, performing a cleanup across the project is easy, because searching for “#if SYMBOL“ works well.
Obviously, you could choose more descriptive symbols (e.g. “#if TODO_DATA_ACCESS” and “#if TODO_CACHING") to differentiate different places of ongoing work. But if you think you need this, it could be a sign you are trying to juggle too many balls at once.
“#else” is great while you work on replacing code
Sometimes, when I have to deal with a non-obvious or even buggy third-party API, writing code involves a lot of experimentation. Then I like to keep old code around as a reference for a moment:
#if OLD_WORKAROUND
	...old code...
#else
	...new code...
#endif
You can easily toggle code on/off
You can enable the disabled code simply by defining the symbol, either using “#define” in the same source file or as a conditional compilation symbol for the whole project.
Alternatively, you can invert the condition for a specific “#if” with a “!” in front of the symbol:
#if !DISABLED
	...some code...
#endif
Being able to quickly switch code off and back on, or – in conjunction with “#else” – to switch between old and new code without losing the exact start and end positions of the code blocks is a huge plus. I use this e.g. when working on interactions in GUIs where I have to decide whether the old or the new code makes the user interface “feel” better.
Notes on disabled code
- Disabled code in a code base should always be viewed as a temporary measure, because code that never gets compiled “rots” over time. To the compiler/IDE, disabled code is plain text that is not affected by refactoring or renaming, i.e. at some point it is no longer valid.
- Try to get rid of disabled code as soon as possible, preferably before committing to source control.
- Last, but not least: Consider using source control for what it is good at - it exists for a reason. For instance, when experiments involve changes to many files, a new branch may be the better choice.
-
Notes on Migrating a WPF Application to .NET Core 3.0
Recently, I migrated a WPF application from .NET Framework 4.7.2 to .NET Core 3.0, which took me about two hours in total. The application consisted of four assemblies (one EXE, one UI class library, two other library assemblies).
A Google search for “migrate wpf to .net core 3” brings up enough helpful documentation to get started, so this post is mainly a reminder to myself what to look out for the next migration – which may be far enough in the future that I’ll have forgotten important bits by then.
How to get started
My starting point was the Microsoft article “Migrating WPF apps to .NET Core”. A lot of text, which makes it easy to get impatient and start just skimming for keywords. Tip: Do take your time.
In my case, I somehow missed an important detail concerning the
AssemblyInfo.csfile at first.AssemblyInfo.cs
When you migrate to .NET Core and use the new project file format, you have to decide what you want to do about the
AssemblyInfo.csfile.If you create a new .NET Core project, that file is autogenerated from information you can enter in the “Packages” section of the project properties in Visual Studio (the information is stored in the project file).
In the .NET Framework version of the UI class library, I used the attributes
XmlnsDefinitionandXmlnsPrefixto make the XAML in the EXE project prettier. That’s why I wanted to keep using anAssemblyInfo.csfile I could edit manually. For this, I had to add the following property:<GenerateAssemblyInfo>false</GenerateAssemblyInfo>
PreBuild Step
I use a pre-build step in my UI library project (calling a tool called ResMerger), After the migration, macros like
(ProjectDir)were no longer resolved. The migration document does not cover pre/post build events (at the time of this writing). But the article “Additions to the csproj format for .NET Core” does, in the section “Build events”.PreBuild event in the old csproj file:
<PropertyGroup>
    <PreBuildEvent>"$(SolutionDir)tools\ResMerger.exe" "$(ProjectDir)Themes\\" $(ProjectName) "Generic.Source.xaml" "Generic.xaml"
    </PreBuildEvent>
</PropertyGroup>
And in the new csproj file:
<Target Name="PreBuild" BeforeTargets="PreBuildEvent"> <Exec Command=""$(SolutionDir)tools\ResMerger.exe" "$(ProjectDir)Themes\\" $(ProjectName) Generic.Source.xaml Generic.xaml" /> </Target>Note that the text of the PreBuild step is now stored in an XML attribute, and thus needs to be XML escaped. If you have a lot of PreBuild/PostBuild steps to deal with, it’s maybe a good idea to use the Visual Studio UI to copy and paste the texts before and after migrating the project file.
WPF Extended Toolkit
My application uses some controls from the Extended WPF Toolkit. An official version for .NET Core 3 has been announced but is not available yet. For my purposes I had success with a fork on https://github.com/dotnetprojects/WpfExtendedToolkit, your experience may be different.
Switching git branches
Switching back and forth between the git branches for the .NET framework and .NET Core versions inside Visual Studio results in error messages. To get rid of them, I do the typical troubleshooting move of exiting Visual Studio, deleting all
binandobjfolders, restarting Visual Studio and rebuilding the solution. Fortunately, I don’t need to maintain the .NET framework in the future. The migration is done and I can move on.Automating the project file conversion
For the next application, I’ll likely use the Visual Studio extension “Convert Project To .NET Core 3” by Brian Lagunas. I installed the extension and ran it on a test project – a quick look at the result was promising.
