Windows 7 Sensor and Location platform: Sensors programming (Part 2/3)
Recently I wrote about Sensor and Location platform in Windows 7 and for what purposes it is necessary. Now we will talk about how this platform can be used in the applications.
To make experiments with not virtual sensors, but with something more approached to a reality, we will use the device from Freescale semiconductor, constructed on the basis of JMBADGE2008-B microcontroller. This device represents the small circuit board on which also there are some sensors - 3D accelerometer, ambient light and buttons.
|
|
 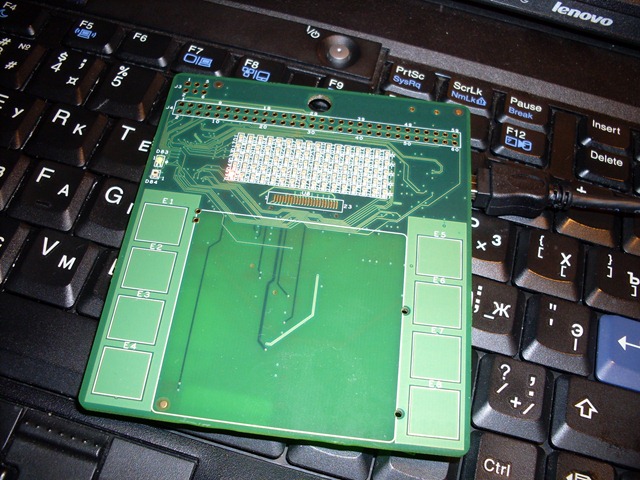 |

This device is developed specially for demonstration of possibilities of Sensor and Location platform in Windows 7. Actually, everyone can buy it. Thus, this device is good for using for demonstration of this possibility Windows 7.
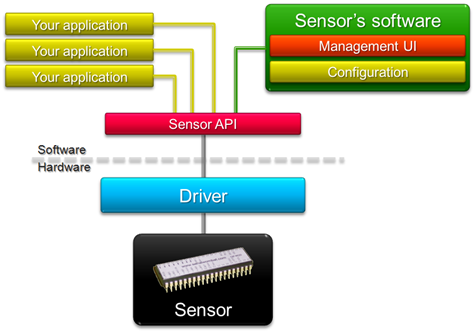
Before to consider concrete applications, let's look inside Sensor and Location platform. Before creation of Windows 7 and Sensor&Location platform the connection of various sensors was reduced to implementation of driver and software for it.

At such organisation of a task of interaction with external sensors it is possible, but it is heavy. For this purpose each application should interact with that API which will be offered by the vendor of a sensor and a software which serves this sensor. The problem is especially unpleasant in case when the application should use set of the same sensors from different vendors. How Sensor&Location platform suggests to solve this problem?
At level of operational system there are mechanisms of work with sensors. There is a standard unified program interface for work with sensors - Sensor API. Thus all interactions occur to the sensor through Sensor API. It is important, that interactions with all sensors occurs in uniform style. Now you do not need to be integrated with native API through p/invoke.
To work with Sensor and Location API it is necessary to download corresponding library ".NET Interop Sample Library". In it there are.NET-wrappers for work with Sensor API. In it there are some classes with which help it is possible to work with sensors.
Class SensorManager is an entry point. Through it it is possible to receive the information of sensor controls, and also to work with them. For example, by means of GetSensorBySensorId <> method it is possible to get access to the sensor which interested us. Each sensor should have a class-wrapper which is inherited from base class Sensor. In NET Interop Sample Library already there are such three realisations - AmbientLightSensor, Accelerometer3D, UnknownSensor.

The main idea at work with sensors consists in the following. At change of a state of the sensor (connected/disconnected/active/etc) StateChanged event is throwed. This event is necessary to begin with or end of work with sensors. After communication with the sensor is adjusted, the DataReportChanged event is generated at receiving of new data . This event will be generated how much often depends on sensor and driver. At processing of this event it is possible to read a state of sensors and somehow to change work of application. For these purposes GetProperty method is used. In parameters of this method the identifier of property as which it is necessary to read from the sensor is transferred. As a rule, details of calls of this method disappear in classes which are implements for the specific sensor.
Besides, each sensor has own identifier (GUID) on which it is possible to identify the device. At implementation of a class-wrapper for the sensor this ID is set by means of attribute. Thus, the sensor can be accessed as obviously having specified the identifier of this sensor, or having referred on this class-wrapper.
/// <summary>/// Represents a generic ambient light sensor/// </summary>[SensorDescription( "97F115C8-599A-4153-8894-D2D12899918A" )]public class AmbientLightSensor : Sensor
{// .....// .....// .....var sensors = SensorManager.GetSensorsByTypeId<AmbientLightSensor>();
Let's try implement some examples of work with sensors which are accessible in the device from Freescale. We will work with two types of sensors - accelerometer (allows to measure a corner of an inclination of the device) and light (measures light exposure level indoors).
The first application which we implement will display level of light exposure in the form of a burning bulb on the form. To begin with we will subscribe to event of change of a state in Sensor API. It is necessary that the application has started to work, if the sensor is connected in a hot mode. In the handler of this event we will receive the list of all sensors of the necessary type and we will subscribe at them for DataReportChanged event.In the handler of this event we will read value from the sensor of light exposure and to write it in TextBox at the form. Because event is generated in an additional thread, also it is required to make a call of method Dispatcher.Invoke that processing went in the main thread and we could co-operate with elements on the form. Thus we will get the following code.
private void Window_Loaded(object sender, RoutedEventArgs e)
{SensorManager.SensorsChanged += SensorManagerSensorsChanged;
}
void SensorManagerSensorsChanged(SensorsChangedEventArgs change){Dispatcher.Invoke((System.Threading.ThreadStart)(UpdateSensorsList));
}
private void UpdateSensorsList()
{var sensors = SensorManager.GetSensorsByTypeId<AmbientLightSensor>();
foreach (var sensor in sensors)
sensor.DataReportChanged += delegate(Sensor sender, EventArgs e) { Dispatcher.Invoke((System.Threading.ThreadStart)(delegate { if (ActiveSensorsListBox.SelectedItem == sender) {CurrentValue.Text =
((AmbientLightSensor)sender).CurrentLuminousIntensity.Intensity.ToString();
}
}));
};
}
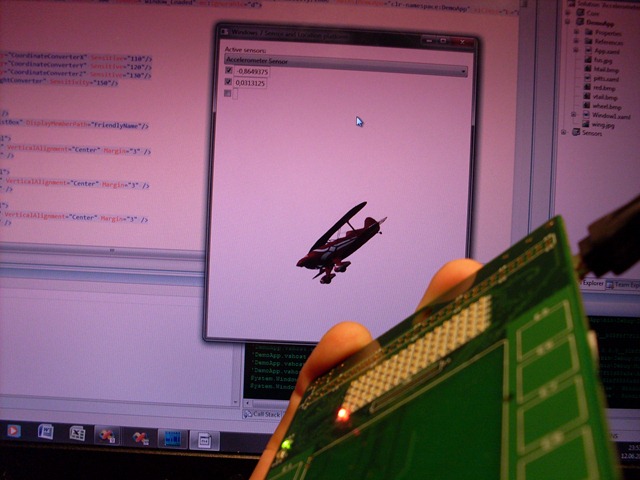
Now in TextBox on the form current value of light exposure is displayed. Now it is easy to implement any visualisation for it. By means of bindings in WPF we will display degree of light exposure in the form of bulbs. As a result we will receive the following application.
 |
 |
As on a photo it is very difficult to see application work, I have recordered short video in which how the sensor reacts to light exposure degree is well visible.
Other sensor is more interesting - he allows to define degree of an inclination of the device on different axes. For demonstration of degree of an inclination we take 3D model of the airplane for WPF application and we will rotate it in space depending on sensor indicators. The principle of this application is similar previous - we find the necessary sensors, we subscribe for events and at their processing we write down co-ordinates in entry fields on the form. After that we bind model's coordinates to values of these TextBoxs.
private void UpdateSensorsList()
{foreach (var sensor in SensorManager.GetSensorsByTypeId<Accelerometer3D>())
{ sensor.DataReportChanged += delegate(Sensor sender, EventArgs e) { Dispatcher.Invoke((System.Threading.ThreadStart)(delegate {if (UseXCoordinate.IsChecked == true)
CurrentXValue.Text = ((Accelerometer3D)sender).CurrentAcceleration[Accelerometer3D.AccelerationAxis.X].ToString();
if (UseYCoordinate.IsChecked == true)
CurrentYValue.Text = ((Accelerometer3D)sender).CurrentAcceleration[Accelerometer3D.AccelerationAxis.Y].ToString();
if (UseZCoordinate.IsChecked == true)
CurrentZValue.Text = ((Accelerometer3D)sender).CurrentAcceleration[Accelerometer3D.AccelerationAxis.Z].ToString();
}));
};
}
}
Apparently from this example, the code for work with sensors has changed not so strongly. Actually, the code of data acquisition from sensors has changed only, and the rest remains invariable.
 |
 |
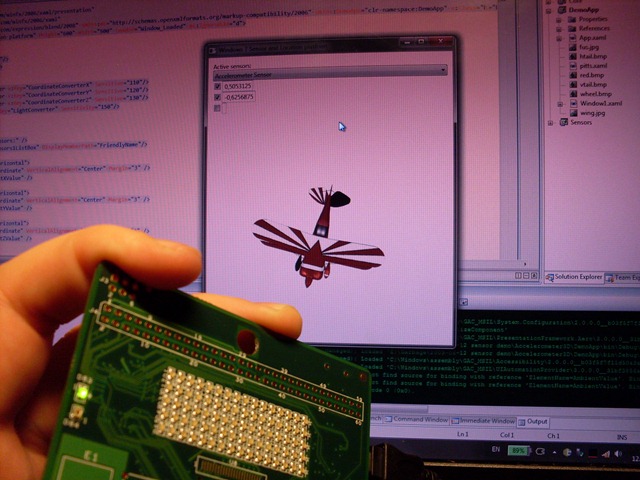 |
Apparently from a photo at a device inclination, the sensor transfers the information to the application and model coordinates change. Thus, we can see effect of an inclination of three-dimensional model.
That is interesting, these sensors can use some applications simultaneously. Also in one application it is possible to use some sensors. Let's combine application of rotation of three-dimensional model with light sensor. In this case except turn of model we will show the sun. If light exposure indoors decreases, also the sun will disappear. The more illumination indoors, the the sun will shine more intensively. Accordingly in this application the code from two previous examples is used. Therefore I will not bring a code, and at once I will show result.
 |
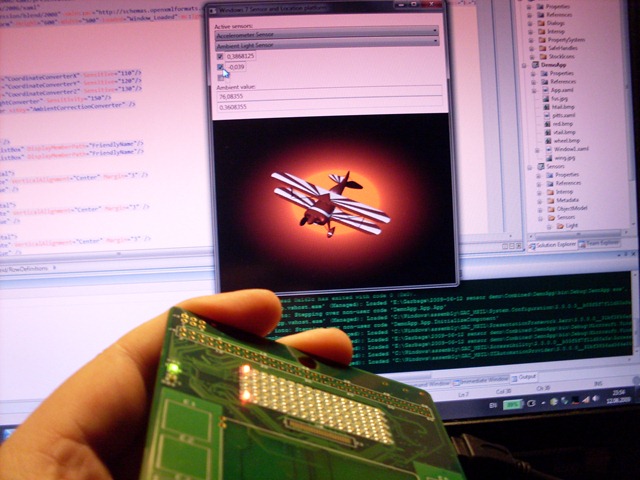 |
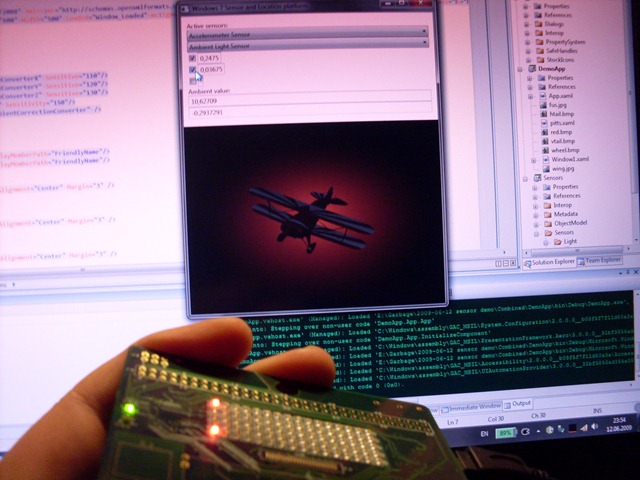 |
Also it is possible to look this application in dynamics.
On these examples it is well visible, that work with sensors in Windows 7 is very simple. However, for this purpose it is necessary to have the driver for Windows 7 and a class-wrapper for Sensor&Location platform. As a rule, the driver are delivered by the vendor of a hardware platform, and the class-wrapper can be implemented independently. Next time we will talk just on this theme.
Sample applications: