January 2008 - Posts
Part 1 - What is ClickOnce?
CickeOnce, is a technology for deploying smart-client applications. When we talk about smart-client application that deployed with ClickOnce, we want that the application will:
- Provide automatic installation in one click.
- Install updated automatically
- Can be installed from local file, or from the WEB.
ClickeOnce, give us this options out of the box, and all we need to do is to write two XML manifest files (one for the application, and one for the ClickOnce engine). If you use Visual Studio, you have a wizzard for this.
In this post, I'll show how to work with ClickOnce from Visual Studio, and from your code too.
Part 2 - How to use ClickOnce in your application?
First of all, ClickOnce supports deployment of Windows Applications from all types (Console
Applications, Windows Forms Applications, WPF Applications).
So, in this example I created a new empty Windows Forms Application. to edit the ClickOnce settings, you should go to the project properties page (by right click on the project name in the solution explorer, see pic. #1).
In the Property page go the the "Publish" tab. In this tab, you can change the ClickOnce settings for this Project. First of all, in the first textbox, you have to enter where VS will create the installation files. It can be in the local file system, web site
and FTP.
If you'll click on the Application Files button, you can edit the files that will include in your project.
You can add new files that are currently in your solution, and choose if they will be in the package.
In the Prerequisites screen, you can choose package that muse be installed in the computer before your project will deploy.
For example, the .NET version you use, SQL Server etc.

It's recommended to click on the Update button, and turn on the update feature.
By default, it's turned off. This feature give you the option to create new versions and the clients will automatically update.
By default, the updates should be in the same directory like the publish directory.
But, you can specify a special directory for the updates, if you want so. Note that the updater will check if there is a newer version in the server. the version defuned in the main screen, in the Publish tab in the Project properties. If the V in "Automatically increment revision with each publish" checked, then any publish will increase the version.
After you configure the Updates, click on the Options button in the main screen and configure the general details.
After you finish, go close this Dialog and click on the Publish button:
Now, Visual Studio will build your project and will publish it. After anything will done, a new IE window will open (by default, unless you change it in the Options screen.) with the product auto-generated page.
The page that automatically generated, include the prerequisites, and if everything is already installed you can click in the "launch" link. After clicking, if you are verified publisher, the application will start automatically, and later can be started from the Start Menu shortcut.
Part 3 - How the updater works?
The current project includes only an empty form. Now, let's say it's version 1.0.0.1.
Now, I changed the back color of the form , and I want it to be version 2.0.0.0.
I'll go to the Publish tab in the project properties and edit the version:
Now, I'll click the publish now button. It will publish the new version to the location I chose (in the web).
Next time I'll launch the application, as I set in the Update properties, the application will update and show this message:
If you click OK, then the new version will download and run.
Part 4 - ClickOnce with code
Until now, we worked with wizards and GUI to manage the ClickOnce deployment, but we can do it from our code too. First of all, we should add using statement to System.Deployment.Application:
using System.Deployment.Application;
Now, we can use the ApplicationDeployment class to manage our application deployment information. This code, for example, check for updates and shows a MessageBox with the version of the newest version for the current deployment. Note, that this code can replace the built-in message of new versions. you can cancel in the Update screen in the Publish tab the auto-check for updates, and do it manually from your code:
1: ApplicationDeployment deploy = ApplicationDeployment.CurrentDeployment;
2: UpdateCheckInfo update = deploy.CheckForDetailedUpdate();
3: MessageBox.Show("You can update to version: " + update.AvailableVersion.ToString());
Note that this code will cause an exception if no update available, because then update.AvailableVersion.ToString() will be null. So, if you want to use this code, make sure that it's in if...else statement that show the message only if update doesn't equal to null.
We can fix this code a little, so the application will update after the message show:
ApplicationDeployment deploy = ApplicationDeployment.CurrentDeployment;
UpdateCheckInfo update = deploy.CheckForDetailedUpdate();
if (deploy.CheckForUpdate())
{
MessageBox.Show("You can update to version: " + update.AvailableVersion.ToString());
deploy.Update();
Application.Restart();
}
This code will work always. If an update is available, it will inform the user, download the update synchronously and restart the application. Otherwise, this code do nothing.
Put this code in the form load event, and then when you release a new version, the user will informed about and the application will update. you can use this code instead the built-in message, to make this progress more friendly.
Shahar Gvirtz.
ASP.NET 3.5 Extensions is a package of new controls and tools that improve the existing ASP.NET 3.5.
One of the interesting (and time-saving) features, is the Dynamic Data Controls. Dynamic Data Controls can be used to build easily, almost without writing any line of code a complete data-driven Web Application.
The controls cover the common things that developers use when build a web application which work with DB - view information, delete, update, view detailed information, add new data etc.
For example, let's say we need to build a management panel for DB. First, we (or the DBA) build the DB, and then, we create a web forms for managing this DB. Let see how can I do it simply with Dynamic Data Web Application in 5 minutes.
In this article, you won't see any line of code!
The site we build is actually based on the Dynamic Data controls built-in template, and doesn't include any custom logic.
In the real world, we may want to add our logic, and in the next part of the article you'll see how to do this.
Step 1 - Create a new Dynamic Data Web Application
After you downloaded and installed the ASP.NET 3.5 Extensions, you open your VS 2008, and create new Dynamic Data application. Note that you must use .NET 3.5 for this (if you use .NET 2.0, maybe you want to check ASP.NET Futures July CTP which works in .NET 2.0)
Step 2 - Add you database to the App_Data folder
In this example, I use the Northwind database.
Step 3 - Add LINQ to SQL Classes File
Add new item to your project, I called in "db". The Dynamic Data Controls based on LINQ to SQL Object Mapper, and use it to get and work with your DB. Drag from the Server Explorer the items you want that Dynamic Data will work with. I added all the tables in Northwind DB.
Step 4 - Edit your web.config file
If you don't want to customize the Dynamic Data site, and you want to create fully data driven application without writing even one line of code (great for demos), just go to web.config to line 130 and set enableTemplates property as "true" and set the dataContextType to the name of our LINQ to SQL classes name:
<dynamicData dataContextType="db" enableTemplates="true">
In this line we set Dynamic Data to work with the default templates (you can find them in App_Shared folder).
Step 5 - Run the Application
What we get by default?
The default template of the Dynamic Data site stored in the App_Shared folder. The web forms use the new controls - DynamicGridView (which render on client side like a standard GridView), DynamicFormView etc.
In the main page we can se list of all our tables that are in the LINQ to SQL. The LINQ to SQL include the full database schema, which means that all the relationships can be used it the Dynamic Data Site.
For example, take a look in the Products page. you see a list of all the items in GridView, you
can select and see details in the DetailsView in the bottom of the page, you can sort, edit and delete.
But, you can also see that the last 3 columns, are a links to another pages that include the categories, the order dentils and the supplier information. In the database schema, this columns include only the ID of the category, the ID of the Supplier. The DynamicData Controls, show instead the ID, a link to page with the category details or the supplier details.
This feature based on the LINQ to SQL that create objects from the tables, with association that make it possible for DynamicData Controls to link the relevant page instead show numeric ID.
Summary
In this part, you see how to create a simple data driven web application without write code.
In the next part, we'll see how we can customize the application. change the style, remove and add columns from the view, and add logic.
Shahar Gvirtz.
Sometimes, we want to run PowerShell script from command-let that derives from PSCmdlet (If you derived from Cmdlet, you can't use this way).
To do so, we just have to use this code:
1: using System.Management.Automation;
2: using System.Collections.ObjectModel;
3:
4: ......
5:
6: Collection<PSObject> results = InvokeCommand.InvokeScript("dir" /*replace it with your script */);
7: foreach (PSObject var in results)
8: {
9: WriteObject(var.ToString(),false);
10: }
I included in this code the important using statements, and the code itself. Few things about this code:
- I use PSObject as the type for the collection, which means that I can access any property and method of the returning object, include Extended methods (ETS).
- Always use WriteObject method in Command-lets NEVER use System.Console.
That's because WriteObject write stream of object, not text, which is one of the biggest advantages in PowerShell - we can work with object instead text.
When you use WriteObject you can be sure that any PowerShell host will be able to use the command-let and the output easily.
Shahar.
Someone asked me how we can set Windows PowerShell to work like in VB when you specify Option Explicit.
How to disable using of variables that didn't defined in the code. In this way, you know for sure that you aren't use undefined variable and get unexpected results.
to do "Option Explicit" in PowerShell, simply run this command:
set-psdebug -strict
and to disable the Option Explicit:
set-psdebug -off
Shahar.
I saw it today, and it looks very cool. try the new MSDN Code Gallery.
Windows PowerShell, is the new (kind of new) Shell from Microsoft. Actually, PowerShell is more than a shell. you can use PowerShell as a Platform. Because PowerShell commands (AKA command-lets or cmdlets) are actually .NET classes, and PowerShell, not like other shells, is object oriented, we can use powershell as a development platform.
When you write an Application, you can create a new PowerShell tier, which include command-lets which relevant for your application. for example, in student management application, I'll create the following command-lets:
- Get-Student
- New-Student
- Update-Student
- Delete-Student
This PowerShell tier include command-lets that can be used as your Application API.
The command-lets you write can use by users who want to use command line for working with your application, scripts writers that can use your command lines, and you can base your GUI (PowerShell is more than command line you can create even WPF GUI PowerShell command-lets behind the scenes) based on this command-lets (think about it: the name of command-let is verb-noun which exactly the way we describe the things the user can do with the GUI), and other applications can use this command-lets as your Application's API, because any .NET application can easily execute PowerShell scripts, include your application's command-lets, and work with the results (everything is objects).
For more information about it, download my presentation and the source code (include exampled of build GUI based on PowerShell in .NET 3.5 application [even that PowerShell command lets should be written in .NET 2.0 or be fully compatibility with it]) from my lecture about PowerShell in Developer Academy 2 (Israel).
You can also read my code project article about Build PowerShell Command-Let.
Shahar Gvirtz.
Someone asked me, and I post here the answer - sometimes, we want to get from our command-let the command that the user entered to use our command-let. we want the full line, with all the command-lets in the pipeline and all the parameters.
In this case, we will use the following code (works only from command-lets that derived from System.Management.Automation.PSCmdlet):
string commandLine = this.MyInvocation.Line;
Shahar.
When you write a Command-Let in Windows PowerShell, you must derive from one of the following classes: System.Management.Automation.Cmdlet or System.Management.Automation.PSCmdlet.
One of the most popular questions from beginners PowerShell developers, is "What's the difference?".
The answer is simple - PSCmdlet derives from Cmdlet and give more power and functionality. When you derive from PSCmdlet, you have a better interaction with the PowerShell runtime environment. it means that you can access the session state information, call script, access providers - and more access to the powershell runtime than when you derive from Cmdlet class.
Anyway, PSCmdlet, derives from Cmdlet too.
So, When derives from Cmdlet and when from PSCmdlet?
To answer, it's important to understand what's the disadvantage of deriving from PSCmdlet - you more depend in the PowerShell runtime.
When command-let (which every command-let is actually a class) derives from Cmdlet, it can be invoked directly, without using Runspace in some cases.
But, if you derive from PSCmdlet, you can't invoke the command lets directly (by simply create instance of them), and you must use Runspace to run commands that use your command-let.
In conclusion, deriving from Cmdlet is the best choice except when you need fully integration with powershell runtime, access to session state data, call scripts etc. Then, you have to derive from PSCmdlet.
Shahar.
Visual Studio 2008 and .NET 3.5 are already here, but some of us, sometimes, still need to use .NET 2.0.
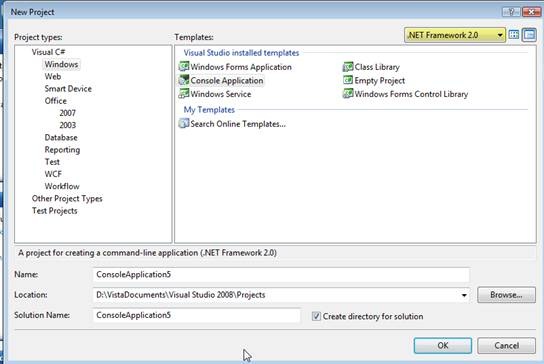
Visual Studio 2008, support in a new feature called “Multi Targeting”. You can use Visual Studio 2008 ad IDE for .NET 2.0 and .NET 3.0 too. Simply, in the “New Project” form, choose the version you want.
The common between all this versions you can use VS2008 to develop for it, is that this entire versions are actually based on the same version of CLR – CLR 2.0.
.NET 3.5 based in the same version of CLR that .NET 2.0 uses. Of course, there are a lot of new features, new C# and VB.NET versions, but under the covers the same CLR works.
Why is it so important? Because theoretically, you can use some of the mew features of .NET 3.5 in .NET 2.0 when you work from VS 2008.
In this post, I'll show you some of the new C# 3 and .NET 3.5 features and how they work in .NET 2.0 project (that created and developed from Visual Studio 2008). For every feature I'll give you a look of which code is actually generated. I give you the original code, and the disassembly code from Reflector.
All the code in this post written in Visual Studio 2008 in a .NET 2.0 Console Application projects, without reference to any addition assemblies, and checked in machine without .NET 3.5.
Auto-Properties
one of the new features in C# 3 is auto-properties. because, actually, a lot of the properties we write are very simple, we don't have to write the full code (declare private variable, create getter and setter). We just have to write this:
public string Name { get; set; }
The same code of auto-properties works from .NET 2.0 projects under Visual Studio 2008. That's because the auto-properties is only a compiler trick. Let's see how this code looks in reflector (in .NET 2.0 project, same like in .NET 3.0 project):
1: // Fields
2: [CompilerGenerated]
3: private string <Name>k__BackingField;
4:
5: // Properties
6: public string Name
7: {
8: [CompilerGenerated]
9: get
10: {
11: return this.<Name>k__BackingField;
12: }
13: [CompilerGenerated]
14: set
15: {
16: this.<Name>k__BackingField = value;
17: }
18: }
19: }
As you can see, what's actually happened, is that the compile create new private variable, and public property with simple getters and setters. because that's actually a compiler trick, we can use it in .NET 2.0 projects too.
Object Initializers
1: List<Book> books = new List<Book>();
2: books.Add(new Book() { Name = "Enders Game", ISDN = "13456789" });
This simple code is an example of the new Object Initializers in C# 3. But, this code works when you create a .NET 2.0 project too. Because, again, it's simple compiler trick. This is the output of the Reflector's disassemble for this code (in .NET 2.0 project under Visual Studio 2008):
1: internal class Program
2: {
3: // Methods
4: private static void Main(string[] args)
5: {
6: List<Book> books = new List<Book>();
7: Book <>g__initLocal0 = new Book();
8: <>g__initLocal0.Name = "Enders Game";
9: <>g__initLocal0.ISDN = "13456789";
10: books.Add(<>g__initLocal0);
11: }
12: }
13:
14:
Behind the scenes, this code creates a new instance of the Book object, and simply give values to the properties. Because .NET 2.0 and .NET 3.5 are actually working on the same CLR, the same code generated, and it's working on .NET 2.0 too.
"var" keyword
the keyword "var" is new in C# 3, and give us the option to declare a new variable without specify the type. the type will be the type of the value that we will put to the variable:
var i =5;
this code will work in .NET 2.0 project in Visual Studio 2008 too. because again, it's compiler code. If I'll check the Reflection's disassembly, I'll see:

Empty!!!
the compiler is smart. when i only declare a variable but never use it, it will not compile. but, if I'll change a little the code, and print this variable:
1: var i = 5;
2: Console.WriteLine(i);
then, we'll see this:
We can use this feature in .NET 2.0 project, because it's only a compiler trick. actually, "var" only tell the compiler to replace it with the type name of the value we use. in this example, we see that int replaced the var keyword.
More than that. we also can use Anonymous Type in .NET 2.0 project:
1: var i = new { Name = "Enders Game", ISDN = "123456789" };
2: Console.WriteLine(i.Name);
The disassembly:

WOW! What is this "var" keyword in the disassembly? this is .NET 2.0 project, and in C# 2 there is no "var" keyword.
Actually, a new class was generated:

But, this class is hidden with DebuggerHiddenAttribute and DebuggerDisplayAttribute so, in the debugging we can't see it.
And again, we see how we can use .NET 3.5 feature and C# 3 keyword in .NET 2.0 project under Visual Studio 2008. It's possible just because this (and everything else we see in this post) is a compiler trick, which doesn't requied any additional assemblies or features - and use CLR v2.0.
Extension Methods
Daniel Moth wrote about using Extension Methods in .NET 2.0 here.
Summary
Visual Studio 2008 support Multi Targeting which give us the option to develop .NET 2.0 project in VS 2008 and compile it with new version of the compiler. this compiler create a regular .NET 2.0 code - but give us the option to use .NET 3.5 and C# 3 features, that are actually compiler-tricks to work easily.
Behind the scenes, the compiler generate regular .NET 2.0 code.
Shahar.
Hello, and welcome to my new weblog here. My name is Shahar Gvirtz, I’m 15 years old from Israel (so, first of all I just apology for my English) . I have a blog here (Hebrew) since April 2006. Now, I start to write here, in English.
I’m .NET developer, especially web development. In the last time, I also work a lot with Windows PowerShell, and I lectured about it in the last Microsoft’s conference in Israel (Developer Academy). Hebrew speaker can watch my lecture here.
In this blog I’ll write about .NET, PowerShell and other things I think that you may interest in them.
I hope to enjoy here, and hope you'll like my posts.
More Posts