How-To: Use ClickOnce to deploy your Applications
Part 1 - What is ClickOnce?
CickeOnce, is a technology for deploying smart-client applications. When we talk about smart-client application that deployed with ClickOnce, we want that the application will:
- Provide automatic installation in one click.
- Install updated automatically
- Can be installed from local file, or from the WEB.
ClickeOnce, give us this options out of the box, and all we need to do is to write two XML manifest files (one for the application, and one for the ClickOnce engine). If you use Visual Studio, you have a wizzard for this.
In this post, I'll show how to work with ClickOnce from Visual Studio, and from your code too.
Part 2 - How to use ClickOnce in your application?
First of all, ClickOnce supports deployment of Windows Applications from all types (Console  Applications, Windows Forms Applications, WPF Applications).
So, in this example I created a new empty Windows Forms Application. to edit the ClickOnce settings, you should go to the project properties page (by right click on the project name in the solution explorer, see pic. #1).
In the Property page go the the "Publish" tab. In this tab, you can change the ClickOnce settings for this Project. First of all, in the first textbox, you have to enter where VS will create the installation files. It can be in the local file system, web site 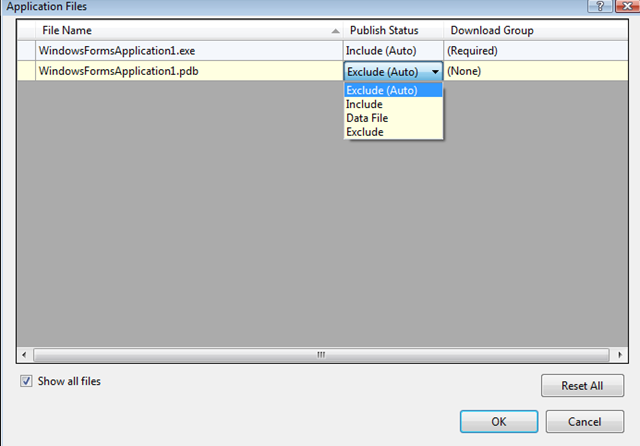 and FTP.
If you'll click on the Application Files button, you can edit the files that will include in your project.
You can add new files that are currently in your solution, and choose if they will be in the package.
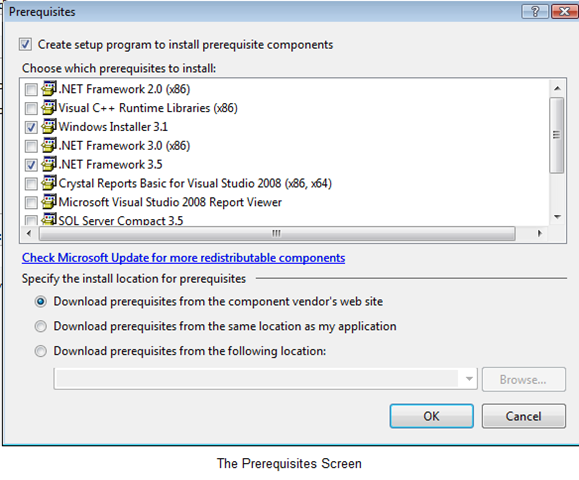
In the Prerequisites screen, you can choose package that muse be installed in the computer before your project will deploy.
For example, the .NET version you use, SQL Server etc.
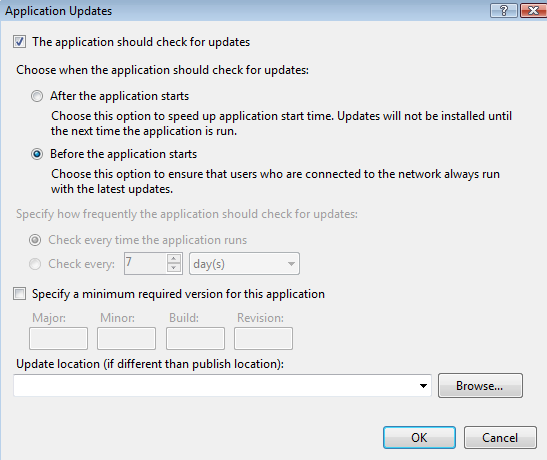
It's recommended to click on the Update button, and turn on the update feature.
By default, it's turned off. This feature give you the option to create new versions and the clients will automatically update.
By default, the updates should be in the same directory like the publish directory.
But, you can specify a special directory for the updates, if you want so. Note that the updater will check if there is a newer version in the server. the version defuned in the main screen, in the Publish tab in the Project properties. If the V in "Automatically increment revision with each publish" checked, then any publish will increase the version.

After you configure the Updates, click on the Options button in the main screen and configure the general details.
After you finish, go close this Dialog and click on the Publish button:

Now, Visual Studio will build your project and will publish it. After anything will done, a new IE window will open (by default, unless you change it in the Options screen.) with the product auto-generated page.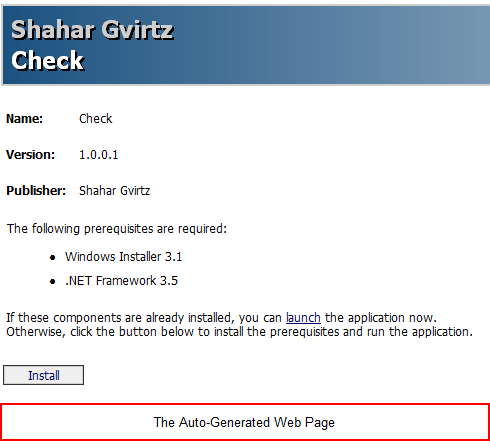
The page that automatically generated, include the prerequisites, and if everything is already installed you can click in the "launch" link. After clicking, if you are verified publisher, the application will start automatically, and later can be started from the Start Menu shortcut.
Part 3 - How the updater works?
The current project includes only an empty form. Now, let's say it's version 1.0.0.1.
Now, I changed the back color of the form , and I want it to be version 2.0.0.0.


I'll go to the Publish tab in the project properties and edit the version:

Now, I'll click the publish now button. It will publish the new version to the location I chose (in the web).
Next time I'll launch the application, as I set in the Update properties, the application will update and show this message:
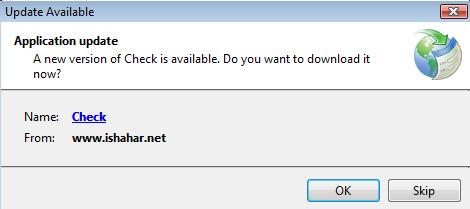
If you click OK, then the new version will download and run.
Part 4 - ClickOnce with code
Until now, we worked with wizards and GUI to manage the ClickOnce deployment, but we can do it from our code too. First of all, we should add using statement to System.Deployment.Application:
using System.Deployment.Application;
Now, we can use the ApplicationDeployment class to manage our application deployment information. This code, for example, check for updates and shows a MessageBox with the version of the newest version for the current deployment. Note, that this code can replace the built-in message of new versions. you can cancel in the Update screen in the Publish tab the auto-check for updates, and do it manually from your code:
1: ApplicationDeployment deploy = ApplicationDeployment.CurrentDeployment;
2: UpdateCheckInfo update = deploy.CheckForDetailedUpdate();
3: MessageBox.Show("You can update to version: " + update.AvailableVersion.ToString());
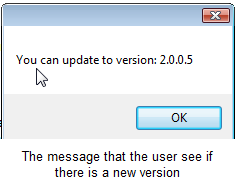
Note that this code will cause an exception if no update available, because then update.AvailableVersion.ToString() will be null. So, if you want to use this code, make sure that it's in if...else statement that show the message only if update doesn't equal to null.
We can fix this code a little, so the application will update after the message show:
ApplicationDeployment deploy = ApplicationDeployment.CurrentDeployment;
UpdateCheckInfo update = deploy.CheckForDetailedUpdate();
 if (deploy.CheckForUpdate())
{
     MessageBox.Show("You can update to version: " + update.AvailableVersion.ToString());
     deploy.Update();
     Application.Restart();
}
This code will work always. If an update is available, it will inform the user, download the update synchronously and restart the application. Otherwise, this code do nothing.
Put this code in the form load event, and then when you release a new version, the user will informed about and the application will update. you can use this code instead the built-in message, to make this progress more friendly.
Shahar Gvirtz.