ASP.NET MVC Tip: Ajax and Validations using jQuery
jQuery is now part of the ASP.net development platform and it is going to ship with Visual Studio in the future and will also be the part of ASP.NET MVC installation. ASP.NET MVC will be the first product to include jQuery. Guru Gu’s blog entry has the full details regarding this. This is a great decision from Microsoft and I hope that the community would be happy about the great decision taken by Microsoft. And this is another good step for web development after the ASP.NET MVC technology. jQuery is an excellent java script library and very popular among the web developers regardless of technology.
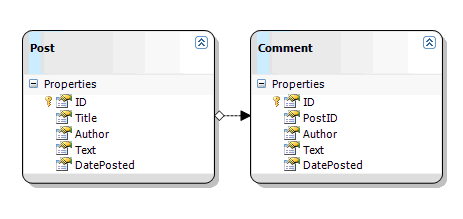
The below is the class diagram of the example I have used for this demo.
Controller
public class BlogController : Controller{
private readonly ICommentRepository comments
=new CommentRepository();
private readonly IPostRepository posts
= new PostRepository();
[AcceptVerbs( "GET" )]
public ActionResult Post( int id )
{
return View(
posts.Retrieve().Where( p => p.ID == id ).Single() );
}
[AcceptVerbs( "POST" )]
[ActionName( "Post"
)]
public ActionResult AddComment( int postId, string commentAuthor, string
commentText ) {
var comment = new Comment{
PostID = postId,
Author = commentAuthor,
Text = commentText,
DatePosted = DateTime.Now
};
try {
comments.Create( comment
);
return View("PostComment", comment);
}
catch( Exception ex )
{
throw ex;
}
}
}
View
<asp:Content ID="content"
ContentPlaceHolderID="MainContent"
runat="server">
<h2>
<% =Html.ActionLink( ViewData.Model.Title,"Post",
new { id = ViewData.Model.ID } )%>
</h2>
<div>Posted by <strong><% =ViewData.Model.Author%>
</strong> on <strong><% =ViewData.Model.DatePosted%></strong>
</div>
<p>
<% =ViewData.Model.Text.Replace( "\n", "<br />"
)%>
</p>
<h3>Comments</h3>
<div id="post_comment">
<% if( ViewData.Model.Comments.Count > 0 )
{ %>
<%foreach( var
comment in ViewData.Model.Comments )
{ %>
<% Html.RenderPartial("PostComment", comment); %>
<% } %>
<% } %>
</div><form id="new_comment"
action="/Blog/Post"
method="post">
<input type="hidden" name="postId" id="postId" value="<% =ViewData.Model.ID%>" />
<img id="ajaxLoader" src="../../Content/ajax-loader.gif"/>
<fieldset>
<legend>Add Comment</legend>
<ul><li>
<label for="author"><span
class="required">Name:
</span></label>
<input id="commentAuthor" class="text required" name="commentAuthor" type="text" value="" />
</li> <li>
<label for="text"><span
class="required">Comment:
</span></label>
<textarea cols="20" id="commentText" class="text required" name="commentText" rows="2"></textarea>
</li> </ul></fieldset>
<input
type="submit"
value="Add"
/>
</form> </asp:Content>
Displaying the comments
<% if( ViewData.Model.Comments.Count > 0 )
{ %>
<%foreach( var
comment in ViewData.Model.Comments )
{ %>
<% Html.RenderPartial("PostComment", comment); %>
<% } %>
<% } %>
The above code iterating through Comments collection of our ViewData and also calling the PostComment user control with comment object as ViewData for displaying a single comment. This user control is also using for partial rendering when we send
<u><% =ViewData.Model.Author%>
commented on
<% =ViewData.Model.DatePosted%>:</u><p>
<% =ViewData.Model.Text%></p>
Client Side Validation
For client side validation, I am using jQuery Validation plugin. For more details about the jQuery plugin, visit http://bassistance.de/jquery-plugins/jquery-plugin-validation/ . This validation framework is very easy to use. You just put class="text required" for a required field validator. For an email validation, you need to put class="text email".
<input id="commentAuthor"
class="text
required" name="commentAuthor" type="text" value="" />
<textarea cols="20" id="commentText" class="text required" name="commentText" rows="2"></textarea>
The validation process will be working with the jQuery method validate of form object.
$(function() {
// for highlight
var elements = $("input[type!='submit'], textarea,
select");
elements.focus(function(){
$(this).parents('li').addClass('highlight');
});
elements.blur(function()
{
$(this).parents('li').removeClass('highlight');
});
$("#new_comment").validate()
// for validation
});
You can optionally add validation rules along with validate method. The below code added validation rules included with validate method of form object.
$("#new_comment").validate({
rules:
{
commentText:
"required",
commentAuthor:
{
required:
true,
minlength:
2
},
email:
{
required:
true,
email:
true
}
},
messages:
{
commentText: "Please enter Comment"
commentAuthor: {
required:
"Please enter your Name"
minlength:
"Your Name must consist of at least
2 characters" },
email:
" Please enter a valid email address”
}
});
jQuery includes
<script type="text/javascript" src="../../Content/jquery-1.2.5.min.js"></script>
<script src="../../Content/jquery.validate.js" type="text/javascript"></script>
Ajxa using jQuery
$(document).ready(function()
{
$("#ajaxLoader").hide();
$("#new_comment").submit(function()
{
addComment(this);
return false;
});
});
jQuery method $(document).ready()
will executes when the DOM has been loaded and in this function we handles the
onsubmit event of the form. In the onsubmit event, we calling the addComment
function and then the return false statement
prevent the form submit and we submit the form post using
addComment function
function addComment(form)
{
$("#ajaxLoader").show();
$.ajax(
{type: form.method,
url: form.action,
data: $(form).serialize(),// Form data
dataType: "html",
completed: $("#ajaxLoader").hide(),
success: function(result)
{
var domObj = $(result); // create element from result html
$("#post_comment").append(domObj); // append to end of comment list
},
error: function(error)
{
alert(error);
}
});
}
The above code sends the
form data to the controller action Post using
success: function(result)
{
var domObj
= $(result);// create element from result
html
$("#post_comment").append(domObj); // append to end of comment list
}
Controller Action
[AcceptVerbs( "POST" )]
[ActionName( "Post"
)]
public ActionResult AddComment( int postId, string commentAuthor, string
commentText ) {
var comment = new Comment{
PostID = postId,
Author = commentAuthor,
Text = commentText,
DatePosted = DateTime.Now
};
try {
comments.Create( comment
);
return View("PostComment", comment);
}
catch( Exception ex )
{
throw ex;
}
}
}
Our
Update : You can download the source code from MVCjQuery.zip