Serge van den Oever [Macaw]
SharePoint RIP. Azure, Node.js, hybrid mobile apps
-
JSON Debugger visualizer in Visual Studio 2012
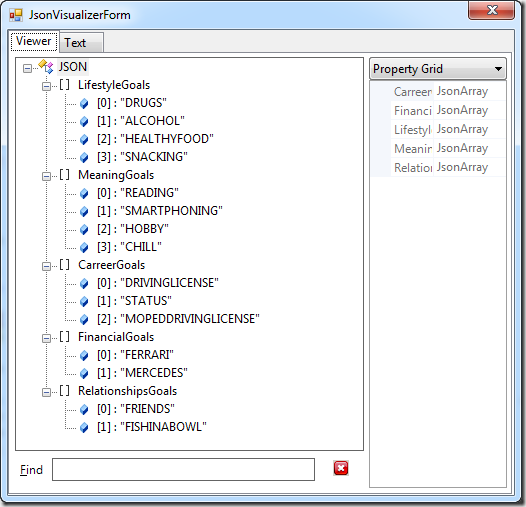
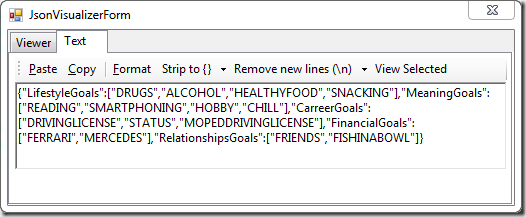
Recently working a lot with JSON data. Needed a debugger visualizer for JSON. Found one at: http://jsonviewer.codeplex.com/
Copy contents of the visualizer folder in the zip package to VisualStudioInstallPath\Common7\Packages\Debugger\Visualizers (on my machine this is C:\Program Files (x86)\Microsoft Visual Studio 11.0\Common7\Packages\Debugger\Visualizers) and working! See http://msdn.microsoft.com/en-us/library/sb2yca43(v=vs.110).aspx for other instalation options.
-
Visual Studio 2012 LightSwitch intellisense not working with Resharper 7
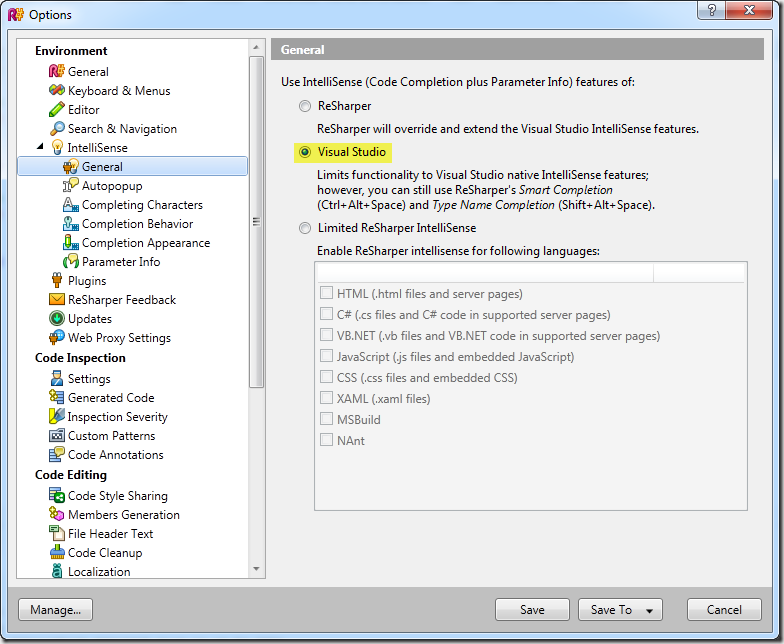
I’m developing LightSwitch code in c# but didn’t get intellisense. After configuring Resharper to use the Visual Studio intellisense I finally got intellisense, and you need that in LightSwitch development!
-
SharePoint: UI for ordering list items
SharePoint list items have in the the base Item template a field named Order. This field is not shown by default.
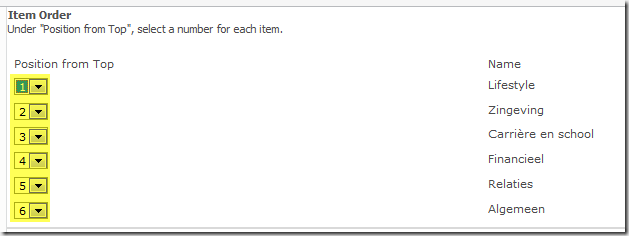
SharePoint 2007, 2010 and 2013 have a possibility to specify the order in a UI, using the _layouts page:
{SiteUrl}/_layouts/Reorder.aspx?List={ListId}
In SharePoint 2010 and 2013 it is possible to add a custom action to a list. It is possible to add a custom action to order list items as follows (SharePoint 2010 description):
- Open SharePoint Designer 2010
- Navigate to a list
- Select Custom Actions > List Item Menu
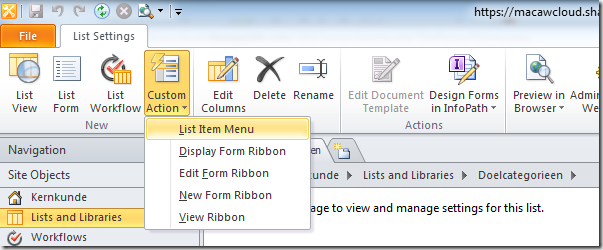
- Fill in the dialog box:
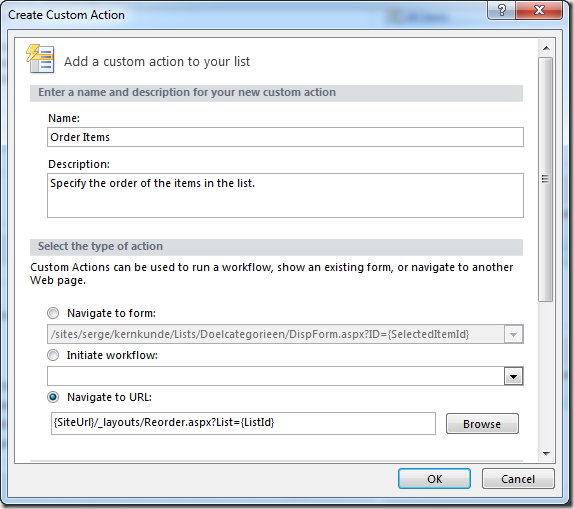
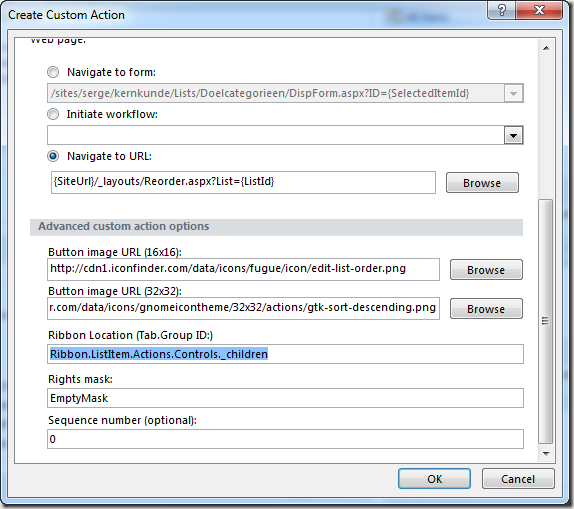
- Open List Settings > Advanced Settings > Content Types, and set Allow management of content types to No
- On List Settings select Column Ordering
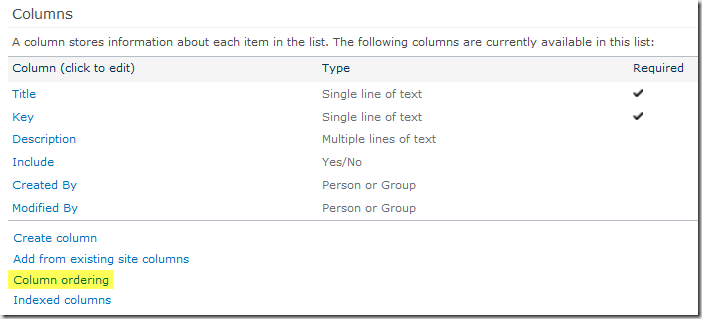
This results in the following UI in the browser:
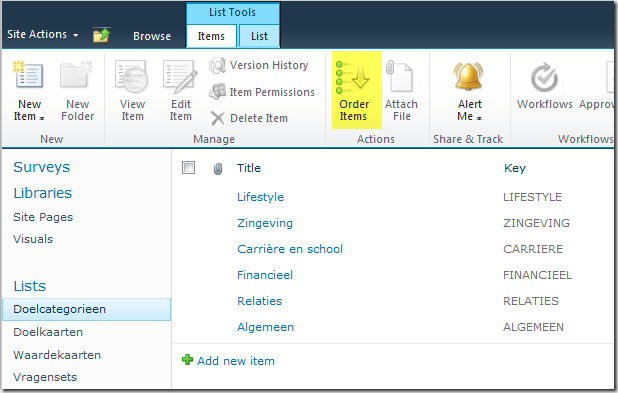
Selecting the custom Order Items action (under List Tools > Items) results in:You can change your custom action in SharePoint designer. On the list screen in the bottom right corner you can find the custom action:
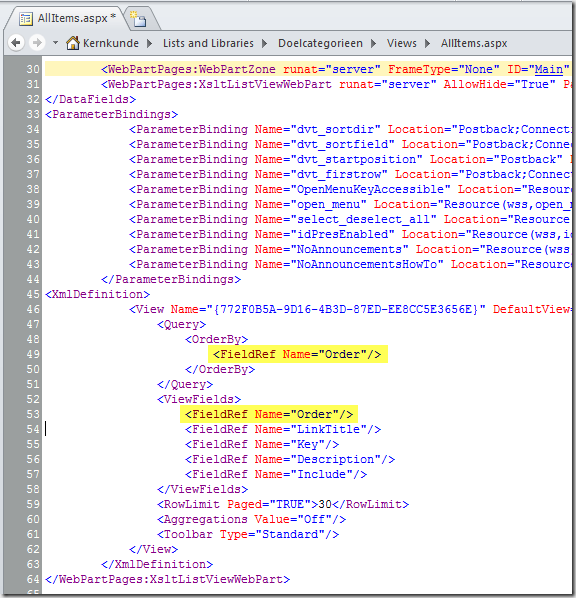
We now need to modify the view to include the order by adding the Order field to the view, and sorting on the Order field. Problem is that the Order field is hidden. It is possible to modify the schema of the Order field to set the Hidden attribute to FALSE. If we don’t want to write code to do it and still get the required result it is also possible to modify the view through SharePoint Designer:
Modify the code of the view:
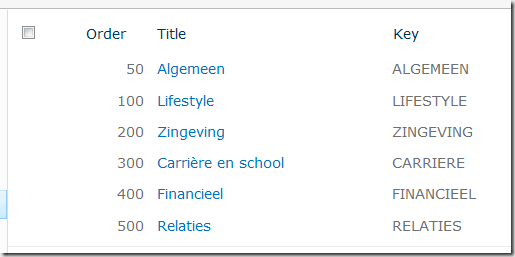
This results in:
Note that if you change the view through the web UI these changes are partly lost. If this is a problem modify the Order field schema for the list.
-
Icons from CDN (content delivery network)
Sometimes you need an icon in a site, but don’t want to (or can’t) add the icons themselves to the site. A good example is http://jsfiddle.net (a playground for web developers) where you can only edit html, Javascript and css, but can’t add any icons. In my case I need some icons for a custom SharePoint list action on Office365. I could add the icons to a SharePoint picture library, but I don’t want to do that. So after some search I stumbled upon this StackOverflow question. In one of the answers the site the site http://www.iconfinder.com was mentioned, together with a link to a post describing that linking to the icons from their CDN is allowed (if licence permits it):
https://getsatisfaction.com/iconfinder/topics/direct_linking_to_icons_from_iconfinder
I love their search UI where you can specify a search term, that you want a transparent background, the size of the icon, and that you want an unlicensed icon.
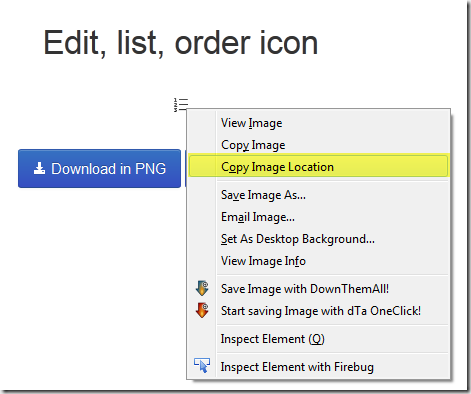
To get the CDN url, select the icon, and on the following screen right-click on the icon and select Copy Image Location.
This results in the following url: http://cdn1.iconfinder.com/data/icons/fugue/icon/edit-list-order.png.
-
Google image search: exact size and file type missing
When I need an icon I use Google search for images, type in the usage for the icon, for example order, and specify an exact size for the icon.
Until recently…
Google in their infinite wisdom decided to change the image search UI:
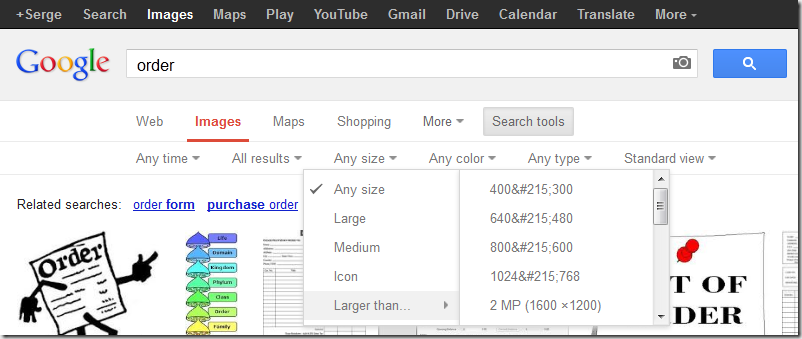
Select Search tools:
As you can see, no exact size can be specified… you can specify Icon, but no size for the icon.
After some searching I found this question nicely answered. An the answer is…. add the following to your search terms:
imagesize:widthxheight
So search for: order imagesize:16x16
This results in some messed up UI:
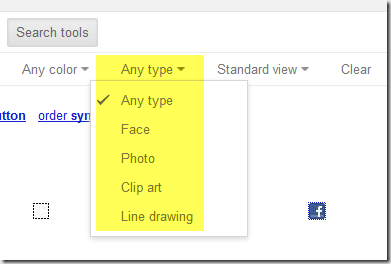
The next step is that I want to specify the type of image. In the new UI I get the following options:
That’s not what I mean…I want to say gif or png!
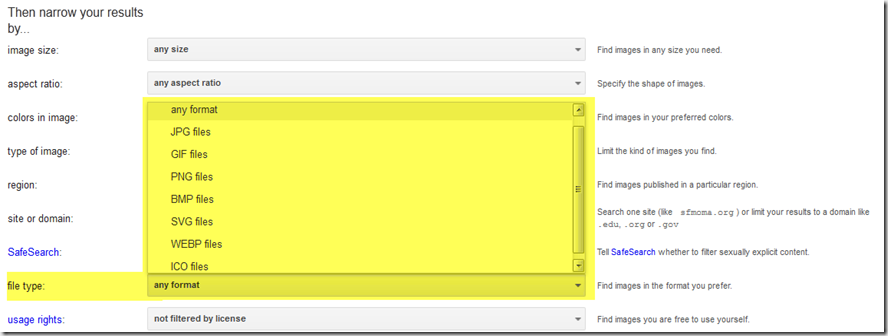
If we go to the Google advanced image search page (http://www.google.com/advanced_image_search), we see some other options:
After some fiddling we extend our search to: order imagesize:16x16 filetype:png
The Google search UI is modified again!
Happy image searching!
-
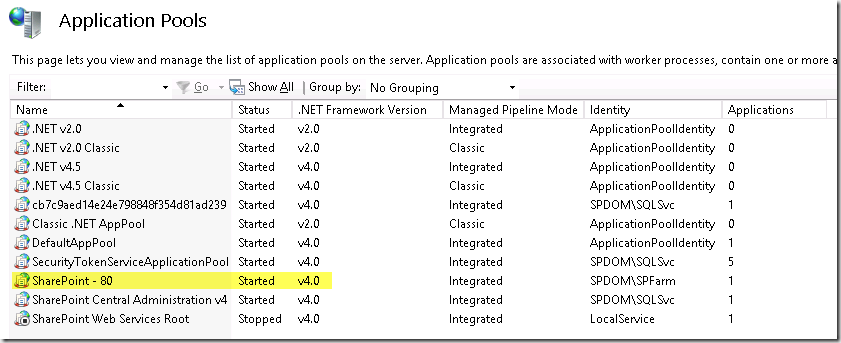
SharePoint 2013 is running on .Net 4 framework
The new SharePoint is running on the .Net 4 framework, but still using ASP.NET web forms, and not ASP.NET MVC. As far as I can see its running on ASP.NET Web Forms 4.0, although Chris O’Brian (http://www.sharepointnutsandbolts.com/2012/07/sharepoint-2013-my-view-on-whats-new.html) says that ASP.NET Web Forms 4.5 is used.
What is the best method to see which version of ASP.NET web forms is running?
-
Getting SharePoint 2013 dev machine up and running in 5 minutes
I’m a happy customer of http://www.cloudshare.com, and only days after the release of SharePoint 2013 preview I was able to spin up an instance of SharePoint Server 2013 with the following configuration:
SharePoint Server 2013 Preview
Description: OS: Windows Server 2012 RC x64
Spec: 80 GB HD / 8 GB RAM
Installed:
• SharePoint Server 2013 Preview
• SQL Server 2012 Standard
• Visual Studio 2012 RC Ultimate Edition
• SharePoint Designer 2013 Preview
• Adobe ReaderThe machine works like a breeze, although I already had some SharePoint crashes. But hey, it’s a preview!
Kudo’s to CloudShare for getting a template machine up and running so fast.
PS: I’m in no way affiliated to CloudShare, just a happy customer.
-
SharePoint.DesignFactory.ContentFiles 1.4.0.3 - bugfix release, how to update
Today I released version 1.4.0.3. of SharePoint.DesignFactory.ContentFiles. This is a bugfix release where the following issues are fixed:
Change Log - SharePoint.DesignFactory.ContentFiles v1.4.0.3
===========================================================Product Version:
1.4.0.3
- Fixed issue: Documentation and Sample.ps1 machine configuration file had missing ';' after first line of configuration (SharePointDeployment = 'ClientObjectModel')
- Fixed issue: UseClaims flag of machine configuration was not passed correctly, so Claims Authenticated deployment with client object model (Office365 for example) was not working
- Fixed issue: Custom configurations not working due to missing parameter in Deploy.cmd and Redeploy.cmd
See: http://myspworld.wordpress.com/2012/06/25/deploy-content-files-to-sharepoint-using-sharepoint-designfactory-contentfiles/ (thanks Amadeu)
1.4.0.2
- Fixed issue: Code outside begin block when doing ClientObjectModel deployment
- Fixed issue: Not all files packaged (fixed by Danny)
- Fixed issue: Deployment path incorrect (one letter missing)1.4.0.1
- Fixed issue: Mapped folder ABC would also deploy files in unmapped folder ABCD due to startswith() logic.1.4.0.0
- Initial release to general public.To upgrade the NuGet package to a new version execute the following steps:
- To upgrade your NuGet package following the following steps:
- Right-click on solution or project, and select Manage NuGet packages…
- In the Manage NuGet Packages screen click left on Updates
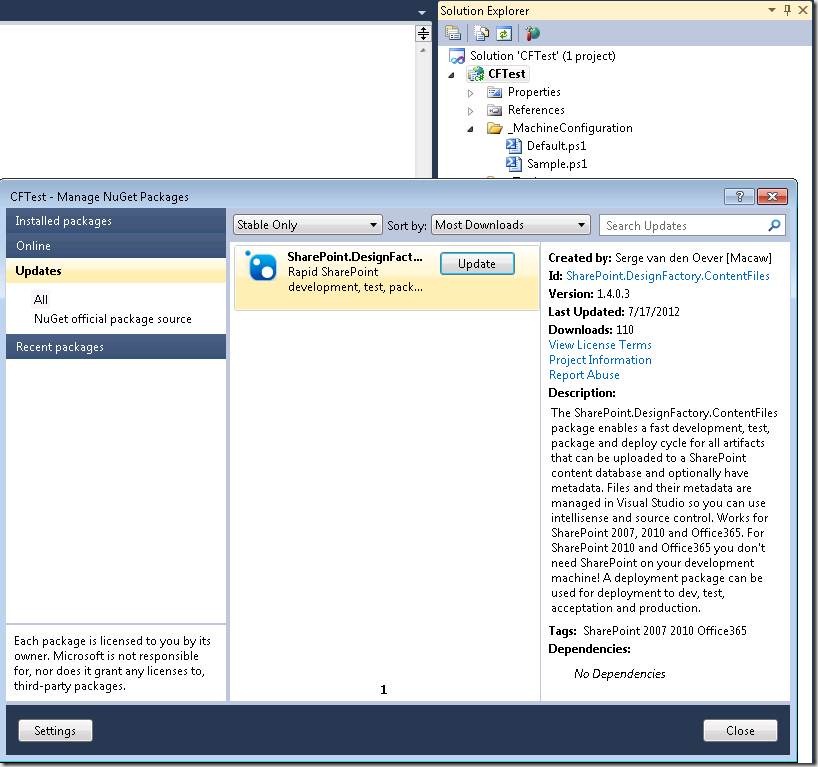
- Select the SharePoint.DesignFactory.ContentFiles package and press the Update button
- Open from the menu Build the Configuration Manager
- Make the project configurations match the solution configurations (always mixed up after uninstall/install or update)
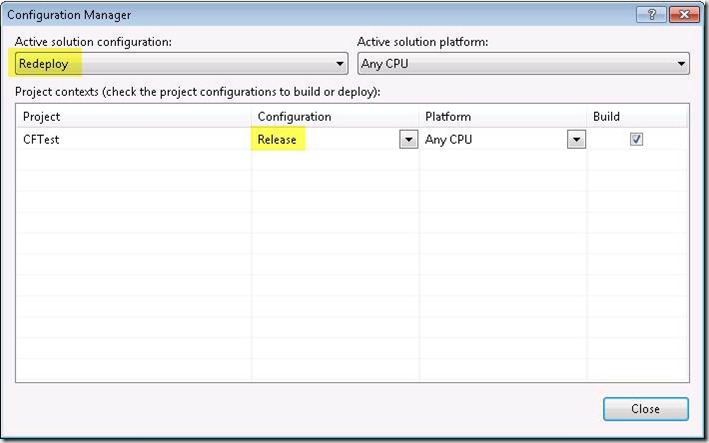
This should get you up and running!
-
-
Facebook makes some of its core libraries open source (C++)
For Facebook with 900.000.000 users one of the most important things is performance. Core libraries of Facebook are written in C++, and some of these libraries are now open-source on github: https://github.com/facebook/folly. See also the blog post http://herbsutter.com/2012/06/02/facebook-folly-oss-c-libraries/ and the discussions in this post where other C++ libraries open sourced by big companies are mentioned. There is already someone working on getting the libraries to work under Windows and Visual Studio at the fork: https://github.com/jbandela/folly/tree/vc11/.
-
SharePoint.DesignFactory.ContentFiles–building WCM sites
One of the use cases where we use the SharePoint.DesignFactory.ContentFiles tooling is in building SharePoint Publishing (WCM) solutions for SharePoint 2007, SharePoint 2010 and Office365.
Publishing solutions are often solutions that have one instance, the publishing site (possibly with subsites), that in most cases need to go through DTAP.
If you dissect a publishing site, in most case you have the following findings:
- The publishing site spans a site collection
- The branding of the site is specified in the root site, because:
- Master pages live in the root site (/_catalogs/masterpage)
- Page layouts live in the root site (/_catalogs/masterpage)
- The style library lives in the root site ( /Style Library) and contains images, css, javascript, xslt transformations for your CQWP’s, …
- Preconfigured web parts live in the root site (/_catalogs/wp)
- The root site and subsites contains a document library called Pages (or your language-specific version of it) containing publishing pages using the page layouts and master pages
- The site collection contains content types, fields and lists
When using the SharePoint.DesignFactory.ContentFiles tooling it is very easy to create, test, package and deploy the artifacts that can be uploaded to the SharePoint content database. This can be done in a fast and simple way without the need to create and deploy WSP packages. If we look at the above list of artifacts we can use SharePoint.DesignFactory.ContentFiles for master pages, page layouts, the style library, web part configurations, and initial publishing pages (these are normally made through the SharePoint web UI).
Some artifacts like content types, fields and lists in the above list can NOT be handled by SharePoint.DesignFactory.ContentFiles, because they can’t be uploaded to the SharePoint content database. The good thing is that these artifacts are the artifacts that don’t change that much in the development of a SharePoint Publishing solution. There are however multiple ways to create these artifacts:
- Use paper script: create them manually in each of the environments based on documentation
- Automate the creation of the artifacts using (PowerShell) script
- Develop a WSP package to create these artifacts
I’m not a big fan of the third option (see my blog post Thoughts on building deployable and updatable SharePoint solutions). It is a lot of work to create content types, fields and list definitions using all kind of XML files, and it is not allowed to modify these artifacts when in use. I know… SharePoint 2010 has some content type upgrade possibilities, but I think it is just too cumbersome.
The first option has the problem that content types and fields get ID’s, and that these ID’s must be used by the metadata on for example page layouts. No problem for SharePoint.DesignFactory.ContentFiles, because it supports deploy-time resolving of these ID’s using PowerShell. For example consider the following metadata definition for the page layout contactpage-wcm.aspx.properties.ps1:
Metadata page layout- # This script must return a hashtable @{ name=value; ... } of field name-value pairs
- # for the content file that this script applies to.
- # On deployment to SharePoint, these values are written as fields in the corresponding list item (if any)
- # Note that fields must exist; they can be updated but not created or deleted.
- # This script is called right after the file is deployed to SharePoint.
- # You can use the script parameters and arbitrary PowerShell code to interact with SharePoint.
- # e.g. to calculate properties and values at deployment time.
- param([string]$SourcePath, [string]$RelativeUrl, $Context)
- @{
- "ContentTypeId" = $Context.GetContentTypeID('GeneralPage');
- "MasterPageDescription" = "Cloud Aviator Contact pagelayout (wcm - don't use)";
- "PublishingHidden" = "1";
- "PublishingAssociatedContentType" = $Context.GetAssociatedContentTypeInfo('GeneralPage')
- }
The PowerShell functions GetContentTypeID and GetAssociatedContentTypeInfo can at deploy-time resolve the required information from the server we are deploying to.
I personally prefer the second option: automate creation through PowerShell, because there are PowerShell scripts available to export content types and fields.
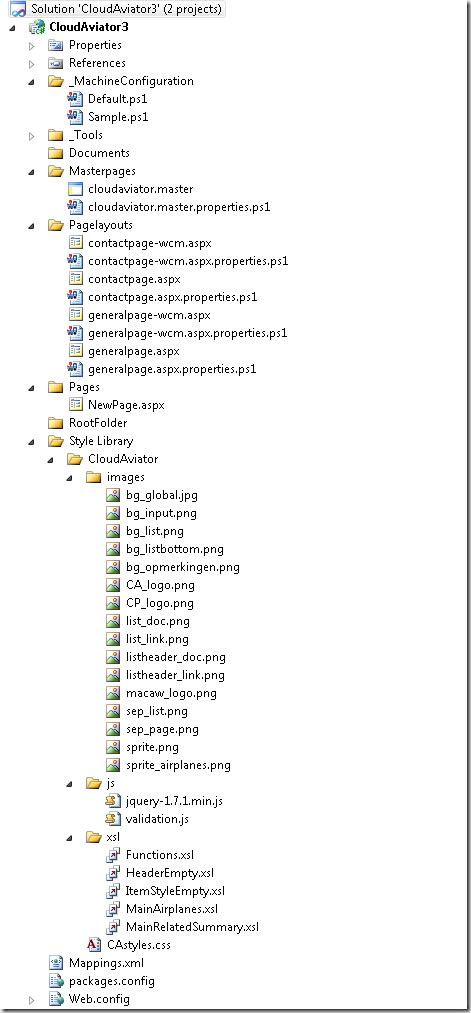
An example project structure for a typical SharePoint WCM site looks like:
Note that this project uses DualLayout.
So if you build Publishing sites using SharePoint, checkout out the completely free SharePoint.DesignFactory.ContentFiles tooling and start flying!
-
SharePoint.DesignFactory.ContentFiles - Installation
The SharePoint.DesignFactory.ContentFiles tooling can be used to develop, test, package and deploy SharePoint files and metadata that can be uploaded to the SharePoint content database. Use this tooling for developing and packaging your master pages, page layouts, style library files, web part configurations and any file you can think of that can be uploaded to the SharePoint content database. Works on SharePoint 2007 (on SharePoint server), SharePoint 2010 (on SharePoint server or remote) and Office365 (remote).
Installation is simple. In this post I will show the steps required to install the SharePoint.DesignFactory.ContentFiles on a Visual studio project.
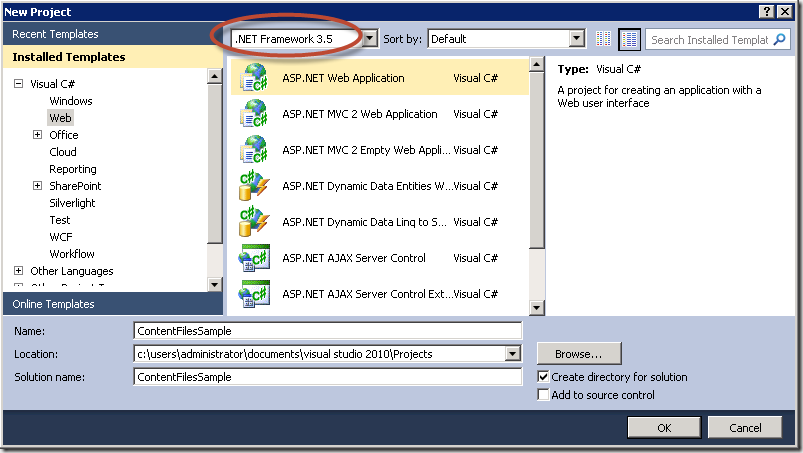
- Fire-up Visual Studio 2010 and create a new project (File > New > Project…)
- Under Installed Templates select Visual C# > Web
- Select the .Net Framework 3.5, then select the ASP.NET Web Application project
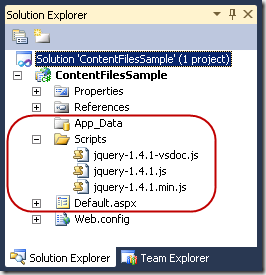
- Note that the resulting project contains all kind of artifacts that are not relevant in the context of a SharePoint.DesignFactory.ContentFiles project:
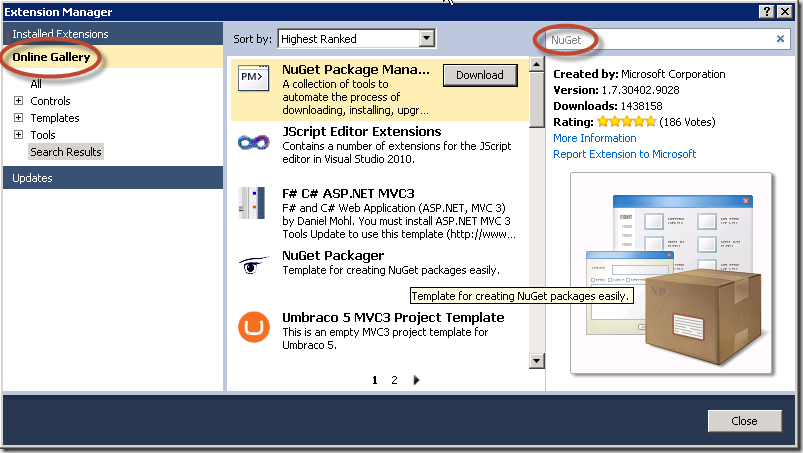
- If NuGet is not installed yet on your Visual Studio (Tools > Library Package Manager is missing), start the Visual Studio Extension Manager (Tools > Extension Manager…). In the Extension Manager window select the Online Gallery at the left and search for NuGet. Select the NuGet Package Manager and press the Download button to install NuGet. Preferably use NuGet 1.7 or up to use all features available in the SharePoint.DesignFactory.ContentFiles NuGet package.
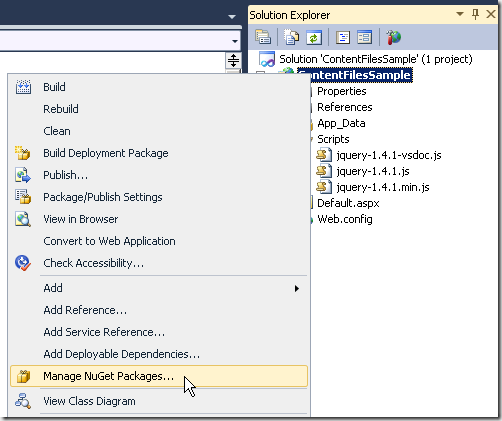
- Right-click on the just created Web Application project and in the context menu select Manage NuGet Packages….
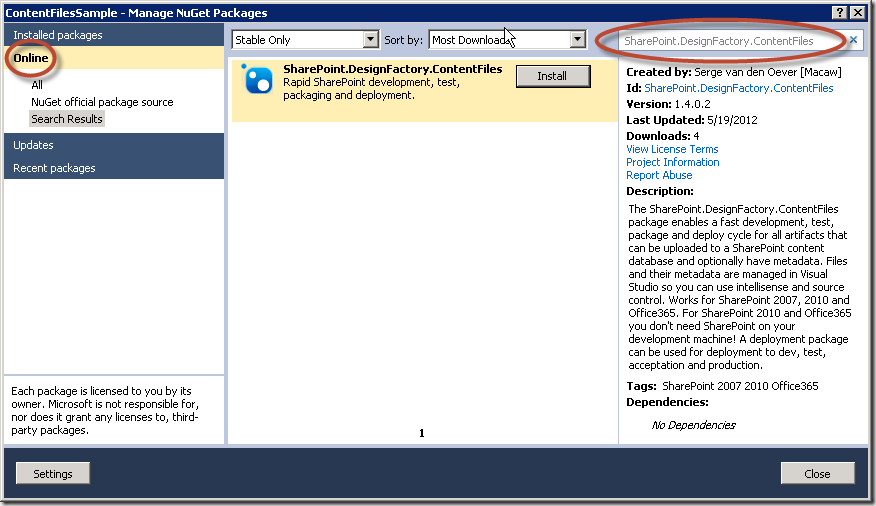
- In the Manage NuGet Packages window select Online at the left and search for SharePoint.DesignFactory.ContentFiles. Select the SharePoint.DesignFactory.ContentFiles package and press the Install button.
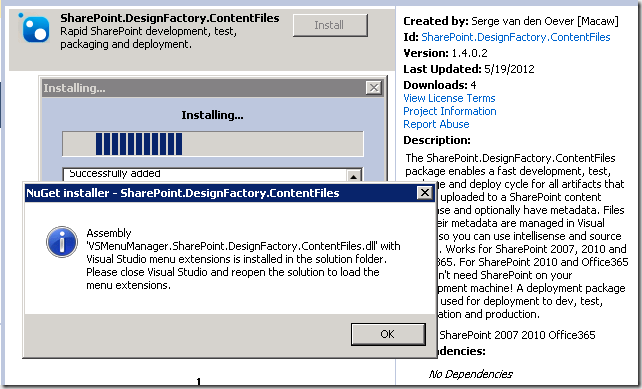
- After installation where a lot of project manipulation magic happens the following message appears. An assembly is installed in the solution folder containing Visual studio Solution Explorer context menu actions that makes working with SharePoint.DesignFactory.ContentFiles even easier. This assembly is magically loaded by a Visual Studio extension called Managed Menu Extension (MME). Although this extension is not required and it is perfectly possible to work without the additional context menu actions, it is advised to install the Managed Menu Extensions (explained in the next step).
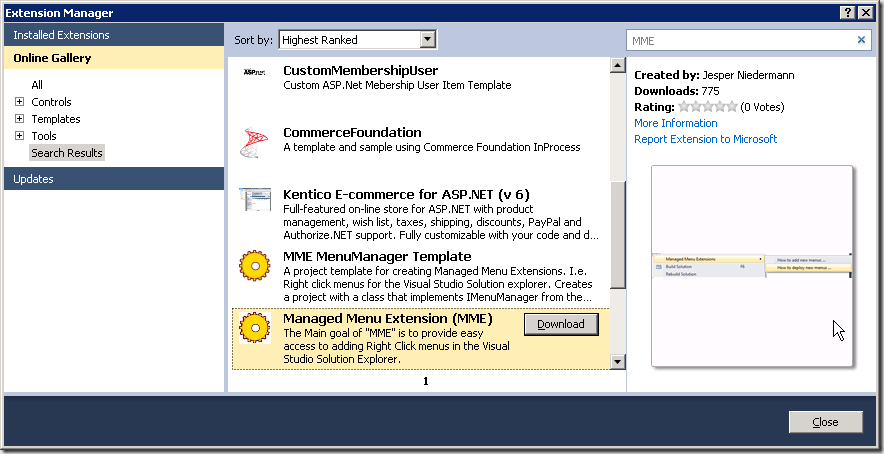
- Install the Managed Menu Extensions (MME) through the Extension Manager (Tools > Extension Manager…). Select Online Gallery and search for MME.
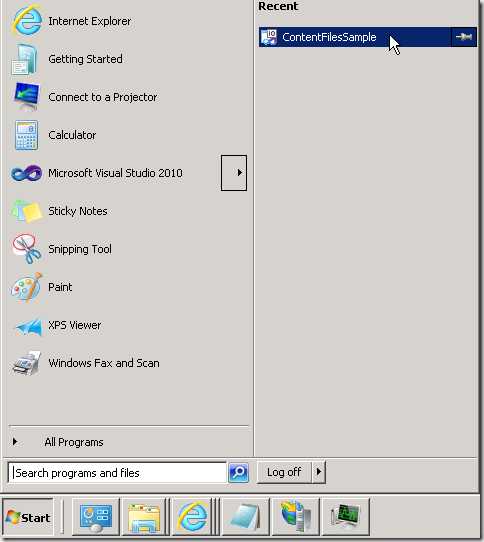
- Visual studio requires a restart for the Managed Menu Extensions to work and the context menu extension for SharePoint.DesignFactory.ContentFiles to work. Close Visual Studio, and reopen Visual Studio with our new solution in one of two ways (First starting Visual Studio and then loading the solution does not load the menu extensions):
- By starting the solution through the start menu
- By double-clicking the solution file in the explorer
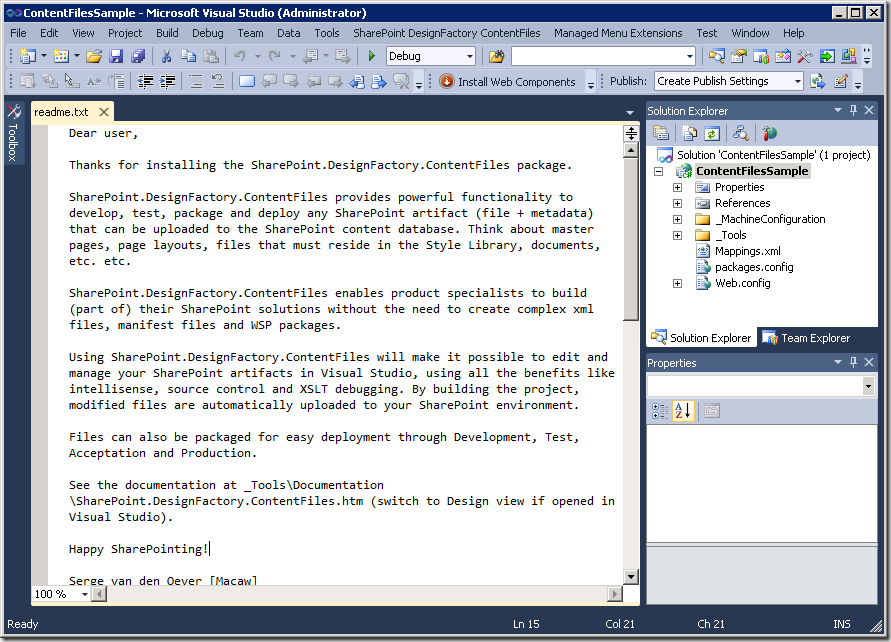
- We are done with installation! The project is cleaned up, all unwanted files are removed. You are presented with a readme file explaining some things about the SharePoint.DesignFactory.ContentFiles tooling.
In a next blog post I will give a tour through a SharePoint.DesignFactory.ContentFiles enabled Visual Studio project.
-
Thoughts on building deployable and updatable SharePoint solutions
-
SharePoint.DesignFactory.ContentFiles NuGet package released
Wouldn’t it be great to edit your SharePoint 2007/2010/Office365 content files like master pages, page layouts, web part files, style library files etc. etc. in Visual Studio, use intellisense, source control and the XSLT debugger, but without the overhead of creating complex xml files, manifest files and WSP packages? Wouldn’t it be great if you could package those file and deploy them through Dev, Test, Acceptation and Production without WSP packages? Now you can!
Create an ASP.NET Web Application Project, add the SharePoint.DesignFactory.ContentFiles NuGet package and start building!
See the included documentation for more information. More information will follow on this blog!
-
EULA SharePoint.DesignFactory.ContentFiles
LICENSE AGREEMENT FOR Macaw SharePoint.DesignFactory.ContentFiles
IMPORTANT-READ CAREFULLY: This End User License Agreement (this "LICENSE AGREEMENT") contains the terms and conditions regarding your use of the SOFTWARE (as defined below). This LICENSE AGREEMENT contains material limitations to your rights in that regard. You should read this LICENSE AGREEMENT carefully and treat it as valuable property.
I. This License Agreement.
Software covered by this LICENSE AGREEMENT. This LICENSE AGREEMENT governs your use of the Macaw SharePoint.DesignFactory.ContentFiles software product(s) enclosed or otherwise accompanied herewith (individually and collectively, the "SOFTWARE"). The term "SOFTWARE" includes, to the extent provided by Macaw Nederland B.V.:
1. Any revisions, updates and/or upgrades thereto;
2. Any data, image or executable files, databases, data engines, computer software, or similar items customarily used or distributed with computer software products;
3. Anything in any form whatsoever intended to be used with or in conjunction with the SOFTWARE; and
4. Any associated media, documentation.
This LICENSE AGREEMENT is a Legally Binding Agreement between You and Macaw Nederland B.V..
If you are acting as an agent of a company or another legal person, such as an officer or other employee acting for your employer, then "you" and "your" mean your principal, the entity or other legal person for whom you are acting. However, importantly, even if you are acting as an agent for another, you may still be personally liable for violation of federal and State laws, such as copyright infringement.This LICENSE AGREEMENT is a legally binding agreement between you and Macaw Nederland B.V.. You intend to be legally bound to this LICENSE AGREEMENT to the same extent as if Macaw Nederland B.V. and you physically signed this LICENSE AGREEMENT. By installing, copying, or otherwise using the SOFTWARE, you agree to be bound by the terms and conditions contained in this LICENSE AGREEMENT. If you do not agree to all of the terms and conditions contained in this LICENSE AGREEMENT, you may not install or use the SOFTWARE. If, for whatever reason, installation has begun or has been completed, you should cancel installation or un-install the SOFTWARE, as the case may be. (You may click on the "exit" button or its equivalent to immediately abort installation.) If you do not agree to all of these terms and conditions, then you must promptly return the SOFTWARE to the place of business from which you obtained it in accordance with any return policies of such place of business.
II. YOUR LICENSE TO INSTALL AND TO USE.
This LICENSE AGREEMENT grants you a free license. The license for this version of the SOFTWARE requires no payment by the user to Macaw or any other party. However, Macaw or another party may require the user to purchase the computer media and pay service charges related to providing the SOFTWARE to the user. Because this license is granted to the user for no cost, the user is not entitled to free technical support from Macaw Nederland B.V..
You agree that you will not reverse engineer, decompile or disassemble any portion of the SOFTWARE.
In all cases, you may not use Macaw's name, logo, or trademarks to market your Web Site without the express written consent of Macaw Nederland B.V.; You agree to indemnify, hold harmless, and defend Macaw Nederland B.V., its suppliers and resellers, from and against any claims or lawsuits, including attorney's fees that may arise from the use or distribution of your Web Site; You may use the SOFTWARE only to create Web Sites.
You may use the SOFTWARE to create and deploy packages on SharePoint Servers in both non-commerncial and commercial projects.
III. INTELLECTUAL PROPERTY.
Copyright. You agree that all right, title, and interest in and to the SOFTWARE (including, but not limited to, any images, photographs, animations, video, audio, music, text, and “applets” incorporated into the SOFTWARE), and any copies of the SOFTWARE, and any copyrights and other intellectual properties therein or related thereto are owned exclusively by Macaw Nederland B.V., except to the limited extent that Macaw Nederland B.V.may be the rightful license holder of certain third-party technologies incorporated into the SOFTWARE. The SOFTWARE is protected by copyright laws and international treaty provisions. The SOFTWARE is licensed to you, not sold to you. Macaw Nederland B.V. reserves all rights not otherwise expressly and specifically granted to you in this LICENSE AGREEMENT.
IV. WARRANTIES AND REMEDIES.Macaw Nederland B.V. expressly disclaims any warranty for the software, documentation and anything else provided by Macaw Nederland B.V. hereby and Macaw Nederland B.V. provides the same in “as is” condition without warranty of any kind, either express or implied, including, without limitation, the implied warranties of merchantability or fitness for a particular purpose. The entire risk arising out of use or performance of the software and documentation remains with you.
in no event shall Macaw Nederland B.V. be liable for any damages whatsoever (including, without limitation, damages for loss of business profit, business interruption, loss of business information, or any other pecuniary loss) arising out of the use or inability to use the software, even if Macaw Nederland B.V. has been advised of the possibility of such damages. Because some states/jurisdictions do not allow the exclusion or limitation of liability for consequential or incidental damages in certain cases, the above limitation may not apply to you.
V. MISCELLANEOUS.
Any disputes arising from and/or related to and/or in connection with the LICENSE AGREEMENT, the formation and/or performance thereof as well as these General Terms and Conditions shall in the first instance be dealt with exclusively by the competent court in Amsterdam. However, the Parties may agree in writing that disputes will be settled by means of arbitration in compliance with the Arbitration Regulations of the Foundation for the Settlement of Automation Disputes (SGOA: Stichting Geschillenoplossing Automatisering) in The Hague.
The Parties shall not go to court until they have exerted their best efforts to settle a dispute in mutual consultation.
-
SharePoint.DesignFactory.ContentFiles
Welcome to the landing page of the SharePoint.DesignFactory.ContentFiles NuGet package.
Please see the following blog posts:
Documentation SharePoint.DesignFactory.ContentFiles
About
The DesignFactory.SharePoint.ContentFiles mechanism is designed for deploying SharePoint files with optional meta data to a SharePoint environment. This SharePoint environment can be:
- a local environment, running on the same machine as where you are developing or deploying your content files
- a remote environment, running on either the same machine or a machine that is accessible remotely over http.
In both scenario's the files will end up in the SharePoint content database, as if they were uploaded by hand. This means that files are deployed in another way than if they were deployed using a WSP package using features and modules. Files are deployed as customized files. See Understanding and Creating Customized and Uncustomized Files in Windows SharePoint Services 3.0 for a good article on customized and uncustomized files.
Project structure
A SharePoint.DesignFactory.ContentFiles project has the following strucure:
- ProjectFolder
- _MachineConfiguration - configuration files describing connections to SharePoint web (SPWeb)
- Default.ps1 - configuration file used if there is no specific configuration file for the currenty machine (MACHINE.ps1)
- Machine1.ps1 - machine specific configuration file
- Machine2.ps1 - machine specific configuration file
- SPDesign.ps1 - configuration file for SharePoint web to be used for importing artifacts in project folder if no specific configuration file to use for import is specified [not used yet]
- _Tools
- Deploy.cmd - command for deploying all changed files in project
- Redeploy.cmd - command for deploying all files in project
- Package.cmd - command for packaging the files in the project
- Clean.cmd - command to mark all files in the project for redeployment
- SharePoint.DesignFactory.ContentFiles.ps1 - the script implementing all functionality. Can be called directly as well for more advanced features
- ContextExtensions... - folder containing extension functions that can be used in ObjectModel and ClientObjectModel
- Documentation... - folder containing documentation
- Lib... - folder containing a library of reuseable functions
- MSBuild... - folder containing a SharePoint.DesignFactory.ContentFiles specific MSBuild targets file
- MasterPages - A folder mapped in Mappings.xml for deployment to SharePoint
- MyMaster.master - file to be deployed to SharePoint
- MyMaster.master.properties.ps1 - metadata for the file to be deployed to SharePoint
- ...
- PageLayouts
- ...
- ...
- _MachineConfiguration - configuration files describing connections to SharePoint web (SPWeb)
Some remarks on the above project structure:
- The project structure can be used from any tool that is your favorite HTML editor, like:
- Visual Studio 2010 (lower versions are supported, but not through nuget package installation)
- WebMatrix 2.0 (still in beta, does support nuget package installation)
- ... enter your vaforite web editor here ...
- Visual Studio 2010 has many enhancements for working with SharePoint.DesignFactory.ContentFiles
Mappings.xml
The Mappings.xml file describes a relationship between the project folder and where artifacts in the project folder should be deployed in to SharePoint. The Mappings.xml file looks like:
<ContentFilesMappings xmlns="http://solutionsfactory.macaw.nl/ContentFilesMappings-1.0">
    <Mappings>
        <Mapping projectFolder="RootFolder" destinationFolder="/" />
        <Mapping projectFolder="Documents" destinationFolder="/documents" />
        <Mapping projectFolder="Masterpages" destinationFolder="/_catalogs/masterpage" />
        <Mapping projectFolder="PageLayouts" destinationFolder="/_catalogs/masterpage" />
        <Mapping projectFolder="Style Library" destinationFolder="/Style Library" />
    </Mappings>
</ContentFilesMappings>
A Mapping node describes the mapping from a project folder to a SharePoint folder.
The Mapping node attribute projectFolder':
- refers to a folder within the project
- must be specified
- may not be empty
- may not point to the root folder of the project, only files from subfolders can be uploaded
ProjectFolders for multiple Mapping elements must be disjunct; e.g. valid is:
<Mapping projectFolder="sub1" ... >
<Mapping projectFolder="sub2" ... >
invalid is:
<Mapping projectFolder="sub1" ... >
<Mapping projectFolder="sub1\sub3" ... >
The Mapping node attribute destinationFolder:
- specifies a folder within SharePoint relative to the SharePointWebUrl as specified in the machine configuration file
- must be specified
- may not be empty
- to specify the root folder in 'SharePointWebUrl' specify '/'
If the destination folder does not exist yet it will be created as an SPFolder. Any child folders below the projectFolder will result in corresponding child urls (SPFolders) in the destination folder.
Working with the command-line tools
The following command-line tools are available for performing the simple tasks involved in working with SharePoint.DesignFactory.ContentFiles:
_Tools\deploy [machineconfigurationname]- deploy changed files in the project using configuration MACHINE.ps1, Default.ps1 or specified configuration_Tools\redeploy [machineconfigurationname]- deploy all files in the project using configuration MACHINE.ps1, Default.ps1 or specified configuration_Tools\package- package all files in the project_Tools\clean- mark all files in the project for redeployment
For more advanced actions like deploying or marking for deployment a single file or folder the underlying PowerShell script _Tools\SharePoint.DesignFactory.ContentFiles.ps1 can be used. To see the available parameters open a PowerShell command prompt in the project foder and execute the following command:
get-help _Tools\SharePoint.DesignFactory.ContentFiles.ps1
Open this script file for more details on the available arguments.
Visual Studio 2010 integration
There is extensive integration with the Visual Studio 2010 IDE if SharePoint.DesignFactory.ContentFiles is installed as a NuGet package:
- Create a new ASP.NET 3.5 Web Application project - File -> New -> Project..; Select .NET Framework 3.5; Select template Visual C# -> Web -> ASP.NET Web Application
- Ensure that the Macaw NuGet repository is accessible:
- Open Tools -> Library Package Manager -> Package Manager Settings
- Go to Package Manager -> Package Source
- Add source: Name = Macaw NuGet, Source = http://nuget.macaw.nl/nuget
- Add the SharePoint.DesignFactory.ContentFiles NuGet package to the project and solution:
- Open Tools -> Library Package Manager -> Manage NuGet Packages for Solution...
- Select Online and the source Macaw NuGet
- Now select the SharePoint.DesignFactory.ContentFiles package and hit Install. Add the package at both the project and solution level.
Right click menus
The SharePoint.DesignFactory.ContentFiles NuGet package adds right click menu entries if the Managed Menu Extension (MME) is installed. These extension can be installed through the Visual Studio 2010 UI:
- Open Tools -> Extension Manager..
- Select Online
- Search for managed Menu Extension (MME)
- Select managed Menu Extension (MME) and hit Install
Close and reopen the Visual Studio 2010 instance containing your project to get the right click menu's loaded.
The following right click actions are now added:
On SharePoint.DesignFactory.ContentFiles project:
- DesignFactory -> Deploy changed files
- DesignFactory -> Deploy all files
- DesignFactory -> Mark all files for deploy
- DesignFactory -> Package
- DesignFactory -> Documentation ContentFiles
On mapped folder (folder in project mapped to SharePoint folder with Mappings.xml):
- DesignFactory -> Deploy changed files in folder
- DesignFactory -> Deploy all files in folder
- DesignFactory -> Mark folder for deploy
- DesignFactory -> Documentation ContentFiles
On mapped file (file in folder in project that is mapped to SharePoint folder with Mappings.xml): - DesignFactory -> Deploy file - DesignFactory -> Deploy all files in folder - DesignFactory -> Mark file for deploy - DesignFactory -> Documentation ContentFiles
Configurations
The SharePoint.DesignFactory.ContentFiles NuGet package adds the following configurations to the project and to the solution, besides the Debug and Release configurations:
- Deploy: build project in Debug mode, and deploy changed content files
- Redeploy: build project in Debug mode, and deploy all content files
- Package: build project in Release mode, and build package
The following action is also supported when you right-click on a project:
- Clean: marks all files in the project for redeployment, default project clean action is executed
Select a configuration and build the project/solution. The configurations correspond with the command-line commands.
It is also possible to add additional configurations using the Visual Studio Configuration dropdown, with at the end Configuration Manager.... In this way the following additional deployment commands can be added:
- Deploy machineconfigurationname, i.e. Deploy Office365
- Redeploy machineconfigurationname, i.e. Redeploy Office365
Note that a solution configuration builds projects with a specific configuration. This works fine after installation of the NuGet package. If the SharePoint.DesignFactory.ContentFiles package is uninstalled and installed again, the solution configurations are not aligned anymore to the project configurations. To align again open the Configuration dropdown, and select at the end Configuration Manager.... Now align solution configurations with project configurations.
Machine configuration files
A machine configuration file is used to describe how to deploy the current project to SharePoint. The machine configuration file describes a deployment to a local machine (SP2007/SP2010) or a remote machine (SP2010). Deployment to the local machine can be done using the ObjectModel or the ClientObjectModel. Deployment to a remote machine is done with the ClientObjectModel. A machine configuration file is:
- Located in the folder MachineConfiguration in the project folder
- Named after the machine name, i.e.
MYMACHINE.ps1for the default deployment (Deploy.cmd,Redeploy.cmd) OR - Named as wanted. Requires explicit deployment, i.e.
Deploy NAME,Redeploy NAME. - The machine configuration file
Default.ps1will be used for deployment if no machine specific configuration file exists - TODO: The machine configuration file
SPDesign.ps1will be used for importing SharePoint artifacts if no explicit configuration file is specified
This machine configuration file is executed as a PowerShell script and returns a Hashtable with the following keys:
- SharePointDeployment - MANDATORY
- ObjectModel (on server itself, SP2007/SP2010)
- ClientObjectModel (remote, SP2010)
If ObjectModel is used for deployment, sharepoint is accessed with the credentials of the current user (integrated security).
- SharePointWebUrl - MANDATORY
- Example: 'http://myserver/sites/mysitecollection'
Url to the SharePoint web site where the content files must be deployed to. In most cases this is the root site of a site collection, but it can be any SharePoint site. The content files in the package can only be deployed to locations within the specified site.
- UserName - OPTIONAL
- 'DOMAIN\UserName'
User name to authenticate with. Must be in the format DOMAIN\UserName. If not specified check if the credentials to authenticate for the SharePointWebUrl are specified in the Windows Credential Manager.
- Password - OPTIONAL
- 'MyPassword'
Password to authenticate with.
- UseClaims - OPTIONAL
- $true or $false
Boolean that specifies if authentication should be done using claims authentication. This is for example the case for Office365. Note that claims-based authentication for now only works with SharePointDeployment set to ClientObjectModel.
Authentication is done as follows:
- If SharePointDeployment is set to ObjectModel
- Always use integrated security (credentials of currently logged in user)
- If SharePointDeployment is set to ClientObjectModel
- If UserName,Password is specified and not empty, use these
- Otherwise use the credentials specified in the Windows Credential Manager for Url SharePointWebUrl
- If no credentials found --> error.
Using these key,value pairs multiple authentication approaches can be taken:
Integrated security:
@{
    SharePointDeployment = 'ObjectModel';
    SharePointWebUrl = 'http://myserver/sites/mysitecollection';
    UserName = '';
    Password = '';
    UseClaims = $false;
}
Integrated security (as short as possible):
@{
    SharePointDeployment = 'ObjectModel';
    SharePointWebUrl = 'http://myserver/sites/mysitecollection';
}
Explicit authentication (ClientObjectModel deployment only):
@{
    SharePointDeployment = 'ClientObjectModel';
    SharePointWebUrl = 'http://myserver/sites/mysitecollection';
    UserName = 'DOMAIN\UserName';
    Password = 'Password';
    UseClaims = $false;
}
Explicit authentication (ClientObjectModel deployment only), but user name and password configured in Windows Credential Manager:
@{
    SharePointDeployment = 'ClientObjectModel';
    SharePointWebUrl = 'http://myserver/sites/mysitecollection';
    UseClaims = $false;
}
Explicit claims-based authentication (ClientObjectModel deployment only):
@{
    SharePointDeployment = 'ClientObjectModel';
    SharePointWebUrl = 'http://myserver/sites/mysitecollection';
    UserName = 'DOMAIN\UserName';
    Password = 'Password';
    UseClaims = $true;
}
Explicit claims-based authentication (ClientObjectModel deployment only), but user name and password configured in Windows Credential Manager:
@{
    SharePointDeployment = 'ObjectModel';
    SharePointWebUrl = 'http://myserver/sites/mysitecollection';
    UseClaims = $true;
}
How files are marked for deployment
The Archive atribute is used to mark files for deployment. if the Archive attribute is set, the file must be deployed. After a file is successfully deployed the Archive attribute is cleared. The Archive attribute can also be set on read-only files.
There is a case where the Archive attribute is fooled. If a file that is under TFS source control is reverted to an older version, the file should be deployed again. On Revert the Archive attribute is not set, so the file will not be deployed, although it has been updated (to an older version).
In case of reverting from TFS source control, mark the specific file or folder for deployment.
NuGet package installation
When the NuGet package is installed in Visual studio the following actions are performed:
- Add the configurations Deploy, Redeploy and Package to the project and to the solution
- Add import of targets file SharePoint.DesignFactory.ContentFiles.targets in the project file to provide handling of building the configurations Deploy, Redeploy and Package, and a target Package for automating packaging
- Remove the folders App_Data, Scripts and Default.aspx from the project if it is a web project
- Copy assembly VSMenuManager.SharePoint.DesignFactory.ContentFiles.dll to the solution folder for right click menu extensions (requires restart of Visual Studio to be picked up)
This tool is copyright 2012, Macaw.
-
SharePoint 15: What is coming?
Something everyone busy with SharePoint would like to know: what will be the new features of SharePoint? What has been changed in the existing functionality? A lot of information that will point us in the right direction is available now from the source…
See the Office 15 Technical Preview - Open Specification Update @ http://blogs.msdn.com/b/officeinteroperability/archive/2012/01/30/office-15-technical-preview-open-specification-update.aspx.
The material is sometimes hard to read, but there is a lot of information hidden in the documents.
-
PowerShell: script to show detailed information on a set of assemblies
To get some insight in your assemblies you can use the script below. It gets all information out that I required, but you can extend it if you need for example all assemblies an assembly depends on.
One thing that was new for we was that I needed functions in a script that can be executed in a pipeline. You can define these functions in the begin {} block.
Save the following code as Get-AssemblyInformation.ps1. Call for example as follows:
get-childitem -path "D:\MyProject\tools" -filter '*.dll' -recurse | D:\bin\Get-AssemblyInformation.ps1
Or if all files are in a folder:
Get-AssemblyInformation.ps1 –Path "D:\MyProject\tools"
Get-AssemblyInformation.s1- #requires -version 2.0
- [CmdletBinding(DefaultParameterSetName="Path")]
- param(
- [Parameter(Mandatory=$true,
- Position=0,
- ParameterSetName="Path",
- ValueFromPipeline=$true,
- ValueFromPipelineByPropertyName=$true)]
- [ValidateNotNullOrEmpty()]
- [string[]]
- $Path,
- [Alias("PSPath")]
- [Parameter(Mandatory=$true,
- Position=0,
- ParameterSetName="LiteralPath",
- ValueFromPipelineByPropertyName=$true)]
- [ValidateNotNullOrEmpty()]
- [string[]]
- $LiteralPath
- )
- Begin
- {
- Set-StrictMode -Version 2.0
- function Get-AssemblyCustomProperty
- {
- param
- (
- $assembly,
- $TypeNameLike,
- $Property = $null
- )
- $value = $null
- foreach ($attribute in $assembly.GetCustomAttributes($false))
- {
- if ($attribute.GetType().ToString() -like "*$TypeNameLike*")
- {
- if ($Property -ne $null)
- {
- # Select-Object -ExpandProperty fails if property value is $null
- try {
- $value = $attribute | Select-Object -ExpandProperty $Property
- }
- catch {
- $value = $null
- }
- }
- else
- {
- $value = $attribute
- }
- break;
- }
- }
- $value
- }
- function Get-AssemblyInfoAsHashtable
- {
- param
- (
- [System.Reflection.Assembly]$assembly
- )
- $info = @{}
- $info.FullName = $assembly.FullName
- $info.Name = $assembly.ManifestModule.Name
- $info.Location = $assembly.Location
- $info.ImageRuntimeVersion = $assembly.ImageRuntimeVersion
- $info.GlobalAssemblyCache = $assembly.GlobalAssemblyCache
- $info.Title = Get-AssemblyCustomProperty -Assembly $assembly -TypeNameLike 'Title' -Property 'Title'
- $info.Configuration = Get-AssemblyCustomProperty -Assembly $assembly -TypeNameLike 'Configuration' -Property 'Configuration'
- $info.Description = Get-AssemblyCustomProperty -Assembly $assembly -TypeNameLike 'Description' -Property 'Description'
- $info.Company = Get-AssemblyCustomProperty -Assembly $assembly -TypeNameLike 'Company' -Property 'Company'
- $info.Product = Get-AssemblyCustomProperty -Assembly $assembly -TypeNameLike 'Product' -Property 'Product'
- $info.Copyright = Get-AssemblyCustomProperty -Assembly $assembly -TypeNameLike 'Copyright' -Property 'Copyright'
- $info.Trademark = Get-AssemblyCustomProperty -Assembly $assembly -TypeNameLike 'Trademark' -Property 'Trademark'
- $info.DelaySign = Get-AssemblyCustomProperty -Assembly $assembly -TypeNameLike 'DelaySign' -Property 'DelaySign'
- $info.KeyName = Get-AssemblyCustomProperty -Assembly $assembly -TypeNameLike 'KeyName' -Property 'KeyName'
- $info.ClsCompliant = Get-AssemblyCustomProperty -Assembly $assembly -TypeNameLike 'ClsCompliant' -Property 'IsCompliant'
- $info.ComVisible = Get-AssemblyCustomProperty -Assembly $assembly -TypeNameLike 'ComVisible' -Property 'Value'
- $info.IsJITTrackingEnabled = Get-AssemblyCustomProperty -Assembly $assembly -TypeNameLike 'System.Diagnostics.DebuggableAttribute' -Property 'IsJITTrackingEnabled'
- $info.IsJITOptimizerDisabled = Get-AssemblyCustomProperty -Assembly $assembly -TypeNameLike 'System.Diagnostics.DebuggableAttribute' -Property 'IsJITOptimizerDisabled'
- $info.DebuggingFlags = Get-AssemblyCustomProperty -Assembly $assembly -TypeNameLike 'System.Diagnostics.DebuggableAttribute' -Property 'DebuggingFlags'
- $info.CompilationRelaxations = Get-AssemblyCustomProperty -Assembly $assembly -TypeNameLike 'CompilationRelaxations' -Property 'CompilationRelaxations'
- $info.WrapNonExceptionThrows = Get-AssemblyCustomProperty -Assembly $assembly -TypeNameLike 'System.Runtime.CompilerServices.RuntimeCompatibilityAttribute' -Property 'WrapNonExceptionThrows'
- $info
- }
- function Get-AssemblyInformation
- {
- param
- (
- $AssemblyFile
- )
- try
- {
- $assembly = [Reflection.Assembly]::LoadFile($AssemblyFile)
- $info = Get-AssemblyInfoAsHashtable -assembly $assembly
- $info.IsValidDotNetAssembly = $true
- }
- catch { # it is not a valid dotnet assembly
- $info = @{
- FullName = $AssemblyFile;
- Name = Split-Path -Path $AssemblyFile -Leaf;
- IsValidDotNetAssembly = $false
- }
- }
- $info
- }
- }
- Process
- {
- if ($psCmdlet.ParameterSetName -eq "Path")
- {
- # In the non-literal case we may need to resolve a wildcarded path
- $resolvedPaths = @()
- foreach ($apath in $Path)
- {
- $resolvedPaths += @(Resolve-Path $apath | Foreach { $_.Path })
- }
- }
- else
- {
- $resolvedPaths = $LiteralPath
- }
- foreach ($rpath in $resolvedPaths)
- {
- $PathIntrinsics = $ExecutionContext.SessionState.Path
- if ($PathIntrinsics.IsProviderQualified($rpath))
- {
- $rpath = $PathIntrinsics.GetUnresolvedProviderPathFromPSPath($rpath)
- }
- $assemblyInfo = Get-AssemblyInformation -AssemblyFile $rpath
- Write-Host "***************************************************************************************************"
- Write-Host "**************** $($assemblyInfo.Name)"
- Write-Host "***************************************************************************************************"
- $assemblyInfo
- Write-Host ""
- }
- }
Thanks goes to Keith Hill for some of the more advances parameter stuff which is lent from http://rkeithhill.wordpress.com/2009/01/28/tail-content-%E2%80%93-better-performance-for-grabbing-last-lines-from-large-ascii-log-files/.
-
PowerShell: PrimalForms and the TFS source control provider
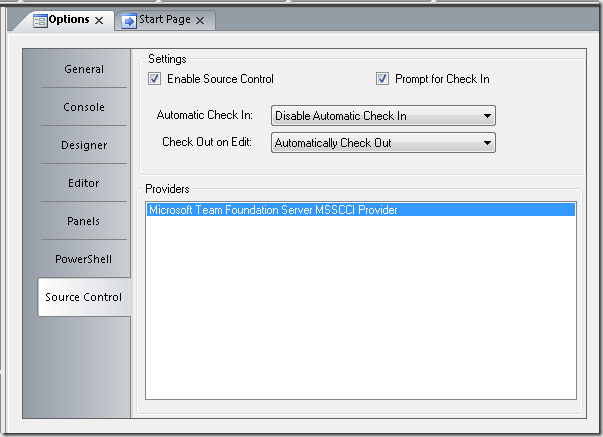
I’m using PrimalForms 2011 for designing PowerShell front-ends and editing some PowerShell. Code is under source control (TFS), and PrimalForms has a Source Control tab. Initially the “Providers” section was empty, after installing Team Foundation Server MSSCCI Provider 2010 and restarting PrimalForms I got my provider:
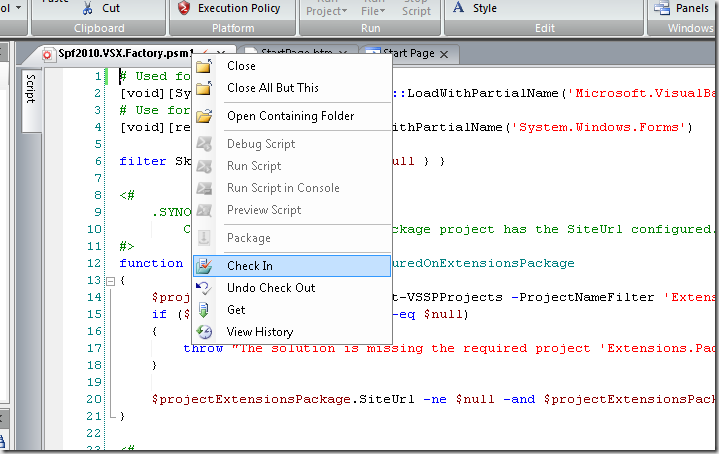
If you open a file under TFS source control you can now right-click on the file to do our source control operations:
-
Persisting custom properties on a Visual Studio project using object model
It is possible to persist custom properties in your Visual Studio project. I will show how using some PowerShell code in the NuGet console.
Note that VariableValue() persist in session, the call to VariablePersists() writes to the project file for persistance over sessions.
The Global object has the following methods:
PM> (Get-Project).Globals | gm    TypeName: System.__ComObject#{e68a3e0e-b435-4dde-86b7-f5adefc19df2}

Name             MemberType            Definition                                  ----             ----------            ----------                                  VariableExists   ParameterizedProperty bool VariableExists (string) {get}          VariablePersists ParameterizedProperty bool VariablePersists (string) {get} {set}  VariableValue    ParameterizedProperty Variant VariableValue (string) {get} {set}  DTE              Property              DTE DTE () {get}                            Parent           Property              IDispatch Parent () {get}                   VariableNames    Property              Variant VariableNames () {get}
Some sample code:
PM> (Get-Project –name "MyProject").Globals.VariableValue("FirstProperty") = "Value1"
PM> (Get-Project –name "MyProject").Globals.VariableValue("SecondProperty") = "Value2"
PM> (Get-Project –name "MyProject").Globals.VariablePersists("FirstProperty") = $True   PM> (Get-Project –name "MyProject").Globals.VariablePersists("SecondProperty") = $True   PM> (Get-Project –name "MyProject").Globals.VariableValue("FirstProperty")
Value1
PM> (Get-Project –name "MyProject").Globals.VariablePersists("SecondProperty")
True
PM> (Get-Project –name "MyProject").Globals.VariableNames FirstProperty SecondProperty
PM> (Get-Project –name "MyProject").Globals.VariableExists("DoesNotExist")
False
PM> (Get-Project –name "MyProject").Globals.VariableExists("FirstProperty")
True
And if you look at your .csproj file:
<?xml version="1.0" encoding="utf-8"?>
<Project ToolsVersion="4.0" DefaultTargets="Build" xmlns="http://schemas.microsoft.com/developer/msbuild/2003">
  :
  <Import Project="$(MSBuildToolsPath)\Microsoft.CSharp.targets" />   <Import Project="$(MSBuildExtensionsPath32)\Microsoft\VisualStudio\v10.0\SharePointTools\Microsoft.VisualStudio.SharePoint.targets" />   <ProjectExtensions>     <VisualStudio>       <UserProperties SecondProperty="Value2" FirstProperty="Value1" />
    </VisualStudio>   </ProjectExtensions>
</Project>
-
Set the properties on your Visual Studio project
Reminder to self:
Settings properties on a Visual Studio project,like DefaultNamespace and AssemblyName.
In NuGet console window:
(Get-Project).Properties.Item("DefaultNamespace").Value = "HelloWorld"Available properties on a simple class library project project:
PM> (Get-Project).Properties | Select-Object -Property Name,Value
Name Value
---- -----TargetFrameworkMoniker .NETFramework,Version=v4.0
ComVisible False
EnableSecurityDebugging True
OptionCompare 0
StartupObject
ManifestCertificateThumbprint
Trademark
Title FactoryExtensionsTemplate
AssemblyOriginatorKeyFileType 1
FileName FactoryExtensions3.csproj
WebServer
AssemblyOriginatorKeyMode 0
AssemblyKeyContainerName
ProjectType 0
ReferencePath
PreBuildEvent
Copyright Copyright © Microsoft 2011
ApplicationIcon
ExcludedPermissions
RunPostBuildEvent 1
DefaultTargetSchema 1
RootNamespace HelloWorld
ManifestTimestampUrl
ManifestKeyFile
DebugSecurityZoneURL
Product FactoryExtensionsTemplate
PostBuildEvent
OptionStrict 0
DefaultHTMLPageLayout 1
DelaySign False
OutputType 2
NeutralResourcesLanguage
OptionExplicit 1
OutputFileName FactoryExtensions.dll
ServerExtensionsVersion
AssemblyGuid 919e5f68-ec7d-4508-aa24-ee3da14edd84
GenerateManifests False
AssemblyVersion 1.0.0.0
Win32ResourceFile
Description
URL file:///d:\temp3\Acme.Portal\FactoryExtensions3\
DefaultClientScript 0
TargetFramework 262144
SignManifests False
OfflineURL
WebServerVersion
Publish System.__ComObject
AssemblyType 0
FullPath d:\temp3\Acme.Portal\FactoryExtensions3\
WebAccessMethod
AssemblyKeyProviderName
TypeComplianceDiagnostics False
Company Microsoft
ActiveFileSharePath
AssemblyOriginatorKeyFile
ApplicationManifest DefaultManifest
AssemblyFileVersion 1.0.0.0
AspnetVersion
FileSharePath
AssemblyName FactoryExtensions
LocalPath d:\temp3\Acme.Portal\FactoryExtensions3\
DefaultNamespace HelloWorld
LinkRepair False
TargetZone
SignAssembly False -
Nuget 1.3: some observations
I’m testing out a lot of features from NuGet for extending our software factory. In this testing I made the following observations:
Tools\Init.ps1 is only executed if the Content folder contains a file[See: http://nuget.codeplex.com/discussions/257282#post611456]- Tools\Install.ps1 is executed AFTER Tools\Init.ps1
- If you have an empty solution without projects and install a package then the Tools\Init.ps1 is executed, but Tools\Install.ps1 is NOT executed
- Tools\Install.ps1 is executed when a package is installed for a specific project
- The $project parameter is always $null in Tools\Init.ps1
- Don’t use the nuget.config file to configure your packages folder, it is an undocumented experimental feature which results in unexpected behaviour
- Packages are installed at the solution level in a folder packages next to your solution file (.sln file)
- Each project that has packages installed writes these installed packages and the installed packages it depends on in a packages.config file that is located in the project folder next to the project file (for example .csproj file)
<?xml version="1.0" encoding="utf-8"?>
<packages>   <package id="EntityFramework" version="4.1.10331.0" />   <package id="T4Scaffolding" version="1.0.0" />   <package id="MacawSolutionsFactory-Core" version="1.0.0" />   <package id="MacawSolutionsFactory-Spf2010" version="1.0.0" />
</packages>
- The packages folder contains a file repositories.config referencing the packages.config files of all projects in the solution that has packages installed
<?xml version="1.0" encoding="utf-8"?>
<repositories>   <repository path="..\srcfactory\Core\packages.config" />   <repository path="..\srcfactory\Spf2010\packages.config" />
</repositories>
- The repositories.config and packages.config files are used for “reference counting” packages. If uninstall-package is executed on a package, and there is no more packages.config file containing the package, the package folder is removed from the packages folder
- The parameter $installPath points to the folder where the package is installed
- The parameter $rootPath points to the Tools folder in the folder where the package is installed
- The parameter $package is a package object describing information about the package. To see the values of the properties add the code $package | format-custom –depth 1 to your Init.ps1/Install.ps1/Uninstall.ps1.
- The parameter $project is an EnvDTE Project object ($null in Tools\Init.ps1, this script is executed at the solution level)
- Uninstall-package removes a package, but does not automatically cascade delete the packages that were installed because the package was depending on these packages. Use the parameter –RemoveDependencies to do this
- Scaffolders (see T4Scaffolding package for more info) are only available in the project where the package containing the scaffolders in installed. To have access to the scaffolders in all projects, add the project at the solution level
- A package can’t be installed at the solution level using the install-package command, use the command-line NuGet.exe tool to do this
- A good place for more information on how to create packages, what the parameters mean, etc is http://nuget.codeplex.com/documentation?title=Creating%20a%20Package
- NuGet is a very active open source project with a lot of great discussions on http://nuget.codeplex.com/discussions
You can execute the command Install-Package NuGetPSVariables to validate some of the above observations.
UPDATE 1:
- Great NuGet documentation on http://docs.nuget.org (uses open source MarkDown based documentation system: http://nugetdocs.codeplex.com) [Thanks Cyriel!]
<li><font color="#ff0000">No files required in Content folder for Init.ps1 to run</font> </li>

<li><font color="#ff0000">If a project is removed from a solution (and not deleted from the filesystem) the <strong>packages.config</strong> file in the removed project is still referenced in the <strong>packages\repositories.config</strong> file. It is now not possible to remove a package at solution level that is also referenced by the removed project. Delete the removed project from the filesystem to solve this issue.</font> </li>

<li><font color="#ff0000">Add the <strong>packages.config</strong> files in your project folders to your Visual Studio project (Show hidden files on project, Include in project) and include in source control. Set the build action to none otherwise the file could be included in the project output [Thanks Marino!]</font> </li>

<li><font color="#ff0000">Add the <strong>packages</strong> folder to source control (or at least the <strong>packages\repositories.config</strong> file)</font> </li>
UPDATE 2:
- When a solution is loaded the script Tools\Init.ps1 of all packages is executed. In execution of the Init.ps1 scripts the package dependencies are respected. So if package A depends on package B, the script B\Tools\Init.ps1 is executed before script A\Tools\Init.ps1.
UPDATE 3:
-
When a package is installed, the Tools folder is added to the PATH environment variable ($env:PATH) with process scope, so scripts and applications in the tools folder can be directly executed from the NuGet console. Note that if you uninstall the package, the Tools folder of the uninstalled package in NOT removed from the PATH. When the package is installed again, the Tools folder is added to the again, so it appears twice in the PATH.
NuGet: refreshing NuGet packages in packages folder during development
I'm working on NuGet packages in a Visual Studio project. On build I publish a new version of my nuget package to a repository (a directory on my system).
I don't increment version numbers after each change, i only want to do that on published versions of my packages.
To test out changes to the package in my solution where I already reference the package I want to pull in a new version of the package that has the same version number.
install-package does not have a -force option to force uninstall/install of the package with an unchanged version number.
The script below solves this issue. Save as Update-NuGetPackages.ps1 and put next to NuGet.exe.
Test out first on a copy of your Packages folder (copy to PackagesTest), so you have all parameters right. The script deletes all existing packages.
UPDATE: Updated the code so if package is deleted and install fails, an empty folder with the package name is created so after fixing the error the script can be called again to retry the update.
- <#
- .SYNOPSIS
- Update NuGet packages with same version of package.
- .DESCRIPTION
- During the development cycle version numbers of packages are often not changed,
- but the contents of the package itself is updates. Update-NuGetPackages.ps1
- refreshes all packages in a given packages directory.
- By default don't specify any sources, so NuGet.exe (version 1.3 and later) will use
- the NuGet.config which is stored in the AppData folder and shared between Visual Studio
- and NuGet.exe
- .PARAMETER PackagesPath
- Path to folder containing the packages to refresh.
- .PARAMETER PackagesSource
- Source where packages should be installed from. Post version 1.3 of NuGet.exe
- supports specifying multiple sources separated by ';'.
- Source paths may not contain PSDrives in its path, like product:\mypath.
- .PARAMETER IncludeDefaultSource
- Switch parameter to specify that the default NuGet packages source
- https://go.microsoft.com/fwlink/?LinkID=206669 should be included as a
- packages source. Don't specify this switch and dont use the PackagesSource
- parameter to let NuGet.exe use the sources specified in the NuGet.config.
- This functionality is available after release version 1.3 of NuGet.exe.
- If used together with the PackagesSource parameter a version newer than
- version 1.3 of NuGet.exe is required.
- .EXAMPLE
- PS C:\> Update-NuGetPackages.ps1 -PackagesSource c:\MyProduct\Packages
- Deleting package 'EntityFramework' version '4.1.10331.0'
- Deleting package 'MacawSolutionsFactory-Core' version '1.0.0'
- Deleting package 'MacawSolutionsFactory-Spf2010' version '1.0.0'
- Deleting package 'T4Scaffolding' version '1.0.0'
- Reinstalling package 'EntityFramework' version '4.1.10331.0'
- Successfully installed 'EntityFramework 4.1.10331.0'.
- Reinstalling package 'MacawSolutionsFactory-Core' version '1.0.0'
- 'T4Scaffolding (= 1.0.0)' not installed. Attempting to retrieve dependency from source...
- Done.
- Dependency 'EntityFramework (= 4.1.10311.0)' already installed.
- Successfully installed 'T4Scaffolding 1.0.0'.
- Successfully installed 'MacawSolutionsFactory-Core 1.0.0'.
- Reinstalling package 'MacawSolutionsFactory-Spf2010' version '1.0.0'
- Dependency 'T4Scaffolding (= 1.0.0)' already installed.
- Dependency 'EntityFramework (= 4.1.10311.0)' already installed.
- Successfully installed 'MacawSolutionsFactory-Spf2010 1.0.0'.
- Reinstalling package 'T4Scaffolding' version '1.0.0'
- Dependency 'EntityFramework (= 4.1.10311.0)' already installed.
- 'T4Scaffolding 1.0.0' already installed.
- Done.
- .EXAMPLE
- PS C:\> Update-NuGetPackages.ps1 -PackagesSource c:\MyProduct\Packages `
- -PackagesSource "c:\Dist\Feed1;c:\Dist\Feed2" -IncludeDefaultSource
- :
- .INPUTS
- System.String,System.String,System.Boolean
- .NOTES
- This script must be located next to NuGet.exe.
- This script requires a version later than the release version 1.3 of NuGet.exe
- when specifying multiple sources on the commandline and/or using the IncludeDefaultSource
- parameter.
- Version: 1.0
- Author: Serge van den Oever (http://weblogs.asp.net/soever)
- #>
- [CmdletBinding()]
- param
- (
- [Parameter(Position=0, Mandatory=$true)][String]$PackagesPath,
- [Parameter(Position=1, Mandatory=$false)][String]$PackagesSource = '',
- [Parameter(Position=2, Mandatory=$false)][Switch]$IncludeDefaultSource = $false
- )
- $nugetDefaultSource= 'https://go.microsoft.com/fwlink/?LinkID=206669'
- function Get-ScriptDirectory
- {
- $Invocation = (Get-Variable MyInvocation -Scope 1).Value
- Split-Path $Invocation.MyCommand.Path
- }
- $nugetExe = Join-Path -Path (Get-ScriptDirectory) -ChildPath 'nuget.exe'
- if (-not (Test-Path -Path $nugetExe)) { throw ("Expected NuGet.exe at path '{0}'" -f $nugetExe) }
- if (-not (Test-Path -Path $PackagesPath)) { throw ("Specified PackagesPath '{0}' does not exist" -f $PackagesPath) }
- $PackagesPath = Convert-Path -Path $PackagesPath
- # Collect packages
- $packageFolders = Get-ChildItem -Path $PackagesPath | Where-Object {$_.psIsContainer -eq $true}
- $packages = @()
- if ($packageFolders -ne $null) {
- $packageFolders | ForEach-Object {
- $packageFolder = Convert-Path -Path $_.FullName # Handle case where PSDrive is specified
- $packageFolderName = Split-Path -Path $packageFolder -Leaf
- $parts = $packageFolderName.split('.')
- $packageName = $parts[0]
- $packageVersion = $parts[1..$($parts.length-1)] -join '.'
- $packages += @{
- Name = $packageName;
- Version = $packageVersion;
- Folder = $packageFolder;
- }
- }
- }
- # Delete all package folders
- $packages | ForEach-Object {
- Write-Host ("Deleting package '{0}' version '{1}'" -f $_.Name, $_.Version)
- Remove-Item -Recurse -Force -Path $_.Folder -ErrorAction SilentlyContinue
- if (Test-Path -Path $_.Folder) { Write-Warning ("Can't remove folder '{0}'. Make sure it is not locked." -f $_.Folder) }
- }
- # Reinstall all packages
- $packages | ForEach-Object {
- Write-Host ("Reinstalling package '{0}' version '{1}'" -f $_.Name, $_.Version)
- if ($IncludeDefaultSource) {
- $source = $nugetDefaultSource
- } else {
- $source = ''
- }
- if ($PackagesSource -ne '') {
- if ($source -ne '') { $source += ';' }
- $source += (Convert-Path -Path $PackagesSource)
- }
- if ($source -ne '') {
- & $nugetExe install $_.Name -Version $_.Version -Source $source -OutputDirectory $PackagesPath
- } else {
- & $nugetExe install $_.Name -Version $_.Version -OutputDirectory $PackagesPath
- }
- if (-not (Test-Path -Path $_.Folder)) {
- New-Item -Path $_.Folder -Type Directory -Force
- Write-Warning ("Failed to reinstall package '{0}' version '{1}'. Created dummy directory '$($_.Folder). Fix error and try again." -f $_.Name, $_.Version)
- }
- }
- # Call Init.ps1 on all packages
- $packages | ForEach-Object {
- $initScript = Join-Path -Path $_.Folder -ChildPath 'Tools\Init.ps1'
- if (Test-Path -Path $initScript)
- {
- $rootPath = $_.Folder
- $toolsPath = Join-Path -Path $_.Folder -ChildPath 'Tools'
- $package = Get-Package -Filter $_.Name
- $project = $null
- & $initScript -rootPath $rootPath -toolsPath $toolsPath -package $package -project $project
- }
- }
- Write-Host 'Done.'
NuGet: should you check-in packages into source control?
Interesting discussion at http://nuget.codeplex.com/discussions/230110 about checking in NuGet packages into source control.
NuGet packages can contain more than a simple libraries, it can contain tools that grow quite big as well. Good example in the NUnit package that contains the total NUnit toolset.
Do you want all your binaries into source control, it is already preserved in the NuGet feed. You can always reload the packages from the feed. The required packages in a project are available in the packages.config file that is part of your project and checked into source control.
But what if a package is removed from the feed by the author? That would be bad… on the other hand: in this case shouldn’t you remove a dependency on that package anyway?
What about a build server not connected to the internet and not being able to get packages from the NuGet feed?
After reading the discussion I think I would prefer to not check-in packages into source control…
Just found the following post: https://msmvps.com/blogs/theproblemsolver/archive/2011/04/12/nuget-and-projects-under-source-control.aspx taking the same approach. It describes how you can install all missing packages using the command-line version of nuget.exe with the following command: NuGet install MyProject\packages.config –OutputDirectory Packages
From the documentation:
usage: NuGet install packageId|pathToPackagesConfig [options]
Install a package from a given source. If no source is specified the default feed is used.
Specify the id and optionally the version of the package to install. If a path to a
packages.config file is used instead of an id, all the packages it contains are installed.
options:
Source The location to look for packages.
OutputDirectory Specifies the directory in which packages will be installed
Version The version of the package to install.
ExcludeVersion (x) If set, the destination folder will contain only the package name, not the version number
Help (?) help
NuGet: test if a package is installed
With Get-Package you can get the list of currently installed packages. How can you test if a package is installed?
Get-Package returns list of packages as follows:
Id Version Description -- ------- ----------- EntityFramework 4.1.10331.0 DbContext API and Code First workflow for ADO.NET Entity Framework. MacawSolutionsFactory-Core 1.0.0 Macaw Solutions Factory Base package MacawSolutionsFactory-Spf2010 1.0.0 Macaw Solutions Factory core package for Spf2010 T4Scaffolding 1.0.0 A fast and customizable way to build parts of your .NET application via templates
To test if a package is installed do the following:
(get-package | Select-Object -ExpandProperty ID) -contains 'EntityFramework'
This will return $true or $false.
DualLayout for SharePoint 2010 WCM Quick Start
DualLayout for SharePoint 2010 WCM is a solution to provide you with complete HTML freedom in your SharePoint Server 2010 publishing pages. In this post I provide a quick start guide to get you up and running quickly so you can try it out for yourself. This quick start creates a simple HTML5 site with a page to show-case the basics and the power of DualLayout. We will create the site in its own web application. Normally there are many things you have to do to create a clean start point for your SharePoint 2010 WCM site. All those steps will be provided in later posts. For now we want to give you the minimal set of steps to take to get DualLayout working on your machine.
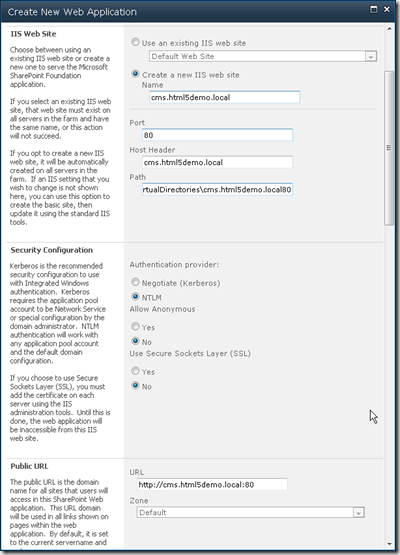
- Create an authenticated web application with hostheader cms.html5demo.local on port 80 for the cms side of the site.
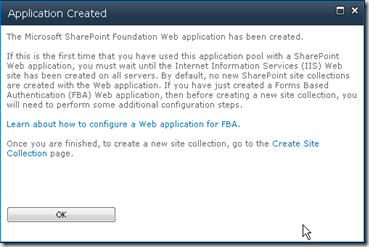
- Click the Create Site Collection link on the Application Created dialog box and create a Site Collection based on the Publishing Portal site template.
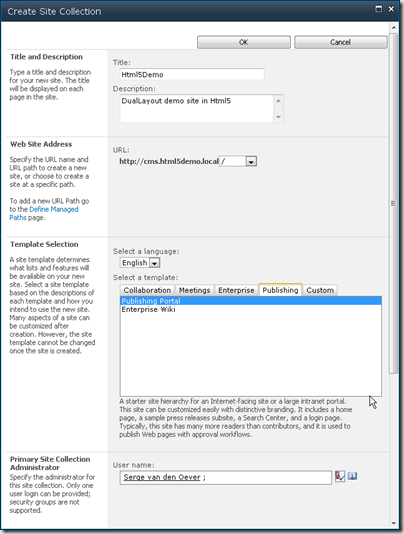
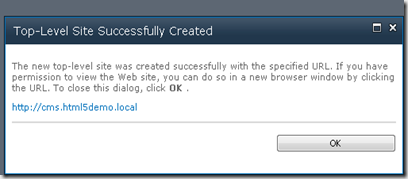
- Before we can click the site link in the Top-Level Site Successfully Created dialog we need to add the new host header cms.html5demo.local to the hosts file.
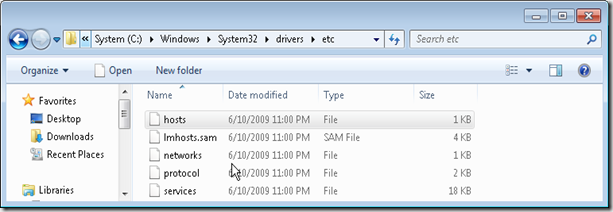
Add the following line to the hosts file:127.0.0.1 cms.html5demo.local
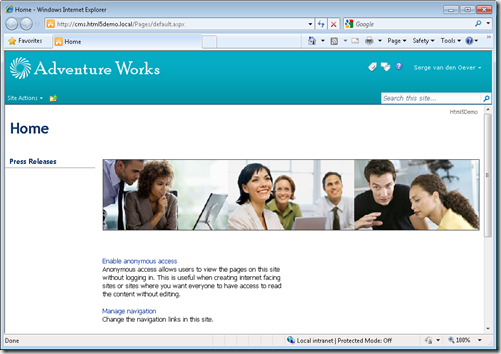
- Navigate to the site at http://cms.html5demo.local to see the out-of-the-box example Adventure Works publishing site.
- Download and add the DualLayout solution package designfactory.duallayout.sps2010.trial.1.2.0.0.wsp to the farm’s solution store:
- On the Start menu, click All Programs.
- Click Microsoft SharePoint 2010 Products.
- Click SharePoint 2010 Management Shell.
- At the Windows PowerShell command prompt, type the following command:Add-SPSolution -LiteralPath designfactory.duallayout.sps2010.trial.1.2.0.0.wsp
- In SharePoint 2010 Central Administration deploy the solution to the web application http://cms.html5demo.local.
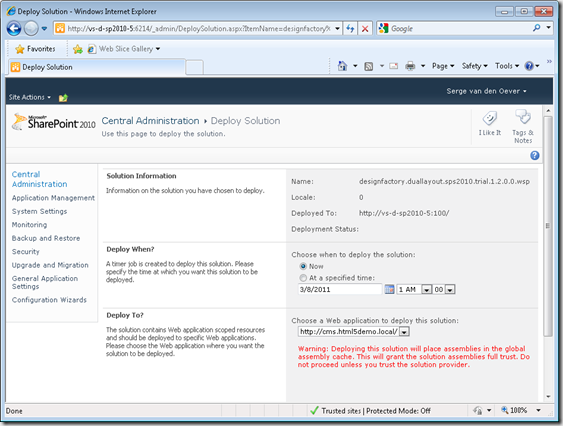
- Navigate to the site at http://cms.html5demo.local, and in the Site Settings screen select Site Collection Administration > Site collection features and activate the following feature:
- Open the site http://cms.html5demo.local in SharePoint Designer 2010.
- Create a view-mode masterpage html5simple.master with the following code:
html5simple.master- <%@ Master language="C#" %>
- <%@ Register Tagprefix="SharePointWebControls" Namespace="Microsoft.SharePoint.WebControls" Assembly="Microsoft.SharePoint, Version=14.0.0.0, Culture=neutral, PublicKeyToken=71e9bce111e9429c" %>
- <%@ Register TagPrefix="sdl" Namespace="DesignFactory.DualLayout" Assembly="DesignFactory.DualLayout, Version=1.2.0.0, Culture=neutral, PublicKeyToken=077f92bbf864a536" %>
- <!DOCTYPE html>
- <html class="no-js">
- <head>
- <meta charset="utf-8" />
- <meta http-equiv="X-UA-Compatible" content="IE=Edge" />
- <title><SharePointWebControls:FieldValue FieldName="Title" runat="server"/></title>
- <script type="text/javascript">
- document.createElement('header');
- document.createElement('nav');
- document.createElement('article');
- document.createElement('hgroup');
- document.createElement('aside');
- document.createElement('section');
- document.createElement('footer');
- document.createElement('figure');
- document.createElement('time');
- </script>
- <asp:ContentPlaceHolder id="PlaceHolderAdditionalPageHead" runat="server"/>
- </head>
- <body>
- <header>
- <div class="logo">Logo</div>
- <h1>SiteTitle</h1>
- <nav>
- <a href="#">SiteMenu 1</a>
- <a href="#">SiteMenu 2</a>
- <a href="#">SiteMenu 3</a>
- <a href="#">SiteMenu 4</a>
- <a href="#">SiteMenu 5</a>
- <sdl:SwitchToWcmModeLinkButton runat="server" Text="…"/>
- </nav>
- <div class="tagline">Tagline</div>
- <form>
- <label>Zoek</label>
- <input type="text" placeholder="Voer een zoekterm in...">
- <button>Zoek</button>
- </form>
- </header>
- <div class="content">
- <div class="pageContent">
- <asp:ContentPlaceHolder id="PlaceHolderMain" runat="server" />
- </div>
- </div>
- <footer>
- <nav>
- <ul>
- <li><a href="#">FooterMenu 1</a></li>
- <li><a href="#">FooterMenu 2</a></li>
- <li><a href="#">FooterMenu 3</a></li>
- <li><a href="#">FooterMenu 4</a></li>
- <li><a href="#">FooterMenu 5</a></li>
- </ul>
- </nav>
- <small>Copyright © 2011 Macaw</small>
- </footer>
- </body>
- </html>
Note that if no specific WCM-mode master page is specified (html5simple-wcm.master), the default v4.master master page will be used in WCM-mode. - Create a WCM-mode page layout html5simplePage-wcm.aspx with the following code:
html5simplePage-wcm.aspx- <%@ Page language="C#" Inherits="DesignFactory.DualLayout.WcmModeLayoutPage, DesignFactory.DualLayout, Version=1.2.0.0, Culture=neutral, PublicKeyToken=077f92bbf864a536" %>
- <%@ Register Tagprefix="SharePointWebControls" Namespace="Microsoft.SharePoint.WebControls" Assembly="Microsoft.SharePoint, Version=14.0.0.0, Culture=neutral, PublicKeyToken=71e9bce111e9429c" %>
- <%@ Register Tagprefix="WebPartPages" Namespace="Microsoft.SharePoint.WebPartPages" Assembly="Microsoft.SharePoint, Version=14.0.0.0, Culture=neutral, PublicKeyToken=71e9bce111e9429c" %>
- <%@ Register Tagprefix="PublishingWebControls" Namespace="Microsoft.SharePoint.Publishing.WebControls" Assembly="Microsoft.SharePoint.Publishing, Version=14.0.0.0, Culture=neutral, PublicKeyToken=71e9bce111e9429c" %>
- <%@ Register Tagprefix="PublishingNavigation" Namespace="Microsoft.SharePoint.Publishing.Navigation" Assembly="Microsoft.SharePoint.Publishing, Version=14.0.0.0, Culture=neutral, PublicKeyToken=71e9bce111e9429c" %>
- <asp:Content ContentPlaceholderID="PlaceHolderPageTitle" runat="server">
- <SharePointWebControls:FieldValue FieldName="Title" runat="server"/>
- </asp:Content>
- <asp:Content ContentPlaceholderID="PlaceHolderMain" runat="server">
- Title: <SharePointWebControls:TextField FieldName="Title" runat="server"/>
- </asp:Content>
Notice the Inherits at line one. Instead of inheriting from Microsoft.SharePoint.Publishing.PublishingLayoutPage we need to inherit from DesignFactory.DualLayout.WcmModeLayoutPage. - Create a view-mode page layout html5simplePage.aspx with the following code:
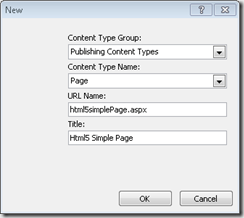
html5simplePage.aspx- <%@ Page language="C#" Inherits="DesignFactory.DualLayout.ViewModeLayoutPage, DesignFactory.DualLayout, Version=1.2.0.0, Culture=neutral, PublicKeyToken=077f92bbf864a536" %>
- <%@ Register Tagprefix="SharePointWebControls" Namespace="Microsoft.SharePoint.WebControls" Assembly="Microsoft.SharePoint, Version=14.0.0.0, Culture=neutral, PublicKeyToken=71e9bce111e9429c" %>
- <asp:Content ContentPlaceholderID="PlaceHolderAdditionalPageHead" runat="server" />
- <asp:Content ContentPlaceholderID="PlaceHolderMain" runat="server">
- The title of the page is: <SharePointWebControls:FieldValue FieldName="Title" runat="server"/>
- </asp:Content>
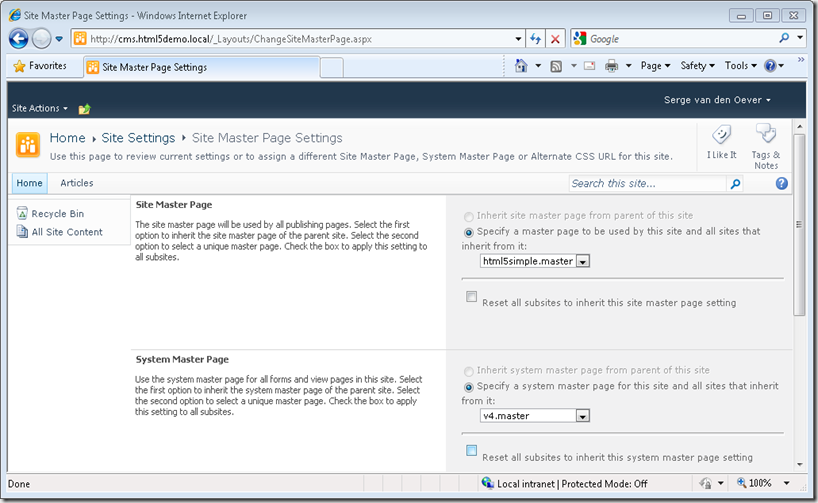
Notice the Inherits at line one. Instead of inheriting from Microsoft.SharePoint.Publishing.PublishingLayoutPage we need to inherit from DesignFactory.DualLayout.ViewModeLayoutPage. - Set the html5simple.master master page as the Site Master Page:
- Set the allowed page layouts to the Html5 Simple Page page layout and set the New Page Default Settings also to Html5 Simple Page so new created pages are also of this page layout.
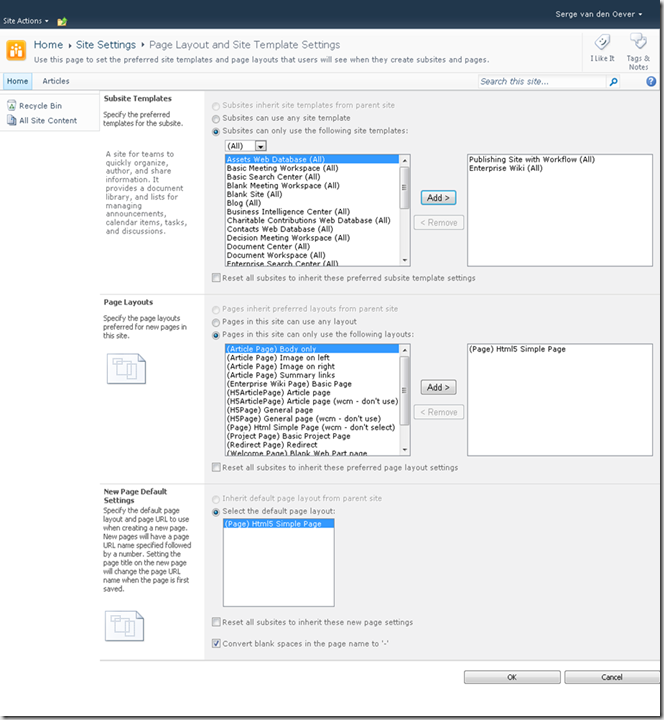
Note that the Html5 Simple Page page layout is initially not selectable for New Page Default Settings. Save this configuration page first after selecting the allowed page layouts, then open again and select the default new page. - Under Site Actions select the New Page action. Create a page Home.aspx of the default page layout type Html5 Simple Page.
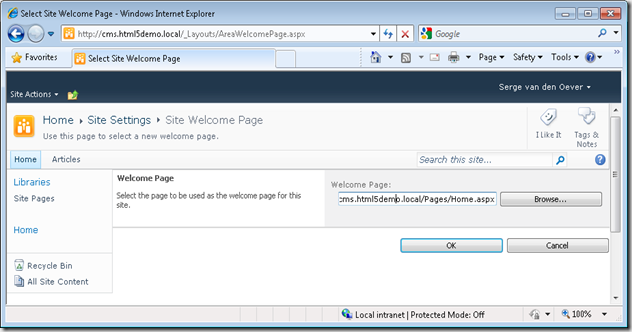
- Set the new created Home.aspx page as Welcome Page.
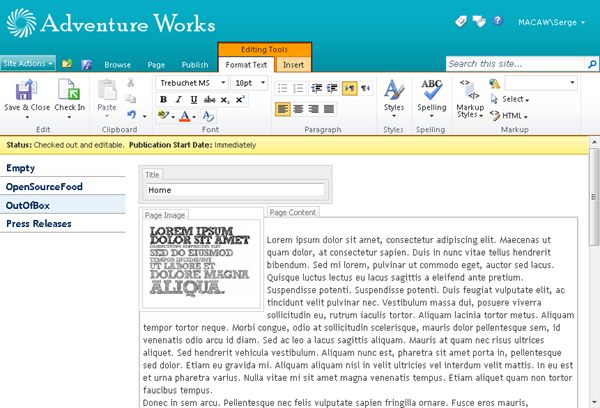
- Navigate to the site http://cms.html5demo.local and see the home page in the WCM display and edit mode.
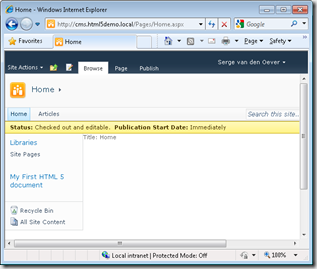
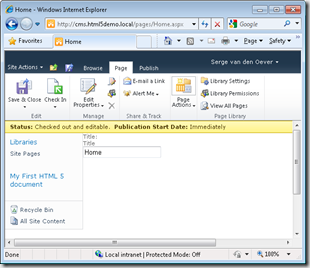
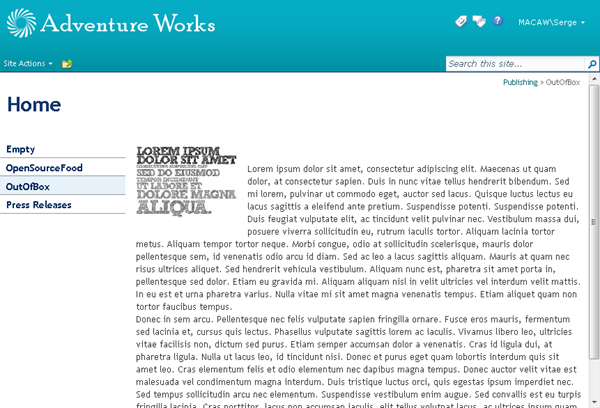
- Select Switch to View Mode under Site Actions to see the resulting page in view-mode. Select the three dots (…) at the right side of the menu to switch back to WCM-mode.
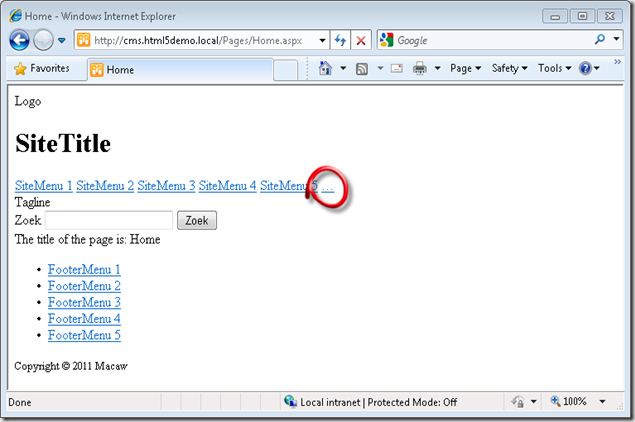
- Have a look at the source view of the resulting web page and admire the clean HTML. No SharePoint specific markup or CSS files!
Clean HTML in page- <!DOCTYPE html>
- <html class="no-js">
- <head>
- <meta charset="utf-8" />
- <meta http-equiv="X-UA-Compatible" content="IE=Edge" />
- <title>Home</title>
- <script type="text/javascript">
- document.createElement('header');
- document.createElement('nav');
- document.createElement('article');
- document.createElement('hgroup');
- document.createElement('aside');
- document.createElement('section');
- document.createElement('footer');
- document.createElement('figure');
- document.createElement('time');
- </script>
- </head>
- <body>
- <header>
- <div class="logo">Logo</div>
- <h1>SiteTitle</h1>
- <nav>
- <a href="#">SiteMenu 1</a>
- <a href="#">SiteMenu 2</a>
- <a href="#">SiteMenu 3</a>
- <a href="#">SiteMenu 4</a>
- <a href="#">SiteMenu 5</a>
- <a href="/Pages/Home.aspx?DualLayout_ShowInWcmMode=true">…</a>
- </nav>
- <div class="tagline">Tagline</div>
- <form>
- <label>Zoek</label>
- <input type="text" placeholder="Voer een zoekterm in...">
- <button>Zoek</button>
- </form>
- </header>
- <div class="content">
- <div class="pageContent">
- The title of the page is: Home
- </div>
- </div>
- <footer>
- <nav>
- <ul>
- <li><a href="#">FooterMenu 1</a></li>
- <li><a href="#">FooterMenu 2</a></li>
- <li><a href="#">FooterMenu 3</a></li>
- <li><a href="#">FooterMenu 4</a></li>
- <li><a href="#">FooterMenu 5</a></li>
- </ul>
- </nav>
- <small>Copyright © 2011 Macaw</small>
- </footer>
- </body>
- </html>
- <!-- Macaw DesignFactory DualLayout for SharePoint 2010 Trial version -->
Note the link at line 37, this link will only be rendered for authenticated users and is our way to switch back to WCM-mode.
This concludes our quick start to get DualLayout up an running in a matter of minutes. And what is the result:
- You can have the full SharePoint 2010 WCM publishing page editing experience to manage the content in your pages.
- You don’t have to delve into large SharePoint specific master pages and page layouts with a lot of knowledge of the does and don'ts with respect to SharePoint controls, scripts and stylesheets.
- The end-user gets a clean and light HTML page.
Get your fully functional, non-timebombed trial copy of DualLayout and start creating!
DualLayout OpenSourceFood demo site installation instructions
We released DualLayout which enables advanced web design with the power of SharePoint. DualLayout and a demo site which shows off the feature of DualLayout can be downloaded from the DualLayout product page.
This blogpost contains detailed instructions on installing this demo site.
The DualLayout demo site is based on the site http://opensourcefood.com. The demo site requires internet access because for some menu items it still links to pages and resources of the real site.
Execute the following steps to install the OpenSourceFoodDemo demo site on your SharePoint Server 2010:
- Downloaded the OpenSourceFoodDemo.zip file from the DualLayout product page
- Copy the OpenSourceFoodDemo.zip file to your development computer running SharePoint Server 2010
- Make sure that the zip file in “unblocked”, otherwise files are marked as “unsecure” because they are downloaded from another computer, and the installation script will not run (right-click on zip file, press “Unblock” button if available, if not available the file is already unblocked)
- Unzip the OpenSourceFoodDemo.zip file to a folder of your choice (c:\OpenSourceFoodDemo)
- Open the SharePoint 2010 Management Shell (Start->Microsoft SharePoint 2010 Products->SharePoint 2010 Management Shell)
- Change directory to the unzip folder (cd c:\OpenSourceFoodDemo)
- Start the PowerShell installation script: .\InstallDemoSite.ps1
- Answer the questions, default values are in most cases ok. A little guidance:
- Question: Give credentials for the account that will be used for the application pool
Answer: use for example same account as used for the application pool of your SharePoint site (lookup in IIS Manager) - Question: Give credentials for the account that will be used for the application pool
Answer: Use same account you are currently logged in with
- Question: Give credentials for the account that will be used for the application pool
The DualLayout demo site is made available through a SharePoint backup and restore created using stsadm. The SharePoint Server 2010 installation must be patched to a level equal or higher to the update level on the SharePoint Server that we used to create the backup.
If you get version errors with respect to the restore check http://technet.microsoft.com/en-us/sharepoint/ff800847.aspx for downloading the latest cumulative update. Don’t forget to make a snapshot before installing the cumulative update if you are using a virtual development environment. I updated one of my development machines to the december cummulative update and never got it working again:-(
Macaw DualLayout for SharePoint 2010 WCM released!
A few months ago I wrote a blog post about the DualLayout component we developed for SharePoint Server 2010 WCM. DualLayout enables advanced web design on SharePoint WCM sites. See the blog post DualLayout - Complete HTML freedom in SharePoint Publishing sites! for background information.
DualLayout if now available for download. Check out DualLayout for SharePoint 2010 WCM and download your fully functional trial copy!
Enjoy the freedom!
PowerShell: dot source scripts into your module
You can create wrapper modules around existing library script files you “dot source” ‘d into your PowerShell 1.0 code by dot sourcing them into your module.
Problem is that from a module your current location is the location of the script that first imported your module.
You can get the location of your module using the PowerShell variable $PSScriptRoot.
So in your module file Xml.mps1 you can do something like:
Write-Host "Module Location: $PSScriptRoot"
. $PSScriptRoot\..\..\..\DotNet2\MastDeploy\MastPowerShellLib\MastDeploy-Logging.ps1
. $PSScriptRoot\..\..\..\DotNet2\MastDeploy\MastPowerShellLib\MastDeploy-DebugTooling.ps1
. $PSScriptRoot\..\..\..\DotNet2\MastDeploy\MastPowerShellLib\MastDeploy-Util-Xml.ps1
Export-ModuleMember -function Xml*
Using this approach you can keep using the “dot source” approach in your PowerShell 1.0 code until you have time to refactor it, and start using modules in your PowerShell 2.0 code which prevents reloading code when the code is already available.
DualLayout - Complete HTML freedom in SharePoint Publishing sites!
Main complaint about SharePoint Publishing is HTML output size and quality. DualLayout to the rescue: complete HTML freedom in all your publishing pages!
In this post I will introduce our approach, in later posts I will go into details on my personal vision on how you could build Internet facing sites on the SharePoint platform, and how DualLayout can help you with that.
How SharePoint Publishing works
But first a little introduction into SharePoint Publishing. SharePoint Publishing has the concept of templates that are used for authoring and displaying information. There are two types of templates:
- master pages
- page layouts
The master page template contains the information that is displayed across multiple page layouts like headers, footers, logo’s and navigation. The master page is used to provide a consistent look and feel to your site.
The page layout template is associated with a content type that determines the set of fields that contain the (meta)data that can be stored, authored and displayed on a page based on the page layout. Within the page layout you can use field controls that are bound to the fields to provide editing and display capabilities for a field.
A page is an instance of a page layout. The master page used by the page is configured by the CustomMasterUrl property of the site a page is part of.
Some images to help describe the concepts:
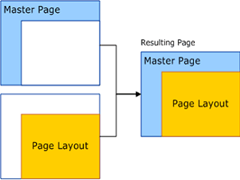
Image 1: Relationship between page instance, master page and page layout (source)
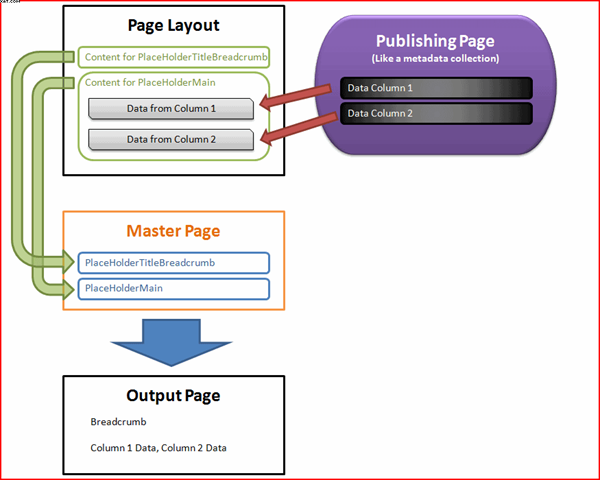
Image 2: Usage of fields in a page layout (source)
The problem
A SharePoint Publishing page can be in edit or display mode. The same SharePoint master page and page layout are used in both the edit mode and display mode. This gives you WYSIWYG editing.
Image 3: A SharePoint Publishing page in WCM edit mode
Image 4: A SharePoint Publishing page in WCM display mode
To be able to use a Publishing page in both editing and display mode there are a few requirements:
- The Publishing master page and page layouts need a minimal set of controls to make it possible to use a page in both edit and display mode. See for example http://startermasterpages.codeplex.com for a minimal Publishing master page which has a size of 25 kb to get you started
- Create a master page that works in both the edit and display mode
- The style sheets (CSS) and JavaScript used in publishing pages must not interfere with the standard styles and master pages used by SharePoint to provide the editing experience. This means that designers of the publishing site need to know how to let their style sheets work together with the SharePoint style sheets like core.css
- The page must use the ASP.NET Single Web Form Postback architecture, otherwise editing stops working
All these requirements are not easy to fulfill if you have to migrate an existing internet site to the SharePoint 2010 Publishing platform, or when you get a new design for your Internet site from a design agency. The people who created the design and site interaction in most cases didn’t design with SharePoint in mind, or they don’t have knowledge of the SharePoint platform.
When you want to make your design work together with the SharePoint styles heet you need a lot of knowledge of SharePoint. Especially with MOSS 2007 people like Heather Salomon became famous for dissecting and documenting the SharePoint CSS files to prevent designers from branding nightmare.
One of the design agencies we work with describe SharePoint as the “hostile environment” where their CSS and JavaScript must live in. If you don’t play exactly by the rules of SharePoint you will see things like:
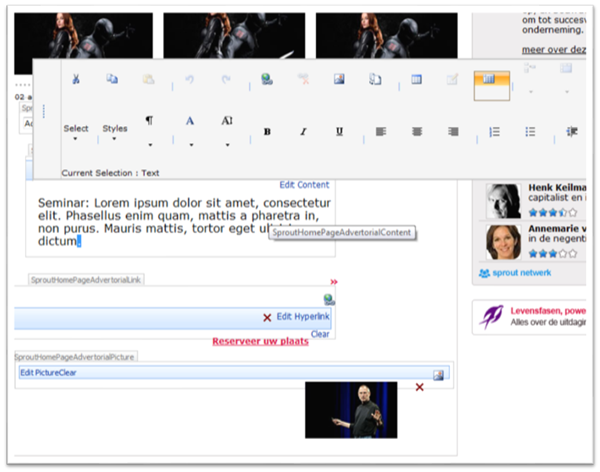
Image 5: SharePoint 2007 usability trouble when the padding and margins of tables are changed
Things got a lot better in SharePoint 2010 with the introduction of the context sensitive Ribbon at the top of the page, instead of editor bars injected into the design. But still many of the same issues remain.

Image 6: The SharePoint 2010 Ribbon
So in my opinion SharePoint Publishing has a few “problems”:
- A lot of SharePoint knowledge is required by visual designers and interaction designers
- Time consuming and complex construction of master pages and page layouts
- Master pages and page layouts get complex in order to keep them working in both edit and display mode
- Issues with upgrades of master pages / page layouts when going to new version of SharePoint
- Large set of required server control that are only used in edit mode, but still “execute” in display mode
- SharePoint pages are large
- SharePoint pages are difficult to get passing W3C validation
- You are stuck with the ASP.NET Single Web Form Postback architecture
Enough about the problems, lets get to the solution!
The Solution
About a year ago we got completely stuck on a huge project. A design agency delivered a great design completely worked out with perfect html, CSS and JavaScript, using progressive enhancement principles. They created everything without knowledge of SharePoint, and without taking SharePoint into account. We did everything we could to get it working on SharePoint: we wrote compensating CSS, custom controls, did tricks to fix id’s as created by ASP.NET, rewrote multiple form tags back to the single ASP.NET form post, but we could not get it working the way they wanted.
We saw two approaches to solve our issues:
- Use SharePoint for web content management and build an ASP.NET MVC site against the SharePoint services to read the data for the site
- Make the SharePoint Publishing beast dance to our tunes
It became a kind of competition within our company which approach would be best, and we managed to do both.
Using ASP.NET MVC works great, but then it isn’t SharePoint. Its just like a custom application that uses data from an external database. Something that is difficult to sell to a company who just decided for very good reasons to go for a unified platform for intranet, extranet and internet. (See also my post Why use SharePoint Publishing for public internet sites?)
But we also managed to do the second which we named DualLayout. We created an approach where we can introduced an additional mode to SharePoint Publishing pages. Besides the SharePoint Publishing WCM mode with it’s edit and display modes, we introduced a view mode. The view mode is a mode that gives you a view-only version of the page where you don’t have to bother about the page going into edit mode, and also don’t need the plumbing to enable your page to go into edit mode.
So now a SharePoint Publishing page can have the following modes:
- SharePoint Publishing WCM Display Mode
The standard SharePoint display mode using the master page and page layout with all the required controls and the field controls rendered in display mode. - SharePoint Publishing WCM Edit Mode
The standard SharePoint edit mode using the master page and page layout with all the required controls and the field controls rendered in edit mode. - SharePoint Publishing View Mode
The additional view, with complete freedom in HTML, no requirements for controls or ASP.NET single web form.
And how is this accomplished? We made it possible to have a master page and page layout for WCM mode (edit, display) and a master page and page layout for view mode (display only). Depending on the mode we display the page with the correct master page and page layout. This gives us complete freedom in designing an end user view separate from a content author / approver view.
The WCM master page and page layout are the domain of the SharePoint specialist. She can go for completely WYSIWYG editing, or use the out of the box v4.master master page to stay as close as possible with the SharePoint look and feel so the content authors recognize the UI from the SharePoint text books.
The View Mode master page and page layout are completely the domain of the web site designer. Any HTML can be used, there is no dependency on core.css of SharePoint JavaScripts. If required the ASP.NET single web form model can be used, for example around a web part zone, but it does not have to be around the complete page, or it can be left out completely.
Below some screenshots of an example I made with DualLayout based on the web site http://opensourcefood.com. In a next post I will go into detail on how I created the example using DualLayout. In this example I use the out of the box v4.master master page for the WCM mode (edit/display) where I give a schematic preview of the content in WCM display mode, and provide guidance for the content author in WCM edit mode. In the view mode I generate the exact HTML as is used in the actual site http://opensourcefood.com, without any compromise.
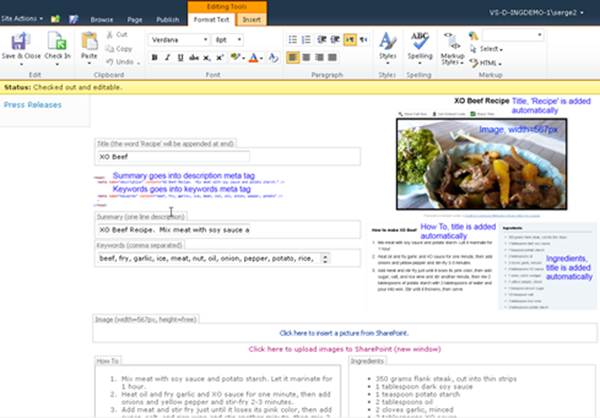
Image 7: OpenSourceFood sample, SharePoint Publishing WCM Edit Mode
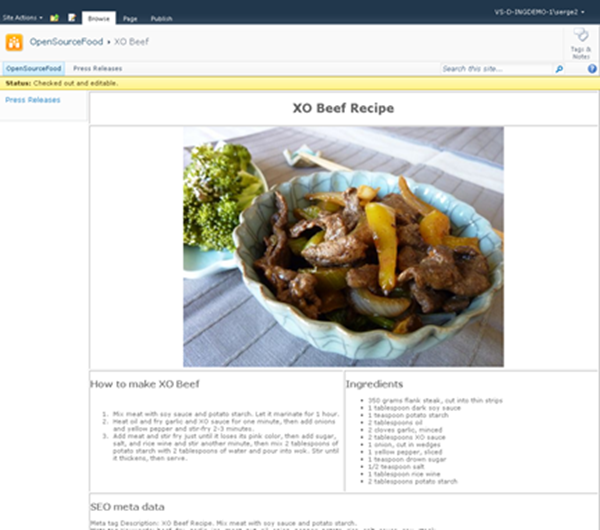
Image 8: OpenSourceFood sample, SharePoint Publishing WCM Display Mode

Image 9: OpenSourceFood sample, SharePoint Publishing View Mode
If you are in the SharePoint Publishing View Mode, and you have the rights to author the page, there is a link that the designer can put in any location on the page to switch to WCM mode. In the zoom below you can see that we created it as a simple link at the top of the page. This link is not visible for the end user of your site.
Image 10: Link in View mode back to WCM Display mode
If you are in WCM Edit mode and want to see a preview of your page in View mode, you can go to the Page tab on the ribbon and select the Preview action:

Image 11: See a preview of page you are currently editing in View mode
If you are in WCM Display mode, you can switch to the View mode using an action in the Site Actions menu:
Conclusion
DualLayout gives you all the freedom you need to build Internet facing web sites on the SharePoint Publishing platform,the way you want, without any restrictions. In the next post I will explain how I created the OpenSourceFood sample. DualLayout works on both MOSS 2007 and SharePoint 2010. I will make a full-featured download available soon so you can try it out yourself. Let me know if you are interested.
Why use SharePoint Publishing for public internet sites?
Is SharePoint the best Web Content Management System you can get? Is it the best platform for your internet sites? Maybe not. There are specialized WCM platforms like Tridion, SiteCore and EPIServer that might be better. But there are many reasons why you would use SharePoint over the many alternatives.
Strategic platform for many organizations – SharePoint is a platform that works great for intranets and extranets. It is often selected as the strategic web platform within an organization. There is a SharePoint unless policy. So why not do the public facing web sites on SharePoint as well?
Unified web platform – In these organizations SharePoint is used as the unified web platform that is used for team, divisional, intranet, extranet, and internet sites. This unified platform promises to reduce cost and increase agility.
With respect to the Internet this vision is also promoted by Microsoft as Microsoft’s Internet Business Vision with focus on IT Control (existing infrastructure, low TCO) and web agility; one platform to rule them all:
See also: Microsoft's Internet Business Platform Vision Part 1, Microsoft's Internet Business Platform Vision Part 2
Reuse of knowledge and people - Unified Development, Unified Infrastructure; the same skills can be reused for development and maintenance.
Existing relationships – the Communication department (focusing on Intranet/Extranet) and the Marketing department (focusing on Internet) are either the same group of people, or working close together.
Support from the community – SharePoint is one of the Microsoft server products with the best community support in blogs, support sites and open source projects. For example on http://codeplex.com you can find 1300 open source projects related to SharePoint, versus for example 27 projects for EPIServer.
SharePoint is a development platform – SharePoint isn’t just an out of the box product, it is a development platform that you can extend at will, like an infinite number of companies already did to provide you with tools for all the (many) gaps that exist in the out of the box SharePoint offering.
---
But if you look at the Internet sites that are built with SharePoint Publishing, some people are a bit disappointed. Microsoft’s classic showcases like http://ferrari.com and http://www.hawaiianair.com deliver pages with 1000+ lines, and 100+ validation errors when you run the W3C validator. But there are also a lot of great sites that use the SharePoint Publishing platform. Have a look at http://www.wssdemo.com/livepivot/ for a nice overview of those sites. In a future post I will describe our approach to delivering quality HTML on the SharePoint Publishing platform. We call this approach DualLayout.
