Archives
-
SharePoint.DesignFactory.ContentFiles–building WCM sites
One of the use cases where we use the SharePoint.DesignFactory.ContentFiles tooling is in building SharePoint Publishing (WCM) solutions for SharePoint 2007, SharePoint 2010 and Office365.
Publishing solutions are often solutions that have one instance, the publishing site (possibly with subsites), that in most cases need to go through DTAP.
If you dissect a publishing site, in most case you have the following findings:
- The publishing site spans a site collection
- The branding of the site is specified in the root site, because:
- Master pages live in the root site (/_catalogs/masterpage)
- Page layouts live in the root site (/_catalogs/masterpage)
- The style library lives in the root site ( /Style Library) and contains images, css, javascript, xslt transformations for your CQWP’s, …
- Preconfigured web parts live in the root site (/_catalogs/wp)
- The root site and subsites contains a document library called Pages (or your language-specific version of it) containing publishing pages using the page layouts and master pages
- The site collection contains content types, fields and lists
When using the SharePoint.DesignFactory.ContentFiles tooling it is very easy to create, test, package and deploy the artifacts that can be uploaded to the SharePoint content database. This can be done in a fast and simple way without the need to create and deploy WSP packages. If we look at the above list of artifacts we can use SharePoint.DesignFactory.ContentFiles for master pages, page layouts, the style library, web part configurations, and initial publishing pages (these are normally made through the SharePoint web UI).
Some artifacts like content types, fields and lists in the above list can NOT be handled by SharePoint.DesignFactory.ContentFiles, because they can’t be uploaded to the SharePoint content database. The good thing is that these artifacts are the artifacts that don’t change that much in the development of a SharePoint Publishing solution. There are however multiple ways to create these artifacts:
- Use paper script: create them manually in each of the environments based on documentation
- Automate the creation of the artifacts using (PowerShell) script
- Develop a WSP package to create these artifacts
I’m not a big fan of the third option (see my blog post Thoughts on building deployable and updatable SharePoint solutions). It is a lot of work to create content types, fields and list definitions using all kind of XML files, and it is not allowed to modify these artifacts when in use. I know… SharePoint 2010 has some content type upgrade possibilities, but I think it is just too cumbersome.
The first option has the problem that content types and fields get ID’s, and that these ID’s must be used by the metadata on for example page layouts. No problem for SharePoint.DesignFactory.ContentFiles, because it supports deploy-time resolving of these ID’s using PowerShell. For example consider the following metadata definition for the page layout contactpage-wcm.aspx.properties.ps1:
Metadata page layout- # This script must return a hashtable @{ name=value; ... } of field name-value pairs
- # for the content file that this script applies to.
- # On deployment to SharePoint, these values are written as fields in the corresponding list item (if any)
- # Note that fields must exist; they can be updated but not created or deleted.
- # This script is called right after the file is deployed to SharePoint.
- # You can use the script parameters and arbitrary PowerShell code to interact with SharePoint.
- # e.g. to calculate properties and values at deployment time.
- param([string]$SourcePath, [string]$RelativeUrl, $Context)
- @{
- "ContentTypeId" = $Context.GetContentTypeID('GeneralPage');
- "MasterPageDescription" = "Cloud Aviator Contact pagelayout (wcm - don't use)";
- "PublishingHidden" = "1";
- "PublishingAssociatedContentType" = $Context.GetAssociatedContentTypeInfo('GeneralPage')
- }
The PowerShell functions GetContentTypeID and GetAssociatedContentTypeInfo can at deploy-time resolve the required information from the server we are deploying to.
I personally prefer the second option: automate creation through PowerShell, because there are PowerShell scripts available to export content types and fields.
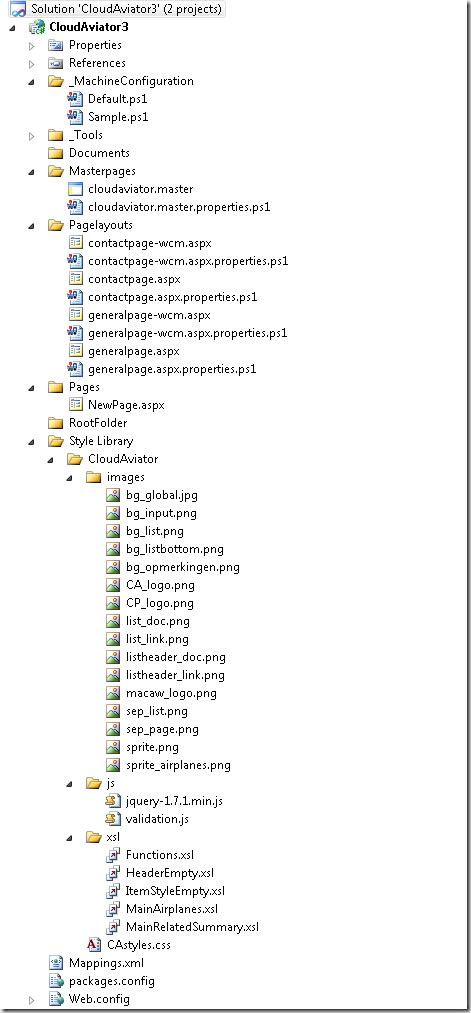
An example project structure for a typical SharePoint WCM site looks like:
Note that this project uses DualLayout.
So if you build Publishing sites using SharePoint, checkout out the completely free SharePoint.DesignFactory.ContentFiles tooling and start flying!
-
SharePoint.DesignFactory.ContentFiles - Installation
The SharePoint.DesignFactory.ContentFiles tooling can be used to develop, test, package and deploy SharePoint files and metadata that can be uploaded to the SharePoint content database. Use this tooling for developing and packaging your master pages, page layouts, style library files, web part configurations and any file you can think of that can be uploaded to the SharePoint content database. Works on SharePoint 2007 (on SharePoint server), SharePoint 2010 (on SharePoint server or remote) and Office365 (remote).
Installation is simple. In this post I will show the steps required to install the SharePoint.DesignFactory.ContentFiles on a Visual studio project.
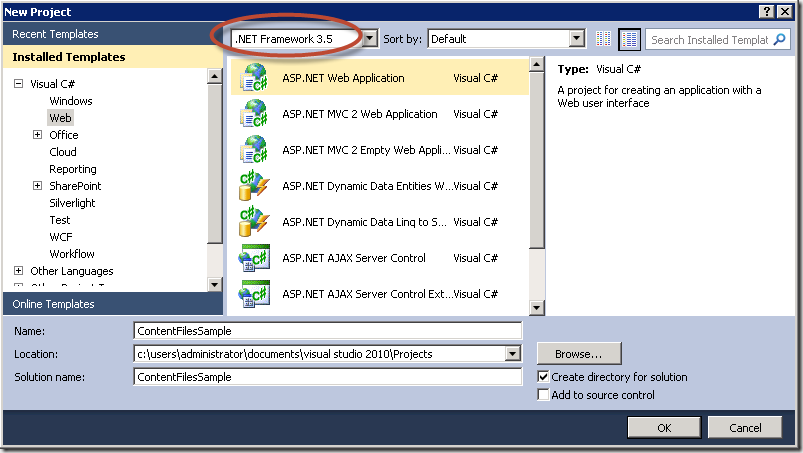
- Fire-up Visual Studio 2010 and create a new project (File > New > Project…)
- Under Installed Templates select Visual C# > Web
- Select the .Net Framework 3.5, then select the ASP.NET Web Application project
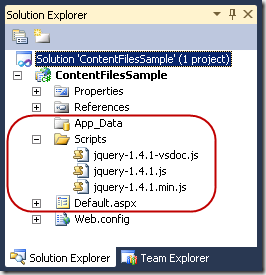
- Note that the resulting project contains all kind of artifacts that are not relevant in the context of a SharePoint.DesignFactory.ContentFiles project:
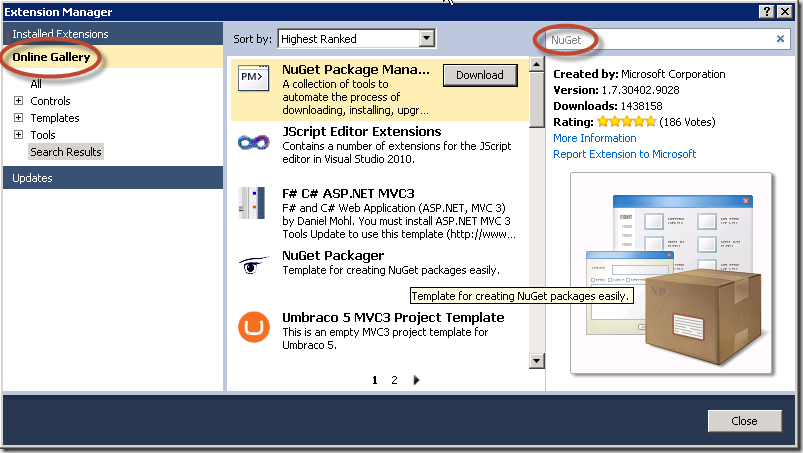
- If NuGet is not installed yet on your Visual Studio (Tools > Library Package Manager is missing), start the Visual Studio Extension Manager (Tools > Extension Manager…). In the Extension Manager window select the Online Gallery at the left and search for NuGet. Select the NuGet Package Manager and press the Download button to install NuGet. Preferably use NuGet 1.7 or up to use all features available in the SharePoint.DesignFactory.ContentFiles NuGet package.
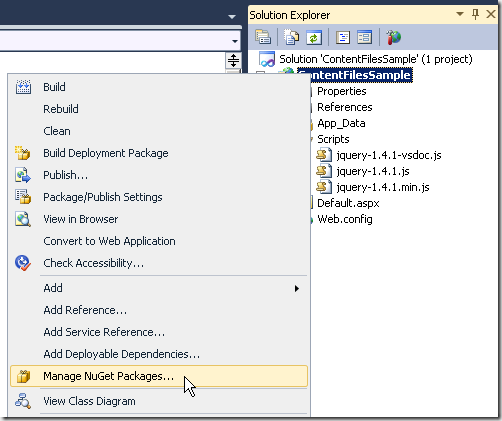
- Right-click on the just created Web Application project and in the context menu select Manage NuGet Packages….
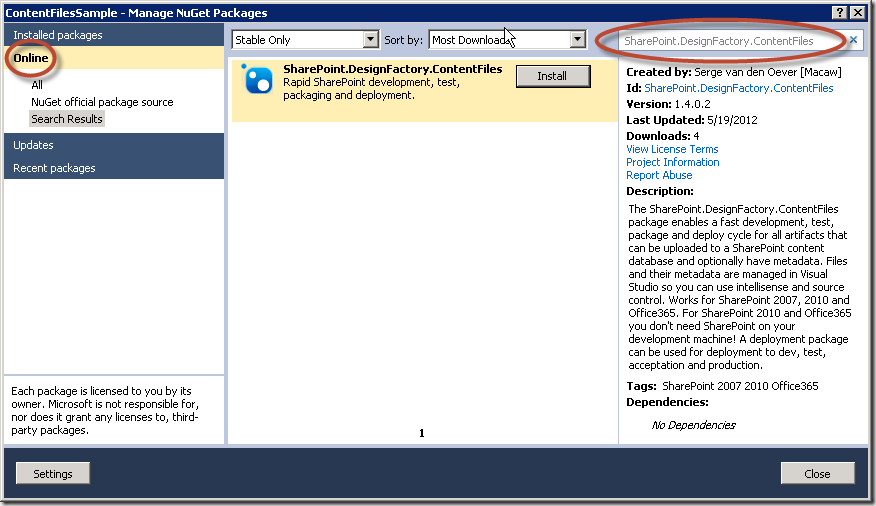
- In the Manage NuGet Packages window select Online at the left and search for SharePoint.DesignFactory.ContentFiles. Select the SharePoint.DesignFactory.ContentFiles package and press the Install button.
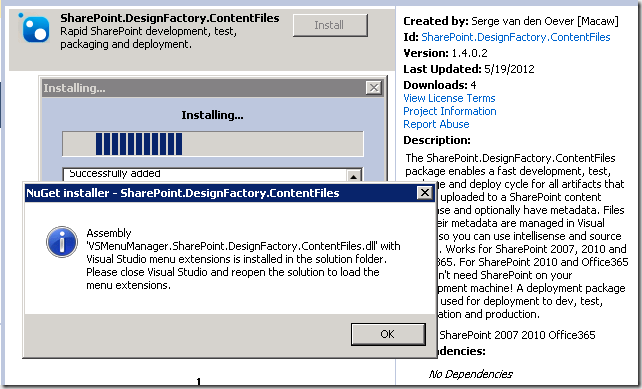
- After installation where a lot of project manipulation magic happens the following message appears. An assembly is installed in the solution folder containing Visual studio Solution Explorer context menu actions that makes working with SharePoint.DesignFactory.ContentFiles even easier. This assembly is magically loaded by a Visual Studio extension called Managed Menu Extension (MME). Although this extension is not required and it is perfectly possible to work without the additional context menu actions, it is advised to install the Managed Menu Extensions (explained in the next step).
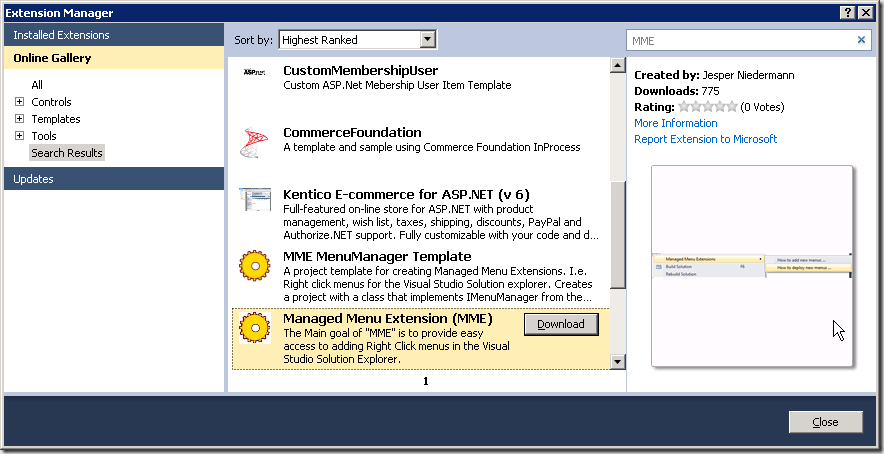
- Install the Managed Menu Extensions (MME) through the Extension Manager (Tools > Extension Manager…). Select Online Gallery and search for MME.
- Visual studio requires a restart for the Managed Menu Extensions to work and the context menu extension for SharePoint.DesignFactory.ContentFiles to work. Close Visual Studio, and reopen Visual Studio with our new solution in one of two ways (First starting Visual Studio and then loading the solution does not load the menu extensions):
- By starting the solution through the start menu
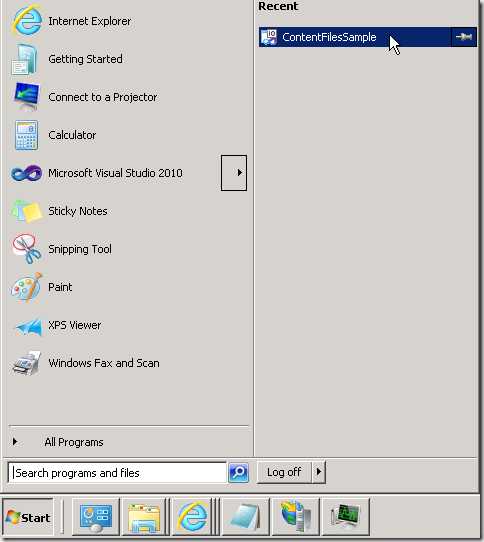
- By double-clicking the solution file in the explorer
- We are done with installation! The project is cleaned up, all unwanted files are removed. You are presented with a readme file explaining some things about the SharePoint.DesignFactory.ContentFiles tooling.
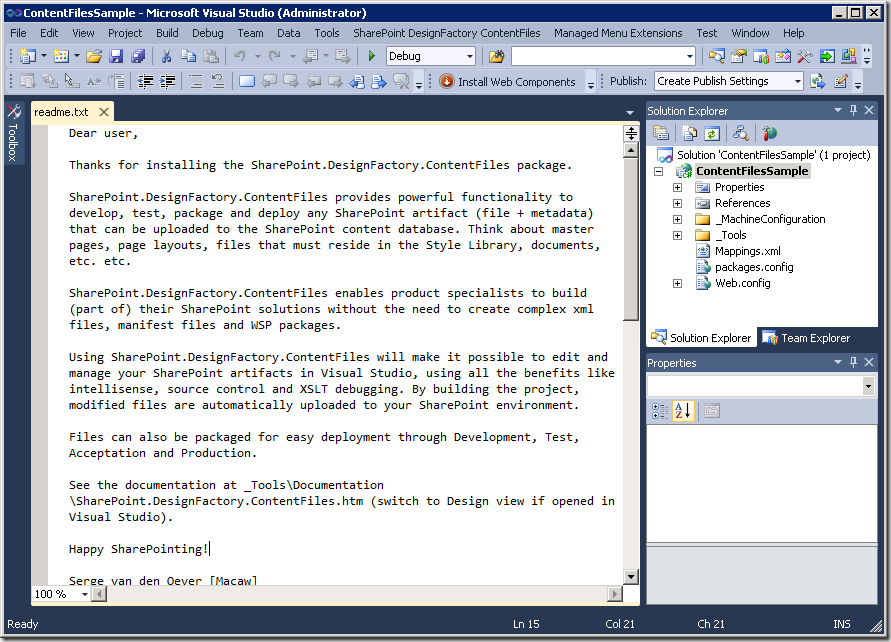
In a next blog post I will give a tour through a SharePoint.DesignFactory.ContentFiles enabled Visual Studio project.
-
Thoughts on building deployable and updatable SharePoint solutions
-
SharePoint.DesignFactory.ContentFiles NuGet package released
Wouldn’t it be great to edit your SharePoint 2007/2010/Office365 content files like master pages, page layouts, web part files, style library files etc. etc. in Visual Studio, use intellisense, source control and the XSLT debugger, but without the overhead of creating complex xml files, manifest files and WSP packages? Wouldn’t it be great if you could package those file and deploy them through Dev, Test, Acceptation and Production without WSP packages? Now you can!
Create an ASP.NET Web Application Project, add the SharePoint.DesignFactory.ContentFiles NuGet package and start building!
See the included documentation for more information. More information will follow on this blog!
-
EULA SharePoint.DesignFactory.ContentFiles
LICENSE AGREEMENT FOR Macaw SharePoint.DesignFactory.ContentFiles
IMPORTANT-READ CAREFULLY: This End User License Agreement (this "LICENSE AGREEMENT") contains the terms and conditions regarding your use of the SOFTWARE (as defined below). This LICENSE AGREEMENT contains material limitations to your rights in that regard. You should read this LICENSE AGREEMENT carefully and treat it as valuable property.
I. This License Agreement.
Software covered by this LICENSE AGREEMENT. This LICENSE AGREEMENT governs your use of the Macaw SharePoint.DesignFactory.ContentFiles software product(s) enclosed or otherwise accompanied herewith (individually and collectively, the "SOFTWARE"). The term "SOFTWARE" includes, to the extent provided by Macaw Nederland B.V.:
1. Any revisions, updates and/or upgrades thereto;
2. Any data, image or executable files, databases, data engines, computer software, or similar items customarily used or distributed with computer software products;
3. Anything in any form whatsoever intended to be used with or in conjunction with the SOFTWARE; and
4. Any associated media, documentation.
This LICENSE AGREEMENT is a Legally Binding Agreement between You and Macaw Nederland B.V..
If you are acting as an agent of a company or another legal person, such as an officer or other employee acting for your employer, then "you" and "your" mean your principal, the entity or other legal person for whom you are acting. However, importantly, even if you are acting as an agent for another, you may still be personally liable for violation of federal and State laws, such as copyright infringement.This LICENSE AGREEMENT is a legally binding agreement between you and Macaw Nederland B.V.. You intend to be legally bound to this LICENSE AGREEMENT to the same extent as if Macaw Nederland B.V. and you physically signed this LICENSE AGREEMENT. By installing, copying, or otherwise using the SOFTWARE, you agree to be bound by the terms and conditions contained in this LICENSE AGREEMENT. If you do not agree to all of the terms and conditions contained in this LICENSE AGREEMENT, you may not install or use the SOFTWARE. If, for whatever reason, installation has begun or has been completed, you should cancel installation or un-install the SOFTWARE, as the case may be. (You may click on the "exit" button or its equivalent to immediately abort installation.) If you do not agree to all of these terms and conditions, then you must promptly return the SOFTWARE to the place of business from which you obtained it in accordance with any return policies of such place of business.
II. YOUR LICENSE TO INSTALL AND TO USE.
This LICENSE AGREEMENT grants you a free license. The license for this version of the SOFTWARE requires no payment by the user to Macaw or any other party. However, Macaw or another party may require the user to purchase the computer media and pay service charges related to providing the SOFTWARE to the user. Because this license is granted to the user for no cost, the user is not entitled to free technical support from Macaw Nederland B.V..
You agree that you will not reverse engineer, decompile or disassemble any portion of the SOFTWARE.
In all cases, you may not use Macaw's name, logo, or trademarks to market your Web Site without the express written consent of Macaw Nederland B.V.; You agree to indemnify, hold harmless, and defend Macaw Nederland B.V., its suppliers and resellers, from and against any claims or lawsuits, including attorney's fees that may arise from the use or distribution of your Web Site; You may use the SOFTWARE only to create Web Sites.
You may use the SOFTWARE to create and deploy packages on SharePoint Servers in both non-commerncial and commercial projects.
III. INTELLECTUAL PROPERTY.
Copyright. You agree that all right, title, and interest in and to the SOFTWARE (including, but not limited to, any images, photographs, animations, video, audio, music, text, and “applets” incorporated into the SOFTWARE), and any copies of the SOFTWARE, and any copyrights and other intellectual properties therein or related thereto are owned exclusively by Macaw Nederland B.V., except to the limited extent that Macaw Nederland B.V.may be the rightful license holder of certain third-party technologies incorporated into the SOFTWARE. The SOFTWARE is protected by copyright laws and international treaty provisions. The SOFTWARE is licensed to you, not sold to you. Macaw Nederland B.V. reserves all rights not otherwise expressly and specifically granted to you in this LICENSE AGREEMENT.
IV. WARRANTIES AND REMEDIES.Macaw Nederland B.V. expressly disclaims any warranty for the software, documentation and anything else provided by Macaw Nederland B.V. hereby and Macaw Nederland B.V. provides the same in “as is” condition without warranty of any kind, either express or implied, including, without limitation, the implied warranties of merchantability or fitness for a particular purpose. The entire risk arising out of use or performance of the software and documentation remains with you.
in no event shall Macaw Nederland B.V. be liable for any damages whatsoever (including, without limitation, damages for loss of business profit, business interruption, loss of business information, or any other pecuniary loss) arising out of the use or inability to use the software, even if Macaw Nederland B.V. has been advised of the possibility of such damages. Because some states/jurisdictions do not allow the exclusion or limitation of liability for consequential or incidental damages in certain cases, the above limitation may not apply to you.
V. MISCELLANEOUS.
Any disputes arising from and/or related to and/or in connection with the LICENSE AGREEMENT, the formation and/or performance thereof as well as these General Terms and Conditions shall in the first instance be dealt with exclusively by the competent court in Amsterdam. However, the Parties may agree in writing that disputes will be settled by means of arbitration in compliance with the Arbitration Regulations of the Foundation for the Settlement of Automation Disputes (SGOA: Stichting Geschillenoplossing Automatisering) in The Hague.
The Parties shall not go to court until they have exerted their best efforts to settle a dispute in mutual consultation.
-
SharePoint.DesignFactory.ContentFiles
Welcome to the landing page of the SharePoint.DesignFactory.ContentFiles NuGet package.
Please see the following blog posts:
Documentation SharePoint.DesignFactory.ContentFiles
About
The DesignFactory.SharePoint.ContentFiles mechanism is designed for deploying SharePoint files with optional meta data to a SharePoint environment. This SharePoint environment can be:
- a local environment, running on the same machine as where you are developing or deploying your content files
- a remote environment, running on either the same machine or a machine that is accessible remotely over http.
In both scenario's the files will end up in the SharePoint content database, as if they were uploaded by hand. This means that files are deployed in another way than if they were deployed using a WSP package using features and modules. Files are deployed as customized files. See Understanding and Creating Customized and Uncustomized Files in Windows SharePoint Services 3.0 for a good article on customized and uncustomized files.
Project structure
A SharePoint.DesignFactory.ContentFiles project has the following strucure:
- ProjectFolder
- _MachineConfiguration - configuration files describing connections to SharePoint web (SPWeb)
- Default.ps1 - configuration file used if there is no specific configuration file for the currenty machine (MACHINE.ps1)
- Machine1.ps1 - machine specific configuration file
- Machine2.ps1 - machine specific configuration file
- SPDesign.ps1 - configuration file for SharePoint web to be used for importing artifacts in project folder if no specific configuration file to use for import is specified [not used yet]
- _Tools
- Deploy.cmd - command for deploying all changed files in project
- Redeploy.cmd - command for deploying all files in project
- Package.cmd - command for packaging the files in the project
- Clean.cmd - command to mark all files in the project for redeployment
- SharePoint.DesignFactory.ContentFiles.ps1 - the script implementing all functionality. Can be called directly as well for more advanced features
- ContextExtensions... - folder containing extension functions that can be used in ObjectModel and ClientObjectModel
- Documentation... - folder containing documentation
- Lib... - folder containing a library of reuseable functions
- MSBuild... - folder containing a SharePoint.DesignFactory.ContentFiles specific MSBuild targets file
- MasterPages - A folder mapped in Mappings.xml for deployment to SharePoint
- MyMaster.master - file to be deployed to SharePoint
- MyMaster.master.properties.ps1 - metadata for the file to be deployed to SharePoint
- ...
- PageLayouts
- ...
- ...
- _MachineConfiguration - configuration files describing connections to SharePoint web (SPWeb)
Some remarks on the above project structure:
- The project structure can be used from any tool that is your favorite HTML editor, like:
- Visual Studio 2010 (lower versions are supported, but not through nuget package installation)
- WebMatrix 2.0 (still in beta, does support nuget package installation)
- ... enter your vaforite web editor here ...
- Visual Studio 2010 has many enhancements for working with SharePoint.DesignFactory.ContentFiles
Mappings.xml
The Mappings.xml file describes a relationship between the project folder and where artifacts in the project folder should be deployed in to SharePoint. The Mappings.xml file looks like:
<ContentFilesMappings xmlns="http://solutionsfactory.macaw.nl/ContentFilesMappings-1.0">
    <Mappings>
        <Mapping projectFolder="RootFolder" destinationFolder="/" />
        <Mapping projectFolder="Documents" destinationFolder="/documents" />
        <Mapping projectFolder="Masterpages" destinationFolder="/_catalogs/masterpage" />
        <Mapping projectFolder="PageLayouts" destinationFolder="/_catalogs/masterpage" />
        <Mapping projectFolder="Style Library" destinationFolder="/Style Library" />
    </Mappings>
</ContentFilesMappings>
A Mapping node describes the mapping from a project folder to a SharePoint folder.
The Mapping node attribute projectFolder':
- refers to a folder within the project
- must be specified
- may not be empty
- may not point to the root folder of the project, only files from subfolders can be uploaded
ProjectFolders for multiple Mapping elements must be disjunct; e.g. valid is:
<Mapping projectFolder="sub1" ... >
<Mapping projectFolder="sub2" ... >
invalid is:
<Mapping projectFolder="sub1" ... >
<Mapping projectFolder="sub1\sub3" ... >
The Mapping node attribute destinationFolder:
- specifies a folder within SharePoint relative to the SharePointWebUrl as specified in the machine configuration file
- must be specified
- may not be empty
- to specify the root folder in 'SharePointWebUrl' specify '/'
If the destination folder does not exist yet it will be created as an SPFolder. Any child folders below the projectFolder will result in corresponding child urls (SPFolders) in the destination folder.
Working with the command-line tools
The following command-line tools are available for performing the simple tasks involved in working with SharePoint.DesignFactory.ContentFiles:
_Tools\deploy [machineconfigurationname]- deploy changed files in the project using configuration MACHINE.ps1, Default.ps1 or specified configuration_Tools\redeploy [machineconfigurationname]- deploy all files in the project using configuration MACHINE.ps1, Default.ps1 or specified configuration_Tools\package- package all files in the project_Tools\clean- mark all files in the project for redeployment
For more advanced actions like deploying or marking for deployment a single file or folder the underlying PowerShell script _Tools\SharePoint.DesignFactory.ContentFiles.ps1 can be used. To see the available parameters open a PowerShell command prompt in the project foder and execute the following command:
get-help _Tools\SharePoint.DesignFactory.ContentFiles.ps1
Open this script file for more details on the available arguments.
Visual Studio 2010 integration
There is extensive integration with the Visual Studio 2010 IDE if SharePoint.DesignFactory.ContentFiles is installed as a NuGet package:
- Create a new ASP.NET 3.5 Web Application project - File -> New -> Project..; Select .NET Framework 3.5; Select template Visual C# -> Web -> ASP.NET Web Application
- Ensure that the Macaw NuGet repository is accessible:
- Open Tools -> Library Package Manager -> Package Manager Settings
- Go to Package Manager -> Package Source
- Add source: Name = Macaw NuGet, Source = http://nuget.macaw.nl/nuget
- Add the SharePoint.DesignFactory.ContentFiles NuGet package to the project and solution:
- Open Tools -> Library Package Manager -> Manage NuGet Packages for Solution...
- Select Online and the source Macaw NuGet
- Now select the SharePoint.DesignFactory.ContentFiles package and hit Install. Add the package at both the project and solution level.
Right click menus
The SharePoint.DesignFactory.ContentFiles NuGet package adds right click menu entries if the Managed Menu Extension (MME) is installed. These extension can be installed through the Visual Studio 2010 UI:
- Open Tools -> Extension Manager..
- Select Online
- Search for managed Menu Extension (MME)
- Select managed Menu Extension (MME) and hit Install
Close and reopen the Visual Studio 2010 instance containing your project to get the right click menu's loaded.
The following right click actions are now added:
On SharePoint.DesignFactory.ContentFiles project:
- DesignFactory -> Deploy changed files
- DesignFactory -> Deploy all files
- DesignFactory -> Mark all files for deploy
- DesignFactory -> Package
- DesignFactory -> Documentation ContentFiles
On mapped folder (folder in project mapped to SharePoint folder with Mappings.xml):
- DesignFactory -> Deploy changed files in folder
- DesignFactory -> Deploy all files in folder
- DesignFactory -> Mark folder for deploy
- DesignFactory -> Documentation ContentFiles
On mapped file (file in folder in project that is mapped to SharePoint folder with Mappings.xml): - DesignFactory -> Deploy file - DesignFactory -> Deploy all files in folder - DesignFactory -> Mark file for deploy - DesignFactory -> Documentation ContentFiles
Configurations
The SharePoint.DesignFactory.ContentFiles NuGet package adds the following configurations to the project and to the solution, besides the Debug and Release configurations:
- Deploy: build project in Debug mode, and deploy changed content files
- Redeploy: build project in Debug mode, and deploy all content files
- Package: build project in Release mode, and build package
The following action is also supported when you right-click on a project:
- Clean: marks all files in the project for redeployment, default project clean action is executed
Select a configuration and build the project/solution. The configurations correspond with the command-line commands.
It is also possible to add additional configurations using the Visual Studio Configuration dropdown, with at the end Configuration Manager.... In this way the following additional deployment commands can be added:
- Deploy machineconfigurationname, i.e. Deploy Office365
- Redeploy machineconfigurationname, i.e. Redeploy Office365
Note that a solution configuration builds projects with a specific configuration. This works fine after installation of the NuGet package. If the SharePoint.DesignFactory.ContentFiles package is uninstalled and installed again, the solution configurations are not aligned anymore to the project configurations. To align again open the Configuration dropdown, and select at the end Configuration Manager.... Now align solution configurations with project configurations.
Machine configuration files
A machine configuration file is used to describe how to deploy the current project to SharePoint. The machine configuration file describes a deployment to a local machine (SP2007/SP2010) or a remote machine (SP2010). Deployment to the local machine can be done using the ObjectModel or the ClientObjectModel. Deployment to a remote machine is done with the ClientObjectModel. A machine configuration file is:
- Located in the folder MachineConfiguration in the project folder
- Named after the machine name, i.e.
MYMACHINE.ps1for the default deployment (Deploy.cmd,Redeploy.cmd) OR - Named as wanted. Requires explicit deployment, i.e.
Deploy NAME,Redeploy NAME. - The machine configuration file
Default.ps1will be used for deployment if no machine specific configuration file exists - TODO: The machine configuration file
SPDesign.ps1will be used for importing SharePoint artifacts if no explicit configuration file is specified
This machine configuration file is executed as a PowerShell script and returns a Hashtable with the following keys:
- SharePointDeployment - MANDATORY
- ObjectModel (on server itself, SP2007/SP2010)
- ClientObjectModel (remote, SP2010)
If ObjectModel is used for deployment, sharepoint is accessed with the credentials of the current user (integrated security).
- SharePointWebUrl - MANDATORY
- Example: 'http://myserver/sites/mysitecollection'
Url to the SharePoint web site where the content files must be deployed to. In most cases this is the root site of a site collection, but it can be any SharePoint site. The content files in the package can only be deployed to locations within the specified site.
- UserName - OPTIONAL
- 'DOMAIN\UserName'
User name to authenticate with. Must be in the format DOMAIN\UserName. If not specified check if the credentials to authenticate for the SharePointWebUrl are specified in the Windows Credential Manager.
- Password - OPTIONAL
- 'MyPassword'
Password to authenticate with.
- UseClaims - OPTIONAL
- $true or $false
Boolean that specifies if authentication should be done using claims authentication. This is for example the case for Office365. Note that claims-based authentication for now only works with SharePointDeployment set to ClientObjectModel.
Authentication is done as follows:
- If SharePointDeployment is set to ObjectModel
- Always use integrated security (credentials of currently logged in user)
- If SharePointDeployment is set to ClientObjectModel
- If UserName,Password is specified and not empty, use these
- Otherwise use the credentials specified in the Windows Credential Manager for Url SharePointWebUrl
- If no credentials found --> error.
Using these key,value pairs multiple authentication approaches can be taken:
Integrated security:
@{
    SharePointDeployment = 'ObjectModel';
    SharePointWebUrl = 'http://myserver/sites/mysitecollection';
    UserName = '';
    Password = '';
    UseClaims = $false;
}
Integrated security (as short as possible):
@{
    SharePointDeployment = 'ObjectModel';
    SharePointWebUrl = 'http://myserver/sites/mysitecollection';
}
Explicit authentication (ClientObjectModel deployment only):
@{
    SharePointDeployment = 'ClientObjectModel';
    SharePointWebUrl = 'http://myserver/sites/mysitecollection';
    UserName = 'DOMAIN\UserName';
    Password = 'Password';
    UseClaims = $false;
}
Explicit authentication (ClientObjectModel deployment only), but user name and password configured in Windows Credential Manager:
@{
    SharePointDeployment = 'ClientObjectModel';
    SharePointWebUrl = 'http://myserver/sites/mysitecollection';
    UseClaims = $false;
}
Explicit claims-based authentication (ClientObjectModel deployment only):
@{
    SharePointDeployment = 'ClientObjectModel';
    SharePointWebUrl = 'http://myserver/sites/mysitecollection';
    UserName = 'DOMAIN\UserName';
    Password = 'Password';
    UseClaims = $true;
}
Explicit claims-based authentication (ClientObjectModel deployment only), but user name and password configured in Windows Credential Manager:
@{
    SharePointDeployment = 'ObjectModel';
    SharePointWebUrl = 'http://myserver/sites/mysitecollection';
    UseClaims = $true;
}
How files are marked for deployment
The Archive atribute is used to mark files for deployment. if the Archive attribute is set, the file must be deployed. After a file is successfully deployed the Archive attribute is cleared. The Archive attribute can also be set on read-only files.
There is a case where the Archive attribute is fooled. If a file that is under TFS source control is reverted to an older version, the file should be deployed again. On Revert the Archive attribute is not set, so the file will not be deployed, although it has been updated (to an older version).
In case of reverting from TFS source control, mark the specific file or folder for deployment.
NuGet package installation
When the NuGet package is installed in Visual studio the following actions are performed:
- Add the configurations Deploy, Redeploy and Package to the project and to the solution
- Add import of targets file SharePoint.DesignFactory.ContentFiles.targets in the project file to provide handling of building the configurations Deploy, Redeploy and Package, and a target Package for automating packaging
- Remove the folders App_Data, Scripts and Default.aspx from the project if it is a web project
- Copy assembly VSMenuManager.SharePoint.DesignFactory.ContentFiles.dll to the solution folder for right click menu extensions (requires restart of Visual Studio to be picked up)
This tool is copyright 2012, Macaw.
