Walkthrough: Wizard control in ASP.Net
In this article I am going to explain about the ASP.Net Wizard control and how you can use it in your application. When there are large forms, the wizard control is a useful tool that helps the end user to fill the form quiet easily. When you have large forms, it is a better approach to split the forms to various steps. In this article I am going to demonstrate how ASP.Net wizard control can be applied to multi-step form application. I am using ASP.Net 4.0 with Visual Studio 2010 for this demonstration.
For the purpose of demonstration, I am going to build a form that contains the following steps
Step 1: A welcome page, usually the first step gives an introduction to the form and filling instructions. For the purpose of this demonstration, I just enter some sample text there.
Step 2: A page that collects personnel information such as name and gender, based on the selection the user will be redirected to either step 3 or step 4.
Step 3: User will enter wife name here
Step 4: User will enter husband name here
Step 5: All the selection will be displayed here
Step 6: Data will be saved and display thank you message.
These steps are simple and I am sure in real time you will not get chance to do simple stuff like this. But for the purpose of demonstration I believe this is more than enough.
I created an ASP.Net web application and added a wizardSample.aspx page to it. In the Visual Studio toolbox, you can see wizard control under the standard tab.
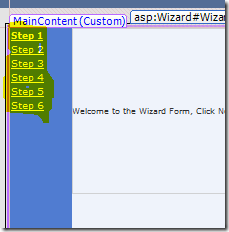
Drag and drop the Wizard to the page. The default view of the Wizard control in the designer surface is as follows.
Drag the control with the necessary width and height. Now in the designer, click on the Step1, now in the right side area (as marked in the below image) you can add the content for the selected step, in our case step1.
I entered some content for Step 1. The Designer surface looks as follows.
Let us run the project. The output in the browser is as follows.
Now let us add all the 6 steps to the wizard. We already have 2, so need to add 4 more. From the design mode, you can see the arrow at right top of the wizard.
Click on the arrow at the right top, the smart navigation will appear. Click on Add or remove wizard steps from the list.
Now visual studio will bring wizard collection editor. You can add, remove and modify the wizard steps using this editor.
Click on the Add button to add a new wizard step to the wizard. Normally you need to add a proper title and select a StepType here.
Click OK once you are done. Use the same steps to add three more steps to the wizard. For the last step, I selected Finish as the Step Type.
Now I am going to format my wizard control. Click on the Smart Tag arrow and select Auto format.
By default wizard control comes with 4 styles. I have chosen classic as my style. This is a great option as with out much effort you will get a standard wizard theme.
Also if you want to remove the selected formatting, just use “Remove formatting Option” in the auto format dialog.
Now Let us add other steps as mentioned. Select step 2 in the design surface of Visual studio. In the step 2 I need to collect the name and gender from the user. I have placed the Textbox control and radio button list in the step 2. Also I placed required field validator for both. So user cannot go to next step without entering the values. Once added all the controls, my design surface looks as follows.
Now based on the gender selection we need to send the user to either step 3 or step 4. You need to add the event handler for the Next button. Here you need to note one thing, the previous, next etc. buttons are common for all wizard steps. So in the event handler you need to check whether you are in step 2, then check the radio button list selected value and set the appropriate step as the active step.
To define the event handler, Click on the Wizard and in the properties Window, select the events.
You can enter a name in the right column on NextButtonClick, or simply double click; Visual Studio will create a default method name. The default method created is as follows
Write the following code in the method.
if (Wizard1.ActiveStepIndex == 1)
{
if (rdoGender.SelectedValue == "Male")
{
Wizard1.ActiveStepIndex = 2;
}
else
{
Wizard1.ActiveStepIndex = 3;
}
}
else if (Wizard1.ActiveStepIndex == 2)
{
Wizard1.ActiveStepIndex = 4;
}
I believe the code is self-explanatory. If male is selected, it will redirect the user to the Third Step (i.e. with index 2) otherwise to step 4. Once the user clicks next from the step 3, the user will be navigated to step 5.
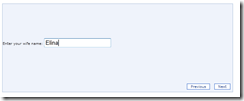
In the Design Surface, Click on the Step 3 add a label and textbox control to the content area. The design of Step 3 in Visual studio is as follows.
The design for Step 4 is as follows.
Now in step 5, I am going to show all data back to the user. I placed some labels in the step. I need to load the control values; this can be done in the Step activation event handler. To write event handler for step activation, you can perform the following steps.
From Visual studio, go to the source view of your page and locate the wizard step 5.
Now in the <asp:WizardStep, you can find OnActivate event ,
See the code in Visual Studio for Wizard Step 5
I have entered the following code In the Step5_Activate event handler. The code looks as follows
In the Step 6, I have entered some Thank you message for the user. Now user can navigate to steps either by the button or by the left navigation menu.
Since I want the user to navigate to each step by using the button, I am going to disable the left navigation links. In the Visual Studio designer, select the Wizard control. In the properties window, see the DisplaySideBar property and set it to false
Now you are ready to test your code. See the screenshot of steps.
Wizard is a useful tool for developers that can be used to split complex forms in to multiple steps. The user can fill the form step by step. In each step the validation can be performed. Using this developer can hide the complexity of the form from the end user.


