CI Deployments To IIS VIA MS Web Deploy 2.0
Now that I have my source code being checked into GitHub and have TeamCity doing automatic builds (and running tests), I thought it was about time to take the last big step and automatically deploy the latest version of an application to a live site (either for testing or just straight to production, it’s up to you) whenever a successful build has taken place.
The best resource I’ve found for deploying directly from TeamCity (note: the steps would be the same for any CI server) can be found in Troy Hunt’s excellent 5 part blog series here: http://www.troyhunt.com/2010/11/you-deploying-it-wrong-teamcity.html. It is very comprehensive and well worth a read, but I had some issues configuring deployment permissions and wanted to detail them here in case it helps someone else down the road.
An Overview Of the CI Deployment Process
Here’s a basic idea of how to get started—if you’ve ever used the Visual Studio 2010 “Publish” wizard then you are 1/2 way there. If you have any questions on these steps, refer to the blog series mentioned above or Google with Bing for help.
- Install Microsoft Web Deploy 2.0 from http://www.iis.net/download/webdeploy on the server you wish to publish to.
- Setup Web.Config transformations for your desired build configurations (see http://msdn.microsoft.com/en-us/library/dd465318.aspx)
- Inside Visual Studio, right click –> properties on your Web project, and under Package/Publish Web setup the IIS Web Application name to match your IIS server
- This is the virtual directory inside IIS that your deployment will be pushed to. Set it up for each desired build configuration.
- Setup Permissions on your IIS Server to allow web deployment from your CI agent or service account (detailed below).
- Craft an MSBuild command that will build AND deploy your web application, and run it during your CI Server build process (also detailed below).
Deploying Via MSBuild
That last point requires a bit of explanation as it’s the crux of the problem (other than permissions, which I’ll get to later). What we want MSBuild to do here is to build your project/solution using the desired build configuration (like Debug/Release) and then to use the MS Web Deploy service to push your auto-created deployment package to IIS. Here’s an example of MSBuild parameters from Troy’s blog that will accomplish this:
/P:Configuration=%env.Configuration%
/P:DeployOnBuild=True
/P:DeployTarget=MSDeployPublish
/P:MsDeployServiceUrl=https://%env.TargetServer%/MsDeploy.axd
/P:AllowUntrustedCertificate=True
/P:MSDeployPublishMethod=WMSvc
/P:CreatePackageOnPublish=True
/P:UserName=AutoDeploy\Administrator
/P:Password=Passw0rd
Basically the above parameters use the provided env.Configuration (Debug/Release) to set the build configuration and then tell MSBulid to deploy using WMSvc (web management service) to the service url located at env.TargetServer (you can set the defaults on your CI server).
This is pretty handy, but I unfortunately for me (and maybe for you) there are two problems here:
#1: The user (AutoDeploy\Administrator) needs to be an admin on your IIS, and you need to have allowed Administrators to bypass rules in the “Management Service Delegation” area of IIS (see ScottGu’s post here: http://weblogs.asp.net/scottgu/archive/2010/09/13/automating-deployment-with-microsoft-web-deploy.aspx). For me, this is too much by itself.
#2: The username and password as passed in plain text through your configuration, as shown above. Not good.
The rest of this post will detail how to solve these issues, and in the end we will setup an service account that has non-admin access and which doesn’t require passing credentials manually.
Setting Up the Service Account
The first step is to create a non-admin service account that will be used on both your build server and IIS boxes. I’ll be using a no-login domain account called “mydomain\builderservice”, but any account would work.
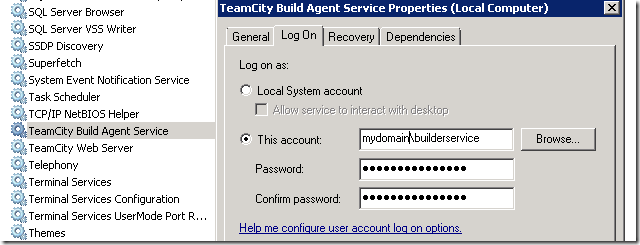
On your CI server (in my case, TeamCity), you’ll want to run your build agent as your new service account, as shown here:
Note you might also have to give this service access to certain files. For example, in TeamCity the build agent needs access to C:\TeamCity\buildAgent to do its work.
Changing the MSBuild Script to Run As “Current User”
This part was fairly tricky since simply removing the UserName/Password parameters from the msbuild command will not work as expected. Instead you must specify the AuthType to be NTLM (or it will default to Basic) and the UserName=[blank] so it will impersonate the current user. The relevant parameters are /P:UserName= /P:AuthType=NTLM. This makes the final MSBuild parameters:
/P:Configuration=%env.Configuration%
/P:DeployOnBuild=True
/P:DeployTarget=MSDeployPublish
/P:MsDeployServiceUrl=https://%env.TargetServer%/MsDeploy.axd
/P:AllowUntrustedCertificate=True
/P:MsDeployPublishMethod=WMSvc
/P:CreatePackageOnPublish=True
/P:UserName=
/P:AuthType=NTLM
Now that we have TeamCity running MSBuild with these parameters while running under a service account, we need to grant permission on the IIS server that has MS Deploy installed (%env.TargetServer%).
IIS Server Permission For Deployment
Your mileage may vary, but in order to get a successful web deployment from a non-administrator account, I had to perform the following steps, each of which I will explain in detail.
- Enable Windows Authentication for the Web Management Server (WMSvc)
- Grant Management Service Delegation rights at the Site level to the necessary providers
- Grant IIS Manager Permissions to your virtual application
- Grant file/folder permissions to the web directory
#1: Enable Windows Authentication for the Web Management Server (WMSvc)
In order to get the WMSvc to accept my build agent credentials, I had to enable Windows Authentication inside the IIS Management Service. You can do this either from the UI or Windows Registry as described in this stackoverflow post. For convenience, here is the regex key (make sure to restart the WMSvc after making the change): ‘reg add HKLM\Software\Microsoft\WebManagement\Server /v WindowsAuthenticationEnabled /t REG_DWORD /d 1’
#2: Grant Management Service Delegation rights at the Site level to the necessary providers
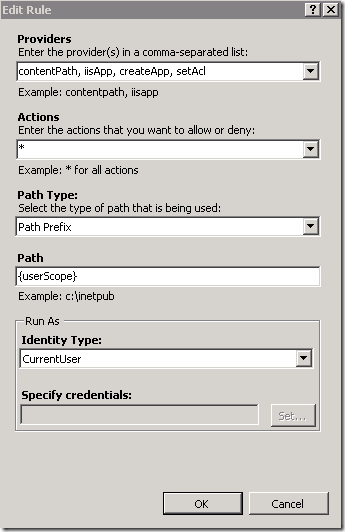
Next you must Delegate to your service account the rights to perform certain actions through the management service providers. If you forget any of these you will get a helpful error message saying that you don’t have rights to run a certain provider (ex: “createApp”) so you’d then need to come back in and add those. I needed the following providers: “contentPath, iisApp, createApp, setAcl.”
To set a delegation rule go to your site root in IIS and under Management choose “Management Service Delegation.” Now choose “Add Rule” in the upper-right and choose the “Deploy Applications with Content” template (this has the best defaults) and then add in your desired providers. Mine looked like this:
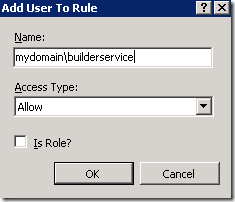
Click ok, and now that the rule is defined you just have to select the newly created rule and choose “Add User To Role.” In the ensuing dialog enter the name of your service account and press OK.
#3: Grant IIS Manager Permissions to your virtual application
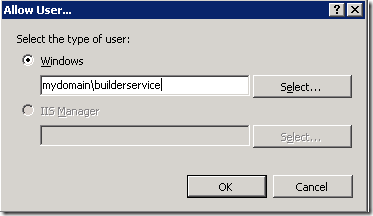
Now that you granted site-level provider access within the {userScope} path, you must give the account IIS permission on the site/application that you will be deploying to. Choose your site and then under Management choose “IIS Manager Permissions.” Now click “Allow User” and enter the account name again to grant access.
#4: Grant file/folder permissions to the web directory
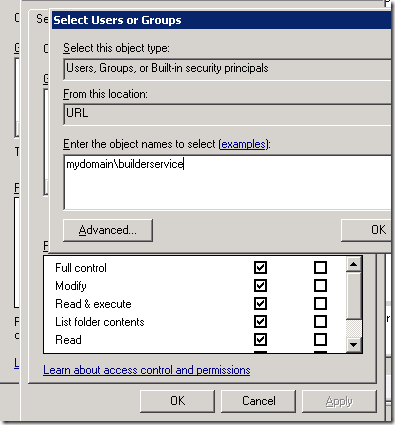
This one is pretty obvious, but you still have to remember to give full control to your service account at the OS-folder level (ex: C:\inetpub\SiteName). Right-click –> Properties –> Security –> Edit, and then choose Add. Now type in your service account one more time, grant it full control, and you are finished.
Celebrate!
That was certainly a lot of info, and I hope it makes someone’s deployment configuration easier. Integrating your build, test, and deployments with a CI Server like TeamCity has many advantages, including the ability to handle “deploy automatically only when all tests pass” and “oops, deploy the version from last week” scenarios.
May all your Deployments be green.
Enjoy!
