Configuring web application to utilise ASP.NET Application Services database
In my article Install ASP.NET Application Services database step by step guide is provided to install ASP.NET Application Services database regard less of SQL Server version. Installing / configuring Application services database allows multiple applications to utilise the database to implement application authentication and authorization.
After installation of services database, it is required to configure ASP.NET application to utilise the ASP.NET Services database(called as Membership database as well).
I come across multiple number of repeating postings at www.asp.net/forums with exceptions when post holders try to utilise ASP.NET application services database to authenticate or authorise end users. Common exceptions noted are ‘sql exceptions’ or ‘Invalid end user credentials when tried to use Login control’ or similar exception.
The reason behind most of these exceptions are not configuring web application to utilise SQL Server installed ASP.NET Application Services database. When responding to those repeating postings on asp.net forums i decided to write an article explaining this process instead of repeating the same info multiple times.
This article explains step by step process of configuring ASP.NET Web application to utilise SQL Server installed ASP.NET Application Services database.
- Copying and configuring connection String
- Copying and configuring Membership, Roles and Profile sections
- Using ASP.NET Web application Configuration tool to choose providers
Hope you find it helpful.
Step 1
Copying and configuring connection String
Note that configuration settings in Web.config file are inherited from machine.config file on your machine. In order to configure web application to utilise Application Services database it is required to copy related sections from machine.config file, which is located at
C:\windows\Microsoft.NET\Framework\v2.0.50727\CONFIG
NB:- Make sure that you are not making any changes to your machine.config file.
To Do:- Copy connection string from machine.config file as shown below.
<connectionStrings>
	<add name="LocalSqlServer"
	connectionString="data source=.\SQLEXPRESS;
	Integrated Security=SSPI;
	AttachDBFilename=|DataDirectory|aspnetdb.mdf;
	User Instance=true"
	providerName="System.Data.SqlClient"/>
</connectionStrings>
To Do:- Paste above connection string from machine.config into Web.config and
change required properties as shown below.
<add name="<Connection String Name>"
connectionString="Server=<SQL Server NAME>;
Database=<ASP.NET Application services Database NAME>;
User ID=<user ID>;
Password=<password>"
providerName="System.Data.SqlClient"
/>
Step 2
Copying and configuring Membership, Roles and Profile sections
Note that depending on your application requirements you need either or combination
or all of these three sections.
- Membership
- Roles
- Profile
To Do:- Copy Membership, Roles and Profile sections from machine.config into Web.config and configure required properties.
<membership>
	<providers>

	<add name="AspNetSqlMembershipProvider"
type="System.Web.Security.SqlMembershipProvider, System.Web, Version=2.0.0.0, Culture=neutral, PublicKeyToken=b03f5f7f11d50a3a" connectionStringName="LocalSqlServer" enablePasswordRetrieval="false" enablePasswordReset="true" requiresQuestionAndAnswer="true" applicationName="/" requiresUniqueEmail="false" passwordFormat="Hashed" maxInvalidPasswordAttempts="5" minRequiredPasswordLength="7" minRequiredNonalphanumericCharacters="1" passwordAttemptWindow="10" passwordStrengthRegularExpression=""/> </providers> </membership> <profile> <providers> <add name="AspNetSqlProfileProvider" connectionStringName="LocalSqlServer" applicationName="/" type="System.Web.Profile.SqlProfileProvider, System.Web, Version=2.0.0.0, Culture=neutral,PublicKeyToken=b03f5f7f11d50a3a"/> </providers> </profile> <roleManager> <providers> <add name="AspNetSqlRoleProvider" connectionStringName="LocalSqlServer" applicationName="/" type="System.Web.Security.SqlRoleProvider, System.Web, Version=2.0.0.0, Culture=neutral,PublicKeyToken=b03f5f7f11d50a3a"/> </providers> </roleManager>To Do:- After copying above sections into Web.config, make sure you modifyminimum required attributes such as name, connectionStringName andApplicationName
- Note that depending on your application requirements you may modify other attributes mostly in Membership section.
After modifying minimum attributes in Membership, Roles and Profile sections, these sections looks similar as shown below.
<membership defaultProvider="AspNetMembershipProvider"> <providers> <add connectionStringName="<AspNetServices Connectionstring Name from connectionstrings section" enablePasswordRetrieval="false" enablePasswordReset="true" requiresQuestionAndAnswer="true" applicationName="<WEB APP NAME>" requiresUniqueEmail="false" passwordFormat="Clear" maxInvalidPasswordAttempts="5" minRequiredPasswordLength="7" minRequiredNonalphanumericCharacters="0" passwordAttemptWindow="10" passwordStrengthRegularExpression="" name="AspNetMembershipProvider"type="System.Web.Security.SqlMembershipProvider, System.Web, Version=2.0.0.0, Culture=neutral,PublicKeyToken=b03f5f7f11d50a3a"/> </providers> </membership> <roleManager enabled="true" defaultProvider="AspNetRoleProvider"> <providers> <add connectionStringName="<AspNetServices Connectionstring Name from connectionstrings section" applicationName="<ASP.NET application NAME>" name="AspNetRoleProvider" type="System.Web.Security.SqlRoleProvider, System.Web, Version=2.0.0.0, Culture=neutral,PublicKeyToken=b03f5f7f11d50a3a"/> </providers> </roleManager> <profile> <providers> <add name="<ProfileProvider Name>" connectionStringName="<From above connectionStirngs section that is pointing to Servies database>" applicationName="/<Your ASP.NET app Name>" type="System.Web.Profile.SqlProfileProvider, System.Web, Version=2.0.0.0, Culture=neutral,PublicKeyToken=b03f5f7f11d50a3a"/> </providers> </profile>NB:- Make sure that application Name property is set at all the time assuggested by Scott Guthrie here
Step 3
Using ASP.NET Web application Configuration tool to choose providers
After adding and modifying required sections as explained above, save your Web.config and configure your web application to utilise ASP.NET Application Services Database as explained below.
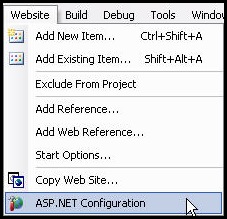
To Do:- Start ASP.NET Configuration tool from Website menu (shown below). Note that ASP.NET configuration tool can be initiated from Solution Explorer menu as well.
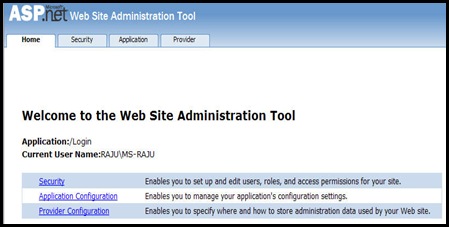
Selecting ASP.NET Configuration opens Web Site Administration Tool in browser.
To Do:-Select Provider Configuration hyperlink as shown below.
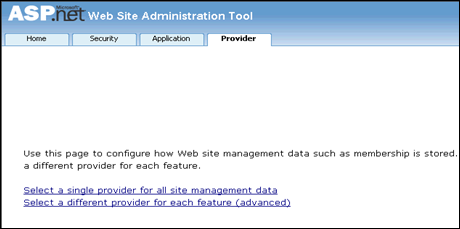
Selecting Provider Configuration navigates to Provider page where you can choose either Single provider or different provider for each feature as shown below.
-
To Do:- You can choose either of the above options available. For this tutorial choosing ‘Select a different provider each feature’ option. By doing so each providercan choose different data sources.
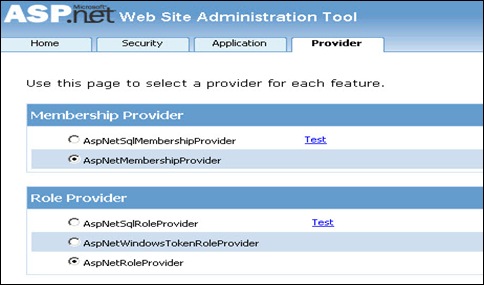
Selecting Select a different provider for each feature (advanced) hyperlink navigates to next page where you can select a provider for each feature as shown below.
On this screen you can see provider name(from provider section), choose a provider
for each feature i.e., Membership, Roles and Profile and select Ok.
Thats it. You are ready to fly! Configuration is done.
-
Testing:- In order to make sure your ASP.NET application services database is configured to be used by web application, you can create a new user by selecting Security tab with in Web Site Administration tool, then Create User hyperlink. After creating the user make sure that you see the same information in ASP.NET Application Services database aspnet_Users
References


