Consuming OData from Windows Phone7
Hi,
In this article I want to show you quickly how easy, funny and powerful is to consume OData services in Windows Phone 7.
I am going to take this article from Microsoft as reference, adding screenshots and comments about the process.
So, in order to write your first Windows Phone 7 application that consumes OData, you may want to follow the following steps:
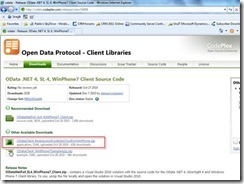
1. Download Windows Phone 7 OData Client libraries.
http://go.microsoft.com/fwlink/?LinkId=207900
The OData client library for Windows Phone generates HTTP requests to a data service that supports OData and transforms the entries in the response feed into objects on the client. Using this client, you can bind Windows Phone controls, such as ListBox or TextBox, to an instance of a DataServiceCollection class that contains an OData data feed. This class handles the events raised by the controls to keep the DataServiceContext class synchronized with changes that are made to data in the controls. For more information about using the OData protocol with Windows Phone applications, see Open Data Protocol (OData) Overview for Windows Phone.
Pasted from <http://msdn.microsoft.com/en-us/library/gg521145(v=vs.92).aspx>
2. Create a new Windows Phone application. In Solution Explorer, right-click the Solution, point to Add, and then select New Project.
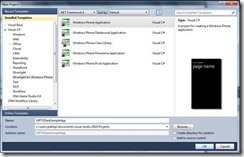
3. In the Add New Project dialog box, select Silverlight for Windows Phone from the Installed Templates pane, and then select the Windows Phone Application template. Write a name for the project (e.g. 'WP7ODataSampleApp')
4. Click OK. This creates the application for Silverlight.
5. Generate the proxy classes by running the command datasvcutil.exe included in the OData client libraries ZIP.
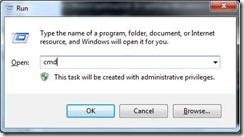
Go to Start->Run
Write 'cmd' and press Enter
Within the console, move to the directory where you have downloaded the OData client libraries.
For instance, '> cd D:\pablop\Documents\WP7\odata client libraries'
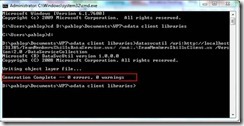
Then, run the datasvcutil.exe in order to generate the local proxy for the exposed OData services.
For the purposes of this article we are going to use the Northwind public OData services, exposed at the following Url: http://services.odata.org/Northwind/Northwind.svc
(you can take this as an example and actually use whatever OData service you have access to)
Take the following command line as reference to generate the proxy:
datasvcutil /uri:http://services.odata.org/Northwind/Northwind.svc/ /out:.\NorthwindModel.cs /Version:2.0 /DataServiceCollection
You can check the generated proxy class file by running a 'dir *.cs' command, like shown below:
6. Move the generated file to the directory where the WP7 solution is located. You can do that just with Windows Explorer.
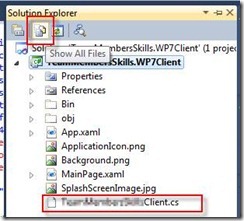
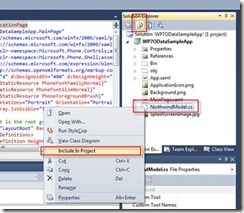
7. Add the file by selecting it from Project -> Add Existing item … or just by clicking on 'Show All Files' in Solution Explorer, right clicking then on the new .cs file and choosing 'Include in Project'
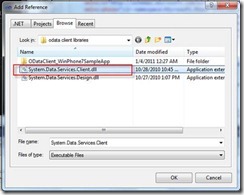
8. Add a reference in the project to the System.Data.Services.Client.dll included in the OData Client library ZIP.
9. In the project, double-click the MainPage.xaml file.
Add the following attributes to your phone:PhoneApplicationPage node:
xmlns:my="clr-namespace:NorthwindModel"
d:DataContext="{d:DesignInstance Type=my:Customer, CreateList=True}"
Loaded="PhoneApplicationPage_Loaded">
Take the following xaml as a reference:
<phone:PhoneApplicationPage
x:Class="ODataNorthwindPhone.MainPage"
xmlns="http://schemas.microsoft.com/winfx/2006/xaml/presentation"
xmlns:x="http://schemas.microsoft.com/winfx/2006/xaml"
xmlns:phone="clr-namespace:Microsoft.Phone.Controls;assembly=Microsoft.Phone"
xmlns:shell="clr-namespace:Microsoft.Phone.Shell;assembly=Microsoft.Phone"
xmlns:d="http://schemas.microsoft.com/expression/blend/2008"
xmlns:mc="http://schemas.openxmlformats.org/markup-compatibility/2006"
xmlns:my="clr-namespace:NorthwindModel"
mc:Ignorable="d" d:DesignWidth="480" d:DesignHeight="768"
d:DataContext="{d:DesignInstance Type=my:Customer, CreateList=True}"
FontFamily="{StaticResource PhoneFontFamilyNormal}"
FontSize="{StaticResource PhoneFontSizeNormal}"
Foreground="{StaticResource PhoneForegroundBrush}"
SupportedOrientations="Portrait" Orientation="Portrait"
shell:SystemTray.IsVisible="True" Loaded="PhoneApplicationPage_Loaded">
<Grid x:Name="LayoutRoot" Background="Transparent">
<Grid.RowDefinitions>
<RowDefinition Height="Auto"/>
<RowDefinition Height="*"/>
</Grid.RowDefinitions>
<StackPanel x:Name="TitlePanel" Grid.Row="0" Margin="12,17,0,28">
<TextBlock x:Name="ApplicationTitle" Text="Northwind Sales"
Style="{StaticResource PhoneTextNormalStyle}"/>
<TextBlock x:Name="PageTitle" Text="Customers" Margin="9,-7,0,0"
Style="{StaticResource PhoneTextTitle1Style}"/>
</StackPanel>
<Grid x:Name="ContentPanel" Grid.Row="1" Margin="12,0,12,0">
<ListBox x:Name="MainListBox" Margin="0,0,-12,0" ItemsSource="{Binding}">
<ListBox.ItemTemplate>
<DataTemplate>
<StackPanel Margin="0,0,0,17" Width="432">
<TextBlock Text="{Binding Path=CompanyName}" TextWrapping="NoWrap"
Style="{StaticResource PhoneTextExtraLargeStyle}"/>
<TextBlock Text="{Binding Path=ContactName}" TextWrapping="NoWrap"
Margin="12,-6,12,0" Style="{StaticResource PhoneTextSubtleStyle}"/>
<TextBlock Text="{Binding Path=Phone}" TextWrapping="NoWrap" Margin="12,-6,12,0"
Style="{StaticResource PhoneTextSubtleStyle}"/>
</StackPanel>
</DataTemplate>
</ListBox.ItemTemplate>
</ListBox>
</Grid>
</Grid>
</phone:PhoneApplicationPage>
The 'd:DataContext' line above allows to create data bindings at design time for a data context that is assigned at run time. This way you will be able to see sample data within the Silverlight Visual Designer in Visual Studio and Expression Blend. Obviously this line is not required but recommended :).
10. Replace ContentPanel grid with something like this:
<Grid x:Name="ContentPanel" Grid.Row="1" Margin="12,0,12,0">
<ListBox x:Name="MainListBox" Margin="0,0,-12,0" ItemsSource="{Binding}">
<ListBox.ItemTemplate>
<DataTemplate>
<StackPanel Margin="0,0,0,17" Width="432">
<TextBlock Text="{Binding Path=CompanyName}" TextWrapping="NoWrap"
Style="{StaticResource PhoneTextExtraLargeStyle}"/>
<TextBlock Text="{Binding Path=ContactName}" TextWrapping="NoWrap"
Margin="12,-6,12,0" Style="{StaticResource PhoneTextSubtleStyle}"/>
<TextBlock Text="{Binding Path=Phone}" TextWrapping="NoWrap" Margin="12,-6,12,0"
Style="{StaticResource PhoneTextSubtleStyle}"/>
</StackPanel>
</DataTemplate>
</ListBox.ItemTemplate>
</ListBox>
</Grid>
11. Open MainPage.xml and add the following namespaces:
using System.Data.Services.Client;
using NorthwindModel;
12. Add the following declarations to the MainPage class:
private DataServiceContext northwind;
private readonly Uri northwindUri =
new Uri("http://services.odata.org/Northwind/Northwind.svc/");
private DataServiceCollection<Customer> customers;
private readonly Uri customersFeed = new Uri("/Customers", UriKind.Relative);
13. Add the following PhoneApplicationPage_Loaded method to the MainPage class:
private void PhoneApplicationPage_Loaded(object sender, RoutedEventArgs e)
{
// Initialize the context and the binding collection
northwind = new DataServiceContext(northwindUri);
customers = new DataServiceCollection<Customer>(northwind);
// Register for the LoadCompleted event.
customers.LoadCompleted
+= new EventHandler<LoadCompletedEventArgs>(customers_LoadCompleted);
// Load the customers feed by using the URI.
customers.LoadAsync(customersFeed);
}
The above code initializes the binding collection and registers the method 'customers_LoadCompleted' (to be created on next step) to be called when collection has been loaded.
Remember that in Silverlight, all data must be retrieved asynchronously.
14. Now, let's handle the LoadCompleted event by adding the customers_LoadCompleted method. Take the following code as reference:
void customers_LoadCompleted(object sender, LoadCompletedEventArgs e)
{
if (e.Error == null)
{
// Handling for a paged data feed.
if (customers.Continuation != null)
{
// Automatically load the next page.
customers.LoadNextPartialSetAsync();
}
else
{
// Set the data context of the listbox control to the sample data.
this.LayoutRoot.DataContext = customers;
}
}
else
{
MessageBox.Show(string.Format("An error has occurred: {0}", e.Error.Message));
}
}
When the LoadCompleted event is handled, the following operations are performed if the request returns successfully:
o The LoadNextPartialSetAsync method of the DataServiceCollection object is called to load subsequent results pages, as long as the Continuation property of the DataServiceCollection object returns a value.
o The collection of loaded Customer objects is bound to the DataContext property of the element that is the master binding object for all controls in the page.
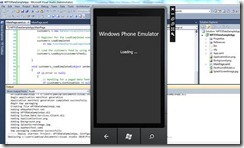
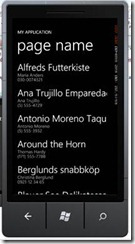
o Now, we are ready to test our first WP7 OData sample application. Just press F5 and wait for the emulator to be loaded and run our app. (this typically takes several secs)
16. As shown above, the main page is retrieving customers from OData.
Hope you find this article useful in order to start to play and/or build robust solutions on top of OData and Windows Phone 7, two extremely powerful platforms. Better together, for sure! :)
PP.
