Creating Hello World With Silverlight
I finally have to embrace Silverlight as my team decided to use silver in building part of our community site. I had been trying to avoid Silverlight since 1.0 version, feeling that my Ajax skills and asp.net concepts would be all I need to do my daily activities. But with the upcoming release of Silverlight which supports .net runtime, world is changing over. We no longer have to program in JavaScript and can be comfortable writing code in our domain specific language such as C# or Vb.net. Today, I decided to begin my journey to learn Silverlight. The best way to learn any technology is to create a hello world application. Below is a step by step tutorial to create a hello world application.
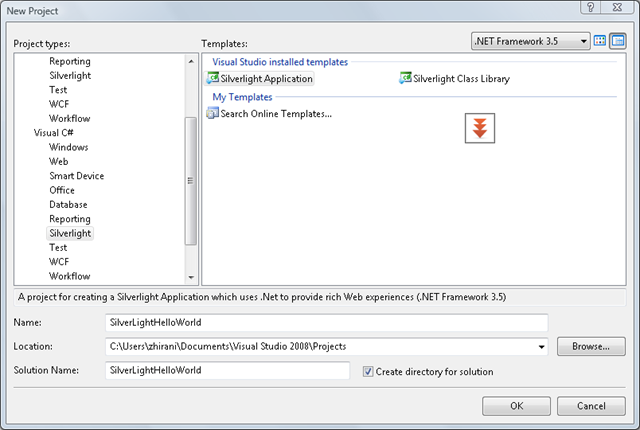
To get started go to File New Project and create a new Silverlight project.
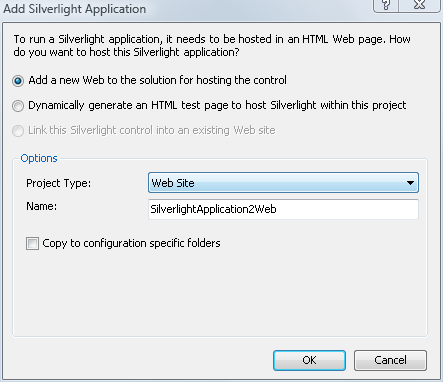
On clicking ok you are asked if you would like to create a Web application to test the Silverlight application. You also have the option to just create a simple html page to host the Silverlight application. If you want more flexibility and easier debugger experience, you would be better of creating either a website or web application project. For this blog posting, I will choose creating a website project to host my Silverlight application as shown in the screenshot below.
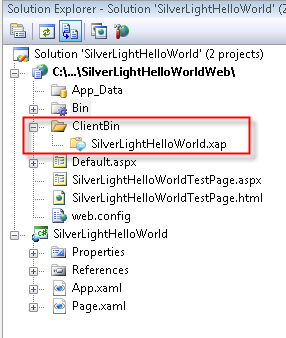
On Clicking Ok you get two projects, one is the website project and other one is the Silverlight application. WebSite project references the Silverlight application and on building the Silverlight application, the Silverlight application gets copied over into the ClientBin folder of the WebSite project in the form of xap extension.
To get started with creating my hello world app, I modify my page.XML file in my Silverlight application as follows.
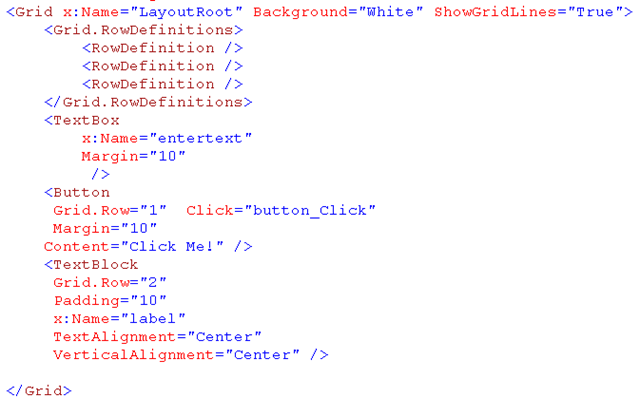
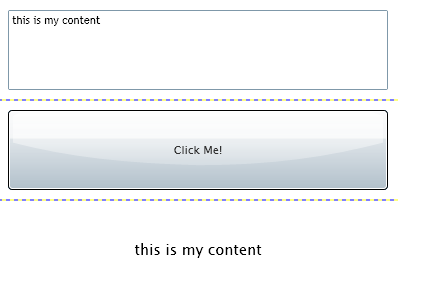
In the above screenshot, I have a simple grid which has 3 rows. By declaring 3 RowDefinations, I get a grid which has 3 rows. First row in the grid has a textbox. We are not specifying which row the textblock belongs to because by default first content belongs to first row in the grid. I am also assigning the name to the textbox, so I can reference the textbox in the code behind. TextBox is followed by a Button. I am registering a click event handler with the button so that when you click the button I am taking the text put in the textbox and setting it to the label that I have created in the third row of the grid. I am creating the label by declaring a TextBlock in the third row of the grid by setting Grid.Rows equal to 2. I am also creating some margins around the textblock following by horizontally and vertically centering the content in the center of the row of grid. Below figure shows the code behind that is wired to the click event of the button that gets the value from the textbox and assign it to label's text property.

When you run the application, and enter some text in the textbox and on clicking the Click Me button, the text is copied into our label. Below figure shows how our final output looks like.