DotNetStories


In this post I will article shows you how to build a simple web application in ASP.NET MVC 6 & Entity Framework 7 using ASP.NET 5-ASP.Net Core.
I will also demonstrate some new concepts in ASP.Net 5.0 and highlight important changes.
If you are new to ASP.Net 5.0 and MVC 6.0 then please have a look at this introductory post of mine, here.
If you want to learn ASP.Ne 5.0 by video there is a great introductory course by Scott Hanselman in this link.
You can developer ASP.Net 5.0 applications without Visual Studio and outside Windows. I will use Visual Studio 2015 in this post.Any edition will work.
To those people who do not have access to Visual Studio 2015, please note that Visual Studio 2015 has a community edition which is available for free.Please check the licensing of this edition though
You can download it here. You also need to download ASP.Net 5.0.
Please note that ASP.NET 5 is not included in the installation of Visual Studio 2015. This will probably change in the fucture.
Before diving into our hands-on example, I would like to highlight the fact that ASP.NET 5.0 has been renamed to ASP.Net Core 1.0.
ASP.NET 5 is significantly different than other versions of ASP.NET. It has been rebuilt from scratch. It is open source, lightweight and cross-platform.
Let's start with our own hands-on example. It will be a simple CRUD Application that creates projects and maps employees to them.
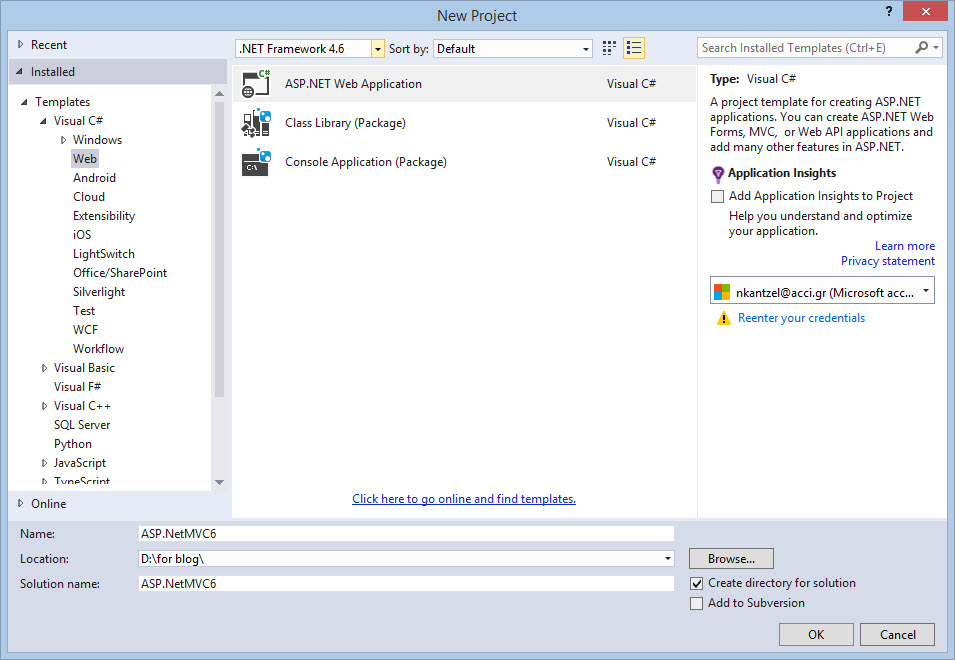
1) Launch Visual Studio 2015 and create a new ASP.NET Application, name it as ASP.NetMVC6. Have a look a the picture below.
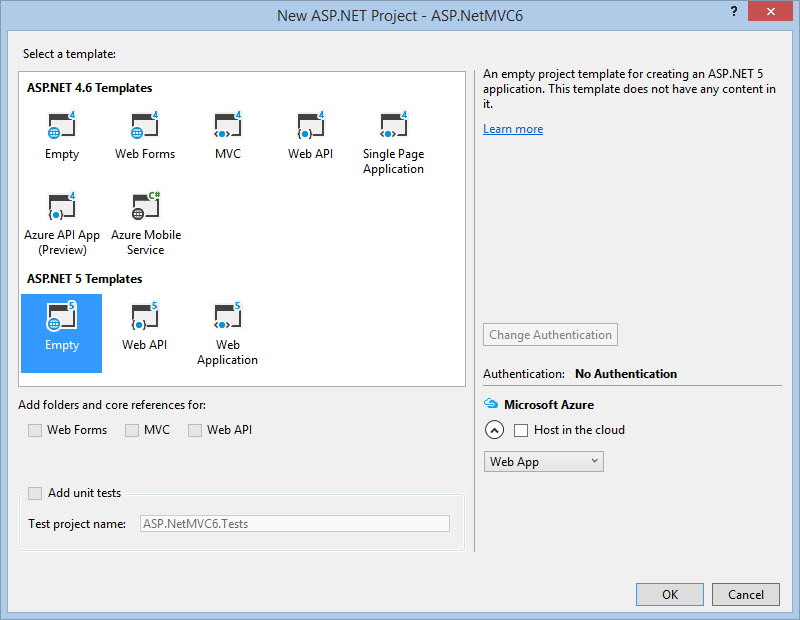
2) Click on Ok and in the next window select Empty from ASP.NET 5 Templates as shown in the following image.
3) After creating the project, the project structure will be as shown in the following image
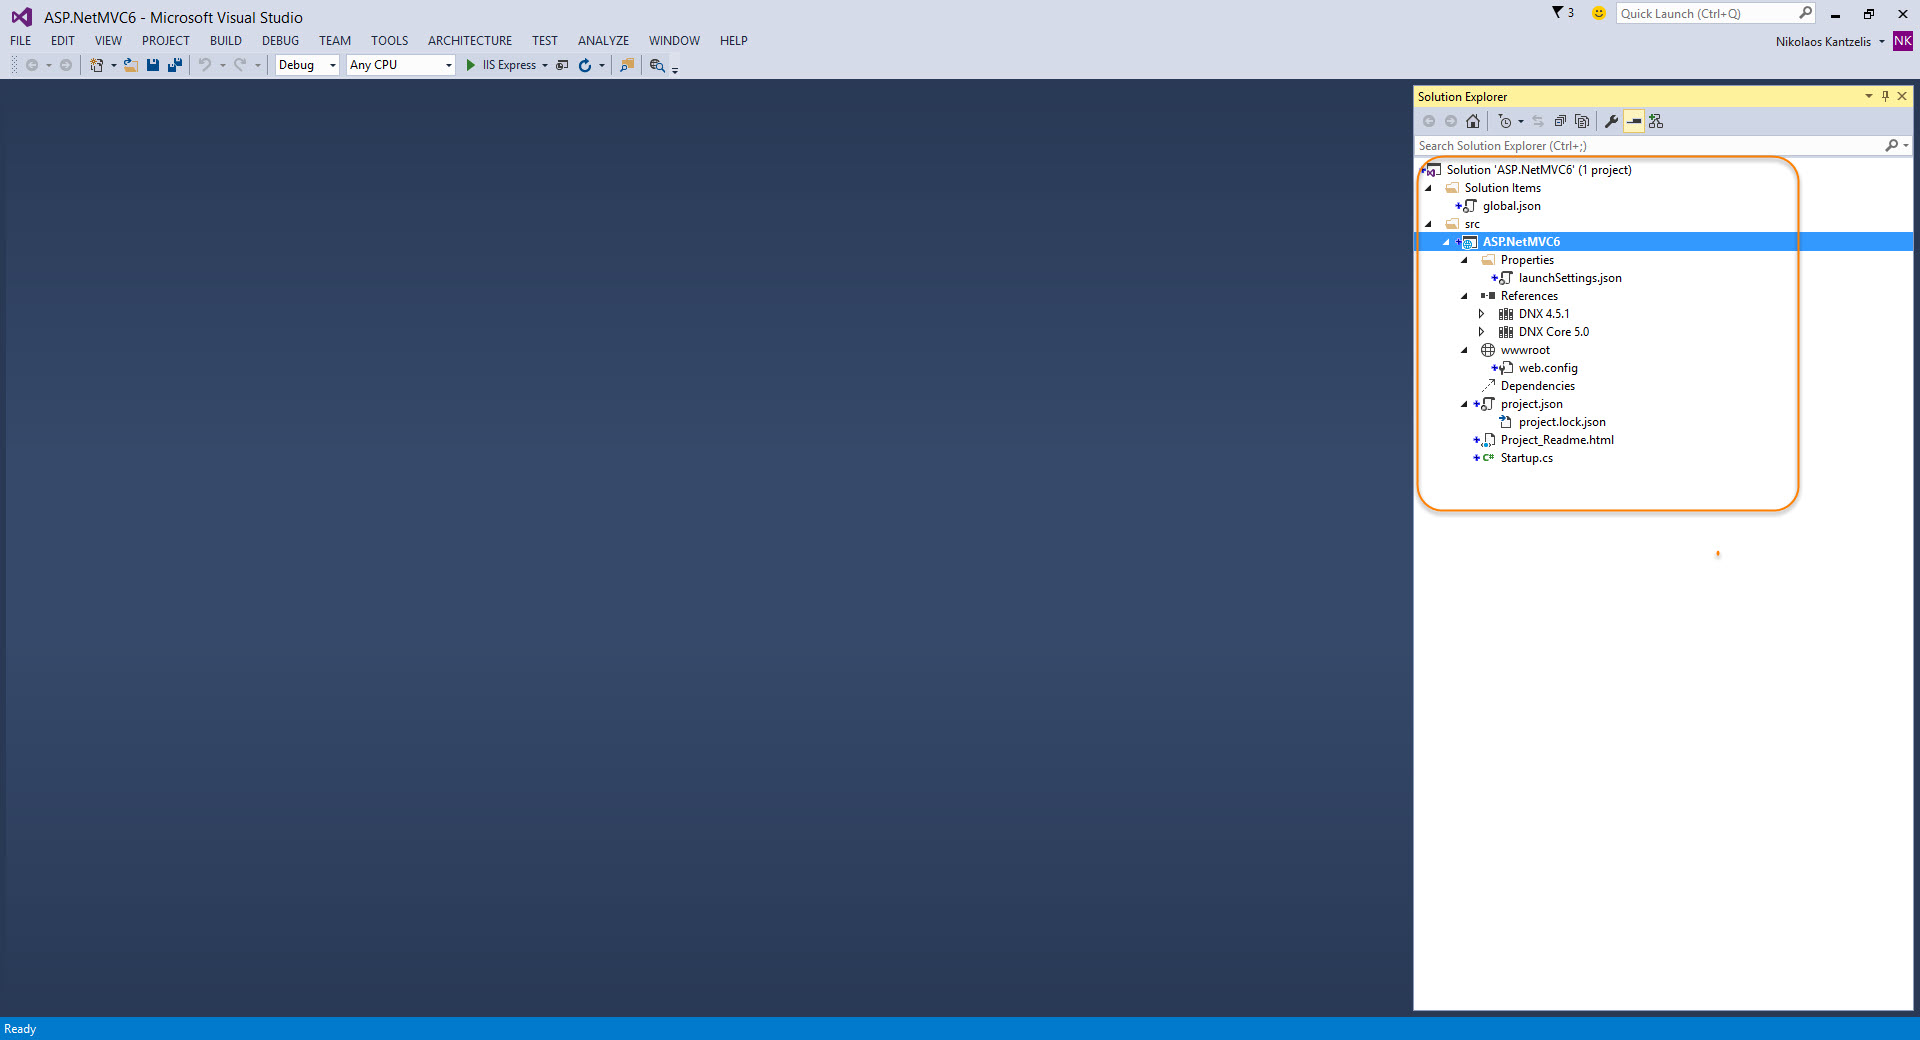
4) Before explaining the various files in the new Solution structure (very different from Solution structures in previous ASP.Net versions) DNX is the .Net execution environment ASP.NET 5 uses. This runtime environment has everything to build and run .NET Apps on Windows, Mac and Linux. The project shows necessary references for the project.
Under Solution Items, there is a file called global.json. Open this file and you will see a projects setting that mentions src, for source, and test.
These are instructions for DNX, which is responsible for executing our application.
This section in global.json instructs the DNX to go look for projects in the listed subfolders src and test.
DNX relies on the global.json configuration file. Also in the file is the SDK version which explicitly configures this solution to work with a particular version of the DNX, in my case is "1.0.0-rc1-update1". You can also see the Solution DNX SDK version if you right-click on the project and choose Properties.
5) Project.json is used to configure all dependent reference assemblies for the application. This file provides intellisense for assemblies and their versions so that we can select a necessary reference for developing application.
If you right-click on the project and view all files in the File Explorer then you can see the csproj file is not there anymore. Visual Studio now uses an xproj file together with project.json. Have a look at the picture below
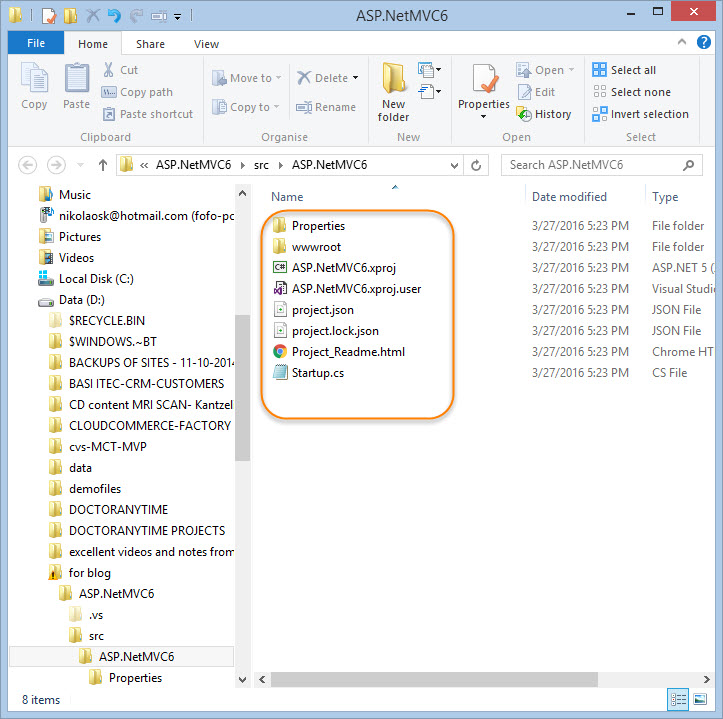
Project.json is used as the configuration file, but this time for the project instead of the solution.
6) Another big change that catches the eye is the wwwroot folder.Folder wwwroot is the actual server root. Only the files that are in wwwroot are accessible by the browser and served by the server.
We keep all our configurations in files like global.json and project.json outside of wwwroot so they can never be accessed in the browser.
Folder wwwroot contains front-end resources like CSS, JavaScript libraries, images, etc.
Dependencies is about client-side development. It allows you to configure the dependencies for the project like loading external JavaScript library like jQuery, Knockout.js, Bootstrap, etc. and using Bower and npm tools.
We all use Nuget to manage various packages that we need for our various applications.
We use it to install Entity Framework and a client side library like JQuery.
In ASP.Net 5.0 we should use NuGet for packages that are related to ASP.NET framework.
In ASP.Net 5.0 as far client-side packages is concerned we should use Bower.
Bower is just a client-side package manager that is fully supported from within Visual Studio.
Through Grunt developers can minify javascript files,compile LESS and Sass files into CSS, do code validation, run javascript unit tests.
Project.json is used to configure all dependent reference assemblies for the application. This file provides intellisense for assemblies and their versions so that we can select a necessary reference for developing application.Open this file in VS. You will see something like this.
{
"version": "1.0.0-*",
"compilationOptions": {
"emitEntryPoint": true
},
"dependencies": {
"Microsoft.AspNet.IISPlatformHandler": "1.0.0-rc1-final",
"Microsoft.AspNet.Server.Kestrel": "1.0.0-rc1-final"
},
"commands": {
"web": "Microsoft.AspNet.Server.Kestrel"
},
"frameworks": {
"dnx451": { },
"dnxcore50": { }
},
"exclude": [
"wwwroot",
"node_modules"
],
"publishExclude": [
"**.user",
"**.vspscc"
]
}
Project.json along with the project's xproj file is the replacement for the csproj file.
You will notice that the xproj file is a specific Visual Studio config file. DNX doesn't need it to execute your project.
Project.json contains the metadata of your project. One can specify the version, the title of the application.There is intellisense in this file.
In versions of ASP.NET prior to 5, the system.web assembly took care of starting the app, and the global.asax file had methods that were called by system.web in which you could provide custom logic.
7) Startup.cs is an entry point for the application. This file is used to define the environment for the application, e.g. Using MVC, EntityFramework, etc.
The steps needed to start up an application are now determined by the Startup class. There is no global.asax file.
The Startup class contains a Main method and when DNX executes the application, it looks for this method and calls it.
The DNX hosting environment will by call two methods first ConfigureServices and then Configure.
The purpose of the ConfigureServices method is to configure dependency injection. Dependency injection is integral part of ASP.NET. The dependency injection uses an IoC container.
The concept of Dependency Injection is really simple. Types,classes when the applications starts up are registered in the container. You can think of these types as services. We usually want to create instances of classes from other classes. That is not so good when we develop large scale applications.
Now that our classes/services are registered with the containter, we ask the container for an instance of those registered classes/services.
During registration,the lifetime of that instance is determined. The lifetime of the object is managed by the container.
You are free to use other dependency injection frameworks like Ninject,Autofac but now ASP.NET 5 comes with a default dependency injector out of the box.
The container is invisibly created at application startup and filled with ASP.NET 5's services.
At application startup,we can register our own types in the container by calling the ConfigureServices method in the Startup class.
By supplying an IServiceCollection object as a parameter of ConfigureServices, you get the API to do the registering.
You can see below the part of the Startup.cs file where you can register types.
public void ConfigureServices(IServiceCollection services)
{
}
The Configure method configures the HTTP request pipeline of ASP.NET meaning it specifies how the application should respond to HTTP requests.
When the request is made, it first arrives at the web server which in most cases is IIS.
IIS then invokes the DNX which loads the CLR.
Then an entry point for the application is needed. Inside the Startup.cs file, the Main method, is executed.
Then the request is pushed to and processed by the middlewares (Authentication,ASP.Net MVC 6.0) which will produce the response.
8) Now that we explained the various items in a new ASP.Net Core application, let's get back to our actual application.We will add dependencies for our application in the dependencies section of the project.json file. I have added the following dependencies
"EntityFramework.Commands": "7.0.0-rc1-final",
"EntityFramework.MicrosoftSqlServer": "7.0.0-rc1-final",
"Microsoft.AspNet.Mvc": "6.0.0-rc1-final",
"Microsoft.AspNet.Mvc.TagHelpers": "6.0.0-rc1-final",
"Microsoft.AspNet.Razor": "4.0.0-rc1-final",
"Microsoft.Extensions.Configuration.Json": "1.0.0-rc1-final",
"Microsoft.Extensions.CodeGenerators.Mvc": "1.0.0-rc1-final"
The whole dependecies section is
"dependencies": {
"Microsoft.AspNet.IISPlatformHandler": "1.0.0-rc1-final",
"Microsoft.AspNet.Server.Kestrel": "1.0.0-rc1-final",
"EntityFramework.Commands": "7.0.0-rc1-final",
"EntityFramework.MicrosoftSqlServer": "7.0.0-rc1-final",
"Microsoft.AspNet.Mvc": "6.0.0-rc1-final",
"Microsoft.AspNet.Mvc.TagHelpers": "6.0.0-rc1-final",
"Microsoft.AspNet.Razor": "4.0.0-rc1-final",
"Microsoft.Extensions.Configuration.Json": "1.0.0-rc1-final",
"Microsoft.Extensions.CodeGenerators.Mvc": "1.0.0-rc1-final"
},
After we do that you will see all these referneces added under the DNX 4.5.1 and DNX Core 5.0
Let me go through those dependencies and what actually mean.
a) EntityFramework.Commands is used for DB Migrations so that POCO Classes can be migrated and mapped with database objects
b) EntityFramework.MicrosoftSqlServer is used to specify the Database Server used as Sql Server
c) Microsoft.AspNet.Mvc specifies that MVC 6 is used for the application
d) Microsoft.AspNet.Razor indicates that the Razor View Engine will be used
e) Microsoft.Extensions.Configuration.Json gives the ability to load and read configuration from JSON files in the application.
9) Let's move on with creating the main POCO classes. As I said in the beginning of this post I will create a simple ASP.Net MVC 6.0 application that allows the user to create Projects (create,update,delete projects) and map Employees(create,update,delete employees) to projects. One project can have many employees working on it. We add a new folder in the project of name Models.
The two classes follow
public class Project
{
public int ProjectId { get; set; }
public string ProjectName { get; set; }
public virtual ICollection<Employee> Employees { get; set; }
}
public class Employee
{
public int EmployeeId { get; set; }
public string EmployeeName { get; set; }
public int Age { get; set; }
public int ProjectId { get; set; }
public virtual Project Project { get; set; }
}
The Project class contains the Employees collection representing one-to-many relationship.
The Employee class contains the reference for the Project class and there willl be a relationship between Project and Employees and we will be able to navigate between those two types.
10) Now we will need to add the Controller in our MVC project.We will use the amazing help of the VS scaffolding mechanism.Add a Controllers folder to your project.Right-Click on the folder and select Add Controller, option. Have a look at the picture below.
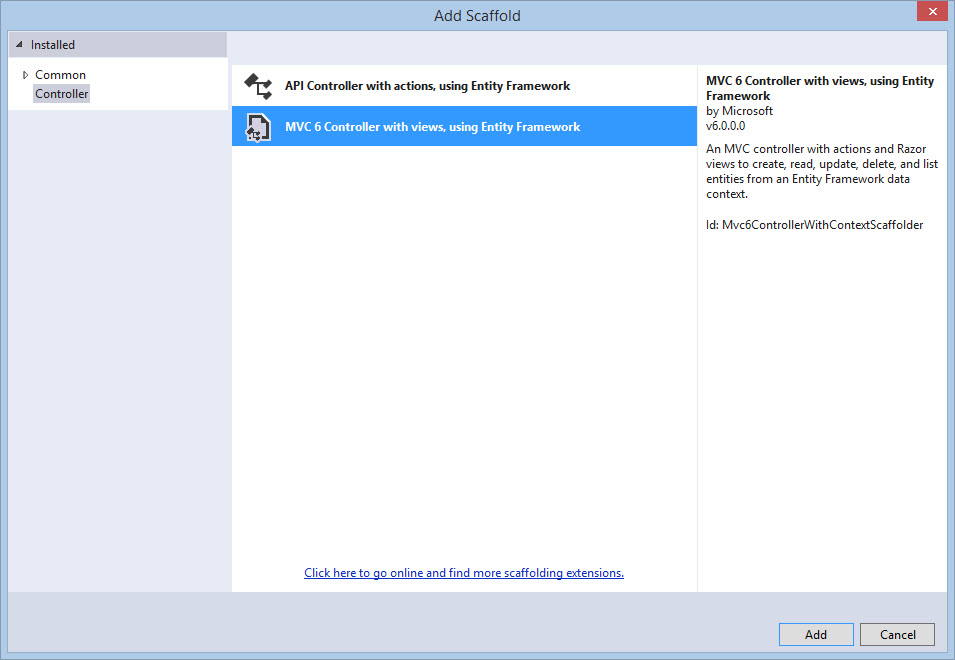
On clicking the Add button the following window will be displayed.In this window select Model class name.We will generate controller for Project entity. Add the DbContext class by clicking on the + button.
Keep the Generate Views and Use Layout View checkbox checked.
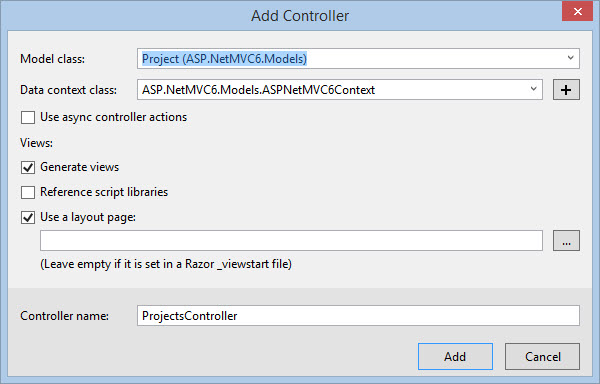
After clicking the Add button, the project will show ProjectsController class added in the Controllers folder with all the CRUD methods.
A Views folder will be created along with the Projects subfolder in it with Views for performing CRUD operations.
Now we need to repeat the same steps for Employee Model to generate controller and views for the employees.
In the Models folder, the ASPNetMVC6Context.cs file will be added with the following code:
The contents of the file follow
public class ASPNetMVC6Context : DbContext
{
private static bool _created = false;
public ASPNetMVC6Context()
{
if (!_created)
{
_created = true;
Database.EnsureCreated();
}
}
protected override void OnConfiguring(DbContextOptionsBuilder optionsBuilder)
{
}
protected override void OnModelCreating(ModelBuilder builder)
{
}
public DbSet<Project> Project { get; set; }
public DbSet<Employee> Employee { get; set; }
}
11) Now we need to instruct EF 7.0 to implement DB migrations and to generate tables in the database. In my local instance of SQL Server I create a database with the name "Projects". We need to define a connection string by adding a ASP.Net Configuration file.
We add a new ASP.NET Configuration file in our project with the default name appsettings.json
The contents of this file follow
{
"Data": {
"DefaultConnection": {
"ConnectionString": "Server=.;Database=Projects;Trusted_Connection=True;"
}
}
}
12) In the Startup.cs, we must add the following property for Configuration so that we can load the appSettings.json file.
public IConfigurationRoot Configuration { get; set; }
Add the constructor in the Startup class with the following code:
public Startup(IHostingEnvironment env)
{
var builder = new ConfigurationBuilder()
.AddJsonFile("appsettings.json")
.AddJsonFile($"appsettings.{env.EnvironmentName}.json", optional: true);
builder.AddEnvironmentVariables();
Configuration = builder.Build();
}
This code loads and reads the appSettings.json file.
13) We need to add and change some code in the ConfigureServices () method of the Startup class.
This configures the EntityFramework for the application with Sql Server and the connection string. The code follows:
public void ConfigureServices(IServiceCollection services)
{
services.AddEntityFramework()
.AddSqlServer()
.AddDbContext<ASPNetMVC6Context>(options =>
options.UseSqlServer(Configuration["Data:DefaultConnection:ConnectionString"]));
services.AddMvc();
}
We pass the right connection string and not the LocalD one.
The services.AddMvc() adds the MVC service in the IServiceCollection.So we register MVC with the built-in DI framework.
14) In the Configure() method, we must add the following code in order to use MVC and routing for request processing.
app.UseStaticFiles();
app.UseMvc(routes =>
{
routes.MapRoute(
name: "default",
template: "{controller=Home}/{action=Index}/{id?}");
});
The complete code inside the Configure() method follows:
public void Configure(IApplicationBuilder app)
{
app.UseIISPlatformHandler();
app.UseStaticFiles();
app.UseMvc(routes =>
{
routes.MapRoute(
name: "default",
template: "{controller=Home}/{action=Index}/{id?}");
});
}
The above code also uses the UseStaticFiles() method which helps us to read and use CSS and jQuery files from the project in the View.
15) Now we need to add the migration commands in order to map the classes to the database.
Open the project in file explorer. Go to the Project folder (in my case is D:\for blog\ASP.NetMVC6\src\ASP.NetMVC6). You need to use the Open Command Window here. In order to make that window apper,right-click on the project folder from the file explorer, with ctrl+shift combination.
In that window type the following commands
a) dnvm upgrade
b) dnu restore
c) dnvm install 1.0.0-rc1-final
d) dnvm use 1.0.0-rc1-final
e) dnx ef migrations add Initial
After executing these commands, we will see the Migrations folder with following files:
a) 20160327174152_Initial_initial.cs - Contains code for creating table based on model classes.
b) ASPNetMVC6ContextModelSnapshot.cs - This is a class which is used as model builder with model class properties and its types.
Build the application.
In your Projects database you will see the Project and Employee tables in it.
16) Tag Helpers is one brand new feature in ASP.Net 5 and ASP.Net MVC 6.
This is a direct alternative of the MVC helper methods that we are writing inside our Razor Views.
I am pretty sure HTML designers will love this new feature as it makes more sense to them.
Let's have a look at the View below
@using (Html.BeginForm())
{
<div>
@Html.LabelFor(m => p.Αge, "Age:")
@Html.TextBoxFor(m => p.Age)
</div>
<input type="submit" value="Submit" />
}
We have the Html.BeginForm(), Html.LabelFor(), and Html.TextBoxFor() helper methods that are part of the razor syntax in order to build a form.
Let's rewrite the snipper above using Tag Helpers:
@addtaghelper "Microsoft.AspNet.Mvc.TagHelpers"
<form asp-controller="Customers" asp-action="Submit" method="post">
<div>
<label asp-for="Age">Age:</label>
<input asp-for="Age" />
</div>
<input type="submit" value="Save" />
</form>
Open up any of the created views and you will see Tag Helpers in them.
The asp-validation-summary attribute is used to display the validation summary. The asp-for attribute is used for Model Binding.
To execute these attributes we need to add new item of type, MVC View Imports . Right-click on the Views folder and add such an item. The default name is _ViewImports.cshtml view.
In this view add the following code.
@addTagHelper "*, Microsoft.AspNet.Mvc.TagHelpers"
17) Build and run your application. Navigate to the http://localhost:33158/projects
Add new projects to the application. Those projects will be saved to the database.
Obviously our application lacks in stying.We need to add Bootstrap to it.
When we need to add client side libraries like Bootstrap or JQuery in our project we should use Bower.
We need to add to the project a Bower Configuration File (Bower.json). We should add the following dependencies:
"dependencies": {
"jquery": "2.1.4",
"bootstrap": "3.3.6"
}
All the files will be added by the manager in the wwwroot/lib folder.
You need to reference those libraries them in the _Layout.cshtml view if you want to use those libraries in your project.
Then you need to reference the _Layout.cshtml view in your Views.
In this post we talked a lot about ASP.NET 5.0 and we showed how to build a CRUD application. We also looked in the new project structure and explained the various files and folders.
Hope it helps!!!