DotNetStories
One of the most important concepts in Object Oriented Programming is Inheritance. In this post I would like to talk about LINQ to SQL and the inheritance type that it supports which is Table per Class Hierarchy.
In this type of hierarchy we have a single table/entity and its columns apply to all derived child tables/entities. Obviously the child tables/entities have columns that are only specific to them.
We can create this type of hierarchy in the
Object Relational Designer. It is true that in
Entity Framework we have more flexibility when it
comes to inheritance types but we will talk about LINQ to
SQL now.
We will demonstrate this with a hands on example. I am going to create a new database with new tables for this example.
The scenario we have in this case is derived from the institution I am delivering courses at. So we have different roles in there. We have instructors,students,marketing people,administration people.
So we will have this generic table/entity called Human. Well, we do have different roles and skills but we are alla humans after all.
You will need to create a database as well.I am going to
name the database CPLS. CPLS is the kind of instution
that is authorised by Microsoft to deliver Microsoft
approved courses.
Obviously we need some sample data in our table.
So before you go any further make sure you have SQL Server installed and execute the T-SQL code you will find inside the CPLS.zip.
If you do not have SQL Server installed, you can
download and install the free SQL Server Express edition
from here.
The Human table contains the following columns:
[HumanID]
,[HumanType],[LastName],[FirstName],[BirthDate],[HireDate],[EnrollmentDate],[Address],[City],[Region],[PostalCode],[Country],[Phone]
,[Fax],[Wage],[SalesRegion],[ProgrammingSkills],[Bonus],[Grade]
We can see that we can derive 3 main
entities:Instructor,Student and
SalesPerson. These are the entities I am going to use
in my model after I define the inheritance associations.
Make a note that I will not change the underlying database
table.
Let's proceed to our hands-on example.
1) Launch Visual Studio 2010/2008 (express editions will work fine). Create a new empty website and choose a suitable name for it. Choose C# as the development language.
2) Add a new item in your site. Add a LINQ to SQL Classes and name it Human.dbml. Place this file in the App_Code special folder.
3) From the Server Explorer/Data Explorer window select the option "Connect to database" and then simply specify the instance of the SQL Server where you installed the CPLS database.
4) From the Server Explorer / Data Explorer window drag the Human table and drop it on the Human.dbml. When you do that you must have something similar like the picture below

5) Let's see how we can transform the entity above to implement inheritance and more specifically Table per class Hierarchy.In order to build this new model we should have defined what we call a Discriminator property.
In our case this property is "HumanType". HumanType=1 means Instructor , HumanType = 2 means Student and HumanType=3 means SalesPerson. Those are the 3 values for the HumanType column/property in our Human table/entity.
6) This is the new model. Have a look at the picture below.
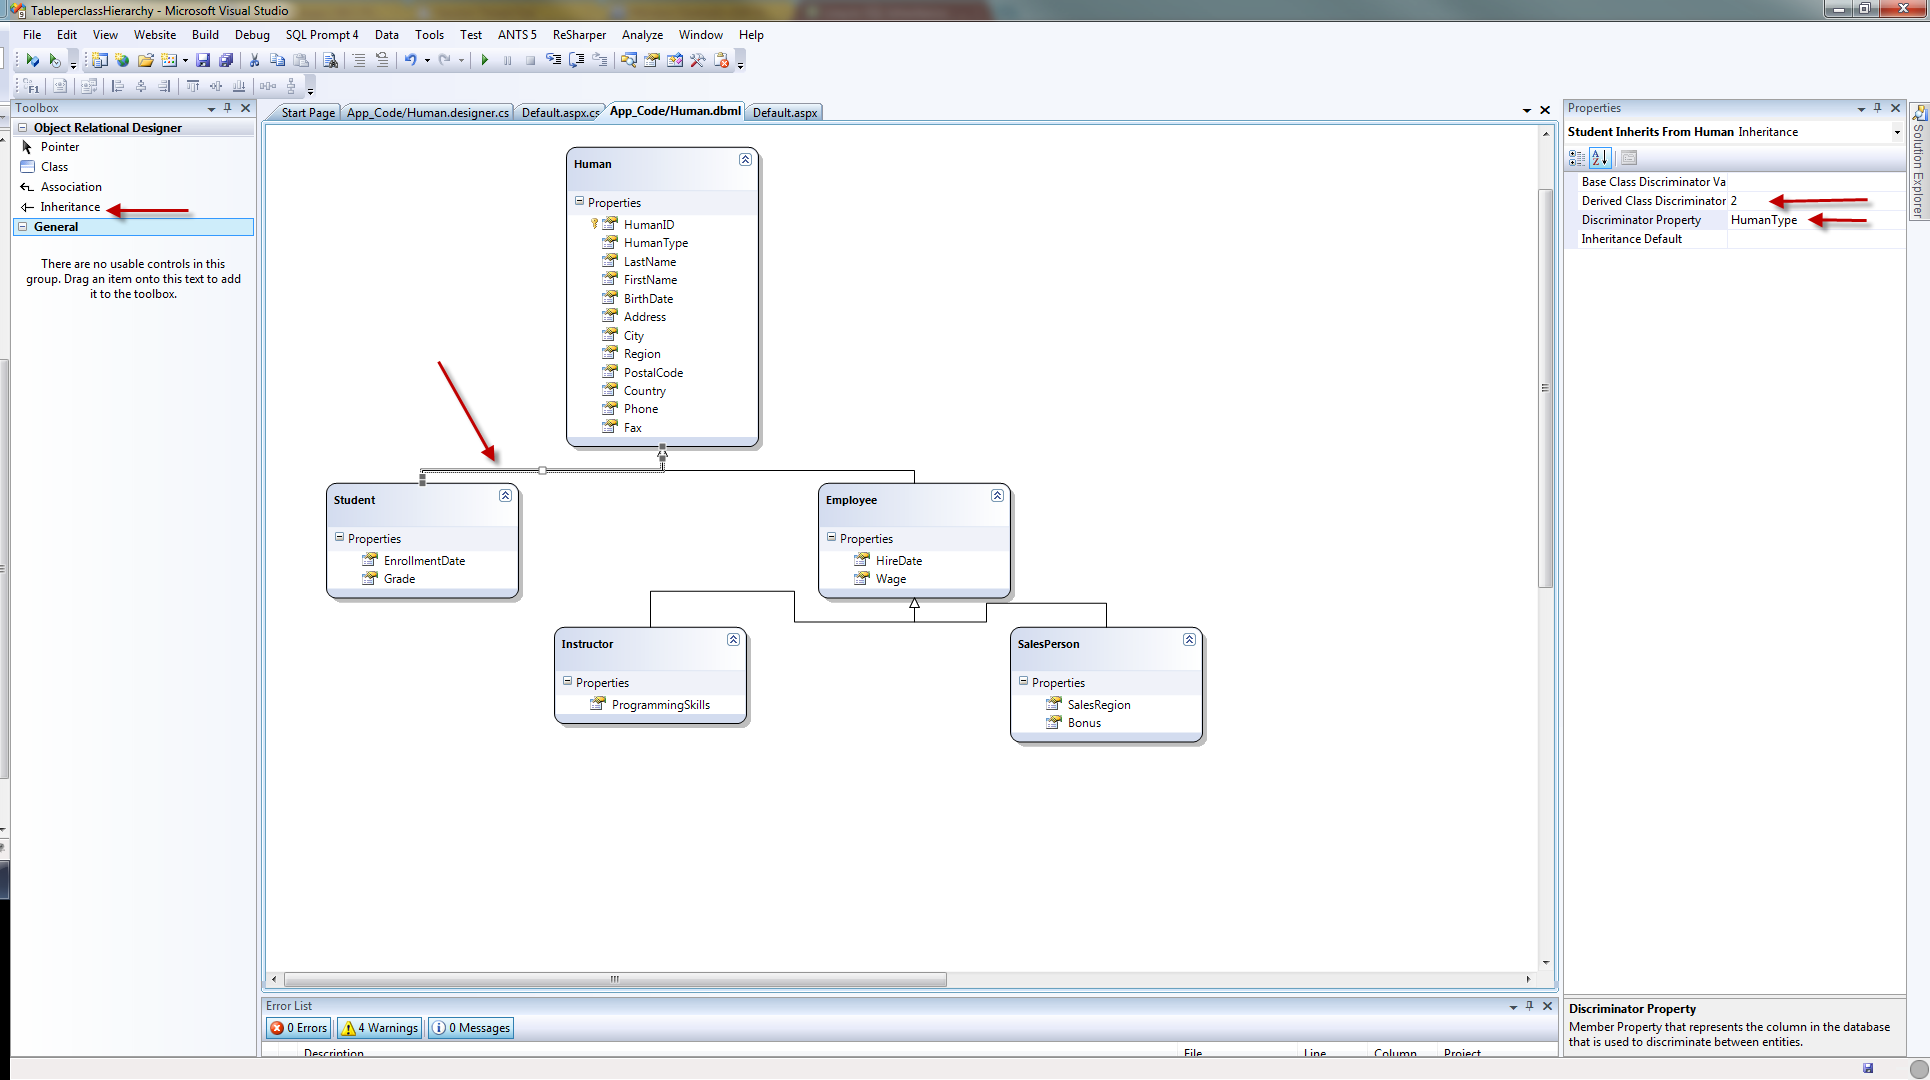
7) The way I constructed this model was to drag and drop from the Server Explorer 3 more times the Human table.
Then I changed the names of the other entities to Instructor,Student,SalesPerson and Employee. Then I deleted the properties that were obsolete to that particular entity.
Then I dragged an Inheritance arrow from the Object Relational Designer and "joined" together the Student to Human and Employee to Human entities.
Then I dragged an Inheritance arrow from the
Object Relational Designer and "joined" together
the Instructor to Employee and
SalesPerson to Employee entities.
Then I selected the Human entity and changed the Inheritance modifier to abstract.
Then I selected the Employee entity and changed the Inheritance modifier to abstract.
Then I selected the inheritance arrow from
Student to Human and changed those properties
Discriminator Property:HumanType
Derived Class Discriminator : 2
Then I selected the inheritance arrow from
Employee to Human and changed the property
Discriminator Property:HumanType
Then I selected the inheritance arrow from
Instructor to Employee and changed those
properties
Discriminator Property:HumanType
Derived Class Discriminator : 1
Then I selected the inheritance arrow from
SalesPerson to Employee and changed those
properties
Discriminator Property:HumanType
Derived Class Discriminator : 3
8) Let's try and get some data out from our new model as it is defined in the .dbml file. We want to get the students from our table.
In the Page_Load() event handling routine of the Default.aspx page type,
HumanDataContext ctx = new HumanDataContext();
var students = from stu in ctx.Humans.OfType
<Student>()
select
stu;
foreach (var student in
students)
{
Response.Write("First Name: " + student.FirstName);
Response.Write("---");
Response.Write("Last Name: " + student.LastName);
Response.Write("---");
Response.Write("Enrollment Date : " +
student.EnrollmentDate);
Response.Write("---");
Response.Write("Grade: " + student.Grade);
}
Before you run your application, you need to specify
a default.Make sure that you do not choose an entity
that is marked as abstract.You cannot create instances of
classes that are marked as abstract.
One way to do it is to go to the Human.designer.cs file and find this bit of code and make the necessary changes.
LINQ needs to know that if for some reason cannot map an
entity to one that exists already, needs to have a default
one to map it to that.
[Table(Name="dbo.Human")]
[InheritanceMapping(Code="2",
Type=typeof(Student))]
[InheritanceMapping(Code="1",
Type=typeof(Instructor),IsDefault=true)]
[InheritanceMapping(Code="3",
Type=typeof(SalesPerson))]
9) Run your application and see the results. The main thing is to look carefully at this bit of code
var students = from stu in ctx.Humans.OfType
<Student>()
select stu;
We use the OfType extension method. If you look more
carefully at the properties available for the
Student entity you will see that we have available
all the properties defined in the parent entity
Human (base class) and the specific properties of the
Student entity.
10) If we wanted to get data out of our Instructors entity as well, we need to rewrite the code above.In the Page_Load() event handling routine of the Default.aspx page type,
HumanDataContext ctx = new HumanDataContext();
var students = from stu in
ctx.Humans.OfType<Student>()
select stu;
var instructors = from inst
in
ctx.Humans.OfType<Employee>().OfType<Instructor>()
select inst;
foreach (var instructor in
instructors)
{
Response.Write(instructor.ProgrammingSkills);
Response.Write("<br/>");
}
foreach (var student in students)
{
Response.Write("First Name: " + student.FirstName);
Response.Write("---");
Response.Write("Last Name: " + student.LastName);
Response.Write("---");
Response.Write("Enrollment Date : " +
student.EnrollmentDate);
Response.Write("---");
Response.Write("Grade: " + student.Grade);
}
11) Run your application and see both the results from both entities printed out in the screen. If you look more carefully at the properties available for the Instructor entity you will see that we have available all the properties defined in the parent entity Human (base class) and the specific properties of the Instructor entity.
12) Now let's try and add a new Student record into the database.In the Page_Load() comment out everything.
In the Page_Load() event handling routine of the Default.aspx page type,
HumanDataContext ctx = new HumanDataContext();
Student mystudent = new Student();
mystudent.FirstName = "Grace";
mystudent.LastName = "Jennings";
mystudent.BirthDate = DateTime.Now.AddDays(-10000);
mystudent.EnrollmentDate = DateTime.Now.AddDays(-234);
mystudent.Address = "76 Blade Road";
mystudent.City = "Coventry";
mystudent.Region
= "Midlands";
mystudent.PostalCode =
"SW4567";
mystudent.Country = "England";
mystudent.Phone = "493497294334";
mystudent.Fax = "43243242442";
mystudent.Grade = "A+";
try
{
ctx.Humans.InsertOnSubmit(mystudent);
ctx.SubmitChanges();
Response.Write("saved!!!");
}
catch (Exception ex)
{
Response.Write(ex.Message);
}
13) Run your application and see the "saved" message
printed out in the screen. Have a look at your database
table Human and see the new record added.Please note
that we do not have to specify a value for the
HumanType column for the new record. LINQ to
SQL will know what value to fill in for that column. In our
case will be 2 which means Student.
Email me if you need the source code.Hope it helps.