CodePlex supports Windows Live Writer!
I am documenting local community portal that is hosted in CodePlex. Wikis have always been annoying for me when it comes to creating a good content. So, I was preparing for boring evening full of wiki mark-up and messing with good format, manual image uploads etc. But CodePlex surprised me today – it’s wiki supports Windows Live Writer!
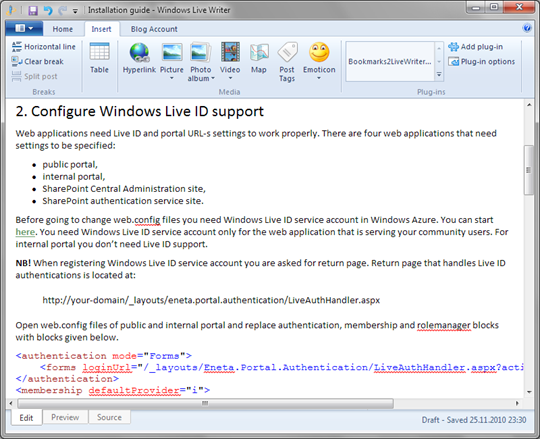
As tonight is not the last night when I am documenting my work I was specially glad I got this heavy boost to my documenting action. I will save a lot of time I think as I am pretty quick when I’m using Windows Live Writer. Take a look at the following screenshot.

Click on image to see it at original size.
Yes, it is one of my CodePlex pages opened in Windows Live Writer. Cool! I think creating public documentation to CodePlex is now easier than ever. I hope that now devs have more motivation to write better documentation as it is way easier and less time consuming than before. I saw winnings in time after finishing to longer documentation chapters. Believe me – documenting is now fun in CodePlex!
How to get Live Writer connected to CodePlex?
Follow these simple steps (stolen from Using Windows Live Writer page from CodePlex):
- add new blog account and select Other service as it’s type,
- insert URL of your CodePlex project as address of new blog,
- username and passwords are same you are using to log in to CodePlex,
- don’t download layouts as it doesn’t work yet.
After last okay you are are ready to start writing documentation using Windows Live Writer.
NB! I am using Windows Live Writer 2011. After adding new blog account the new account is not displayed in ribbon dropdowns. If you also see something like this then close Windows Live Writer and run it again. For me it worked.
Content management tips and tricks
Here are some things I found useful to share – CodePlex wiki is not exactly the same thing as blog.
- Unique titles are mandatory. Page titles must be unique because page title is practically primary key of wiki page. If you have already page with same title as your new one then select other title for your new text.
- You can edit existing pages. If your Live Writer has no good old Open dialog available in mess called ribbon you can get this dialog opened easily – just press CTRL+O. Select your CodePlex page and Live Writer downloads titles directly from CodePlex. Select page and open it. You can save your changes by pushing Publish button on toolbar.
- You can use images. Yes, you can insert images to your CodePlex wiki postings and you have to do nothing manually to get them online. Just press Publish after you are done with writing and your images go with your post.
If you want to document API-s or write code examples you can use different plugins suggested on CodePlex Live Writer page. If you don’t find plugin that fits your needs you can go to CodePlex, open some page in HTML view and click on Insert code snipet icon. Code inserting dialog makes syntax highlight for you.

Click on image to see it at original size.
Paste your code to left area, select language and press Preview button. Now select all code from right area and paste it to Windows Live Writer. Not as elegant as using plugins but it works.
Conclusion
After couple of documentation pages I was amazed how fast I can move on with documenting when I don’t have to use this weird wiki mark-up and manual image uploads. Windows Live Writer is my killer tool when it goes to writing something for web. Now I can do also my CodePlex writing with Windows Live Writer and I can focus more on the quality of my documents. And this IS cool!