Jeff Widmer's Blog
ASP.NET, ASP.NET MVC, C#, VB.NET, IIS7, Windows Forms, VB6, ASP 3.0
-
Reference assemblies for .NET Framework v4.5 were not found
Setting up a build server on a new install of Windows Server 2012 R2 and ran into the following warning when building the projects:
Warning MSB3644 - The reference assemblies for framework ".NETFramework,Version=v4.5" were not found. To resolve this, install the SDK or Targeting Pack for this framework version or retarget your application to a version of the framework for which you have the SDK or Targeting Pack installed. Note that assemblies will be resolved from the Global Assembly Cache (GAC) and will be used in place of reference assemblies. Therefore your assembly may not be correctly targeted for the framework you intend.
The build server was a fresh machine and the issue was Visual Studio 2013 needing to be installed on the server. Installing Visual Studio Professional 2013 without any options resolved the issue.
- Under optional Features uncheck all the options to speed up the install.
- Under optional Features uncheck all the options to speed up the install.
-
Vault Login Failed: The server uses a protocol that is not supported by this client.
Installing CruiseControl.NET on a new server and ran into an issue with CruiseControl.NET pulling from the Vault server. I found the following error in the CruiseControl.NET Log:
[PROJECT:ERROR] Vault Standard Login Failed Twice.:The server uses a protocol that is not supported by this client.
Vault Standard Login Failed: The server uses a protocol that is not supported by this client.
The problem turned out to be an incorrect version of the Vault CruiseControl.net Plug-In. I had accidentally grabbed the latest version (7.0) but the Vault server is running an older version of Vault (6.1). The older version could be found on the Previous Vault Downloads page. Installing the correct version of the Vault plugin to match the Vault server solved the problem.
-
Your current security settings do not allow this file to be downloaded.
When running a new Windows Server 2012 R2 server install, Internet Explorer is locked down and you will end up getting prompted multiple times when visiting sites and most likely you will not be able to download any setup files:

---------------------------
Security Alert
---------------------------
Your current security settings do not allow this file to be downloaded.
---------------------------
OK
---------------------------Follow the steps below to modify the default Internet Explorer security settings to bring it down to a level which is more realistic for system administrator tasks:
- Disable Internet Explorer Enhanced Security Configuration
- Open Server Manager > Local Server

- Click on IE Enhanced Security Configuration:

- Within the dialog switch IE Enhanced Security off for both Administrators and Users (you will turn it back on for Users later).

- Open Server Manager > Local Server
- Modify Security Settings in Internet Explorer
- Open Internet Explorer > Internet Options

- Change to the Security tab and move the slider to “Medium-high” and uncheck the “Enable Protected Mode” checkbox.

- Medium-high enables file downloads which is pretty important for system administrators
- Medium-high enables file downloads which is pretty important for system administrators
- Note: It was necessary to turn off Internet Explorer Enhanced Security for “Users” in order to move the security level slider. If the slider is disabled check to make sure Internet Explorer Enhanced Security is disabled for both Users and Administrators.
- Ok you way out of here and then close Internet Explorer.
- Note: Since this is a server there may be other users logged on. It may be necessary to sign out those users and then close any other instances of Internet Explorer from Task Manager to get these security settings to be applied.
- Turn on Internet Explorer Enhanced Security for Users
- It is a good idea to enabled Internet Explorer Enhanced Security for Users who may use this machine. Return back to the Local Server Manager dashboard and enable it for just Users:
- It is a good idea to enabled Internet Explorer Enhanced Security for Users who may use this machine. Return back to the Local Server Manager dashboard and enable it for just Users:
Now you will no longer be prompted multiple times when browsing a site in Internet Explorer and you will also be able to download install files.
- Disable Internet Explorer Enhanced Security Configuration
-
Where does IAppBuilder.UseWebApi come from?
I was converting a self-hosted ASP.NET Web API application from Microsoft ASP.NET Web API Self Host to use OWIN Self Hosting. Everything went find until I tried to add the route configuration to the OWIN pipeline. Samples I found indicate all you have to do is call “UseWebApi” but the IAppBuilder.UseWebApi method did not resolve for me:

After some searching around I found that you will need to import the Microsoft ASP.NET Web API 2 OWIN Self-Host Nuget package.


I didn’t realize that there was a separate Nuget package if you wanted to combine OWIN and ASP.NET Web API. It was a simple solution and honestly now that I think about it, should have been one of the first things I checked. This post is for the next person that runs into this issue.
-
Hello World!

Hello World!
-
How to detect if the new HTML5 File Upload progress information is available in your browser
HTML5 has a some new File Upload features added to it must notably upload progress notifications while the file is being posted to the server through the XMLHttpRequest Level 2 (XHR2) object (http://www.w3.org/TR/XMLHttpRequest2/#event-xhr-progress).
Keep in mind that XMLHttpRequest Level 2 is not really HTML5 but as mentioned in this article http://www.html5rocks.com/en/tutorials/file/xhr2/, it is part of the core platform improvements and therefore frequently gets included under the HTML5 name umbrella:
One of the unsung heroes in the HTML5 universe is XMLHttpRequest. Strictly speaking XHR2 isn't HTML5. However, it's part of the incremental improvements browser vendors are making to the core platform.
Chrome, Firefox, Safari, and IE10 all support the new XHR2 progress events but unfortunately IE9 does not so you will need to check for them and fall back to something like SWFUpload to give you progress information while your file is posting to the server if the XHR2 object is not available.
But how do you test to see if the browser supports the new features of XMLHttpRequest Level 2 (XHR2) for progress information?
There is an interesting Modernizr thread here which talks about the various ways to test for it. In the end all you need to test for is the existence of window.FormData.
If you want to add an XHR2 test into Modernizr you can do it like this:
        Modernizr.addTest('xhr2', 'FormData' in window);
        if (Modernizr.xhr2) {
             alert('File upload progress supported');
        } else {
             alert('No file upload progress support');
        }
Or you can just do it by running your own check without Modernizr:
        if (!!window.ProgressEvent && !!window.FormData) {
             alert('File upload progress supported');
        } else {
             alert('No file upload progress support');
        }
Note: Technically the test for window.ProgressEvent being undefined is not necessary as shown in the above Modernizr thread but I left it in just for my own knowledge.
-
You are not authorized to view this page due to invalid authentication headers.
I have been working through an authentication issue and making changes to IIS to debug the problem and then ran into the following IIS error:
HTTP Error 401.2 - Unauthorized
You are not authorized to view this page due to invalid authentication headers.

It took me a while to figure out what the problem was and in the end the cause was already listed in the “Most likely causes” section of this error page:
Most likely causes:
- No authentication protocol (including anonymous) is selected in IIS.
- Only integrated authentication is enabled, and a client browser was used that does not support integrated authentication.
- Integrated authentication is enabled and the request was sent through a proxy that changed the authentication headers before they reach the Web server.
- The Web server is not configured for anonymous access and a required authorization header was not received.
- The "configuration/system.webServer/authorization" configuration section may be explicitly denying the user access.
My issue is that I had been debugging an issue with Windows Authentication and I had disabled Anonymous Authentication and enabled Windows Authentication for this website in IIS (I know you are not supposed to have both Forms Authentication and Windows Authentication enabled at the same time... this was for a test).

When I had finished I thought I had reset everything back but I forgot to enable Anonymous Authentication. Just enabling Anonymous Authentication resolved the issue.

-
Show detailed Classic ASP error messages in IIS7 for both local and remote requests
In IIS7 you have to enable sending the detailed error message for Classic ASP. You can do this by configuring Classic ASP in IIS7:

And then setting the “Send Errors to Browser” setting to true:

Now you will get the detailed Classic ASP error message when an error occurs in your Classic ASP pages. But these will only show for local requests. Remote requests will still display the standard IIS 500 - Internal Server Error:

Not sending detailed error messages for remote requests is the default since it is a good idea for remote requests not to see the full error details (it could expose sensitive data to the Internet). But if you need to see it, such as on an internal testing server, follow these instructions to have IIS send the detailed error message for remote requests too.
In IIS go to the Error Pages:

Then on the right click on the Edit Feature Settings...

In the Edit Error Pages Settings dialog is where you choose to send for both local and remote requests. The second option button is what needs to be selected to have the detailed errors returned for both local and remote requests. The bottom option is what is on by default – where detailed error messages are only sent for local requests.

Keep in mind that it is not recommended to send detailed errors for remote requests since this could expose sensitive information to the Internet. -
Building the Ultimate Developer Computer for $1000 - The Parts List
I am due for a new computer. Following on the foot steps of Scott Hanselman (Ultimate Developer PC 2.0) and Jeff Atwood (Building a PC, Part VII: Rebooting) I decided to build my own computer. I have built my own machine before but in the past it has been with mixed success. Usually I have run into issues with getting a complete set of compatible parts, or fitting all of the components into the case.
Prior to giving building my own computer another try, I did shop around for pre-built computers (Dell, CyberPower). The prices of some pre-built computers certainly do make just buying one from a company like Dell or CyberPower very attractive (and also you are practically guaranteed a fully compatible set of hardware), but you do not always get the high-performance machine that I wanted (at least not without paying a premium). So not only is building my own machine about putting together a high-performance computer, it also has to be very cost effective to be a better deal than prebuilt off-the-shelf computers.
I set $1000 as the goal because above $1000 I felt I could get a pretty decent machine from one of the pre-built shops (albeit maybe with some components that I did not necessarily want). The $1000 price goal also made an assumption that I might sacrifice on some parts knowing that I could upgrade them in the future if this goes well.
So here goes... below is the list of parts that I selected to build my $1000 Ultimate Developer Machine.
I borrowed heavily from Jeff Atwood’s latest post on rebuilding his machine. He posted it in July 2011 so the parts list was still very up to date. The only issue was that his selected parts cost just under $2000 and, as mentioned above, I wanted to have it at or under $1000.
Pulling from his list of parts and skimping and saving where I could I came up with the following parts that I finally went with. I will talk about each of these later in this post.
- ASUS LGA 1155 - Z68 - SATA 6Gb/s and USB 3.0 - ATX Intel Z68 ATX DDR3 2200 Motherboard (P8Z68-V LE) – $129.99
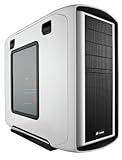
- Corsair CC600TWM-WHT Special Edition Graphite Series 600T Mid Tower Gaming Computer Case - $159.09
- Corsair Enthusiast TX V2 Series 550-Watt 80 Plus Bronze Certified High Performance Modular Power Supply – $87.59
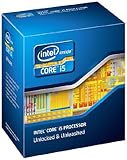
- Intel Core i5-2500K Processor – $214.99
- Crucial 64 GB m4 2.5-Inch Solid State Drive SATA 6Gb/s – $109.99
- Corsair Vengeance Blue 16 GB DDR3 SDRAM Dual Channel Memory Kit - $99.99
- Sapphire HD 6850 PCIE Video Card - $149.99
- Asus 24xDVD±RW Drive DVD-RAM/±R/±RW 24x8x16x(DVD) 48x32x48x(CD) Serial ATA Internal OEM DRW-24B1ST – $20.99
The total cost of the parts above was $972.62. So below my goal of $1000. To be fair though, I did reuse a hard drive from another machine: a Seagate 500 GB Hard Drive (Seagate Barracuda 7200.12 SATA 3Gb/s 500GB Hard Drive).
So that’s pretty much all you need to know to purchase an awesome machine for $1000. See this post (COMING SOON) which gives a decent set of step-by-step instructions on building this $1000 Ultimate Development Computer. And then below I dive into each of the parts and why I decided to go with the one that I did (and also recommendations on potential substitutes). Everything is just my opinion so take it as you may.
And finally, here is the required Windows Experience Index screenshot after I had built the machine:

Motherboard - ASUS LGA 1155 - Z68 - SATA 6Gb/s and USB 3.0 - ATX Intel Z68 ATX DDR3 2200 Motherboard (P8Z68-V LE)
- This was one of the big differences between Jeff Atwood’s build (Building a PC, Part VII: Rebooting) but it was also a big cost savings. Below is a comparison of the major differences between the P8Z68-V PRO and the P8Z68-V LE motherboards from the Asus website (http://usa.asus.com/Compare/). The major difference which caused a minor issue was the lack of a IEEE 1394a port. The Corsair case that I went with has an IEEE 1394a (firewire) outlet on the front so with the LE motherboard I did not have a place to plug it in. This was not an issue for me because 1) I currently do not have any firewire devices and 2) I had an old (very old) IEEE 1394a PCI card which I added to allow me to plug it in (just because). Depending on your Firewire needs you may want to upgrade (either a 1394 PCI card or the P8Z68-V PRO Motherboard).


Computer Case - Corsair CC600TWM-WHT Special Edition Graphite Series 600T Mid Tower Gaming Computer Case
- This is the case recommended in Jeff Atwood’s build. It is big and it is expensive but after building the machine I have absolutely no regrets spending the extra money on this case. This case made it so much easier to put the machine together and the extra air flow is awesome. Don’t skimp here... just buy this one. I also assume that when I rebuild I will be able to reuse this case so it is a good investment.
Power Supply - Corsair Enthusiast TX V2 Series 550-Watt 80 Plus Bronze Certified High Performance Modular Power Supply
- I did save some money on the power supply. I knew I would not need as much power as the PSU recommended in Jeff Atwood’s build so I moved down to the 550-Watt and only Bronze certified power supply. Nothing more to say here other than I traded a lower up-front costs with higher costs to power the machine (Bronze vs Gold).

Processor - Intel Core i5-2500K Processor
- Big difference here compared to Jeff Atwood’s build (i5 vs i7) but it saved me about $100. I can always upgrade in the future. Notice that the processor is the limiting factor in the machine’s Windows Experience Index. If you have the extra money then I would recommend the Intel Core i7 Processor but to keep costs under $1000 I stuck with this Intel Core i5.
Solid State Drive (SSD) - Crucial 64 GB m4 2.5-Inch Solid State Drive SATA 6Gb/s
- Once you step into the world of Solid State Drives you will never want to go back. to quote Jeff Atwood: “I can't imagine using a computer without a SSD any more; it'd be like going back to dial-up internet or 13" CRTs or single button mice.” - The Hot/Crazy Solid State Drive Scale (May 2, 2011). The SSD drive is what makes this machine blazing fast. Notice the 7.9 on the Windows Experience Index for Primary Hard Drive. I went with the small 64GB Crucial SSD once again to save on costs. This is small for the operating system drive but it is doable. Windows had to move the page file to the 7200 RPM drive with this small SSD so I am seeing a small performance decrease because of that. Again if you have the money an excellent upgrade would be to the Crucial 128GB SSD.

RAM - Corsair Vengeance Blue 16 GB DDR3 SDRAM Dual Channel Memory Kit
- I didn’t want to go cheap on the RAM so I went with Jeff Atwood’s recommendation.

Video Card - Sapphire HD 6850 PCIE Video Card
- I don’t know much about video cards and I always have trouble figuring out why one is better than another. I do know that one of my biggest complaints with my old machine is the video performance so I didn’t want to skimp here. So without knowing better options I just went with Jeff Atwood’s recommendation.

DVD Drive - Asus 24xDVD±RW Drive DVD-RAM/±R/±RW 24x8x16x(DVD) 48x32x48x(CD) Serial ATA Internal OEM DRW-24B1ST
- I needed one of these. This one was highly recommended on Amazon and it is an Asus. Enough said.

Hard Drive – Seagate Barracuda 7200
- I reused a Seagate 7200 RPM drive from another machine so technically you could say that I cheated and this development machine really cost more than $1000 if you take into account purchasing this drive. But I imagine nearly all of us developers that are embarking on building our own machine already have several decent 7200 RPM drives sitting around to use. If not you can get this one Seagate Barracuda 7200 for $129.
-
Final Flower

Winter is on the horizon….


