AJAX History and ASP.NET AJAX Preview 3
I hope everybody had a great holiday break and is ready to go for 2009 :).
In .NET 3.5 SP1 we shipped some improvements to the AJAX framework, including the AJAX History Feature, which allows you to add history points in the browser for AJAX applications. There have been some great blog posts about how to use the history feature; Jonathan Carter has a post specifically talking about it client-side here.
Jonathan's sample is clean and simple, and showcases the feature well. He includes a lot of great detail on the intricacies and inner workings of AJAX client-side history. I'm actually going to refer to his post a lot as I build a similar demo, making use of some of the cool new features in ASP.NET AJAX Preview 3. If you are unfamiliar with the history feature, now would be a good time to read through the first two parts of Jonathan's series on ASP.NET AJAX History here and here, as I'm going to assume some basic knowledge about the feature.
To start off my sample site, I've done a lot of the same setup steps as my last app: basically I've created a new web application and added the ASP.NET AJAX Preview 3 scripts into the project. If you're unsure how to get up until that point, please refer to this post and follow the instructions under "Website Setup".
One difference is that my ScriptManager doesn't need the MicrosoftAjaxAdoNet.js file since I won't be using data services in this app. and also that my ScriptManager now needs to enable the AJAX History scripts by setting EnableHistory="true".
<asp:ScriptManager ID="ScriptManager1" EnableHistory="true" runat="server">
<Scripts>
    <asp:ScriptReference Path="~/Scripts/MicrosoftAjaxTemplates.js" />
</Scripts>
</asp:ScriptManager>
If you've read through Jonathan's post, you'll note that he's done some work to get his selected item concept working. With ASP.NET AJAX Preview 3, we get this functionality for free through the DataView, so let's go ahead and set that up now.
I'm using a default StyleSheet, Default.css, which is available in the zip file of the project here. I've also added some classes for the body and selectedItem which we will use later. So my style section looks like this:
<style type="text/css">
    @import url(Default.css);
    .sys-template { display:none }
    body
    {
        width: 350px;
        margin: 0px auto;
    }
    .selectedItem
    {
        text-decoration:none;
        color:White;
        background-color:Black;
    }
</style>
I'm also going to go ahead and set up some JavaScript data at this point so I can have an array to bind to when we set up the dataview. Here I've created a list of people, using members of the AJAX team.
var myList = [{ name: "Jim Wang", location: "Vancouver" },
              { name: "Dave Reed", location: "Los Angeles" },
              { name: "Clay Compton", location: "Kirkland" },
              { name: "Nghi Nguyen", location: "Redmond" },
              { name: "Bertrand Le Roy", location: "Seattle" },
              { name: "Boris Moore", location: "Bellevue" }];
So now I can set up my master and detail view in declarative markup, where I show the name of the person in the master, and display the location in the detail. Here's the master view:
<fieldset>
<legend>Person</legend>
<div id="personListMaster" sys:attach="dv"
        dv:data="{{myList}}"
        dv:initialselectedindex="-1"
        dv:selecteditemclass="selectedItem"
        dv:sys-key="master" >
    <a sys:command="select">{{name}}</a><br />
</div>
</fieldset>
I've disabled the default selected index of 0 (and set it to -1 declaratively) so that when the page renders, there will be no item selected initially. I've also added the selectedItem class declaratively, and set a sys-key on the master, so I can refer to it in the detail view without doing a $find. Here's the detail view:
<fieldset>
<legend>Location</legend>
<div id="personListDetail" sys:attach="dv"
        dv:data="{binding selectedData, source={{master}}}">
    <span>{{location}}</span>
</div>
</fieldset>
As you can see, I'm able to bind to the selectedData property of the master simply by referring to it by its sys-key, which is cleaner than doing a $find.
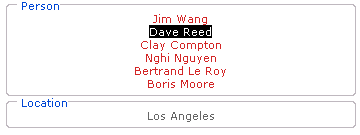
So at this point the site should be operational: you can load it up and click on a name to populate the detail view like so:
Now that we have the selection of names working, let's add the history feature. The first thing I'm going to do is add a command handler to my master view. If you look at the master view, you'll see that the link has the sys:command="select" property associated with it. This command is special, it means that when you click on that item, it will become selected and the selected item class, if available, will be applied. However, we can also add to this functionality by adding a handler for the event, and passing in a command argument, which we will do for the purposes of this demo. So my new master view looks like this:
<fieldset>
<legend>Person</legend>
<div id="personListMaster" sys:attach="dv"
        dv:data="{{myList}}"
        dv:initialselectedindex="-1"
        dv:selecteditemclass="selectedItem"
        dv:sys-key="master"
        dv:oncommand="{{personClicked}}">
    <a sys:command="select" sys:commandargument="{{$index}}">{{name}}</a><br/>
</div>
</fieldset>
So I've added a handler called personClicked (which I'm going to have to define in my JavaScript), and I'm passing a commandargument of $index. $index is a special pseudo-column, accessible within a template/dataview, that gives the current index of the item being rendered, starting from 0. So in my case, when this dataview is rendered, since I have 6 names, I will generate $index values of 0 to 5.
With this new code, when I click on a name, it is selected, bubbles the command up to the dataview, and then the personClicked handler is called and passed an argument of $index, which will vary depending on which name was clicked (which is exactly what we want, since we need to be able to tell which person was clicked).
Here's the code for personClicked, which is where we will add our history point.
function personClicked(sender, args) {
    if (args.get_commandName() === "select") {
        var mySelectedIndex = args.get_commandArgument();
        var myTitle = myList[mySelectedIndex].name;
        Sys.Application.addHistoryPoint({selected : mySelectedIndex}, myTitle);
    }
}
So here, I'm ensuring that the command is a "select" before doing further processing. In general, you can make up your own command names, so I could specify sys:command="myFoo" to an element, and then, if I specified a command handler, I would be able to pick out that command using the get_commandName() API. However, in this case, I'm only interested in "select". After I've verified that the event was a select, I pull out the command argument, which tells me the index of the person who was clicked on. Since I'm dealing with a fixed array, I can immediately get the name of the person associated with that index by looking at the array. Finally, I can add my history point with these parameters. I've arbitrarily named the property "selected", because all I need to save in state is the currently selected index. Also note that the user can see this property in the URL, so making it compact and meaningful is important. I'm also passing in the optional title property to change the title of the website (and history entry) to the name of the person who has been clicked.
This might be a good time to note that although passing the $index pseudo-column in as a command argument is one way to get the selected index in the personClicked handler, you can also access the same information directly from the sender and args like so:
mySelectedIndex = sender.getItem(args.get_commandSource()).index;
In this case, the sender is the DataView, so we call the getItem API on the source of the command (which is the element being clicked), and look at the index property. So using this method, although slightly more complex, eliminates the need to pass a command argument to the handler, but I'm going to leave the command argument implementation as is for illustration purposes.
If I didn't want to use a command handler, I could also hook into the selectedIndex change event, enabling me to pick up changes in the selected index from things other than the user clicking on an item (for example, if I was to change the selected index in code using the DataView's set_selectedIndex() API). For simplicity and illustration purposes, I'm going to leave the command handler implementation as is, but if you wanted to hook into the selectedIndex change event, you could use the following code to add a property changed handler to the dataview, and then add the history point:
function pageLoad() {
    $find("personListMaster").add_propertyChanged(myHandler);
}
function myHandler(sender, args) {
    if (args.get_propertyName() == "selectedIndex") {
        var mySelectedIndex = $find("personListMaster").get_selectedIndex();
        var myTitle = myList[mySelectedIndex].name;
        Sys.Application.addHistoryPoint({selected: mySelectedIndex}, myTitle);
    }
}
Now, all that is left to do is add a handler for the Navigate event so that the page knows what to do with the history points. We can do this in init like so (put this snippet right after the ScriptManager, otherwise you won't be able to resolve the Sys namespace):
<script type="text/javascript">
    Sys.Application.add_init(function() {
        Sys.Application.add_navigate(navigatePerson);
        });
</script>
With the associated navigatePerson function defined as follows:
function navigatePerson(sender, args) {
    var clickedSelectedIndex = args.get_state().selected;
    $find("personListMaster").set_selectedIndex(clickedSelectedIndex);
    document.title = clickedSelectedIndex ?
                myList[clickedSelectedIndex].name : "Ajax History Blog Post";
}
Note that here I'm pulling only the index out of the state information, and then using that to directly set the selectedIndex of the dataview. I'm also restoring the old title information by setting document.title to the name of the person if the clickedSelectedIndex is defined, and setting it back to the default title if it isn't defined. So now if we load up the application, we should have full history support, being able to click on different people, and then using the browser's back button to jump back to previous states. One cool thing is that the detail view data is also seamlessly saved (which makes sense since we only depend on the selected index, and the detail view is live-bound to the selected data of the master). A typical URI looks like this:
http://localhost:18142/AjaxHistory/Default.aspx#selected=5
Which is as expected. Note that from a security standpoint, I can create my own user states by simply changing the last number in the URI, which is why you shouldn't store any critical information in unencrypted client-side AJAX history. In our case, this isn't a risk because all we're doing is changing the selected item.
A final note is that in this simple example, I'm not changing the array of items at all, so my selected index is always going to be consistent. However, if I were to add the ability to add and remove items from the array (perhaps using Sys.Observer), this example is going to break, because when I modify the collection, I change the selected index values. So for example, if I had Dave selected, but I removed Jim, Dave's selected index goes from being 1 to 0, which means that I cannot accurately reconstruct the state of the page using selected index alone, and will need a more complex data key (preferably a primary key) to reconstruct the user's state. However, for this simple example, using the selected index is lightweight and works fine.
I hope this post has given you some good ideas on how to use the new ASP.NET AJAX stuff to do creative things with older legacy features. The big things that stick out for me are that we didn't have to loop through our elements and add handlers because of the command bubbling architecture of dataview, and that we didn't have to write any code to get selected items working. The full website is attached as a zip to this post. Happy Coding!