8 Windows Live Writer tips
Windows Live Writer really is an amazing application. It does one job really, really well. I've been using it on several blogs including this one (running on Community Server, Herding Code podcast (running on Wordpress). I've also used it to manage content in a variety of ways, including posting content to "hidden" blogs which were really content repositories for consumer facing sites.
Scott Hansleman's post last week (Download Windows Live Writer 2012) reminded me that I've been meaning to post some of my favorite tips I've picked up along the way.
1. Change Editor Font Size with a Simple CSS Edit
When I'm working on a post, I really want to focus on the content. WLW has a feature that pulls in your site's theme (hello Temporary Post Used For Style Detection), but I don't use that most of the time. You can toggle it on and off if you want, by the way - go to the Blog Account tab and click on Blog theme.
I've been wanting a way to change the text size in WLW forever - something like the Zoom feature in Office or Visual Studio would be nice, or even just a Text Size option. Alas, it's not there. I spent while trying to write a plugin or otherwise override the zoom for the editor area, but it wasn't happening.
It turns out there's an easier way: just edit the template CSS. If you're using the default theme, you can find that here:
"%ProgramFiles(x86)%\Windows Live\Writer\template\defaultstyle.css"
Note: You'll need to open whatever program you're using to edit the CSS as an administrator, since saving to \Program Files\ requires admin permissions.
I add the following to the end of the defaultstyle.css:
body
{
    font-family: 'Segoe UI';
    font-size: 16pt;
}

h1, h2, h3, h4, h5, h6 { font-weight: 900; }
It's up to you - add whatever is most readable while you're editing. You can toggle the blog theme back on when you're done if you need, but I rarely do.
If you want to tweak the detected blog theme, you can do that too - it just takes a bit more hunting. I found my blog theme's CSS here:
"%APPDATA%\Windows Live Writer\blogtemplates\9e1a3813-9fca-411f-8bdb-346d0b3d4671\style.css"
It'd be quite a coincidence if you've got the same GUID, but that will hopefully get you pointed in the right direction.
2. Sync Your Drafts With SkyDrive
One of the main reason to use WLW over the simple in-page editors is the use of offline drafts. I have tons of drafts. I'll frequently find out something interesting but not have time to blog it at the moment, or noodle on something I'm not ready to post just yet, etc., so I'll just throw links and an outline in a WLW draft until it's go time.
I work with a large, revolving cast of computers: a main desktop computer that gets upgraded every few years, as well as a bunch of different laptops. You probably do, too. So I'll frequently take some notes on my desktop computer one day and decide to write the blog post on my laptop that weekend. This is where draft sync comes in handy.
I used to use Windows Live Mesh, and I really liked that you could choose to sync any folder on any computer. SkyDrive went another way: you get one SkyDrive folder and that's that. But there are a couple of workarounds.
The high geek score approach is to use the mklink command to create a symlink - a fake subdirectory in your SkyDrive folder that points to another directory somewhere else.
But it turns out there's an easier way. There's a registry setting you can use to point the WLW posts folder wherever you want. Add a PostsDirectory key to HKCU\Software\Microsoft\Windows Live\Writer as shown below:
And of course, this will work with other sync systems like DropBox, too.
3. Export Your Settings as a Reg File
While we're talking registry - and who doesn't love to talk registry - I like to export my HKEY_CURRENT_USER\Software\Microsoft\Windows Live\Writer\Weblogs node or hive or whatever it's called to a reg file. I keep it in my SkyDrive blog folder, so I don't need to go through setting up all my blogs on a new computer. The WLW default run still expects you to set up one blog, so I do that, then close WLW and run my reg file to add all the others.
4. Look Up Your Blog Password Using the WLW API
If you happen to forget a blog password but it's stored in WLW and it's slow or difficult to retrieve it from the blog site, Javier Lozano wrote up a nice little console app to decrypt the password from where it's stored (encrypted) in the registry. It's an old post that's not up to date with the current API, but fortunately an anonymous blog poster published some updated code:
| using System; | |
| using Microsoft.Win32; | |
| // Add a ref to C:\Program Files (x86)\Windows Live\Writer\WindowsLive.Writer.BlogClient.dll | |
| using WindowsLive.Writer.BlogClient; | |
| // Add a ref to C:\Program Files (x86)\Windows Live\Writer\WindowsLive.Writer.CoreServices.dll | |
| using WindowsLive.Writer.CoreServices.Settings; | |
| using WindowsLive.Writer.CoreServices; | |
| namespace RecoverLiveWriterCredentials | |
| { | |
| class Program | |
| { | |
| static void Main(string[] args) | |
| { | |
| ApplicationEnvironment.Initialize(); | |
| RegistrySettingsPersister persister = | |
| new RegistrySettingsPersister(Registry.CurrentUser, | |
| @"Software\\Microsoft\\Windows Live\\Writer\\Weblogs"); | |
| string[] names = persister.GetSubSettings(); | |
| for (int i = 0; i < names.Length; i++) | |
| { | |
| ISettingsPersister blogPersister = persister.GetSubSettings(names[i]); | |
| SettingsPersisterHelper settings = new SettingsPersisterHelper(blogPersister); | |
| CredentialsDomain domain = new CredentialsDomain("name", "description", null, null); | |
| BlogCredentials creds = new BlogCredentials(settings, domain); | |
| Console.WriteLine("Blog: {0}", blogPersister.Get("BlogName")); | |
| Console.WriteLine("Username: {0}", creds.Username); | |
| Console.WriteLine("Password: {0}", creds.Password); | |
| Console.WriteLine(); | |
| } | |
| Console.ReadLine(); | |
| } | |
| } | |
| } |
5. Enable HTML5 Features
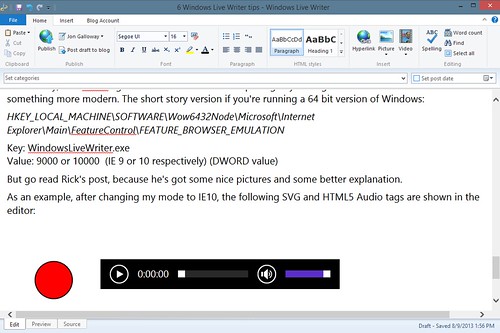
The WLW editor uses a Web Browser Control, but it defaults to IE 7 document mode. That means it won't understand any CSS3 styles or other modern HTML5 goodies.
Fortunately, Rick Strahl figured out how to make a simple registry setting that sets the browser version to something more modern. The short story version if you're running a 64 bit version of Windows:
HKEY_LOCAL_MACHINE\SOFTWARE\Wow6432Node\Microsoft\Internet Explorer\Main\FeatureControl\FEATURE_BROWSER_EMULATION
Key: WindowsLiveWriter.exe
Value: 9000 or 10000 (IE 9 or 10 respectively) (DWORD value)
But go read Rick's post, because he's got some nice pictures and some better explanation.
As an example, after changing my mode to IE10, the following SVG and HTML5 Audio tags are shown in the editor:
6. Use (And Write) Plug-Ins
After local / offline drafts, the other killer feature of WLW is plugins. I just use two (Flickr4Writer and PreCode Snippet), but it's of course up to you - what you're posting and how the editor can better support it.
I like Flickr4Writer because I host my blog photos on Flickr and Flickr4Writer makes it easy to insert them into posts.
I like PreCode because it cleanly formats source code in <pre> tags with support for a lot of code formatting JavaScript systems. (note: if you're inserting screenshots of code into posts, stop doing that)
I've also written some Plugins over the years (note to self: clean up and publish that code snippet to Gist plugin). The Windows Live Writer SDK does take a bit of work to figure out, but it's pretty powerful and you can find some good sample code to get you going.
I've found that most of what I've wanted to extend has required a Content Source Plugin. There are two kinds: simple (which just insert things into posts) and smart (which support live two-way editing, sidebars, resizing, etc. I tend to stick to the simple ones when possible, because full editor support is complex. Both Flickr4Writer and PreCode Snippet are open source, so check them out to see how it works.
7. Post Drafts To Your Blog
In the past, I've made some stupid mistakes in publishing Herding Code episodes. I've published incorrect or broken MP3 links, wrong guest information, you name it. It's worse publishing bad podcast info because podcast clients don't always pick up corrections later, plus there's a lot of caching on the site. It's better to get it right the first time.
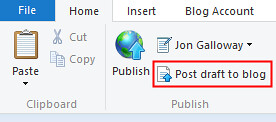
So lately I've been making a lot more use of the "Post draft to blog" publishing feature. Lots of blogging engines - including Wordpress - support this. It lets me post the draft so it's live on the site but only visible to me while logged in as an admin. I test that the audio plays, the download link is right, it looks okay in the browser (funny how viewing in the browser makes mistakes more obvious), etc., then publish it for real.
8. Installers
Okay, one more. Scott Hanselman just posted the link to the Windows Live Writer installer. Hooray for that, because it's not easy to find. Here are a few ways I cope.
Install using Chocolatey
Best: Install Windows Live Writer using Chocolatey. Part of the joy of Chocolatey is that you don't need to download installers anymore. This is the easy button.
c:\> cinst WindowsLiveWriter
Use the easy (but secret) URL
This is easy, right? http://writer.live.com
Sadly, hard to find. You can see it linked on the Wikipedia page, though.
Keep a backup
I don't know what's going on with Windows Live Writer any more than you do. I like it and hope for many more wonderful years of WLW bliss. In case it's ever unavailable, though, it's good to keep a copy of the offline installer around: http://windows.microsoft.com/en-us/windows-live/essentials-install-offline-faq


