Controls and the Desktop Window Manager
Of all the Windows Vista for Developers series articles that I have written, the one about the Desktop Window Manager (DWM) is by far the most popular considering the blog traffic statistics and the amount of email I receive with questions about glass.
By far the most common question I hear is about how to get controls to render correctly on glass. If you recall, I wrote the DWM article before the release of Windows Vista to manufacturing. Those early builds included a hack that allowed you to easily draw controls on glass by tweaking the transparency key. I demonstrated this technique in the article. Unfortunately, when Microsoft finally released Windows Vista this “hack” no longer worked leaving developers to wonder how it could be done.
Having said my piece about DWM and what with being extremely busy with my day job and various other commitments I never quite found the time to present alternative solutions. For the sake of my email inbox, I am going to present a simple solution to address the most common request:
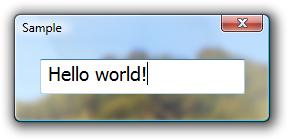
How can I display an edit control on glass?!
There are a number of ways of solving this sort of problem. Specifically, there are a number of ways to override the default drawing behavior of the standard and common controls.
You can handle WM_PAINT and draw it yourself. This tends to be more work than it’s worth so most developers avoid it, however it does allow you all the freedom necessary to paint with the necessary alpha channel information to render correctly on glass. My DWM sample demonstrates this technique, albeit not with a control.
Another solution is to owner draw controls. This is a lot of work but a lot less than the WM_PAINT approach as the system does a lot of the work for you. Owner draw is nice and works for most but not all controls. Notably it does not work with edit controls.
An even simpler approach is custom draw but this works with an even smaller set of controls.
Finally, for a small number of controls you can handle WM_CTLCOLORxxx to set the text and background color of the control.
Considering the options listed thus far, only the last one actually supports edit controls and does not involve a gargantuan amount of work. Unfortunately, it does not play nicely with glass since the technique involves GDI primitives that do not support alpha blending.
I repeat: How can I display an edit control on glass?!
It is at times like these that I wonder why I don’t work for Microsoft and am not compensated for the articles I post on my blog… :)
Having received yet another email yesterday asking about edit controls on glass I decided to poke around the Windows SDK to see if it has anything new to offer. By the way, if you do not regularly read the Windows SDK I highly encourage that you do so. On a hunch, I started my search in the Themes and Visual Styles section of the SDK. After all, this is the subsystem responsible for providing the look and feel for controls.
The first thing I noticed was a set of functions added to UxTheme.dll in Windows Vista to support buffered painting. At first this might not seem all that interesting since the DWM already provides a degree of double buffering, but having the ability to buffer painting operations means that you can capture, alter, and then paint the updated bitmap. Of course, this is nothing new and could be achieved manually but the new functions provided by Visual Styles just simplify the task and solves our immediate problem quite nicely.
The Buffered Paint API
The buffered paint API provides a set of functions to provide efficient off-screen painting to a device context (DC). Since painting is done to a DC, it means that your investment in GDI is not lost. That’s right folks, you don’t have to port your entire application to Windows Presentation Foundation just yet.
To start, you should call the BufferedPaintInit function at least once per thread to initialize the API for use. Each call to BufferedPaintInit must eventually be matched with a call to BufferedPaintUnInit on the same thread.
To begin a buffered paint operation, simply call the BeginBufferedPaint function. It accepts a target DC and target rectangle identifying the eventual location that the buffer will be copied to. A few additional paramteters allow you to control the buffer characteristics. One of these is the format of the buffer and thankfully, it supports device-independent bitmaps (DIBs) necessary for most alpha blending operations. BeginBufferedPaint then returns a handle that can be passed to various other buffered paint API functions as well as a DC that you can use to paint to the buffer.
One such function that you can pass the buffered paint handle to is BufferedPaintSetAlpha. It allows you to easily update the alpha channel for the entire buffer and set it to a single value to control the level of transparency/opacity. Note that it updates the alpha value for each pixel in the buffer to a single value.
Finally you can copy the buffer to the target DC and free the associated resources allocated by BeginBufferedPaint with a single call to the EndBufferedPaint function.
By now, you can probably imagine where I am going with this. You simply need to use the buffered paint API to create a buffer to paint the edit control into and then set the alpha channel on the buffer before updating the window DC. Let us bring it home with a sample.
The BufferedPaint class
The following class wraps the buffered paint API to simplify its use from C++.
class BufferedPaint
{
public:
BufferedPaint() :
m_handle(0)
{
COM_VERIFY(::BufferedPaintInit());
}
~BufferedPaint()
{
COM_VERIFY(::BufferedPaintUnInit());
}
HRESULT Begin(HDC targetDC,
const RECT& targetRect,
BP_BUFFERFORMAT format,
__in_opt BP_PAINTPARAMS* options,
__out CDCHandle& bufferedDC)
{
ASSERT(0 == m_handle);
m_handle = ::BeginBufferedPaint(targetDC,
&targetRect,
format,
options,
&bufferedDC.m_hDC);
HRESULT result = S_OK;
if (0 == m_handle)
{
result = HRESULT_FROM_WIN32(::GetLastError());
}
return result;
}
HRESULT End(bool updateTargetDC)
{
ASSERT(0 != m_handle);
HRESULT result = ::EndBufferedPaint(m_handle,
updateTargetDC);
m_handle = 0;
return result;
}
HRESULT SetAlpha(__in_opt const RECT* rect,
BYTE alpha)
{
ASSERT(0 != m_handle);
return ::BufferedPaintSetAlpha(m_handle,
rect,
alpha);
}
private:
HPAINTBUFFER m_handle;
};
The OpaqueEdit class
The following C++ class is used to subclass the system’s edit control so that we can more easily take over its painting duties.
class OpaqueEdit :
public CWindowImpl<OpaqueEdit, CEdit>
{
public:
BEGIN_MSG_MAP_EX(OpaqueEdit)
MESSAGE_HANDLER(WM_PAINT, OnPaint)
REFLECTED_COMMAND_CODE_HANDLER_EX(EN_CHANGE, OnChange)
DEFAULT_REFLECTION_HANDLER()
END_MSG_MAP()
private:
LRESULT OnPaint(UINT /*message*/,
WPARAM /*wParam*/,
LPARAM /*lParam*/,
BOOL& /*handled*/)
{
CPaintDC targetDC(m_hWnd);
CDCHandle bufferedDC;
if (SUCCEEDED(m_bufferedPaint.Begin(targetDC,
targetDC.m_ps.rcPaint,
BPBF_TOPDOWNDIB,
0, // options
bufferedDC)))
{
SendMessage(WM_PRINTCLIENT,
reinterpret_cast<WPARAM>(bufferedDC.m_hDC),
PRF_CLIENT);
COM_VERIFY(m_bufferedPaint.SetAlpha(0, // entire buffer
255)); // 255 = opaque
// Copy buffered DC to target DC
COM_VERIFY(m_bufferedPaint.End(true));
}
return 0;
}
void OnChange(UINT /*notifyCode*/,
int /*control*/,
HWND /*window*/)
{
VERIFY(InvalidateRect(0, // entire window
FALSE)); // don't erase background
}
BufferedPaint m_bufferedPaint;
};
As you can see in my WM_PAINT handler, I send the edit control the WM_PRINTCLIENT message, instructing it to paint into the buffered DC. I then set the buffer’s alpha channel to 255 (completely opaque) and update the target DC. What might come as a surprise is the need for the EN_CHANGE handler. Since the edit control paints outside of the WM_PAINT message, I need to paint “over” the extra painting that occurs when the control’s text changes. In this example, I simply invalidate the control, which forces it to receive a new WM_PAINT message. I could probably optimize this further but it is sufficient for this example. Keep in mind that since the DWM provides double buffering automatically you should not notice any flicker due to the repeated painting.
The SampleDialog class
The following class simply ensures that the window is represented as a “sheet” of glass and uses the OpaqueEdit class to subclass the edit control.
class SampleDialog :
public CDialogImpl<SampleDialog>
{
public:
enum { IDD = IDD_SAMPLE };
BEGIN_MSG_MAP(MainWindow)
MSG_WM_INITDIALOG(OnInitDialog)
MSG_WM_ERASEBKGND(OnEraseBackground)
COMMAND_ID_HANDLER(IDCANCEL, OnCancel)
REFLECT_NOTIFICATIONS()
END_MSG_MAP()
private:
bool OnInitDialog(HWND /*control*/,
LPARAM /*lParam*/)
{
const MARGINS margins = { -1 };
COM_VERIFY(::DwmExtendFrameIntoClientArea(m_hWnd,
&margins));
VERIFY(m_edit.SubclassWindow(GetDlgItem(IDC_CONTROL)));
return true; // Yes, go ahead and set the keyboard focus.
}
bool OnEraseBackground(CDCHandle dc)
{
CRect rect;
VERIFY(GetClientRect(&rect));
dc.FillSolidRect(&rect,
RGB(0,0,0));
return true; // Yes, I erased the background.
}
LRESULT OnCancel(WORD /*notifyCode*/,
WORD identifier,
HWND /*window*/,
BOOL& /*handled*/)
{
VERIFY(EndDialog(identifier));
return 0;
}
OpaqueEdit m_edit;
};
That is all there is to it. I hope the techniques described in this article will help in your path to adopting Windows Vista as a developer.
© 2007 Kenny Kerr