Blinking LEDs on Windows 10 IoT Core
With the release of Windows 10 IoT Core, Microsoft
released a set of new APIs, such as the ability to
control GPIO pins on Raspberry Pi. These can be used
both as output and input. In this example we are using
them as outputs, to be able to control a set of LEDs
on a breadboard.
Software needed:
-
Windows 10 IoT Core
- Visual Studio 2015 RC
Hardware needed:
-
Raspberry Pi 2
-
Four LEDs (red, green, blue and yellow)
-
Five jumper wires (male-female)
-
Four 220 ohm resistors (red - red - brown)
-
A breadboard
-
Ethernet cable
-
Micro-SD card
Before you are able to follow this, you must have installed Windows 10 IoT Core on your Raspberry Pi. You can follow the guide here if you haven’t:
http://ms-iot.github.io/content/win10/SetupRPI.htm
The first thing we will have to do is to set up the breadboard. Make sure you have disconnected your Raspberry Pi before doing this!
It should look like this (make sure the long legs are connected to the resistors and the short legs to ground):
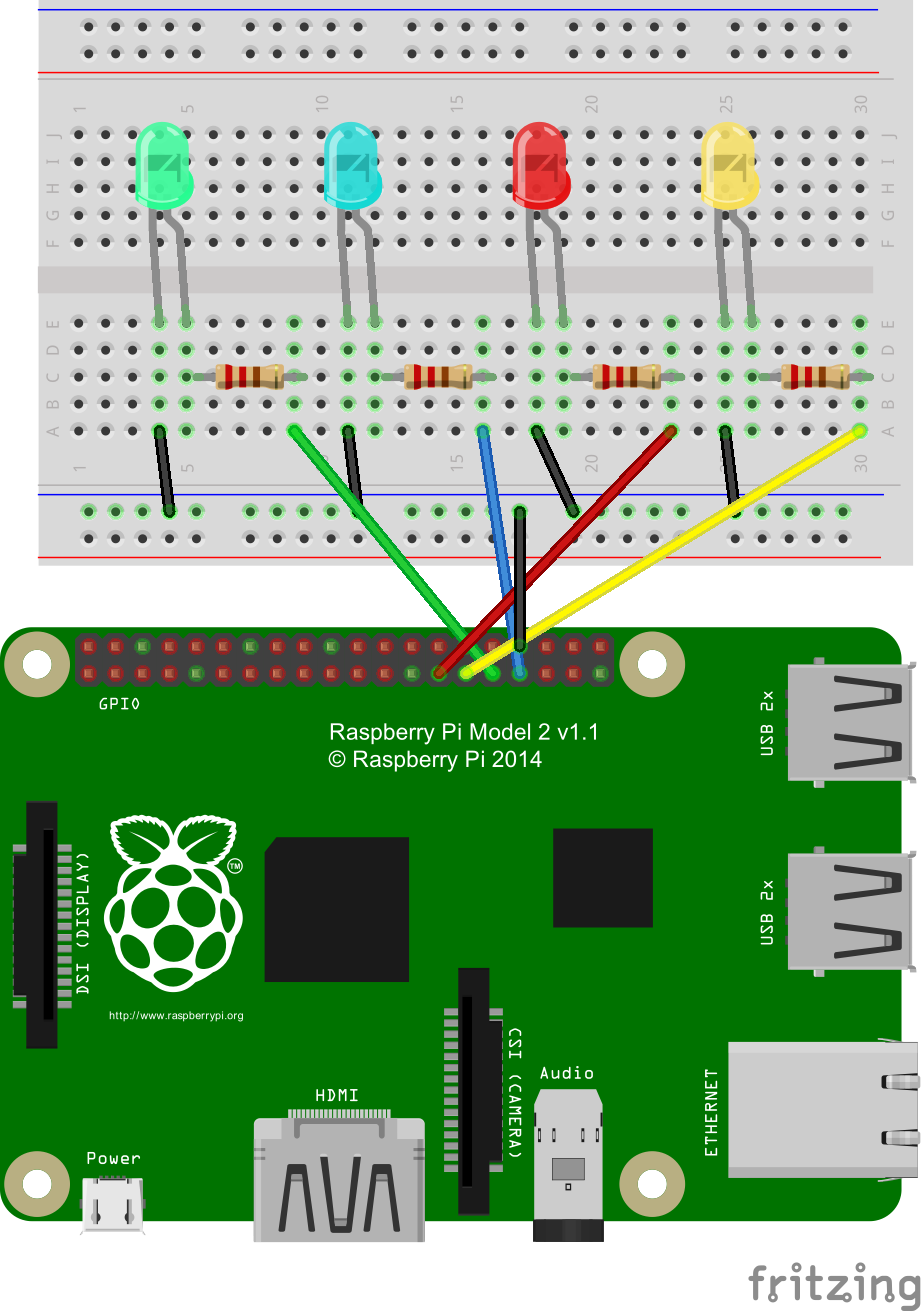
You can connect your Raspberry Pi again, but none of the LEDs should be turned on, since the pins are set to Low (0 volts) as default. To turn them on, we will have to set them as High (3.3 volts).
The reason we use 220 ohm resistors between the Gpio pins and the LEDs is because they will get too much current if we don’t. To calculate the current for this sketch, we can use Ohm’s law:
Current = Voltage / Resistance
Current = 3.3 / 220
Current = 0.015 (15 mA)
Since the LEDs we are using can hold 25-30 mA, this will work great. Using a resistor with less resistance will make the LED brighter, but giving it more than the maximum current will make the LED burn out after a very short while.
Now that we have set up the breadboard we can start Visual Studio.
Since we are going to use the DispatcherTimer class, which runs in the UI thread, we will have to create a “Blank App (Windows Universal)”, and not “Background Application (IoT)”.
When the project is created we need to go to “Add references” and choose Windows Universal > Extensions > Windows IoT Extension SDK. This will make it possible to use the Windows.Devices.Gpio namespace.
In Mainpage.xaml.cs we will add this code:
| using System; | |
| using Windows.Devices.Gpio; | |
| using Windows.UI.Xaml; | |
| using Windows.UI.Xaml.Controls; | |
| // The Blank Page item template is documented at http://go.microsoft.com/fwlink/?LinkId=402352&clcid=0x409 | |
| namespace rpi_win10_blinking_leds | |
| { | |
| /// <summary> | |
| /// An empty page that can be used on its own or navigated to within a Frame. | |
| /// </summary> | |
| public sealed partial class MainPage : Page | |
| { | |
| private GpioPin _yellowLED; | |
| private GpioPin _redLED; | |
| private GpioPin _greenLED; | |
| private GpioPin _blueLED; | |
| private DispatcherTimer _timer; | |
| private int _loop = 0; | |
| public MainPage() | |
| { | |
| this.InitializeComponent(); | |
| _timer = new DispatcherTimer(); | |
| _timer.Interval = TimeSpan.FromMilliseconds(250); | |
| _timer.Tick += BlinkLeds; | |
| _timer.Start(); | |
| SetupLeds(); | |
| } | |
| private void SetupLeds() | |
| { | |
| var gpio = GpioController.GetDefault(); | |
| _redLED = gpio.OpenPin(0); | |
| _redLED.SetDriveMode(GpioPinDriveMode.Output); | |
| _yellowLED = gpio.OpenPin(5); | |
| _yellowLED.SetDriveMode(GpioPinDriveMode.Output); | |
| _greenLED = gpio.OpenPin(6); | |
| _greenLED.SetDriveMode(GpioPinDriveMode.Output); | |
| _blueLED = gpio.OpenPin(13); | |
| _blueLED.SetDriveMode(GpioPinDriveMode.Output); | |
| } | |
| private void On(GpioPin pin) | |
| { | |
| pin.Write(GpioPinValue.High); | |
| } | |
| private void Off(GpioPin pin) | |
| { | |
| pin.Write(GpioPinValue.Low); | |
| } | |
| private void BlinkLeds(object o, object e) | |
| { | |
| switch (_loop) | |
| { | |
| case 1: | |
| On(_greenLED); | |
| break; | |
| case 2: | |
| On(_blueLED); | |
| break; | |
| case 3: | |
| On(_redLED); | |
| break; | |
| case 4: | |
| On(_yellowLED); | |
| break; | |
| default: | |
| Off(_greenLED); | |
| Off(_blueLED); | |
| Off(_yellowLED); | |
| Off(_redLED); | |
| break; | |
| } | |
| _loop = _loop >= 4 ? 0 : _loop + 1; | |
| } | |
| } | |
| } |
We start by declaring our four LEDs, the timer and an int that will be used in the timer callback function to control which LEDs will be turned on.
In the constructor, we start our timer and setup all LEDs. When setting up the LEDs, we declare the GPIO pins to use for each led, and set them all as outputs since we want to control either they should get voltage or not. By using them as input, we can use sensors and devices such as photoresistors, memory card readers, temperature sensors etc to send voltage to the pin, which we can read the value from later on. But in this case, the pins are the “master”.
When our pins are configured, we call the BlinkLeds method every 250 millisecond. Each time we set a new LED to High, or set them all to Low.
To deploy (and possibly debug) the code, change the platform target to ARM, and to a Remote Machine. Here you need to set the IP or machine name to your Raspberry Pi. When you have done that, just click on F5 and your project should be deployed and started. J
This is how it should look like:
You can download the full project here: