Local file access - Silverlight 4
I was successful in setting up my first virtual machine and install Visual Studio 2010 on it. I know I can run VS2010 side-by-side with VS2008, but I wanted to be absolutely sure I don’t corrupt/change any of my projects/solutions. Here’s the first of the ‘- Silverlight 4’ series and I hope to be doing more of these.
Silverlight 4 allows local file/folder access to trusted applications. Let’s build one that does this.
This app runs Out-of-Browser (OOB) as a trusted application thus allowing moving files between the ‘SpecialFolder’s - My Documents, My Music, My Pictures, Program Files, Cookies to name a few. Read on for the ‘how’ part and download the complete application here.
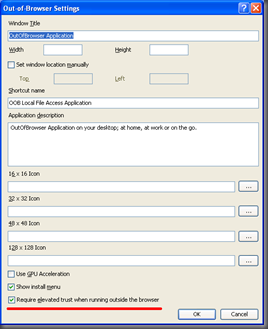
Create a new Silverlight Application project. By default, VS2010 asked me if I needed a Web Application and I accepted, although this is not needed to run your Silverlight app as an Out-Of-Browser (OOB) app. Double-click on the ‘Properties’ folder under your Silverlight project to open the Project properties window (or right-click Silverlight project and select ‘Properties’). Under the ‘Silverlight’ tab, check the ‘Enable running application out of the browser’ and click on the ‘Out-of-Browser Settings’ button. In this window, check ‘Require elevated trust when running outside the browser’ option (see images below). This is how you make your application a ‘Trusted Application’.
After these basic config changes, let’s move on to the XAML/coding side of the application. As mentioned above, the app moves files from two folders, in my case, the My Documents folder and the My Music folder. This means, in the UI, I need two list boxes to hold the files and two buttons to move the files. The complete UI is below:
1: <Canvas x:Name="LayoutRoot" Background="White">
2: <ListBox Height="100" HorizontalAlignment="Left" Margin="12,108,0,0"
3: Name="MyDocsListBox" VerticalAlignment="Top" Width="164" DisplayMemberPath="Name" />
4: <TextBlock Height="23" HorizontalAlignment="Left"
5: Margin="31,79,0,0" Name="MyDocsBlock" Text="My Documents"
6: VerticalAlignment="Top" Width="120" TextAlignment="Center" />
7: <Button Content=">" Height="23" HorizontalAlignment="Left"
8: Margin="191,123,0,0" Name="MoveDocsToMusic"
9: VerticalAlignment="Top" Width="23" Click="MoveDocsToMusic_Click" />
10: <Button Content="<" Height="23" HorizontalAlignment="Left"
11: Margin="191,167,0,0" Name="MoveMusicToDocs"
12: VerticalAlignment="Top" Width="23" Click="MoveMusicToDocs_Click" />
13: <ListBox Height="100" HorizontalAlignment="Left" Margin="231,108,0,0"
14: Name="MyMusicListBox" VerticalAlignment="Top" Width="157" DisplayMemberPath="Name" />
15: <TextBlock Height="23" HorizontalAlignment="Left"
16: Margin="246,79,0,0" Name="MyMusicBlock"
17: Text="My Music" VerticalAlignment="Top" Width="120"
18: TextAlignment="Center"/>
19: <TextBlock Text="To see this app in action, run it out of the browser."
20: Margin="52,240,58,41" Name="MessageBlock" Foreground="#FFCE4242" />
21: <TextBlock Height="23" HorizontalAlignment="Left" Margin="23,12,0,0"
22: Name="textBlock1" VerticalAlignment="Top" Width="354" FontSize="12"
23: Text="App to show how to move files between local folders" />
24: </Canvas>
Nothing fancy, just used the really cool drag-n-drop feature in VS2010 to align my controls. The only notable things here are that we’re only showing the ‘Name’ property of whatever gets added to the list boxes as shown in lines 3 and 14 using the DisplayMemberPath property. The second thing is about the content for the buttons in lines 7 and 10. I had to use the encoded version of the symbols have a valid XAML.
Now to the code-behind: This is what my MainPage’s Loaded event looks like:
1: void MainPage_Loaded(object sender, RoutedEventArgs e)
2: {3: // I only need to check for HasElevatedPermissions
4: // and not both HasElevatedPermissions and IsRunningOutOfBrowser
5: // because an app can run OOB without having elevated permissions
6: // but the converse is not possible
7: if (App.Current.HasElevatedPermissions)
8: {9: // hide the MessageBlock and show all other controls
10: MessageBlock.Visibility = Visibility.Collapsed; 11: MyDocsBlock.Visibility = Visibility.Visible; 12: MyMusicBlock.Visibility = Visibility.Visible; 13: MyDocsListBox.Visibility = Visibility.Visible; 14: MyMusicListBox.Visibility = Visibility.Visible; 15: MoveDocsToMusic.Visibility = Visibility.Visible; 16: MoveMusicToDocs.Visibility = Visibility.Visible;17: // load files from the My Documents and My Music folders
18: // to respective list boxes
19: LoadFiles(); 20: }21: else
22: {23: // hide all controls except the MessageBlock
24: // informing the user to install the app as an OOB
25: MyDocsBlock.Visibility = Visibility.Collapsed; 26: MyMusicBlock.Visibility = Visibility.Collapsed; 27: MyDocsListBox.Visibility = Visibility.Collapsed; 28: MyMusicListBox.Visibility = Visibility.Collapsed; 29: MoveDocsToMusic.Visibility = Visibility.Collapsed; 30: MoveMusicToDocs.Visibility = Visibility.Collapsed; 31: MessageBlock.Visibility = Visibility.Visible; 32: } 33: }Yes, as mentioned in the comments, you only need to check if the app has elevated permissions. The first time you run the app in the browser, I’m hide everything except the MessageBlock that tells the user to install the app as OOB. What about the LoadFiles() method? Here it comes!!
1: private void LoadFiles()
2: {3: // this is where the app would fail if it did not have elevated permissions
4: string path = Environment.GetFolderPath(Environment.SpecialFolder.MyDocuments);
5: AddFilesToListBox(path, MyDocsListBox); 6: path = Environment.GetFolderPath(Environment.SpecialFolder.MyMusic); 7: AddFilesToListBox(path, MyMusicListBox); 8: } 9: 10: private void AddFilesToListBox(string path, ListBox myListBox)
11: { 12: myListBox.Items.Clear();13: DirectoryInfo myDirectory = new DirectoryInfo(path);
14: foreach (FileInfo file in myDirectory.EnumerateFiles())
15: {16: // discard the 'desktop.ini' file
17: // since it's specific to the folder
18: // you can also bind the data (enumerated files) to the list box
19: // but I chose this method
20: if (file.Extension.ToLower() != ".ini")
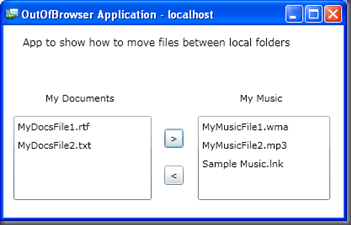
21: { 22: myListBox.Items.Add(file); 23: } 24: } 25: }Now your application should run and load the files in the two folders to the two list boxes. Here’s my version:
Coming to the Click events of the two buttons:
1: private void MoveDocsToMusic_Click(object sender, RoutedEventArgs e)
2: {3: // since we've added a FileInfo object to the list box
4: // we can cast the SelectedValue property back to FileInfo
5: FileInfo selectedFile = (FileInfo) MyDocsListBox.SelectedValue;6: string path = Environment.GetFolderPath(Environment.SpecialFolder.MyMusic);
7: string newPath = string.Format("{0}\\{1}", path, selectedFile.Name);
8: if (!File.Exists(newPath))
9: { 10: File.Move(selectedFile.FullName, newPath); 11: File.Delete(selectedFile.FullName); 12: }13: // reload the list boxes to reflect the changes
14: LoadFiles(); 15: } 16: 17: private void MoveMusicToDocs_Click(object sender, RoutedEventArgs e)
18: { 19: FileInfo selectedFile = (FileInfo)MyMusicListBox.SelectedValue;20: string path = Environment.GetFolderPath(Environment.SpecialFolder.MyDocuments);
21: string newPath = string.Format("{0}\\{1}", path, selectedFile.Name);
22: if (!File.Exists(newPath))
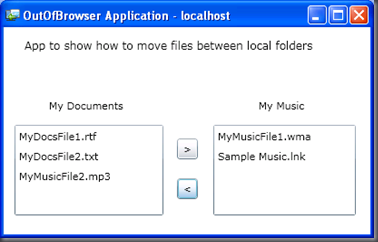
23: { 24: File.Move(selectedFile.FullName, newPath); 25: File.Delete(selectedFile.FullName); 26: } 27: LoadFiles(); 28: }And it’s done. Here’s what my screen looks like after I’ve moved the MyMusicFile2.mp3 to My Documents folder:
That’s it. It’s that simple.
Now, there was something else that helped me write this blog - Laurent Duveau’s article that tells you how you can debug OOB apps.. real useful and real simple. Thanks Laurent.
Download the application here.
Disclaimer: The app I’ve written is not intended to do anything else other than what’s mentioned above. If for some reason, something goes wrong on your machine, don’t hold me responsible (please!).
PS: I know there are a few ‘gaps’ in my app, but this is not meant to be production quality code, just intended to share the information.


