Using QUnit for JavaScript unit test and BlanketJS for code coverage
I recently started using QUnit for unit testing JS code and I’m really impressed with it. I’m sure Jasmine framework is equally good, but I picked up QUnit because none of the languages/frameworks I have learned so far have the letter ‘Q’ in them!!
So I have a simple page which is used to add two numbers and show the sum as a text.
1: <!DOCTYPE html>
2:
3: <html lang="en" xmlns="http://www.w3.org/1999/xhtml">
4: <head>
5: <meta charset="utf-8" />
6: <title>qUnit and Blanketjs</title>
7: </head>
8: <body>
9: <input type="text" id="arg1" />
10: <input type="text" id="arg2" /> <br />
11: <div id="output1"> </div>
12: <input type="button" id="button1" value="Show sum" /><p />
13: </body>
14: <script src="Scripts/jquery-2.0.0.min.js"></script>
15: <script src="Scripts/main.js" type="text/javascript"></script>
16: </html>
I’m using jQuery 2.0 for this as it is the current version. My javascript to get the ‘complex’ summation feature looks as below.
1: var getSum = function (arg1, arg2) {
2: var intArg1 = parseInt(arg1);
3: var intArg2 = parseInt(arg2);
4: return intArg1 + intArg2;
5: };
6:
7: var getSumText = function (arg1, arg2) {
8: var sum = getSum(arg1, arg2);
9: return 'The sum of ' + arg1 + ' and ' + arg2 + ' is ' + sum + '.';
10: };
11:
12: $("#button1").click(function (e) {
13: var sumText = getSumText($("#arg1").val(), $("#arg2").val());
14: $("#output1").text(sumText);
15: e.stopPropagation();
16: });
I’m using the ‘function operator’ methodology to create my functions. See a very good article by Helen Emerson on this here. Declaring your functions before they are called will also help you get a ‘green’ from jsLint and jsHint.
A sample output looks like below.
Now let’s start writing unit test for these. QUnit requires three things to get started – the html, QUnit javascript framework and QUnit CSS file. All of these are detailed in the site itself. My qUnit.html contains a reference of main.js (containing the .js code for the feature) and the mainTests.js where I’m going to write my JavaScript unit test cases in.
1: <!DOCTYPE html>
2: <html>
3: <head>
4: <meta charset="UTF-8" />
5: <title>Test Suite</title>
6: <link href="Content/qunit-1.12.0.css" rel="stylesheet" />
7: <script src="Scripts/jquery-2.0.0.min.js"></script>
8: <script src="Scripts/main.js"></script>
9: <script src="Scripts/qunit-1.12.0.js"></script>
10: <script src="Scripts/mainTests.js"></script>
11: </head>
12: <body>
13: <h1 id="qunit-header">Test Suite</h1>
14: <h2 id="qunit-banner"></h2>
15: <div id="qunit-testrunner-toolbar"></div>
16: <h2 id="qunit-userAgent"></h2>
17: <ol id="qunit-tests"></ol>
18: <div id="qunit-fixture"></div>
19: </body>
20: </html>
Let’s start with writing a unit test for the getSum method.
1: module('Sum tests');
2: test('should add correctly', 1, function() {
3: var sum = getSum('2', '1');
4: deepEqual(sum, 3, 'sum is correct');
5: });
The first line declares a module which somewhat equates to a test class under which you can add all related tests. This is not required for unit testing per say, but is a good practice to segregate your tests. Also, as you will see later, QUnit gives a way to run all tests under a specific module.
The second line declares your unit test with a title – ‘should add correctly’. The second parameter tells the number of assertions expecting in this test case. The third one the function itself. We call the getSum() function passing two arguments and get the return.
The assertion ‘deepEqual’ compares the output with an expected value along with the type of the result, hence the name ‘deepEqual’. The complete details on using QUnit is provided on their cookbook page.
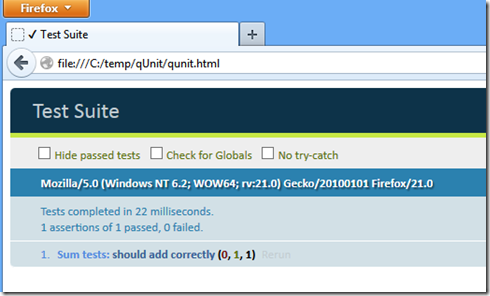
If I run the qUnit.html in the browser, I’ll see the below.
There’s one test method under the module ‘Sum tests’ and it has passed. Wuhoo!
Now, let’s switch gears and go to BlanketJS to implement the code coverage part.
There are three changes we’ll make to get BlanketJS to do it’s job to the qUnit.html page.
1: <!DOCTYPE html>
2: <html>
3: <head>
4: <meta charset="UTF-8" />
5: <title>Test Suite</title>
6: <link href="Content/qunit-1.12.0.css" rel="stylesheet" />
7: <script src="Scripts/jquery-2.0.0.min.js"></script>
8: <script src="Scripts/main.js" data-cover></script>
9: <script src="Scripts/qunit-1.12.0.js"></script>
10: <script src="Scripts/blanket.min.js"></script>
11: <script src="Scripts/mainTests.js"></script>
12: </head>
13: <body>
14: <h1 id="qunit-header">Test Suite</h1>
15: <h2 id="qunit-banner"></h2>
16: <div id="qunit-testrunner-toolbar"></div>
17: <h2 id="qunit-userAgent"></h2>
18: <ol id="qunit-tests"></ol>
19: <div id="qunit-fixture"></div>
20: <script type="text/javascript">function blanket_toggleSource(e) {
21: var t = document.getElementById(e);
22: t.style.display === "block" ? t.style.display = "none" : t.style.display = "block";
23: }</script>
24: </body>
25: </html>
The first is the inclusion of the blanket js file as shown in line 10. The second one is the addition of ‘data-cover’ attribute to the reference of main.js on line 8. This is the attribute that BlanketJS looks for to provide code coverage on. The third and the last change is the addition of the script tag as seen in lines 20-23.
Now if you refresh the qUnit.html page, you’ll see a new option – the Enable coverage checkbox. Click on it and the page refreshes with the coverage details.
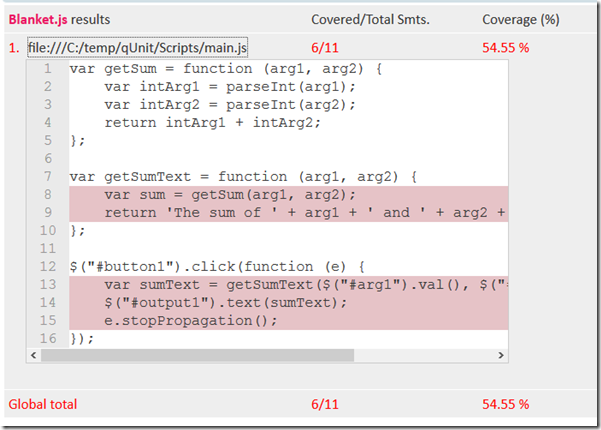
There you go. Now you have coverage for your main.js file. Clicking on the main.js link gives you even more details.
Brilliant right? So now we know the getSumText is not covered, let’s write another test for that and see the results.
1: test('should display text correctly', 1, function() {
2: var sumText = getSumText(3, 5);
3: equal(sumText, 'The sum of 3 and 5 is 8.', 'sum text is correct');
4: });
The latest results are:
So there you go – JavaScript unit testing and code coverage in real simple steps.


