Roland Weigelt
Born to Code
-
Emaroo 4.7.0 - Support for VS Code 1.55
Emaroo is a free utility for browsing most recently used (MRU) file lists of programs like Visual Studio, VS Code, Word, Excel, PowerPoint, Photoshop, Illustrator and more. Quickly open files, jump to their folder in Windows Explorer, copy them (and their path) to the clipboard - or run your own tools on files and folders with custom actions!
- Download Emaroo on www.roland-weigelt.de/emaroo
About this Release
- Updated: Support for Visual Studio Code 1.55 (changes regarding list of most recently used folders/workspaces). Previous versions of Visual Studio Code are still supported.
-
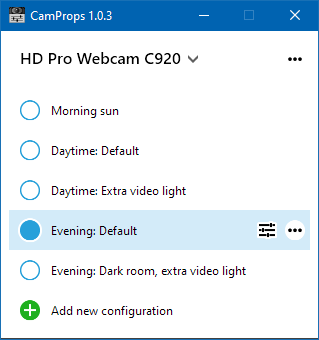
Adjust, Save and Restore Webcam Properties With CamProps
In recent months, I wrote a few articles that hinted that I was developing a webcam-related utility (here, here, here and here). About two weeks ago, I released it to my colleagues who liked it and found it useful. Now, after some improvements, I am ready for a release to a larger audience.
What is it?
CamProps is a free utility for quickly adjusting and managing the properties of webcams and other video capture devices.
Where can I get it?
You can download CamProps at https://www.roland-weigelt.de/camprops/
Why should I use it?
The picture quality of many webcams can be improved by manually tweaking properties like focus, exposure or gain. When doing so, you may run into a few issues, though:
- If you are in a room with changing lighting conditions, you have to adjust the settings each time you want to use the camera.
- Some third-party software may decide to reset the camera back to default.
- And some devices simply
forget
all settings after a reboot.
CamProps lets you
- quickly adjust camera properties,
- manage different sets of configurations, and
- restore the settings with a single click.
Which devices can I use?
CamProps works with all webcams and video capture devices that support opening the webcam driver property dialog (either the default provided by Windows or a specific dialog by the manufacturer's driver).
For instance, when you press the “
 ” button for a Logitech C920 without the Logitech software installed, this will open the following dialog:
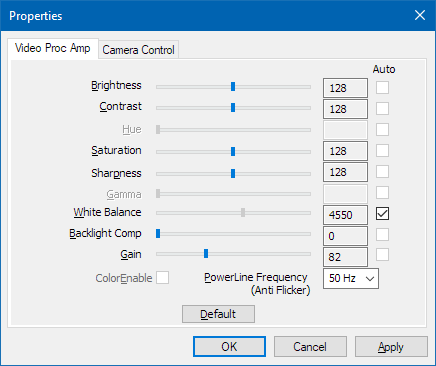
(This dialog may look different for other devices)
How do I start?
- Head to https://www.roland-weigelt.de/camprops/
- Download and install the program.
- Read the “How to…” section on setting up your first configuration, activating a configuration and backing up the automatically stored settings.
-
Compiling DirectShow.Net for use in .NET 5
In a previous blog post, I wrote about how to access webcam properties from C# using DirectShow.Net. The last release of the library is version 2.1 from February 2010, with project files for Visual Studio 2008.
Fortunately, porting the project to compile for .NET 5 went pretty quick.
The project file
<Project Sdk="Microsoft.NET.Sdk">

  <PropertyGroup>
    <TargetFramework>net5.0-windows</TargetFramework>
    <RootNamespace>DirectShowLib</RootNamespace>
    <SignAssembly>true</SignAssembly>
    <AssemblyOriginatorKeyFile>DShowNET.snk</AssemblyOriginatorKeyFile>
    <DelaySign>false</DelaySign>
    <GenerateAssemblyInfo>false</GenerateAssemblyInfo>
    <PackageId>DirectShowLib.Net</PackageId>
    <Authors>http://sourceforge.net/projects/directshownet/</Authors>
  </PropertyGroup>

</Project>
Things to note:
- The target framework is
net5.0-windowsbecause the code (obviously) uses Windows-specific features. - I added
<GenerateAssemblyInfo>false<GenerateAssemblyInfo>to use theAssemblyInfo.csfile that came with the original project.
AssemblyInfo.cs
The following modifications were necessary:
- Change
AssemblyVersionfrom2.1.0.*to2.1.0.0because the compiler complained about the wildcard. - Remove the lines related to the
.snkfile (now handled in the project file). - Add
SupportedOSPlatform("windows").
using System; using System.Reflection; using System.Runtime.InteropServices; using System.Security.Permissions; [assembly : AssemblyTitle("DirectShow Net Library")] [assembly : AssemblyDescription(".NET Interfaces for calling DirectShow. See http://directshownet.sourceforge.net/")] [assembly : AssemblyConfiguration("")] [assembly : AssemblyCompany("")] [assembly : Guid("6D0386CE-37E6-4f77-B678-07C584105DC6")] [assembly : AssemblyVersion("2.1.0.0")] #if DEBUG [assembly : AssemblyProduct("Debug Version")] #else [assembly : AssemblyProduct("Release Version")] #endif [assembly : AssemblyCopyright("GNU Lesser General Public License v2.1")] [assembly : AssemblyTrademark("")] [assembly : AssemblyCulture("")] [assembly : AssemblyDelaySign(false)]// Path is relative to the resulting executable (\Bin\Debug) #if USING_NET11 [assembly : AssemblyKeyFile("..\\..\\DShowNET.snk")] #endif [assembly : AssemblyKeyName("")][assembly : ComVisible(false)] [assembly : CLSCompliant(true)][assembly : SecurityPermission(SecurityAction.RequestMinimum, UnmanagedCode=true)][assembly: System.Runtime.Versioning.SupportedOSPlatform("windows")]LGPL
The DirectShow.Net library is licensed under the Lesser General Public License (LGPL) Version 2.1.
To be able distribute my software at some point in the future, the LGPL license requires – in addition to proper attribution – to
- ship the library as an individual DLL (instead of ripping out just the parts that I need), and to
- make the source code available publicly.
In order to comply with the LGPL, I published my fork of the library on https://github.com/RWeigelt/DirectShow.Net.
Please note that I did not perform any tests of features that go beyond accessing webcam properties. The library compiles, I can use it in my project, and so far it did not break my code – that’s good enough for me at this moment…
- The target framework is
-
WPF, Text Rendering and the Blues
I am currently working on a small webcam utility written in C#/WPF that I intend to release as freeware later this year.
On the main window, I use a
ComboBoxfor selecting a webcam in a dropdown list, with the toggle button of the control styled to look like a heading:
When you move the mouse pointer over the toggle button, the text and the glyph turn blue – nothing special.

The application does not have a main menu, only a settings menu that you open by clicking a gear icon:

The icon also turns blue when the pointer hovers over the general area:

But wait a second… is this the same blue? A quick check:
- The XAML says the text color is
#0987c3. - The color picker in Photoshop tells me that the color of most icon pixels is… also
#0987c3!
What is going on?
On a screenshot zoomed to 300%, the gear icon looks like this:

And this is the text at 300% size:

The colored pixels to the left and the right of the characters are caused by ClearType. You will also notice that many pixels “inside” the character shapes also have a different color. This is because less pixels than one might expect are fully covered in blue – which means that more pixels have their color modified by ClearType.
What did I do wrong?
It is not what I did do, but what I did not do. I did not tweak WPF’s text rendering to suit my needs. Which sounds curious, because writing a desktop application that looks good at typical application font sizes is not exactly an exotic usage scenario.
When WPF was developed, it was designed to be device-independent and ready for a future of high pixel density displays (“HiDPI”). So WPF rendered text exactly as specified by the font metrics, which on normal density displays led to blurry characters. It took until .NET 4 for WPF to offer a way to render small text with an emphasis on readability instead of correctness (read this old article by Scott Hanselman for a look way back in time).
What to do
As a WPF developer, you can influence the text rendering by using the attached properties
TextOptions.TextFormattingModeandTextOptions.TextRenderingMode. You apply them directly on an element, e.g., aTextBlockor set them on a window.TextOptions.TextFormattingMode
The property
TextOptions.TextFormattingModecan be set toDisplayorIdeal(which is the default).- With
Ideal, text is rendered according to the font's metrics. Which is fine for large text, but not so much for small text on a non-HiDPI display. - With
Display, the text rendering favors of aligning letters to pixels. This is especially important for small text on normal density screens.
TextOptions.TextRenderingMode
The property
TextOptions.TextRenderingModecontrols the way rendered text will be anti-aliased. Possible values areAliased(which we will see can be confusing),Auto(the default),ClearType, andGrayscale.To show off the possible combinations, I placed the gear icon directly in front of the text (where it does not make any sense, just for comparing colors):
DisplayAliased

DisplayAuto

DisplayClearType

DisplayGrayscale

IdealAliased

IdealAuto

IdealClearType

IdealGrayscale

So many options…
In a first round, I eliminated:
Display&Aliased(no anti-aliasing),Ideal&ClearType(the combination that caused me to write this article in the first place),Ideal&Auto(which in my simple scenario looks the same asIdeal&ClearType), andDisplay&ClearType(even though it looks better thanIdeal&ClearType)
Which left me with the following options:
DisplayGrayscaleIdealAliasedIdealGrayscaleIn the end, I decided to use
Ideal&Aliasedbecause I wanted the bolder text without a larger font size. And Segoe UI in “real” bold does not look good at this font size. Interesting that withIdeal, the settingAliasedis actually anti-aliased…I set
TextOptions.TextFormattingMode="Display"on my application window but did not specifyTextOptions.TextRenderingModethere.For the dropdown list, I set
TextOptions.TextFormattingMode="Ideal"andTextOptions.TextRenderingMode="Aliased"on theContentPresenterof the toggle button.A note on “Display” vs. “Ideal” used with “Grayscale”
While writing this blog post, I had to juggle a larger number of image files than usual. When I saw the letter “P” in the enlarged versions of
Display&GrayscaleandIdeal&Grayscale, I first suspected I had mixed up the screenshots. But that was not the case; it is just a coincidence that the “H” and the “P” look sharper.This becomes clear when you look at a different text:
DisplayGrayscale

IdealGrayscale

Note the way the “m” is rendered and how more vertical lines are aligned to full pixels in
Displaymode.A good example for small sample sizes leading to wrong conclusions…
- The XAML says the text color is
-
How to Access Webcam Properties from C#
My Logitech C920 webcam requires some tweaking of settings like exposure, gain, focus, etc. to get good image quality. I uninstalled the “feature rich” Logitech software and now change the settings using the bare-bones Windows webcam properties dialog. This works well for me; unfortunately, the settings are not persisted reliably. After a cold-boot, or sometimes after simply starting an application that uses the webcam, I have to make the adjustments again.
That is why I became interested in what would it take to read and write the webcam properties and to open the properties dialog from C#. The result of a web search was a bit intimidating as I came across multimedia APIs that go way beyond what I intended to do. After all, I only wanted to access the properties, not write a full-blown video capture suite.
In the end I settled on DirectShow.Net, a C# wrapper around DirectShow under LPGL license. Even though DirectShow is an old API and the DirectShow.Net project seems to be no longer active, I found one very important reason to use it: A working sample that opened the webcam properties dialog.
This blog post starts with a guided tour through the sample, with the intended side-effect of making the sample easier to discover on the web. Additionally, I will describe how to access the properties from your code.
Step 1: Download DirectShow.Net
- Visit http://directshownet.sourceforge.net/
- Go to “Downloads”
- Download the latest version of the library (
DirectShowLibV2-1.zipat the time of this writing) - Download the samples (
DirectShowSamples-2010-February.zip) - Unpack the ZIP files so that the folder
Samplesis in the same directory asDocs,libandsrc. - The
libfolder contains the fileDirectShowLib-2005.dllwhich the samples reference.
Step 2: Run the “DxPropPages” demog
- Open
Samples\Capture\DxPropPages\DxPropPages-2008.slnin Visual Studio and let the “One-way upgrade” finish. - Run the project.
- In the window that appears,
- select your webcam and
- press the “Show property pages” button.
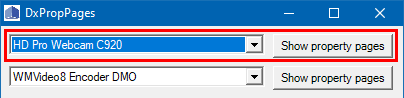
- On my computer, a properties dialog with two tabs appears. Depending on your drivers/webcam software, the dialog may have been replaced. But the generic, low-level dialog looks like this:
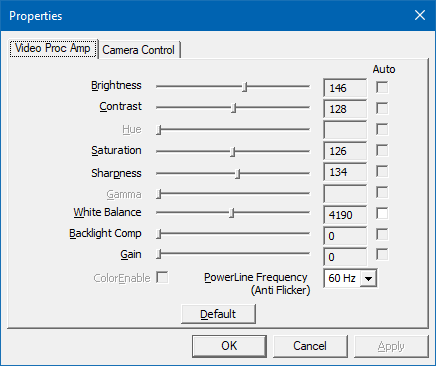
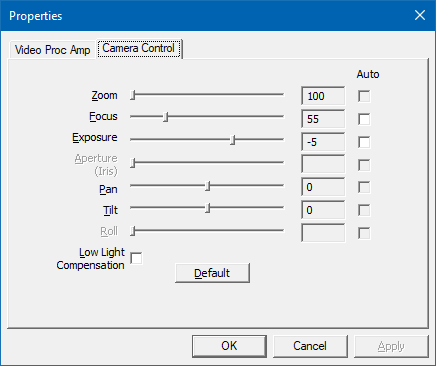
(Remember “Video Proc Amp” and “Camera Control”, we will come across these names later)
Step 3: Look at the code
- Stop the program.
- Open the code view of the file
Form1.cs. - Set a breakpoint at the start of
- the constructor e
Form1(), - the
comboBox1_SelectedIndexChanged()event handler, and - the
DisplayPropertyPage()method. - Run the program in the debugger.
How to get the available webcam(s)
When the first breakpoint is hit, you will see the following lines:
foreach (DsDevice ds in DsDevice.GetDevicesOfCat(FilterCategory.VideoInputDevice))
{
    comboBox1.Items.Add(ds.Name);
}
The code gets all available “video input devices” (which include webcams) and fills the dropdown that you used in step 2 to choose your webcam.
A
DsDeviceinstance has two important properties for identifying a device:Namereturns a human-readable name (i.e., what you saw in the dropdown list)DevicePathreturns a unique identifier.
At this point, the sample does not store the instances, only the names, even though we need the
DsDeviceinstance for the selected webcam later. I am not sure whether there is a reason for this other than keeping the sample code short and to be able to re-use theCreateFilter()method (which we will look at soon).How to open the properties dialog
Now continue to run the program. The
comboBox1_SelectedIndexChangedevent handler gets called automatically during startup. If your webcam is not the first device, let the program continue and select the webcam in the dropdown.After the breakpoint has been hit, look at the code.
- The purpose of the event handler is to set the field
theDevice(of typeIBaseFilter) which we need later. - The call of
Marshal.ReleaseComObject(theDevice)when switching between devices is a reminder that we are dealing with COM and its reference counting (instead of relying on garbage collection). - Note that the variable name
devicepathis misleading; the dropdown contains the display names of the devices. This becomes clear when we look at theCreateFilter()method: The second parameter is calledfriendlynamewhich is more appropriate.
Inside the
CreateFilter()method, some “COM stuff” happens. The important bit for us is that the returnedIBaseFilteris assigned to the fieldtheDevice, which is used in thebutton1_Clickhandler when callingDisplayPropertyPage().The method
DisplayPropertyPage()contains even more COM stuff that we can ignore for now, because the method does exactly what its name says. We will see later that we need some basic understanding what is happening inside, though.How to make the controls in the dialog appear “Windows 10”-like
The steps described my blog post “Windows 10 Theme for a Properties Dialog” for a WPF application are also valid for WinForms. In the case of the sample application the change also affects the controls of the main window.
Step 4: Start to experiment
The code inside
DisplayPropertyPage()uses theISpecifyPropertyPagesinterface. Two other interesting interfaces areIAMVideoProcAmpandIAMCameraControl. The names correspond to the pages of the properties dialog. Using the two interfaces, you can access the properties you see in the dialog.How to read or write the webcam properties from your code
The interfaces
IAMVideoProcAmpandIAMCameraControlboth offerGetRange(),Get()andSet()methods.For
IAMCameraControl, these methods are defined like this:int GetRange( [In] CameraControlProperty Property, [Out] out int pMin, [Out] out int pMax, [Out] out int pSteppingDelta, [Out] out int pDefault, [Out] out CameraControlFlags pCapsFlags ); int Set( [In] CameraControlProperty Property, [In] int lValue, [In] CameraControlFlags Flags ); int Get( [In] CameraControlProperty Property, [Out] out int lValue, [Out] out CameraControlFlags Flags );
When using the methods:
- You specify the property you want to access via an enum value of type
CameraControlProperty. Your device may not support all properties, though – if you look at the screenshots above, you will notice that some sliders are disabled. Therefore it is important to check the return value to be 0 (zero) for a successful call. - The
CameraControlFlagsvalue contains information whether the property is (or should be) set automatically and / or manually.
Let us say you want to access the “exposure” property of your webcam (this may or may not work on your webcam; if not, you can try another property).
For a quick-and-dirty test, resize the “Show property pages” button so can add another button next to it, double click the new button and insert the following code into the “Click” event handler:
var cameraControl = theDevice as IAMCameraControl;
if (cameraControl == null) return;

cameraControl.GetRange(CameraControlProperty.Exposure,
	out int min, out int max, out int steppingDelta,
	out int defaultValue, out var flags);

Debug.WriteLine($"min: {min}, max: {max}, steppingDelta: {steppingDelta}");
Debug.WriteLine($"defaultValue: {defaultValue}, flags: {flags}");
When I run the program, select my Logitech C920 webcam and press the button I added above, the following appears in the debug output window in Visual Studio:
min: -11, max: -2, steppingDelta: 1
defaultValue: -5, flags: Auto, Manual
This means that the exposure can be adjusted from -11 to -2, with -5 being the default. The property supports both automatic and manual mode.
Not all properties have a stepping delta of 1. For the Logitech C920, for instance, the focus property (
CameraControlProperty.Focus) has a range from 0 to 250 with a stepping delta of 5. This is why setting the property value to e.g. 47 has the same effect on the hardware as setting the value to 45.Calling the
Get()andSet()methods is simple. For instance, setting the focus to a fixed value of 45 looks like this:cameraControl.Set(CameraControlProperty.Focus, 45, CameraControlFlags.Manual);
The
CameraControlFlags.Manualtells the webcam to switch off aufo-focus.Where to go from here
Note the COM pitfall in the sample
If you are as inexperienced working with COM interop as I am and look at the original sample code inside
DisplayPropertyPage(), you may notice that the lineISpecifyPropertyPages pProp = dev as ISpecifyPropertyPages;
seems to have a corresponding
Marshal.ReleaseComObject(pProp);
Does this mean that we need a similar call in our experimental code we added above?
No, because if you add the (only supposedly) “missing”
Marshal.ReleaseComObject(cameraControl)to your code and click the button repeatedly, you will run into this exception:System.Runtime.InteropServices.InvalidComObjectException HResult=0x80131527 Message=COM object that has been separated from its underlying RCW cannot be used. Source=DxPropPages …
What is happening here? The answer is that simply “casting” to a COM interface in C# is not something that has to be “cleaned up”. The code may imply that, but you could change the line
Marshal.ReleaseComObject(pProp);
to
Marshal.ReleaseComObject(dev); // oDevice would work, too
and it still would run without leaking references.
How do I know? Because
Marshal.ReleaseComObject()returns the new reference count and changing the line toDebug.WriteLine(Marshal.ReleaseComObject(oDevice));
will output 1 each time we opened and close the properties dialog. The value of 1 is correct, because want to continue to be able to access the device object.
Placing a copy of that line in front of the call of the external function
OleCreatePropertyFrame()obviously does not make sense and will lead to an exception. But if you do it anyway, just for testing, the debug output will show 0 instead of 1. This shows us that passing the object as a parameter in COM interop – at least in this case – caused the reference count to be increased. This is whyMarshal.ReleaseComObject()is called afterOleCreatePropertyFrame(), not because of the cast toISpecifyPropertyPages.Practice defensive coding
As already mentioned, not all webcams support all properties. And if a webcam supports a property, the allowed values may differ from other devices. That is why you should use
GetRange()to determine- whether a property is supported (return value 0),
- the range of the allowed values, and
- whether the property can be set to “auto”.
Last, but not least: When you access a USB webcam – like any other detachable device – be prepared for it not being available. Not only at startup, but also while your program is running, because the device could have been unplugged unexpectedly.
-
Tiny Difference, Big Consequences Reloaded: SignalR in .NET Core 3.1 vs. .NET 5
In a past blog post I wrote about a surprising change I encountered during the migration of a .NET Core 2.2 application to .NET Core 3.0. I have just migrated that same application to .NET 5 and guess what, I stumbled across another “tiny difference with big consequences”.
The situation: I have a WPF desktop client that communicates with an ASP.NET Core server that in turn communicates with a small TypeScript browser application. I use Web API for accessing files and meta data, and SignalR to call remote functions.
After the migration I ran the application and things were working fine – until a certain point, where I received the following exception in a call of SignalR’s
HubConnection.InvokeCoreAsync()(actual function name replaced with “doSomething”):Microsoft.AspNetCore.SignalR.HubException
HResult=0x80131500
Message=Failed to invoke 'doSomething' due to an error on the server.
Source=System.Private.CoreLibOn the server side, my own code was not even called.
It took me a while to notice that one of the parameters of the function had the type of a class with a specific constellation of constructors:
- A public constructor with parameters
- A private default constructor.
It turned out while SignalR in .NET Core 3.1 has no problem (de)serializing an instance of a class with a private default constructor, SignalR in .NET 5 does. So simply removing that constructor fixed the problem. In terms forcing the usage of the other constructor when explicitly creating objects of that type, nothing changed; I did not need a private default constructor for that.
P.S. Do not ask me why I had a private default constructor in the first place. But the project is a couple of years old now, and things like this do happen.
-
Windows 10 Theme for a Properties Dialog
Today I played around with some code in an WPF application that opens a (COM-style) properties dialog.
When opened outside my application, the dialog looked like this:

But when I opened the dialog from my code, it looked like this:

The solution is simple but appears blog-worthy to me because I had a hard time searching the Web using rather unspecific search terms like “properties dialog”, theme, style, etc.
In the end I came across a theme-related Microsoft article for C++ mentioning a manifest file and connected the dots to a StackOverflow question/answer about changing the Windows User Account Control level for a C#/WPF application using a custom manifest.
What to do
Create the custom manifest file
- In Visual Studio (2019), open the context menu of the project for the WPF application.
- Add > New item.
- Ctrl+E (to jump to the search box), enter “manifest”.
- Press the “Add” button to add the “app.manifest” file to the project.
- Visual Studio selects the file automatically (see project properties > Application > Resources > Icon and manifest > Manifest)
Edit the manifest
- Open the “app.manifest” file.
- Scroll to the bottom.
- Uncomment the section behind the “Enable themes for Windows common controls and dialogs (Windows XP and later)” comment.
- Rebuild.
That’s it!
In case you are wondering about my (webcam) experiment: This will be the topic of an upcoming blog post.
-
UI/UX for Devs: An Illustrated Mental Model for Empathy
In a previous blog post I wrote about how mental models help you understand how something works. These models in your mind explain what did happen in the past and provide a reasonable (but not always reliable) prediction for will happen in the future. Interestingly, mental models can do that even though they are simplified, incomplete, and often enough simply wrong.
Empathy also has been a topic on my blog; I wrote about what it is and why it is important and why it is good for you, too.
In this article, I combine the two topics and present you my personal mental model of empathy. Note that it is a mental model, not the mental model for empathy. As such, it is, well… simplified, incomplete, and probably wrong. Still, it is “good enough” for many purposes and hey, it comes with pictures!
To start things off, imagine you have developed a non-trivial application as a single developer.
You, the developer
Here you are, living in your frame of reference, depicted as a nondescript coordinate system:

(I learned at university that axes without units are the worst. Have I told you how mental models are likely to be incomplete?)
Your knowledge about the application
This is what you, the developer, could theoretically know about the application:

You, the user
Now you try to imagine “the user”. Not being the developer of the application, the user is in a different situation:

A first step is trying to put yourself in the other person’s shoes:

The user’s knowledge about the application
You assume that not being the developer means that you cannot have knowledge of the inner workings. As a user, you only have the UI, the manual and other public sources at your disposal for understanding the application. This means that the user inevitably must know less about the software:

Next you are trying to employ some empathy. You think that it is unrealistic that user has read and understood all publicly available information. So most likely the user will know less than theoretically possible:

(Let’s ignore the relative sizes, you get the idea)
But: You are not the user
Always be aware that it is not you, but somebody else in the situation you are looking at:

This person could be highly motivated to use your application. Never underestimate the amount of work people will put into learning something if they feel it enables them to create results that are worth it. Just think how deep some people dig into Adobe After Effects or Microsoft Excel.
But in general, users most likely acquire just enough knowledge to get the job done. This means that they will know next to nothing about some features. At the same time, they can be very proficient in other features if a task at hand demands it.
So the graph depicting the user’s knowledge could look like this, with the sectors standing for parts of the application or large features:

Another user
A different person…

…may use the application for other purposes.
He or she may have more or less experience, in different areas:

A good start, but not quite there, yet
At this point, we have established that you are not the user and that different users have different needs and thus varying levels of knowledge.
But we are still stuck in our own point of view. For instance, we assess the user’s knowledge in terms of the application’s structure as we see it from a developer’s perspective. Even if we consider scenarios during development, we still tend to think in application parts as well as larger or smaller features.
Next: Stop thinking in your frame of reference
The next step is to acknowledge that users have a different frame of reference. As developers, we work on our software for long periods of time, which gives it a high importance in our daily life.
For users, our software is just another application. For them, is is not exactly the center of the universe.
Or, in other words, they live in their own coordinate system:

As an experiment, try to watch yourself how you use and experience the software you did not develop yourself. How different applications, tools and utilities have different importance. And how some software simply does not excite you enough to really learn more than the absolute basics about it.
Now capture that feeling. Be assured, some user out there will feel the same towards your application. A user like this may never become a big fan of your software, but if you design for them, you automatically help everybody else.
If you…
- lead the eye to the right points (by visual design, not a way-too-long onboarding experience)
- write clear UI texts (that even people can understand who do not want to read) and
- design features that are not simply thin UI layers over existing APIs (because users do not think in APIs),
everybody wins.
Using the software vs. getting the job done
Some application features map directly to a user scenario, some scenarios may span multiple features.
But be aware that “real world” scenarios do not necessarily start and finish inside your software. Users may start with ideas, thoughts, purpose, constraints, raw data, etc. outside your application. The work done inside the application may be a first step towards something very different (which means that e.g. a simple CSV export feature can be more important than the fancy result display that you developed). And in between, the scenario may take the users to use other software.
A person in the situation of achieving a specific goal will likely have a different view of the world. To visualize this, think of a coordinate system that looks very different from yours:

Things to remember
- The way you view your application is influenced by your knowledge of application parts and individual features.
Other people may view it in a different way, based on what they see along their path through the user interface. - Assume that people do not actually want to use your software, they want to achieve a specific goal.
If that aligns with your software, good for everybody. - Be aware that even though you and your users have the software as a connection point, your world view may be very different
As a visual reminder, imagine yourself in a cartesian coordinate system and the user in a spherical coordinate system with a different origin. Neither of you lives in the “correct” or “better” coordinate system, they are just different. But the other coordinate system surely does not have your software as the center of the world, that is for sure…
P.S.
If you are interested in a (non-technical) example of completely different coordinate systems, take a look at my post “Exercise in Thinking: Do Racing Stripes Make a Car Go Faster?”.
-
Ways to Create a Thumbnail for Video and Image Files in C#
In my spare time, I work on a software for the courtside advertising system of a local sports arena. To create the playlists for the advertising loops on the LED modules, users can drag and drop preview thumbnails of video and image files. Which brings us to the topic of this blog post, i.e. how to create these thumbnails.
Ways to create thumbnails
Win API
When I started the project in C#/WPF many years ago, I used some Win API code from a StackOverflow answer by Daniel Peñalba.
StorageFile.GetThumbnailAsync
After a failed attempt at a UWP rewrite, my software now runs on .NET Core 3.1, with a WPF management client, a ASP.NET/SignalR server and a HTML5/Typescript playback client (using a Chrome browser in kiosk mode, although I may change that when Microsoft Edge WebView2 comes out of preview).
Working with UWP introduced me to StorageFile.GetThumbnailAsync, which I kept using because the StorageFile API also gives me easy access to metadata (e.g. width, height and duration of a video).
The StorageFile API is not exactly known for high performance, but in my case this is not an issue, because the number of media files added in one go is typically in single digits.
FFmpeg
As mentioned above, StorageFile.GetThumbnailAsync works for me. So, why am I considering another method for the next version of my software?
For an answer I have to digress a bit: My software initially used individual MediaElement controls for the eleven LED modules. While I did manage to sync up the video playback, making it robust and reliable for many hours of looped playback required many workarounds in the code. To make matters worse, the reliability depended on the video format.
The videos to be played come from a variety of sources; some are produced by advertising agencies or video production companies, others are the work of semi-professionals. Some match the requested specs, many do not. In the end, I made it a habit to transcode each video myself.
Fortunately, this did not cause a noticeable loss of quality. Which encouraged me to try a different approach when I rewrote the playback to be performed in a browser. Now my software uses FFmpeg to combine the individual videos into one MP4 file. FFmpeg is “A complete, cross-platform solution to record, convert and stream audio and video” and this quote from the website is not an understatement.
In addition to offering a wide variety of features to manipulate inputs and outputs, FFmpeg also has been able to handle virtually any media file it has come across so far. Until now I could not fully benefit from this robustness because StorageFile.GetThumbnailAsync does not work with the same range of file formats. For example, on my computer, MOV files cause an exception (note the emphasis, YMMV).
FFmpeg to the rescue: Creating a thumbnail from a video or image file is something that FFmpeg can do easily – with two caveats:
- It is slower than GetThumbnailAsync (at least when calling the executable as a separate process, like I do)
- It does not work for general purpose files, only for videos or images.
My plan is to continue to use StorageFile.GetThumbnailAsync as the default method and to use FFmpeg as a fallback in case of an exception.
Demo code
I have posted a Visual Studio demo project on https://github.com/RWeigelt/ThumbnailCreationDemo. The code shows the use of StorageFile.GetThumbnailAsync and FFmpeg (for Win API, see the StackOverflow answer). Please note that the code is not intended to be a ready-to-use library; instead, you should run the demo, maybe set a few breakpoints, follow the code and use the parts that are of interest to you.
A few prerequisites:
- Your Visual Studio 2019 (I used 16.7.1) should be able to compile .NET Core 3.1 command line applications.
- You must have FFmpeg on your computer. You can get it from https://ffmpeg.org.
Before you run the project, change the following line in “Program.cs” so the path matches the location of the FFmpeg executable on your computer:
const string _FfmpegExeFilePath = @"C:\Program Files\FFmpeg\bin\ffmpeg.exe";
The project comes with two example files, “Image.png” and “Video.wmv”, with 768 x 80 pixels each (the size of a LED advertising module). During a build, the files will be copied to the output directory.
Running the project inside Visual Studio creates two thumbnail files for each media file (“…thumb1.png” and “…thumb2.png”). At the end you will be offered to open an Explorer window for the output directory, so you do not need dig around in the file system.
While the code for using StorageFile.GetThumbnailAsync is straightforward, the usage of FFmpeg needs some explanation.
The call of
ffmpeg.exeis hidden behind a Task using a TaskCompletionSource. For the purpose of the demo code, the Task returns the duration in milliseconds (instead of e.g. the exit code of the FFmpeg process). This is something you may want to change for production code.The command line parameters:
- For video files,
-ss 5means “seek to the position five seconds into the media file”.-anprevents audio streams from being handled in any way-ispecifies the input file-vframes 1gets one frame from the input file-sspecifies the output size-yto confirm overwriting an existing file- The last parameter is the output file; the extension of the thumbnail file tells FFmpeg that we want the file in PNG format.
Note that the order of the parameters makes a difference: Parameters in front of the input file (
-i) are treated as options that affect the input, parameter behind affect the output.For instance, the
-ss 5in front of the-isimply seeks into the file (as one would expect). If the-ss 5is placed behind the-i, then FFmpeg will actually decode five seconds of the input file frame by frame, which takes more time. The difference is noticeable even for this simple demo, try it out. For more information see https://trac.ffmpeg.org/wiki/Seeking.What about metadata?
As I wrote, on my computer, calling StorageFile.GetThumbnailAsync causes an exception for a MOV file (yes, this could surely be fixed with the right codec pack, but for the moment I keep things the way they are to test error handling).
But I can retrieve metadata using StorageFile.Properties – that is because the metadata is not determined at the moment I ask for it, it simply is read from the file without actually looking at its content. This is fortunate because for my purposes, reading the metadata via the StorageFile API is much easier than using e.g. ffprobe’s output.
-
UI/UX for Devs: Have You Thought About the Mental Model?
My day job sometimes involves reviewing existing or planned user interfaces of business applications outside my product team. When I give my feedback to frontend developers, I try to use the opportunity to convey knowledge on UI/UX basics. For instance, by showing them how my findings are informed by a set of questions that can they can use themselves as an early check of their work.
One of these questions is: What is the intended mental model?
I find it helpful because in my experience,
- it highlights problems in a constructive way and
- is a great starter for discussions on working towards a solution.
So, let’s talk about mental models.
What is a mental model?
Generally, a mental model is a simplified, often incomplete (or even wrong) representation of the surrounding world in your mind. The model forms based on the available visible, audible, or sensory information, prior personal experience, what other people have told you or just by guessing.
The benchmark for a mental model is how good it helps you navigate the real world, i.e. if it can explain something that has happened or can offer a reasonable prediction for what will happen.
Take gravity for example. The simple mental model of “things falls down until they get stopped by something” is good enough for most situations in our everyday life.
If a mental model fails to explain an observation (“why doesn’t this ‘balloon’ thing fall down?”) or when additional information becomes available (Helium is lighter than air), the model may evolve, be replaced by another model, or by several models for different situations. But the model(s) remain simple – you usually do not explicitly think about buoyancy if no water is involved, or the gravitational forces that cosmic objects exert on your car.
Example: A mental model for scrolling
Let’s get back to user interfaces. Imagine you have never seen something like scrolling before. Then you watch somebody drag the narrow rectangle at the right side of the window down, causing the larger part to move up:

After you have seen some more scrolling, noticing that content that left the screen can be brought back, the mental model in your head will most likely look like this:

Is this model correct? Do the areas in light gray really exist?
From a purely technical point of view, this is debatable – especially when you think about virtualized scrolling, where the UI “lies” to you, creating the visible part on the fly from pure data (e.g. the text in a text editor).
From a user’s point of view this is not important. The model explains why parts of the screen moved the way they did when you moved the scrollbar. And it allows a reliable prediction what action will bring back content that was moved off the viewport.
In other words: The model is good enough.
Visual cues are key
When a user perceives an application as easy to understand, it means that he/she was able to quickly develop an initial mental model that matches the reality of the user interface. That model surely will continue to grow and evolve and may have to be adjusted over time. But what to look out for are gross misunderstandings, when a wrong mental model leads to confusion, or worse, data loss.
Your job when designing a UI is to “nudge” the user towards a correct mental model. This is a case of “show, don’t tell”: Explaining the basic ideas of the UI in an online manual or a onboarding experience (likely to be skipped) will not reach all users. The UI needs visual cues that convey the mental model that you intended.
For example, when you cannot show all content at once due to space constraints, you somehow must tell the user that there is more content to discover:
- Partially visible content that gets cut off at an edge hints that the area can be scrolled or at least resized.
- Page numbers or simply dots look like paging is possible.
- Stack-like visuals suggest that content can be switched.
Example: A mental model for tabbing
Tab views show different sets of one or more controls in the same space. This user interface pattern is useful if you…
- cannot (or do not want to) show all controls at the same time, but need fast switching and
- you can cluster the controls into groups that make sense.
A mental model for a tab view comes straight from the real world, just imagine e.g. three sheets of paper:

Like other UI elements, the design of tabs has evolved over the years. Moving away from mimicking physical objects and their behavior, the overall trend went to visually reduced designs.
While the following design still tries to convey a foreground-background relationship…

…the second version does not care about how things would work in the real world:

Which is not necessarily a bad thing, to be clear. In UI design, you must deal with the fact that a user has a certain “attention budget”. In your UI, each pixel different from the main background color chips away from that budget. Thus, getting rid of lines, borders and colored area is a good way to reduce “cognitive load” – until it is not. This is the point when you have removed important visual cues that help forming the mental model that you originally intended.
How visual cues influence your mental model
Look at the following four sketches of an application with two levels of navigation:

Notice how the gray backgrounds influence your mental model:
- The upper left does not give you an idea what to expect when you click an item in the top row or one of the icons on the left side.
- The lower right is very clear about the relationships of the different parts of the UI. At the same time, the design is pretty “busy”.
- The upper right and lower left are similar in design but convey different mental models. Which one is “better” depends on factors like scrolling, expected window sizes, etc. So, the answer is the usual “it depends”.
Ask yourself: What is the intended mental model?
The application
Users do not develop a mental model in a vacuum. They look for similarities to other applications. In unfamiliar situations, their behavior is influenced by earlier experiences. While not all applications are the same, certain archetypes have developed over time.
If you aim for a quick route of your users to familiarity with the application, you should be clear about the general model. For instance:
- Is the application a document editor?
Most business users know how to to deal with Office documents. If your application has “things” that can be handled like documents (regardless of whether they are actually stored in files), users can use their previous experience with documents. At the same time, this comes with certain expectations. For example, editing or deleting one “document” should not affect another document (unless there is an explicit relationship). - Is it something that manages one or more lists of “things”, offering views on the data at different detail levels?
This is the model behind applications that have some kind of database at their core. Browsing, searching, or filtering, followed by viewing/editing of single data items are comparable across business applications. Users of your application could e.g. expect that after they have narrowed down the results list, and dive into a single item, that the list will be “somewhere off-screen”. This is an example where a mental model is used for predicting what will happen, i.e. that is possible somehow to come back to the result list. - Is it like a machine that builds something after you have specified what you want to build?
Software that uses the concept of “projects” and “builds” is what developers work with all day. Some single-source documentation systems use the same approach. Another example are e.g. video production tools.
Your application surely can combine different models or be something unique. And if it is similar to existing software, being different can be an advantage. The best thing users can say is “it is like X, but you no longer have to do Y manually”.
What you must avoid is intentionally trying to be similar to other software and then offering a bad experience. For example, early web applications sometimes tried very hard to be like their desktop counterparts before the technology was reliable enough. Which could result in losing work simply by pressing a single key at the wrong time (some may remember: a page-based application, a large text field, some JavaScript that goes wild, lost focus, backspace – everything gone).
The data
Internally, most (.NET) applications deal with objects with properties which in turn can be objects, lists of objects or references to one or more objects. One of the challenges of UI design is to decide how much users should or should not know of these structures.
- Is what a user experiences as a “thing” the same as an object in your code?
Sometimes it is good to hide the complexity of composite objects, sometimes it is not. Take, for example, a form for entering a person’s data. Do you present the address as something that feels like a “thing”, or as something that is part of the person similar to its given and family name? As usual, it depends. On one hand you want a clean and simple UI, on the other hand imagine a database that tracks all addresses that a person has ever lived at. - How do you handle incomplete or invalid “things”?
Let’s say a user has a concept of “things” that map pretty well to objects behind the scenes. Unfortunately, the infrastructure for storing these objects requires them to be complete and valid. Does this impact the user, forcing an “all or nothing” approach when creating a new thing? Or do you allow incomplete data as a “draft”, even if it means it must be stored separately because you e.g. have no influence on the available storage infrastructure?
What to do
- Prepare yourself to be asked “what’s the mental model?”
Even if you will never get asked, this forces you to come up with a short summary that helps you communicating the basic ideas of your application (or a specific part of it). - Remember mental models are simplified and incomplete
When a user writes an email and presses the “send” button, in their mind, this sends the email. Conceptually, emails are moved into the outbox, then collected and sent. But even people who know about this (and may have seen an email stuck in the outbox) tend to think of “click equals send”, because this mental model is – you may have guessed it by now – “good enough”. When you think about mental models in your application, expect users to start with the simplest model they can work with. - Watch yourself how you figure out how other software works
Which visual cues do help you? Where does the software rely on known interaction patterns? Why can you use an application that you have not used before? - Think of instances when your mental model was wrong
Was it your mistake? Did you have assumptions based on prior experience? Was it the application’s fault? What could the software have done differently to prevent this? What about your application? Could this happen to users of your software?


